
14
HTML5, Canvas, and JavaScript
HTML5 was released in 2012 and became standardized in 2014, which caused browsers to support all sorts of new features. The introduction of HTML5 impacted the realm of possibilities that are available through JavaScript. The options for graphics, videos, interaction with graphics, and a lot more with JavaScript have increased tremendously since the introduction of HTML5, and have been so revolutionary that in fact, they led to the end of support of Flash by web browsers.
HTML5 allows web page(s) to be better structured by adding new elements, such as <header>. And also the DOM has improved quite a bit, which has led to increased performance. There are quite a few other additions and you'll see some of them in the chapter. Another fun (and useful) addition worth mentioning here is the <canvas> element, which we'll cover in this chapter as well.
JavaScript gives us a lot of amazing features already, but together with HTML5 there is a lot more possible when it comes to creating dynamic interactive web apps. This combination enables us to level up our content presentation game. We can work with files in the browser now, as well as drawing on the HTML5 canvas and adding images and text to it.
In this chapter, we will be examining some of the amazing things HTML5 has brought us. The topics don't all relate to one another directly, but they have in common that they were made possible by the powerful team of HTML5 and JavaScript, and of course, that they are all fun and useful. They will allow you to create an even more dynamic and interactive experience for the users of your app.
These are the topics that will be covered in this chapter:
- Introducing HTML5 with JavaScript
- Local file reader
- GeoLocation
- HTML5 canvas
- Dynamic canvas
- Drawing on the canvas with the mouse
- Saving dynamic images
- Media on the page
- Digital accessibility
Note: exercise, project and self-check quiz answers can be found in the Appendix.
Introducing HTML5 with JavaScript
HTML5 is formally a version of HTML. It is a huge step up compared to its predecessor and enables us to make full applications in the web browser that are even accessible offline. When you read HTML5 in a job description, it often means more than just HTML. Usually, the combination of HTML5 with JavaScript, CSS, JSON, and others is included here as well.
Since HTML5 the structure of our page has improved. We have new elements such as <header>, <nav>, and <article>. And we can play videos with the <video> element, which means we no longer need Flash since HTML5. And as we already mentioned we can work with the <canvas> element to create visuals on the page or to represent visuals such as animation, graphs, and others. Some things that had to be done with JavaScript in the past can now be done solely with HTML, such as adding video and audio to a webpage.
Changes to the DOM also improved the loading time of web page(s). We are going to dive into some of the HTML5-specific features in this chapter. Let's start with accessing files from the browser.
Local file reader
Since HTML5 we can finally interact with local files using the JavaScript that runs in our browser, which is really an amazing feature. Using this feature, we can upload files from our device to our web app and read from them in our app. This means that we can attach files to forms for example, which is great in many cases whenever we need to upload some sort of file for whatever purpose, for example, adding a résumé to your online job application.
Let's first make sure that the browser you are using supports this. We can run a simple script to check whether it does:
<!DOCTYPE html>
<html>
  <body>
    <div id="message"></div>
    <script>
      let message = document.getElementById("message");
      if (window.FileReader) {
        message.innerText = "Good to go!";
      } else {
        message.innerText = "No FileReader :(";
      }
    </script>
  </body>
</html>
If you open this file in your browser it should say Good to go! when your browser supports file reading. Try updating your browser or using another one if it says No FileReader :(. Browsers that will work are, for example, Chrome and Firefox.
Uploading files
Uploading files is actually easier than you might think. We indicate we want to upload a file by adding an input of type file. Here is a basic script that does just that:
<!DOCTYPE html>
<!DOCTYPE html>
<html>
  <body>
    <input type="file" onchange="uploadFile(this.files)" />
    <div id="message"></div>
    <script>
      let message = document.getElementById("message");
      function uploadFile(files) {
        console.log(files[0]);
        message.innerText = files[0].name;
      }
    </script>
  </body>
</html>
It gives a blank HTML page with a Choose file button and the No file chosen comment behind it. Clicking on the button pops up the filesystem and you can select a file. After selecting the file, the JavaScript gets triggered. And as you can see, we are sending in the property files that are active in our body. This is a list of files. Therefore, we are grabbing the 0th index, the first element in the list. Files are represented as objects.
The file object gets logged to the console here, which enables you to see all the properties and associated values. Some of the important properties are the name, size, type, and lastModified, but there are many more.
We are putting the name of our file in the innerText of our div message. So, on the screen, you will see the name of the file appear in the div. We can do something similar for multiple files. Here is how to upload multiple files at the same time:
<html>
  <body>
    <input type="file" multiple onchange="uploadFile(this.files)" />
    <div id="message"></div>
    <script>
      let message = document.getElementById("message");
      function uploadFile(files) {
        for (let i = 0; i < files.length; i++) {
          message.innerHTML += files[i].name + "<br>";
        }
      }
    </script>
  </body>
</html>
We have added the multiple attribute to our input element. This changes the text on the button; instead of Choose file it now says Choose files, and we can select more than one file as a result.
We have changed our upload function a bit as well by adding a loop. And instead of innerText, we are now using innerHTML, because then we could insert a break using the HTML break. It will output the names of all the selected files below the input box on the screen.
Reading files
There is a special JavaScript object for reading files. It has a very suitable name: FileReader. Here is how we can use it to read a file.
<!DOCTYPE html>
<html>
  <body>
    <input type="file" onchange="uploadAndReadFile(this.files)" />
    <div id="message"></div>
    <script>
      let message = document.getElementById("message");
      function uploadAndReadFile(files) {
        let fr = new FileReader();
        fr.onload = function (e) {
          message.innerHTML = e.target.result;
        };
        fr.readAsText(files[0]);
      }
    </script>
  </body>
</html>
As you can see, we have to specify what needs to happen in order to connect our HTML and JavaScript to a file. We do this by adding the onload event as an anonymous function that is sending on the event data.
Reading the data can then be done using one of the readAs() methods on the FileReader object. We have used readAsText() here, because we are dealing with a text file. This triggers the actual reading and the onload function that comes with it gets triggered when it's done, adding the result of the reading to our message. This accepts all file types, but not all file types will make sense.
In order to see something sensible, we will have to upload something that contains plain text, such as .txt, .json, and .xml. With this we can also send a file to the server or process the contents of a log file.
Practice exercise 14.1
This exercise will demonstrate the process of uploading and displaying local image files in your webpage. Use the following HTML and CSS as a starting template:
<!doctype html>
<html>
<head>
    <title>Complete JavaScript Course</title>
    <style>
        .thumb {
            max-height: 100px;
        }
    </style>
</head>
<body>
    <input type="file" multiple accept="image/*" />
    <div class="output"></div>
    <script>

    </script>
</body>
</html>
Take the following steps to complete the script element:
- Select your page elements as values within variable objects in your JavaScript code.
- Add an event listener to the
inputfield. The event trigger should be changed so that it immediately invokes a reader function. - Create a function to handle the reading of the selected files.
- Using the event object, select the target element that triggered the event. Get the files selected within that input and assign them to the
filesvariable. - Loop through all the files that were selected.
- Set the files by index within the loop to a variable named
file. - Set the image file as the file within the loop selected from the user input field files.
- Add the newly created
imgtag to the page, create an area on the page that you can output the content to, and append the new page element to it. - Create a new
FileReaderobject. - Add an
onloadevent listener to thefileReaderobject to create and invoke an anonymous function that sets the source of the image as the result from the target element. Pass in the image object you just created as an argument into the function. - Using
readAsDataURL(), get the current file object and pass it into the file reader object so that it can be used once the onload completes and is added to the page. - You can now select multiple image files from your computer and have them show on your webpage.
Getting position data with GeoLocation
We are going to look at the window object navigator now to see whether we can locate the user of the browser. This can be useful for many things, for example, suggesting restaurant locations nearby the user. We can have a look at the GeoLocation by inspecting navigator.geolocation. This is one way to do it:
<!DOCTYPE html>
<html>
  <body>
    <script>
      window.onload = init;
      function init() {
        console.dir(navigator.geolocation);
      }
    </script>
  </body>
</html>
If you check out the log, you can see what the GeoLocation object contains, and one of these methods is to get the current position of the user. Here is how to use it:
<!DOCTYPE html>
<html>
  <body>
    <script>
      window.onload = init;
      function init() {
        navigator.geolocation.getCurrentPosition(showGeoPosition);
      }
      function showGeoPosition(data) {
        console.dir(data);
      }
    </script>
  </body>
</html>
This might look a bit more complicated than you'd expect, and this is because the getCurrentPosition() method takes another method as an argument. The position data gets sent to this function and that function will use the data as input. Therefore, we will have to wrap console.dir() in an external function (called showGeoPosition()) that takes a parameter and outputs this data so that we can see the data in the console. We can then send this function to the getCurrentPosition() function and see the data.
If you run this, you should get a GeolocationPosition object, with a coords property containing your latitude and longitude. The browser might prompt whether you're okay with sharing your location. And if it doesn't show anything, make sure the preferences and settings of your computer allow the browser to use your location.
Using this, you can get the location of the user and show personalized content based on it or gather data about their location for other purposes, such as analyzing where visitors are located or displaying suggestions for the user based on their location.
HTML5 canvas
Did we already mention that the <canvas> element is new in HTML5? This is an amazing tool that will help you create dynamic web apps. Here is how to set up the canvas:
<!DOCTYPE html>
<html>
  <body>
    <canvas id="c1"></canvas>
    <script></script>
  </body>
</html>
And when you open this page, you will see nothing. Why? Well, the canvas element is, by default, a white rectangle that you cannot see against the white background. You could add some CSS to add a border to the canvas or a background color to the body and your canvas will be revealed.
But, we probably want to put something on it and we need JavaScript to make that happen. Let's create a "drawing" on it using JavaScript:
<!DOCTYPE html>
<html>
  <head>
    <style>
      canvas {
        border: 1px solid black;
      }
    </style>
  </head>
  <body>
    <canvas id="c1"></canvas>
    <script>
      let canvas = document.getElementById("c1");
      let ctx = canvas.getContext("2d");
      canvas.width = 500; //px
      canvas.height = 500; //px
      ctx.fillRect(20, 40, 100, 100);
    </script>
  </body>
</html>
The context of the canvas is read and stored in the ctx variable (a common shortened version of context). We need this to be able to draw on the canvas. We change the dimensions of the canvas to 500 by 500 pixels. This is not the same as using CSS for width and height; this adds the HTML attributes' width and height.
With the fillRect() method on the context of the canvas, we can draw a rectangle on the canvas. It takes four parameters. The first two are the x and y coordinates of where the figure should be added to the canvas. The last two are the width and height of the rectangle. In our case, it's a square. Here is what the result looks like:

Figure 14.1: Result of the fillRect() method on our 500 px by 500 px canvas
We can also change the color we are drawing with. You can get a pink square instead by replacing the JavaScript of the previous HTML document with the following:
    <script>
      let canvas = document.getElementById("c1");
      let ctx = canvas.getContext("2d");
      canvas.width = 500; //px
      canvas.height = 500; //px
      ctx.fillStyle = "pink";
      ctx.fillRect(20, 40, 100, 100);
    </script>
We have now just used the word pink, but you can also work with hexadecimal color codes for the fillStyle property, which could look like this for pink: #FFC0CB. The first two characters specify the amount of red (FF here), the third and fourth the amount of green (C0), and the last two the amount of blue (CB). The values differ from 00 to FF (0 to 255 in decimal numbers).
There are more things you can do with the canvas than just drawing. Let's have a look at adding text to our canvas.
Practice exercise 14.2
We will be implementing shapes and using the HTML5 canvas element to draw on a webpage with JavaScript. Draw a rectangle using JavaScript. The output will resemble the following:

Figure 14.2: Exercise outcome
Take the following steps:
- Add the canvas element to the page.
- Set the width and height to 640 px and, using CSS, add a 1 pc border to the element.
- Within the JavaScript, select the canvas element and set the
Contextto2d. - Set the fill style to red.
- Create an output of the shape by using a rectangle.
- Set the outline of the rectangle.
- Clear the rectangle inside to make it transparent and the color of the background.
Dynamic canvas
We can draw more advanced shapes, add images, and add text. This enables us to take our canvas skills to the next level.
Adding lines and circles to the canvas
Here we will see how to draw a line and a circle. Here is a piece of sample code that draws a line:
<!DOCTYPE html>
<html>
  <head>
    <style>
      #canvas1 {
        border: 1px solid black;
      }
    </style>
  </head>
  <body>
    <canvas id="canvas1"></canvas>
    <script>
      let canvas = document.getElementById("canvas1");
      let ctx = canvas.getContext("2d");
      canvas.width = 100;
      canvas.height = 100;
      ctx.lineWidth = 2;
      ctx.moveTo(0, 20);
      ctx.lineTo(50, 100);
      ctx.stroke();
    </script>
  </body>
</html>
The line width is set to 2 pixels. This first puts the focus to 0 (x) and 20 (y). This means it is at the very left edge of the canvas, 20 pixels from the top. This canvas is smaller; it is 100 by 100 pixels. The second point is at 50 (x) and 100 (y). This is what the line looks like:
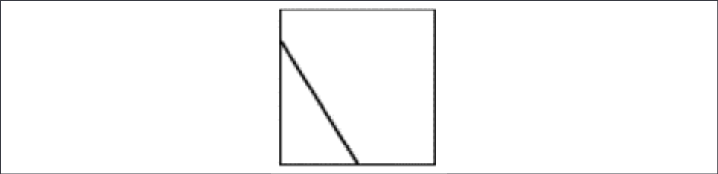
Figure 14.3: Outcome of drawing a line to the canvas
And before we move over to text, here is how to draw a circle.
<!DOCTYPE html>
<html>
  <head>
    <style>
      #canvas1 {
        border: 1px solid black;
      }
    </style>
  </head>
  <body>
    <canvas id="canvas1"></canvas>
    <script>
      let canvas = document.getElementById("canvas1");
      let ctx = canvas.getContext("2d");
      canvas.width = 150;
      canvas.height = 200;
      ctx.beginPath();
      ctx.arc(75, 100, 50, 0, Math.PI * 2);
      ctx.stroke();
    </script>
  </body>
</html>
We use the arc() method to create a curve or a circle. It takes five parameters:
- start position x on canvas
- start position y on canvas
- radius of the circle
- starting angle in radians
- ending angle in radians
So, if we don't want a circle, but a semicircle, for example, we'll have to specify a different starting and end angle in radians. This time we used the stroke() method to do the actual drawing instead of the fill() method:

Figure 14.4: Outcome of drawing a circle using the arc() method
Stroke() is only drawing the line, whereas fill() colors the full shape.
In the canvas, the shapes and lines will be added on top of each other, based on the order in which they're drawn. The first one you draw is underneath the latter ones. Exactly what happens when you paint on a real canvas. You will be seeing this in the next practice exercise.
Practice exercise 14.3
In this exercise, you will be drawing a stick person using canvas:

Figure 14.5: Exercise result within the web browser canvas element
- Create the page elements and prepare to draw on the canvas.
- Begin the path with an arc roughly at the top center of your canvas object.
- Using
arc(), set a position for the left eye, roughly at the top left of the center of the arc you just drew, then add another arc for the right eye. Create a half arc for the mouth (the radian angle for a semicircle is pi) and fill all. - Move the draw position to the center and draw a line for the nose.
- Draw the body with a line down from the center of the arc, create the left arm, and then move the draw position to do the right arm, which will be twice the width of the left arm. Move back to the center and continue down to draw the left leg, move back to the center, and draw the line for the right leg.
- Move to the top, set the colour to blue, and draw a triangle for a hat.
Adding text to the canvas
We can add text to the canvas in a similar fashion as well. In this example, we set a font and a font size, and then write our text to the canvas:
<!DOCTYPE html>
<html>
  <head>
    <style>
      #canvas1 {
        border: 1px solid black;
      }
    </style>
  </head>
  <body>
    <canvas id="canvas1"></canvas>
    <script>
      let canvas = document.getElementById("canvas1");
      let ctx = canvas.getContext("2d");
      canvas.width = 200;
      canvas.height = 200;
      ctx.font = "24px Arial";
      let txt = "Hi canvas!";
      ctx.fillText(txt, 10, 35);
    </script>
  </body>
</html>
The fillText() method is used to add text. We have to specify three parameters: the text, the x position, and the y position. Here is the result:

Figure 14.6: Result of using the fillText() method
We have specified 35 px from the top for the text to start. We can specify other aspects of the text, for example, like this:
ctx.textAlign = "center";
Here, we use the textAlign property on the canvas to specify how the text should be aligned.
Practice exercise 14.4
We will work with text and add text to your canvas element. The following exercise will demonstrate how to dynamically add text and position it within your canvas element. The result from the exercise code will look similar to this diagram:

Figure 14.7: Exercise outcome
Take the following steps:
- Create a simple HTML document, and add the canvas element to your page. Set the height and width to
640, and add a1px border to the element so you can see it on the page. - Select the page elements as values within JavaScript variables.
- Create a string variable with the message
Hello World. - Set a font style using the font property and a blue fill color using the
fillStyleproperty. You can also align the text to the left. - Add the text to the canvas with
fillTextand set the x and y positions of the text. - Set a new font and color of red.
- Create a loop and, using the value of the loop variable, add text to the page canvas element.
Adding and uploading images to the canvas
We can add an image to the canvas. We can simply get an image from our page, and add it to our canvas:
<!DOCTYPE html>
<html>
  <head>
    <style>
      canvas {
        border: 1px solid black;
      }
    </style>
  </head>
  <body>
    <canvas id="c1"></canvas>
    <img id="flower" src="flower.jpg" />
    <script>
      window.onload = function () {
        let canvas = document.getElementById("c1");
        canvas.height = 300;
        canvas.width = 300;
        let ctx = canvas.getContext("2d");
        let myImage = document.getElementById("flower");
        ctx.drawImage(myImage, 10, 10);
      };
    </script>
  </body>
</html>
We wrap it all in an onload event listener here because we want to be sure that the image is loaded before getting it from the DOM, else the canvas will remain empty. We use the drawImage() method to add an image to the canvas. It takes three arguments: the image, the x position, and the y position.
We can use one canvas inside another canvas as well. We do this exactly like we did when we were using the image. This is a very powerful feature, because it enables us to use a part of the drawing from the user input, for example. Let's look at an example of how to do this:
<!DOCTYPE html>
<html>
  <head>
    <style>
      canvas {
        border: 1px solid black;
      }
    </style>
  </head>
  <body>
    <canvas id="canvas1"></canvas>
    <canvas id="canvas2"></canvas>
    <canvas id="canvas3"></canvas>
    <script>
      let canvas1 = document.getElementById("canvas1");
      let ctx1 = canvas1.getContext("2d");
      ctx1.strokeRect(5, 5, 150, 100);
      let canvas2 = document.getElementById("canvas2");
      let ctx2 = canvas2.getContext("2d");
      ctx2.beginPath();
      ctx2.arc(60, 60, 20, 0, 2 * Math.PI);
      ctx2.stroke();
      let canvas3 = document.getElementById("canvas3");
      let ctx3 = canvas3.getContext("2d");
      ctx3.drawImage(canvas1, 10, 10);
      ctx3.drawImage(canvas2, 10, 10);
    </script>
  </body>
</html>
We create three canvases, to two we add shapes, and the third one is a combination of the first two. Here is what it looks like:

Figure 14.8: The result: three canvases with shapes
We also can upload images to the canvas. This can be of great use when you want to show a preview to your user of something that was just uploaded, for example, a profile picture. This is very similar to grabbing the <img> element from the webpage and using that element, but this time we need to read our data from the uploaded file, create a new image element, and then draw that image to the canvas.
The below code does just that:
<html>
  <head>
    <style>
      canvas {
        border: 1px solid black;
      }
    </style>
  </head>
  <body>
    <input type="file" id="imgLoader" />
    <br>
    <canvas id="canvas"></canvas>
    <script>
      let canvas = document.getElementById("canvas");
      let ctx = canvas.getContext("2d");
      let imgLoader = document.getElementById("imgLoader");
      imgLoader.addEventListener("change", upImage, false);
      function upImage() {
        let fr = new FileReader();
        fr.readAsDataURL(event.target.files[0]);
        fr.onload = function (e) {
          let img = new Image();
          img.src = event.target.result;
          img.onload = function () {
            canvas.width = img.width;
            canvas.height = img.height;
            ctx.drawImage(img, 0, 0);
          };
          console.log(fr);
        };
      }
    </script>
  </body>
</html>
Every time the input of the input field changes, the upImage() method gets executed. This method does a few things, so let's break them down. First of all, we create a new FileReader and add the uploaded file. There is only one in this case, so we use index 0. Instead of readAsText() that we have already seen, we are now using readAsDataURL(), which we can use to read images.
This will trigger the onload event. And in our case, this creates a new image that can be added to the canvas later. As a source, we add the result of our read action and when the image is loaded, we change the size of our canvas to the size of our picture and then add the picture in there.
These new skills will enable you to work with images on canvases, draw your own images, upload images from elsewhere, and even re-use the ones on the webpage. This can come in handy for many situations, for example, to create basic animation, or to create the functionality to upload a new profile picture to a user's profile.
Practice exercise 14.5
We will practice uploading a local image to the canvas. The following exercise will demonstrate how to upload images from your local computer and have them displayed within the canvas element within your browser.
- Set up the page elements and add an input field to upload an image. Add the canvas element to the page.
- In JavaScript, select the input field and the canvas elements as JavaScript objects.
- Add an event listener to invoke an upload function once there is a change in the input field contents.
- Create the aforementioned function to handle the upload of the image to the canvas. Using
FileReader, create a newFileReaderobject. In thereader.onloadevent, create a new image object. - Add an
onloadlistener to the image object so that when the image is loaded, set the canvas height and width to match half the image size height and width. Usingctx.drawImage(), add the image to the canvas. - Set the img source to the result from the input value.
- Use the reader object and invoke
readAsDataURL()to convert the file input value to a readable format of base64 image data that can be used within the canvas.
Adding animations to the canvas
With the methods we have seen so far, we can already start creating animations. We do this by using loops and recursion, combined with timeout(). These drawings with (short) time intervals result in an animation. Let's start with a basic animation:
<!DOCTYPE html>
<html>
  <head>
    <style>
      canvas {
        border: 1px solid black;
      }
    </style>
  </head>
  <body>
    <canvas id="canvas"></canvas>
    <script>
      window.onload = init;
      var canvas = document.getElementById("canvas");
      var ctx = canvas.getContext("2d");
      canvas.height = 500;
      canvas.width = 500;
      var pos = {
        x: 0,
        y: 50,
      };
      function init() {
        draw();
      }
      function draw() {
        pos.x = pos.x + 5;
        if (pos.x > canvas.width) {
          pos.x = 0;
        }
        if (pos.y > canvas.height) {
          pos.y = 0;
        }
        ctx.fillRect(pos.x, pos.y, 100, 100);
        window.setTimeout(draw, 50);
      }
    </script>
  </body>
</html>
This will start drawing a square at position 5, 50. And after 50 ms, it will draw another square at position 10, 50, and after that at 15, 50. And it will keep on changing this x value by 5 up to the point that x gets bigger than the width of the canvas, when it is then set to zero. This way, the last bit of white canvas on that line gets colored black too.
Right now, it is more creating a line, and not a moving square. This is because we keep on adding the colored part to the canvas, but not resetting it to the previous color. We can do this with the clearRect() method. This method takes four parameters. The first two are the starting point to draw the rectangle to be cleared (so x, y). The third one is the width of the rectangle to be cleared and the last one is the height. In order to clear the full canvas, we'll have to write:
ctx.clearRect(0, 0, canvas.width, canvas.height);
Adding this to the beginning of the draw function in our previous example results in a moving square instead of a fat line being drawn because the previous square is not kept, but the canvas resets every time and the square gets drawn from scratch.
Practice exercise 14.6
We will practice animating shapes and moving objects on the page. This exercise will demonstrate how to move an object on the page using the HTML5 canvas element and JavaScript.

Figure 14.9: Red circle moving within the boundaries of the canvas object
Take the following steps to create a red circle that will then be moved within the canvas boundaries, appearing to be bouncing off the sides:
- Create the canvas and apply a border of 1 px to it.
- Select the canvas page elements with JavaScript and prepare to draw on the canvas.
- Create variables to track the x and y positions, as well as the x-direction speed and the y-direction speed. You can set these as a default of
1and the x and y starting positions can be half of the canvas dimensions. - Create a function to draw the ball. This will draw the ball as a red ball arc in the x and y positions. Also, the size for the ball should be set as a variable so that the boundaries can be calculated from it. Fill and close the path.
- Create a function to move the ball and set the interval on that function to 10 milliseconds.
- In the aforementioned movement function, clear the current rectangle and draw the ball using the draw ball function.
- Check the position of the ball. If the ball is outside the canvas boundaries, you need to change direction. This can be done by multiplying the direction by -1. Update the x and y positions with the new values.
Drawing on canvas with a mouse
We have all the ingredients already to create a canvas on which we can draw with our mouse. Let's walk you through it. We'll start by setting up the canvas:
<!DOCTYPE html>
<html>
  <head>
    <style>
      canvas {
        border: 1px solid black;
      }
    </style>
  </head>
  <body>
    <canvas id="canvas"></canvas>
    <input type="color" id="bgColor" />
    <script>
      let canvas = document.getElementById("canvas");
      let ctx = canvas.getContext("2d");
      canvas.width = 700;
      canvas.height = 700;
    </script>
  </body>
</html>
In our script element, we are going to add a method for when the window has loaded. When the window has loaded, we need to add some event listeners:
window.onload = init; // add this line to the start of the script
function init() {
  canvas.addEventListener("mousemove", draw);
  canvas.addEventListener("mousemove", setPosition);
  canvas.addEventListener("mouseenter", setPosition);
}
We want to draw when the mouse is moving, and we want to change the current position on the canvas when the mouse is moving. This is also something we want to do on mouseenter. Let's write the code for setting the position. This will be added to the script element as well. We will also have to add the position variable, which again should be declared at the start of the script:
let pos = {
  x: 0,
  y: 0,
};
And the function for setting the position:
function setPosition(e) {
  pos.x = e.pageX;
  pos.y = e.pageY;
}
This function gets triggered on mousemove and on mouseenter. The event that triggers this has a pageX and a pageY property we can use to get the current position of the mouse.
The last must-have ingredient for drawing on the canvas is the draw() method. Here is what it could look like:
function draw(e) {
   if (e.buttons !== 1) return;
   ctx.beginPath();
   ctx.moveTo(pos.x, pos.y);
   setPosition(e);
   ctx.lineTo(pos.x, pos.y);
   ctx.lineWidth = 10;
   ctx.lineCap = "round";
   ctx.stroke();
}
We start with something that might look strange, but it is a great trick to make sure that the mouse is actually being clicked. We don't want to be drawing when no button on the mouse is clicked. This method prevents that by returning from the method if it is not being clicked.
Then we start to begin a path. We always have a current x and y, so they are set as coordinate one, and then we set them again and use these new coordinates for the line. We give it a round linecap to achieve smooth lines and a line width of 10. Then we draw the line, and as long as the mouse is moving, the draw() function gets called again.
The app can now be opened and used as a functioning drawing tool. We can also give the user more options here, for example, adding a color picker to change the color that the user is drawing with. In order to do that, we'll have to add a color picker to the HTML, like this:
<input type="color" id="bgColor" />
And change the selected color in JavaScript by adding an event listener for when the value of that input box changes:
let bgColor = "pink";
let bgC = document.getElementById("bgColor");
bgC.addEventListener("change", function () {
    bgColor = event.target.value;
});
We start with the color pink, and overwrite it with whatever the user selects in the color picker.
Practice exercise 14.7
We will create an online drawing board, and include a dynamic value for width, color, and ability to erase the current drawing. Use the following HTML as a template for this project to add JavaScript code to:
<!doctype html>
<html>
<head>
    <style>
        canvas {
            border: 1px solid black;
        }
    </style>
</head>
<body>
    <div class="controls">
        <button class="clear">Clear</button> <span>Color
            <input type="color" value="#ffff00" id="penColor"></span> <span>Width
            <input type="range" min="1" max="20" value="10" id="penWidth"></span> </div>
    </div>
    <canvas id="canvas"></canvas>
    <script>

    </script>
</body>
</html>
- Select the page elements as variable objects in JavaScript. Get the input field and select the button as an object.
- Add an event listener to the button that will run a function to clear the current canvas. Within the clear function, use the
confirm()method to check if the user wants to erase the canvas drawing. If they then confirm usingclearRect(), delete the contents of the canvas element. - Set a global position object for x and y and by adding event listeners to the mouse events, update the position. If the mouse move is triggered, invoke a draw function. Set the position to update the mouse position, setting the global position values to that of the mouse x and y.
- Within the draw function, check if the mouse button is pressed, and if not, then add
return. If it is pressed, we can then draw on the canvas. Set the new path and move to the positions x and y. Start a new line, get thestrokestylevalue from the color input field, and set thelinewidthvalue from the input width value. Add thestroke()method to add the new line to the page.
Saving dynamic images
We can convert the canvas to an image, and this image can then be saved as a next step. In order to convert it to an image, we need to add the following to our script element:
let dataURL = canvas.toDataURL();
document.getElementById("imageId").src = dataURL;
We are changing our canvas to a data URL, which then becomes the source of our image. We want this to happen whenever a save button gets clicked. Here is the button:
<input type="button" id="save" value="save" />
And the event listener:
document.getElementById("save").addEventListener("click", function () {
  let dataURL = canvas.toDataURL();
  document.getElementById("holder").src = dataURL;
});
Now whenever the save button gets clicked, it is going to update the image with the generated data URL from the canvas. Whatever content is within the canvas element will be turned into a base64 data image value and added to the page within an img tag.
In the following example, there is a canvas of 200 by 200 pixels and an empty image of the same size. When a color gets selected, a square of 100 by 100 pixels in that color is drawn on the canvas. When the save button gets clicked, this canvas gets converted to an image. This image can then be saved. Here is the code for the example:
<!doctype html>
<html>
<head>
    <style>
        canvas {
            border: 1px solid black;
        }
    </style>
</head>
<body>
    <canvas id="canvas"></canvas>
    <input type="color" id="squareColor" />
    <br>
    <img src="" width="200" height="200" id="holder" />
    <input type="button" id="save" value="save" />
    <script>
        const canvas = document.getElementById("canvas");
        const ctx = canvas.getContext("2d");
        canvas.width = 200;
        canvas.height = 200;
        const penColor = document.getElementById("squareColor");
        penColor.addEventListener("change", function () {
            color = event.target.value;
            draw(color);
        });
        document.getElementById("save").addEventListener("click", function () {
            let dataURL = canvas.toDataURL();
            document.getElementById("holder").src = dataURL;
        });
        function draw(color) {
            ctx.fillStyle = color;
            ctx.fillRect(70, 70, 100, 100);
        }
    </script>
</body>
</html>
Here is what it looks like after saving the image:
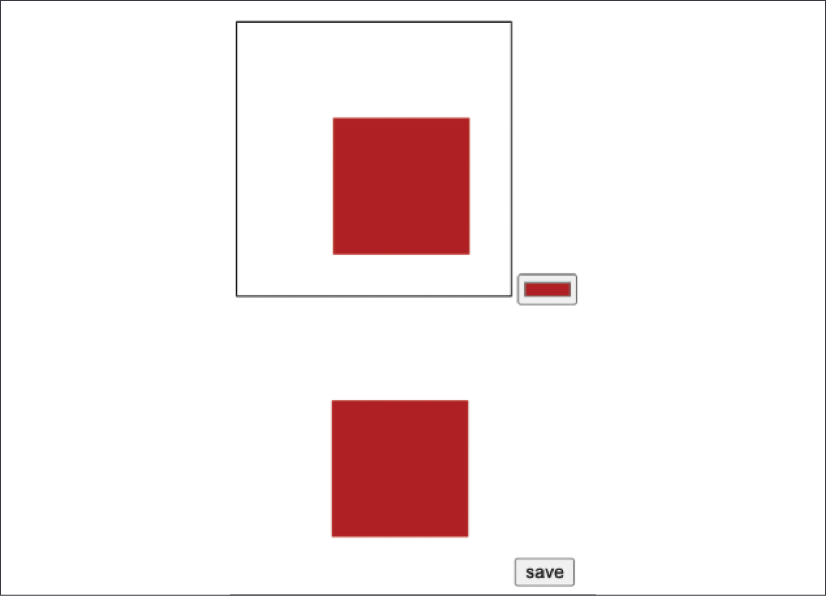
Figure 14.10: Result of saving the image
Media on the page
There are special elements for media on the page. We are going to show you how to add audio and video and how to embed YouTube on a webpage.
Adding an audio player to a page is very simple:
<!DOCTYPE html>
<html>
  <body>
    <audio controls>
      <source src="sound.ogg" type="audio/ogg">
      <source src="sound.mp3" type="audio/mpeg">
    </audio>
  </body>
</html>
You specify the controls attribute if you want the user to be able to control pause and play and the volume. If you want it to start automatically, you'll have to add the attribute autoplay. With the source element, you specify the audio files that can be played. The browser will choose only one and will choose the first one (from top to bottom) that it supports.
Adding a video to a webpage is very similar to adding audio. Here's how to do it:
<video width="1024" height="576" controls>
    <source src="movie.mp4" type="video/mp4">
    <source src="movie.ogg" type="video/ogg">
</video>
Often you would want to link to YouTube instead. Here's how to do that:
<iframe
    width="1024"
    height="576"
    src="https://www.youtube.com/embed/v6VTv7czb1Y"
>
</iframe>
You will have to use the iframe element. This is a special element that allows another webpage inside the current webpage. And you can then add the YouTube embed link as a source. The last code after embed comes from the video URL.
The height and width attributes of the video can be changed to make the video bigger or smaller. If you want to show it fullscreen, you can change the width and height like this:
<iframe
  width="100%"
  height="100%"
  src="https://www.youtube.com/embed/v6VTv7czb1Y"
>
</iframe>
If you want it to be only a part of the screen, you can adjust the width and height attributes accordingly.
You can autoplay these as well with the autoplay attribute. If you use autoplay on more than one, none of them will autoplay to protect the visitor from getting all that noise from the webpage. It is typically considered annoying if your video starts making noise in the browser. Adding the attribute muted will avoid this.
Digital accessibility in HTML
Digital accessibility is of huge importance for visually impaired people or those unable to use a mouse. In order to use the internet with little or no vision, screen readers are in place. This is a special piece of software that reads what is on the screen or converts it to braille using special devices connected to the computer. People that cannot use a mouse will often rely on speech to give the computer instructions.
Early web applications were terrible in terms of accessibility. Luckily, WAI-ARIA created a technical specification of how to make the internet digitally accessible. Dynamic parts can be recognized if implemented correctly, and by adding semantics and metadata to the HTML, it's better useable for external tooling.
Semantics might be one of the most important parts here. This comes down to using the right HTML element for the right purpose. If something should be clicked, it is best to make it a <button> element and not a <span>, for example. If it is a button, it is possible to navigate to it with the Tab key and click it using Enter.
The same goes for headers. You can create something that looks like a header using a special class and give it a layout, but the screen readers are looking for h1, h2, and h3. You should always use the header elements for headers. This helps the screen readers and improves the accessibility of your website. And as a bonus, it helps you rank higher in Google as well because bots also check out the headers to see what is important on your site.
It is also important to use labels and link text that is descriptive. If the link part is only Click here, that is not helpful. Something like Click here to sign up for the summer event is much better.
Throughout this book, we have also done something wrong with our input boxes. In order to make input fields accessible, you'll have to add a label element. This will make it easier for screen readers to pick up on what the input box is about. So this is generally bad practice:
<input type="text" id="address" />
And this is much better, because now screen readers can read it too (and therefore visually impaired people can understand it):
<label for="address">Address:</label>
<input type="text" id="address" />
One last one that you may know already is the alt attribute for images. If the screen reader encounters an image, it will read the alt description. So make sure that these are descriptive, even if the image is not important. Since there is clearly no way to know it's not important if you cannot see the image, all you'll know is that you cannot see some picture. Here is how to add alt text:
<img src="umbrella.jpg" width="200" height="200" alt="rainbow colored umbrella" />
These tips are not that important for practicing and testing purposes, but they are of great use when you are going to create professional apps. Taking accessibility into account will make your app more accessible for everyone. And as I said, Google will (currently) reward this good behavior by ranking you more highly and your app will be more profitable since more people can use it!
Chapter projects
Create a Matrix effect
This exercise will create a continuous animation of text moving from top to bottom. The final effect produced will show characters moving down the screen within the canvas element and appearing to disappear and fade as they approach the bottom of the screen as more new characters will be added to the canvas in their place. The random character can be either a 0 or 1, and will be in place in the position according to the number, which will represent the vertical position of where the character is drawn.
The canvas will be filled with a black background, which is going to use opacity to create the fading effect once it's redrawn:

Figure 14.11: Matrix effect desired outcome
Take the following steps:
- Create a simple HTML document, and in JavaScript create a canvas element and add the
getContentelement as2d. - Select that canvas element and set the attribute height and width to 500x400. Prepend it to the body of your document.
- Create an empty array named
colValand create a loop to add a number of items into the array that will have a value of 0. The number of items you need to add to the array can be determined by dividing the width by ten, which should be the width between each column. The values in the array will be the starting vertical position of the content for thefillText()method that you will set up. - Create the main Matrix function to run at 50 millisecond intervals.
- Set the
fillStyleto be black with .05 opacity, so that when it layers on top of the existing elements it will produce a fading effect. - Set the canvas font color to be green.
- Using an array map, iterate all the current items in the
colValarray, which holds the vertical position for the output text. - Within the map, set the characters to display. We want it to alternate between 0 and 1 so, using
Math.random(), generate a value of either 0 or 1 for the text output. You can use a ternary operator to do this. - Set the position of x using the index value multiplied by 10, which is the start of each new letter. Using the index from the
colValarray, this will create separate columns of moving characters. - Create the character within the canvas using the ctx
fillText()method, setting the output character to the random 0 or 1 value, usingposXfor the column x position, andposY, which is the value in thecolValarray for the item, as the position of the y axis for the output. - Add a condition that checks if the position of y is greater than 100 plus a random value of 0-300. The larger the number, the longer the number will fall on the y position. This is random so not all numbers end at the same spot. This will create a staggered effect after the initial drop.
- If the position of y is not past the random value and 100, increment the value of the index item by 10. Assign this value of y back to the item in the
colValarray, which can then be used in the next iteration. This will move the letter down 10 pixels on the canvas within the next draw round.
Countdown clock
This exercise will produce a real-time countdown clock that will display the amount of time in days, hours, minutes, and seconds left until the date value within the input date field. Adjusting the input date field will update the countdown clock. It will also use local storage to capture and save the value in the input field, so if the page is refreshed, the input field will still retain the date value and the countdown clock can continue to count down to that date value from the input field. You can use the following HTML template:
<!doctype html>
<html>
<head>
    <title>JavaScript</title>
    <style>
        .clock {
            background-color: blue;
            width: 400px;
            text-align: center;
            color: white;
            font-size: 1em;
        }
        .clock>span {
            padding: 10px;
            border-radius: 10px;
            background-color: black;
        }
        .clock>span>span {
            padding: 5px;
            border-radius: 10px;
            background-color: red;
        }
        input {
            padding: 15px;
            margin: 20px;
            font-size: 1.5em;
        }
    </style>
</head>
<body>
    <div>
        <input type="date" name="endDate">
        <div class="clock"> <span><span class="days">0</span> Days</span> <span><span class="hours">0</span>
                Hours</span> <span><span class="minutes">0</span> Minutes</span> <span><span class="seconds">0</span>
                Seconds</span>
        </div>
    </div>
    <script>
    </script>
</body>
</html>
We have created page elements including input with a type of date, a main clock container, and added spans for days, hours, minutes, and seconds. They have been labeled and CSS applied as needed.
You can take the following steps:
- Select the page elements as JavaScript objects, as well as selecting the main clock output area as the value of a JavaScript object.
- Create variables for the
timeIntervaland a global Boolean value that can be used to stop the clock timer. - Check the local storage if there is an item for countdown already set. If there is, use that value.
- Create a condition and function to start the clock as the saved value and set the input field date value to the local storage saved value.
- Add an event listener to invoke a function if the value of the input field is changed. Clear the interval if it has changed and set the new
endDatevalue in the local storage. - Start the clock with the start clock function from that new
endDateinput value. - Create a function to start the clock that is used to start the counter. Within that function, you can create a function that updates the counter and outputs the new clock time values into the page clock container area.
- Within this function, check if
timeLeftis less than the counter time. Create a separate function to handle this. If it's less, stop the timer. - If the time left is more and has a value within the object, then output the object by property names and match the property names you use in the time left function object to the class names you use in your webpage elements so they match and you can save time rewriting them. Loop through all the object values and assign the values within the
innerHTMLpage element. - In the time left function, get the current date. Using
Date.parse(), parse the date and calculate the total milliseconds left until the counter ends. Return the values of the total days, hours, minutes, and seconds as a response object to use in the update function. - If the counter is false and has passed the end time, then clear the interval. If the counter is still valid, set the interval to run the update function every 1,000 milliseconds.
Online paint app
Create a drawing application where the user can draw using their mouse in the canvas element. When the user is within the canvas element and clicks down on the mouse button, holding the button down will add lines, producing a drawing effect within the canvas element. The color and width of the drawing pencil can be changed dynamically for more functionality. In addition, this app will include a button to save and download the image from the canvas element, as well as clearing the current canvas content.
You can use the following template and add the JavaScript code:
<!doctype html>
<html>
<head>
    <title>Canvas HTML5</title>
    <style>
        #canvas {
            border: 1px solid black;
        }
    </style>
</head>
<body>
    <canvas id="canvas" width="600" height="400"></canvas>
    <div>
        <button class="save">Save</button>
        <button class="clear">clear</button>
        <span>Color: <input type="color" value="#ffff00" id="penColor"></span>
        <span>Width: <input type="range" min="1" max="20" value="10" id="penWidth"></span>
    </div>
    <div class="output"></div>
    <script>
    </script>
</body>
</html>
We have created a button to save and a button to clear, an input for color using the HTML5 color type, and the range type to get a numeric value for the pen width. We have also added page elements for the canvas and an output area.
Take the following steps:
- Using JavaScript, select all the page elements as JavaScript objects and set up the canvas element to draw into.
- Set a variable to track the location of the pen.
- On the canvas, add an event listener to track mouse movement. Update the pen position to the
lastXandlastYpositions, and then set the location position toclientXandclientY. Create a function to draw at the pen position and invoke the draw function. - For
mousedown, setdrawtotrue, and formouseupandmouseout, setdrawtofalse. - Within the draw function, begin the move path at the pen location values and set the stroke style to the pen color and stroke width to the pen width. These can be changed by clicking the inputs and updating their HTML values. Add the stroke and close the drawing path.
- Add an event listener to the clear button. If clicked, create a function that confirms that the user wants to remove and clear the drawing, and then if true, invoke
clearRect()to clear the canvas contents. - Add another event listener to save the image. When clicked, it should invoke a function that gets the canvas object using
toDataURLas base64 image data. You can log it into the console to see what it looks like. - Create an img element and prepend it to the output area element. Set the
srcpath to thedataURLvalue. - To set a download of the image, create an anchor tag, append it to anywhere within the HTML page elements, and create a filename. You can generate a unique filename with
Math.random(). Set the hyperlink to the download attribute and thehrefpath to thedataURLpath, and trigger a click with theclick()method. Once clicked, remove the link element.
Self-check quiz
- Which statements below are the correct way to prepare to draw?
const canvas = document.getElementById("canvas"); const ctx = canvas.getContext("2d"); var canvas = document.getElementById("canvas"); var ctx = getContext("canvas"); var ctx = canvas.getContext("canvas"); - What will the following code do?
<canvas id="canvas"></canvas> <script> var canvas = document.getElementById("canvas"); var ctx = canvas.getContext("2d"); canvas.height = 600; canvas.width = 500; ctx.beginPath(); ctx.fillStyle = "red"; ctx.arc(50, 50, 50, 0, Math.PI * 2); ctx.fill(); ctx.closePath(); </script>- Nothing, the code has errors
- Draws a red square
- Draws a red circle
- Draws half a circle
- What are all three methods required to draw a line within the canvas element, and in what order?
Summary
We have discussed a lot of great additions to our JavaScript toolbox using HTML5 in this chapter. These new skills will really enhance our capabilities to build interactive web apps. We started off with the local file reader, which enabled us to upload and read files using several methods, such as the readAsText() method. Then we saw how to get the GeoLocation of a user. This can be great to personalize suggestions, for example, for restaurants or parking spots.
The canvas was yet another amazing addition to what we can do with web page(s). Canvases allow us to draw, write text, add images (by drawing and uploading), and create complete animations. This all can be done using the methods on the canvas.
We then had a look at media on the page and how to add audio and video. Finally, we discussed the topic of digital accessibility and how to make sure your website is accessible for everybody, with and without a screen reader.
And at this point, we can say, you did it! You've worked your way through so many basic and advanced web development topics. In the final chapter, we are going to be exploring the next steps for you to take your skills to the next level beyond pure JavaScript, which is what this book has focused on.
Join our book’s Discord space
Join the book’s Discord workspace for a monthly Ask me Anything session with the authors:
