
This chapter is subject orientated. It takes a cross-section of 11 kinds of subject matter from sports to simple astronomy, outlining some typical professional markets and the general organization and technical approach to the work, plus hazards to avoid. Of course, whole books could be written about each subject, but running them together here points out the different pressures and priorities they impose on you as a photographer. Perhaps you will never have to tackle all of them, but then you are unlikely to specialize in only one type of subject either, especially if you are just setting up as a professional.
It is dangerous to be too categorical about the technique used by different individual photographers. People have an idiosyncratic approach to equipment and working method. After all, it is possible to use a large-format camera for candid documentary photography and 35 mm for still lifes and architectural interiors. Similarly, some photographers heavily impress their own particular style on whatever they shoot, almost to the point of excluding the purposes for which the picture will be used. These, however, are the exceptions.
Generally, market forces, your own specialist subject experience and even equipment design determine why and how pictures are taken. Convenience and common-sense dictate your best technical approach. Most photographers tackle jobs in the way outlined here – just remember that no approach is set and immutable. New markets and new kinds of equipment (digital, for example) mean that subject problems and their solutions change over a period of time. In any case, newcomers to photography should always question the way things were done previously, for breaking away and finding new visual solutions is one way of beating your own path to success.
Most commissioned photographic jobs have to fulfil some form of commercial need or requirement of communication. They also challenge you with extra constraints. The final image may have to fill a long low format, it may have to be quite small (calling for a simple, bold approach) or it has to work when converted later into stark black and white only. Even when you have not been assigned to photograph a subject as a job it is important to set yourself tasks or projects. This gives you a structure to work within, while still allowing experiment. In portraiture, for instance, you might discipline yourself to produce six pictures of pairs of people, and then consider all the ways subjects could relate – mother and son, husband and wife, old and young, etc. Equally, your series might all be people living in the same building, or all in uniform or travelling. Then when you have actually taken pictures along self-set lines and processed and contact-printed results you start to discover take-off points for further extending your project or progressing into new ones. For example, two of the people you photographed might appear in an interesting location which leads on to a series on environmental interiors, or accidentally blurred detail in one frame suggests a series on movement and abstraction.
In this chapter each subject area is discussed under three headings. Purposes means typical functions and markets, reasons why pictures are taken. Approach and organization discusses planning and your relationship with the subject, while equipment and technique suggests how to put it on light-sensitive material, using appropriate gear.
Sport and action
Purposes
Strong, topical action pictures are always of interest to newspapers and the sporting press. Over a period of time a sports photographer accumulates a vast range of shots filed, for example, under the specific occasion, the personalities shown and more generalized pictures of different activities. The best of these photographs will sell over years to publishers of magazines, books, posters and other advertising. They may be used for anything from editorial illustration to product packaging or textile designs. Freelance sports photographers therefore tend to contribute to or run their own comprehensive picture libraries. Others are on the staff of news agencies or specialist publications, or may work directly or indirectly for sport sponsors and sports goods manufacturers.
Approach and organization
First, you should fully understand the sports or activity you are covering. You also need patience, the ability to anticipate a high point in the action and to immediately respond to some vital moment, which can often be unexpected. The main aim is to capture participants’ skill, anguish and tension, plus the dramatic excitement and atmosphere, preferably all summed up in one shot. Experience and preplanning are of great importance. Familiarize yourself with the rules of the game, if you are covering sports, and anticipate the right moment to take a photograph. Aim to pick out the best possible viewpoint in terms of perspective, background (atmospheric but not confusing) and where the action will be most intense. If you do your homework properly you should be in the correct position for a left- or right-hand golfer and know which end a particular vaulter gets his legs over the bar. Make sure that the place you stand is safe when you cover sports such as motorsports, and always follow the regulations of the organizers. Some sports like athletics or cricket consist of mostly repetitive actions, and the problem is to find a picture which is interestingly different. Other events take place all over the field, so you must keep all your options open, working with a kit of lenses from one or more key positions.

Figure 9.1 A split second at a test match, after a long period of waiting and anticipation. Patrick Eagar shot this using an extreme telephoto lens, for The Sunday Times.
Go for the expressions and body language which visually communicate how it feels to be taking part (see Figure 9.1). Look at the tension competitors go through just before an event and the reaction of spectators, as well as the vital peak of action itself. At the same time, your photography must never interfere with the sport or activity – you must know and respect its requirements and rules. Wherever possible, get the cooperation and interest of people organizing the event. This will lead to viewpoint opportunities not otherwise open to you.
Equipment and techniques
When capturing action it is essential to have a good range of lenses. If you use a digital single lens reflex (DSLR) camera, make sure that you have with you memory cards that will provide you with enough storage. You may use many times the ‘Burst Mode’ to capture a sequence of images and this means that you will need to store a large number of images in the memory cards. Fast data-transfer rate is also important. If you use film, a motordrive is an important aid in sport and action photography. You may need two camera bodies, fitted with different lenses, depending on the subject.
Wide-angle lenses are useful for crowd shots, general scenes and dramatic, steep perspective close-ups. However, for many sports your enforced distance means that you will rely on long focal lengths – 600 mm or more in the case of cricket or baseball. All these lenses need to be as wide aperture as you can possibly afford. You are likely to work at shutter speeds of 1/500 and upwards, and the shallow depth of field given at wide apertures is helpful in subduing distracting backgrounds. In the case where the ambient lighting is low and you cannot use longer exposures or open the aperture, you will need to change the ISO speed of your digital camera to higher sensitivity. Note however that this will add some noise in your images. With film cameras you can use a film of higher ISO rating (you can have two camera bodies loaded with films of different sensitivities). In that case the image will appear with more grain. This is subject to the sensitivity and also the type of film. Fill-in flash can solve the problem but remember that in many sports events the use of flash may be prohibited. Ask the organizers on any regulations regarding flash photography before using it. Telephoto lenses with long focal length are heavy and a tripod or monopod is necessary to keep your images sharp and retain your composition especially when you capture sequences of images.
On the other hand, it is a good idea to freeze only those elements in a picture which need to be seen in detail (facial expressions, for example). Rapidly moving extremities – arms, legs, wheels symbolize action much more effectively blurred, especially when shot in colour. This takes judgement and risk in choosing the shutter speed for any one occasion. There is always the possibility of excessive abstraction. Panning your camera to follow the action of track or field events is another way of making blur dramatize speed and isolating subjects from often distracting surroundings.
Despite autofocus cameras, experienced sports photographers often prefer to prefocus on some key spot on the ground and shoot when the action reaches this point. Others pull focus by hand to keep the main element sharp – preferring the freedom this gives to the always centre-frame focusing of automation.
| Sports | |
| 2 digital or 35 mm film bodies with motor drive | |
| Wide-aperture lenses: | 50 mm 24 or 28 mm 70–200 mm 300 or 400 mm 600 mm |
| Tripod Monopod |
Remote release |
Never assume that by shooting a rapid series of frames you are bound to capture the vital moment of an event. This depends on the frames per second that a camera can capture and currently digital cameras offer speeds of around 3–10 frames per second, depending on the manufacturer and the model. For example, at three frames per second, pauses between pictures are still around 300 times longer than the moments being recorded. With the earlier digital cameras the shutter lag, the delay between the moment that you press the shutter release button and the moment that the image is captured, was causing problems in action photography. Nowadays DSLRs have fast shutter lag, allowing you to capture the action with accuracy. Another issue with digital cameras was the time needed for the camera to store the image after exposure, before taking the next picture. Again, this is not a problem with current DSLRs. Although digital and film SLRs give the option of exposing sequences of images in high speeds (several frames per second), there is really no substitute for foreseeing what will be the peak of action and learning to press the shutter just a millisecond or so ahead. Pictures covering an important event are often urgently needed back at a newspaper’s sports desk, to catch an edition. This may well justify the cost of a digital SLR camera able to download shots via modem and mobile phone direct to the editor’s computer screen.
Photo-journalism/documentary
Purposes
In-depth journalistic picture series are like essays or published articles, as opposed to press pictures which singly cover deadline news. The whole concept of ‘photo-journalism’ was pioneered in the late 1930s by magazines such as Life and Picture Post. A good visual story, strong photography with a point of view, plus intelligent layout on the printed page together form a powerful kind of communication. In recent years markets for photo-journalistic essays in magazines and newspaper supplements have greatly declined. However, strong documentary pictures are still in demand for travelling exhibitions, books of photographs and new forms of publication such as CD-ROMs and the Internet.
Most subject themes revolve around human events – after all, most people are interested in people. The relationship of people to their environment, society, work, violence or some catastrophe are constantly recurring story lines. Some of the best journalists – like the best documentary writers – have been obsessed by their subject matter to the extent that it becomes a crusade rather than a job. (See the work of Farm Security Administration photographers revealing the 1930s plight of destitute US farmers, and Eugene Smith’s book Minamata, on industrial pollution.)
Approach and organization
You must decide the theme of your story and give plenty of time and thought to the best approach. As far as possible plan a mental list of vital pictures, so that your project is structured and shows various aspects of the subject and theme. At the same time keep open-minded and aim to take a lot of pictures which can be edited down later. Good selection then allows you (or, more often, the art editor) to lay out pictures which determine the order of viewing, make comparisons through being run side by side and so on.
| Documentary | |
| 2 digital or 35 mm film bodies with motor drive | |
| Flashgun (GN 30–60) | |
| Wide-aperture | 24 mm |
| lenses: | 35 mm 50 mm (2) 70–200 mm |
| Tripod or clamp | |
Perhaps you will want to show differences between young and old, rich and poor or contrast people’s public and private lives. People at work could be photographed to show both social life and working activity. At public events turn your camera on spectators and events behind the scenes as much as the scenes everyone else sees and photographs.
Equipment and techniques
Mostly you will want to be inconspicuous, and merge in with the people around you. This means dressing appropriately and simplifying your camera kit which you carry in a bag not too obviously photographic. 35 mm is the ideal format because of its compactness. Autofocus is also helpful on occasions, especially if you must grab pictures without looking through the viewfinder (for example, over people’s heads). Have two camera bodies fitted with different lenses and, if they are film cameras with different motordrives. Be prepared to wind on film manually in situations where motor noise will attract attention. Use existing light as much as possible (Figure 9.2) but pack a flashgun for times when conditions and depth of field requirements are beyond even the fastest film, or when you must fill in ambient light to reduce contrast (page 153).
Most work will probably be done with a wide-aperture standard lens, but have a wide angle for interiors and whenever foreground detail should look large and dominate the general environment. Pictures taken close with a wide-angle lens add to a sense of ‘being there’ when you are among a crowd, and during a threatening situation even increase the apparent aggression. Shooting from afar using a moderately long focal length ‘puts together’ elements in mid-distance and background. You can also use it for unobtrusive head shots some distance away (sometimes an easy option – you will get a less ‘detached’ perspective by shooting closer with a normal lens).
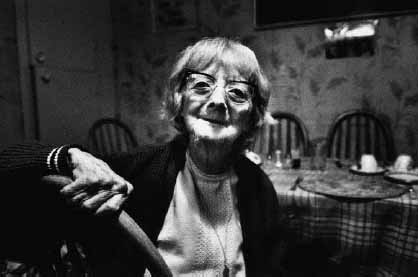
Figure 9.2 Monique Cabral used existing light for this journalistic portrait shot for New Society magazine. 35 mm camera equipment offers lenses with wide aperture and adequate depth of field to record environment, even under poor light.
Portraiture
Purposes
Apart from mere physical identification, most deliberate portraits are shot either to flatter the sitter or to express individual character. Of course, these purposes are not mutually exclusive, but flattery portraiture is mostly commissioned by or taken for your actual sitter or his or her family or business organization. Sitters expect to be shown favourably, perhaps portrayed as they see themselves or hope others see them. However, with portraits commissioned by third parties such as magazine editors you can forget flattery and sum up a person as a character, even if this is cruelly revealing. It is helpful to know how a picture is to be used – perhaps framed in a commanding position on a boardroom wall, reproduced single column or full page in a magazine or even sent out in response to fanmail. Pose, lighting and size of detail within the frame can then be geared to this end form.
Approach and organization
It definitely helps to be extrovert and good with people. You may prefer to photograph in the studio, isolating your sitters from their normal surroundings. The studio is easier for you but often more intimidating for your sitter. Going instead to their own environment (home or work) means that you can make local features form a part of the portrait, adding information and allowing you scope for interesting composition (Figure 9.3). Unlike candid portraiture, the sitter must be directed. Uncertainty or overmanagement on your part is likely to result in either self-conscious or ‘stagey’-looking portraits. Make up your mind what facial features you should emphasize or suppress. Observe the way your sitter uses hands, sits or stands. You need to establish a relationship, talking and putting the sitter at ease while you decide setting, pose, lighting and viewpoint.
If hands are important you might have the sitter at a desk or table, perhaps at work. He or she will take up a much more relaxed, expansive pose in an armchair than perched on the corner of a stool. Photographed from a low angle someone will look dominant, whereas shown from a high viewpoint they can appear dominated. A broad face or broad shoulders look narrower from a three quarter viewpoint instead of square-on. Organize everything for a natural and productive relationship between you and your subjects. Minimize the machinery. Do not have people trapped into straight-jacketed poses and critical lighting arrangements which are bound to make them look artificial and ill at ease.
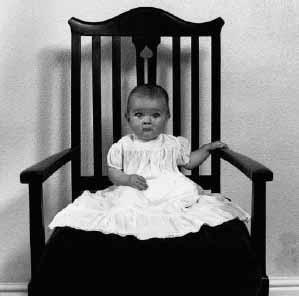
Figure 9.3 A formal approach to portraiture in this nearsymmetrical baby shot by Sue Packer. It was photographed on location with bounced studio flash, using a 6 6 cm camera. The simplicity of the lighting makes the throne-like chair shape all the stronger. From series ‘Baby Sittings’.
Equipment and techniques
This type of subject lends itself well to medium-format cameras. High-resolution digital cameras or camera backs are also suitable for portrait photography. The extra picture qualities outweigh equipment size and weight. It is a good idea to use a tripod anyway. You can more easily fine-tune lighting, etc. without moving the camera and disturbing composition. If you stand to the left or right of the lens you naturally get the sitter to look to the right or left in your picture, without direct instructions. For half-length or head shots, pick a slightly longer than normal focal length lens (i.e. 150 mm for 6 6 cm or 85 mm for 35 mm). You can then work from a more distant viewpoint, giving a less steep, more flattering perspective and intimidating the sitter less with your camera equipment.
Of the three light sources – daylight, tungsten lamps or studio flash – daylight indoors often gives excellent natural qualities but it can be difficult to control. Flash scores over tungsten lighting in terms of heat and glare. Its power allows you to shoot on slower, finer-grain film. Be sure to have plenty of light reflectors and diffusers. Try to go for a simple lighting arrangement within which the sitter can freely change poses without instantly calling for light-source adjustments or altered exposure. One soft main light from a ‘natural’ angle plus reflectors to return light into the shadows and help to create catchlights in both eyes is a typical starting arrangement (see Chapter 7). As soon as possible, stop tinkering with the equipment and concentrate on your relationship with the sitter.
| Portraiture | |
| High-resolution digital camera or camera back, or 6 × 6 cm film camera 150 mm, 250 mm, 80 mm lenses 2 studio flashes Flash meter Tripod, cable release Reflectors, diffusers |
|
Weddings
Purposes
Photographing weddings is often regarded as a chore, but the fact is that within a family a wedding is a very special occasion. Consequently, covering such an event is a serious responsibility. Indifferent or missed pictures will deprive participants of important memories. Your work must be good enough to be framed and put in albums, and looked at over the years by different generations. Wedding photographs are a kind of time-warp within which families measure themselves, so results are of increasing value and interest.
Approach and organization
Meet the bride, groom and parents before the event to talk over the scenario. Clear permission with the religious or official authorities so that you know where photographs can and cannot be taken during the ceremony. Find out if there are to be any unusual events – for example, the bride arriving in a horse-drawn trap or the appearance of some invited celebrity. If the proceedings are to follow an unfamiliar ethnic procedure it is vital to learn the order and significance of each stage. Before the event, make sure that you have made precise notes regarding the requests of the families and prepare a list of all the images that have to be taken before, during the wedding and after the wedding, at the reception.
On the day itself remember that you are a part of the proceedings. Dress neatly, in deference to other participants, and arrive early. This allows you to assess potential backgrounds, lighting and best camera positions. Avoid backgrounds which are cluttered, ugly or inappropriate (church gravestones, for example). You can also start photographing the arrival of guests, preferably posed in groups. Follow this through with the arrival of key figures such as groom and best man, bride and father. Where there are noticeable differences in height it is best to step back and take full-length shots rather than half-lengths and close-ups.
After the ceremony there will be formal groups. Start with husband and wife alone, then work outwards, adding the immediate family and increasing numbers of close relatives until the final group includes most guests, if there is sufficient space. With the smaller groups, especially, pay great attention to detail. Make sure that men have jackets buttoned and no flapping ties, long dresses are arranged neatly, hair and headdresses tidy. Later, complement these somewhat cliché but popular pictures by taking informal shots at the wedding reception (see Figure 9.4). Similarly, look out for, and record, any unexpected event which people will enjoy recalling – the groom arriving by motorbike because of a car breakdown, the best man hunting for the ring, even just a pile of hats in a church porch, or puddles and umbrellas if it rains.
Equipment and techniques
A medium-format (preferably magazine-loaded) camera allows you to work fast yet give excellent detail. This is especially important for groups. Digital cameras are also used extensively in wedding photography due to the high resolution provided by the current sensors, and advantages such as no risk of damaged films during processing, no need to change film during the event, flexibility to adjust colour balance and to make corrections to the image using software. Image manipulation is also useful if you want to omit any background detail, provide to your clients both colour and black and white images, make a montage from several images, etc.
Figure 9.4 In wedding photography also try to capture special moments and try different angles of view.
| Weddings | |
| Medium-format SLR camera (digital or film camera) 6 × 6 cm or 6 × 7 cm with 80 mm, 150 mm, 65 mm lenses 35 mm camera with 35–100 mm lens Alternatively small-format DSLR with a ranges of lenses from 35 to 100 mm Flashgun, light meter Effects filters Tripod |
|
Use mostly standard and moderately long focal length lenses, the latter mainly for head shots and half-lengths. Have a wide-angle lens for interior general views, but do not use it for shots of people or groups unless space limitations are desperate. A lens hood is useful to avoid any flare from the sun if the subjects are backlit. A tripod is important. It sets the camera position so you can go forward and adjust some detail or tactfully ask people to change places or move closer. You must also have a powerful variable-output flashgun to deal with daylight fill-in problems – for example, people arriving at a doorway photographed from within the building or filling the shadows under the eyes of the subjects. Flashguns are also useful in rainy days when most of the images will be taken indoors. A few effects filters such as ‘misty’ diffusers are useful, along with pins and clips to help arrange dresses. If you use a medium format digital or film camera, a 35 mm SLR or DSLR outfit with zoom or wide-aperture normal lens is the best equipment for candid shots at the wedding feast. If you have an assistant he or she can use this equipment to cover incidentals at the ceremony.
Landscapes
Purposes
Landscapes are photographed for a wide variety of purposes. Detailed, representative shots are needed as picture library material for travel, ecology and educational publications of all kinds. Many of these photographs have timeless qualities which make them sell over a long period. However, landscape also lends itself to personal expression and interpretation. It can be majestic and dramatic, undulating and gentle, an abstract mixture of patterns or stark slabs of tone. From early times creative photographers have recognized landscapes’ visual possibilities. Pictures on exhibition walls, published as book portfolios or framed prints, prove how landscape photography can symbolize concepts like ageing, rejuvenation, a joyful sense of life, etc. or mystery and gloom.
Yet again, the main point of a landscape photograph may be much more social documentary, with the significance in what it contains. Threatened coastlines, pollution from industrial plant, the carving up of countryside by new roads and other developments need to be brought to the attention of the public and those who make planning decisions.
Approach and organization
Landscape photography looks deceptively easy. After all, the subjects themselves are largely unchanging and always there. Yet your total experience of a landscape includes space, distance, air movement, sounds and smells – you look around you and notice the changing juxtapositions of elements near and far as you walk. These things are difficult to sum up within one still photograph, unless in some way you can isolate just a part which will encapsulate the character of the whole scene. Perhaps this means a low viewpoint, wide-angle shot which exaggerates jagged foreground rocks and, through differences of scale, emphasizes the depth and distance between them and distant, brooding mountains.
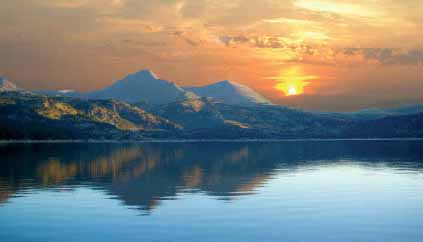
Figure 9.5 The mood of the landscape changes with the time of the day. Try to shoot landscapes at different times and seasons.
Sunlight and shadow changes transform landscapes too. Differences of weather, time of day and season of year all make startling differences to appearance. You need the care and organization to pick conditions which strongly convey the mood of the place. Direction and quality of light can emphasize textures, patterns, colour and linear and tonal perspective (Figure 9.5).So you have to be dedicated enough to get yourself and equipment to a particular chosen viewpoint at a calculated time.
Look at the way one form overlaps another. Think about the best proportion of land to sky, that all-important placing of the horizon which occurs with practically every shot. The picture may depend greatly on some feature such as a line of cast shadow, reflections in water, or some small, strongly placed shape.
Equipment and technique
Landscapes lend themselves to medium- or large-format photography provided that you are prepared to transport the equipment. Larger cameras offer finer tonal qualities and detail, plus possibilities of camera movements (swings to extend depth of field from foreground to horizon; shifts to adjust converging lines). Often there is plenty of time to set up a check of composition and exposure while you wait for the right lighting conditions. However, difficult locations may have to be handled with a high-resolution digital SLR camera or with a 35 mm film camera using slow, high-resolution film. The ‘Burst mode’ in digital or a motordrive in film cameras is also handy for shooting negatives for mosaic panoramas. Consider too the possibilities of using a panoramic camera (see page 315).
| Landscape | |
| High-resolution digital camera (medium- or large-format camera) Normal, wide-angle and moderately wide-angle lenses Filters, including polarizer Tripod Meter Instant-picture back if using film camera |
|
A tripod will prove vital for serious work, as you may be shooting at dawn or dusk (Figure 9.6). With a digital camera you can convert the image to black and white, alter the contrast, and alter the colour balance. A polarizing filter may also be useful. When you use film, filters are very important.
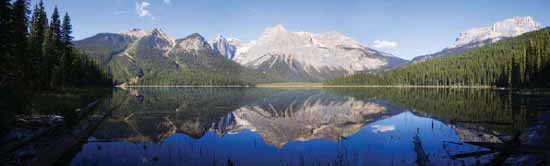
Figure 9.6 Choose the right lighting conditions and use a tripod, if necessary, which will enable you to use small aperture, for maximum depth of field, with slow shutter speed.
When shooting in black and white, have orange or red contrast filters to darken the tone of blue skies and a green filter to lighten vegetation. For colour, have a polarizing filter and an ultraviolet absorbing or ‘warm-up’ (haze) filter to reduce blue casts when you are working at high altitudes or near the sea. Include colour-correcting and colour-balancing filter types. A graduated grey filter is handy to prevent sky and cloud ‘burning out’ when you are exposing for darker ground detail.
Architecture
Purposes
Photographs of the exteriors and interiors of buildings are required by architects, real estate agents, conservationists, historians, local authority and community groups, etc. Architecture, like landscape, still-life and other ‘non-people’ subjects, is also chosen by some photographers concerned with expressing their own ideas in pictures which are ends in themselves. All these people use photography for different purposes. The architect of a new structure will want striking dramatic pictures for magazine articles and exhibitions. You need to show the spirit of the place, as well as its character and broad features (form and texture). For more technical publications important details must be stressed, and the architecture generally shown with less visual licence. Specialist readers need information on its structure and proportions.
Environmentalists may want photographs to show the relationship of a new building to its local community, perhaps stressing detrimental influences. Real estate agents want a highly complimentary portrayal, showing space and light, and all the best features, but with no signs of the cement works and fertilizer factory next door. If the purpose of the pictures is freer and mainly to express yourself it can be argued that you are very much in the hands of the original architect. Like photographing sculpture, it is not easy to take someone else’s creative work to form original images of your own. The challenge is often to express the impressions the architecture makes on you as an observer.
Approach and organization
Good preparation is important before you start your photographic work. If you are commissioned to produce images of a specific building or area you must discuss in detail with your client, the requirements of your project. You need to know how many images and views are required, obtain information on the lighting (orientation of the building and interior/exterior artificial light sources), what permissions are needed to get for photographing the building or the interior, and in what media do the clients want the images. It is also important to know what will the output media be for the images. Will they be published in a book or brochure, enlarged at poster size, or used for presentations? You will have to choose your camera format, lenses, film or resolution if you use a digital camera, to meet these requirements and produce images of the highest quality. You also have to discuss and negotiate with your client your fees, copyright, etc. (see Chapter 15).
Your two most important controls are lighting and camera viewpoint. Make up your mind about the important features to show and plan the best time and lighting conditions to bring these out in your pictures. Unlike landscape photography, your choice of camera position may be quite restricted – and this then determines the time of day you must shoot. A compass and watch are useful tools in planning where the sun will have to be to pick out different facets of the building. Better still, keep returning to observe throughout the day how lighting changes the appearance of volume, surface, colour and shadow pattern (Figure 9.8). The time of the year has an effect not only on the angle of the sun but also on the environment. The colours in nature change through the seasons. You will have warm yellow and red colours in the autumn, bright colours in the spring, etc. You must take this into account when you plan your work. Also think about any seasonal decorations that may be present when you start your work. Unless your client wants the decoration to be present in the images, you must avoid viewing angles that include it.
List the shots to do at any one time. This might include close-ups of embellishments at one part of the building and, at the same time of day, general views of a totally different part, because light will then just be brushing across large wall surfaces. Do not overlook the possibilities of exteriors at dusk. Arrange to have all the lights on early enough for you to shoot a series while natural light fades and the dominant illumination changes from outside to inside the building.
The main problem with exteriors is the weather, as well as irrelevant surroundings such as parked cars and building plant. Listen to the weather forecasts. For many situations soft but directional hazy sunlight is best. Totally overcast conditions give a lifeless, tone-flattening effect (although this might better suit a social documentary shot of poor housing).
Avoiding unwanted elements is mostly a matter of devising the right camera location. Sometimes this is quite hazardous, but you may need to be above parked cars, traffic and people, or block them out by some foreground feature. All this is best worked out in advance, helped if you know how much you can include with each of your different focal length lenses. Architecture which is essentially low in structure with surrounding grounds usually looks more impressive from a high viewpoint outside the area. If necessary, turn to low-level aerial photography (see page 198).
| Architectural | |
| Large-format monorail camera
Shift camera, or medium-format Normal and wide-angle lenses having Filters, flashgun, compass, meter, lamp kit |
|

Figure 9.7 Good composition and attention to the lighting is essential when you photograph interiors. In this image the indoor and outdoor lighting are well balanced and we are able to see detail from the window. You may need to apply special techniques for this such as multiple exposure or image manipulation to optimise your results.
The main difficulty with architectural interiors is the unevenness and mixed colour balance of the light and the need to include as much as possible (Figure 9.7). Check whether all light bulbs or tubes in a room are working and that they have the same colour temperature. If they have different colour temperatures this will be recorded in your images producing colour casts in different areas and it may be very difficult to correct. If it is not possible for the bulbs or tubes to be changed, try to choose an angle that will minimize the effect. Your eye tends to scan an interior, and it is not easy to match this with any wide-angle lens which does not also distort shapes. Like landscape, you may have to seek out some part which epitomizes important features of the whole. Be prepared to shoot rooms from outside windows or from corridors looking through doorways. The normal content of rooms often looks cluttered in photographs, so expect to spend time removing or rearranging items to avoid confusion and give a sense of space when seen from the camera’s static viewpoint. As in still-life work, take out anything which will not be missed from your picture. Before moving any personal items, however, you must have the permission to do so. You can ask your client to arrange this. The same applies when you include people in the interior or exterior images. In that case you will need model releases (see page 363).
Equipment and techniques
A camera with movements is essential for serious architectural photography, although detail work can be carried out with any regular camera. Vertical lines shown strongly converging are acceptable for dramatic, linear compositions but they look wrong (or careless) when just off-true. In any case, you will need shift and probably swing movements to work from high or low viewpoints, extend depth of field over a chosen plane, etc. Your lenses – especially wide angles – must therefore offer really generous covering power. Remember that lenses give best results when used at an aperture around the middle of the aperture range. Use an incident light meter to determine the correct exposure. If you use only your camera’s built-in light meter make sure that you measure a mid tone area for correct exposure. Your method depends on your camera’s available light-metering system (centre weighted, matrix, spot, etc.). With digital cameras ensure that you do not overexpose the highlights because you will lose all detail in these areas. If available, check the histogram of your image on the camera display before exposure (see page 237).
Figure 9.8 The lighting of exteriors at dusk adds colour and reveals different aspects of the architectural design.
Have a kit of lamps or portable studio flash to help fill in and reduce contrast and unevenness with interiors. For colour shots, have blue acetate so that, where necessary, you can match up lamps with daylight seen through windows. However, never overdo your extra lighting – often it is vital to preserve the existing lighting scheme as part of the character of the building itself. For this reason, soft, bounced illumination is often best. Take some blue-tinted domestic lamps to swap for lamp bulbs in any desk lamp, wall lights, etc. included in the picture if an orange cast here is objectionable on daylight film stock. You also need a powerful variable-output flashgun for situations where there is no suitable electricity supply. If you work with a large- or medium-format camera using film an instant-picture back helps you to preview whether fill-in is sufficient yet natural-looking. Remember that either tungsten light or flash can be used from several different positions during a time exposure (covering the lens in between) to fill-in dark areas. Another way of working is to shoot at dusk and use tungsten light film or set the white point of your camera to tungsten – at one point your interior will be lit at the same intensity as the outside orangey daylight view.
Have filters which include a polarizer to help control unwanted reflective glare as well as darken sky tones. A strong neutral-density filter allows you to extend exposure (say, × 100, a filter density of 2.0) so that in daylight shots moving people or traffic are so blurred that they do not record. If you use film, have light-balancing filters for daylight and for different forms of tungsten and fluorescent lighting, plus any colour-correcting filters needed for reciprocity failure compensation, and the usual contrast filters for black and white shots. A spirit level will let you check that the camera is truly upright, and a small hand torch helps to make camera settings in dim interiors or when shooting at night.
Built studio sets
Purpose
A set built in the studio to represent a room, patio, etc. has the advantage that it can be designed in every detail to suit a drawn layout. Sets range in complexity from a couple of simple wallpapered ‘flats’ to three sides of an elaborate room. Building time and cost involved is often much higher than working in a real location. However, this is justified for jobs such as product advertising in bulk (for example, for mail order catalogues), where you want to shoot a series of kitchen suites or fitted bedroom units one after another, just changing the curtains and decorations. A built set may also be the only practical way you can put together a historical scene, such as a Victorian kitchen for an editorial feature on nineteenth-century recipes. The accessories can come from television/film prop hire, or loaned or bought from dealers. The main advantage of a well-planned set is that you have the greatest possible freedom of camera viewpoint and lighting. The absence of a ‘ceiling’ and fourth ‘wall’ gives plenty of space for equipment outside the picture area, and complete control over every element shown.
In macro form there are similar advantages when you photograph scale models for architects, town planners, exhibition designers, etc. The usual purpose here is to give a realistic preview of something which has not yet been constructed. You must therefore match the technical accuracy of the model with properly worked-out lighting and a scaled-down ‘human eye’ viewpoint for the camera.
Approach and organization
Set building may take several days – far longer than the photography. Sets are best constructed from clamped-together ‘flats’, like theatre and television scenery (see Figure 9.9). Working from the angles of view of your lenses for normal or steepened perspective viewpoints, plan out the total size of the set on paper first. Remember to leave sufficient gap between the flats and studio walls and ceiling to get in lights, reflectors, etc. The main danger is that a constructed, propped set becomes too perfectionist, and lacks the idiosyncrasies and untidiness of an actual room. Results then look self-conscious and sterile, like a museum exhibit. Naturalness is also important in the lighting. Illumination should appear to come through windows (or imaginary windows in a wall unseen), not from a ceiling grid of top lights as in a television soap.
With scale models, take particular care over the height and direction of the ‘day’ light. This needs to comply realistically with any compass bearing marked on the model, not shine from one or more impossible quarters. If a model building has to be shown internally illuminated, as at night, use scaled-down sources which light limited areas just as they might be in reality.
Equipment and techniques
Apart from having a studio of sufficient size and with good access, you need basic carpentry and general do-it-yourself skills to construct flats. Whenever possible, incorporate standard builder’s doors and window frames. Clamps and clips can take the place of nails and screws, provided they are unseen. If the budget is sufficient you may be able to have a stylist to decide and track down necessary props. There is little point in not using a large-format camera, together with an instant-picture back or a hired computer-linked digital back. You are certain to want camera movements to give the freedom to shoot from a higher or lower viewpoint without always showing vertical lines converging. Have plenty of studio lighting units – tungsten or flash to light various areas of the set. They can also give general soft light, bounced off the studio ceiling and perhaps walls behind window frames. Have a sufficiently high level of illumination so you can stop down for sufficient depth of field without reciprocity failure. Remember that with flash you can fire and recharge again several times during one exposure.
For scale models, it may be physically easier to work with a medium or small-format camera, unless you need comprehensive movements. For realism, scale down your viewpoint to match the model. For a ‘standing spectator’ viewpoint (say, 1.6 m above the ground in a 1:50 model) have the centre of the lens 3.2 cm (1.6 m divided by 50) above the base. A wide angle is the most useful lens. Stop down fully, because shallow depth of field is the biggest give-away that the subject is not full size.
Studio still-lifes
Purpose
Still-lifes (inanimate objects) cover everything from factual records of technical subjects through catalogue illustration to abstract images intended purely for mood and atmosphere. Your subject may be some form of merchandise for advertising, or perhaps the need is for a ‘scene-setting’ editorial illustration or cover shot to suit the theme of a magazine article or section of a book. It may be a collection of shapes and forms you put together for a picture which is complete in itself, as a piece of fine art or a social or political statement. Sometimes a plain background is necessary, for clarity of outline. However, more often you have to devise a background or setting which positively contributes to picture content, helping to put your subject in context without dominating it or confusing important features.
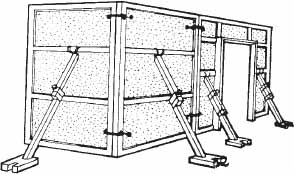
Figure 9.9 Simple corners of ‘rooms’ can be quickly constructed from wooden flats, G-clamped together and propped up from behind.

Figure 9.10 A still-life shot by Philip Fraser-Betts (for British Petroleum) making graphic use of simple shapes and colours. It is the sort of picture which can be used time and time again for brochure covers, exhibition displays and advertisements. Immaculate subject matter and tight control of lighting are vital. The tone range includes good shadow and highlight detail without flatness – which reproduces well on the printed page.
Approach and organization
By photographing a still-life subject in the studio you have a totally controlled situation. It is so open-ended that you can miss pictures by the sheer range of opportunities, skipping from one possibility to another. A disciplined approach is therefore essential. For example, decide the most important subject qualities (perhaps some aspect of form, shape, texture, colour) you need to show. Perhaps the subject itself will fill and bleed off the frame so there is no need for a setting, as in Figure 9.10, or the space around may be filled up with props or an area of appropriate background. Look at the subject from different points of view and choose the most interesting angle. Many photographers create a sketch with the composition of the image before setting up the subjects in the studio. Think thoroughly about the shapes and colours in your composition and whether you want symmetry in your image. Consider setting the subject of interest offcentre. This can make your composition more interesting. Ensure, however, that you compose your image well; otherwise it may seem that the subject is off-centre by mistake. Simplicity is often best – the more you can take out of your picture and still make it work, the better. Any items you include in the image must support the composition. Remember that many items in the image may guide the viewer’s attention away from your main subject. Where you have to include many items on a background it is often best to work them into a group which has a satisfying overall outline and shape. Observe all items that form your composition carefully and make the necessary adjustments. For example, if you use fabric as background or as an item, it should not have any creases. If there are any folds, these should be done carefully so that they follow the symmetry of the composition. Build up the lighting gradually, starting by deciding the position and quality of your main source. We are used to viewing objects in our environment lit by one light source, the sun. For realistic results, therefore, you should aim for one main lighting source and some complementary lighting to fill shadows, illuminate the background, etc. (see Chapter 7). Keep returning to the camera (on a stand) every time you adjust lights or the position of objects, to check how these changes actually look within the frame.
When shooting promotional pictures of products, food, flowers, etc. it is essential that the particular specimen in front of your camera is in immaculate condition. Special preparation for photography is advisable, although you must not break laws protecting the consumer from false appearances. Food shots usually mean calling in expert help from a home economist who can prepare your dishes in the studio. Whenever possible, have two examples of each item made – one to set up, compose and light, the other to be substituted fresh just before shooting.
Equipment and techniques
The gradual build-up of a still-life picture suits the considered approach of a large- or medium-format camera. They also offer shift, swing and tilting movements. Use a normal lens or a slightly longer focal length for objective work where steep perspective and distortion are undesirable, and keep close viewpoints with a wide-angle lens for rare dramatic effects. Seriously consider use of a digital back for bulk shooting sessions – to illustrate mail order catalogues, for example. It can pipe the images as you shoot them direct to a page-layout computer present in the studio – allowing you and a graphic designer to put together complete, finished spreads on the spot.
Studio flash is the best lighting equipment for any delicate subject matter which is easily heat damaged. Have a good range of light heads, especially softbox or large umbrella types. For subjects with highly reflective surfaces you will probably have to build a light-diffusing tent (Figure 7.8). In the cases where you cannot avoid reflection of the surrounding environment (walls, softbox, camera, etc.) on the subject, try to change slightly your camera position (and thus the viewing angle) and aim to integrate any reflections in the composition. You may need to change the surrounding so that its reflection on the subject will not give objectionable results in the image. For exploded views items will have to be supported from behind or suspended from a gantry. Consider the use of a still-life table if your composition requires back diffused lighting or lighting from below. Even quite small subjects often demand more studio space than you might expect. Remember, too, that still-life photography – with its progressive refining of ideas and approach – can often take longer than most other subjects.
| Studio still-life | |
| Large- or medium-format camera Normal and wide-angle lenses Studio flash or tungsten lights Meter, CC filters Camera stand Instant-picture back Fibre optics lighting |
|
Natural history
Purposes
Natural history pictures span a vast range of subjects, from plants to birds, tiny insects to herds of wild animals. Mostly they are needed for detailed factual information in educational publications (books, specialist magazines, exhibitions) as well as for general illustration. This is therefore another area where you can build up a specialist subject picture library. The secret of successful natural history photography is to show your subject and its environment accurately, but at the same time turn it into a creative picture which non-specialist viewers will also enjoy.
Approach and organization
This is an area where it is helpful to have special knowledge (as a biologist, ornithologist or zoologist) outside photography itself. You need to understand where and when to locate your chosen subject, best location and time of year, and (animals and birds, etc.) regular drinking or eating habits. Practise within an enclosed location such as a butterfly farm, plant sanctuary or safari park, where there will be a range of good specimens in a reasonably natural setting. Zoos are the easiest places for animal portraits, but these habitats are often ugly, and the inmates’ behaviour usually quite different from that in the wild.
For animals and birds you need the ability to track down locations, perhaps with expert help. Then by stealth, anticipation and a great deal of patience you must photograph your subject from an effective angle and showing an identifiable activity. Sometimes it is more appropriate to work from a hide and watch and wait for your subject (Figure 9.13).Unless your hide is a permanent feature it may have to be assembled gradually over a period of time so that the animals and birds accept changes taking place. Then whenever you go to the hide take someone with you who soon leaves, making your subject think the hide remains empty.
With flowers and plants choose perfect specimens in their natural setting and photograph to emphasize their form, structure and colour. It is often helpful to include a scale for sizing – show this along one edge of the picture where it can be trimmed off later if necessary. With all natural history work there are two golden rules. Always log details of what, where and when you photographed; and do not damage or seriously disturb the plants or creatures which form your subjects.
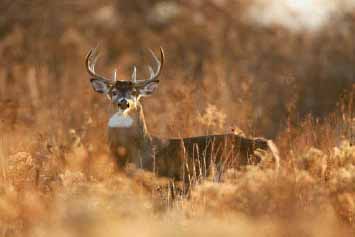
Figure 9.11 In nature photography you usually need to use high shutter speed and long focal length lenses. This photograph was taken with a 560 mm telephoto lens, a shutter speed of 1/500 sec and f/4.
| Natural history | |
| 35 mm film or digital camera
Macro, normal, 80–200 mm zoom, Spot meter, motordrive Tripod and clamp Flashgun, remote control Notebook |
|
Equipment and techniques
Most subjects are best photographed using a 35 mm film or digital camera, giving you the benefit of its range of lenses. With a digital camera you have to consider the number of frames per second in Burst mode. This is important in nature photography if your subjects are animals, birds, insects, etc. which may move fast. Long focal length lenses are particularly important for wild life, giving a good-size image from a distance and picking out subject from background by shallow depth of field (Figure 9.11). Mirror-type designs are the lightest to carry and hold. Even so, a lightweight but firm tripod is essential. If your camera or hand meter takes spot readings this is especially helpful when birds and animals are moving against changing backgrounds (Figure 9.12). Autofocus also helps in these circumstances.
You need a macro lens for insects, flowers, etc. A flashgun (on an extension lead) is also important for close work, allowing you to shoot at a small aperture to improve the shallow depth of field and freeze movement. Make sure that lighting direction will enhance form. Flowers often need card outside the picture area to act as a windbreak when you are shooting outdoors. However, try to avoid card backgrounds – the trick is to include some information on habitat in your background but without confusing detail. If you want to take photographs of the inside of an aquarium, you need special arrangement for your camera and lighting (Figure 9.14).

Figure 9.12 A long focal length lens is important for wild life because it allows you to photograph the subject from a longer distance and get an image with shallow depth of field. Spot readings are helpful especially when the subject moves against changing backgrounds.
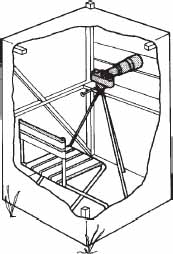
Figure 9.13 Portable photographer’s hide must offer ample space for you and equipment over long periods. A long focal length zoom lens is helpful here.
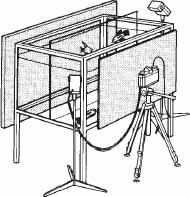
Figure 9.14 An aquarium adapted for photography. Pick a suitable muted colour non-reflective backdrop. Black card around the camera prevents reflection of you and your equipment. Use main and fill-in flash from well to the sides for controlled illumination.
With subjects such as birds frequently returning to a nesting or feeding place you can gradually build up a motor-driven camera system clamped in some nearby position, or use the Burst mode in your digital camera. Include flash if necessary. Then trigger the camera by radio or infrared pulse (page24) from a remote hide where you observe the action through binoculars. Sometimes you can use an infrared trigger beam across the path of the subject itself so that it keeps taking its own photograph. At night you can photograph light-shy creatures with the flash filtered down to emit infrared radiation only and expose on infrared film.
Aerial subjects
Purposes
Air-to-ground photography at low altitude is used for pictorial shots of architecture and estates, records for traffic surveys, city planning and proposed new developments. It also forms a platform for press photography when covering large open-air events. In archaeology, aerial pictures (taken at dawn and dusk, when sunlight rakes the ground contours) often show up evidence of early structures invisible at ground level. Similarly, colour-filtered black and white shots or infrared colour pictures in flatter light (during the middle of the day) reveal patterns in crops denoting earthworks and geological changes beneath the soil, as well as crop diseases. All these pictures are valuable for research, information and education. At higher altitudes, specialist aerial survey photography forms a vital reference for preparing accurate maps for resource planning and military purposes. (This merges into remote electronic imaging from satellites.) Air-to-air pictures of aircraft, ballooning, etc. are used for technical record, sales and general press pictures.
Approach and organization
The camera can be flown at low levels, up to 90 m (300 ft) or so, in a model aircraft, balloon or kite and operated remotely from the ground. However, for more accurate, sustained work you need to be up there aiming the camera from a helicopter, fixed-wing aircraft or balloon (Figure 9.16). Helicopters are ideal for controlling your position in space but are expensive to hire and suffer from vibration. Air balloons make expensive, much less manoeuvrable but smoother camera platforms. You are most likely to do general low-level aerial photography from a light aircraft – preferably a high-wing type because this allows you maximum visibility. Have a window removed for oblique shots, and use an aperture in the cabin floor for vertical pictures.
To make best use of your rental costs, pick weather conditions which give the lighting you need (Figures 9.15 and 9.17). For example, air is clearest after a cold front has passed. Work out the time of day for the best direction and height of sunlight for your subject. Plan with the pilot the best flying height (links with focal length), provided that this complies with regulations. The lower the height, the less light-scattering haze between you and your subject, so you get greater tonal contrast and purer colours. Fix up a clear means of communication between you and the pilot. His cooperation and understanding of your needs are vital.
Equipment and techniques
Model aircraft, balloons and kites are able to lift a 35 mm camera (with motordrive, if it is a film camera), triggered by radio or controlled through the tethering wire. You operate the camera when it is seen to be pointing in the correct general direction. However, if your balloon or kite is powerful enough it will be practical to fit a miniature closed-circuit television camera to the still camera eyepiece and so check what you are shooting from a monitor at ground level.
Figure 9.15 In aerial photography clear visibility is vital. This photograph was taken from a hot air balloon with a shutter speed of 1/125 sec and f/4.8.
The best equipment for working from a full-size aircraft for general oblique photography is either a hand-held aerial camera or a 35 mm SLR with normal and moderately wide-angle and long focal length lenses. Small-format cameras have the advantage of wider maximum apertures. Depth of field is not a problem, and this means that the best automatic exposure programme to use is shutter priority. Keep to 1/1000 or 1/500 sec minimum, and let the camera’s light reading control f-number.
Cushion the camera with your body or support it in a special hanging cradle – do not rest it on any part of the vibrating aircraft body. If you use a digital camera you can adjust colour balance and contrast later on the computing using imaging software. With film cameras, filters are important to emphasize tone contrasts in black and white photography, and correct colour balance for colour work. An ultraviolet-absorbing filter is best fitted as standard along with an efficient lens hood.

Figure 9.16 Camera-raising stands and platforms. Where you cannot be alongside the camera yourself, use video to monitor viewpoint (on mast and balloon here).

Figure 9.17 In aerial photography it is essential to take photographs at the time of the day when you have the best direction and height of sunlight for your subject.
Vertical survey cameras are most often clamped on shock-absorbing supports looking downwards from within the aircraft fuselage. Digital aerial survey cameras have a charge-coupled device (CCD) or a complementary metal-oxide semiconductor (CMOS) sensor (see Chapter 6). There is a specified nominal ground sampled distance (GSD) that is represented by each pixel of the image. The film cameras typically shoot pictures 23 cm2 on wide rollfilm, through a glass plate pressed hard over the emulsion and engraved with crosses at 1 cm intervals. By recording lens focal length, aircraft height, and ground speed as data alongside each frame you can make accurate measurements of ground distances from the processed film. You can use film which is scanned later using a photogrammetric scanner. You work then with the digital image. This is called ‘derived digital imagery’. As in digital aerial imagery, each pixel of your image represents the nominal GSD. It is vital that the aircraft flies at a steady height and speed over carefully planned flight lines so that by triggering cameras at timed intervals you get each shot overlapping in subject content by 60%. You can view prints or transparencies from such a series through a stereo viewer (page 319) or lay them out in an overlapping mosaic, from which maps are prepared.
Night skies
Purposes
Serious astronomical photography is mostly for experts, scientists with access to specialist equipment. However, as a non-expert you may want to photograph night skies as dramatic backgrounds for advertising products, fashion, etc. or as part of landscape or architectural pictures. (Remember though that when star pictures are reproduced in print any specks of light smaller than the dots of the halftone screen will disappear.)
Approach and organization
For best detail pick a clear atmosphere and shoot in a rural area well away from towns or highways, which will spill light upwards (Figure 9.18). With digital cameras you can use special filters that minimize the effect of light pollution, called light pollution reduction (LPR) or light pollution suppression (LPS) filters. These filters minimize the transmission of the wavelengths of artificial lighting. You can also process your images afterwards. Use RAW file format to preserve all the information of the image. You can convert your images to other formats such as Joint Photographic Experts Group (JPEG) after image processing. If there is a product to be shown against the sky this can be lit independently by flash. Where you want some suggestion of detail in the landscape, take a series of pictures in clearest atmosphere at twilight (dawn or dusk). Stars appear at a constant intensity as the sky lightens or darkens, so the scene goes through a whole range of different lighting balances. The moon, like the sun, appears less bright when near the horizon. With careful planning you can record the moon with its surface detail at dawn or dusk, and still show most of the landscape detail (most realistically shot with the land one-and-a-half to two stops underexposed.)
Equipment and techniques
Long focal length lenses enlarge moon detail but, curiously, have little effect on the image size of individual stars because of their vast distance away. Shooting with a telephoto simply limits your field of view. For starry skies it is often best to use a medium- or small-format camera with a wide-aperture, normal or wide-angle focal length high-resolution lens. Then you can enlarge from this picture later. Remember that the colour of starlight, and also the moon when high in the sky, is effectively the same as sunlight. Set the white balance of your digital camera to daylight or use daylight colour film if you use a film camera. With digital cameras, you do not need exposures as long as with film. Note that when you use high ISO speed setting, the noise in the images increases.
Length of exposure may have to be found by trial and error, although most through-the-lens (TTL) meter systems will measure exposures of several minutes. Test exposure with the camera programmed for aperture priority. If you use a digital camera you can see the image immediately and adjust the exposure time until you have the results you want. With a film camera, time the exposure the metering system gives and bracket around this with further shots. The longer the exposure, the more faint stars will record and bright stars flare. However, in practice, choice of exposure is also influenced by four factors:
1. Blur caused by rotation of the Earth
2. The light-gathering power of the lens (not f-number in this instance)
3. The reciprocity failure of your film (see Figure 5.22) or the noise in digital images due to long exposures and
4. Light pollution when you use film – the general background brightness of the sky, particularly near cities. This gradually accumulates as light on the film, swamping detail.
The amount that the images of stars move during any given exposure depends on the part of the sky and your lens focal length. The pole star appears to remain stationary while all other stars rotate about it, 360° in 23 hours 56 min. As a guide, stars are likely to record as streaks instead of dots in a 1 sec or longer exposure with a firmly clamped 500 mm lens. To keep all star images still, borrow an equatorial telescope mount which has motors and gears to gradually pan the camera against the Earth’s rotation.
Another special feature of astronomical work is that a lens’s starlight-gathering power depends on the area of its effective aperture, not its relative aperture (f-number). The wider the ‘hole’, the more photons of starlight the film will accumulate in a given time, irrespective of focal length. So a 500 mm lens at f/11 (effective aperture diameter 45 mm) becomes faster than an 80 mm f/2 (effective aperture diameter only 40 mm). This applies for point sources such as stars; for extended sources such as comets or nebulae the relative aperture is important.
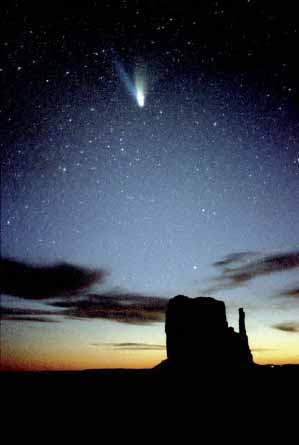
Figure 9.18 Photograph of the Comet Hale-Bopp over Monument Valley, Arizona, taken in March 1997. Shot on ISO 800 film and scanned using a Nikon Coolscan 4000ED.
SUMMARY
![]() In sports photography you need subject know-how and anticipation, patience and fast reaction. Pick moments of human tension and reactions. Learn the rules of the game and anticipate the right moment to take the photograph. A good viewpoint is vital, plus a good range of lenses – mostly telephotos. With a digital camera you can send your images very fast and meet publication deadlines. Go for movement and dynamic action, often through controlled blur, dramatic angles, correct choice of moment. Do not rely on autofocus and burst mode (or motordrive) to create good pictures.
In sports photography you need subject know-how and anticipation, patience and fast reaction. Pick moments of human tension and reactions. Learn the rules of the game and anticipate the right moment to take the photograph. A good viewpoint is vital, plus a good range of lenses – mostly telephotos. With a digital camera you can send your images very fast and meet publication deadlines. Go for movement and dynamic action, often through controlled blur, dramatic angles, correct choice of moment. Do not rely on autofocus and burst mode (or motordrive) to create good pictures.
![]() A good documentary picture story needs research, ample shooting time to express a point of view and sympathetic final layout. Often the best work is people based. Adopt a positive, determined approach yet remain sensitive to significant events. A small-format inconspicuous camera kit and use of existing light will least influence your subject matter. Close viewpoint and wide-angle lens give a sense of dramatic involvement and overcome lack of distance in tight situations. Standing back with a telephoto more closely relates near and far components.
A good documentary picture story needs research, ample shooting time to express a point of view and sympathetic final layout. Often the best work is people based. Adopt a positive, determined approach yet remain sensitive to significant events. A small-format inconspicuous camera kit and use of existing light will least influence your subject matter. Close viewpoint and wide-angle lens give a sense of dramatic involvement and overcome lack of distance in tight situations. Standing back with a telephoto more closely relates near and far components.
![]() Portraits (for flattery or character) might be shot in the studio or in the sitter’s own environment to add to content. Decide what features and postures to emphasize. Camera viewpoint, your personal direction of the sitter, lighting and surroundings are all important but never so fixed that they prevent freedom to relax and relate as person to person. Work with a longer than normal focal length lens; using studio flash or existing light.
Portraits (for flattery or character) might be shot in the studio or in the sitter’s own environment to add to content. Decide what features and postures to emphasize. Camera viewpoint, your personal direction of the sitter, lighting and surroundings are all important but never so fixed that they prevent freedom to relax and relate as person to person. Work with a longer than normal focal length lens; using studio flash or existing light.
![]() Weddings are undervalued but responsible occasions for a photographer. Contact the people concerned, go over the details, plan your key shots. Dress appropriately. Pick the best possible backgrounds. Work calmly but authoritatively, covering formal and informal elements. In the recent years many photographers use digital cameras for wedding photography. If you use film cameras have a medium-format camera and tripod for groups, hand-held 35 mm for incidentals. Consider use of digital means for any necessary postcamera image adjustments.
Weddings are undervalued but responsible occasions for a photographer. Contact the people concerned, go over the details, plan your key shots. Dress appropriately. Pick the best possible backgrounds. Work calmly but authoritatively, covering formal and informal elements. In the recent years many photographers use digital cameras for wedding photography. If you use film cameras have a medium-format camera and tripod for groups, hand-held 35 mm for incidentals. Consider use of digital means for any necessary postcamera image adjustments.
![]() Landscape photography ranges from a personal art form through pictorial travel illustration to objective geographic records. Pictures can symbolize abstract feelings, concepts or document social ecology. Plan the work, picking weather and time of day (lighting), distance and viewpoint. Consider creating panoramas either by taking several images and stitching them together or by using a dedicated panoramic camera. Medium-or even large-format cameras offer best tone qualities and detail compared to 35 mm. Do not overlook filters.
Landscape photography ranges from a personal art form through pictorial travel illustration to objective geographic records. Pictures can symbolize abstract feelings, concepts or document social ecology. Plan the work, picking weather and time of day (lighting), distance and viewpoint. Consider creating panoramas either by taking several images and stitching them together or by using a dedicated panoramic camera. Medium-or even large-format cameras offer best tone qualities and detail compared to 35 mm. Do not overlook filters.
![]() Architectural photography ranges from the needs of real estate, architects or environmentalists, to being a subject of form and texture for self-expression. Time the best lighting for chosen viewpoints – avoid flat, overcast conditions. Check the external appearance of lighted buildings at dusk. Expect to simplify internal furnishings, and counter lighting which is excessively uneven or of mixed colour temperature. Have a camera with movements, and include a high-quality wide-angle lens, flashgun or lamps and filters.
Architectural photography ranges from the needs of real estate, architects or environmentalists, to being a subject of form and texture for self-expression. Time the best lighting for chosen viewpoints – avoid flat, overcast conditions. Check the external appearance of lighted buildings at dusk. Expect to simplify internal furnishings, and counter lighting which is excessively uneven or of mixed colour temperature. Have a camera with movements, and include a high-quality wide-angle lens, flashgun or lamps and filters.
![]() Studio sets, built from flats, allow unobstructed use of lighting and camera viewpoint. Chosen props mean that you control every detail but avoid a false ‘museum’ look; do not overlight. For realism with scale models, accurately scale down your viewpoint and maximize depth of field. Use a camera with movements.
Studio sets, built from flats, allow unobstructed use of lighting and camera viewpoint. Chosen props mean that you control every detail but avoid a false ‘museum’ look; do not overlight. For realism with scale models, accurately scale down your viewpoint and maximize depth of field. Use a camera with movements.
![]() Still-lifes (advertising merchandize, technical records and editorial or poster illustration) need a disciplined approach to a totally controlled situation. Make a sketch of the final image and decide important subject qualities, pick appropriate non-confusing props and background, build up your lighting. Simplicity
throughout is often best. For most work, subject matter must be immaculate. Have prepared foods made up professionally, undercooked for optimum appearance. Pay attention to highly reflective objects such as mirrors, jewellery, etc. Expect to use studio flash and a camera offering movements. Bulk catalogue assignments are ideal for using a digital camera linked to a computer with page-layout programme.
Still-lifes (advertising merchandize, technical records and editorial or poster illustration) need a disciplined approach to a totally controlled situation. Make a sketch of the final image and decide important subject qualities, pick appropriate non-confusing props and background, build up your lighting. Simplicity
throughout is often best. For most work, subject matter must be immaculate. Have prepared foods made up professionally, undercooked for optimum appearance. Pay attention to highly reflective objects such as mirrors, jewellery, etc. Expect to use studio flash and a camera offering movements. Bulk catalogue assignments are ideal for using a digital camera linked to a computer with page-layout programme.
![]() Natural history illustration needs to combine scientific accuracy with strong visual qualities and is helped by specialist subject know-how. Research best natural location and timing to suit subject habits. Pick an informative activity and background. Long focal length lenses are often vital. For some animals or birds, shoot from a hide or use a remote controlled or subject-triggered camera. Tackle flower/insect close-ups with a macro lens and an off-camera flash. Log subject information.
Natural history illustration needs to combine scientific accuracy with strong visual qualities and is helped by specialist subject know-how. Research best natural location and timing to suit subject habits. Pick an informative activity and background. Long focal length lenses are often vital. For some animals or birds, shoot from a hide or use a remote controlled or subject-triggered camera. Tackle flower/insect close-ups with a macro lens and an off-camera flash. Log subject information.
![]() Aerial photography includes obliques of architecture, highways, archaeology, etc.; vertical surveys for map making; air-to-air shots of other aircraft. Appropriate choice of lighting, filtration and special (infrared) film helps reveal features not normally visible from the ground. Work from a helicopter or high-wing light aircraft, timing your flight according to light and weather. Use a rollfilm aerocamera or 35 mm SLR, working shutter priority mode (1/500 sec or faster). Survey cameras, set vertically within the aircraft and fired remotely, record speed and height data alongside the image.
Aerial photography includes obliques of architecture, highways, archaeology, etc.; vertical surveys for map making; air-to-air shots of other aircraft. Appropriate choice of lighting, filtration and special (infrared) film helps reveal features not normally visible from the ground. Work from a helicopter or high-wing light aircraft, timing your flight according to light and weather. Use a rollfilm aerocamera or 35 mm SLR, working shutter priority mode (1/500 sec or faster). Survey cameras, set vertically within the aircraft and fired remotely, record speed and height data alongside the image.
![]() Night-sky pictures for general purposes are best shot in clear air, far from town lights. With digital cameras you can use light pollution reduction filters. Dawn and twilight offer greatest choice of landscape/starlight/moon balance. For starry skies, use a DSLR (or medium- or small-format film camera and daylight colour film) with a good wide-aperture normal lens. Exposures beyond a few seconds blur from Earth rotation (unless you have an equatorial mount). Other limitations are film reciprocity failure, the area of your effective lens aperture, and ambient light polluting the sky.
Night-sky pictures for general purposes are best shot in clear air, far from town lights. With digital cameras you can use light pollution reduction filters. Dawn and twilight offer greatest choice of landscape/starlight/moon balance. For starry skies, use a DSLR (or medium- or small-format film camera and daylight colour film) with a good wide-aperture normal lens. Exposures beyond a few seconds blur from Earth rotation (unless you have an equatorial mount). Other limitations are film reciprocity failure, the area of your effective lens aperture, and ambient light polluting the sky.
PROJECTS
1 In architectural photography you usually need to record the building without the presence of people or cars in motion. You can achieve this by using a low ISO setting or slow film and long exposure times. You may also need a neutral density filter in front of your camera lens so that you can use very slow shutter speeds for the ambient light, and a tripod.
Select a scene that includes moving subjects such as people, cars, trains, etc. and work preferably at dusk when the ambient lighting is low. Set the ISO 100 setting on your camera and determine the correct aperture for a shutter speed of 1/4 sec, using your camera’s TTL metering system or a handheld light meter. Shoot with this shutter speed and observe how the motion of the subjects has been recorded. Shoot with slower shutter speeds, always adjusting the aperture for correct exposure. The moving subjects will disappear when the shutter speed is around 4 sec, 8 sec or longer, depending on their speed.
2 The choice of black and white or colour in landscape photography can change the whole mood of the scene. With a digital camera take a picture of an interesting landscape scene.
Convert the image to black and white and compare it to the colour version (alternatively, shoot the same scene in both black and white and colour negative film). Observe how different the landscape appears in these images. Process the image further, by altering the colour balance and the contrast and see how the landscape changes. If you use film, change the contrast of the black and white image in the printing stage and, if you print the colour image yourself, change its colour balance. Compare all images, colour and black and white and see the differences in style and mood.
3 Experiment in portrait photography with different lenses and angles of view. Use a digital or film camera and select a series of lenses (or a zoom lens) with a range of focal lengths, from wide-angle to telephoto. Use the lighting techniques described in Chapter 7 and take pictures with the different lenses (for example, wide-angle, normal and telephoto lens). Take several pictures with each lens changing the viewing angle. Experiment with the distance between the camera and the subject. Compare your results and see which images are more flattering, show a specific character, etc.