4 Lighting control
This chapter provides a structured approach to photographic lighting which will enable you to analyse light and lighting effects, and to create and control every imaginable lighting scenario. The lighting considered includes daylight and ambient light, studio and location lighting, as well as fash and continuous light.
Proficiency in lighting requires an understanding of the different ways in which light sources illuminate objects, reveal their qualities and influence the meaning of the final image. Once these are understood you can achieve any effect either by manipulating available light or by setting up lighting on location or in the studio. Furthermore, you `will be able to evaluate, then recreate or make reference to, lighting styles deployed in historical and contemporary photographs, as well as in paintings and in cinematic and theatrical productions.
To control lighting there are five key aspects to analyse and coordinate: the size of the light source, the direction and angle of light, distribution of light, the contrast between light and shade, the exposure and finally the colour of the light.
Size of light sources
It is the size of the principal light source in relation to the subject that determines the most significant qualities of the light. Observing the play of sunlight on people, places, objects and surfaces reveals the essential characteristics of different light source sizes. Sunlight falling directly on a subject casts shadows which have hard edges; sunlight diffused through cloud casts soft-edged shadows, and sunlight diffused through an overcast sky casts virtually no shadow at all.
The same qualties of shadow are true of any light source of the same relative size. Any small light source casts hard-edged shadows, medium-sized lights cast soft-edged shadows and large lights sources cast very soft-edged shadows.
Small source
Shadows
The smaller the light source, the harder edged the shadows. Small sources are often referred to as hard light sources because of the hard-edged shadows they cast. Though the sun itself is vast it is so far away that relative to us it is small, occupying an area of around only 1% of the sky on a clear day.
The qualities of small source direct sunlight are familiar to us in any sunny outdoor scene: buildings and trees cast hard-edged shadows across the land, noses cast hard shadows across faces and people cast body-shaped shadows along the ground.
The same-sized natural or artificial light produces the same quality of shadow edge. This can be observed when the relative size of source is the same, whether it is the sun, a bare light bulb, torch, headlamp, flashgun or spotlight. All these forms of illumination originate from relatively small sources radiating light waves travelling in straight lines. When the source is of a size which equates to an angle of 1–20° in relation to a subject, then the light waves will be diverging from the subject; no light waves immediately radiating from the source can reach around the subject. The transition from light into shade is then very abrupt and there is little shading at the shadow edge.
A small source casting light across a subject reveals the texture of its surface in fine detail since even the smallest raised areas are sharply lit on one side and abruptly in shadow on the other; indentations receive no direct light so the convolutions of the surface are either in light or shadow, with no shading in between. Across a face, every wrinkle, crease and hair cast shadows. The shadows are hard-edged and highlights bright, so sharp contrasts are formed (Figure 4.1). The area between highlight and shadow (the ‘lit area’) is distinct and well defined. The sun, when low on the horizon in a cloudless sky, angling across the land, reveals folds, contours, indentations and mounds in the landscape as each convolution is either in the bright light or in the depths of shadow.
Highlights
Small light sources illuminating shiny objects produce small, bright, specular highlights, producing pinpoints of bright, refected light in eyes, water, metallic surfaces and glass. The highlight is the same colour as the light source on neutral surfaces. A small light source illuminating semi-matt surfaces, such as brushed aluminium, eggshell paint finishes, many skin types, leather and plastics, will form a distinct highlight region.

Figure 4.1 Mikayo is lit by a small source giving hard-edged shadows. A studio flash head with no reflector has been used from an angle equivalent to 11 o’clock (75 degrees), simulating sunlight. By Andy Golding.
Lit area
The space between shadow and highlight is the lit area. A small light source creates a discrete space with defined edges between the highlight and the shadow; in between them in this lit area the tones and colours of the object are rendered in their most saturated and intense form.
Medium source
Shadows
As a light source increases in size the shadow edges soften. The sun diffused by a large cloud, occupying 20–50% of the sky, produces soft-edged shadows in the world below. As the area of the light source increases in relation to the subject, the light waves increasingly scatter and can converge around the subject; the light wraps around the subject so the shadow edges become less distinct.
In diffused light beneath a beach parasol sunlight becomes a medium light source; light gradually shades from lightest to darkest areas, and faces, bodies and objects will cast soft-edged shadows.
Medium-sized light sources include the sun diffused through cloud, light bounced from walls, ceilings or photographic umbrellas, light from the sky framed by a window, photographic lamps diffused through softboxes or by ‘trace’ (lighting quality tracing paper) (Figure 4.2). These sources of light wrap around the subject and as the light gradually gives way to shadow three-dimensional objects are revealed in all their facets and volume. Medium light sources are most effective in giving the suggestion of shape in the two-dimensional space of print or screen.
Highlights
Medium light sources give substantial highlights and the shape of the light source becomes evident in refections. The object radiating the light can be clearly seen in close-up; shiny surfaces refect the shape of the light source – an illuminated cloud, umbrella or window will be revealed in miniature in the eye of a subject or in the highlight on an object. Controlled use of the shape of the medium light source can be used to define the shape and surface of the object being photographed. The rectangular shape of a softbox refected in the eyes can be used to suggest the light of a domestic window or of an artist’s studio’s north light, a vertically standing strip-flash can be made to run a highlight down the side of a bottle, an overhead studio lightbank (a very large softbox) can be manoeuvred to run a highlight along the length of a car.

Figure 4.2 David is lit by a medium source giving soft-edged shadows. A large softbox has been positioned to the side of the subject emulating Vermeer-like window light. By Andy Golding.
Lit area
The lit area produced by a medium light source can be quite desaturated, for as the light increases in size the size of the highlight increases: the larger the light source, the more the highlight extends to the shadows. Highlights can begin to dominate shiny areas and on semi-matt and matt surfaces they will begin to desaturate the tones and colours of the object.
Large source
Shadows
The larger the light source, the softer edged the shadows. When a source occupies 90–180° around the subject the light source wraps mostly then entirely around the subject until no shadows are cast. Under an overcast sky on a flat landscape shadows become virtually imperceptible (Figure 4.3).
Highlights
Large light sources fill the highlight area. Eyes fill with highlight, bodies of water mirror the clouds and car roofs refect the sky.

Figure 4.3 Charlene, lit by a large light source formed by the glass canopy of Paddington Station. By Andy Golding.
Lit area
As the highlight area increases it fills the ‘lit area’; tone and colour are desaturated and the subject takes on a flat and even appearance.
Source size and meaning
The size of the principal light source dictates the way the subject appears in light and shadow and the way the surface textures are revealed. Most importantly, the size of the light in nature, indoors, on location or in the studio is significant in determining the ways in which the light in the scene is understood; we interpret the play of light metaphorically as well as objectively.
Sunlight implies a wealth of uplifting associations – sunshine, radiant, brilliant, dazzling, glittering, light, luminous. The highlights, intense colours and hard-edged shadows of the midday sun simultaneously take on the uplifting, bright, sunny, sparkling qualities we associate with sunny days.
Shadow, on the other hand, is linked to metaphors of darkness and the dark side – shadowy, shady, dark, dim, dingy, gloomy and Stygian. The desaturated qualities of a sunless day bring with them the emotional connections we make with light which is overcast, clouded, flat, leaden, murky, dreary. As the sun descends shadows deepen and the world descends into shadow. We tend to fear that which we cannot see; light and dark are associated with good and evil. Sunlight gives way to moonlight and the lower key nature of the chiaroscuro suggests drama, a dark mood and the likelihood of danger lurking in the shadows.
Medium source lighting illuminates people and objects with a full range of tones; it smooths and emphasizes curvature and roundness. It is literally and metaphorically easy on the eye and is inextricably linked with sensuousness and pleasure. In painting, the connection is with north light – the medium light source formed by the north-facing windows of artists’ studios (where direct sunshine could never cast its hard-edged shadow). It is also the light most associated with classical studio oil painting, particularly that of Rembrandt and Vermeer (Figure 4.2).
Direction and angle of light
The direction from which light strikes the subject is significant in determining textural information on the subject’s surface, suggesting a time of day, creating a sense of drama and heightened emotion, sensuousness and peacefulness, featurelessness and flatness, and implying the origins of an out-of-frame light source.
The position of the light leaves its trace in the direction of the shadows; shadows are cast away from the light and follow the same angle as that of the light in relation to the subject. In the morning or evening, sunlight is low in the sky and lights the environment from a low angle; long shadows are cast horizontally away from the light. As the sun rises in the sky, the light falls on the upper sides then top of objects; shadows shorten then fall away below.
A small, medium or large light source behind and above us and directly in line with our eyes, falling on to the subject in front of us with direct light, will be shadowless from our viewpoint as the shadow is formed directly behind the subject; light which directly fronts on to the camera view will reveal little of the texture of the subject.
As the angle moves away from the centre, shadows will be cast in the opposite direction from the light source, small sources casting hard-edged shadows, medium sources soft-edged. The texture of surfaces is revealed starkly, with the hard-edged shadows of small sources showing up detailed facets and the softer shadows of medium sources describing volume and roundness.
A light off-centre to our eyeline and lens position, just to the left or right, will be revealed accordingly in the highlight of the eye just to the left or right of the pupil – it is useful to consider these as the 9 o’clock or 3 o’clock positions. A studio light at the same angle can be made to suggest sunlight just after sunrise or just before sunset, or of light emanating from table lamps or windows.
Small sources angling across objects give a sense of drama as long, deep shadows are formed. Medium and large sources soften the shadows and the literal flatness of the view reinforces a calmer impression of the scene.
In the studio, small source lighting from overhead can imply light sources that we are familiar with from above, midday sunlight, midnight moonlight, streetlights and living room lights. Small source lighting from the side might suggest morning and evening sunlight, searchlights or car headlights. Medium light sources from the side might suggest window light or artists’ north light.
Distribution of light
Light radiating from a point source, like a flashgun, a torch or a spotlight, diverges from that point in such a way that as distance doubles from the source it has spread four times as widely. This is the inverse square law of light. As a light source is moved further from a subject, its intensity reduces by the square of its inverse. If a light is moved twice the distance from a subject, the amount of light on the subject will be the inverse of 22 (the doubled distance). This is (1/22) or one-quarter. If the distance is quadrupled it will be (1/42) or one-sixteenth of the intensity, at eight times the distance (1/82) one-sixty-fourth of the intensity. Thus, an object 1 m from a small light source will receive four times as much light as an object 2 m away. There will be two stops difference in the exposure reading from nearest to furthest distance. If the distance is quadrupled there will be one-sixteenth of the light, which equates to four stops less light.
The spread of light can be compared to the spread of paint from the nozzle of a spray can. When the spray is held very close to a surface it will project an intense stream of paint focused in a small area. If the spray is moved back twice as far the paint will cover an area four times greater, but the density of the paint will be four times less (for the same duration of spray). Thus, a flashgun close to a surface will give a focused intense beam of light; move it back twice as far and the surface will be covered by a patch of light four times greater in area but four times less in brightness, giving two stops less exposure.
This is a dramatic ‘fall-off’ and is only significant when a light source is close to the subject. The sun is 93 million miles away so the difference of distribution across the earth is imperceptible. However, a lamp 2 m from an object of 2 m width will illuminate the closest edge four times as brightly as the far side. If the object is 4 m across then the furthest side will receive 16 times less light than the surface nearest the lamp. This can be useful when it is required to plunge the distant area into blackness, but very inconvenient when detail is required across the object from front to back. Equally, across a row of people at the same distance the nearest person will be two stops brighter than those twice as far away. (To make the light distribution more even, the light must be either moved away from the subject so that the difference across is less significant – or the light can be bounced, so that the increased area of light will reduce the distance to the overall subject.)
Contrast and exposure
In a scene lit by sunlight the main light (or key light) is the sun. But secondary light sources are also at play, which act as fill-in light sources and contribute various levels of light to fill the shadows. In the absence of sky or bounced light, shadows in nature would be entirely black. However, on a clear day the sky acts as a secondary fill light source alongside the sun. Furthermore, the sun is refected into shadow areas from the ground, walls and other surfaces in the environment.
A single light on a subject in a black studio will offer little or no fill-in light and the contrast between highlight and lit area to the shadow will be so extreme that an exposure based on the lit surface will reveal no detail in the shadows. A white studio will offer some fill if the light source spills on to the floor or wall and is refected back to the subject.
If some detail is required at the shooting stage in shadow then the difference between the lit area and shadow should be less than five stops for colour transparency film, seven stops for colour negative film and up to nine stops for a complementary metal oxide semiconductor (CMOS) or charge-coupled device (CCD) sensor in a digital camera. However, these are extremes and such levels of contrast require work in the darkroom or using image-editing software such as Adobe Photoshop if shadow detail is required in the print. If the image is needed for publication then considerably less contrast is desirable as the printing process will limit the rendering of detail in shadow and highlight.
To measure contrast in the studio, or in controlled location settings where the main subject is within easy reach, an incident light meter fitted with a flat diffuser is most useful to take readings of the light falling on different facets of the subject.
First check the subject contrast. Set the (ISO) speed and aim the meter towards the main light from the surface of your subject to be ‘correctly’ exposed. In portraiture this would normally be the side of the face nearest to the light, in still life it would be the surface most essential to the image. Take a reading and set the camera to this reading. Then aim the flat diffuser from the same component of the subject (face, package, bottle, object) which is seen in shadow from the camera position. Take another reading. If the shadow reading is one stop different (say f/8 when the lit area was f/11), then there is half as much light on the dark side, one stop less, so the lighting ratio is 2:1. If the difference is two stops (f/5.6 to f/11), a quarter of the light, the ratio is 4:1; if it is three stops (f/4 in relation to f/11), the ratio is 8:1 and so on.
These ratios are well within range of film and sensors to reveal details throughout the metered subject. (Viewing the scene through squinted eyes gives an impression of the print stage contrast.) To the eye the 2:1 ratio will appear quite flat and the 8:1 ratio will look relatively contrasty; at the print stage they will appear much more contrasty.
If time permits, metering should now continue throughout the scene composed for the viewfinder. Care should be taken to meter the full length and breadth of the subject or the still life, and the full depth of the set from foreground to background. Note the ratios in relation to the area of the scene to which the exposure is to be set. Any shadow area in which detail is required in the final image, which is beyond the bounds of film or sensor sensitivity, will require some form of fill lighting (conversely, any area in brighter light in which detail is required will need to be masked or flagged from the light).
In a landscape the metering is best effected with a spot meter or digital single-lens reflex (DSLR) or film-based single-lens reflex (SLR) camera with the meter set to spot or centre-weighted meter mode. Take these reflective readings from the area to be reproduced as a midtone in the image, then read from shadows and the highlights. In a landscape the contrast can be controlled by consideration of the time of year, the time of day and by waiting for periods of clear sunshine or for the sun to be obscured by cloud (depending on the desired high or low contrast and soft or hard shadow edges). The fill-in light is either produced by the blue sky, haze or cloud.
For a full consideration of the contrast in the scene, the ‘brightness range’ is the product of the lighting ratio multiplied by the tonal range of the subject, often expressed as a ratio of highlight to shadow brightness. For example, direct sunlight on a subject under a clear sky in an open area gives a lighting ratio, between sun and sky lit areas, of around 10:1 (3.5 stops). If a subject has a brightness range of 13:1, this will result in a total brightness range of 130:1, or seven stops.
In the plaster-shaped images shown in Figure 4.4, the difference between the objects in the foreground and the background is 4:1. The lighting ratio, or lighting contrast, is the difference in light readings between the lit side and the shadow side of the object. In Figure 4.4(c) the lighting ratio is 8:1. In combination the total contrast is 32:1, which represents the difference between the darkest area of background shadow and the brightest lit area of the object.
As a general guide (Figure 4.6) reversal films will record a maximum brightness range of 32:1 with full detail throughout. Monochrome negative will record around 128:1 (seven stops) or more if development is held back. Colour negative can record 128:1 in terms of detail, but the colour begins to distort at the extremes of this range. CMOS sensors and sensors in digital

Figure 4.4 Changes in lighting ratios. These objects are lit by a small source from a 9 o’clock position (45 degrees) just behind the objects. The hard-edged shadows are increasingly filled from a flat fill lamp from the camera position. The lighting ratios were (a) 64:1 (6 stops difference), (b) 16:1 (4 stops difference), (c) 8:1 (3 stops difference), (d) 4:1 (2 stops difference) and (d) 1.5:1 (1 stop difference). Reproduction on this printed page limits the tonal values producible in a photographic print.
Figure 4.5 Direct sunlight under blue sky gives a lighting ratio, between sunlit and sky lit areas, of around 10:1 (3.5 stops difference). An average subject gives a reflectance range of around 13:1. Together this gives a total brightness range of 130:1 (7 stops). Picture by Andy Golding.
cameras and backs capture a greater dynamic range than most colour films, an area array recording up to 250:1, a trilinear array 712:1 or nine stops.
However, the printing process will reveal a much more limited brightness range, around 32:1 or five stops for digital prints, 32:1 for colour negative, perhaps 128:1 for monochrome prints. Where the output range is lower than the recorded range, the preferred range of tones should be printed or selected then local areas burned in or dodged out in the darkroom or in computer software.
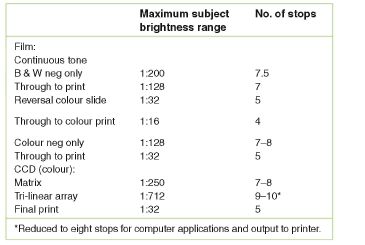
Figure 4.6 The subject brightness range (subject reflectance × lighting range) is that in which detail can just be recorded at one exposure setting. Sensors and film record more than printing can accommodate so the range of tones must be selected through choice of exposure and adjusted in postproduction accordingly.
A great deal of time and effort can be saved in post-production by controlling the contrast at the time of shooting; working in a subject brightness range of no more than three or four stops, 8:1 or 16:1, will ensure that colour, tone, highlight and shadow details will reproduce readily and accurately with little need for manipulation in post-production.
When the brightness range of the scene is undesirable for the intended style, atmosphere and meaning, and it extends beyond the range of film, sensor or print, then you may wish to apply some form of contrast control.
When addressing the lighting contrast:
1. Consider if the shot really needs detail from the brightest highlight to the deepest shadow. Sometimes an image benefits from black shadows to emphasize contrasts and drama. If this is acceptable or desirable then expose principally for the highlights and lit area.
2. Consider the reflectance range. High-contrast lighting is more difficult to manage for a scene including a person in black clothes standing against a white wall than it is for someone dressed in white, less still if the person is in blue against a midtoned surface.
3. Adjust the lighting ratio in relation to the sensor or film stock you are shooting with and for the final print medium.
When photographing subjects or nearby objects in the landscape, consider using reflectors to bounce diffused light into the darkness of the foreground, or shoot in areas away from direct sunlight, lit only by the larger source of sky or cloud (but be aware of colour temperature changes - see page 6). Another option is to position subjects with the sun behind them, then to use white reflectors to catch the sun (use white card, polystyrene boards or collapsible reflectors). The reflector will create a medium light source, which is now the main light source for the shot: the sun in turn becomes a backlight. Finally, consider using flash to fill the shadows of the foreground (see the section on flashguns for details of this technique).
In the studio or indoor locations you might use white reflectors to catch some of the main light so as to fill in the shadows on your subject and, if possible and desirable, into the background. The reflector will always be less bright than the main light source so will not add a second set of shadows.
When reflectors bounce too little light from the main light source into the scene to sufficiently reduce the contrast, bounce an additional light into the reflector. Take care that the fill light does not begin to dominate the scene by becoming so powerful that it effectively becomes the main light, and take care also to ensure that the shadow shapes, depths and edges you require are not being over-attenuated by the fill light source.
In the studio and on location, where time permits, with every change to the lighting set-up, take new meter readings, checking the ratios constantly against the area of the scene which is to be correctly recorded. Then take test digital shots and check the histogram, or with film shoot Polaroids and check the exposure, to ensure that the exposure and contrast are as desired.
With experience you can judge the combined effect of subject and lighting contrast by eye with reasonable accuracy. When time allows it is best to make many meter readings throughout the scene to measure the lighting ratios, and when shooting digitally check the histogram, so you can best assess how the final image will appear in print form - and in turn reduce to a minimum time in post-production.
Colour and colour temperature
The colour of light sources must be considered for photography, on the one hand to ensure that colours are accurately recorded and, on the other, as an influence on the atmosphere, style and connotations of the image.
Colour temperature
To accurately record a scene the colour of the lighting must be matched to the colour balance of the recording medium. It is most efficient and effective to control colour before the photograph is taken, rather than attempt to correct the lighting in post-production.
Most colour film is daylight balanced and is manufactured to accurately reproduce colours lit by ‘average sunlight’ or flash lighting. Some film is balanced for photographic tungsten lamps (see page 262) but the range of such films is dwindling, and domestic tungsten lights are being rapidly phased out.
The colour temperature of light is assessed in relation to the colour emitted by heated metal (technically a ‘black metal body’). As metal is heated up to very high temperatures it begins to glow, first red then orange, yellow, white and finally blue (see page 6). These colours can be matched to the temperature at which they occur. So, for example, the filament of a traditional 100 W domestic light bulb heats up when switched on and glows. Measured on the Kelvin scale (K), it would have a temperature of around 2900 K. A domestic tungsten filament lamp looks yellow when compared to daylight as it radiates more yellow and red than blue light (see Figure 1.12). Hydrargyrum (mercury) medium-pressure iodide arc (HMI) lights are the most favoured continuous light source for photographers and filmmakers; they are the same colour temperatures as daylight and are very bright, though very expensive.
Daylight film is balanced for ‘daylight’ or flash; tungsten film is designed for use with photographic lamps. Under light sources of different colour temperatures, the colour of objects will not be recorded accurately and colour casts will be noticeable in the final images.
Digital cameras can be balanced to a range of light sources. They can be set to auto white balance so that light falling on the sensor will be measured and processed to a neutral recording. They can also be preset for the average colour temperatures, including tungsten, fluorescent, sunlight, flash, cloud and shade (blue sky only). Professional digital cameras and digital backs also allow for a ‘custom white balance’ to be set; the camera is aimed at a grey (or white) card illuminated by the prevailing light, and the refected light is set as the correct colour temperature for the shot. In controlled conditions this is the most accurate method for dealing with colour temperature. In a studio shoot when the lighting has been fixed the custom white balance should be set for light refecting from the main light. The white balance should be changed whenever the lighting set-up changes.
When shooting RAW files the light prevailing at the time of the exposure can be corrected after the files are processed. Nonetheless, care with the colour temperature of the lights, ensuring that they are balanced to each other as much as possible, will greatly ease post-production. Setting the camera’s presets can be useful when shooting RAW to remind you later of the prevailing conditions.
In controlled conditions the inclusion of a grey card, and ideally a colour chart, in the first frame or two of a shoot will provide a perfect reference for batch-processing digital files, and for printing digitally or from film. Cards and charts should be reintroduced whenever the lighting changes.
Colour temperature meters
In a neutral-coloured studio with standardized and matched lighting, results can be predictable. On location it is often only necessary to control the colour temperature of the predominant light on the principal subject. The colour temperature variances of the background can be tolerated and will often retain or enhance the atmosphere of the location. However, where highly accurate colour reproduction is essential for packaging, clothing, artworks and so on, the colour temperature of light sources can be measured with a meter (see page 11).
Note that the colour temperature meter is designed to read continuous spectrum light sources. It will give rogue readings of sources such as fluorescents, lasers or most sodium or mercury vapour lamps because they all emit lines or bands of wavelengths with gaps in between ( Figure 1.11). This confuses the meter’s sensors.
Practical control of colour
Digital cameras can be set to the colour temperature of most prevailing light sources, or set to auto white balance. High-end cameras can be custom white balanced. Colour negative is balanced for daylight and flash. Colour transparency film will also provide neutral results in flash and daylight, and tungsten-balanced film will provide neutral results under appropriate photographic tungsten lights.
Radical shifts of colour temperature from tungsten to daylight and vice versa require strong blue or orange filters. A blue 80A acetate colour correction placed over tungsten photo lamps will filter the light for daylight film; it will shift the colour temperature from 3200 to 5500 K. An orange 85B will shift a flash or daylight source to tungsten balance, 5500–3200 K. The same value conversion filters can be used over the camera lens to convert the colour temperature of the prevailing light to match the colour balance of film (80A if daylight film is used to shoot a tungsten-lit scene, 85B if tungsten-balanced film is used when shooting with flash).
In the studio when precise neutral results are needed, some filtration of lights might be required. If tungsten is to be mixed with flash but both must appear neutral on daylight-balanced film, then the tungsten must be filtered with 80A acetate (or ‘gel’). Exposure must be compensated for – the 80A will reduce the brightness of the tungsten lamp by two stops.
More frequently, in the studio adjustments will be needed to balance slight differences in lamps to bring them to the same colour temperature throughout the scene and to ensure no unintended casts across the subject or background.
The 81A or 81B light-balancing (yellowish) filters are often used to slightly warm up the ‘colder’ than daylight quality of light delivered by some flashtubes.
Colour-compensating (CC) filters are used to improve results when a film-based shoot allows for a test shoot and process. When viewing a reversal film test with a cast to correct, look at the result through CC filters of the complementary colour – magenta for green, yellow for blue, cyan for red (and vice versa). Aim to make the midtones neutral, and ideally include a colour chart or grey card in the test to check against. Then reshoot using a filter which is half the strength over the lens. For example, if a bluish slide looks correct when viewed on daylight-balanced lightbox with a 10Y (yellow) filter, then reshoot with a 5B (blue) filter. This test should ideally be carried out on the same batch of film stock to be used and processed through the same line. The correction will not work on instant picture materials (Polaroid film, for example) as they respond differently to filtration.
Finally, check any exposure compensation needed by the addition of filter – either by re-metering the lights or by checking the literature on the lens filter (or test the difference needed by metering through the filter).
Mixed lighting
On location it is rarely possible to ensure that all light sources are of similar colour temperatures. Filtering the camera lens or setting the digital camera to one source will not balance all sources. This may not be a problem if the scene is acceptable for the intended use, and if it looks aesthetically pleasing. However, if controlled colour balance throughout the scene is essential, then there are a number of solutions.
Firstly, filter one light source to match the other. For example, if shooting a tungsten-lit interior with a window opening on to a daylight scene, the window can be draped with (full) orange 85B acetate to bring the light to tungsten balance. This was the traditional method, often with the interior lighting boosted with supplementary tungsten lighting such as ‘redheads’.
Domestic interiors are increasingly lit by ‘energy-saving’ lamps; these are compact fluorescent lamps which tend to give a green cast when film or sensor is daylight balanced. Fluorescent tubes come with a variety of spectral properties and subtle colours, each requiring different filtration to match them to daylight or tungsten (tubes can be identified by name and matched to filtration requirement listed in Kodak data books; an acetate sleeve of the correct value can be wrapped round each tube but this is extremely arduous and only worthwhile for big-budget shoots).
If flash is to be used in the foreground it can be covered with a filter (normally pale green) to match it to the fluorescent light; a correction filter (normally pale magenta) can then be added to the lens so that the whole scene appears neutral. Other options include relighting the interior with flash (normally through umbrellas or softboxes and bounced) or use HMI lamps and a daylight balance.
When using film, if there will be no movement in the scene, it is possible to split the exposure; with the camera on a tripod cover the window with black velvet, and make the exposure with tungsten film. Switch off interior lights and make the second half of the exposure with an 85B orange filter over the lens. With a digital camera make two exposures – one balanced for the interior and one for the exterior – and bring them together in post-production, or simply appropriately correct two images from the RAW file and combine them.
It is only worth making such efforts if there is a real need aesthetically or commercially; mismatched colours can provide a sense of place and atmosphere, but ensure that the result will be as you desire. Often a controlled neutral region is all that is needed, and this can be affected with carefully directed and balanced flash, leaving other light sources to be read by sensor or on film, as they will.
Guidelines for lighting
To be able to create any lighting effect, no matter whether the light source is daylight, existing artificial light, a flashgun or studio flash or continuous lighting (tungsten or HMI), the following must be controlled:
- Size of light sources
- Direction of light
- Distribution of light
- Contrast and fill-in light and exposure
- Colour
- Meaning.
To summarize the key considerations above:
- Hard-edged or soft-edged shadows are controlled by the size of the light source relative to its distance from the subject.
- Direction of shadows and position of highlights are controlled by the height and direction of the light relative to the subject and viewpoint of the camera.
- Distribution, the evenness or fall-off of light across the subject depends on the relative distances of the nearest and furthest parts of the subject from the light source. The more distant and large the light source, the less fall-off.
- Contrast or brightness range (lighting ratio) is the combined result of the highlight to shadow ratio and the subject’s reflectance range. Brightness range is best controlled by the amount of fill light introduced into shadows.
- Exposure depends on the intensity of the light, due both to the power of the light output and the distance of the light source from the subject, attenuated by any reflectance or diffusion.
- Colour content is controlled by the type of light source and any colour surfaces or filters the light is refected from or diffused through on the way to the subject.
Control of lighting is normally intended to create effects ranging from naturalistic to theatrical. For a lighting set-up to allude to nature it needs to be constructed on natural principles – we have one sun, which is for most of the day high in the sky, and the sky itself acts as a natural fill-in source to lighten shadows. To emulate this, one main light source is required (with no shade or reflector to make it as ‘small as the sun’), set above eye height with some form of fill light.
When a studio set-up is designed to mimic a particular location the lighting should be ‘motivated’ (Figure 4.7); lights should share the qualities of the lights they are intended to infer, and be sized, positioned and coloured accordingly. An overhead small source can imply a room light, a search light or the stereotypical view of an interrogation cell; medium source side lighting can be made to suggest window light. Scenes suggesting street lights require small sources from above, coloured accordingly; knee-level-focused beams can suggest car headlamps.
Lighting to supplement or enhance location lighting should be ‘justified’ – that is, designed to share the qualities of existing lighting in the home, office, shop, club, hotel, restaurant, factory and so on. Lights of similar source sizes can be positioned at similar angles to existing lighting, to raise overall intensity for exposure yet at the same time retaining the atmosphere of the place. Care should be taken to ensure that the supplementary lights do not cast inappropriate shadows across and away from any existing lights appearing in frame, and additional fill is often needed to give shadow detail.
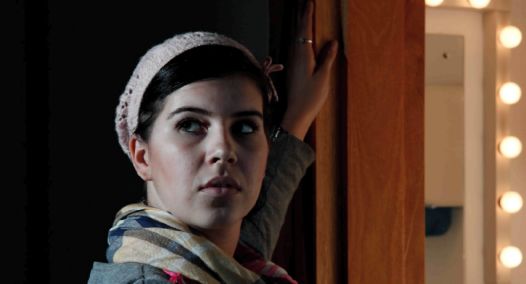
Figure 4.7 Elizabeth is lit by a small source flash head from our left at a 10 o’clock angle (75 degrees) and a flash warmed with a quarter orange gel and balanced with the mirror lights inside the room to our right. The first flash ‘motivation’ is of a stage light, the second is ‘justified’ with the tungsten interior lamps. Picture by Andy Golding.

Figure 4.8 A light tent for still-life photography.
Dramatic lighting of people most frequently refers to theatrical conventions and cinematic genres. Multiple small sources, focused spotlights, casting very hard-edged shadows, can be made to emulate heightened emotions through the contrast and difference of light and shade, or cinematic film noir conflicts of good and evil.
At a more routine level the lighting of intricate multifaceted subjects (product shots, pack shots, clothing samples, jewellery and glass) often require the simplicity of medium-to-large light sources so that large highlights, soft shadows or shadowlessness complement, simplify and clarify the objects for the final image. Such subjects can be shown to clear effect with overhead light from softboxes (or just to the side to once again imply a window) or a light tent which envelops the still-life object in a diffuse, highlight-enhancing, large source (Figure 4.8).
Lighting equipment
Most professional photographic lighting is produced with flash – it is very powerful, relatively lightweight and cool running. Much can be achieved with flashguns but studio lighting, portable flash kits and rechargeable flash kits are the most practical means for lighting still life, portraits, group portraits, interiors and exteriors.
Power pack (monobloc)
Power packs generate power for separate flash heads. They contain capacitors, which store power at very high voltage to be switched to a number of flash heads. They can be suspended from the studio ceiling in a lighting grid or can set on floor stands. Their power is rated in watt seconds (or joules); a reasonably powerful pack, capable of powering up to three flash heads, would be rated at 3000 Ws. A symmetric pack splits power equally to additional heads, an asymmetric pack allows variations of power to the flash heads.
Flash heads are made up of the flash tube, a glass tube of xenon gas, which emits light (flashes) when excited by the high voltage from the power pack. The flash tube encircles a modelling light, a bright tungsten or light-emitting diode (LED) source which can be switched on continuously so that the quality and spread of flash to come can be visualized. The flash head has a fitting to which light moderators can be attached – reflectors, barn doors, focusing spots, snoots, honeycombs, grids, umbrellas and softboxes.
Monolight
A monolight combines the powerpack and the flash head. Their compactness does not allow them to be as powerful as a powerpack/flash head combination. They are typically rated at 250–500 Ws. Their advantage is their comparative lightness and portability. They can also be fitted with the full range of light modifiers.
Reflector – spill kill, wide angle, food, capped food
The reflector contains and directs the flashlight. A wide-angle reflector is chrome-lined, short and fared to direct the light most widely. A food is broader and may come with a cap to conceal the flash tube and modelling light – this ensures that the light is a single refected medium source rather than a combination of small source flash tube and medium source reflector (which gives two shadow edges – Figure 4.9(a)).
Barn doors
These are hinged metal flaps which attach to reflectors to further direct light and prevent spill (Figure 4.9(b)).

Figure 4.9 (a) A reflector attached to a flash head. (b) A flash head with a reflector and barn doors attached.
Honeycombs or lighting grids
These are metal grids in the shape of honeycombs which gather the light to a narrow area; the finer and deeper the honeycomb cells, the more focused will be the area of light.
Snoot
This is a conical attachment to narrow the pool of light (Figure 4.10).
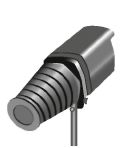
Figure 4.10 Flash head with snoot. Alighting grid may be attached in front of the snoot.
Umbrellas
A refecting umbrella is fitted to the flash head to bounce light to the subject and convert the small source of the flash tube into a medium source. A silver-lined umbrella is the most efficient but focuses light more narrowly than a white umbrella. Some umbrellas are tinted gold to produce a warmer light. A transmission or ‘shoot-through’ umbrella is made of white translucent material. The flash head is aimed through it to increase the light source size by diffusion. As some light bounces back from the surface of the umbrella, light is spread around the set or room, providing a secondary fill source (Figure 4.11(a)).
Softbox
This is a rectangular, lightweight box with a reflective interior and a translucent front. Light from the flash head is directed into the box, where it is refected and diffused to create a medium light source (Figure 4.11(b)).
Lightbank
This is a large softbox.
Flag
Any object used to prevent light from spilling into unwanted areas is called a flag.

Figure 4.11 An umbrella (a) and a softbox (b) attached to a flash head.
Scrim
This is a semi-translucent fag – used to cut down the brightness of light spill.
Focusing spot
This is an attachment or flash head including lenses to focus the light into tight circles or through shapes in metal ‘gobos’ to provide local areas or dapples of light (Figure 4.12).
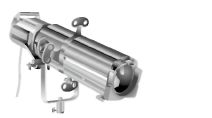
Figure 4.12 Focusing spot.
Lighting principles in practice
Studio portraiture
Plan the shot in advance, have the lighting and style firmly in mind before you start and have everything in place before the subject arrives.
Fix the camera position and the subject position, ideally with plenty of space from the background so extra lamps can be introduced from behind if needed. The most straightforward and conventional approach is to set up a medium source of light a little above and to the front and side of the subject (at a 10 o’clock elevation and based around 30° in an arc around from the camera – Figure 4.13). The medium-sized light source will enhance most skin types and the gradual transition of light into shade will elegantly portray the face and body. Check the distribution of the light, particularly across the face as seen from the camera position. If the light is very close to the subject the fall-off will be dramatic: a distance of 2–3 m will provide reasonable evenness across a single subject. The shadow of the nose will cast a small loop shape towards the lip – this is sometimes known as ‘loop lighting’.
It is also important to meter the full length of the figure or figures to be included in the image. Light can fall off significantly from head to toe – this can be particularly problematic for the exposure if the face is light skinned and the clothing dark. A solution is to aim the light at
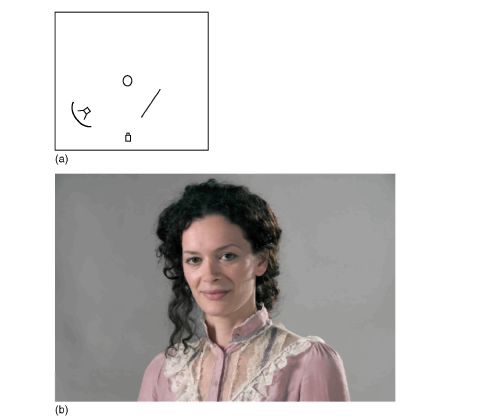
Figure 4.13 A medium source of light a little above and to the front and side of the subject. Fill light to the right of the camera angled into the subject using a reflector.
the subject’s chest so that its brightest region is lighting the dark fabric. Expose for the face; the slight overlighting of the clothing will reveal details in the folds of the fabric. In a group shot those with darker skin or clothing should ideally be placed to the lighter side of the frame so that the fall-off does not plunge them into underexposure.
When the lamp is set at 45° around from the camera, the lighting reference links to the painterly, studio and window-light convention. The angle of the light and face combine to create an inverted triangle of light around the eye furthest from the light source; the remainder of the side of the face is in shadow. This is known as Rembrandt lighting. (The positioning of the main light to the viewers’ left appears to be a western convention where text is read from left to right and where consequently eyes tend to scan images from left to right.)
When the lamp is at 45° above the camera height, a miniature image of the light source will appear in the iris of the eye at around a 10 o’clock position. In close-up it will be seen clearly if a refecting umbrella (one light is bounced from), a transmission umbrella (one light diffuses through) or a softbox has been used. In the first instance the round, fluted shape of the umbrella will be detectable with a black keyhole shape in the middle where the lamphead and stand obscure the refected light. The transmission umbrella gives a clear circular shape and the softbox a rectangular shape.
Exposure is best read with an incident light meter with a flat diffuser aimed from the subject towards the main light. Take note of the exposure. Then take a reading from the shadow side of the face. The difference in values gives the lighting ratio: one stop 2:1, two stops 4:1, three stops 8:1, four stops 16:1 and so on. A domed, ‘invercone’, diffuser can be used from the subject towards the camera; this averages light and shade falling on the sensor but does not enable accurate readings of light ratios.
If the difference between light and shadow gives too much contrast, introduce a fill light. Most simply this would be a white reflector to the right of the camera angled in to the subject and bouncing light from the main light into the shadows (Figure 4.13).
Meter all parts of the subject viewed by the camera. Remember that if the light is very close to the subject, the fall-off will be extreme.
Finally, meter the background. If the background is a midtoned grey or other midtoned colour, and is more than three stops less lit than the side of your subject, then it will appear nearly black. Set the exposure to the lit side of the face and shoot. This lighting set-up will almost always look wonderful.
With more equipment and time, further controls and refinements can be made. If a midtoned reproduction of a midtoned backdrop is required in the print then it must be lit to match the foreground. For a perfectly even appearance it should be lit with background lights from behind the subject aimed from 45° into the centre of the background (Figure 4.14). Two or four lamps will be needed depending on the area of the background.

Figure 4.14 For a perfectly even appearance, the background should be lit with background lights from behind the subject aimed from 45° into the centre of the background.
Where the face is lit from the left and in shadow on the right, try turning off the background light on the right. The lit side of the face will be elegantly contrasted with the shadows on the backdrop and the shadow of the face will be set against the light from behind. This effect is known as ‘chequerboard’ lighting.
To create a pure white background, set up a white backdrop, direct the lamps in the same way but increase their intensity by a stop, either by raising the power output or by bringing them closer to the background. Make the exposure for the face as above. The overlit white will ensure a pure white result. Using appropriate gels can produce any colour background from this set, colour the lamps and then adjust the power – one stop less than the main light for a midtoned colour and successively for darker colours.
For a pure black, set up a black backdrop, turn off the backlights and ensure that no light from the umbrellas or softboxes can reach the background. Use full-length fags (black-sided polystyrene boards, for example) to fag light away from the background. Aim to have the black background receive two to three stops less light than your subject for a fully black result.
Another convention is to introduce a ‘backlight’ – a small source high, from behind opposite the main light and falling on the top of the hair and on to the shoulders. It is particularly effective in ensuring differentiation from black hair or clothing from the black of the background. This light should be a stop brighter than the exposure to be used for the face (Figure 4.14).
Setting up camera and lights
The camera lens should be fitted with as deep a lens hood as possible. If a bellows style ‘pro hood’ can be used, it should be extended until it can just be seen in frame, then racked back just out of frame. The hood is the first guard against light spilling on the lens and causing fare (which reduces contrast as light bounces around the interior of the lens and on to the film or sensor, and can at its most extreme cause aperture-shaped fare spots of light). Background lights should be fitted with barn doors to mask light both from the lens and from spilling on to the subject. Any additional spill on to lens, subject or background should be fagged off, using black card, polyboard or fabric stretched on frames, and clamped in place or set on separate stands.
The backlight should be fitted with barn doors, a honeycomb (or ‘grid spot’) or focusing spot to contain the spread of light. Prevent light spilling on to the subject and background.
If flash heads are being used with umbrellas they should be fitted with wide-angle reflectors (or ‘spill kills’). These reflectors will direct all the light into the full width of the umbrellas and give one or two more stops illumination than if allowed to spill. They will also prevent unwanted light leakage on to other areas of the set.
Front fill light
A very large umbrella or softbox set directly behind the camera provides a shadowless light into all areas of the scene; shadows are projected behind the subject so they are unseen from the camera position. By careful adjustments of this fill light power in relation to other lights on the scene, it can be made the main light or a very subtle fill (Figures 4.15 and 4.16).
The light must be large enough to wrap around the camera, tripod and photographer. The eyes of a sitter will refect the white shape of the light and the black silhouette of the photographer (the photographer literally puts their image, in silhouette, into the image). This lighting reveals its ‘unnaturalness’ but makes clear reference to an idealized flashion lighting style where every blemish and wrinkle must be eliminated through flat frontal lighting. (An even more flat, shadowless light recurs in flashion photography with the use of the ring-flash – a doughnut-shaped light which encircles the lens. The light, designed for shadowless scientific specimen photography, can be seen in close-up by the doughnut-shaped highlight around the pupil, and by the dramatic fall-off across the skin towards the edges of face and limbs.)
Used in conjunction with one of the lighting set-ups described above, this ‘flat fill’ can be set to two or three stops below the exposure from the main light for the most subtle of fill effects. Shadow areas of the background can be coloured by adding gels to this light source. The colour will be eliminated on the subject provided the main light is a couple of stops brighter.
Three-point lighting, using small sources throughout with one as a front fill, has been widely used to emulate 1940s style film-still photography. The main light here is the rim light set at approximately 110° from the camera axis. A backlight, either with a snoot or a honeycomb (gridspot), is aimed down on to the hair and shoulders of the subject. The front fill will be set two or three stops lower than the main light. The backlight is at least one stop brighter than the main light (Figure 4.17).

Figure 4.15 Front fill light using a very large umbrella or softbox set directly behind the camera.
Balancing foreground and background lighting
On location it is often desirable to match the power of supplementary lights to the existing lights, for example when a subject is standing with their back to a window or other bright light source.
An exposure can be made for the subject by measuring the light falling on the face using an incident meter (with an invercone or flat diffuser) aimed from face back to camera. This exposure, with no additional light, would result in the subject being reasonably well exposed but the background overexposed.
To balance the lighting take a meter reading out of the window, or towards the background light, using the meter in the refected light mode, or by using a spot meter or a DSLR camera. An exposure for the background would result in an underexposed subject. (If the meter is pointed at a sky full of white clouds and the reading from them is used as the exposure, then the clouds will be exposed as a midtone grey; the land below would tend to be underexposed – darker than a midtone. A blue sky metered and exposed in the same way would correctly result in a midtone.)

Figure 4.16 Front fill light with additional lighting.
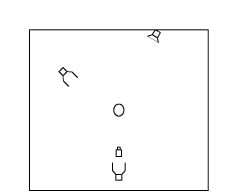
Figure 4.17 Small source lighting with a small source front fill.
Flash can be used in the foreground to balance the light on the subject with the light outside. (HMI light can be used, or tungsten lights with full blue filters to correct the colour balance to that of the daylight – 5400 K.)
If the background reading is f/11 then the flash should be set to achieve a reading of f/11 on the subject. The shutter speed should be that required for the background exposure (provided it is not faster than the maximum synchronization speed of the camera).
The nature of the foreground light – source size, direction and colour – should be designed to be justified, if it is to complement existing foreground lighting, or motivated, if it is to imply a certain source or location, or stylized to reveal information or suggest a genre.
Darkening backgrounds with flash
This is a dramatic lighting method. It is extremely effective against cloudy skies in early evening or morning; with this method the foreground subject will be perfectly exposed and will radiate out from brooding, darkened backgrounds (Figure 4.19). Tests with digital camera or Polaroid-type film are recommended.
Balance the foreground flash with the background ambient light by matching the flash power to the ambient light exposure. Then the simplest way to darken the background, leaving the foreground correctly exposed, is to increase the shutter speed. With a high-speed flash, like a flashgun, the shutter speed will have no effect on the flash exposure in the foreground (where the flash duration is less than 1/1000 second); however, each increase of shutter speed will underexpose the background ambient light by one stop.
Method 1 – Increase shutter speed
Ambient light exposure f/11 at 1/60
| Flash | Exposure | Background |
| f/11 | f/11 at 1/60* | Balanced |
| f/11 | f/11 at 1/125* | One stop darker |
| f/11 | f/11 at 1/250* | Two stops darker |
| f/11 | f/11 at 1/500* | Three stops darker |
Method 2 – Increase the flash power on the foreground
Ambient light exposure f/11 at 1/60
| Flash | Exposure | Background |
| f/11 | f/11 at 1/60 | Balanced |
| f/16 | f/16 at 1/60 | One stop darker |
| f/22 | f/22 at 1/60 | Two stops darker |
| f/32 | f/32 at 1/60 | Three stops darker |
*Synchronization
If you are using a focal plane shutter camera make sure that the shutter speed does not exceed the synchronization speed of the camera. For example, the background reading for the scene here could also be taken as:
• f/5.6 at 1/250
• the flash could be set to f/5.6 and
• expose at f/5.6 at 1/250.
These settings would be fine for modern DSLR cameras, but many early focal plane cameras can only synchronize up to 1/60. If you use 1/250 with such a camera, more than half of the image will have the flash obscured by the shutter (Figure 4.18).

Figure 4.18 The exposure of the foreground flash has been first balanced with the sky by matching the flash power to the ambient light exposure. Then the shutter speed has been increased by three stops, so the sky is dramatically darkened by underexposure. The flash has been bounced from an umbrella and filtered with a quarter orange gel to suggest a warm, medium source, interior light. By Andy Golding.
Leaf shutters will synchronize throughout their speed range as the shutter is always fully open when the flash is fired.
Slow-duration flash heads
Many portable flash kits and studio flash heads have a long flash duration at full power (some can be as long as 1/90).
To darken backgrounds with such lights use ‘Method 2’ (page 109), with a shutter speed no faster than 1/60. Then the foreground will not be underexposed due to the shutter ‘clipping’ the flash – i.e. shutting before the flash has finished its full duration.
It is not always desirable to have the foreground ‘perfectly’ exposed. If the background is the most important feature of the shot, or if the subject should be shadowy or mysterious, then underexpose the foreground by decreasing the flash power, but have the camera set for the ambient light.
Flash – to darken the foreground, decrease the flash power on the foreground
Ambient light exposure f/11 at 1/60
| Flash | Exposure | Background |
| f/11 | f/11 at 1/60 | Balanced |
| f/8 | f/11 at 1/125 | One stop darker |
| f/5.6 | f/11 at 1/250 | Two stops darker |
| f/4 | f/11 at 1/500 | Three stops darker |
Still-life photography
Still-life photography encompasses pack shots and product shots for advertising, catalogues, brochures and websites, food photography, car photography as well as content for some realms of fine art photography. Lighting requirements range from the emulation of natural light to highly stylized lighting.
The painterly top/side medium light source formed by a softbox, lightbank or strip flash (a long thin softbox) is often favoured not only to suggest products in the artist studio (raising the status of products to that of art), but also suggesting a domestic setting with light flooding across the objects from a nearby window. For small objects, detailed fill lighting can be achieved with small mirrors and shaped aluminium foil.
At the other extreme objects are often made to appear in a pure space, as though floating in thin air, with highlights running the length of the surfaces. On a small scale this is achieved by setting the objects on a translucent light table, which is lit from underneath. The light is balanced to a softbox, the width of the set, suspended above. At the greatest scale cars are set on ‘infinity curves’ or ‘coves’ – a white painted surface gradually curving from the studio floor to the ceiling. The cove is evenly lit and is balanced to an overhead lightbank, which is sufficiently long to throw a highlight along the contours of the car’s length.
Small precious objects are frequently set in a light tent – a translucent fabric tent with an aperture for the lens to peek through. When lit all round the tent becomes a large light source which reduces the contrast by filling in shadows, keeping the exposure range within useful limits (Figure 4.8).
Location interior lighting
Photographing rooms on location, and the people in them, presents a number of lighting problems, including their intrinsically low light levels, colour temperature differences and extreme contrast. If there is too little light for the required exposure then a monolight kit can be used to substitute as the primary light source or to supplement the available light.
Monolights as principal light source
A two-head monolight kit is unlikely to cover a large space of more than 15 m deep but within this the options are to create even lighting throughout by using umbrellas, softboxes or by bouncing the flash off the ceiling.
For a little more drama then use one head with an umbrella behind the camera as a front fill source and highlight your subject, or a detail of the room with the second head fitted with a reflector (or more focused through a snoot or honeycomb).
If an exposure of around f/11 can be achieved, then shooting at 1/125th is likely to ensure that the available light is overwhelmed by the flash.
A typical tungsten or compact florescent lit living room might require an exposure of 1/8 second at f/11 using 100 ISO. Exposing for the flash at 1/125th will render the room light four stops underexposed. In these circumstances the photograph will be dominated by the flash lighting. If the flash lighting is uncoloured the light will be of neutral colour on daylight setting or daylight film. The resulting photograph is unlikely to reveal the atmosphere of the room’s original lighting.
To create more atmosphere then either match the flash lighting to the style of the available light or let the available light become a significant component of the exposure.
Matching flash to the room lights
An umbrella light or softbox can be used to suggest the light from ‘medium’-sized light sources such as window light or from the shade of a table lamp. Use the direct flash from a reflector to suggest light from small sources such as overhead room lights or spotlights. To match them for colour use quarter or half orange lighting gels to imitate the warmth of tungsten light or ‘warm’ domestic compact fluorescents.
Matching the exposure to room lights
To retain the atmosphere of the room and to keep the best qualities of the existing lighting, balance the flash exposure to the available light. If the flash exposure is f/11 then take an available light reading at f/11. The reading might be in the region of 1/8th at f/11. Using this exposure will give an equal balance of flash and available light. An increase of the shutter speed will reduce the effect of the available light by one stop, a decrease will increase it. The flash exposure will be unaffected.
Flashguns
The integral flash of a compact camera, the pop-up flash of a DSLR and the separate flash unit canal can be controlled to subtle effect. Flash will reveal detail in dark shadows, bring a sparkle to a dull day, freeze motion and can provide a sense of movement, resolve colour balance clashes in complex lighting environments and, carefully filtered, will warm up or cool down selected elements of the scene.
Yet for many users the flashgun is only resorted to when light is too low for acceptable exposures. Results tend to be dreadful: in the foreground faces are overlit with hard-edged shadows, the background appears in inky darkness and the garish white light of the flash overpowers atmospheric interior lighting or exquisite sunsets.
The latest generation of dedicated flashguns and cameras will resolve the exposures for you, mix flash and available light, balance the flash with backlight or allow you to increase or decrease the flash to your taste, in thirds of a stop increments. But any combination of camera and flash – old, new, cheap or top of the range – can be manipulated to allow you to control the flash and prevent it dominating the photograph. The trick is to take control of the flash rather than allow it to dictate the play of light in the photograph.
Check your camera’s handbook to discover if it has a maximum synchronization speed; newer DSLR and SLR cameras may allow a speed of 1/250th (the faster the better for use with bright daylight), older models perhaps 1/125th, 1/60th or even as low as 1/30th. Digital cameras and compact cameras vary considerably. (Flash will synchronize at most shutter speeds when used with camera with leaf shutters, since the flash is fired when the leaves are fully open.) Using a speed faster than the synchronization will result in the flashlight being cut off in the frame, but it is by using slower speeds that the flash effect is lessened and the impact of the ambient light heightened.
Exposures in interiors at night, living rooms, restaurants, cafés, bars, and so on using 100 ISO might require in the region of f/4 at 1/15th; using flash at a synch speed of 1/125th would result in the ambient light being underexposed by three stops (eight times less light). The room lights will barely be revealed and the background will appear to be in near darkness. Reduce the shutter speed to 1/30th and surrounding light will be just one stop less (half as) bright – revealing much more of the lighting quality of the environment. Lower the shutter speed to 1/15th and flash and available light will be equally balanced. Now though the shot will be overexposed, as there is light coming equally from the interior and the flash. Stop down the aperture (f/5.6 at 1/15) and the exposure will be correct, with the room light and flash equally mixed (so-called ‘mixed flash’).
This effect is achieved automatically with many newer cameras, (some Nikon cameras, for example) by locating the ‘slow-synch’ setting in the flash menus. The camera’s exposure system will automatically match the flash to the surrounding lighting conditions.
Without a tripod slower shutter speeds will result in some blur – both from moving subjects and from camera shake. However, the flash will freeze elements of the scene it reaches and often gives an effect of dynamism and action. Cameras normally fire the flash at the start of the exposure; if a slow shutter speed is used then moving elements are frozen but the blur from the ambient light exposure appears ahead of them; things look as though they are moving backwards. To make the ‘trail’ appear behind the movement check the menus of your camera to see if it can allow for ‘rear curtain synch’, then the flash will be fired at the end of the exposure and a more natural sense of forward movement will be achieved.
To show up background lighting or skies behind your subject, simply match the flash and background exposures. If the evening background or sky exposure is 1/30th at f/5.6, set your camera accordingly; then set the flash to f/5.6. In the resulting image the foreground subject will be lit to the same value as the background (the flash is balanced with the backlight). An increase of one stop of the shutter, here to 1/60th, will darken the background and give more drama in the sky, yet not affect the foreground (the flashgun fires at 1/1000th of a second or faster so is unaffected by the faster shutter speed).
This balancing act is automated by many modern amateur cameras with a ‘night portrait’ function, usually indicated by an icon of a silhouette head and shoulders with a star behind. Professional DSLRs can achieve this effect with matrix-style metering, or a metering option which takes account of the whole scene and, if necessary for the camera model, ‘slow-synch’ settings.
In bright daylight the same balance can be achieved by matching flash foreground exposure to the value of the sunlit background; this is the look of paparazzi photography and in the more garish confrontational photography of documentary artists since the 1980s (in the UK). Higher shutter speeds are needed so take care not to exceed the maximum synchronization speed. This effect can be achieved with contemporary equipment when full-power flash is used in daylight (provided no compensation or flash underexposure has been set).
With fill-in flash the aim is to make the flash a secondary light source, not the key light or main light. If shadows, falling across your subject, are too dark and highlights too bright for the exposure range of the camera, then fill-in flash will lower the contrast and lift the shadow detail. To retain some drama in the shot, add a subtle flash at two or even three stops lower than the exposure for the ambient light.
So, for example, to achieve fill-in flash which is two stops less than ambient light, ambient light exposure is 1/125 at f/11 then set your flash to f/5.6. Use f/4 for a delicate three stops under fill-in effect. The same method will brighten subjects on dull days, lift them from the background, add highlights to shiny elements in the scene and ‘catch-lights’ to eyes.

Figure 4.19 Contre jour flash. Johnny is lit by on-camera flash matched to the daylight exposure. Picture by Andy Golding.
A modern camera and flashgun will have a menu to allow you to set the fill-in level in third of a stop increments; a setting of two or three stops underexposure of the flash gives most subtle results.
Finally, colour the flash with filters to balance the flash with the ambient lighting and integrate the light into the scene. Use a straw-coloured filter over the flash to bring the colour temperature to that of the setting sun, or to the colour of most interior lights.
SUMMARY
- Small light sources produce hard-edged shadows and bright, specular highlights. As a light source increases in size, it becomes a ‘medium’ light source: the shadow edges soften. By controlling the shape of the medium light source you can define the shape and surface of the object being photographed.
- The direction and angle of light, and the size of the light source in combination, affect the way we interpret an image. For example, sunlight implies a host of uplifting associations whereas shadow is associated with the ‘dark side’, sin and threat.
- Light distribution follows the inverse square law. Light radiates from a source so that as distance doubles from the source, the light spreads four times as widely. Uniform light distribution can be achieved either by moving the light source away from the subject, or by bouncing the light; the increased area of light will reduce the distance to the overall subject.
- Contrast can be measured by taking readings of the light falling on different facets of the subject, using an incident light meter fitted with a flat diffuser. If the reading between the most important part of the scene and the shadow is one stop different then there is half as much light on the dark side, so the lighting ratio is 2:1. If the difference is two stops, a quarter of the light, the ratio is 4:1; if it is three stops the ratio is 8:1 and so on.
- The maximum brightness range recorded by reversal films is 32:1 with full detail throughout; monochrome negatives will record around 128:1 (seven stops); colour negatives can record 128:1 in terms of detail (note that the colour begins to distort at the extremes of this range). CCD and CMOS sensors in digital cameras and backs capture a greater dynamic range than most colour films, an area array recording up to 250:1, a trilinear array 712:1 or nine stops.
- When addressing the lighting contrast, consider the detail required from the brightest highlight to the deepest shadow, as well as the reflectance range and the lighting ratio in relation to your film, digital sensor and printer.
- The colour temperature of the light source affects the colours of the final image. If you use film, you can measure the colour temperature and adjust the colour balance using filters. Digital cameras provide auto white balance or have presets such as ‘tungsten’, ‘fluorescent’, etc., and most accurately for controlled work ‘custom balance’.
- When you work on location with mixed lighting conditions, you can filter one light source to match the other. If you work on interiors, you may relight the interior with flash.
- When a studio set-up is designed to mimic a particular location the lights should be motivated – that is, they should share the qualities of the lights they are intended to emulate, and be sized, positioned and coloured accordingly. Lighting to supplement or enhance location lighting should be justified – designed to share the qualities of existing lighting in the home, office, shop, club, hotel, restaurant, factory and so on.
- There are several techniques for portrait lighting. Most straightforwardly and flatteringly, use a medium light source for portraits and check the distribution of light across the face. If you place the light source around 2–3 m away from the subject the lighting will be reasonably even across the subject. You may need additional lighting for fill-in, to control the background lighting, or introduce a ‘backlit’ appearance. Expose for the face.
- Use lighting techniques to balance foreground and background lighting, or relatively darken the background by using flash lighting of the foreground to give a dramatic effect.
- For interior location lighting you can use monolights as the principal light source, with umbrellas or softboxes (or you can bounce the light). Match the exposure to room lights to retain the atmosphere of the room.
- You can achieve excellent lighting using flashguns if you work out how to control the flashlight in relation to the ambient light. You can balance the lighting of the subject and the background indoors or outdoors using fill-in flash, etc.
PROJECTS
1 To control lighting you should be able to identify the lighting used in existing photographs. It is very good practice to collect images from publications – magazines, books, exhibition catalogues and brochures – to analyse then inform and influence your own practice. Seek out three photographs representing the genres and styles you most admire and identify the lighting in each. List the lights involved and make a lighting diagram. By looking carefully at the quality of the shadow edges, the direction in which they are cast, the position and shapes of any highlights, you should be able to recognize the size, angle and relative brightness in stops (lighting ratios) of the main light, as well as identify any fill, back and background lights employed.
2 Practising the styles of the most admired photographers and artists is invaluable in mastering lighting and in acquiring the skills to create innovative lighting techniques of your own. Replicate the lighting of one of the images you most admire. Select a photograph which you can most readily emulate; if it is a portrait, still life or landscape ensure that you have appropriate people and places available to you. Equally, select an image which has been lit, in your estimation, by lights which are available to you or which you can emulate with the kit at your disposal. Use a digital camera both to record the image and to record the lighting set-ups you create.
3 Balancing flash and available light is a key skill in the control of light. Try the following exercise to see how combinations of flash and ambient light can be determined by careful combinations of aperture and shutter speed. Use flash (either a flashgun or a flash kit) in the foreground of a room, which includes a window. Use a digital camera on a tripod and take notes of each setting. Set and position the flash to enhance the available light – perhaps by bouncing from a wall, ceiling or by using an umbrella or softbox. Next balance the flash to the lighting outside the window by matching its output to the aperture and shutter speed required for the view outside. Increase the shutter speed one stop at a time and note in the images the gradual darkening of the exterior, as well as the diminution of the interior room lights. Decrease the shutter speed to see the gradual lightening of the exterior scene and the increase in the influence of the room lights. Finally, filter the flash to match the interior lights.