![]()
Your First Bite of Raspberry Pi
This chapter is where we finally get our hands dirty. If you decided to skip the introduction in your eagerness to get up and running, that’s fine; you won’t have missed anything critical for this chapter. However, make a note to pay the introduction a visit in the not too distant future as it gives you a lot of background on the Pi and what makes it so special.
Now, back to dirty hands! We are going to start off by unpacking the Pi and going through the list of things that you need to actually get it up and running. Once we’ve hooked everything up, we’ll then need to sort out something for it to run—in this case, Raspbian Linux (more on this a little later). Once we get Raspbian running, we still need to configure it and some of the options are a little technical and Linux-specific; but don’t fret, we have you covered there, too. To round off the chapter, we will bask in the glow of the Raspbian desktop before heading off to Chapter 2 to see what we can actually do with it.
Your Freshly Baked Pi Arrives
Okay, so the postman has just dropped off your long-anticipated package, and after eagerly ripping away the padded envelope you’re left with a little box, (little being the operative word). You simply can’t help but look into the depths of the envelope to see if there is perhaps something lingering at the bottom. Failing to find anything with a visual inspection, you’ll no doubt proceed to the old faithful approach of turning the envelope upside down and giving it a bit of a shake. Although you might shake loose the packing sheet (somehow they always seem to super glue themselves to the inside), you won’t find anything else.
When you order a Raspberry Pi, this, dear reader, is all that you’re going to get (see Figure 1-1).

Figure 1-1. What falls out of the envelope
WHY A PICTURE OF JUST A BOX?
The honest reason is because when this is all that turned up, our first thought was that something must have gone missing. Yes, the site tells you when you order that this is all you are going to get, and it really makes perfect sense.
We want to emphasize that this is all you get, and it’s not enough to get your Pi hooked up and in business. You will need other bits and pieces (some or all which you might already have), and it’s important to highlight it right at the beginning. In the next section, we will cover the kit you actually need to get started.
You might spot the big label at the bottom that (in big bold letters) says GETTING STARTED. It also provides the address of the Raspberry Pi website with a direct link to what you need to get started. Not too challenging, you might think, assuming that you actually looked at this side of the box rather than simply ripping it open to get at your new toy. We would love to say that the first thing we did was visit that website, but we were somewhat overexcited about seeing a Raspberry Pi with our own eyes. Admittedly, the complete lack of any writing on the other side of the box was probably a dead giveaway that we were missing something important, but we were somewhat preoccupied with showing everyone in the office just how small a Raspberry Pi actually is. Believe it or not, we have company in the fail corner; another technically savvy new Pi owner converted his box into a Pi stand and missed the label altogether (and his packing sheet was MIA for nearly three weeks).
Unsurprisingly, going to http://raspberrypi.org/downloads/ is actually a very good place to begin your journey, and we will be heading there shortly. If you have yet to order a Pi (or are waiting for it to turn up in the mail), Figure 1-2 shows one sitting next to a mouse.

Figure 1-2. A Raspberry Pi next to an average-sized mouse
Even though the size of the Pi is well known and it comes in such a small box, it isn’t until you actually hold it in your hands that you realize how small it truly is! After “aw-ing” to ourselves (and anyone else who sadly for them happened to be within earshot), we figured it was time to get the show on the road.
And that’s where things came to a somewhat abrupt halt. We had the Pi, but it had only just dawned on us that we didn’t have the faintest idea what we actually needed to make it go. Even though we’re not exactly new to all this, we let ourselves get caught up in the moment and for whatever reason hadn’t considered that the Pi would need anything special (or at least something that your average geeky type person wouldn’t have hanging around the house).
If you’re not equipped with a cupboard of odds and ends straight out of Dexter’s lab, you might need to pick up a few things. Fortunately, they are all easy to find, and you should be able to pick up everything you need at your local computer shop. If you don’t fancy going on a treasure hunt, many companies are offering starter kits that come with everything you need. Because these kits are rapidly changing, the best way to find what’s available is to go online and search for “raspberrypi starter kit”.
![]() Note Although we only cover HDMI in this book (so it’s the only display in the list), it is possible to use different types of display such as DVI, composite, or SCART with appropriate cables or adapters.
Note Although we only cover HDMI in this book (so it’s the only display in the list), it is possible to use different types of display such as DVI, composite, or SCART with appropriate cables or adapters.
List of Ingredients
To bake your Pi to perfection, you’re going to need the following ingredients:
- Raspberry Pi
- Micro USB lead (for power)
- USB power adapter (also for power)
- HDMI lead: Type A to Type A (to connect to your monitor or TV)
- HDMI display
- SD card: 2 GB to 64 GB (for storage); 8 GB minimum recommended
- SD card reader
- USB keyboard and mouse
If you happen to have an Android phone or a Kindle sitting about, chances are good that you’ve got a lead that you can reuse to power the Pi. This lead isn’t actually used for transferring data, and although you can draw power from a USB port (you can plug it into your main PC or laptop), you can’t use the USB connection for anything else. The different types of USB connectors are hard to describe if you haven’t already seen one. Take a look at Figure 1-3 for some examples.

Figure 1-3. Different types of USB connectors
The connector you’re interested in is the first one on the left, known as a micro USB. Be careful because on quick inspection, a micro USB plug can easily be mistaken for a mini USB plug (second on the left). The last thing you want to do is make a special trip to the store and then come back only to find out that you picked up the wrong one!
You might actually be able to get away with this one. A normal USB port can power a Model A Pi (the one without built-in Ethernet), and for testing you can probably get away with doing the same with a Model B. That’s all well and good as long as you want to have your Pi sitting next to your PC, but chances are you want it to be somewhat independent. Even if you do plan on using it in the same location, powering it from your laptop can prove to be problematic when you want to take your laptop somewhere, but your Pi is busy doing something and you really don’t want to unplug it.
Fortunately, the sheer number of devices that adopted USB as a means of charging means that you can get main adapters really cheaply and easily. As far as which adapter to get, that really comes down to personal choice. However, as the Model B requires 700 ma and you always want to have a bit of room for expansion, you probably should aim to get an adapter that can provide at least 1000 ma (or 1 amp). From our highly scientific tests (wandering around numerous shops and squinting at packaging labels), it seems that 1000 ma is actually the most common rating. We did come across some rated at 500 ma and although that’s enough for most USB devices (and even the Model A Pi), it isn’t really enough for your needs.
Over the past few years, HDMI has become the de facto standard in connecting a myriad of devices to both monitors and TVs. This is really handy because it means that if a device supports HDMI, it can be easily connected to any display that supports it. This might not sound all that impressive, but it wasn’t too long ago that TVs and monitors were very separate things and usually there was no direct way to connect, say, a computer to a TV or a VCR to a monitor (although interestingly if you go back 20 years, all home computers connected directly to the TV (for example, the Commodore 64 or Spectrum). Of course, you could get special hardware, and some higher-end devices did offer a range of different connectors, but as a rule, the two worlds didn’t really mix.
Fortunately, the Pi uses HDMI, so we can ignore the irritations of the past. To connect your Pi to a display, you will need a “Type A to Type A” lead. Type A is the size you will find in the back of your TV or monitor; all you have to do is find a lead for connecting some device via HDMI to a TV and where both ends are the same size. Most consumer electronics use Type A, so if you have an Xbox 360 or your laptop has HDMI, chances are you already have a lead of the correct type.
You probably saw this one coming, but you’re going to need some sort of display that supports HDMI. As it has been widely adopted over recent years, practically every new TV comes with one or more HDMI ports. These days, it’s fairly common to see three or four ports on a TV because you’ll need that many to hook up all your new digital devices.
It’s pretty easy to determine whether your TV or monitor supports HDMI. All you have to do is look for a physical HDMI port. You are much more likely to find it on your TV rather than your monitor, but many of even the more basic monitors these days seem to support it.
In our case, it turned out that the aging monitor didn’t support HDMI, although the TV in the living room did. Of course, it being the main TV meant that people wanted to watch TV on it and admittedly we were not looking forward to sitting cross-legged on the floor in front of a big TV, trying to convince a Pi to boot. In the end, we decided to get a new monitor that supported it. Although we could have bought a DVI converter, we decided we couldn’t pass up on the opportunity to get a new shiny toy.
If you can’t reuse your TV or computer monitor, you should be able to get your hands on a basic TV or monitor that supports HDMI quite easily. As mentioned earlier, the Pi does have composite output as well as HDMI, so you could certainly use that if you prefer.
Most computers use a hard drive of some sort as their primary form of storage. Even laptop-sized disks are larger than the Pi, and although the newer solid state disk (SSD) models draw very little in the way of power, they would certainly drastically increase the amount of power your Pi would need. Fortunately, we have an alternative. Rather than using something heavy duty like a hard disk, we can instead borrow technology that cameras have been using for many years: flash memory. Although the cards can’t match a hard disk for space or for performance, they are exceptionally good for power usage and despite being smaller than their erstwhile cousins; 64 GB (the maximum for your Pi) is still a reasonably impressive amount and probably more than you will need for your Pi.
SD cards are standardized so there isn’t too much more to say about them. You do want to get a high-performance card if you can (often referred to as Class 10) but they ultimately all do the same job. That said, we have heard of some SD cards that haven’t worked with the Pi, but if you stick to a well-known brand you should be fine.
As there are lots of different types of memory cards floating about these days, Figure 1-4 shows what an SD card actually looks like.

Figure 1-4. SD card with micro SD and adapter
The card on the far left is your typical SD card; on the far right is a micro SD card. They have become pretty popular for use in smartphones (particularly Android-based phones), and because most phones come with small cards (in terms of storage space), it’s not unusual to either buy a larger card or have one thrown in as part of your phone package.
If you happen to have one of these floating about, you can use it with your Pi by using a micro SD adapter (shown in the middle of Figure 1-4). They tend to come with micro SD cards because often one would use the micro SD in a phone but the laptop would only have the full-sized SD card. We haven’t seen the adapters for sale individually as they are basically just a physical adapter, but they do tend to end up in the strangest of places so you never know!
Now that you have your SD card, you need some way to actually use it. The Pi has you covered and has an SD card slot built right in. However it doesn’t actually have any other storage on the device, so it’s effectively a blank slate until you insert an SD card with something useful (like Linux) installed on it. The thing is, to put Linux on the card, you need a device that’s already up and running that can also read and write to the card. This is a classic Catch-22 situation. Even if you could borrow someone else’s card with Linux already installed, you couldn’t simply swap out the cards because as soon as you do that, you won’t have Linux anymore!
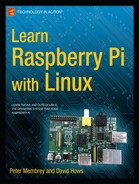
Again, thanks to the proliferation of digital cameras, many computers come with card readers built in. Many (often dubbed as media PCs) come with a whole range of slots for various different card types. So chances are you already have a way to read the card. If you don’t have a reader already, you can pick up any cheap multicard reader from your local computer store. They’re generally inexpensive and will support lots of different types of cards. Just make sure that it has an SD card before you hand over your hard-earned cash! For reference, the adapter we are using looks like the one in Figure 1-5.
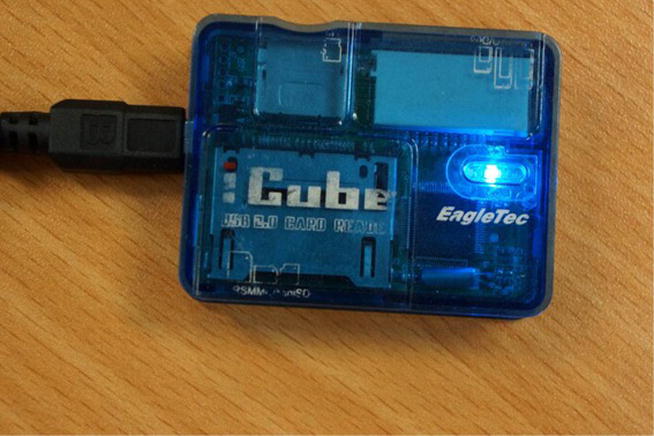
Figure 1-5. Multicard reader
Last but not least is the good old keyboard and mouse. Advanced as the Pi is, it doesn’t yet have telepathy so you’re going to need some way to control it. This is common sense, but with modern computers often coming with a wireless keyboard and mouse and a fair few of those using Bluetooth with no USB adapter (even some with an adapter have been known to cause problems), you might find that your current keyboard and mouse just won’t work with your new toy (no Bluetooth on the Pi, I’m afraid). There’s really no need to go into any detail here as any keyboard and mouse will do, and this is mostly a reminder to check what you actually have before you go out to buy your Pi-making ingredients to avoid untold frustration when you get home and find you’re completely stuck.
Whew, We’re Done!
Finally we have everything we need! Hooking all this stuff up to your Pi is very easy, especially as each item has a unique shape so it will fit into only one slot (see Figure 1-6 for the finished Pi).
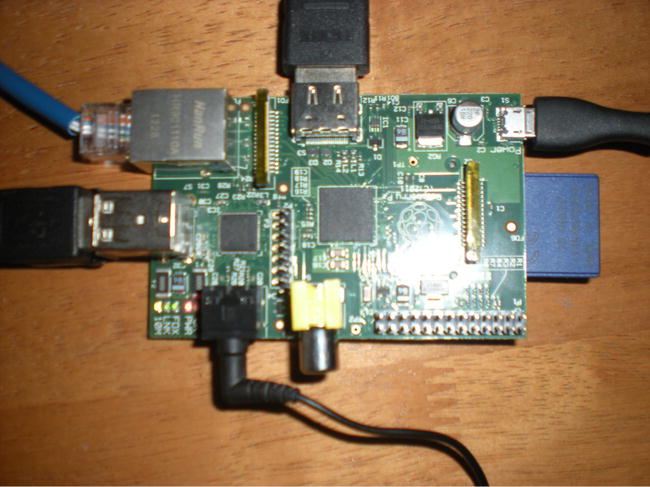
Figure 1-6. A fully loaded Pi
If you put everything together, plug in the power, and turn on your TV you should see… a completely black screen.
Don’t Panic!
When your PC or laptop boots, there is a piece of software called the BIOS that kicks everything off for you. It tests the memory, sets up a basic display, and allows all your devices to initialize. On some machines (notably those from Apple) the machine will have an EFI instead of a BIOS. For all intents and purposes (at least from our point of view), they’re basically equivalent. Regardless of the technology used, it is this system that finally hands control over to your bootloader, the piece of software responsible for starting your operating system.
BIOSs are by nature very noisy, and if you get something wrong it will either bleep a lot (with some magic number code that you can only find in the BIOS manual that you threw in the bin 3 years ago) or display some helpful yet cryptic message on the screen. In short, it may not do what you want, but at least you know that your computer is still alive. Although it has a little red LED “on light”, the Pi won’t do a thing unless it has a bootable operating system on its SD card. If you were expecting some sort of splash screen or other sign of life (hands up; we know we were), you’re out of luck (and probably thinking you have a dead Pi).
Now that you know what you need to restore the Pi to life (a bootable operating system) it’s time to move on to Phase 2 of our master plan and get us some Linux!
Linux
As this is a book for beginners, we’re going to take the time to talk a little about Linux, where it came from, what’s special about it and some of the little gotchas that trip people up from time to time. If you already know this stuff (or simply don’t care), feel free to skip to the next section “Downloading Raspbian.” For those who want a quick refresher, just keep on reading.
What Is Linux?
Ah, this simple question opens a big can of worms that many people go out of their way to avoid. The reason is that in technical terms, Linux means one thing but in general speech, it tends to mean something else. When talking about operating systems in general, we see Microsoft Windows and Apple OSX to be discrete, whole things. If you say “I run Windows,” everyone knows what you’re talking about. With Linux, it’s a bit different.
Linux is just an operating system kernel, which means that it handles all the low-level bits and pieces such as handling device drivers, and providing easy access to networks and hard disks. What actually makes Linux usable is all the software that is wrapped around it. Not much trouble there, but it starts to get complicated when you realize that people have differing opinions about what software should be wrapped around it. There are no simple or minor opinions when it comes to computing!
As this software is open source, and anyone can put it together in pretty much any way they like, people have been able to build their own Linux distributions. This is an operating system with Linux at its core, but with the surrounding ecosystem set up to match the goals of the people who built it. For example, Red Hat Enterprise Linux (RHEL) is built to be robust, supportable, and stable over long periods of time. Fedora, on the other hand, is released every 6 months or so and has the latest and greatest of everything in each build. Gentoo requires that you build your software from source (so it can be completely optimized for your machine), and Debian goes to great lengths to remain stable and secure at the cost of introducing new features.
OPEN SOURCE
In the olden days, when computers cost millions of dollars, it was the machine itself that sold, not the applications that ran on it. It was common practice for a company to write software for you, in order to get you to buy their machine. It wasn’t until computers became commodity items that suddenly the value was in the software, and companies moved to start protecting the software they’d written. One way to do this is to provide the software ready to use without the source code (which is effectively the blueprint on how to make the software). This meant that you couldn’t change the software or make improvements to suit your changing needs.
Many people believe that software should always come with the source code so that people can make changes. Open source revolves around the idea of people being able to freely exchange, modify, and improve software collectively. This can only be done when the source code is provided freely and permission is given (through an open source license) to make those changes.
Entire books can and have been written on this topic, but you can find a presentation on this topic that Peter gave at his university last year: http://www.youtube.com/watch?v=c-1LQIGh6cI
So which one is best? Well, that depends on your needs! There’s no perfect distribution; just the best fit for a particular job. For the Pi, the official and supported platform is Raspbian, which is based on the Debian distribution. Because it is supported and because it’s the easiest to use (and quite likely the fastest to get updated and fixed when things go wrong), we’re going to stick to using Raspbian in this book. If you do fancy something a little different, Brendan Horan’s upcoming book (also from Apress), Practical Raspberry Pi will show you in great depth how to install Fedora and (if you’re feeling particularly brave) how to make a custom build of Gentoo!
When the Linux kernel first debuted in the early 1990s, no one really appreciated the huge impact it would have on the world of computing. Open-source software had already been around for a long time before this, and countless tools for the UNIX platform had already been released (such as the awesome GCC compiler). However, they were just tools and software packages. They still needed a proprietary operating system to run (the only kind available at the time). To be fully compatible with the open-source ethos, what was needed was an open-source kernel to power these systems. and this is what Linux delivered. While many will talk about how this brought freedom and hope to the world of computing, we will save you from that particular lecture (although admittedly there is quite a bit of truth to it) and simply say that it was the Linux kernel that really brought open source to the eyes of the general public.
Now that the world has Linux, what exactly can we do with it? Almost anything we like—such as installing it for free on our Pi.
At last we’re off to http://raspberrypi.org/downloads/ to get our hands on Raspbian. Not only does the page contain links for the download we’re looking for but it also has links for various useful tools as well as links for other prebaked Linux distributions for the Raspberry Pi. We touched on this lightly in the previous section, but if you’re thinking about getting one of the more exotic distributions, take a look at the “Why Raspbian?” sidebar.
WHY RASPBIAN?
As you can see from the download page, there are numerous distributions to choose from, and especially if you’ve used Linux elsewhere you might be tempted to pick something other than Raspbian. However, before you download that exotic distribution, you should know that the majority of people using a Pi run Raspbian—and as such most of the support, blog posts, and tutorials (not to mention this book) are all based on it. This means if you pick something else, you might find it much harder to get help if something doesn’t go quite according to plan.
The other more subtle issue is that the Raspberry Pi is an ARM-based device. It doesn’t quite work the same way as your PC does. For example, the Pi doesn’t have a PCI bus, so any tools that expect there to be one (and there are more than a few) just won’t work. There are also quite a few gotchas for these other distributions, and they might not be as well maintained as Raspbian. In short, you will be taking on much more work if you don’t pick Raspbian to start out.
Traditionally, a Linux distribution will come on a set of CDs or DVDs. When you download your distribution of choice, you would download a set of images. These images are basically a clone of the real thing. The idea is that you take the image and once you write it to a CD, that CD will be identical to the one the image was originally cloned from. Raspbian (and the Pi in general) is a bit different. It doesn’t have a built-in CDROM or even a floppy drive. Instead of downloading an image of a CD or DVD, we’re going to download an image of an SD card that contains Raspbian all set up and ready to go.
You can download Raspbian either directly from the site (there are numerous mirrors) or via BitTorrent. BitTorrent can sometimes be faster, and it helps take some of the load off Source Forge. However, there are some places where you probably shouldn’t be firing up a BitTorrent client (i.e., at work), and some connections perform very badly due to the way BitTorrent works (such as mobile 3G). If in any doubt, just select the direct download. We want the mainline version of Raspbian (Raspbian Wheezy), which is the first one in the list of available distributions for download.
Getting Raspbian onto Your SD Card
Getting Raspbian onto your SD card isn’t as easy as simply copying across the file. Remember we downloaded an image that is a direct representation of what should be on the card. If you just copy the image onto the card, it will still just be a card with a copy of the Raspbian image on it. What we need to do is write the image directly to the card, and for that we’re going to need some of those handy tools we briefly mentioned earlier.
![]() Note The image file you downloaded is a compressed ZIP file. On Windows 7, double-clicking this file will open a Compressed Folder. You will need to copy the image file itself to another location such as My Documents. On the Mac, simply double-clicking the file will extract the image and place it in the Downloads folder.
Note The image file you downloaded is a compressed ZIP file. On Windows 7, double-clicking this file will open a Compressed Folder. You will need to copy the image file itself to another location such as My Documents. On the Mac, simply double-clicking the file will extract the image and place it in the Downloads folder.
The tool recommended for writing images on Windows is the somewhat predictably named Image Writer. You can find the link on the Raspberry Pi downloads page; you want the binary version highlighted in Figure 1-7.

Figure 1-7. Download the binary version of Image Writer
Depending on what software you have installed on your PC, you will either be able to open the download as a folder or open it in your ZIP program of choice. Either way, you need to extract all the contents before you can run the application. If you are just using the standard Windows tools, when you double-click the program (Win32DiskImager), you will be prompted to extract the contents to another location.
- Select Extract All and make sure that Show Extracted Files When Complete is checked on the next window.
- After you press Extract, you should see the same folder layout as in the ZIP file.
- Double-click the program in this new folder and you should be able to open the tool. Because the program isn’t digitally signed, you will get a warning like Figure 1-8.

Figure 1-8. Windows will warn you when you run Disk Imager
- Because the tool needs low-level access to perform its main function (i.e., writing directly to disk-based devices), Windows will warn you that the program wants to make changes to your computer. Click Yes to continue.
- We’re not sure if you will see the message shown in Figure 1-9, but it happened on both the machines we tested it on. In both cases, it didn’t seem to affect the program, but just in case you do see it, we thought you’d like to know you’re not the only one!
Figure 1-9. Error occurred when opening Image Writer
 Note Image Writer will look only for cards to write to when it starts up. That means you’ll need to have your SD card in the slot before you start the application; otherwise, you will get an empty list, even if you later insert the card.
 - In our case, the device we want to write to is drive G:, but you should choose the right one for your system. If the Device drop-down menu is empty, try closing Image Writer and reopening it as sometimes it seems to miss things on the first try. It goes without saying that you should make sure that you’ve actually picked the right drive—the last thing you want to do is accidentally erase the card from your camera and all those special family moments that you’ve captured over the years!
- Once you’ve selected the right device (take a quick look in My Computer if you’re not convinced) and you’ve picked the Raspbian image by browsing to it, click the Write button and sit back and relax. It does take a fair bit of time to write the image (it depends on how fast your card is, among other things). However, it gets faster as it goes along (it’s mostly writing zeroes at this point), so it will probably be done within a few minutes. Figure 1-10 is an action shot of Image Writer during our tests. From the screenshot, you can see that the image we’re writing to the SD card is the current (at least at the time of writing) Raspbian release.

Figure 1-10. Action shot of Image Writer writing the image
- Once complete, take the card out of its slot and feed it to your Pi.
You’re ready to rock and roll! To get started, flip through to the section, “First Boot,” to get the show on the road!
![]() Note If you look closely at the filename in Figure 1-10, you can see that it has an extension of .img. One of the more common mistakes when writing an image is to accidentally write the ZIP file rather than the decompressed image file (after all, they have almost identical names). When you come to boot up your Pi, if nothing happens, come back and double-check that you picked the right file.
Note If you look closely at the filename in Figure 1-10, you can see that it has an extension of .img. One of the more common mistakes when writing an image is to accidentally write the ZIP file rather than the decompressed image file (after all, they have almost identical names). When you come to boot up your Pi, if nothing happens, come back and double-check that you picked the right file.
If you are using a Mac, we want to show you how simple it is to write an image to your SD card. Alas, we can’t do that because there isn’t a simple, easy way to do it. Disk Utility, which excels at so many other things, simply does not know how to handle our standard image files. We tried converting it to a .dmg file (the native image format for a Mac), which didn’t work, either. We also looked at online tools that you might have been able to download to help with the problem, but we didn’t find anything that made the task significantly easier than doing it by hand in the first place.
So we’re going to get our hands dirty on the command line a little bit earlier than planned. We’re not going to go into too much depth about what it is we’re actually doing because most of these commands you’ll see a little later in their Linux incarnations. For now, you’ll just have to trust us.
Finding the Terminal
First, we need to open the terminal. You can find it in the Utilities directory under Applications. To put the following into context, we end this section with a complete transcript of all the commands that we used. The process is reasonably straightforward; it just has a fair number of moving parts.
We opened the terminal and now we need to use sudo to become the root user, the equivalent of Administrator on a Windows machine.
Now, tinkering with low-level devices is dangerous for security reasons (you don’t want a virus being able to write directly to a hard disk, for example), so a normal user is not allowed to issue commands at that level. Because we need to write our Raspbian image directly onto an SD card, we simply have no choice: we need direct access to the card. Fortunately, root has effectively unrestricted access to the machine, so as root we can write the image to the card. The command we need to use is this:
sudo –i
This command opens an interactive prompt as the root user and gives “super user” privileges. You can use sudo to execute commands directly, but because we are going to be executing a few of them, it’s more convenient to do it this way. sudo will then prompt you for your password (the one you normally use for your user account). Once sudo can confirm that it really is you sitting at the keyboard, you will end up at a root prompt.
![]() Caution We now have permission to do anything we like on the system. And although that means we can now make our image, it also means that we could really mess things up if we aren’t careful. Under UNIX, it is assumed that root knows what it is doing and there is very little in the way of safeguards. Be very careful when running any command as root, double-check it (and then do it again), and only when you’re completely sure should you hit the Enter key. As soon as you’re done, you should also close the terminal window, just in case.
Caution We now have permission to do anything we like on the system. And although that means we can now make our image, it also means that we could really mess things up if we aren’t careful. Under UNIX, it is assumed that root knows what it is doing and there is very little in the way of safeguards. Be very careful when running any command as root, double-check it (and then do it again), and only when you’re completely sure should you hit the Enter key. As soon as you’re done, you should also close the terminal window, just in case.
Using the Terminal to Write the Image
Okay, so what now? One of the challenges with writing to the SD card is to know which device on the system that card actually is. You don’t want to accidentally mistake your main hard disk for it because that would have some rather unpleasant consequences. There are generally some assumptions you can make (for example, we know that /dev/disk0 is usually the system disk, so you never ever want to write to this), but in order to limit the risk, we’re going to do this one by the numbers.
First, make sure your SD card is not attached to your Mac and then run the mount command like so:
mbp:∼ root# mount
/dev/disk0s2 on / (hfs, local, journaled)
devfs on /dev (devfs, local, nobrowse)
map -hosts on /net (autofs, nosuid, automounted, nobrowse)
map auto_home on /home (autofs, automounted, nobrowse)
mbp:∼ root#
Now, you will probably see something similar to this, but it might be a little different. We can ignore devfs and the map lines as they’re really just parts of the operating system. What we’re interested in here is the first line that identifies /dev/disk0s2 on /. This is the system disk, and we want to make sure we don’t touch this one. You might have additional entries in your list if you have any network drives mapped or disk images attached. That’s okay because we’re not really looking for anything in particular at this stage; we just want to establish a base line for your system.
Okay, now it’s time to slot in your SD card. SD cards come preformatted for use in cameras (although these days many cameras will reformat them, anyway) and so you should see it show up in Finder under Devices. Our card looked like Figure 1-11.

Figure 1-11. What you’ll see in Finder after inserting your SD card
As the card has been automatically mounted, we can now go back and rerun our mount command to see how things have changed. Here’s what we got when we reran it:
mbp:∼ root# mount
/dev/disk0s2 on / (hfs, local, journaled)
devfs on /dev (devfs, local, nobrowse)
map -hosts on /net (autofs, nosuid, automounted, nobrowse)
map auto_home on /home (autofs, automounted, nobrowse)
/dev/disk2s2 on /Volumes/UNTITLED (msdos, local, nodev, nosuid, noowners)
mbp:∼ root#
What we care about here is the addition of a new disk, in this case disk2. We can see from where it is mounted (/Volumes/UNTITLED) that this is the disk we are interested in. So now we know where we want to write our image.
![]() Info BSD systems split disks out in slices. In our example, the mounted file system was on disk2s2. This translates to disk2, slice 2. This allows you to reference a slice directly, but for our purposes we want to write to the device. So in our case we will be writing to /dev/disk2.
Info BSD systems split disks out in slices. In our example, the mounted file system was on disk2s2. This translates to disk2, slice 2. This allows you to reference a slice directly, but for our purposes we want to write to the device. So in our case we will be writing to /dev/disk2.
There is one little wrinkle, though. We can’t write to the SD card directly while we have it mounted and usable. If we eject it from within Finder, it will not only unmount the filesystem but it will also eject the device as well. That doesn’t help us because we still need the device to be present in order to write to it. To solve this issue, we will unmount the filesystem manually using a Mac-specific command called diskutil. The Mac does have the general UNIX umount command (which we’ll cover in later chapters), but if anything on your Mac happens to be looking at the SD card, umount will fail and claim that the device is busy. diskutil is aware of this and can usually unmount the device without any problems. We ran the following command:
mbp:∼ root# diskutil unmount /dev/disk2s2
Volume UNTITLED on disk2s2 unmounted
mbp:∼ root#
So we gained super-user privileges, we isolated the device that we want to write to, and we unmounted the filesystem so that we can write directly to the card itself. All we have to do now is actually go ahead and do the writing!
The tool of choice for this task is called dd. This tool is a bit old school in that it only cares about reading from a device and writing to a device. It has no interest in filesystems nor is it aware of any of the subtle differences between a hard disk and an SD card. It just reads and writes without caring where it reads from or writes to. This is a fundamental UNIX principle that we will be revisiting in later chapters. For now, we’re going to take advantage of this to make an exact copy of our image file on the SD card.
dd only needs to know two things: where to read from (the if= argument) and where to write to (the of= argument). We figured out the writing bit (it’s going to be /dev/disk2), but what about the source? If you followed the earlier instructions, you should have the image file sitting in the Downloads directory in your home area. The easiest way to get the information we need into terminal is to type this in:
dd if=
Then go to your Downloads directory in Finder (or wherever you extracted the image file to), click and hold on the image file, and then drag it on to your terminal window. This should then paste in the full path for you without you needing to type anything in. This should mean you end up with something pretty similar to this:
dd if=/Users/myuser/Downloads/2012-08-16-wheezy-raspbian.img
Now we have our input file specified, all we need to do is specify where exactly we want dd to write it. Thanks to our earlier experimentation we know that this will be /dev/disk2. We’re also going to add bs=512 which lets dd write the image in bigger chunks (meaning you won’t have to wait four hours for it to complete). So the full command we need for dd looks like this:
dd if=/Users/miggyx/Downloads/2012-08-16-wheezy-raspbian.img of=/dev/disk2 bs=512
Running this command might take some time (hours, not seconds). The image is about 2 GB in size, and your average smart card reader is not particularly fast. With our USB adapter, our recent MacBook Pro took a good two hours to actually write the image. After coming back later, you should find that dd has completed its task and you’re back at the command prompt.
Okay, admittedly this wasn’t quite as simple or straightforward as writing the image on Windows, but if you look at everything we had to do, using the command line allowed us to express what we wanted in a very compact and precise way. This is something we come back to in Chapter 3, in which we look at the various benefits of learning to use the command line.
Here is the full transcript of the commands we entered in order to write the image to the disk. If something in our explanation didn’t quite click, or you’re not entirely sure what the end result should look like, you can use the following transcript as a reference to compare your version with ours:
Last login: Wed Sep 19 13:48:40 on ttys000
mbp:∼ pmembrey$ sudo -i
Password:
mbp:∼ root# mount
/dev/disk0s2 on / (hfs, local, journaled)
devfs on /dev (devfs, local, nobrowse)
map -hosts on /net (autofs, nosuid, automounted, nobrowse)
map auto_home on /home (autofs, automounted, nobrowse)

<<SD Card inserted>>
mbp:∼ root# mount
/dev/disk0s2 on / (hfs, local, journaled)
devfs on /dev (devfs, local, nobrowse)
map -hosts on /net (autofs, nosuid, automounted, nobrowse)
map auto_home on /home (autofs, automounted, nobrowse)
/dev/disk2s1 on /Volumes/UNTITLED (msdos, local, nodev, nosuid, noowners)
mbp:∼ root# diskutil unmount /dev/disk2s1
Volume UNTITLED on disk2s1 unmounted
mbp:∼ root# dd if=/Users/pmembrey/Downloads/2012-08-16-wheezy-raspbian.img of=/dev/disk2 bs=512
mbp:∼ root#
With our (painstakingly) prepared SD card, we can finally move on to the next step.
First Boot
Okay, that was a bit of a marathon, but hopefully it’s something you will only need to do once. Once you get the hang of it, it’s not so bad; it’s just that there are quite a few moving parts.
Armed with our freshly imaged SD card, we can at long last boot up the Pi. Plug in your keyboard, mouse, and monitor, and slot your SD card into your Pi. All you have to do now is attach the power lead and you’re good to go! All being well, you should see a screen like Figure 1-12.
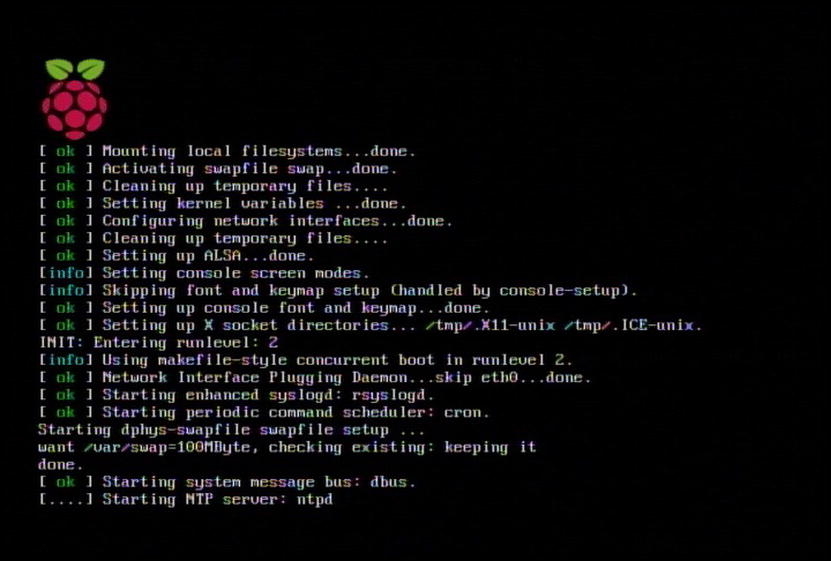
Figure 1-12. The Pi’s first boot—it lives!
If you can see something similar, congratulations, your Pi is up and running! If not, there are a few common things that might have gone wrong.
The first thing to check is whether your Pi has a nice red glowing power LED. Now we know this sounds obvious, and we know that it’s probably the first thing you checked, but not checking it is also the most common mistake to make. If your desk looks anything like ours, you will have a fair collection of cables draped about. It’s not too much of a stretch to see how you might have plugged in the wrong cable or that the cable you’re using isn’t actually plugged in to a live power source (some laptops, for example, turn off USB power when they go to sleep). Either way, this is what you should check first because if you did make a mistake, only you will know about it. This is much better than having an extended discussion on the forums trying to get help only to then realize that whoops! you forgot to plug it in.
The second thing to check is whether you have selected the right input on your TV or monitor. Most TVs have multiple inputs these days, and monitors often as not don’t default to HDMI (ours doesn’t), even if that is the only input signal they are receiving. Obviously, we can’t tell you exactly how to fix or check this one as it all depends on the equipment you’re using. However, it should be fairly easy to flick through the different inputs to see whether or not your Pi turns up. In one interesting case, even though on the TV the port clearly said HDMI2, the Pi was actually visible on HDMI3. We have no idea why, but had we thought to flick through the inputs before fiddling with the Pi, we could have saved ourselves a fair bit of grief.
The third thing to check is that the SD card is fully inserted into its slot. The Pi will quite literally do nothing unless it can find the card and boot from it, so if all you’re getting is a black screen, this could well be the reason. If you are sure the card is inserted properly, but you’re still not having any luck, it might be that something went wrong when you wrote the image to the card. In that case, flip back to the last section and have another go at writing the image to the card. If you still aren’t getting anywhere and you’ve checked that everything is all plugged in nicely, you have the right input on your monitor, and you have a happily glowing power LED, then it’s probably something more onerous. Unfortunately, without being there with you to look at your poorly Pi, we can’t really give any more specific advice. Fortunately, you’re not alone; there are lots of people on the Raspberry Pi discussion forums who are ready to help out. To visit the forum, go to www.raspberrypi.org and click the Forum link (just below and to the left of the Raspberry Pi logo). This will get you to the main forum page; the particular board you’re looking for is Basic Usage and Setup under Using the Raspberry Pi.
Configuring Your Pi
After the torrent of incomprehensible text (though we’re sure it means something to someone) you should end up at the configuration shown in Figure 1-13. This is where we’ll configure your Pi for general use so that next time you turn it on, you will be greeted with a nice desktop rather than some chunky text.
We are only going to cover the basic configuration options here (and you can always go back and change them once you’ve got your Pi up and running) as we want to get you in front of a working computer as soon as possible. To start with, ensure that your Pi is configured to boot to the desktop (select the boot_behavior option to make sure that the desktop will appear next time you boot your Pi).
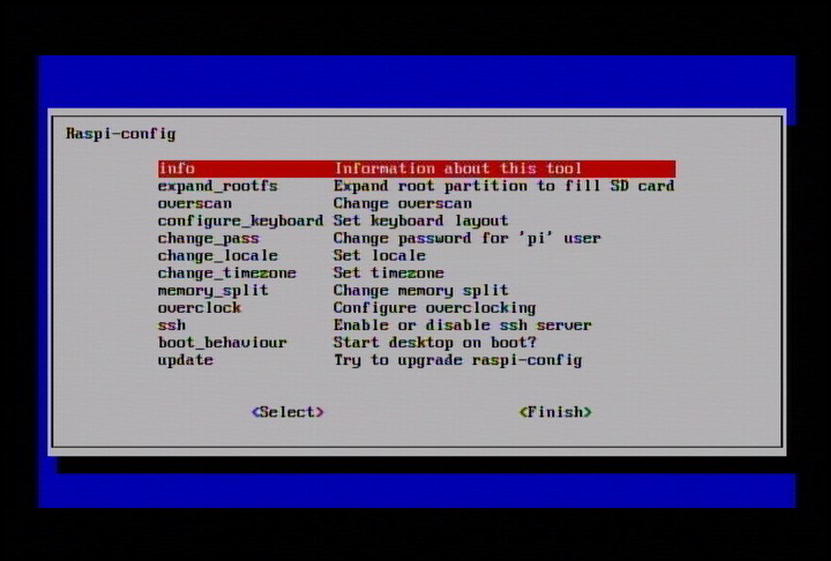
Figure 1-13. First boot: time to configure your Pi!
Expanding the Filesystem
The first option of interest is expand_rootfs, which, as the description suggests, will expand the filesystem to fill the entire card. The image we downloaded was around 2 GB after we decompressed it and this is what we wrote to our SD card. So although you might have an 8GB card or larger, you will be able to see only the first 2 GB of it. By expanding the filesystem, we can take advantage of all the space that you have available. This approach works pretty well because it means we don’t need a different image file for each disk size; we can all use the same small image and simply expand it to fit our needs. Using the arrow keys, move the bar down to highlight expand_rootfs and press Enter. You should see a window that tells you that the partition has been resized, and the filesystem will be resized after you next reboot. Press the Enter key to get back to the main menu.
Configuring the Keyboard
The next option of interest is configure_keyboard. By default, Raspbian assumes a UK keymap, but chances are you will want something else. Be warned, though, that Raspbian knows a huge number of keyboards, and the sheer quantity can be confusing. For instance, do you know if you have a generic 104 key keyboard or is it actually a 105 key version? We weren’t sure either, so we stuck with the default: the Generic 105 key (Intl) PC shown in Figure 1-14.

Figure 1-14. Choose your keyboard
If you can find your exact model, by all means feel free to select it. If you aren’t sure, you’re probably best off following our lead and sticking to the default. Once you have settled on your keyboard of choice, press Enter to move through to the next screen.
Now we get to choose which keymap we want to use. By default, it lists various UK keymaps (as shown in Figure 1-15), but if you aren’t lucky enough to own a British keyboard, move the bar down to Other, press Enter, and then scroll through the list to find something more suitable for your needs. Once you’ve found the right keyboard, again just press Enter to move on to the next screen.
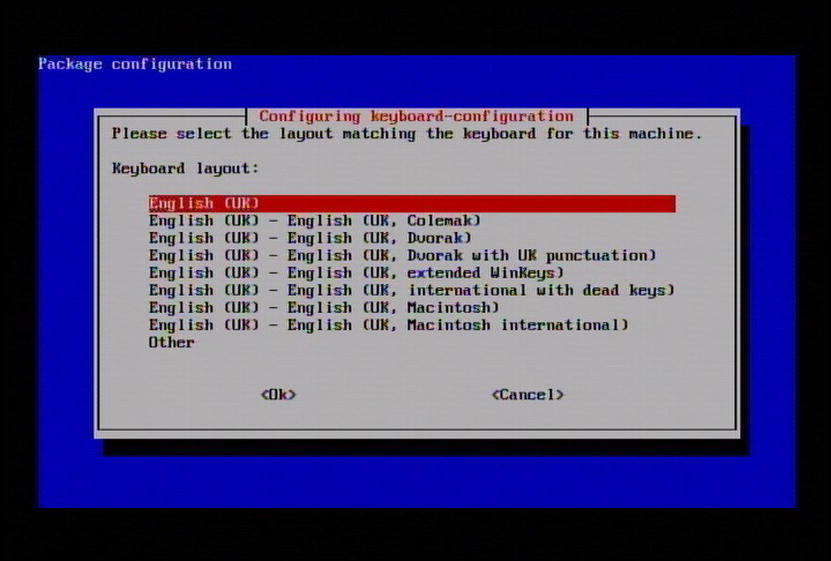
Figure 1-15. Choose your keyboard layout
If you’re not sure what to select from the menu (shown in Figure 1-16), you’re not alone. For most people, the keyboard defaults will be fine because they will include any special key combinations that your particular keymap already offers. This is one of those times when if you need to make a change, you probably already know why and what to choose. If you are in any doubt, just leave the default selected and press Enter. Now you will see another menu that looks suspiciously like its predecessor (shown in Figure 1-17), at least in terms of knowing what to pick. Again you probably already know if you need to change anything here; if you’re not sure, you should just select the default by pressing Enter.

Figure 1-16. Customize your keyboard configuration
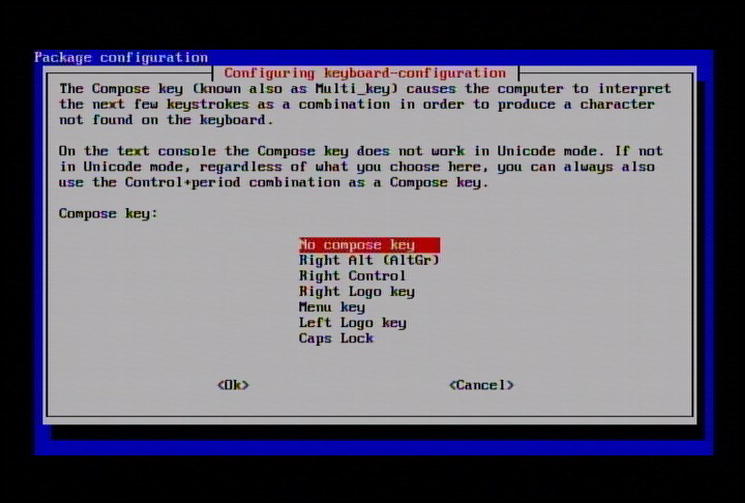
Figure 1-17. Customize your keyboard some more
The next menu (shown in Figure 1-18) only really means anything to old-school Linux users. Back in the day, if your GUI decided to crap out on you, you could effectively “reboot” the session by holding down Ctrl + Alt + backspace. As the GUI has become more stable, and Linux has become more mainstream, this feature is more often than not disabled. We haven’t had to make use of it for years, although we do happen to think it is quite useful. The default is No, and this is probably what you want. You can always go back and change this later if you find yourself craving this particular feature. To pick the default (and finally return to the main menu), just press Enter.
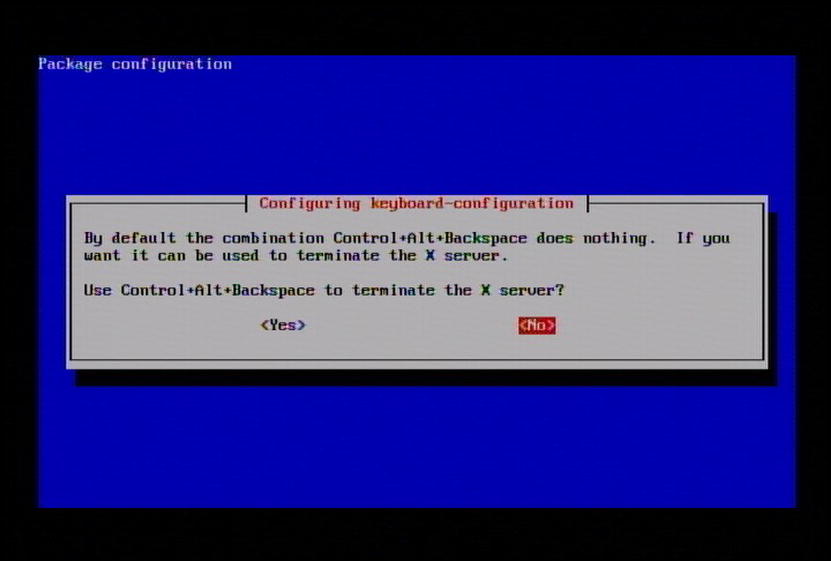
Figure 1-18. Do you want to enable the X server kill switch?
Changing the Password
Next we’re going to change the password for the pi user account. This is the account you’ll be using throughout the book, and for most people this will be the only account you’ll ever need on your Pi. At the moment, although the password is set to raspberry and it is the default, it means that anyone can log in to your Pi. While securing your Pi against unauthorized intruders is probably not top of your list of priorities, it is still good practice to change this just in case. Later on, you might make your Pi available via the Internet and in your excitement you might forget that you didn’t actually get around to changing the password. Bad things will happen. So let’s take the opportunity to make the switch now. Highlight change_pass and press Enter, and you’ll see something like Figure 1-19.
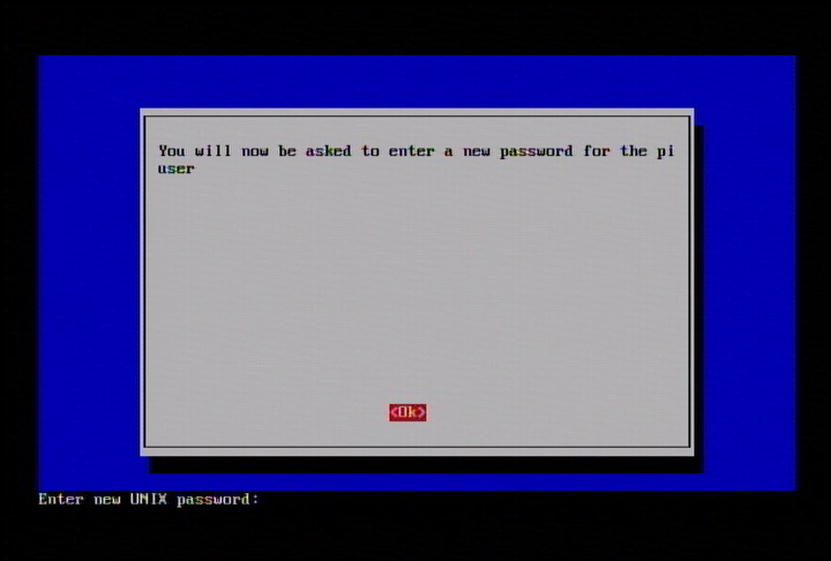
Figure 1-19. Time to set your password
The configuration tool has executed the standard passwd command, which is why you’re looking at a text prompt rather than a prettier menu. Just enter your new password (remember that it is case-sensitive: HeLLo is not the same as hello or Hello) and press Enter. For security reasons, the password won’t be shown on the display and it won’t show any stars to let you know you’ve actually typed something. You will then get prompted to enter your password again; after you press Enter, you will be back at the configuration menu. (Getting a sense of deja vu yet?).
Next is configuring your locale. By telling Linux where you are in the world, it can determine useful things such as the separator between numbers and which currency symbol to use. For example, in the United States we might write 1,000.00, but in many places in Europe it would be written as 1.000,00. Either way for maximum comfort and to ensure that everything just looks right, we need to set the locale. Highlight the change_locale option and press Enter.
You’ll now be presented with an extensive list of different locales to choose from (see Figure 1-20). The first two letters in the name specify the language while the second pair of letters specifies a regional difference. For example, en_US would be English customized for US users but en_GB would have settings specific to English speakers in the UK. You should select the language and country pairs that most closely match your needs and choose them by pressing the spacebar. You probably want both the ISO-8859 and the UTF-8 versions. If you decide to hedge your bets and select all locales, be warned that you will be in for quite a wait as the Pi generates all the locale settings for you. In fact, we tried this option and after waiting ages for just two locales to be generated, we got fed up and pulled the plug. After you select the locales you want, press the Tab key once to highlight the OK button and then press Enter to move to the next screen. Here you’ll need to pick the locale you want to use by default (see Figure 1-21). Once you have made your choice, highlight it and press Enter. Once again, we’re back at the main configuration page.
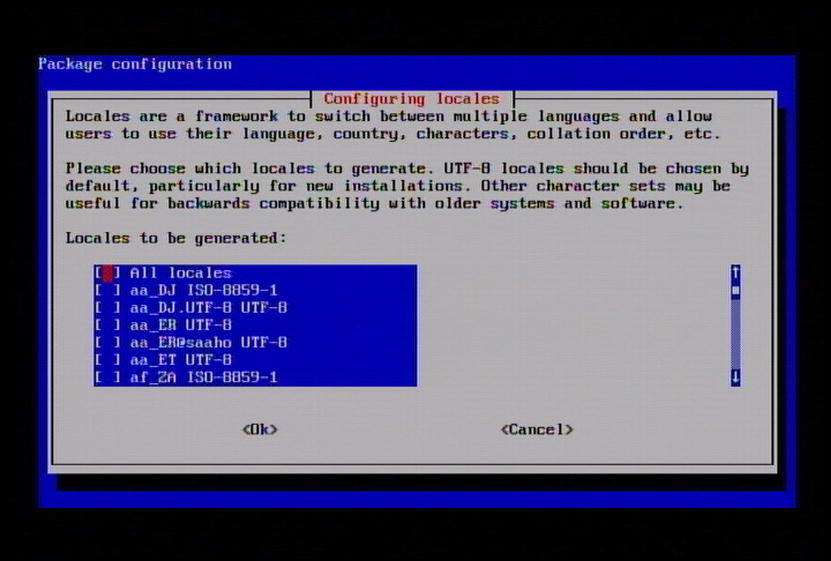
Figure 1-20. Select which locales you want to use

Figure 1-21. Now pick which locale you want to use by default
Changing the Time Zone
The change_timezone option does pretty much what it says. After selecting this option, you’ll be shown a list of regions (shown in Figure 1-22). In this case, we were configuring Pete’s Pi, so we selected Asia. The next screen will give you a chance to fine-tune your selection and pick your country or city (see Figure 1-23). Once you’ve found the closest match to you, select the option and press Enter.
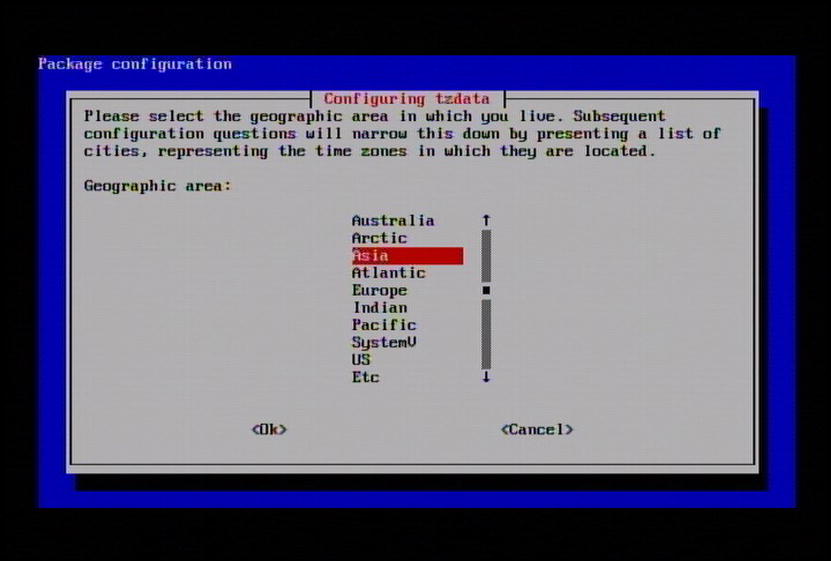
Figure 1-22. Select your region

Figure 1-23. Select your country or city
Allocating Memory
The memory_split option needs a bit of explanation. Your Pi has two main processors: the CPU (or central processing unit) and the GPU (or graphics processing unit). The CPU is responsible for the general running of your machine, and the GPU is responsible for handling the display and provides features such as 2D and 3D acceleration as well as hardware support for decoding high-quality video streams. A GPU is dedicated to handling graphics (for the most part) and cannot perform the role of a CPU. However, it does mean that if the CPU can offload all the complex graphics work to the GPU, the CPU doesn’t have to be quite so powerful. By having both, the Pi keeps the costs and power requirements nice and low but without sacrificing much in the way of performance.
So far so good; but what does that have to do with splitting memory? The Pi comes with 256 MB of RAM in total and it needs to supply both the CPU and GPU. As the GPU is effectively an independent unit, it needs its own allocation of memory. Rather than having dedicated memory for both, it is possible to split the 256 MB between the two processors. By default, the Pi allocates 192 MB for the CPU and only 64 MB for the GPU. This is ideal if you want to use the Pi as a server or you never plan to attach a display to your Pi. If you’re not using graphics, allocating additional memory to the GPU is somewhat pointless.
On the other hand, if you plan to use your Pi as a mini desktop computer or to display high-quality movies, you’re going to want as much memory allocated to the GPU as you can get away with (which in the case of the Pi means splitting it down the middle and having 128 MB for each). It would be difficult to anticipate how everyone will want to use their Pi, and apart from adding more memory to the Pi itself (and raising the cost) there is no easy solution. Fortunately, we have the ability to choose how we want to allocate the memory ourselves.
For general usage and “getting started”—type tasks, we recommend you split the memory 192 MB/64 MB. To set this up, select the memory_split option from the menu, press Enter, and you’ll have something similar to Figure 1-24. Type in the memory split that you want and then press Tab to highlight the OK button and then press Enter.

Figure 1-24. Choose your memory split
At Last! It’s Configured!
Wow, we finally made it to the end! After all that effort, you can now reboot the Pi and (finally) start using it! Press the Tab key twice to highlight the Finish button and press Enter. Your Pi should shut down and then reboot. If you decided to expand the root filesystem earlier, you’ll see this (as promised) during the boot process, as shown in Figure 1-25.
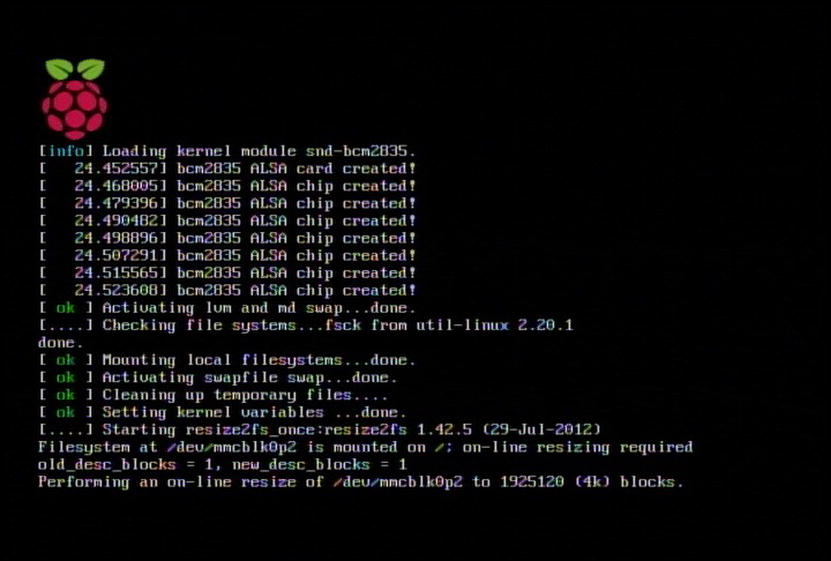
Figure 1-25. Resizing the filesystem on first reboot
This process can take a while depending on how big your SD card actually is. As it is being resized online, it won’t actually interfere much with the startup process, but because it’s happening in the background, and it’s doing fairly intensive work on your SD card, you might notice that things feel a bit sluggish. That’s completely normal, and it will speed up considerably once this process has finished.
After all that effort (and a bit more waiting while the Pi boots up), you should finally be at a pretty graphical display that should look something like Figure 1-26.

Figure 1-26. At long last, we have a desktop!
Congratulations! You now have a fully functional Raspberry Pi! If you don’t end up with a pretty desktop, you might need to tweak your configuration a little. At the login prompt, you can log in with the username pi and the password you set during the install. If you then run the following you will be able to change the settings (boot_behavior is the option you want to change):
$ sudo raspi-config
You can also try starting the graphical interface manually with this:
$ startx
Summary
This chapter has taken you from getting your hands on your Pi all the way through getting it up and running. We deliberately took it slow and covered all the basics as it’s always the so-called simple things that trip people up (us included!). We looked at what comes in the box (and more importantly what doesn’t) and provided a shopping list of all the things you’ll need to bake your Pi.
We then touched briefly on Linux—what makes a distribution and why we decided to stick with Raspbian for this book. We then covered how to download Raspbian and get it on your SD card (which turned out to be much more involved than we first thought).
Armed with a fully loaded card, we fired up the Pi and walked through the initial setup and configuration process that ultimately ended with us looking at the very pretty Raspberry Pi logo in the middle of an equally impressive desktop.
In the next chapter, we’ll start to explore your new desktop. We give you a quick tour of what comes with Raspbian out of the box, and we finish up by showing you how you can tweak and customize it to suit your needs.