
Chapter 8. Middleware Configuration
In this section we will go deeper into the configuration of the Middleware and explain each option and parameter in more detail. If you are just learning MCollective, it is not essential that you understand everything in this section. If MCollective is working properly in your environment and meets your needs, you can set this section aside and read it later.
However, if you are having difficulty with connectivity to your middleware broker, or you wish to implement a Network of Brokers, it will be essential for you to understand the middleware configuration in detail. That is what this section will provide for you.
Open Platform
MCollective uses a publish/subscribe Message Broker as middleware to provide communications channels between clients, servers, and listeners. By design MCollective uses plugins to communicate with the middleware, thus allowing considerable flexibility in the choice of middleware and the type of communication. The core installation contains the following middleware plugins at the time this book was written, however one can create their own middleware connector based on a different technology.
- ActiveMQ 5.8 or higher (preferred) http://activemq.apache.org/
- RabbitMQ 2.8 or higher http://www.rabbitmq.com/
Each of these Message Brokers are widely used and actively supported by developer communities. Each of these are suitable for small deployments, large clusters, and wide-scale hierarchical deployments. Each of these are used in thousands of environments every day.
There is also Apache’s Apollo, a next-generation messaging server intended to replace ActiveMQ. It works with MCollective using the ActiveMQ connector. It does not yet support clustering at the time this book was written.
By leveraging popular and actively maintained open source Message Brokers, MCollective is freed from having to create and support a proprietary communications infrastructure.
Let’s review the middleware configuration file from Configuring ActiveMQ in depth.
Network Security
These are some of the security considerations you should take into account when configuring your middleware broker.
Transport Connectors
You should disable any transport connector that you are not using. For example, if you have enabled SSL encryption for ActiveMQ middleware, you should comment out the unencrypted connector.
<transportConnectors><!-- # disable the unencrypted connector as we are using SSL<transportConnector name="stomp+nio" uri="stomp+nio://0.0.0.0:61613"/>--><!-- this would be IPv4 only<transportConnector name="stomp+ssl" uri="stomp+ssl://0.0.0.0:61614"/>--><!-- this accepts IPv4 and IPv6 both --><transportConnectorname="stomp+ssl"uri="stomp+ssl://[::0]:61614"/></transportConnectors>
If you have multiple IP addresses on the host, you may replace 0.0.0.0 or ::0 with the specific IP you’d like ActiveMQ to answer on. Remember that every server and client must be able to reach this address. Repeat if necessary for each IP separately.
<transportConnectorname="stomp+nio"uri="stomp+nio://192.168.2.5:61613"/><transportConnectorname="stomp+nio"uri="stomp+nio://[2001:DB8:6A:C0::200:5]:61613"/>
Firewall Configurations
MCollective depends on the ability of both servers and clients to initiate inbound TCP sessions to the appropriate TCP port on the middleware broker. Below is a table of which ports are used for which middleware brokers:
| Middleware | Usage | TCP Port |
ActiveMQ | STOMP unencrypted | 61613 |
ActiveMQ | STOMP+SSL | 61614 |
ActiveMQ | OpenWire unencrypted | 61616 |
ActiveMQ | OpenWire+SSL | 61617 |
RabbitMQ | STOMP unencrypted | 61613 |
RabbitMQ | STOMP+SSL | 61614 |
Most Linux systems use iptables firewalls. On a Linux system you could use the following steps to add a rule before the global deny. If all of your servers will fit within a few subnets, it is advisable to limit this rule to only allow those subnets to connect:
$sudo iptables --list --line-numbersChain INPUT (policy ACCEPT) num target prot opt source destination 1 ACCEPT all -- anywhere anywhere state RELATED,ESTABLISHED 2 ACCEPT icmp -- anywhere anywhere ... Look through the output and find an appropriate line number for this rule $sudo ip6tables --list --line-numbersChain INPUT (policy ACCEPT) num target prot opt source destination 1 ACCEPT all anywhere anywhere state RELATED,ESTABLISHED 2 ACCEPT ipv6-icmp anywhere anywhere ...etc
Look through the output and find an appropriate line number for the new rule. Then use the following syntax to insert the rule into this location in the list:
$sudo iptables -I INPUT$20-m state --state NEW -p tcp \ --source192.168.200.0/24--dport 61613 -j ACCEPTsudo ip6tables -I INPUT20-m state --state NEW -p tcp \ --source2001:DB8:6A:C0::/24--dport 61613 -j ACCEPT
Don’t forget to save that rule to your initial rules file. For RedHat-derived systems this can be as easy as this:
$sudo service iptables saveiptables: Saving firewall rules to /etc/sysconfig/iptables:[ OK ] $sudo service ip6tables saveip6tables: Saving firewall rules to /etc/sysconfig/ip6table:[ OK ]
Check the appendix for platform-specific instructions for other operating systems.
IPv6 Dual-Stack Environments
If you have both IPv4 and IPv6 deployed on your network you may find that some hosts are using IPv4 and others are using IPv6. You’ll also notice that all of these hosts can communicate with each other just fine. As long as the host can connect to the middleware broker, it really doesn’t matter which protocol they used to get there.
However there are situations where you may need to control which protocol is used, for example if you want to ensure IPv6 is used in all places. Or perhaps you have a remote site where the provider doesn’t provide IPv6 transit yet. How does one control which protocol is used?
The answer is that this choice is determined by your operating system. If a remote host has both IPv4 and IPv6 addresses then the operating system will decide which one to attempt to connect to first. If the first protocol fails, MCollective will attempt a fallback query on the other address.
At the time I tested, every OS I checked will go first to the IPv6 address and then fall back to the IPv4 address if the first attempt fails. As MCollective server connections are very long lived, a short delay for initial connection will not matter.
There are no parameters in MCollective to define the protocol used for the connection.
So there is nothing you can do in the configuration to influence the protocol used? Nope. Well no, that’s actually a lie. The hint comes from the statement above:
If a remote host has both IPv4 and IPv6 addresses then the operating system will decide which one to attempt to connect to first.
So the easiest way to ensure that a given client uses a certain protocol to connect to your middleware broker is to set the broker’s name in the configuration file to a name which only resolves to that one protocol. For example:
$host activemq.example.netactivemq.example.net has address 192.168.200.5 activemq.example.net has IPv6 address 2001:DB8:6A:C0::200:5 $host activemq-v6.example.netactivemq-v6.example.net has IPv6 address 2001:DB8:6A:C0::200:5 $host activemq-v4.example.netactivemq-v4.example.net has address 192.168.200.5
For hosts which I want to connect only over IPv6, I could use this Hiera config:
mcollective::hosts:
  - 'activemq-v6.example.net'
Or here is an IPv4-only connection.
mcollective::hosts:
  - 'activemq-v4.example.net'
And believe it or not, the following will cause the server to connect over BOTH protocols:
mcollective::hosts:
  - 'activemq-v6.example.net'
  - 'activemq-v4.example.net'
ActiveMQ Config Structure
The ActiveMQ configuration file is quite long, and it can be easy to lose your place within the file. So before we start let’s review the structure of the file.
- There is a single broker element that handles all MCollective configuration.
-
Flow Control and Garbage Collection are defined by
policyEntryelements. -
Users are defined in
authenticationUserelements. -
Access rules are defined in
authorizationEntryelements. -
System resource limits are defined in
systemUsageelements -
Network connectors for clients are defined in
transportConnectorelements. -
Network connectors for other brokers are defined in
networkConnectorelements.
Following is a non-working skeleton of the activemq.xml configuration file. Use this to review the structure of the configuration file.
<beansschemas><brokerbrokerName="hostname"key attributes here><destinationPolicy><policyMap><policyEntries><policyEntrydisable flow control, enable memory recycling here /></policyEntries></policyMap></destinationPolicy><managementContext><managementContextcreateConnector="false"/></managementContext><plugins><statisticsBrokerPlugin/><simpleAuthenticationPlugin><users><authenticationUserusers and passwords></users></simpleAuthenticationPlugin><authorizationPlugin><map><authorizationMap><authorizationEntries><authorizationEntryaccess rules for queues and topics></authorizationEntries></authorizationMap></map></authorizationPlugin></plugins><systemUsage><systemUsagememory, disk, and temp usage limits></systemUsage></systemUsage><transportConnectors><transportConnectorclient access protocol connectors></transportConnectors><networkConnectors><networkConnectorbroker-broker protocol connectors></networkConnectors></broker></beans>
Detailed Configuration Review
Following are the definitions missing from the activemq.xml configuration skeleton in the previous section. We’ll go through each one and document which values should be set, and which values you may want to change.
Broker Definition
The broker element defines the ActiveMQ java application with whom all servers and clients communicate. This is the container which encloses all other elements we will be discussing.
<brokerxmlns="http://activemq.apache.org/schema/core"useJmx="true"brokerName="localhost" schedulePeriodForDestinationPurge="60000" networkConnectorStartAsync="true" >
brokerName can be any name and for a single instance the value localhost is just fine. In a Network of Brokers each broker will need to have a unique name. We’ll cover this in ActiveMQ Clusters.
schedulePeriodForDestinationPurge tells ActiveMQ to scan and identify destinations which are inactive for more than one minute. This allows the queue to be garbage collected if the server stops retrieving items from its queue, or in the case of clients, after the timeout has been reached and it stops reading from the queue.
networkConnectorStartAsync tells ActiveMQ to bring up all network connectors in parallel. This parameter only matters if you have a network of brokers, but it’s a good default to have.
Topic and Queue Tuning
MCollective works best if producer flow control is disabled, and reply queues aregarbage-collected after five minutes of inactivity. If a node hasn’t picked up items from the queue in five minutes, we should discard the requests to avoid delayed delivery.
<policyEntries><!-- MCollective works best with producer flow control disabled. --><policyEntrytopic=">"producerFlowControl="false" /><!-- MCollective generates a reply queue for most commands.Garbage-collect these after five minutes to conserve memory. --><policyEntryqueue="*.reply.>"gcInactiveDestinations="true" inactiveTimoutBeforeGC="300000" /></policyEntries>
Authentication and Authorization
The critical parts for middleware authentication are the nodes queue and the agent topics described below. These are used to deliver messages to the servers who should be acting on the requests.
To consider the marionette metaphor, these are your strings. Messages to a node’s queue will be delivered to exactly one node. Messages published to an agent’s topic will be received and processed by every mcollectived daemon which has the named agent installed.
Users and Groups
This section defines the users and assigns them to groups.
<users><authenticationUserusername="admins"password="Broker Password" groups="admins,everyone" /><authenticationUserusername="client"password="Client Password" groups="servers,clients,everyone" /><authenticationUserusername="server"password="Server Password" groups="servers,everyone" /></users>
All of the authorization rules defined in the following block of the configuration use groups, not usernames. You can create additional usernames and passwords if you like, but remember that these don’t control the commands which can be run on a server—this only controls who can send messages to each queue. In general it is best to leave the middleware authentication to these two groups, and implement fine-grained control using the authorization rules as documented in Authorization.
Topics and Queues the Clients Send To
First thing you’ll notice that we define an admins group and give them the ability to write to every queue and topic. This is used only by brokers to relay data in a cluster configuration. We’ll cover this in ActiveMQ Clusters.
<authorizationEntryqueue=">"write="admins"read="admins"admin="admins"/><authorizationEntrytopic=">"write="admins"read="admins"admin="admins"/>
Next, we give global read and write on the MCollective topics and queues to clients. The > character in this case is equivalent to a trailing wildcard, allowing access to all topics or queues underneath mcollective.
<authorizationEntryqueue="mcollective.>"write="clients"read="clients"admin="clients"/><authorizationEntrytopic="mcollective.>"write="clients"read="clients"admin="clients"/>
The admin permission allows the client to create the topic or queue if it doesn’t exist already.
Note
In this example our collective is named mcollective which is the default. In Chapter 10 we will discuss using multiple collectives. At that time, you’ll need to duplicate the last two lines with each collective’s name.
Topics and Queues the Servers Read From
Here we allow the server nodes to read from or create the MCollective agent topics.
<authorizationEntrytopic="mcollective.*.agent"read="servers"admin="servers"/>
This is where the clients place commands intended for multiple agents. For example a mco puppet runonce command would be sent out on the mcollective.puppet.agent topic.
<authorizationEntryqueue="mcollective.nodes"read="servers"admin="servers"/>
Here we allow the server nodes to read from or create the mcollective node queue. This is where the clients place commands intended for a single mcollective server.
These topics and queues don’t need an explicit write permission as the wildcard client rules above them allow clients to write to any of these queues.
Topics and Queues the Servers Write To
<authorizationEntrytopic="mcollective.registration.agent"write="servers"read="servers"admin="servers"/>
Here we allow the server nodes to create or submit data to one of the agent topics: the registration agent. This information is submitted during the server connection and when a registration request is received. More information about registration is available in Chapter 14.
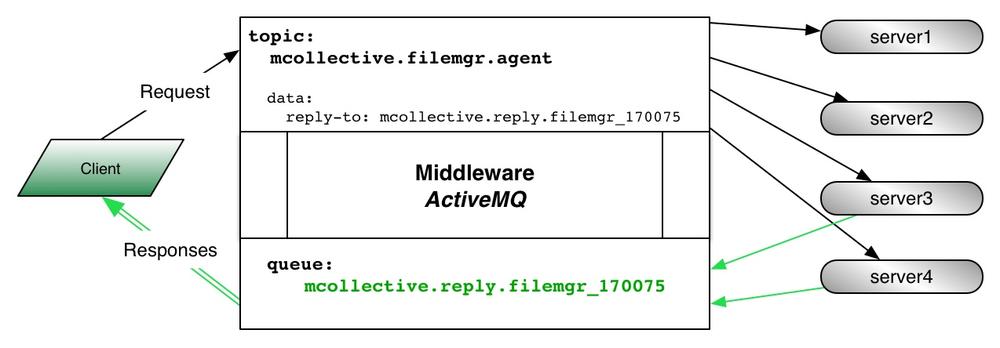
<authorizationEntryqueue="mcollective.reply.>"write="servers"admin="clients"/>
This is a queue where servers send back their responses to commands. For example, if you send a command to the filemgr agent with a reply-to number 170075 then each server which matches the filter (number 3-4 below) would send a response on the queue mcollective.reply.filemgr_170075. The client would read each reply from the queue, as the diagram below shows.
Tip
The writeable queues used by the servers to communicate information can be read by the clients, or by specially designed Listeners. We’ll discuss how Listeners collect feedback from the agents in Chapter 15.
Transport Connectors
A transportConnector element defines how servers and clients connect to the middleware broker over the network. The following configuration enables a STOMP protocol connection to ActiveMQ’s New I/O (NIO) transport.
<transportConnectors><transportConnectorname="stomp+nio"uri="stomp+nio://[::0]:61613"/></transportConnectors>
All MCollective messages are carried by STOMP protocol, and the NIO interface has significantly better performance than using STOMP without NIO. At this point in the book, this is the only valid configuration.
You could of course make the IP address specific to just one interface, and you could change the TCP port used if you wanted to. In the following examples we show specific IPv4 and IPv6 addresses with TCP port 6163.
IPv4.
uri="stomp+nio://192.168.200.5:6163"
IPv6.
uri="stomp+nio://[2001:DB8:6A:C0::200:5]:6163"
In ActiveMQ Clusters you will learn how to use networkConnector elements to link to other middleware brokers.
Chapter 9 will document how to enable TLS encryption to protect the traffic between MCollective nodes and the middleware broker.
Conclusion
In this section we have gone through each tuning parameter in the baseline configuration used for our initial setup. The following sections will build on this baseline, showing changes which could be made to increase security or improve reliability in larger environments.
ActiveMQ Clusters
If your collective grows near a thousand nodes, or if you have multiple sites where you’d like to have a server at each site, you may want to set up a Network of Brokers to convey messages between the systems. If you want redundancy within a single site, you may want to set up Master/Slave synchronization. You can even use both of these options together. Let’s go over how to configure each one.
Network of Brokers
A Network of Brokers configuration is useful when you want to put ActiveMQ servers in different physical locations (e.g. different data centers) but to operate as a single consistent messaging space. Here is an example of the lines you’d need to add to both of the ActiveMQ systems to set up the linkage.
Connection accepting side.
<plugins><simpleAuthenticationPlugin><users><authenticationUserusername="intersite"password="somethingYouWillNeverShare"groups="admins,everyone"/></users></plugins><transportConnectors><transportConnectorname="openwire"uri="tcp://0.0.0.0:61616"/></transportConnectors>
Connection creating side.
<networkConnectors><networkConnectorname="SFO-PVG"duplex="true"uri="static:(tcp://activemq.london.example.net:61616)"userName="intersite"password="somethingYouWillNeverShare</replaceable>"/></networkConnectors><transportConnectors><transportConnectorname="openwire"uri="tcp://0.0.0.0:61616"/></transportConnectors>
Tip
Tuning options for the networkConnector can be found at: http://activemq.apache.org/networks-of-brokers.html.
By putting the intersite user in the admins group it will have the ability to write to all topics and queues on the accepting ActiveMQ server. This is necessary for replication to work.
At each location you configure the client to connect to the local system. All messages will be transmitted between the two locations, thus allowing a single collective to work cleanly across sites. If you are concerned about redundancy, you can configure the client to fall over to the other sites if the local site is down.
plugin.activemq.pool.size =number of sites with their own brokerplugin.activemq.pool.1.host =site #1 broker hostnameplugin.activemq.pool.1.setting=settings for this siteplugin.activemq.pool.2.host =site #2 broker hostnameplugin.activemq.pool.2.setting=settings for this site...etc
Warning
The Puppet Labs site indicates that you will need two connections, one for topics and another for queues, at http://docs.puppetlabs.com/mcollective/deploy/middleware/activemq.html#settings-for-networks-of-brokers. My tests were unable to confirm this-- I used the settings above successfully with clients and servers on each side.
The Puppet module provided with this book will configure a network of brokers simply by adding more brokers to the hosts hiera parameter and providing a broker password.
mcollective::broker_password: 'openssl rand -base64 32' mcollective::hosts: -site #1 broker hostname-site #2 broker hostname-site #3 broker hostname
All of the other parameters used for connecting to the brokers are assumed to be identical.
You may want to limit clients or servers to use only a local node. Each of the modules can be overridden at its own layer, so you can play with Hiera hierarchy to your heart’s content. There are two good ways to do this. The easiest is only to inform the brokers of all nodes:
mcollective::hosts:
        - site local broker hostname
mcollective::middleware::hosts:
        - site #1 broker hostname
        - site #2 broker hostname
        - site #3 broker hostname
Or you can limit the servers to a local node, and let the brokers and clients know about all nodes:
mcollective::server::hosts:
        - site local broker hostname
mcollective::hosts:
        - site #1 broker hostname
        - site #2 broker hostname
        - site #3 broker hostname
Warning
In large environments (about 2-3k nodes depending on latency between your brokers) discovery might take longer than the default 2 seconds. In a production environment with 5,500 nodes we found that 10 seconds was necessary for discovery to consistently talk to all nodes. You will need to modify client apps to extend the discovery timeout (discussed in Chapter 13 later) or set an environment variable to avoid having to type this with every CLI command:
export MCOLLECTIVE_EXTRA_OPTS="--discovery-timeout 10 --timeout 5"
I created Puppet Labs Feature Request MCO-193 to request a configuration file option for this. It may be available by the time this book is printed.
Master-Slave Redundancy
If you are looking for fast failover response at a single location, you may instead want to use a Master/Slave cluster setup. For that kind of setup you want this identical configuration on both brokers.
<plugins><simpleAuthenticationPlugin><users><authenticationUserusername="redundant"password="somethingYouWillNeverShare" groups="admins,everyone" /></users></plugins><transportConnectors><transportConnectorname="openwire"uri="tcp://0.0.0.0:61616"/></transportConnectors><networkConnectors><networkConnectoruri="masterslave:(tcp://activemq1.example.net:61616,tcp://activemq2.example.net:61616)"userName="redundant"password="somethingYouWillNeverShare" /></networkConnectors>
Pay special attention to the networkConnector uri here. The first host listed should be the master, and then every hostname listed after it would be slaves. Every ActiveMQ broker should have the list in the same order.
Note
Tuning options for the networkConnector can be found at http://activemq.apache.org/networks-of-brokers.html.
To enable the servers and clients to fail over to the slave, you will need to make the following changes to both the server and client configuration files.
plugin.activemq.pool.size =count of all ActiveMQ brokersplugin.activemq.pool.1.host =master broker nameall the settings for the master broker plugin.activemq.pool.2.host =slave broker #2all the same settings slave broker 2 plugin.activemq.pool.3.host =slave broker #3all the same settings slave broker 3 ...repeat until done
The Puppet module provided with this book supports a master/slave setup with the following Hiera parameter:
mcollective::hosts:
        - master broker hostname
        - slave broker #1 hostname
        - slave broker #2 hostname
All of the other parameters used for connecting to the brokers are assumed to be identical.
Encrypted Broker Links
You should use SSL/TLS encryption for the links between sites. You should absolutely do this if you are connecting across the public Internet. To do this you’ll need to create both the keystore described in Anonymous TLS Security and the trustStore from Trusted TLS Servers.
Then you would adjust the ActiveMQ configuration between the sites to use the appropriate protocol:
<transportConnectors><transportConnectorname="openwire+ssl"uri="ssl://0.0.0.0:61617?needClientAuth=true"/></transportConnectors><networkConnectors><networkConnectorname="SFO-PVG"duplex="true"uri="static:(ssl://activemq.siteb.example.net:61617)"userName="intersite"password="somethingYouWillNeverShare"/></networkConnectors><sslContext><sslContextkeyStore="ssl/keystore.jks"keyStorePassword="somethingElseYouWillNeverShare"trustStore="ssl/truststore.jks"trustStorePassword="anotherThingYouWillNeverShare"></sslContext>
If you are using the Puppet module provided with this book you would simply set the following Hiera parameters and Puppet will do all the work for you:
mcollective::connector_ssl                  : true
mcollective::middleware::keystore_password  : 'openssl rand -base64 20'
mcollective::middleware::truststore_password: 'openssl rand -base64 20'
Conclusion
In this section we have reviewed two different models for multi-broker usage:
- Using a Network of Brokers to provide connectivity between diverse sites.
- Using Master-Slave redundancy to provide resilience to hardware problems.
You can blend both of these options together to connect sets of Master-Slave brokers to sets at remote sites.
Large-Scale Broker Configurations
There are two very different types of large-scale broker configurations.
- Many clients using a single broker.
- Brokers at many sites around the world.
Obviously you can have both configurations in the same organization. We’ll try to cover the individual needs of each.
In this section we’ll discuss tuning ActiveMQ for high numbers of clients or high volume traffic. Most matters of tuning ActiveMQ are common to any ActiveMQ installation and beyond the scope of this book. However there are some configuration choices which are specific to MCollective and we’ll talk about them here.
The Puppet Labs documentation has very conservative recommendations for middleware sizing;
Scale—we recommend a maximum of about 800 MCollective servers per ActiveMQ broker, and multiple brokers let you expand past this.
— http://docs.puppetlabs.com/mcollective/deploy/middleware/activemq.html#settings-for-networks-of-brokers
This is a very safe rule. The fact of the matter is that it depends. I’ve been involved with sites that have four times that amount per broker. I’ve also been involved with sites that max out brokers well below that number. The answer for your exact needs is something that you may spend some time figuring out, and will likely change over time.
First, let’s go over what does and doesn’t matter for making MCollective feel faster in your network:
✗ Bigger network pipes ✓ Low-latency links
In very few environments will MCollective generate substantial network traffic on the broker, and frankly you know who you are because you wrote or are using an agent that transfers large data. Most requests and responses are trivial in size and generate hundreds of minimum-size packets, rather than any substantially sized packets.
However MCollective is very sensitive to latency in the network links between brokers. I have found it best practice to implement all Networks of Brokers as a mesh rather than a star whenever possible. It allows traffic to get to its destination with a single hop, rather than traversing an additional queue prior to delivery.
✗ Dozens of CPU cores ✓ Gigabytes of RAM
ActiveMQ does not appear to scale vertically. I have never witnessed a performance gain by moving ActiveMQ to a bigger hardware box. In my experience OpenStack/KVM or VMware ESX virtual hosts provide identical performance to bare metal hosts with equivalent specs. In most circumstances the ActiveMQ host can be running at very low CPU utilization while ActiveMQ queues are overloaded.
The best way to tune ActiveMQ for higher performance is to make more memory available for it. Many default installations limit the Java application to 512mb and the ActiveMQ broker a mere 20 megabytes of RAM. As even small-end systems these days have significantly more RAM I often quadruple or octuple (8x) this limiter. Java will only use what it needs. I have not witnessed any significant memory leakage in ActiveMQ 5.8 or 5.9.
✗ Less collectives with more machines on them ✓ Localized collectives that avoid transit between brokers
This is simple enough. Any query, even one with a fairly tight filter, sent to a collective with 5,000 hosts on it will cause the request to be broadcast to all 5,000 hosts. Each host must read the filter and decide whether to respond. If you split up your collectives and send most messages to a local sub-collective it will reduce cross-site network traffic significantly. We’ll show you how to do this in Chapter 10.
Recommendations
So what does this all mean? Here is our summary for what you can and should tune for high performance middleware:
-
Tune Java Max Memory up to most of the available memory in the system. A dedicated broker isn’t doing much else with that memory is it? This is
wrapper.java.maxmemoryin activemq-wrapper.conf for many platforms, or however you adjust-Xmx512mon the command line for your platform. (Specifics can be found in OS Specifics.) -
Set
org.apache.activemq.UseDedicatedTaskRunnerto false in the wrapper configuration file, or use-Dorg.apache.activemq.UseDedicatedTaskRunner=falsein the command line arguments. -
As discussed in Detailed Configuration Review, ensure that producer flow control is disabled. If you are seeing queue messages being lost, adjust
systemUsage/systemUsage/memoryUsageto use 70% of the size of Java Max Memory. For any broker supporting a thousands clients or large reply queues this should be several gigabytes. - Create subcollectives for each location or region as discussed in Localizing Traffic. You can still initiate requests to the entire collective when necessary, but it shouldn’t be your default.
Supporting 1000+ Servers
To handle anything near a thousand connections to a single ActiveMQ server you’ll need to tune the TCP stack of the host. I’ve included some recommendations that I and others have found useful.
# More file descriptors == more open TCP connections
ulimit -Hn 8192
ulimit -Sn 8192

# Close and reuse finished TCP sessions faster
/sbin/sysctl -w net.ipv4.tcp_fin_timeout=15
/sbin/sysctl -w net.ipv4.tcp_tw_reuse=1

# Identify failed TCP links faster
/sbin/sysctl -w /proc/sys/net/ipv4/tcp_keepalive_intvl=30
/sbin/sysctl -w /proc/sys/net/ipv4/tcp_keepalive_probes=5

# Allow connection backlog of 2000 connections
# Required as STOMP clients reconnect quickly
/sbin/sysctl -w net.core.somaxconn=2000
/sbin/sysctl -w net.core.netdev_max_backlog=2000

# Increase size of TCP read and write buffers
/sbin/sysctl -w net.core.rmem_default = 256960
/sbin/sysctl -w net.core.rmem_max = 5242880
/sbin/sysctl -w net.core.wmem_default = 256960
/sbin/sysctl -w net.core.wmem_max = 5242880

# Disable timestamps
/sbin/sysctl -w net.ipv4.tcp_timestamps = 0
You may need to find the correct tuneables for non-Linux operating systems.
ActiveMQ 5.9.1
At the time this book went to print, Puppet Labs was providing ActiveMQ 5.8 in their repository. While working with several clients, I found ActiveMQ to work significantly better when handling large numbers of SSL/TLS clients. I created an RPM for ActiveMQ 5.9.1 for RedHat/CentOS and made it available at the following URL http://www.netconsonance.com/2014/04/activemq-5-9-1-for-centos-rhel-6/
I have provided this to Puppet Labs in Improvement CPR-32 so it might be available in the repository already. If not, you can download it from my website for evaluation.
Start by making a backup copy of activemq.xml, as your configuration will revert to the stock Puppet Labs config after installing this RPM:
$sudo cp /etc/activemq/activemq.xml /etc/activemq/activemq.xml_5.8$wget -q http://www.netconsonance.com/downloads/activemq-5.9.1-1.el6.noarch.rpm$sudo service mcollective stopShutting down mcollective: [ OK ] $sudo service activemq stopStopping ActiveMQ Broker... Stopped ActiveMQ Broker. $sudo yum install activemq-5.9.1-1.el6.noarch.rpmLoaded plugins: fastestmirror, security Loading mirror speeds from cached hostfile * base: linux.mirrors.es.net * extras: linux.mirrors.es.net * updates: linux.mirrors.es.net Setting up Install Process Examining activemq-5.9.1-1.el6.noarch.rpm: activemq-5.9.1-1.el6.noarch Marking activemq-5.9.1-1.el6.noarch.rpm to be installed Resolving Dependencies --> Running transaction check ---> Package activemq.noarch 0:5.9.1-1.el6 will be installed --> Finished Dependency Resolution Dependencies Resolved ===================================================================================== Package Arch Version Repository Size ===================================================================================== Installing: activemq noarch 5.9.1-1.el6 /activemq-5.9.1-1.el6.noarch 41 M Transaction Summary ===================================================================================== Install 1 Package(s) Total size: 41 M Installed size: 41 M Is this ok [y/N]:yDownloading Packages: Running rpm_check_debug Running Transaction Test Transaction Test Succeeded Running Transaction Updating : activemq-5.9.1-1.el6.noarch 1/2 Cleanup : activemq-5.8.0-3.el6.noarch 2/2 Verifying : activemq-5.9.1-1.el6.noarch 1/2 Verifying : activemq-5.8.0-3.el6.noarch 2/2 Installed: activemq.noarch 0:5.9.1-1.el6 Complete! $sudo service activemq startStarting ActiveMQ Broker... $sudo service mcollective startStarting mcollective: [ OK ]
To use this version with the Puppet module you need to inform the module that you want the configuration changes specific to version 5.9. This is accomplished with the following Hiera change:
common.yaml.
# Middleware configuration
mcollective::middleware::confversion: '5.9'
Then run the puppet agent on your middleware systems like so:
$ mco puppet runonce --with-class mcollective::middleware

 * [ =================================================> ] 1 / 1

Finished processing 1 / 1 hosts in 283.63 ms
If you aren’t using Puppet to manage the middleware configuration, then start by making a backup copy of /etc/activemq/activemq.xml, as your configuration will revert to the stock Puppet Labs config. You’ll need to reapply by hand many of the changes discussed in Detailed Configuration Review.
Problems Seen in the Wild
At the time this book was written I have seen several problems which you should be aware of. I hope these issues are fixed and obsolete by the time this book reaches your hands, so I’ve given you the bug numbers and links to check them out.
The ActiveMQ connector does not close TCP sessions when it fails to complete an SSL connection.
An incorrectly configured server will create hundreds of open TCP sessions on the ActiveMQ broker. Bug MCO-196 You can see this with the following command on your broker:
netstat -an |grep 6161 |awk '{print $5}' |cut -d: -f1 |sort |uniq -c |sort -nNote
This shows as Resolved on the Puppet Labs ticketing system, but I haven’t had a chance to test this yet with a sufficiently large site. Please contact me if you can confirm whether this is solved or not.
The ActiveMQ connector has only a half-second tolerance for heartbeat failures.
If the server and broker are not in a low latency network, or are virtualized on highly utilized host server, you will want to make this less strict. Feature Request MCO-190
ActiveMQ 5.8.0 also lacks the ability to allow lazy updates.
ActiveMQ 5.8 will also drop a connection which is more than half a second late. We’ve found this to be especially problematic with SSL/TLS connections. ActiveMQ 5.9 provides a new transport option transport.hbGracePeriodMultiplier which can be used to make the heartbeat validation less strict. If you are having issues with this, consider upgrading to ActiveMQ 5.9.1 as documented below.
No more than 500 SSL/TLS Connections per Broker
Somewhere after the 500th client has connected to an ActiveMQ Broker with SSL/TLS you will start seeing clients which fail to negotiate a session. It seems to usually reach six or seven hundred, but of course Your Mileage May Vary. I have been unable to determine the limitation, however it has not been a lack of CPU or Memory on the ActiveMQ broker. It simply ceases to finish the SSL/TLS negotiation after reaching that limit.
The answer again seems to be to update to ActiveMQ 5.9 where you can use Stomp+NIO+SSL as your transport. If you are using the Puppet module provided in this book, it will automatically adjust your configuration to use this connector when
confversionis set to 5.9.
Conclusion
Tuning ActiveMQ brokers or clusters for scale requires changes at multiple levels. In this chapter we discussed the following changes:
- Give as much memory as possible to the java engine, then tune up the size of your broker to match. The broker will only consume memory it needs.
- Tune the system sysctls to enlarge the number of open files and to increase the read and write buffers used for network connections.
- If you are using TLS authentication with more than a few hundred servers, upgrade to ActiveMQ 5.9.1 to utilize the SSL-enabled NIO connector.
- Configuration problems could cause servers or clients to back off and retry connections. Check the number of open connections per IP address on the middleware hosts to identify misconfigured nodes.
Growing your Network of Brokers will require careful tuning to achieve the best performance. None of the tuning done here is specific to MCollective. Most documentation for tuning ActiveMQ will be relevant to your environment’s performance.