
14 Working with Video
FOR THOSE INVOLVED IN SCORING COMMERCIALS, industrial videos, motion pictures, games, or any other visual medium that integrates music and/or sound, Logic provides features to enable you to synchronize your music production with the video. Logic does not enable you to edit your video; for that you need a video production application, such as Apple’s world-class Final Cut Pro—and, as you saw in Chapter 12, “Working with and Sharing Files,” you can export your Logic Pro project to Final Cut Pro/XML via the Export command. Logic Pro will, however, enable you to open your video, view your video alongside your Logic project, and lock your music to particular frames of video.
Logic supports Apple’s QuickTime format for digital video. QuickTime is not only the Macintosh standard, but the format of choice among professionals. If you want to use video with Logic, make sure it is in the QuickTime format.
Opening Movies
There are number of ways to open a QuickTime video in Logic:
![]() Open the File menu, choose Movie, and select Open Movie.
Open the File menu, choose Movie, and select Open Movie.
![]() Press Option+Command+O.
Press Option+Command+O.
![]() Click on the Movie track name and select Open Movie in the Movie menu.
Click on the Movie track name and select Open Movie in the Movie menu.
![]() Click anywhere in the movie track with the Pencil tool and select Insert Movie.
Click anywhere in the movie track with the Pencil tool and select Insert Movie.
![]() Right-click in the video track and choose the Open Movie option from the menu that appears.
Right-click in the video track and choose the Open Movie option from the menu that appears.
If you use any of these methods, you will be presented with the Open File dialog box, with the Movies folder displayed by default, to choose your video. When you open your video, the Open Movie dialog box will appear, giving you two options: Open the Movie and Extract the Audio Track. Figure 14.1 shows the Open Movie dialog box.
Figure 14.1 The Open Movie dialog box.

© Apple Inc.
Although these functions are pretty self-explanatory, realize that you can use the commands independently to open only the video content of the movie by deselecting the Extract the Audio Track checkbox, or import only the audio by deselecting the Open Movie checkbox.
When you click OK to open the movie (regardless of the Extract the Audio Track setting), it will appear in its own window along with your Logic song. Figure 14.2 shows a video opened as part of a Logic song.
Figure 14.2 After you click OK in the Open Movie dialog box, you will be able to view a QuickTime movie along with your Logic project.

© Apple Inc.
If you wish to preview a movie before opening it, you can do so in the Movies tab of the Media Browser. To remove a movie from your project, use the Remove Movie command, which will be located in all the same menus as the Open Movie command. You can adjust the image size via the Movie Options menu, which is discussed in the following section.
Movie Options
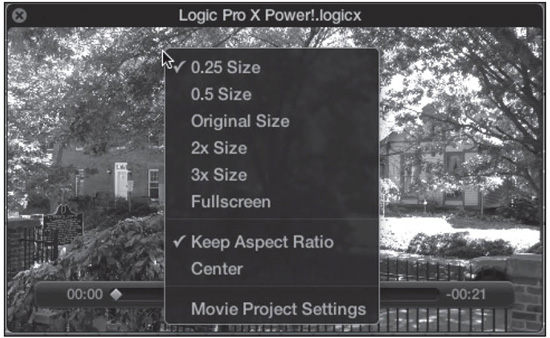
If you right-click anywhere on your QuickTime Movie window, you will be presented with the Movie Options menu, shown in Figure 14.3.
Figure 14.3 You can access the Movie Options menu by right-clicking anywhere on your QuickTime Movie window.
© Apple Inc.
This menu gives you a number of resizing and synchronization options:
![]() 0.25 Size: Display your movie at one quarter its original size.
0.25 Size: Display your movie at one quarter its original size.
![]() 0.5 Size: Display your movie at half its original size.
0.5 Size: Display your movie at half its original size.
![]() Original Size: Display your movie at its original size.
Original Size: Display your movie at its original size.
![]() 2× Size: Display your movie at double its original size.
2× Size: Display your movie at double its original size.
![]() 3× Size: Display your movie at triple its original size.
3× Size: Display your movie at triple its original size.
![]() Fullscreen: Display your movie in a full-screen window.
Fullscreen: Display your movie in a full-screen window.
![]() Keep Aspect Ratio: If you resize your Movie window, the aspect ratio of the video will be maintained.
Keep Aspect Ratio: If you resize your Movie window, the aspect ratio of the video will be maintained.
![]() Center: This will place your Movie window in the middle of your screen. (If you have multiple monitors, your video will be placed in the middle of the monitor it is currently on.)
Center: This will place your Movie window in the middle of your screen. (If you have multiple monitors, your video will be placed in the middle of the monitor it is currently on.)
![]() Movie Project Settings: This opens the Movie Project Settings window. This window is described in the “Movie Project Settings” section, later in this chapter.
Movie Project Settings: This opens the Movie Project Settings window. This window is described in the “Movie Project Settings” section, later in this chapter.
Movie Scene Markers
Movie scene markers are special markers locked to a specific SMPTE time. They were discussed in Chapter 4, “Global Elements of Logic,” in the section on the video track. You can also create them via the Create Movie Scene Markers submenu. (Open the Navigate menu, choose Other, and choose Create Movie Scene Markers, as shown in Figure 14.4.)
Figure 14.4 The Create Movie Scene Markers submenu gives you a variety of options for creating markers for your QuickTime movie.

© Apple Inc.
The Create Movie Scene Markers submenu commands function more or less the same as the Detect Cuts button on the movie track, discussed in Chapter 4. They search for scene cuts in your QuickTime movie and create movie markers in the marker track. Unlike the movie track Detect Cuts button, the Create Movie Scene Markers submenu commands can restrict Logic to looking for cuts within a cycle range, a Marquee tool selection, or a region selection.
You can delete movie markers via a dialog box that opens if you remove the movie from your project. You can also remove them by opening the Navigate menu, choosing Other, selecting Remove Movie Scene Markers, and choosing one of the commands in the submenu that appears. The Remove Movie Scene Markers submenu offers the same options for marker removal as the Create Movie Scene Markers submenu does.
NOTE: Remember that Chapter 4 discussed the movie track, which is the global track that lets you view video thumbnails of your QuickTime movies along with your song. Also, your movie markers will show up on the marker track, another important global track. Remember to use these features in tandem with the Movie window.
TIP: As experienced film and TV composers know, a hit point that is exactly on a cut to the frame will actually seem to sound a little early, which is why they frequently delay it by one to six frames. Although a movie scene marker’s SMPTE position cannot be edited, it can be converted to a standard marker using the Convert to Standard Marker command in the Marker list’s Options menu, and then adjusted as desired. Editing movie markers in the Marker list makes the process quick and easy.
Movie Project Settings
Among the various Project Settings is the Movie Project Settings window. To access this window, open the File menu, choose Project Settings, and select Movie or press Option+P and select the Movie screen. You can also right-click in the Movie window and select Movie Project Settings. Figure 14.5 shows the Movie Project Settings dialog box.
Figure 14.5 The Movie Project Settings dialog box.
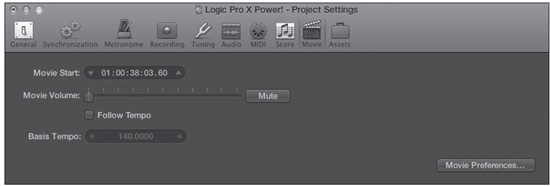
© Apple Inc.
The options of this dialog box are as follows:
![]() Movie Start: The Movie Start setting allows you to offset the start of your video file in SMPTE units to match a particular bar position.
Movie Start: The Movie Start setting allows you to offset the start of your video file in SMPTE units to match a particular bar position.
![]() Movie Volume: You can use this slider to adjust the level of your video’s audio.
Movie Volume: You can use this slider to adjust the level of your video’s audio.
![]() Follow Tempo: Selecting the Follow Tempo checkbox allows your QuickTime movie to follow tempo change events using the Basis Tempo parameter as its baseline.
Follow Tempo: Selecting the Follow Tempo checkbox allows your QuickTime movie to follow tempo change events using the Basis Tempo parameter as its baseline.
![]() Basis Tempo: The Basis Tempo parameter defines the base tempo for any tempo changes the video may undergo when the Follow Tempo option is active.
Basis Tempo: The Basis Tempo parameter defines the base tempo for any tempo changes the video may undergo when the Follow Tempo option is active.
Movie Preferences
As you can see in Figure 14.5, there is a button on the bottom right of the Movie Settings window to open the Movie Preferences window. You can also access the Movie Preferences window by opening the Logic Pro X menu, choosing Preferences, and selecting Movie. Figure 14.6 shows the Movie Preferences window.
Figure 14.6 The Movie Preferences window.
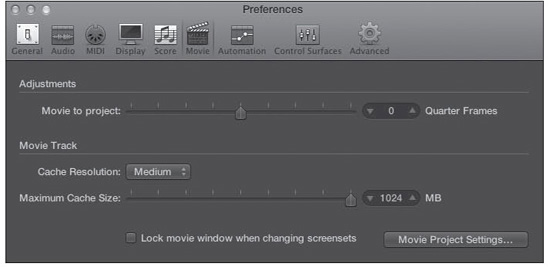
© Apple Inc.
The Movie Preferences window includes the following options:
![]() Movie to Project: This is a global setting to fine-tune exactly which quarter frame your movie will start on. You can either adjust the slider or type in a number. The range is −48 to 48 quarter frames.
Movie to Project: This is a global setting to fine-tune exactly which quarter frame your movie will start on. You can either adjust the slider or type in a number. The range is −48 to 48 quarter frames.
![]() Cache Resolution: This determines the resolution of video thumbnails stored in the temporary internal memory cache. Your options are Low, Medium, High, and Best. Obviously, the higher the quality, the more detail in your video thumbnails, but the more memory they take up.
Cache Resolution: This determines the resolution of video thumbnails stored in the temporary internal memory cache. Your options are Low, Medium, High, and Best. Obviously, the higher the quality, the more detail in your video thumbnails, but the more memory they take up.
![]() Maximum Cache Size: This determines how large your cache for video thumbnails can be. The memory is only filled when movie data is displayed.
Maximum Cache Size: This determines how large your cache for video thumbnails can be. The memory is only filled when movie data is displayed.
![]() Lock Movie Window When Changing Screensets: If you work with video a lot and want movies you work with to be locked in position on the screen when changing screensets, engage this option.
Lock Movie Window When Changing Screensets: If you work with video a lot and want movies you work with to be locked in position on the screen when changing screensets, engage this option.
Importing Audio from a QuickTime Movie
If you want to use the soundtrack from a QuickTime movie in your Logic project, you can use the Import Audio from Movie command to bring the QuickTime audio into your song. To use the command, open the File menu, choose Movie, and select Import Audio from Movie. When you do, Logic will automatically bounce the audio from the movie, perform any necessary sample-rate and format conversions, and add the new audio file to your Project Audio Browser using the name of the movie as the name of the new audio file. A new audio track will be created at the top of the Tracks area, and the audio from the movie will be placed on this track.
Exporting Audio to a QuickTime Movie
If you wish to add the bounced audio from your project into a QuickTime movie soundtrack using the Export Audio to Movie command, you will be presented with the Location and Name of New Movie dialog box, where you can also choose your export options, as shown in Figure 14.7.
Figure 14.7 The Location and Name of New Movie dialog box is where you set the location of your movie, name it, and set your export preferences.

© Apple Inc.
The available audio formats are Linear PCM, AAC, and Apple Lossless. Sample rates range from 44.1 to 96 kHz. Available bit depths are 16 and 24.
After you have chosen a location and a name to save your new QuickTime movie, you are prompted to specify which, if any, soundtracks from the original QuickTime movie should be included in the new QuickTime movie file. Figure 14.8 shows this window.
Figure 14.8 You can select which original tracks from the original QuickTime movie to include in the new QuickTime movie.
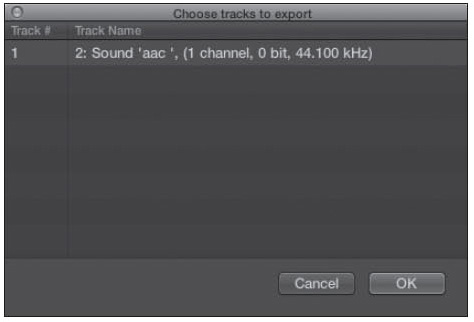
© Apple Inc.
Finally, Logic will bounce your Logic song (just as if you’d pressed the Bnc button on an output channel strip; opened the File menu, selected Bounce, and chosen Project or Section; or pressed Command+B) and then save that bounced audio to your new QuickTime movie.