
Chapter 7
Design and Deploy Azure application gateway, Azure front door, and Virtual NAT
You must ensure that end users have consistent access to applications, services, and data as your organization migrates infrastructure, applications, and data to Azure. Azure provides load balancing services that facilitate consistency of access. Load balancing ensures that no single server bears too much load by distributing network traffic across multiple servers. It increases user availability and application responsiveness by evenly spreading the work. Some load balancers also provide application security.
Critical prerequisites for reading this chapter include experience with networking concepts, including application load balancing and DNS; you should also be familiar with the Azure portal and Azure PowerShell.
In this chapter, you first learn how Azure Application Gateway works. We then show you how to set it up, including configuring health probes and listeners. Next, you learn about request routing, redirection, and rewrite policies.
Then, you see how to deploy Azure Front Door and how to choose an Azure Front Door SKU. You'll also learn about health probe operation and securing Front Door with SSL. SSL termination and end-to-end SSL encryption are covered, as are back-end pools, host headers, and health probes. The chapter then moves on to routing and routing rules, as well as URL redirection and rewriting.
Deploying an Azure Traffic Manager profile and Traffic Manager routing methods are next, followed by using VNet address translation, allocating public IP addresses or public IP prefixes for a NAT gateway, and finally associating a VNet NAT with a subnet.
Azure Application Gateway Overview
During migration to Azure, you must ensure that end users have consistent access to applications, services, and data.
Azure's load balancing tools support consistency of access. Load balancing distributes network traffic among multiple servers to prevent any server from carrying too much load. As a result of distributing work evenly, load balancing improves application responsiveness and increases application and service availability. Furthermore, load balancers offer additional security features.
Azure Application Gateway manages traffic to web applications by serving web traffic load balancers. Load balancers traditionally operate at the Transport layer (OSI Layer 4, TCP and UDP) and route traffic based on IP address and port information. It helps create highly available, scalable, and secure web front-ends. By utilizing Azure's application-level load balancing and routing features, you can create a scalable and highly available web front-end, and you can automatically scale Application Gateway instances as web application traffic increases.
Avoid web vulnerabilities such as SQL injection and cross-site scripting by protecting your business applications. Use custom rules and rule groups to monitor your web applications and eliminate false positives.
Several Azure services can be integrated with Application Gateway:
- Azure Traffic Manager supports multiple-region redirections, automatic failovers, and zero-downtime maintenance.
- You can use Azure Virtual Machines, Azure Virtual Machine scale sets, or Azure App Service Web Apps for back-end pools.
- Monitoring and alerting are provided by Azure Monitor and Azure Security Center and an application health dashboard.
- In Key Vault, SSL certificates can be managed centrally and automatically renewed.
Organization data is protected with strong encryption from front to back. Application Gateway routes traffic to back-end server pools based on URL paths and multiple web applications using host headers. Reduce encryption and decryption overhead on your servers by offloading SSL to business applications and centralizing SSL certificate management.
Application Gateway offers the following capabilities:
- An application delivery controller that is platform-managed, scalable, and highly available
- Centralized SSL policy and offloading
- For multi-instance deployments, a service level agreement (SLA) of 99.95 percent uptime
- Support for cookie-based session affinity and public, private, or hybrid websites
- Layer 7 load balancing solutions that you can customize
- Integration with your web application firewall
Application Gateway has the following features:
- Protocols supported include HTTP, HTTPS, HTTP/2, and WebSocket.
- It offers protection against web application vulnerabilities using a web application firewall.
- End-to-end request encryption is provided.
- It offers autoscaling for dynamically adjusting capacity as needs change.
- You can redirect to another site or switch from HTTP to HTTPS.
- Clients and servers can exchange parameter information using HTTP headers.
- Rather than displaying default error pages, Application Gateway allows you to create custom error pages with your own branding and layout.
- HTTP request attributes can be used by Application Gateway to make routing decisions, including URI paths and host headers.
- Consumers of the Azure cloud can route traffic based on the incoming URL.
How Application Gateway Works
This section explains how an application gateway accepts incoming end-user requests and routes them to the back-end.
Applications can be loaded through Application Gateway both internally and externally. This gateway uses public IP addresses and DNS names for Internet-facing application gateways, which must resolve their private IP addresses to public IP addresses. As a result, Internet-facing application gateways can route client requests.
Internal application gateways use private IP addresses. You can use a custom or private DNS zone, and the domain name should be internally resolvable to the Application Gateway's private IP address. So, internal load balancers can only route requests from clients with access to an application gateway's virtual network. Figure 7.1 is an overview of Application Gateway.

FIGURE 7.1 Application Gateway overview
Gateways accept requests using the following methods:
- Using a Domain Name System (DNS) server, a client resolves the domain name of an application gateway before sending a request to the gateway. Because all application gateways are under the
azure.comdomain, Azure controls the DNS entry. - In Azure DNS, the front-end IP address of the application gateway is returned to the client.
- One or more listeners accept traffic from the application gateway. Listeners are logical entities that receive connection requests and are configured with an IP address, protocol, and port number for client connections to the application gateway.
- Web application firewalls (WAFs) check request headers and bodies, if they are present, against WAF rules. They use this information to determine whether the request is legitimate or a security threat. If the request is valid, it is sent to the back-end. A WAF in Prevention mode blocks a request that isn't valid, considering it a security threat. It is evaluated and logged if it is in Detection mode but is still forwarded to the back-end server if it is not a security threat.
Gateways route requests using the following methods:
- The gateway evaluates the routing rule associated with the listener if a request is valid and not blocked by WAF. Based on this, the gateway routes requests to the appropriate back-end pool.
- Requests for a listener are routed by the application gateway based on the request routing rule, which determines whether they should be routed to one back-end pool or another based on the URL path.
- Upon selecting the back-end pool or another based on the URL Path, the gateway requests one of its healthy back-end servers (
y.y.y.y). This is done with a health probe. If the back-end pool contains multiple servers, the application gateway routes requests among healthy servers using a round-robin algorithm, and this load-balances the recommendations on the servers. - The application gateway determines the back-end server based on HTTP settings and opens a TCP session. A new HTTP session with a back-end server requires specific protocol, port, and routing settings.
- An application gateway determines whether traffic between it and a back-end server is encrypted (thus achieving end-to-end TLS) or not.
- Back-end servers honor any customized HTTP settings made in the HTTP settings, which override hostname, path, and protocol, whenever they receive an original request from an application gateway. Cookies-based session affinity, connection draining, back-end hostname selection, etc. are maintained.
In the case of the back-end pool, gateways route requests as follows:
- The application gateway connects to the server using its front-end public IP address as a public endpoint. One is assigned for outbound external connectivity when there isn't a front-end public IP address.
- Application gateway routes the request to the back-end server using its private IP address.
- The back-end server's front-end public IP address routes requests to a back-end server with an external endpoint or an externally resolvable FQDN. A private DNS zone or custom DNS server is used to resolve DNS, or Azure provides its own DNS. An IP address is assigned for outbound external connectivity if there isn't one.
The next three sections discuss what you need to consider when you deploy Azure Application Gateway.
Approaches to Application Gateway Routing
Clients send requests to your organization's web apps to the gateway's IP address or DNS name. Requests are routed through the gateway to a selected web server in the back-end pool, according to rules configured for the gateway to determine where the appeal should be directed.
There are two primary approaches for routing traffic:
- Path-Based Routing Path-based routing routes requests to different pools of back-end servers using different URL paths.
For instance, if a user wants to play a video, the request is routed to the path
/video/*, which is hosted in a pool of autoscale servers optimized for handling video streaming. If the user wants an image, then the request is routed to the path/images/*, which is hosted in a pool of servers optimized for image retrieval. - Multiple-Site Routing Multiple-site routing is helpful when you need to configure several web applications’ routing on the same application gateway instance. In a multisite configuration, you can register multiple DNS names (CNAMEs) for the Application Gateway IP address, specifying the name of each site. Different listeners handle requests for each site in Application Gateway. Every listener passes the request to a different rule, which routes the request to servers in different back-end pools.
Multisite configurations facilitate the use of multitenant applications in which each tenant has its own virtual machine or other resources for hosting a web application.
Choosing Application Gateway SKU
Standard_v2 SKU supports Application Gateway, and WAF_v2 SKU supports Web Application Firewall (WAF). The v2 SKUs offer essential features such as autoscaling, redundancy in zones, and static virtual IP (VIP) support for static IP addresses. The Standard and WAF v2 SKUs continue to support existing features.
Table 7.1 provides an overview of the Azure Application Gateway and WAF SKUs.
TABLE 7.1 Overview of the Azure Application Gateway and WAF SKUs
| Type | Description |
|---|---|
| Autoscaling | With the autoscaling SKU, a WAF or Application Gateway can scale out in response to changing traffic loads. Additionally, autoscaling removes the requirement to choose a deployment size or instance count when provisioning. The SKU is highly elastic. With the Standard_v2 and WAF_v2 SKUs, Application Gateway can operate in autoscaling-disabled (fixed-capacity) and autoscaling-enabled modes. A restricted capacity mode is beneficial for scenarios with consistent and predictable workloads, whereas an autoscaling mode is beneficial for unpredictable application traffic. |
| Zone redundancy | A single Application Gateway deployment can cover multiple availability zones, thus eliminating the need to deploy separate instances of an application gateway in each zone with Traffic Manager. You can choose to deploy Application Gateway instances in a single zone or multiple zones, increasing zone resilience. Applications’ back-end pools can also be distributed among availability zones. As of this writing, availability zones aren't supported by every Azure region. |
| Static VIP | The Application Gateway v2 SKU supports the static VIP type. Even after restarting the deployment, the VIP associated with the application gateway remains unchanged. You must use the application gateway URL instead of the IP address for domain name routing to App Services via the application gateway. |
| Header Rewrite | You can add, remove, or update HTTP requests and response headers with the v2 SKU of Application Gateway. |
| Key Vault Integration | With Application Gateway v2, certificates attached to HTTPS-enabled listeners can be stored in the Key Vault. |
| Azure Kubernetes Service Ingress Controller | An Azure Application Gateway can be used as an ingress for an Azure Kubernetes Service (AKS) cluster using the Application Gateway v2 Ingress Controller. |
| Performance enhancements | The TLS offload performance of the v2 SKU is up to 5 times better than the Standard/WAF SKU. |
| Faster deployment and update time | Compared to the Standard/WAF SKU, the V2 SKU offers a faster deployment, and the update process includes WAF configuration changes. |
Scaling Options for Application Gateway and WAF
There are two ways to configure Application Gateway and WAF for scaling:
- Autoscaling With autoscaling allowed, the Application Gateway and WAF v2 SKUs scale in or out based on application traffic requirements. This model offers better elasticity to your application, eliminating the need to guess the gateway size and the number of instances.
The Application Gateway does not need to run at peak capacity for the anticipated maximum traffic load using this mode. You must specify a minimum instance count, and, optionally, a complete instance count. With minimum capacity, Application Gateway and WAF v2 ensure they don't fall below the minimum instance count specified, even in the absence of traffic. In terms of reserved capacity units, each model corresponds to 10 or more units, and 0 is an autoscaling model that has no reserved capacity.
You can also specify a maximum instance count to prevent Application Gateway from scaling beyond specified limits. The gateway will only be charged for the traffic it serves. A complete instance count of 20 is the default if no value is specified. The instance count can range from 0 to 125.
Azure Application Gateways are always deployed in a highly available environment. Instances of the service are created either as configured (if autoscaling is disabled) or as required by the application load (if autoscaling is enabled). It is important to note that users only have visibility into the Application Gateway service, not into individual instances. When an Application Gateway model is having a problem and is no longer functioning, a new instance will be created transparently.
- Manual You can also choose Manual mode, which disables autoscaling. If there is too much traffic, a traffic loss may result if Application Gateway or WAF cannot handle it. You must specify the number of instances for Manual mode, varying between 1 and 125.
Overview of Application Gateway Deployment
In Application Gateway, several components work together to send requests to a pool of web servers and check their health. Figure 7.2 depicts the building blocks involved in deploying Application Gateway.

FIGURE 7.2 Building blocks of Application Gateway
Front-End Setup
IP addresses associated with application gateways are called front-end IP addresses. You can configure the IP address in an application gateway to be public, private, or both. Application gateways support one public and one private IP address. You must have the same virtual network and public IP address to use your application gateway. Listeners are assigned a front-end IP address after they are created.
Back-End Setup
Back-end servers receive requests and route them to the back-end pool, which processes them. A back-end pool can be composed of NICs, virtual machine scale sets, public IP addresses, internal IP addresses, and multitenant back-ends like Azure App Service. You can create an empty back-end pool and add back-end targets to the pool following application gateway creation.
Health Probes Setup
By default, Azure Application Gateway automatically removes any resources from its back-end pool when they are deemed unhealthy. Once they become available and respond to health probes, Application Gateway adds the formerly unhealthy instances back to the healthy pool. The application gateway uses the same port as the HTTP back-end settings to send health probes by default. This can be changed by using a custom probe.
Source IP addresses used by Application Gateway for health probes depend on the back-end pool:
- An application gateway's public IP address is the back-end pool's server address's source address.
- The source IP address comes from the application gateway subnet's private IP address space if the server address in the back-end pool is a Private Endpoint.
Default Health Probe
An application gateway automatically configures a default health probe when you do not set up any custom probe configurations. Monitoring is performed by making an HTTP GET request to the configured IP addresses or FQDNs in the back-end pool. Default probes use HTTPS to test the health of the back-end servers if the back-end HTTP settings are configured for HTTPS.
For instance, let's say you configure an application gateway to receive HTTP network traffic on port 80 using back-end servers X, Y, and Z. With default health monitoring, the three servers are tested for a healthy HTTP response every 30 seconds with a 30-second timeout for each request. The HTTP status code for a healthy response is 200 to 399. For this health probe, the HTTP GET request will look like http://127.0.0.1/.
If server X fails the default probe check, the application gateway stops forwarding requests. Server X is checked every 30 seconds by the default probe. The application gateway starts forwarding requests to server X after server X responds successfully to a health probe request.
Table 7.2 provides definitions for the properties of default health probe settings.
TABLE 7.2 Default health probe configuration
| Probe Property | Value | Description |
|---|---|---|
| Probe URL | <protocol>://127.0.0.1:<port>/ | The protocol and port of the probe are inherited from the back-end HTTP settings. |
| Interval | 30 Seconds | In seconds, the time between health probes. |
| Time-Out | 30 Seconds | In seconds, the amount of time the application gateway waits for a probe response before marking the probe as unhealthy. After a probe returns as healthy, the corresponding back-end is also marked as healthy. |
| Unhealthy | 3 | If the standard health probe fails, it determines how many probes should be sent. In the v1 SKU, these additional health probes are sent immediately to determine the back-end's health instead of waiting for the probe interval. A health probe remains in place for the interval with the v2 SKU. In case of consecutive probe failures, the back-end server is marked as unhealthy. |
Application Gateway instances probe the back-end independently, and the same probe configuration applies to each Application Gateway instance. For example, if the probe configuration sends health probes every 30 seconds, both instances of the application gateway will send the health probe every 30 seconds. There may be more than one listener, and each probes the back-end independently.
Custom Health Probe
With custom probes, you have more control over health monitoring. You can configure custom probes to work with a custom hostname, URL path, and probe interval, as well as specify how many failed responses to accept before marking the back-end pool instance as unhealthy.
Table 7.3 provides definitions for the properties of custom health probes.
TABLE 7.3 Custom health probe configuration
| Probe Property | Description |
|---|---|
| Name | The probe's name. In the back-end HTTP settings, the probe is identified by this name. |
| Protocol | The protocol for sending the probe. In the back-end HTTP settings, it must match the protocol it is associated with. |
| Host | This value is the name of the virtual host running on the application server (different from the VM hostname). *protocol>://*host name>:*port>/*urlPath> is the probe address. The server's private IP address, the public IP address, or the DNS entry for the public IP address can also be used. If used with a file-based path entry, this will attempt to access the server and verify that a certain file exists on the server as a health check. |
| Ports | A custom port ranging from 1 to 65535. |
| Path | The relative path is followed by the probe. A valid path begins with a slash (/). |
| Port | The destination port is used if it has been defined. If not, the HTTP settings are used. It is only available with the v2 SKU. |
| Interval | The time in seconds between two successive probes. |
| Time-Out | Calculate the time-out in seconds. During this time-out period, if no valid response is received, the probe is marked as failed. |
| Unhealthy | Count the retries of a probe. If the consecutive probe failure count reaches an unhealthy level, the back-end server is marked as down. |
Probe Matching
HTTP(S) responses with a status code between 200 and 399 are considered healthy by default. Custom health probes also support two additional matching criteria, which can be used to modify the default interpretation of what constitutes a healthy response.
- There is a probe matching criterion for accepting user-specified HTTP response codes or ranges of HTTP response codes. There is support for individual comma-separated response status codes or a range of status codes.
The probe matching criterion looks at the HTTP response body and matches it with a user-specified string. It doesn't perform a full regular expression match and only looks for the presence of a user-specified string in the response body.
- Using the
New-AzApplicationGatewayProbeHealthResponseMatchcmdlet, you can specify match criteria.
Configuring Listeners
An incoming connection request is received by a listener that checks port, protocol, host, and IP address. You have to configure a listener; they enter values that match those in the incoming request on the gateway.
In addition to creating an application gateway using the Azure portal, you should generate a default listener by selecting the protocol and port. If HTTP2 support is enabled on the listener, it can be selected. After creating the application gateway, you can edit the settings of the default listener (appGatewayHttpListener) or create new listeners.
When you create a new listener, you must choose between basic and multisite:
- With a basic listener, every request will be accepted and forwarded to the back-end pools of the domain.
- With a multisite listener, requests are routed to different back-end pools according to the host header or hostname. Incoming requests must match the hostname specified. To host multiple websites on the same public IP address and port, Application Gateway uses HTTP 1.1 host headers.
The following items describe rules to configure for listeners:
- Front-End IP Select the address that will associate with this listener. Requests will be routed to this address.
- Front-End Port A new front-end port can be created, or an existing port should be selected. There are a variety of ports that can be chosen. You can use well-known ports, such as 80 and 443, and any custom port that's allowed. There are two types of ports: public and private.
- Protocol: Choose HTTP or HTTPS
You must select the protocol to use:
-
- HTTP Nothing is encrypted between a client and an application gateway.
- HTTPS Enables the termination or encryption of TLS. At the application gateway, the TLS connection ends, and client and application traffic are encrypted. You must configure the back-end HTTP settings if you want end-to-end TLS encryption. It is reencrypted when traffic travels from the application gateway to the back-end.
- Certificate The certificate must be added to the listener so that the application gateway can derive a symmetric key to configure TLS termination and end-to-end encryption. The TLS protocol specifies this requirement. Traffic sent to the gateway is encrypted and decrypted using the symmetric key. A PFX format certificate must be used for creating the certificate. You can decrypt and encrypt traffic using this gateway by exporting the private key.
- Order of Processing Listeners The v1 SKU matches requests according to the order of the rules and the type of listener. The rules with a simple listener come first, are processed first, and accept requests for that port and IP combination. To avoid this, configure the rules with multisite listeners first, then push the basic listeners to the end.
Listeners for SKU v2 are processed before listeners for SKU v1.
Redirection Overview
Traffic can be redirected using an application gateway. This software allows traffic from one listener to be routed to another listener or a remote website using a generic redirection mechanism. The method simplifies application configuration, optimizes resource usage, and supports new redirection scenarios, such as global and path-based redirection.
Typical web application redirection scenarios automatically redirect HTTP traffic to HTTPS to ensure all communications between the application and its users are encrypted. In the past, customers created a dedicated back-end pool that only redirects HTTP requests to HTTPS. With Application Gateway's redirection support, you can accomplish this easily by adding a new redirect configuration to a routing rule and specifying another listener with HTTPS protocol as the target listener.
Figure 7.3 shows how redirection is performed.
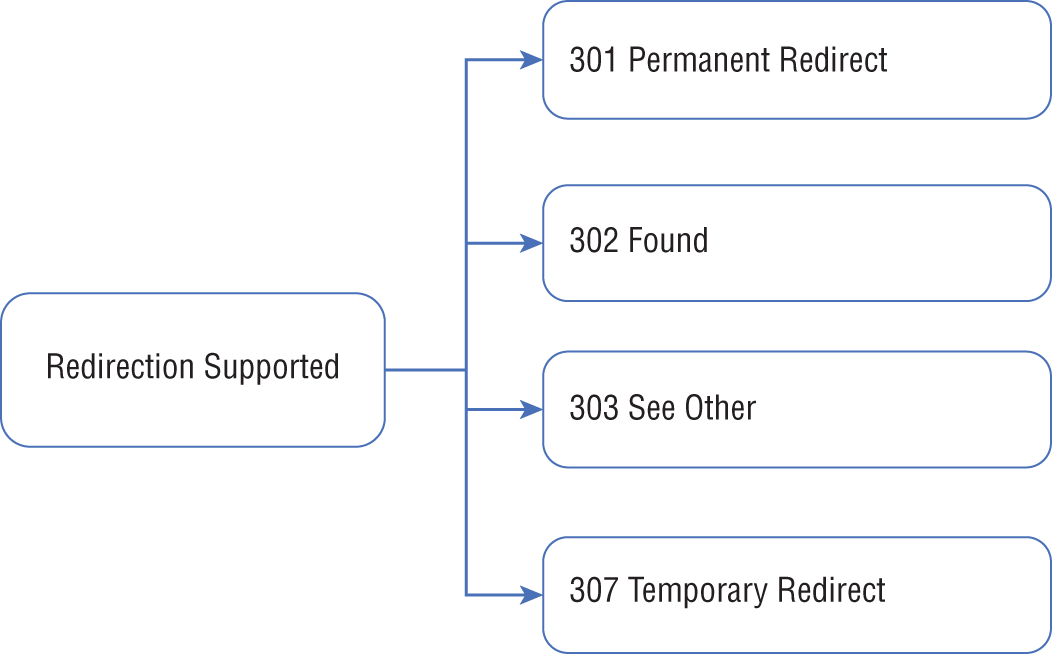
FIGURE 7.3 Redirection types supported
Application Gateway redirection supports the following features:
- It redirects traffic from one gateway listener to another via global redirection. HTTPS redirection is possible.
- Path-based redirection only works on specific site sections, such as a shopping cart area denoted by
/cart/*. - Redirection to an external site requires a new redirect configuration object that specifies the external site or target listener to redirect to. URI paths and query strings can also be appended to the redirected URL with the configuration element. The redirect configuration is attached by adding a new rule to the source listener.
Application Gateway Request Routing Rules
Using the Azure portal, you can create an application gateway that uses the default rule. AppGatewayHttpListener (default listener) and AppGatewayBackendPool (default back-end pool), as well as AppGatewayBackendHTTPSettings (default back-end HTTP settings), are bound together by this rule.
In the v1 and v2 SKUs, pattern matching is applied to incoming requests so that the paths can be listed in the URL path map of the path-based rule. The path listed first is used in the case of requests matching patterns in more than one path in the path map. Those requests are forwarded to the appropriate back-end.
After creating the gateway, you can edit the default rule settings or create new ones. Configure the routing rule as shown in Figure 7.4.

FIGURE 7.4 Routing rules supported by Application Gateway
- The following are routing rule settings.
- Attached Listener The request-routing rule associated with the listener determines the back-end pool to use based on the request-routing rule.
- Attached Backend Pool The rule is associated with the back-end pool containing the back-end targets that serve listeners’ requests. In general, only one back-end pool is allowed. This back-end pool receives all requests made to the associated listener.
For path-based rules, add multiple back-end pools to each URL path. Requests matched by the URL path are routed to the back-end pool. You can also add a default back-end pool. The pool receives requests that don't match any URL path in the rule.
- Attached Backend HTTP Settings For each rule, you should add an HTTP setting. This setting specifies which port numbers, protocols, and other information are used to route requests from the application gateway to the back-end targets.
There can only be one HTTP back-end setting according to a basic rule. A request on an associated listener is forwarded to the corresponding back-end target using this HTTP setting.
For a path-based rule, add multiple HTTP back-end settings. URL paths matching this setting are forwarded to the corresponding back-end targets using HTTP settings corresponding to the URL paths. Default HTTP settings should also be added. The default HTTP setting is used to handle requests that do not match any of the URL paths in this rule.
Redirection Setting
In a basic rule redirection, all requests on the associated listener will be forwarded to the target. We call this global redirection. Redirecting using paths is supported. Only requests from specific site areas are redirected if path-based redirection is configured—for example, the shopping cart area can be identified by /cart/*.
- The following are redirection settings.
- Redirection Type There are four types of redirections: Permanent (301), Temporary (307), Found (302), and See Other (303).
- Redirection Target Redirection can be to another listener or to an external site.
- Listener Use the listener as a redirection target to switch traffic between listeners on a gateway.
- External Site You can use an external site to redirect traffic on the listener associated with this rule. The query string from the original request can be included in the request forwarded to the redirection target. You can't forward the path to the external site in the original request.
As the requests and response packets move between the client and back-end pools via the application gateway, you can add, remove, or update HTTP(S) headers and URL path and query string parameters.
A header and URL parameter can be set to a static value or an array of headers and server variables. This is useful with essential use cases, such as removing sensitive information from back-ends or adding more security.
Application Gateway Rewrite Policies
Application Gateway allows you to rewrite some of the content of requests and responses. Using this feature, you can translate URLs, query string parameters, and custom headers. You can also add conditions to ensure that the URL or specified headers are rewritten only if certain conditions are met. The conditions are set based on requests and responses.
Only one version of Application Gateway (v2) includes HTTP headers and URL rewrites.
Application Gateway supports multiple rewrite types such as the following:
- Request and response headers
- URL path and query string headers
Request and Response Headers
A client and server can include additional information with a request or response using HTTP headers. With these headers, Azure engineers can accomplish essential tasks, such as adding security-related header fields like HSTS/X-XSS-Protection, removing response header fields that could reveal sensitive information, and removing port information from X-Forwarded-For headers.
Application Gateway allows you to add, remove, or update HTTP request and response headers as requests and responses move between client and back-end pools. The request and response header's logical flow is depicted in Figure 7.5.
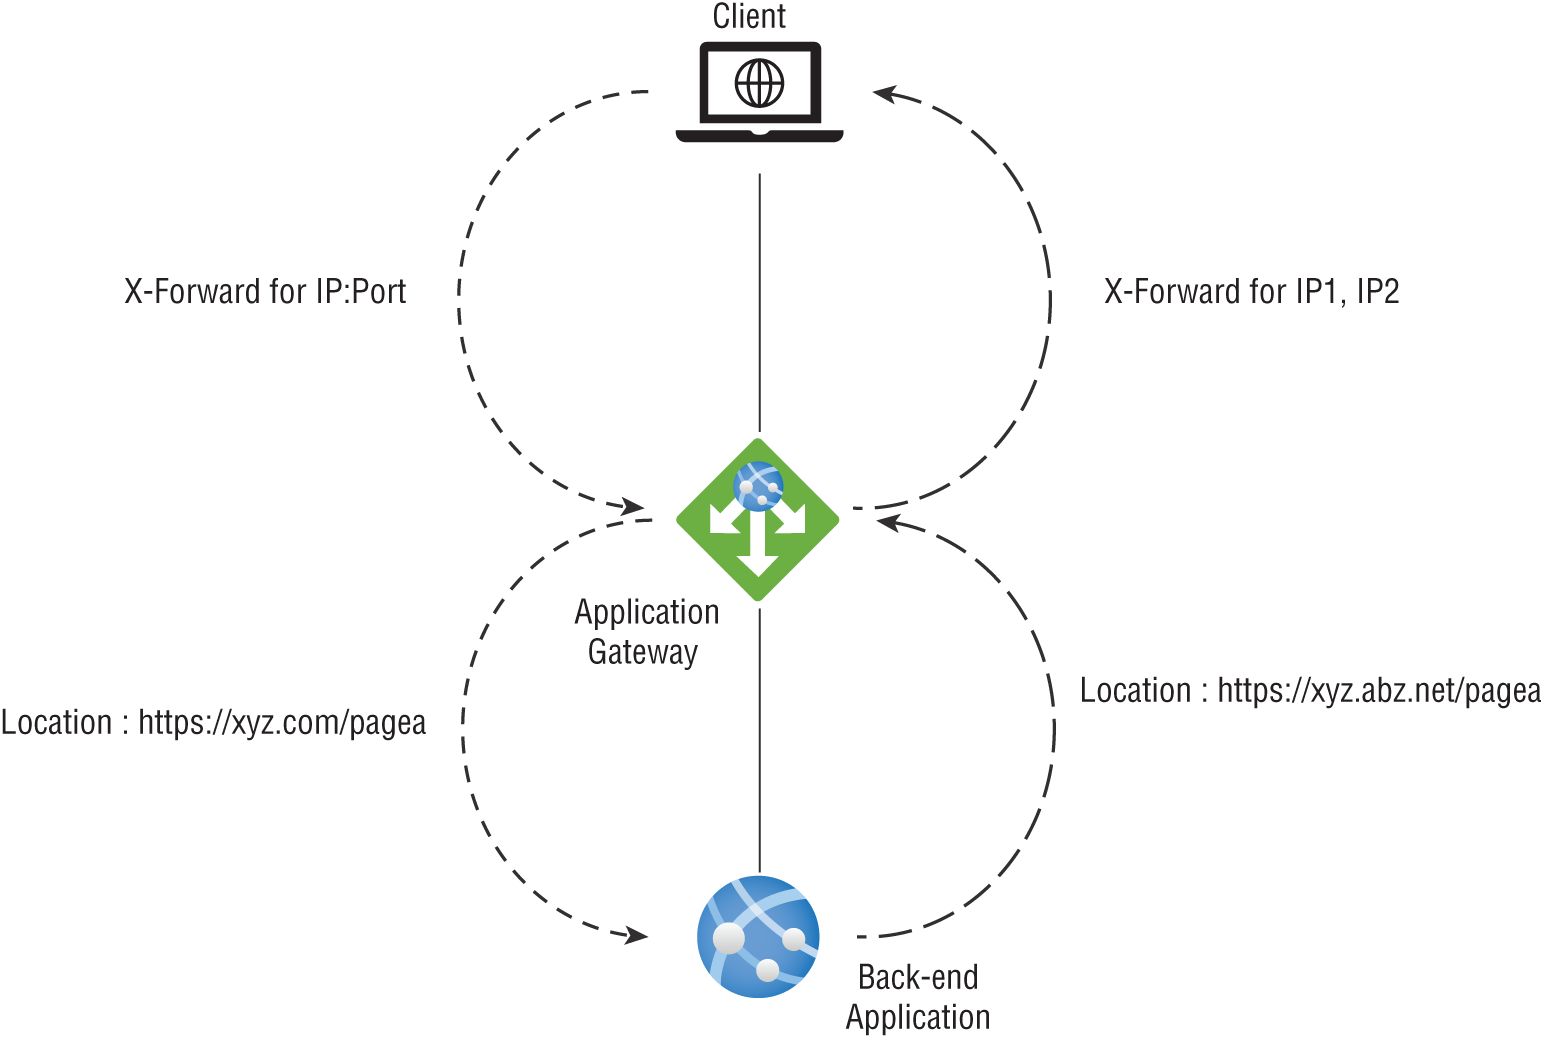
FIGURE 7.5 Request and response header's logical flow
URL Path and Query String Headers
Keep the following in mind when using the URL rewriting capabilities in Application Gateway:
- Request URLs should be rewritten to include the hostname, path, and query string.
- Choose whether to rewrite the URL of all requests on a listener or only those that fulfill one or more conditions. These conditions are determined by the request and response properties (request, header, response header, and server variables).
- When routing the request, it is possible to select either the original URL or the rewritten URL (choosing the back-end pool).
Rewrite Steps
Rewrite actions enable you to specify that the URL, request header, or response header be rewritten to a new value. The value of a URL or a new or existing header can be set to these values, as depicted in Figure 7.6.

FIGURE 7.6 Rewrite logical workflow
Rewrite Conditions
Azure engineers can set up rewrite conditions, an optional configuration, to analyze HTTP(S) requests and responses and only rewrite when the conditions are met. These variables are used by the application gateway to evaluate requests and responses:
- Request headers in HTTP
- Request Response headers in HTTP responses
- Server variables in Application Gateway
You can use conditions to determine whether a specific variable is present, if a particular variable matches a specified value, or if a particular variable matches one specific pattern.
Rewrite Configurations
You can configure rewrite rules by creating a rewrite rule set and adding a rewrite rule configuration. The rewrite configuration's logical flow is shown in Figure 7.7.

FIGURE 7.7 Rewrite configuration's logical flow
Request Routing Rule Association
Router rules are used to associate the rewrite configuration with the source listener. The basic routing rule involves a source listener and global header rewrite for rewrite configurations. The URL path map defines the rewrite configuration using a path-based routing rule. The URL path map specifies if it applies to a particular path area. You can create multiple rewrite sets and apply each rewrite set to many listeners. You can only apply one rewrite set to one listener at a time.
Rewrite Condition
The configuration is optional. HTTP(S) requests and responses are evaluated with rewrite conditions. Whenever the rewrite condition is met, the rewrite action will be executed. You can associate multiple conditions with an effort, but the action will only occur when all conditions are met. This is called a logical AND operation.
Rewrite Types
There are three types of rewrites available:
- Request header rewriting
- Response header rewriting
- URL component rewriting:
- URL path: Redirects the path to a new value.
- URL query string: The new value of the query string.
- Path map re-evaluation: Used to determine whether the URL path map needs to be reevaluated. The original URL path will match the path pattern in the URL path map if the check box is not selected. In this case, the URL path map will be reevaluated to ensure the rewritten path matches the URL path map. Post rewrite, this switch routes the request to a different back-end pool.
With the background gained to this point in the chapter, you are now ready to follow the steps in Exercise 7.1 to design and deploy an Azure Application Gateway using the Azure portal.
As you learned earlier in this chapter, applications use the application gateway to direct web traffic to specific resources in the back-end pool. The back-end pool is built by assigning listeners to ports, creating rules, and adding resources. To keep this exercise simple, we'll only be using a front-end IP address, a listener to host a single site on the gateway, and two virtual machines.
Azure uses a virtual network to connect the resources you create. The application gateway is created when a virtual network is created, and each Application Gateway instance is created in a separate subnet.
Features and Capabilities of Azure Front Door SKUs
Azure Front Door is an entry point that utilizes Microsoft's global edge network to create quick, secure, and globally scalable web applications. You can use Front Door to convert worldwide consumer and enterprise apps into robust, high-performance applications with content that reaches a global audience through Azure.
Front Door allows you to develop, operate, and scale static and dynamic web applications. The service enables you to define, manage, and monitor end-user performance and reliability, allowing quick global failover for a top-of-the-line end-user experience.
Front Door uses the Anycast protocol, a split TCP, and Microsoft's global network to improve global connectivity at Layer 7 (HTTP/HTTPS).
Using split TCP, you can reduce latencies and TCP problems by breaking a long-running connection into smaller pieces.
A client's TCP connection can be split to terminate near the user's Front Door edge location.
You can ensure Front Door routes end-user client requests to the most efficient and available application back-end based on your organization's routing method. In Azure, an application back-end is any service that can be accessed through the Internet. Front Door provides a variety of traffic-routing methods and back-end health monitoring options to meet a wide range of application requirements and scenarios. As with Traffic Manager, Front Door is resilient to failures, including failures to an entire Azure region.
Application Gateway and Front Door are both Layer 7 load balancers, but Front Door is a global service whereas Application Gateway is a regional service. Front Door can balance loads across scale units, clusters, and stamp units in different regions. A scale unit's Application Gateway load-balances virtual machines and containers.
Front Door includes the following features and capabilities:
- A split TCP-based Anycast protocol improves application performance.
- Back-end resources are monitored with intelligent health probes.
- Requests are routed on a URL-path basis.
- Multiple websites can be hosted efficiently.
- An affinity cookie is used to identify sessions.
- You can manage SSL offloading and certificates.
- You can configure custom domains.
- Application security is provided with Web Application Firewall.
- You can use URL redirects or rewrites to forward HTTP traffic to HTTPS.
HTTP/2 and IPv6 connectivity are supported natively.
In addition to Azure Front Door, Azure Front Door Standard and Azure Front Door Premium (both in preview as of this writing) are available. Combined with Azure Content Delivery Network (CDN) Standard and Azure WAF, Azure Front Door Standard/Premium provides a robust, secure cloud CDN platform with intelligent threat protection.
Table 7.4 shows a high-level capabilities comparison.
TABLE 7.4 Front Door Standard vs. Front Door Premium
| Azure Front Door Standard SKU | Azure Front Door Premium SKU |
|---|---|
| Optimized content delivery | All the capabilities of the Standard SKU |
| Static and dynamic content | A wide range of security capabilities across WAF, including protection against bots |
| Global load balancing | Private Link |
| SSL offloading | Security analytics and integration with Microsoft Threat Intelligence |
| Domain and certificate management | |
| Improved traffic analytics | |
| Basic security |
Table 7.5 is a high-level feature comparison.
TABLE 7.5 Front Door Standard and Front Door Premium Feature comparison
| Feature | Standard | Premium |
|---|---|---|
| Custom domains | Yes | Yes |
| SSL offload | Yes | Yes |
| Caching | Yes | Yes |
| Compression | Yes | Yes |
| Global load balancing | Yes | Yes |
| Layer 7 routing | Yes | Yes |
| URL rewrite | Yes | Yes |
| Rules Engine | Yes | Yes |
| Private Origin (Private Link) | No | Yes |
| WAF | Custom Rules only | Yes |
| Bot protection | No | Yes |
| Enhanced metrics and diagnostics | Yes | Yes |
| Security report | No | Yes |
| Traffic report | Yes | Yes |
Health Probe Characteristics and Operation
To determine each back-end's health and proximity to a Front Door environment, Front Door sends a synthetic HTTP/HTTPS request (a health probe) to each configured back-end. Front Door then determines which back-end resources will best route an end-user's client requests using the responses from the probe.
Each Azure Front Door edge POP emits health probes to your origins, resulting in a high volume of health probes for your origins. The number of probes depends on your customer's traffic location and the frequency at which health probes are sent. Azure Front Door edge POPs reduce the frequency of the health probe if they do not receive real traffic from your end-users. Based on the frequency of your health probes, the health probe volume can be high if there is customer traffic to all Azure Front Door edge POPs.
Using the default probe frequency of 30 seconds, estimate the volume of health probes to your origin per minute. A probe volume equals two requests per minute multiplied by the number of edge POPs on each origin. There will be fewer probing requests if all POPs are not contacted.
You can send probes to Front Door via HTTP or HTTPS. The probes are sent over the same TCP ports configured for routing client requests and cannot be overridden.
Supported HTTP Methods for Health Probes
Front Door supports the following HTTP methods for sending health probes:
- GET GET retrieves whatever the Request-URI identifies as information (as an entity).
- HEAD A HEAD request is identical to a GET request, except the server must not return a message-body. For new Front Door profiles, the probe method by default is HEAD since it has a lower load and cost for back-ends.
Health Probe Responses
Table 7.6 summarizes the health probe responses.
TABLE 7.6 Health Probe responses
| Response | Description |
|---|---|
| Determining health | A 200 OK status code indicates a healthy back-end. If a valid HTTP response is not received (including network failures), the back-end has failed. |
| Measuring latency | A probe's latency is the wall-clock time elapsed between when the request is sent and when the last byte of the response is received. As each request uses a new TCP connection, this measurement is not biased toward back-ends with existing warm connections. |
Secure Front Door with SSL
You can ensure that sensitive data is delivered securely via TLS/SSL encryption to your organization's custom domain (for example, https://www.sybexdemo.com). The web browser validates the URL with HTTPS and verifies that a legitimate certificate authority issued the security certificate. Your organization's websites are secured and protected by this process.
Custom HTTPS features should have the following critical attributes:
- No Additional Charges There are no charges for certification or HTTPS traffic.
- Easy Provisioning One-click provisioning is available in the Azure portal. In addition to the REST API, you can use other developer tools to enable this feature.
- Complete Certificate Management All certificate procurement and management are handled for your organization. Certificates are automatically provisioned and renewed before expiration, which removes the risks of service interruption due to a certificate expiring.
You can enable the HTTPS protocol for a custom domain associated with Front Door under the front-end host's section. HTTPS is enabled by default on a Front Door default hostname in Azure Front Door. The HTTPS protocol is automatically enabled for requests made to https://sybexdemo.azurefd.net when you create a Front Door (for example, https://contoso.azurefd.net). You must allow HTTPS for this front-end host once your organization has registered the custom domain www.sybexdemo.com.
Front Door for Web Applications with a High-Availability Design Pattern
In this section, you build a pool of two instances for a web application from different Azure regions by using Azure Front Door. With this configuration, Front Door monitors the web application continuously and directs traffic to the nearest site that runs the application. Also, you perform a failover to the next available site. The network configuration is shown in Figure 7.8.

FIGURE 7.8 Front Door design pattern
To complete Exercise 7.2, you perform the following two activities:
- Activity 1: Build two instances of a web application.
- Activity 2: Build a Front Door for the web applications.
SSL Termination and End-to-End SSL Encryption
Secure Sockets Layer (SSL) was the previous name for Transport Layer Security (TLS), a technology that establishes an encrypted link between a web server and a browser. All data passed between the web server and the web browser remains private and encrypted using this link.
Front Door supports end-to-end TLS encryption to meet security and compliance requirements. By terminating the TLS connection, Front Door TLS/SSL offloads the traffic at the Front Door, decrypts it, and re-encrypts it before forwarding it to the back-end. Because connections to the back-end are made over a public IP, you must configure HTTPS as the forwarding protocol on your Front Door to enforce end-to-end TLS encryption from the client to the back-end.
Secure data in transit to the back-end with end-to-end TLS while taking advantage of Front Door features like global load balancing and caching. URL-based routing, TCP split, caches close to clients, and the ability to customize HTTP requests at the edge are included.
Front Door decrypts client requests at the edge, offloading TLS sessions. Requests are then routed to the appropriate back-end pool by the configured routing rules. When Front Door transmits a request, it establishes a new TLS connection to the back-end and re-encrypts all data using the back-end's certificate. The back-end response to the end-user is encrypted through the same process. Your Front Door can be configured to use HTTPS as a forwarding protocol to enable end-to-end TLS.
The Front Door platform supports three versions of TLS: versions 1.0, 1.1, and 1.2. Since September 2019, all Front Door profiles use TLS 1.2 by default, but TLS 1.0 and TLS 1.1 are still available for backward compatibility.
Front Door currently does not support client/mutual authentication, despite TLS 1.2, which introduces client/mutual authentication through RFC 5246.
You can set the minimum TLS version in the custom domain HTTPS settings by using the Azure portal or the Azure REST API. Currently, you can select between 1.0 and 1.2 TLS to control the minimum TLS version Front Door will accept from a client. You can specify TLS 1.2 as the minimum. Front Door will attempt to negotiate the best TLS version the back-end can reliably and consistently accept when sending TLS traffic.
Your organization must create the certificate chain for your TLS/SSL certificate with an approved certificate authority (CA) on the Microsoft trusted CA list. Organizations whose CAs are not allowed will have their requests rejected. Self-signed certificates and certificates issued by internal CAs are not allowed.
Front Door is configured to Online Certificate Status Protocol (OCSP) by default, so no configuration is needed.
Front Door requires a valid CA certificate from the back-end that matches the back-end hostname for HTTPS connections. This certificate must contain the leaf and intermediate certificates, and Microsoft's trusted CA list must exist for the root CA. If a certificate without a complete chain is presented, requests involving that certificate may not work as expected. From a security perspective, Microsoft recommends that certificate subject name-checks be disabled. During testing, however, this is not necessary.
To enable the HTTPS protocol for secure delivery of contents on a Front Door custom domain, you can use a certificate that Front Door manages or use your organization's certificate. Managed certificates for Front Door are provided via DigiCert and are stored in Front Door's Key Vault. If you want to use certificates, you can use a certificate from a supported CA, such as a standard TLS, extended validation certificate, or a wildcard certificate. It is not possible to use self-signed certificates.
In the Front Door managed certificate option, the certificates are managed and auto-rotated by Front Door within 90 days of the expiry date. By default, Front Door orders and automatically rotates certificates every 45 days for Standard/Premium managed certificates.
Cipher suites that are supported for TLS 1.2 include:
- TLS_ECDHE_RSA_WITH_AES_256_GCM_SHA384
- TLS_DHE_RSA_WITH_AES_256_GCM_SHA384
- TLS_ECDHE_RSA_WITH_AES_128_GCM_SHA256
- TLS_DHE_RSA_WITH_AES_128_GCM_SHA256
The following cipher suites can be used with custom domains with TLS 1.0/1.1 enabled:
- TLS_ECDHE_ECDSA_WITH_AES_128_GCM_SHA256
- TLS_ECDHE_ECDSA_WITH_AES_256_GCM_SHA384
- TLS_ECDHE_RSA_WITH_AES_128_GCM_SHA256
- TLS_ECDHE_RSA_WITH_AES_256_GCM_SHA384
- TLS_ECDHE_ECDSA_WITH_AES_128_CBC_SHA256
- TLS_ECDHE_ECDSA_WITH_AES_256_CBC_SHA384
- TLS_ECDHE_RSA_WITH_AES_128_CBC_SHA256
- TLS_ECDHE_RSA_WITH_AES_256_CBC_SHA384
- TLS_ECDHE_ECDSA_WITH_AES_256_CBC_SHA
- TLS_ECDHE_ECDSA_WITH_AES_128_CBC_SHA
- TLS_ECDHE_RSA_WITH_AES_256_CBC_SHA
- TLS_ECDHE_RSA_WITH_AES_128_CBC_SHA
- TLS_RSA_WITH_AES_256_GCM_SHA384
- TLS_RSA_WITH_AES_128_GCM_SHA256
- TLS_RSA_WITH_AES_256_CBC_SHA256
- TLS_RSA_WITH_AES_128_CBC_SHA256
- TLS_RSA_WITH_AES_256_CBC_SHA
- TLS_RSA_WITH_AES_128_CBC_SHA
- TLS_DHE_RSA_WITH_AES_128_GCM_SHA256
- TLS_DHE_RSA_WITH_AES_256_GCM_SHA384
Multisite Listeners
Listeners are logical entities that listen for incoming connection requests using the port, protocol, host, and IP addresses. You need to enter values that match the values in the incoming request on the gateway when they configure the listener.
You can create an application gateway using the Azure portal, and it is also possible to choose a default listener by selecting the listener's port and protocol. You can choose whether HTTP2 support should be enabled on the listener. After you complete setting up the application gateway, it is also possible to edit the settings of that default listener (per Microsoft, it is appGatewayHttpListener) or build a new listener.
When you build a new listener, you can choose between basic and multisite.
- Choose basic if you want all requests (for any domain) to be accepted and forwarded to back-end pools.
- Choosing a multisite listener is necessary if you wish to redirect requests to different back-end pools based on the host header or hostname. Also, you must specify a hostname that matches incoming requests. Multiple websites can be hosted on the same public IP address and port using HTTP 1.1 host headers.
Requests are matched based on the order of the rules and the type of listener for the v1 SKU. In the ordering, rules with basic listeners appear first and will be handled first and accept requests for those ports and IP addresses. Set up rules with multisite listeners first and push the basic listener rule to the last list to avoid this. Listeners from multisites are processed before listening from basic sites when using the v2 SKU.
A listener must allow the application gateway to enable traffic to be routed appropriately to the back-end address pools. As an example, let's create listeners for two domains: sybexdemo1.com and sybexdemo2.com.
With the front-end configuration and the front-end port, create the first listener using New-AzApplicationGatewayHttpListener. If incoming traffic is to be handled by a pool, the listener needs a rule. Use the New-AzApplicationGatewayRequestRoutingRule command to create a basic rule named contosoRule.
$sybexdemo1listener = New-AzApplicationGatewayHttpListener `-Name sybexdemo1Listener `-Protocol Http `-FrontendIPConfiguration $fipconfig `-FrontendPort $frontendport `-HostName "www.sybexdemo1.com"$sybexdemo2listener = New-AzApplicationGatewayHttpListener `-Name sybexdemo2Listener `-Protocol Http `-FrontendIPConfiguration $fipconfig `-FrontendPort $frontendport `-HostName "www.sybexdemo2.com"$sybexdemo1Rule = New-AzApplicationGatewayRequestRoutingRule `-Name sybexdemo1Rule `-RuleType Basic `-HttpListener $sybexdemo1Listener `-BackendAddressPool $sybexdemo1Pool `-BackendHttpSettings $poolSettings$sybexdemo2Rule = New-AzApplicationGatewayRequestRoutingRule `-Name sybexdemo2Rule `-RuleType Basic `-HttpListener $sybexdemo2Listener `-BackendAddressPool $sybexdemo2Pool `-BackendHttpSettings $poolSettings
Back-Ends, Back-End Pools, Back-End Host Headers, and Back-End Health Probes
In this section we consider back-ends and back-end pools for Azure Front Door.
A back-end is a web application deployment in a specific region, and Front Door supports Azure and non-Azure resources in the pool. The application can either be hosted in the on-premises datacenter or another cloud provider's datacenter.
Back-end Front Doors refer to your application's public IP address or hostname. Cloud back-ends are not the same as the database or storage tier. Your organization's application back-ends should be viewed as public endpoints. It would be best to consider adding the following when adding back-ends to a Front Door back-end pool:
- Back-End Host Type This is all about the type of resource you want to add. Front Door supports autodiscovery of application back-ends from App Service, Cloud Service, or Storage; if you wish to use a different resource in Azure or even a non-Azure back-end, select the custom host type.
- Subscription and Back-End Hostname You must select a custom host for the back-end host type if you haven't selected your organization's back end. Select the relevant subscription and the corresponding back end hostname in the UI.
- Back-End Host Header The host header is sent with each request to the back-end server.
- Priority When all traffic is routed through a primary service back-end, assign priorities to different back-ends. In addition, if the backup or the primary back-ends are unavailable, provide backups.
- Weight You can be assigned weights distributed between various back-ends, either evenly or based on weight coefficients.
Requests forwarded by Front Door to back-ends include a host header field used to locate the requested resource. This field usually contains the host header and port information from the back-end URI.
To add the back-end host header to the back-end, configure the back-end host header field in the back-end pool section of Front Door:
- Open Front Door and select the back-end pool with the back-end to configure.
- Create a back-end if you have not yet done so or edit one already there.
- Leave the back-end header field blank or put a custom value in. A host header value will be set based on the incoming request hostname.
The Front Door back-end pool refers to back-ends that receive similar traffic. It's a group of app instances across the globe that receive the same traffic and respond as expected. Each back-end is based in a separate area or region. Active-active deployment or active-passive configuration is available for all back-ends.
Back-end pools specify how health probes should be applied to different back-ends and how load balancing should take place between them.
Each of the back-ends you configure receives periodic HTTP/HTTPS probe requests from Front Door. To load-balance end-user requests, probe requests pick the proximity and health of each back-end. Back-end pool health probe settings determine how you poll application back-ends for health status. You can configure the following settings:
- Path All back-ends in the back-end pool use this URL to conduct probe requests. Health probe paths are case-sensitive.
- Protocol Used for traffic exchange between Front Door and your back-ends via HTTP or HTTPS.
- Message Method Defines how health probe messages should be sent: GET (default) or HEAD (alternative).
- Interval (Seconds) Sets how frequently your back-ends will send health probes or how often each environment will send a health probe.
Health probes are evaluated based on the load balancing settings of the back-end pool. Based on these settings, the health of a back-end is determined. The health probe also checks how traffic is balanced between the different back-ends in the back-end pool. To achieve load balancing, the following configuration settings are available:
- Sample Size Determines how many health probe samples should be considered for back-end health evaluation.
- Successful Sample Size Establish the sample size, which is the number of successful samples needed to call the back-end healthy. Consider 30 seconds for a Front Door health probe, a sample size of 5, and a success rate of 3. Each time back-end health probes are considered, the last five samples over 150 seconds are evaluated (5 × 30). The back-end must pass three successful tests before it can be declared healthy.
- Latency Sensitivity (Additional Latency) Determines whether Front Door will send your request to back-ends within a specific latency measurement sensitivity range or whether it will forward the request to the closest back-end.
Routing and Routing Rules
Front Door can perform one of two actions when receiving client requests from your organization regarding routing. Respond to them if you enable caching or forward them to the appropriate application back-end as a reverse proxy.
The following are the five high-level routing architectures that exist as of this writing:
- Routing Traffic Using the Front Door Environment (Anycast) All DNS and HTTP traffic routed to the Front Door environments uses Anycast, which allows users to reach the closest Azure environment with the fewest network hops. With this architecture, Front Door provides better round-trip times by utilizing split TCP. It organizes its environments into primary and fallback “rings.” The outer ring is closer to users, offering lower latencies.
The inner-ring environments can handle any issues with the outer-ring environment. All traffic should be directed to the outer ring, and the inner ring handles traffic overflow from the outer ring. All front-end hosts and domains served by Front Door are assigned a primary VIP (Virtual Internet Protocol) address. Inner-ring environments only support a fallback address.
As a result, the closest Front Door environment is always reached by requests from end users. All traffic automatically moves to the closest environment if the preferred Front Door environment is unhealthy.
- Connecting to Front Door Using Split TCP In split TCP, a connection is broken into smaller pieces to reduce latencies. Due to Front Door's closest location to end users, TCP connections terminate within Front Door environments. An application back-end TCP connection has a two-round-trip time (RTT). Due to the “short connection” between the Front Door environment and the end user, the connection is established over three short round-trips instead of three long ones, resulting in lower latency. There is the ability to make a preestablished “long connection” between the Front Door environment and the back-end environment, which can be reused across other end users’ requests to save time connecting to the back-end environment. When SSL/TLS is used, the effect of split TCP is multiplied since there are more round-trips required for securing the connection.
- Processing Requests According to Routing Rules Once a connection is established in a Front Door environment and a TLS handshake has been completed, the next step is to match the request to the routing rule. Configuration determines which routing rule should be applied to each request on Front Door.
- Finding Out Which Back-Ends Are Available in the Back-End Pool If there is no caching, Front Door uses a health probe to determine the status of the back-end pool associated with the routing rule.
- Forwarding Requests to Your Application's Back-End The user request will be forwarded to the “best” back-end, assuming caching isn't configured according to your routing method configuration.
The Azure Front Door Standard/Premium Route outlines how incoming requests are handled when they arrive at the Front Door environment. It is possible to associate a domain with a back-end origin group via the Route settings. Turn on advanced features such as Pattern To Match and Ruleset for greater control over traffic.
“Left-hand side” and “right-hand side” are the two main components of a Front Door Standard/Premium routing configuration. The left-hand side of the route describes how Microsoft matches the incoming request, and the right-hand side describes how Microsoft processes the request.
Basically, Microsoft matches based on the most specific match first, looking only at the left-hand side. Microsoft matches based on HTTP protocol, then front-end host, then path.
URL Redirection and URL Rewriting in Front Door Standard and Premium
Preview versions of Front Door Standard and Premium were available as of this writing.
Traffic can be redirected by Front Door at the following levels: protocol, hostname, path, query string, and fragment. Since the redirection is based on paths, these functions can be configured for each micro-service. By using URL redirect, you can optimize resource usage and implement new redirection scenarios, including global redirection and path-based redirection.
End-user clients can understand the purpose of the redirect based on the response status code set by the redirect type. Redirect types supported include the following:
- 301 (Moved Permanently) There is now a permanent URI for the target resource. The enclosed URIs will be used in any future references to this resource. The HTTPS redirection status code is 301.
- 302 (Found) There is a temporary change of URI for this resource. Despite the redirections changing from time to time, the client should continue to use the effective request URI in the future.
- 307 (Temporary Redirect) A temporary URI has been assigned to the target resource. When a user agent does an automatic redirection to a URI, the request method may not be changed. The client should use the original URI request for future requests since redirections can change over time.
- 308 (Permanent Redirect) Accordingly, the target resource will now have a permanent URI. The enclosed URI should be used for any future references to this resource.
You can specify the redirection protocol. A redirect feature is most commonly used to set HTTP to HTTPS redirection.
- Use HTTPS Only Only set the protocol to HTTPS if you wish to redirect traffic from HTTP to HTTPS. Microsoft recommends always turning to HTTPS only when using Front Door.
- Use HTTP Only Directs the incoming request to HTTP. This value should only be used if you desire nonencrypted HTTP traffic.
- Match Request This option retains the protocol used by the incoming request. Thus, HTTP requests remain HTTP and HTTPS requests remain HTTPS after redirection.
When configuring redirect routing, you can also change the domain or hostname for redirect requests. In this field, you can change the URL hostname for the redirection or preserve the hostname from the incoming request. You can set this field to the new path value to replace the path segment during redirection. However, you can preserve the path value during redirection.
You can also replace the query string parameters in the redirected URL. Set this field to Replace and set the appropriate value to return any existing query string from the incoming request URL. If you keep the original query strings, the field can be set to Preserve.
When the browser lands on a web page, the destination fragment is the part of the URL that follows #. You can set this field to add fragments to redirect URLs.
It is possible to redirect the path of a request route to an origin using Front Door URL rewriting. You can use URL rewrite to specify conditions to ensure URLs or headers are only rewritten when certain conditions are met. Rewrite criteria are determined by request and response information. You can redirect users to different origins based on the scenario, device type, and requested file type with this feature.
Using a rule set, you can configure URL redirection. In source patterns, URL paths replace the original URL path. Prefix-based matching is currently used. Use the forward slash (/) in the source pattern value to match all URL paths. The URL rewrite source pattern is applied only to the path following the route configuration Patterns To Match.
The following is the incoming URL format: *Front-end>/*route-patterns-to-match-path>/*Rule-URL-Rewrite-Source-pattern>. The rule engine will only consider /*Rule-URL-Rewrite-Source-pattern> as the source pattern to rewrite. In the case of URL rewrite rules with source pattern matching, the output URL format will be <Front-end>/<route-patterns-to-match-path>/<Rule-URL-Rewrite-destination>.
The Origin path of the Origin group in route configuration can be set to / in scenarios where the /*route-patterns-to-match-path segment of the URL path must be removed. Rewrites can be configured. Source paths are overwritten by destination paths. You can add the remaining path to the new path by selecting Preserve Unmatched Path.
Design and Deploy Traffic Manager Profiles
Azure Traffic Manager is a load balancer based on DNS. Azure Traffic Manager enables you to distribute traffic to your public-facing applications across Azure regions. Traffic Manager also has highly available and responsive public endpoints. It has six options for routing traffic:
- Priority
- Weighted
- Performance
- Geographic
- Multivalue
- Subnet
Depending on the application, you can select the best one.
Traffic Manager directs clients’ requests to the appropriate service endpoint using DNS based on a traffic-routing method. Traffic Manager also monitors every endpoint's health. Any Azure-hosted or externally hosted Internet-facing service can be an endpoint. Traffic Manager provides a range of traffic routing methods and endpoint monitoring options for different application needs and automatic failover models. It is secure and resilient to failures, including losing an entire Azure region.
Traffic Manager monitors cloud services such as Azure as well as external sites and services, and it automatically redirects users to an alternate location if a failure occurs.
By directing users to the Azure or external location with the lowest network latency, Traffic Manager makes applications more responsive and improves content delivery times. User traffic can be routed across several places, such as numerous cloud services or multiple Azure web applications. Traffic Manager can distribute traffic equally or based on weights.
Traffic Manager can also be used in burst-to-cloud scenarios, cloud migrations, and failovers, as well as on-premises. Use it for datacenters on-site without inconveniencing customers.
The features of Traffic Manager include:
- Increased application availability and performance
- No interruption of service
- Integrated hybrid applications
- Delivery of complex deployments without disruption of service
How Traffic Manager Works
A public endpoint is assigned to Traffic Manager, and it must be an FQDN. Using the routing method you specified, all traffic arriving at the endpoint will be distributed to endpoints in the back-end. By default, performance routing is used, which distributes traffic based on its performance characteristics. The traffic will be evenly distributed when multiple back-end endpoints are in the same region. Depending on the geographical location and minimum network latency of the endpoints, Traffic Manager will delegate traffic to one or more endpoints closest to the incoming traffic.
The architecture shown in Figure 7.9 provides a high-level overview of Traffic Manager's working method.
The following provides an in-depth description of the flow:
demo.sybex.comis resolved by sending a DNS query to the client's configured recursive DNS service. Recursive DNS services, sometimes called local DNS servers, do not host any DNS domains directly. To resolve a DNS name, the client is freed from the burden of contacting all the authoritative DNS servers across the Internet.- The recursive DNS service resolves the DNS name by finding the name servers for the
Sybex.comdomain. These name servers are then contacted to obtain the DNS record fordemo.sybex.com. The DNS servers return CNAME records pointing tosybexdemo.trafficmanager.netforsybex.com. - The recursive DNS service finds the name servers of the
trafficmanager.netdomain, provided by the Azure Traffic Manager service. The application then sends a request for thesybex.trafficmanager.netDNS record to those DNS servers. - A request is sent to Traffic Manager's name servers. The name servers choose an endpoint based on:
- The configuration state of each endpoint (disabled endpoints won't be returned)
- The Traffic Manager's health checks, which determine the current health of each endpoint
- Choice of routing method
- A CNAME record for the chosen endpoint is returned. Let's assume
sybex-eu.cloudapp.netis returned. - A recursive DNS service is used to determine the name servers for the domain
cloudapp.net. A DNS record forsybex-eu.cloudapp.netis requested from those name servers. In this case, a DNS A record containing the IP address of the service endpoint in the EU is returned. - Recursive DNS offers a single DNS response to the client by consolidating the results.
- DNS results are sent to the client, connecting to the given IP address. Clients connect to application service endpoints directly, not through Traffic Manager. Since it is an HTTPS endpoint, the client performs the SSL/TLS handshake and then requests
/login.aspxthrough HTTP GET.
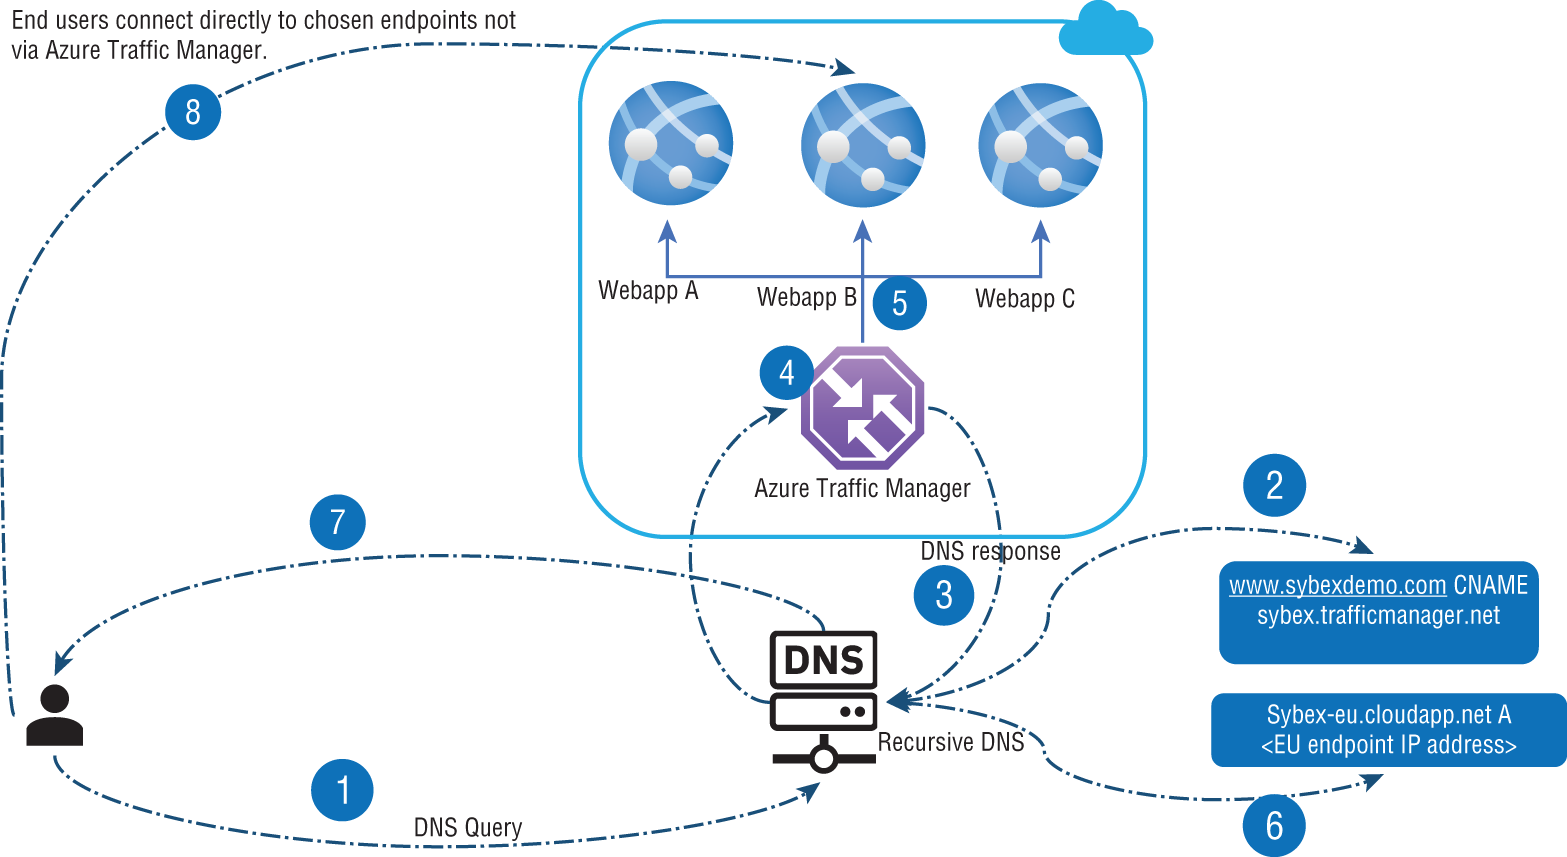
FIGURE 7.9 Azure Traffic Manager Overview
The recursive DNS service caches the DNS responses it receives, and the client device's DNS resolver also caches their results. As a result of caching, subsequent DNS requests are answered faster by utilizing the cached data rather than querying other name servers. A DNS record's time-to-live (TTL) property determines the duration of its cache. With shorter values, the cache expires faster, resulting in a higher number of round-trips to the Traffic Manager name servers. Traffic can take longer to divert from a failed endpoint with longer values. You can configure the TTL used in Traffic Manager DNS responses to be as low as 0 seconds and as high as 2,147,483,647 seconds (the maximum range compliant with RFC-1035), allowing them to pick the value that best suits their needs.
Traffic Manager Routing Methods
Traffic Manager supports six traffic-routing methods to determine how network traffic should be routed to the various service endpoints. Whenever Traffic Manager receives a DNS query, it applies the traffic-routing method associated with that profile. Which DNS endpoint is returned in the response depends on the traffic-routing method.
A health monitor and an automatic failover feature are available in every Traffic Manager profile. Traffic Manager profiles allow you to configure only one traffic-routing method at a time. You can choose a different traffic-routing method at any time for their profile.
Settings you change will be applied without downtime within one minute. You can use nested Traffic Manager profiles to combine different routing methods. In order to meet the needs of more extensive and complex applications, nesting profiles are a flexible way of configuring traffic routing.
Table 7.7 summarizes the six different routing methods.
TABLE 7.7 Routing methods
| Routing methods | Description |
|---|---|
| Priority | Use Priority routing if you want a single service point for all traffic. When a primary or one backup endpoint is unavailable, you can provide multiple backups. |
| Weighted | Consider weighted routing when you want traffic distributed across a set of endpoints based on their importance. This method distributes equal weight across all endpoints. |
| Performance | You can choose performance routing if your endpoints are located in different geographic regions and you want end users to use the closest endpoint to minimize latency. |
| Geographic | When you select Geographic routing, users can be directed to specific endpoints (Azure, External, or Nested) depending on the geographic origin of their DNS queries. It is possible to comply with scenarios such as data sovereignty mandates, localizing content and ensuring a good user experience, and measuring traffic from different regions with this routing technique. |
| Multivalue | Choose Multivalue when the only endpoints of a Traffic Manager profile are IPv4 or IPv6 addresses. All healthy endpoints are returned when a query for this profile is received. |
| Subnet | Use Subnet traffic routing to transform a set of end-user IP address ranges into specific endpoints. When a request is received, an endpoint is mapped to an IP address based on the request's source address. |
Priority-Based Traffic Routing
To ensure the reliability of their services, enterprises usually deploy one or more backup services in case their primary service fails. Azure customers can quickly implement this failover pattern by implementing the Priority traffic-routing method.
Various service endpoints are prioritized in Traffic Manager profiles. By default, Traffic Manager forwards all traffic to the primary (highest priority) endpoint. The traffic is routed to the second endpoint if the primary endpoint cannot be reached. A scenario in which both primary and secondary endpoints are unavailable results in traffic going to the third. Endpoint availability depends on its configured status (enabled or disabled) and its ongoing monitoring. Figure 7.10 shows the architecture of Priority-based traffic routing.
Using the Priority property in Resource Manager, you can set the endpoint priority explicitly. A lower value represents a higher priority, and a value between 1 and 1000 denotes a lower priority. Priority values cannot be shared across endpoints, and it is not mandatory to set this property. If omitted, the endpoint order will be used as the priority.
Weighted-Based Traffic Routing
Users of the Weighted traffic-routing method can choose whether traffic should be distributed equally or according to predetermined weightings. You can assign weights to each endpoint in a profile configuration. The weight can be an integer between 1 and 1000. By default, Traffic Manager uses 1 as the weight, which means a higher priority.

FIGURE 7.10 Priority-based traffic routing
Traffic Manager randomly selects an endpoint for each DNS query it receives. All endpoints are assigned weights based on their selection probabilities, and using the same weight on all endpoints ensures even traffic distribution. In the DNS response, endpoints with a higher or lower weight are more or less likely to be returned. Figure 7.11 shows the architecture of Weighted-based traffic routing.
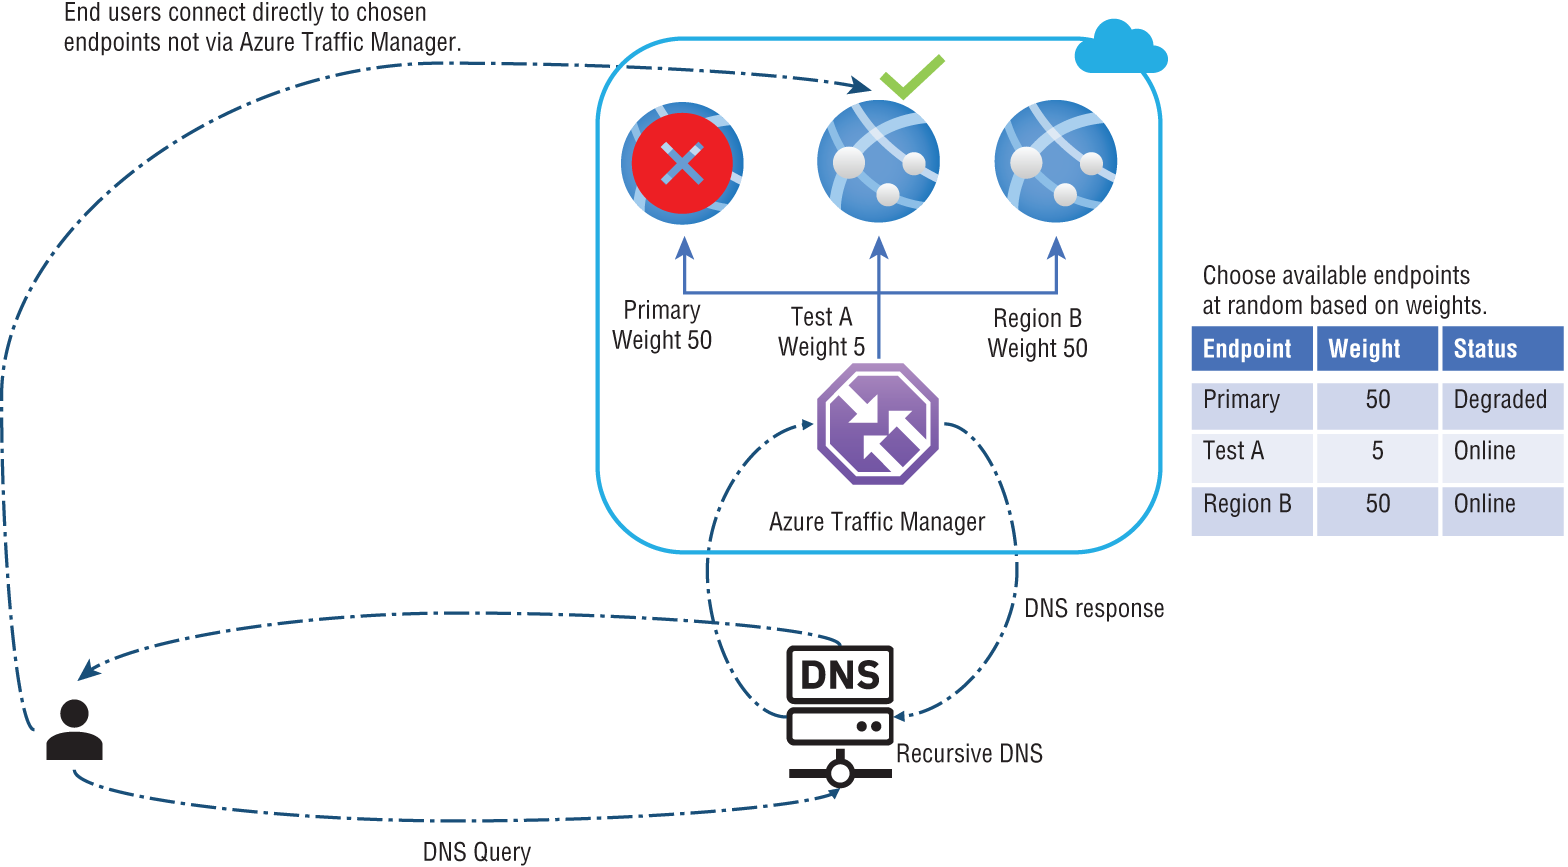
FIGURE 7.11 Weighted-based traffic routing
Several scenarios are enabled by the weighted method:
- An incremental application upgrade involves gradually increasing the amount of traffic to a new endpoint from a small percentage.
- To migrate an application to Azure, create a profile that includes Azure and external endpoints. The weight of the new endpoints should be adjusted to prefer the endpoints.
- Expand an on-premises deployment into Azure by placing it after a Traffic Manager profile. When you require extra capacity in Azure, you can add or enable more additional endpoints and specify what allotment of traffic moves to each endpoint.
The Azure portal, Azure PowerShell, CLI, and REST APIs can be used to set weights.
It is important to remember that clients cache DNS responses, that the recursive DNS servers cache them, and that clients use them to resolve DNS names. If clients cache DNS responses, weighted traffic distributions may change. The traffic distribution works as expected when the number of clients and recursive DNS servers is large. Caching, however, can significantly skew traffic distribution when there are few clients or recursive DNS servers.
The following are some everyday use cases:
- Testing and development environments
- Communication between applications
- Users of an application who share a common recursive DNS infrastructure (such as employees of a company connecting through a proxy)
All DNS-based traffic-routing systems, not just Traffic Manager, exhibit these DNS caching effects. It's possible to bypass DNS caching by explicitly clearing the cache, and if that doesn't work, an alternative traffic-routing method may be more appropriate.
Performance-Based Traffic Routing
Your applications can be made more responsive by deploying endpoints at two or more locations across the globe. With Azure's Performance method of traffic routing, you can route traffic to the nearest user location. Figure 7.12 shows the architecture of Performance-based traffic routing.
The “closest” endpoint isn't always the closest by geographic distance. The Performance traffic-routing method determines the closest endpoint by measuring network latency. Traffic Manager tracks the round-trip times between the Azure datacenters’ IP addresses using an Internet latency table.
The Internet latency table is used to determine the source IP address of incoming DNS requests in Traffic Manager. Once that IP address range is identified, Traffic Manager chooses an available endpoint in the Azure datacenter that has the lowest latency. The DNS response includes Traffic Manager's selection.
Clients do not directly submit DNS queries to Traffic Manager. On the other hand, recursive DNS queries come from clients configured to use recursive DNS. This means that the recursive DNS server's IP address is used to find the “closest” endpoint, not the clients. The client can use this address as a proxy.

FIGURE 7.12 Performance-based traffic routing
As changes in the global Internet and Azure regions occur, Traffic Manager regularly updates the Internet latency table. However, application performance varies due to real-time variations in traffic across the Internet. A given service endpoint is not monitored for load by Performance traffic routing. If an endpoint becomes unreachable, it won't be included in the DNS query results.
Geographic-Based Traffic Routing
Geographic routing can be configured in Traffic Manager profiles to send users to specific endpoints (Azure, External, or Nested) depending on where they originate from. You can use this routing method to comply with data sovereignty mandates, localize content and user experiences, and measure traffic across multiple regions. Every endpoint associated with a profile configured for Geographic routing must have a set of geographic regions.
Each geographic region can have the following granularity levels:
- World – any region
- Regional Grouping
- Country/Region
- State/Province
If an endpoint is assigned a region or series of regions, any requests from those regions will only be routed to that endpoint. Traffic Manager uses the source IP address of the DNS query to identify the region from which a user is querying—commonly identified as the local DNS resolver's IP address. Figure 7.13 shows the architecture of Geographic-based traffic routing.

FIGURE 7.13 Geographic-based traffic routing
Upon reading the source IP address of a DNS query, Traffic Manager determines which geographic region it originates from. Then it checks to see if an endpoint is mapped to this geographic region. Lookups start at the lowest level of granularity (State/Province or Country/Region, where supported) and go all the way up to the highest level, which is World. The first match is chosen to return in the query response using this traversal. A child profile is returned when matching with a nested type endpoint based on its routing method.
Multivalue-Based Traffic Routing
Multiple healthy endpoints can be obtained by using the Multivalue traffic-routing method. In an unresponsive endpoint, this configuration allows the caller to perform client-side retries with other endpoints. In this way, you can increase the availability of services and reduce the latency of a DNS query to obtain a healthy endpoint. The Multivalue routing method only works if all the endpoints of type External are IPv4 or IPv6 addresses. This profile returns all healthy endpoints and a configurable maximum number of results when a query is received.
Subnet-Based Traffic Routing
Organizations can use the Subnet traffic-routing method to map a set of end-user IP address ranges to their specific endpoints. Traffic Manager inspects the source IP address of a DNS query for that profile, determines the endpoint it is mapped to, and returns it in the query response. The source IP address is the DNS resolver that the caller uses most of the time.
The IP address to be mapped to an endpoint can be specified as CIDR ranges (for example, 1.2.3.0/24) or as an address range (1.2.3.4-5.6.7.8). You must define an endpoint with no address range and take traffic from any remaining subnets if the IP address range within a profile is not the same as the IP address range of another endpoint within that profile. Any undefined ranges will result in a NODATA response from Traffic Manager if no fallback endpoint has been specified. Microsoft recommends defining a fallback endpoint to ensure all possible IP ranges are specified.
Users connecting from a specific IP space may experience different results depending on the subnet routing. You can, for example, have all requests from their corporate office routed to another endpoint. You can use this routing method to test an internal version of an app. In another scenario, users connecting from a specific ISP are provided with a different experience (for example, users connecting from a given ISP are blocked).
Building a Traffic Manager Profile
This section covers creating a Traffic Manager profile to provide high availability for Company XYZ's web application.
In Exercise 7.2 you created and deployed two web application instances in two regions, and you reuse them in Exercise 7.3. Traffic Manager will act as the primary endpoint in the first region and a failover endpoint in the second region. Exercise 7.3 involves creating a Traffic Manager profile based on endpoint priority. Users will be redirected to the primary web application site through this profile. Traffic Manager will always monitor the web application. If the primary site goes down, the backup site will automatically fail.
You will deploy an environment as shown in Figure 7.14.

FIGURE 7.14 Architecture overview of Azure Traffic Manager (ATM)
To complete the exercise, you need to perform the following three activities.
- Activity 1: Build two instances of a web app.
- Activity 2: Build a Traffic Manager profile.
- Activity 3: Add Traffic Manager endpoints.
Traffic Manager profiles control traffic distribution to cloud services or website endpoints through traffic-routing methods. Creating Traffic Manager profiles is possible through the Azure portal, and the Azure portal allows you to configure endpoints, monitoring, and other settings after creating your profile. There can be up to 200 profiles in Traffic Manager. Many scenarios only require a few endpoints.
Exercise 7.3 starts with Activity 2, since you performed Activity 1 in Exercise 7.2.
Virtual Network NAT
Network address translation (NAT) provides outbound Internet connectivity for virtual networks while serving as a network address translation service.
Virtual Network Address Translation (VNet NAT) is a fully managed, highly resilient service. With VNet NAT, virtual networks can connect outbound to the Internet. All outbound connectivity on a subnet is established using the VNet NAT's static public IP addresses.
You can have your private IP address virtual machine connected to the Internet via a known and predetermined IP address. You can assign VMs a public IP address, and the VMs will use that to communicate with the Azure cloud.
You can place the VMs behind a load balancer, which has a public IP, and that would be used for communication.
Consider an organization that doesn't have public IP addresses for their virtual machines. An organization can't grant virtual machine private access through a firewall to another network without authorizing several Azure outbound addresses. The organization will access a remote virtual machine from a predetermined static address.
NAT can be deployed in a specific availability zone and has built-in redundancy. When creating availability zone scenarios, NAT can be isolated within a particular zone by default. These deployments are known as zonal deployments.
From the beginning, NAT has been scaled out fully. Scaling or ramping up is not required, and Azure will handle the NAT process for you. Multiple fault domains allow NAT to handle numerous failures without service interruption.
VNet NAT's key benefits are illustrated in Figure 7.15.

FIGURE 7.15 Virtual network NAT benefits
A NAT gateway resource can use a public IP and public IP prefix.
It is possible to create flows between the virtual network and services outside the virtual network. Services outside your organization's VNet cannot establish connections to instances due to return traffic from the Internet.
NAT can be used with public IP addresses, public IP prefixes, or both. Public IP prefixes can be assigned directly to organizations or distributed across multiple NAT gateway resources. The network address translation will shape up all traffic to the prefix's range of IP addresses. Load balancers and public IP addresses are not compatible with NAT, and basic resources must reside on a subnet associated with a gateway. The NAT gateway allows basic load balancers and public IP to be upgraded to standard.
Using a Virtual Network NAT
There is a shortage of IPv4 address ranges globally, and accessing Internet resources can be expensive. To gain access to external resources on a public network, internal resources on a private network needed routable IPv4 addresses. This is where network address translation (NAT) comes in. As an alternative to purchasing an IPv4 address for each resource that needs Internet access, you can use a NAT service to translate outgoing requests from internal resources to an external IP address, enabling communication.
Microsoft offers NAT services for mapping a single IP address, IP prefixes for a range of IP addresses, and ports associated with an IP address. Public IP address resources or public IP prefix resources, or a combination of both, can be used with NAT. You can directly use a public IP prefix or distribute the public IP addresses of the prefix across NAT gateways. Any traffic between the prefix and its IP address range will be routed through NAT. NAT creates flows between the virtual network and the Internet. Internet traffic can only return if there is an active flow.
You can configure NAT for each VNet subnet to enable outbound connectivity by specifying a NAT gateway resource. Any virtual machine instance that connects to the Internet via UDP or TCP will use NAT after NAT is configured. You don't need to create user-defined routes, and no further configuration is required. NAT replaces the default Internet destination over all other outbound scenarios.
As NAT scales to support dynamic workloads, you can avoid extensive pre-planning or pre-allocating addresses. NAT supports up to 64,000 concurrent UDP and TCP, respectively, using port network address translation (PNAT or PAT). NAT can support up to 16 public IP addresses.
Figure 7.16 shows the high-level workflow to deploy a NAT.
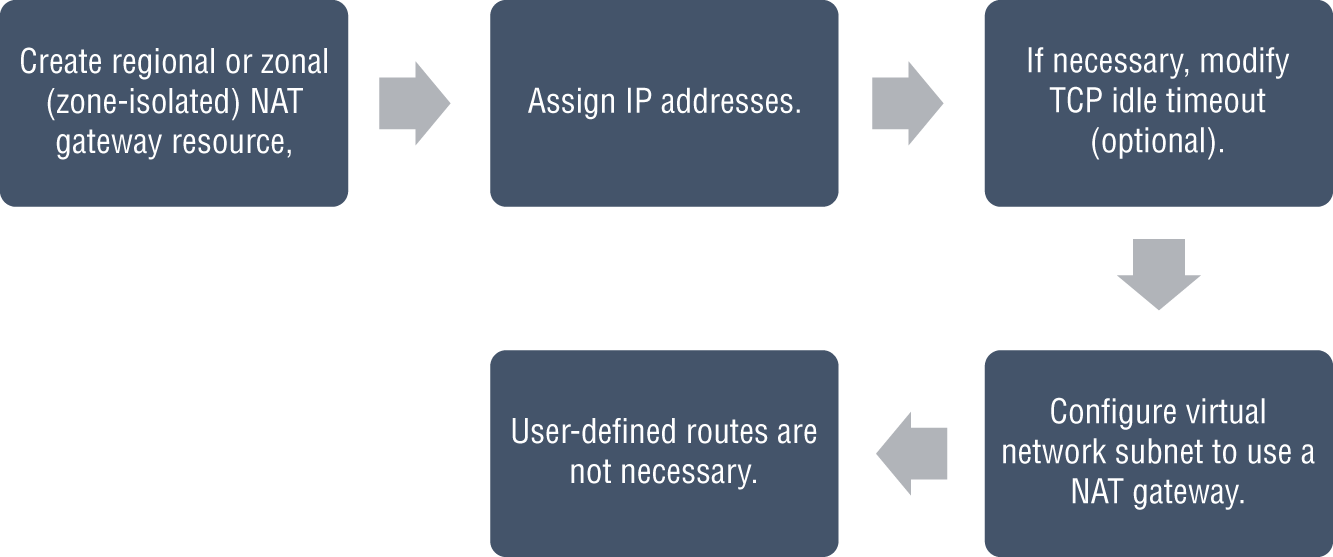
FIGURE 7.16 High-level workflow to deploy NAT
NAT is recommended for connecting to a public endpoint in all outbound scenarios for production workloads. In the following examples, NAT gateways are used for inbound and outbound traffic.
- Example 1: Public IP Addresses for NAT and VM Instances Outbound traffic will be routed through NAT gateways. No outbound traffic will be affected.
Figure 7.17 shows a NAT gateway with a public load balancer.
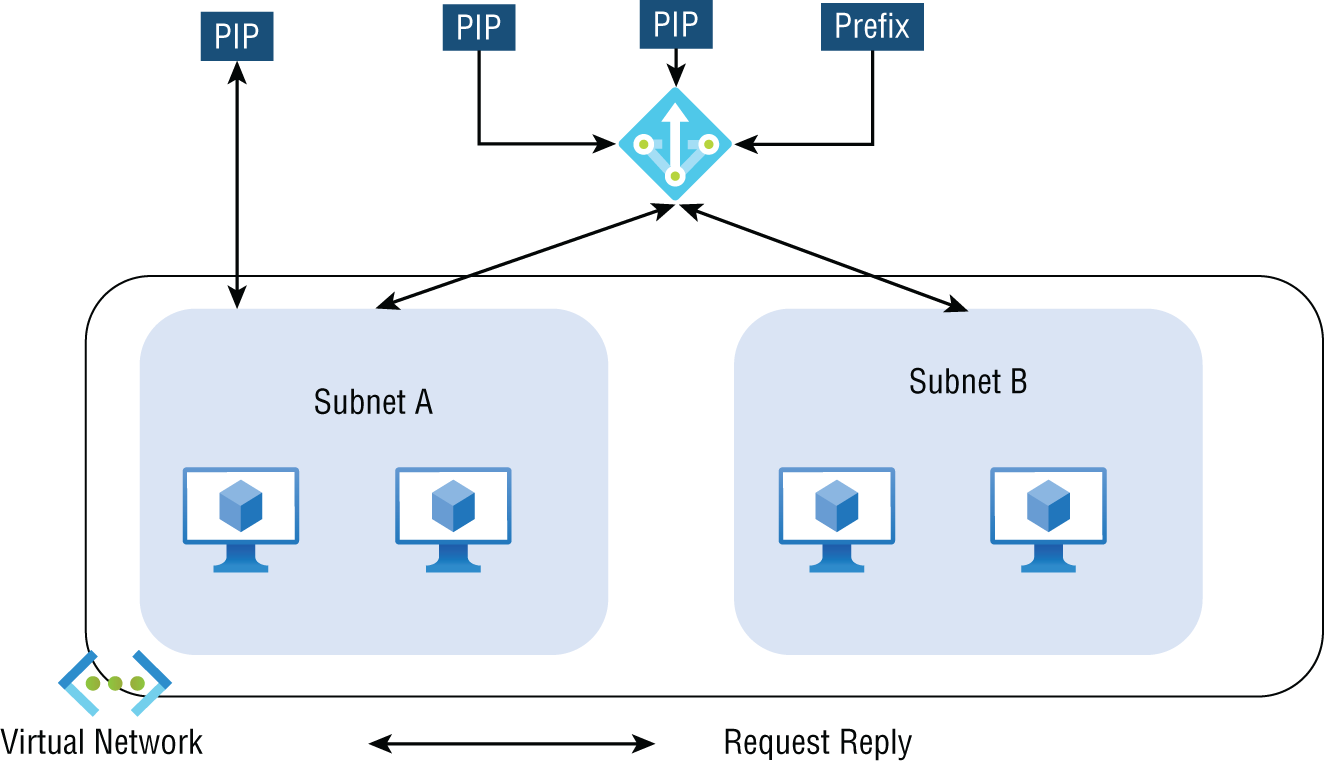
FIGURE 7.17 NAT gateway with a public load balancer
- Example 2: Public IP Address at Instance Level and Standard Public Load Balancer with NAT and VM The NAT gateway supersedes a load balancing or outbound rule that specifies outbound connectivity, and inbound connections are unaffected.
Figure 7.18 depicts a NAT gateway with a public load balancer at instance level.

FIGURE 7.18 NAT gateway with a public load balancer at instance level
In Azure network security groups (NSGs), a VM's inbound and outbound traffic can be filtered. NAT outbound traffic can be monitored with NSG flow logs enabled in Azure.
NAT gateways can provide up to 50 Gbps of bandwidth. You can split deployments into multiple subnets and assign a NAT gateway to scale out. Each assigned outbound IP address can receive up to 64,000 TCP and UDP flows.
Allocate Public IP or Public IP Prefixes for a NAT Gateway
In Exercise 7.4 you create a NAT gateway resource. You can use one or more public IP address resources, public IP prefixes, or both.
In this exercise, the provisioning of public IP addresses is already done.
Associate a Virtual Network NAT with a Subnet
All computing resources in a subnet can use NAT if it's associated with the subnet. In addition, all subnets in a VNet can share resources. When associated with a Public IP prefix, NAT will automatically scale to the number of IP addresses required for outbound connections.
With NAT, each subnet can define its outbound connectivity. Within a single virtual network, multiple subnets can have different NATs. It is also possible to use the same NAT for numerous subnets within the same virtual network. Configuration of a subnet involves specifying which NAT gateway resource should be used. The outbound traffic for the subnet is handled by NAT automatically without custom configuration. Users do not need to define routes. The NAT protocol takes precedence over other outbound scenarios and replaces the default Internet destination.
There can be only one NAT per subnet, and NAT cannot be deployed within a gateway subnet.
There can be no association between NAT and IPv6 Public IP addresses or IPv6 Public IP prefixes. The subnet can be associated with a dual-stack network, however.
In Exercise 7.4, you created a virtual network NAT; now in Exercise 7.5 you associate a virtual network NAT with a subnet.
Summary
This chapter provided a high-level overview of the many load balancing options available to Azure networking engineers in the Azure cloud. You learned about four of those: Azure application gateways, Azure Front Door, Azure Traffic Manager, and Azure Virtual NAT.
You also learned how to load-balance network traffic effectively to ensure high availability of services.
We also discussed designing and implementing Application Gateway, including Application Gateway deployment options and how to choose between manual and autoscaling. You also learned how to create a back-end pool and configure health probes, listeners, routing rules, HTTP settings, Transport Layer Security (TLS), and rewrite sets.
Next, you learned how to deploy Azure Front Door, choose an Front Door SKU, and configure health probes, including customization of HTTP response codes, SSL termination, end-to-end SSL encryption, multisite listeners, back-end targets, routing rules, and redirection rules.
Then you learned how to deploy an Azure Traffic Manager profile, configure a routing method (mode), and configure HTTP settings.
Finally, we showed you how to design and implement an Azure VNet NAT and choose when to use it, how to allocate public IP or public IP prefixes for a NAT gateway, and how to associate a VNet NAT with a subnet.
Exam Essentials
- Understand Azure Application Gateway deployment options. You can manage traffic to your web applications using Azure Application Gateway, a load balancer for web traffic. Application Gateway offers features such as load-balancing HTTP traffic, web application firewalls, and TLS/SSL encryption support between users and application servers and between application gateways and servers.
In addition to the URI path, Application Gateway can use host headers to decide how to route requests. By using the incoming URL, for instance, you can choose how to route traffic. The incoming URL containing/images can be routed to a specific set of servers (known as a pool) configured for images. In URLs that contain videos, the traffic is routed to a pool dedicated to videos.
- Understand the differences between manual and autoscaling configurations. WAF and Application Gateway can be configured to scale in two different ways: automatically and manually. With autoscaling enabled, the Application Gateway and WAF v2 SKUs scale out or in according to application traffic. Using this model makes your application more elastic, and it doesn't need to guess gateway size or instance count. The gateway will not need to run at maximum capacity for maximum traffic loads when you use this mode, so you will save money. Microsoft recommends that you specify a minimum and optional complete instance count.
A manual mode is also available, which disables autoscaling. When the Application Gateway or WAF can't handle all the traffic, it could result in traffic loss. In manual mode, instance counts must be specified, and there are 125 possible instances.
- Know how to create a back-end pool. Web traffic is directed to specific back-end resources through the application gateway. You can create listeners, rules, and back-end resources and assign them to ports. Here is a simple setup: a public IP address for the front-end, a listener to host the single site on the application gateway, two virtual machines in the back-end pool, and a basic request routing rule.
- Be able to configure health probes. All Azure Application Gateway back-end resources are monitored by default, and any resource deemed unhealthy is automatically removed. When unhealthy instances become available and respond to health probes, Application Gateway adds them back to the healthy back-end pool. Health probes are sent using the same port as the back-end HTTP settings by default. Using a custom health probe, you can change this.
- Understand how to configure listeners. A listener is a logical entity that monitors incoming connection requests’ port, protocol, host, and IP address. Configuring the listener requires entering values that match the values in the incoming request on the gateway. A default listener is created when you create an application gateway through the Azure portal by selecting the protocol and port. An HTTP2listener can be enabled if needed. The settings of that default listener (
appGatewayHttpListener) can be edited after creating the application gateway, or new listeners can be created. - Be able to configure routing rules. A default rule is created when you create an application gateway using the Azure portal (rule1). The
appGatewayHttpListenerrule binds the default listener to the default back-end pool (appGatewayBackendPool) and the default back-end HTTP settings (appGatewayBackendHttpSettings). Once the gateway has been created, you can edit the settings of the default rule or create new ones. - Know how to configure HTTP settings. This configuration directs traffic to the back-end servers using the application gateway. An HTTP setting must be associated with one or more request-routing rules after it is created.
- Know how to configure Transport Layer Security (TLS). A secure connection between a web server and a browser is established using Transport Layer Security (TLS), formerly known as Secure Sockets Layer (SSL). Using this link, all data passed between a web server and browser remains private and encrypted. Application gateways support both TLS termination at the gateway and end-to-end TLS encryption.
Gateways support TLS termination at the gateway, and traffic is typically unencrypted to the back-end servers.
- Know how to select an Azure Front Door SKU. With Front Door, you can deliver content and files, build global apps and APIs, and provide a more reliable, secure, and scalable experience for your users. Front Door is a cutting-edge cloud content delivery network (CDN) that provides fast, reliable, and secure access to your applications’ static and dynamic content worldwide. Front Door uses Microsoft's global edge network with hundreds of international and local POPs (An Internet service provider [ISP] local access point is a POP [Point Of Presence].) Users can connect to the Internet through their Internet service provider through a point of presence (POP) close to your enterprise and consumer end users.
- Be able to configure health probes, including customization of HTTP response codes. For each Front Door environment, a synthetic HTTP/HTTPS request is sent periodically to each of your configured origins to determine the health and proximity of each back-end. Front Door uses the probe results to determine the best source to route your client requests. This can be done either using HTTP or HTTPS. Probes are sent over the same TCP port used to route client requests and cannot be overridden.
- Know how to configure SSL termination and end-to-end SSL encryption. TLS is the standard security technology for establishing an encrypted link between a web server and a browser. All data exchanged between the web server and the browser remains private and encrypted through this link. Front Door (AFD) supports end-to-end TLS encryption to meet your security or compliance requirements. With Front Door TLS/SSL offload, the TLS connection is terminated, the traffic is decrypted at the Front Door, and then re-encrypted before being sent back to the back-end. To enforce TLS encryption from the client to the back-end, configure HTTPS as the forwarding protocol on your Front Door so that connections to the back-end occur over the public IP address.
- Know how to configure routing rules, including redirection rules. It is possible to change the path of a request routed to your origin using Front Door. In addition to adding conditions, URL rewrite can also ensure that URLs or specified headers get rewritten only when certain conditions are met. Based on the request and response information, these conditions can be specified.
Traffic is routed over multiple stages for Front Door. First, clients route traffic from Front Door to the client. Then Front Door determines the origin of traffic based on your configuration. Front Door's firewall, routing rules, rules engine, and caching configuration affect the routing process.
- Be able to configure a routing method (mode). Traffic Manager offers six methods of traffic routing to determine how to route network traffic to the various service endpoints. Each DNS query Traffic Manager receives gets routed according to the traffic-routing method associated with that profile, and traffic-routing methods determine which endpoints are returned in DNS responses.
There are six routes for routing traffic: Priority routes, Weighted routes, Performance routes, Geographic routes, Multivalue routes, and Subnet routes.
- Be able to configure endpoints. You can specify the endpoint priority for each endpoint explicitly using the Priority property in Resource Manager. Values for this property range from 1 to 1000, with a lower value representing a higher priority. A priority value cannot be shared between endpoints, and it is optional to set this property. When omitted, a default priority is calculated based on the order of the endpoints.
- Know how to create HTTP settings. The Traffic Manager probing agent initiates a GET request to the endpoint using the given port, protocol, and relative path when the monitoring protocol is set as HTTP or HTTPS. Endpoints are considered healthy if the probing agent receives a 200-OK response or expected status codes. The response might be different, or there may not be a response within the timeout period. If the Tolerated Number Of Failures setting is set to 0, Traffic Manager is probing agent re-attempts. The result is that no re-attempts are made. If the Tolerated Number Of Failures setting is exceeded, the endpoint is marked unhealthy.
- Understand when to use a VNet NAT. NAT (network address translation) with virtual networks is a managed, highly resilient service. With VNet NAT, virtual networks can easily access the Internet. VNet NAT uses static public IP addresses on a subnet when configured on a subnet.
- Understand how to allocate public IP or public IP prefixes for a NAT gateway. There are two types of public IP for NAT gateways: public IP and public IP prefix. The VNet NAT feature is compatible with standard SKU public IP addresses and public IP prefix resources. Public IP addresses of a prefix can be used directly or distributed across multiple NAT gateway resources. All traffic is shaped up to the range of IP addresses for the prefix by the NAT gateway. A basic load balancer or a basic public IP address cannot be used with a VNet NAT gateway. Basic resources must be located on a separate subnet from the NAT gateway. You can upgrade the basic load balancer and basic public IP to work with a NAT gateway.
- Understand how to associate a VNet NAT with a subnet. All compute resources in a subnet can use the NAT gateway resource associated with that subnet. Virtual networks can share this resource across all subnets. In the case of NAT gateways related to public IP addresses, scaling is automatic based on the number of outbound IP addresses.
Review Questions
- Azure Application Gateway should be configured so that users will not experience performance degradation during peak hours. How should this be done?
- Using autoscaling
- Using manual scaling
- Via health probes
- Tuning methods
- A company's app service has 20 instances. The components reside in a different Azure region and are accessible through a public endpoint.
- HRMSApp is an application being developed by the HR department at the company. HRMSApp uses endpoints every 15 minutes and connects to the first available one.
- Cloud consumers will use Traffic Manager to hold the list of endpoints.
- DNS caching can be minimized by configuring Traffic Manager profiles.
Which algorithm fits this requirement?
- Performance
- Multivalue
- Weight
- Geographic
- There are two primary methods of routing traffic in Application Gateway. Which of the following are applicable? (Choose all that apply.)
- Path-based routing
- Event-based routing
- Multisite routing
- All the above
- Which of the following is true of Front Door and Application Gateway?
- Front Door is a global service, whereas Application Gateway is a regional service.
- Front Door is not a global service, and Application Gateway is a not a regional service.
- Front Door is a global service, and Application Gateway is a not a regional service.
- Front Door is not a global service, and Application Gateway is a regional service.
- From the Front Door perspective, which of the following incoming traffic patterns determines whether the incoming request matches the routing rule?
- Host
- Path matches
- Host and path matches
- None of the above
- Which of the following is true of Front Door's back-end health probes?
- Health probes are used to monitor Front Door's back-end.
- Health probes are not used to monitor Front Door's back-end.
- Health probes are used to log events about Front Door's back-end.
- Health probes are not used to log events about Front Door's back-end.
- How many edge environment requests can Front Door handle?
- 99 to 1,000 requests per minute
- 32 to 500 requests per minute
- 25 to 1,200 requests per minute
- 75 to 1,000 requests per minute
- The Traffic Manager listener checks an incoming connection request based on which of the following?
- Port and protocol
- Host and IP address
- A and B
- None of the above
- What is Traffic Manager based on?
- DNS
- DHCP
- NAT
- Subnet
- What enables an organization to distribute traffic to their public-facing applications across Azure regions?
- Azure Traffic Distribution
- Azure Traffic Consolidation
- Azure Traffic Segmentation
- Azure Traffic Controller
- What is the name of the virtual machine instance's network protocol that connects to the Internet? (Choose all that apply.)
- TCP
- UDP
- HTTPS
- SFTP
- What do you specify for each VNet subnet to enable outbound connectivity?
- NAT gateway resource
- Azure Traffic Manager
- Azure Application Gateway
- Azure Virtual appliance
- How many options for routing traffic does Azure Traffic Manager give you?
- 3
- 6
- 10
- 9
- What does Front Door use the Anycast protocol and a split TCP and Microsoft's global network for to improve global connectivity?
- Layer 7 HTTP HTTPS
- Layer 6 Presentation layer SSL
- Layer 7 SSH DNS
- Layer 2 Switching Security
- How many endpoints does Traffic Manager support per profile?
- 821
- 401
- 200
- 221
- Which of the following are features of Azure Traffic Manager?
- Increased application availability and performance
- No interruption of service
- Integrated hybrid applications
- All the above
- Which of the following protocols allows a custom domain associated with a Front Door?
- HTTPS
- HTTP
- SFTP
- SSL
- Which of the following does Front Door support?
- End-to-end TLS encryption
- Up-to-downstream systems
- Up to load balancers
- Up to VM level
- What is the routing rule used to associate the rewrite configuration with the source listener?
- Global header rewrite
- Reevaluate path map
- Path-based routing
- Host header
- Which three options can an organization choose for load balancers with Availability Zone?
- No-zone (the default option)
- A specific zone, or zone redundant
- Region specific
- A and B