
Chapter 11
Deploying and Managing Applications and Solutions
Microsoft Exam Objective Covered in This Chapter:
- Deploying and Managing Applications
- Deploy and Manage SharePoint Solutions
- Manage Site Collections
This chapter introduces how to develop and maintain restricted sandbox environments in SharePoint and how to manage the State Service, required for workflows and InfoPath Forms Services. Then the chapter builds on previously presented material by addressing the document management solutions of InfoPath Forms Services and workflows.
A sandbox solution is used to restrict access of a test environment to local and network resources in order to test load balancing or to test hosted environments prior to deployment. In essence, it’s running an isolated environment where you can test platforms and features prior to releasing them into production.
The majority of the material presented in this book assumes you have installed SharePoint Server 2010 directly into your production environment, but this is not the only option for running a SharePoint platform. You can also deploy SharePoint into a sandbox, restricting the scope of its reach and preventing SharePoint from impacting your current working server farm.
Sandbox solutions are contained on the site collection level, so a manager for a sandbox does not have to belong to the Farm Administrators group. While the sandbox can be run by a site collection administrator, only the farm administrator can promote the sandbox solution into production.
Reviewing the Sandbox Solution
Although you can deploy a complete SharePoint environment in a sandbox, you can also maintain a SharePoint sandbox deployment to test just certain elements, such as new web parts, custom workflows, and InfoPath business logic. Regardless of your goals, deploying a sandbox solution is a good method for testing any changes you want to make in your production SharePoint server farm. If something breaks, productivity isn’t affected, and you’re free to fix the problem without the additional pressure of knowing that work isn’t getting done in the enterprise as a result of the problem.
Sandbox Deployment Review
The high-level overview of sandbox environment deployment involves the following steps. Each activity has to be performed only once, and each step must be performed by the farm administrator.
1. Enabling sandboxing and starting the sandboxing service on each server that will run the sandbox solution
2. Applying a load balancing scheme to all sandbox solutions in all relevant site collections
3. Setting resource quotas that cannot be exceeded by all the combined site collections in the sandbox solution
After the previous tasks have been performed, the following tasks must be done by a site collection administrator, although it is possible for a SharePoint user with full control over the root of the site collection to do the same job.
- Uploading a solution to the site collection’s Solution Gallery
- Activating and validating the solution
If the solution contains an assembly, only the site collection administrator can activate the solution.
Sandbox Isolation Management
Sandbox isolation isn’t an all-or-nothing solution. You can set sandbox isolation to varying degrees depending on your requirements. Of course, the greater the isolation, the more your production server farm is protected from events occurring within the sandbox. The downside of sandbox isolation is that there are specific activities that the sandboxed platform can and cannot perform:
- Cannot access resources on a different site collection within the sandbox
- Cannot access a database
- Cannot call unmanaged code
- Cannot change the threading model
- Can connect to resources on the local server only
- Cannot write to disk
All sandbox solutions must contain a file called manifest.xml, which is a configuration file that defines the limits of the sandbox environment described in the previous list.
Planning and Deploying the Sandbox Solution
As previously mentioned, there is more than one reason to use a sandbox, and sandboxes can be isolated to varying degrees. Depending on your requirements, you will need to establish a particular plan for your sandbox before deployment.
The first part of the plan is whether you are going to even use a sandbox. Keep in mind that a sandbox environment comes at a cost, including more worker and proxy processes than a server farm, since the sandbox uses a separate worker thread that’s unable to access server farm resources. However, if security and stability are higher priorities or if you need to provide scaled deployment of solutions into production, implementing a sandbox will serve those needs.
The following are the primary reasons to choose to use a sandbox solution:
- To provide load balancing between multiple servers for customized code
- To run and test code that is not currently supported in production
- To allow hosted SharePoint sites to upload and run customized code
Using Load Balancing in the Sandbox
You can use either local or remote load balancing with which to run custom code for testing. Local load balancing will always run the solution on the same server that received the request. This option requires less administration but has limited scalability. Remote load balancing will select the server that has the most solution affinity; that is, the solution will run on the server where it has previously been loaded and been run. This option is more scalable but has a higher administration cost on more servers.
To use either option, the User Code Host service and the Sandboxed Code service must be activated on each relevant server. You must choose either local or remote load balancing. You cannot mix both types in a single sandbox. Remote load balancing is a better choice if you want better performance in a multiserver environment. Local load balancing is the better choice if you are using the sandbox as part of a development environment and need to keep the sandbox environment isolated from the production farm.
Sandbox Deployment Management
Once the farm administrator has enabled the sandbox service, a site collection administrator can deploy the sandbox solution at the root of a site collection and then use the sandbox on any site in the collection. Note that if a person is the site collection owner but not the site collection administrator, that person will not be able to deploy the sandbox environment on their site collection.
The site collection administrator can enable or disable the sandbox on a site collection by manipulating quotas. To disable a sandbox in a site collection, set the quota to 0. This allows you to fine-tune which site collections hosted on a server will and will not run the sandbox environment.
Quotas are used in a sandbox environment in a similar manner to how they’re used in production. If a sandbox solution exceeds its resource quotas, the sandbox is disabled for the remainder of the day or until the farm administrator resets the solution. This is one way to determine which site collection in the sandbox is using more resources than initially anticipated and thus requires an increased quota beyond the default settings.
Sandbox Promotion Planning
Only the farm administrator can change a sandbox environment to a fully trusted production environment. Part of your plan should include the criteria for promoting a sandbox solution to production or should include the plan for promoting the elements or code you are testing in the sandbox to production. Also, is promotion going to be a single or multistep process? You can choose to promote your sandbox material to the entire server farm or only to selected additional site collections, gradually introducing the changes over time. The latter usually means adding users who will have control over the sandboxed code or elements.
Deploying the Sandbox Solution
Now that you have some background on sandbox solution environments, it’s time to learn how to enable and manage a sandbox in SharePoint. A number of tasks are associated with this activity. The first task is to enable sandbox solutions on the farm. You can do this either using Central Administration or using Windows PowerShell. Exercise 11-1 shows you the Central Administration method. You must be a member of the Farm Administrators group to perform this task. By default, the SharePoint Foundation Sandboxed Code service is disabled.
Exercise 11-1: Enabling Sandboxed Solutions
1. On the Central Administration home page, click Manage Services On Server under System Settings.
2. On the Manage Services On Server page, select the server on which you want to enable sandboxed services in the Server menu.
3. On the subsequent page, scroll down if necessary; in the Action column next to Microsoft SharePoint Foundation Sandboxed Code Service, click Start.
4. Repeat this procedure for any other servers on which you want to enable this service.
To perform the same task using Windows PowerShell, open PowerShell as an administrator, type the following code at the prompt, and then press Enter:
Start-Service -Name SPUserCodeV4
As previously mentioned, you can select either the local or remote load balancing schemes for the sandbox environment depending on your requirements. By default, the remote scheme is enabled. To change the scheme, you need to be a member of the Farm Administrators group. The only option to perform this task is in Central Administration. Exercise 11-2 will take you through the steps.
Exercise 11-2: Configuring Sandbox Load Balancing
1. On the Central Administration home page, click System Settings.
2. On the System Settings page, click Manage User Solutions under Farm Management.
3. On the User Solution Management page, under Load Balancing, select either All User Code Runs On The Same Machine As Web Requests to set the scheme to local or Requests To Run User Code Are Routed By Solution Affinity to set the scheme to remote, as shown here.
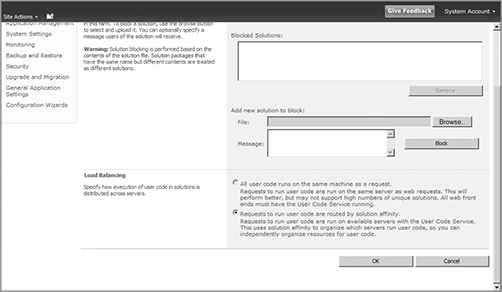
4. Click OK.
A farm administrator may need to manually block a sandbox environment, essentially disabling it, if the environment exceeds its predetermined resource limits. Exercise 11-3 shows you the process for this action.
Exercise 11-3: Blocking a Sandbox Solution
1. On the Central Administration home page, click System Settings.
2. On the System Settings page, click Manage User Solutions under Farm Management.
3. On the User Solution Management page, in the File field under Solution Restrictions, either type the full path of the file containing the solution you want to block or use the Browse button to navigate to the location of the solution.
4. If you desire, you can type an optional message in the Message field that will be read by users when they try to use the blocked solution.
5. Click Block to add the solution to the list in the Blocked Solutions box.
6. If necessary, repeat these steps to block other solutions.
7. Click OK.
To unblock a solution, perform the same steps to navigate to the Sandboxed Solutions Manage page, select the solution you want to unblock in the Blocked Solutions box, click Remove, and then click OK.
Managing a Sandboxed Solution
As a SharePoint administrator for your company, you have been tasked by the CIO with planning and creating a sandboxed SharePoint environment for the general testing of different SharePoint implementations as well as specific SharePoint elements and custom code, such as customized web parts, workflows, and InfoPath forms.
The sandboxed environment must not be able to access resources on the production server farm including site collections, database servers, and even some resources in the sandbox. You must create an environment where the SharePoint implementation in the sandbox can only write to the local server. You have not been required to focus on the load-balancing aspects of using a sandbox.
If the SharePoint implementation in the sandbox becomes viable, it may potentially be promoted into production, which is a task only you or another administrator can perform, but during testing, you will enable the sandbox environment so that site collections in the sandbox can be managed by site collection administrators.
You have been tasked to limit the amount of resources site collections in the sandbox can use, and you may block the sandbox solution manually if site collection users exceed their allotted quota.
Once you’ve planned your sandbox deployment, you enable sandboxed solutions in Central Administration for the required servers as well as setting up sandbox solution blocking.
The State Service is a shared service in SharePoint that’s used by some services and features to store temporary data across relevant HTTP requests in a SQL Server database. The InfoPath Forms Services requires the State Service as does both default and custom workflows, the SharePoint Chart web part, and some of the Visio 2010 features that do not require Microsoft Silverlight 3. This service is generally required to store session state data for forms, charts, and diagrams.
Configuring the State Service
The State Service is automatically configured when you install SharePoint as a basic deployment using the Farm Configuration Wizard, but you can also configure this service using Windows PowerShell. This section of the chapter covers both methods. Exercise 11-4 shows you the Farm Configuration Wizard procedure. If you follow these steps and the State Service check box is unavailable, the service has already been configured.
See Chapter 4, “Configuring Service Applications,” for more information regarding configuring the State Service and other services in SharePoint.
Exercise 11-4: Configuring the State Service Using the Farm Configuration Wizard
1. On the Central Administration home page, click Configuration Wizards.
2. On the Configuration Wizards page, click Launch The Farm Configuration Wizard.
3. On the first page of the wizard, click Start The Wizard.
4. On the Services Configuration page, under Services, select the State Service check box and then click Next (if the option is unavailable, the service has already been started).
5. Complete the other configuration pages in the wizard; then, on the final page,click Finish.
Once the State Service is configured using the Farm Configuration Wizard, you can make changes only by using Windows PowerShell. You can use Windows PowerShell for the initial configuration instead of the Farm Configuration Wizard, but PowerShell is the only option you can use to make any modifications.
State Service–related tasks you can perform in PowerShell include getting information about service applications, databases, and application proxies; changing the configuration parameters for those elements; pausing and resuming the State Service databases; mounting data to a database; and removing the State Service database. You can also install the State Service schema to an existing database, create State Service service applications, and create additional State Service databases.
Remember that, just like any other shared service, the State Service application proxies are bound to web applications using proxy groups, and the State Service service application contains one or more databases.
Configuring the State Service Using Windows PowerShell
To configure the State Service using PowerShell, on the server computer hosting Central Administration, you must load the SharePoint Server module for Windows PowerShell. To do this, click Start Add Programs Administrative Tools and then click Windows PowerShell Modules. Once the modules have been loaded as indicated in the PowerShell window, the command prompt will become available.
1. To create a service application, type $serviceApp = New-SPStateServiceApplication -Name "State Service" at the prompt and then press Enter.
2. To create a State Service database and associate it with a service application, typeNew-SPStateServiceDatabase -Name "StateServiceDatabase" -ServiceApplication $serviceApp and then press Enter.
3. To create a State Service Application Proxy and associate it with the serviceapplication, type New-SPStateServiceApplicationProxy -Name "State Service"-ServiceApplication $serviceApp -DefaultProxyGroup at the prompt and then press Enter.
4. To view a list of all the PowerShell cmdlets related to the State Service, typegcm *spstate* at the prompt and then press Enter.
One detail to keep in mind while you’re using PowerShell to configure the State Service is that you must have at least one service application for a State Service. If you have hosted deployments, although each host partition can have its own service application, it’s not a requirement. However, each service application must have a unique name, so in any of the sample code, replace the example name with a unique name.
Each State Service service application requires at least one State Service database, but you may want to create additional databases if you expect a large volume of forms and charts. Like service applications, each database must have a unique name, so change the text in the example code accordingly. Also, to use another proxy group besides the one named in the sample code, change the DefaultProxyGroup parameter.
As you learned in the previous section of the chapter, one of the features in SharePoint dependent on the State Service is workflow. A workflow is a process that allows multiple people to collaborate and have input on documents for the purpose of managing project tasks. Workflows help impose a specific set of criteria to document creation that matches organizational requirements using a series of steps in which workflow participants can apply a status to the document at each step in order to communicate with the document’s author.
When the document is created and submitted to the workflow, the workflow process sends an email from the author to the workflow approvers that the document is awaiting their review. Each approver views the document and assigns a response such as approve or reject, and, depending on the response, the document takes a different path through the workflow, either forward to the next approver or back to the author.
There are a number of workflow types, depending on the purpose of the workflow and the requirements for the document:
- Approval
- Collect Feedback
- Collect Signatures
- Disposition Approval
- Three-state
- Group Approval
- Publishing Approval
- Translation Management
In addition to workflows that come by default with SharePoint, custom workflows can be created to meet additional business needs. Customizations can be based on the default workflows or created “from scratch” using SharePoint Designer. In addition, custom activities and custom nondeclarative workflows can be created using Visual Studio.
Creating custom workflows is beyond the scope of this book and not a requirement for the certification.
Managing Workflows
Workflows are a significant portion of a user’s SharePoint experience, and as an administrator, you will be responsible to activate, deactivate, modify, and otherwise manage workflows. This first set of workflow exercises will show you how, starting with activating a workflow at the site collection level in Exercise 11-5. Any workflows you activate at the site collection level will become available to all subsites in the collection. You must be a member of the Site Collection Administrators group for the site collection on which you want to activate workflows to complete this task.
You can also deactivate the feature by navigating to the Features page and clicking the Active indicator next to the feature to deactivate it.
Exercise 11-5: Activating Workflows in a Site Collection
1. At the top level of the site collection, click Site Actions and then click Site Settings.
2. On the Site Settings page, click Site Collection Features under Site CollectionAdministration.
3. On the Features page, locate the workflow feature you want to activate and click the Activate button next to the feature, as shown here.
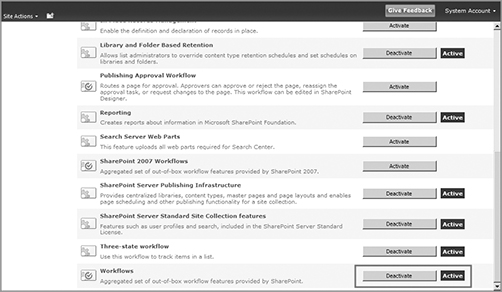
4. When the indicator in the status column next to the feature displays as Active, close the page.
Activating the workflow feature for a site collection is just the first step. Your users still won’t be able to use workflows until you add one or more workflow associations. A workflow association assigns a task or history list that will be used with the workflow. You can use the default list, select a different list, or create a new one. You can associate a number of workflows to a single list or associate separate workflows with separate lists. Choose the latter option if you don’t want to experience a performance slowdown by having a large number of workflows associated with one task list and one history list.
Any workflow participant can view the task list for a workflow by using the My Tasks view of the Tasks list in Quick Launch; however, if the tasks list contains confidential or private information you do not want viewed by all participants, you can associate specific task lists to specific workflows. Then only users who can participate in the confidential workflow can see the associated tasks.
You can perform a number of different workflow association tasks. Exercise 11-6 shows you how to associate a workflow with a list or document library. The task can vary depending on the type of workflow you are associating. For instance, if you are adding a Three-state workflow to a list, you should create a Choice type column to the list and assign the column three choices. At a minimum, you must have Full Control permissions to the relevant list or library to complete this task.
Exercise 11-6: Associating a Workflow to a List or Document Library
1. In the site collection, navigate to the desired site and then to the desired list or library.
2. For a list, on the List Tools tab, click List. For a library, on the Library Tools tab, click Library.
3. Under Settings, click Workflow Settings and then click Add A Workflow.
4. On the Add A Workflow page, select the workflow template under Workflow that you want to associate with the list or library.
5. Give the workflow association a name in the Name field.
6. Under Task List, specify the desired task list.
7. Under History List, specify the desired history list.
8. Under Start Options, choose Automatically or Manually to specify the start option type, select Item Update, Creation, or both to specify the event or events that will start the workflow, or select the user or users who can start the workflow.
9. If additional configuration options are available for the workflow template you previously selected, click Next to customize the settings, make your customizations, and then click OK; otherwise, click OK to apply your changes.
The history list has a tendency to grow a lot, so depending on the amount of activity you expect the workflow to experience, you may want to create a new history list, rather than using the default list or selecting another currently existing list.
Normally, any user with Edit Item permissions can start a workflow, but if you want to restrict this activity further, you can specify that Require Manage List permissions be required. Then, only users with Manage List or Web Designer permissions will be able to initiate a workflow.
Associating a Workflow with a List or Library Content Type
You can associate a workflow with a list or library content type in almost the same manner. You need to be a member of the Site Owners group for the relevant site to perform the task, though. Follow steps 1 and 2 in Exercise 11-6 to get to the List Settings or Library Settings page; then under Content Types, in the Content Type column, click the content type you want to associate. Then under Settings, click Workflow Settings. On the Workflow Settings page, click Add A Workflow; then follow steps 4 through 9 in Exercise 11-6 to finish the job.
The task of associating a workflow with a site content type is also similar but different enough to outline in Exercise 11-7. You must be a member of the Site Owners group for the relevant site to successfully complete this task.
Exercise 11-7: Associating a Workflow with a Site Content Type
1. In the site collection, navigate to the desired site, click Site Actions, and then click Site Settings.
2. On the Site Settings page under Galleries, click Site Content Types.
3. On the Site Content Types page, click the desired content type in the Site Content Type column.
4. Under Settings, click Workflow settings, as shown here.

5. On the Workflow Settings page, click Add A Workflow.
6. On the Add A Workflow page under Workflow, select the desired workflow.
7. Give the workflow a name in the Name field.
8. Select the desired task list under Task List, and select the desired history list under History List.
9. Under Start Options, select the desired start options as you did in Exercise 11-6.
10. If the workflow you select has additional configuration steps, click Next and configure those steps. Then click OK to finish; otherwise, click OK to apply your changes.
To associate a workflow with a site, click Site Actions on the relevant site and then Site Settings. On the Site Settings page, click Workflow Settings under Site Administration and then follow steps 5 through 10 in Exercise 11-7 to finish the job.
Editing and Deleting Workflow Associations
To modify any of the associations that you just created, navigate to the area where you created the workflow; select the desired list, library, or workflow; and edit your settings.
To delete a list or library workflow association, navigate to the list or library settings page, and click Workflow Settings under Permissions and Management. Then on the Workflow Settings page, click Remove Workflow. You can then select No New Instances to prevent new workflows from being started but allow workflows in progress to be finished, or you can select Remove to remove all workflows immediately.
To remove associations with list or library content types, navigate to the List or Library Settings page, and under Content Types, click the name of the content type you want to remove. Under Settings, click Workflow Settings. On the Workflow Settings page, click Remove A Workflow, select the workflow, and then select either No New Instances or Remove.
To remove a workflow association from a site content type, navigate to the Site Settings page. Under Galleries, click Site Content Types. Select the desired content type in the Site Content Type column and click Workflow Settings under Settings. On the Workflow Settings page, click Remove A Workflow and then select either No New Instances or Remove. If after clicking OK, the Apply Changes To All Content Types Inheriting From This Type message appears, click OK.
To remove a workflow association from a site, on the Site Settings page under Site Administration, click Workflow Settings. On the Workflow Settings page, click Remove A Workflow and then follow the remaining steps required to remove the workflow.
Now that you’ve activated the workflow features and made workflow associations, you must start a workflow instance. Exercise 11-8 shows you how to set a workflow instance for a site to start automatically. You must be a member of the Site Owners group for the relevant site to successfully complete this exercise.
Exercise 11-8: Starting an Instance of a Workflow for a Site
1. On the home page for the desired site, click All Site Content in Quick Launch and then click Site Workflows.
2. On the Workflows page, under Start A New Workflow, click the name of the desired workflow.
3. When the Start button appears, click Start.
In step 2 of the previous exercise, if no workflow names appear, it usually means that no workflows have been associated with the site.
Manually Starting a Workflow for a List or Library
If you’re a site owner, you can also manually start a workflow for a list or library. Just navigate to the desired list or library and click Workflows on the lists or library settings page. On the Workflows page, click the name of the desired workflow under Start A New Workflow. You may have to click the Start button should it appear.
If a user has the Contribute permission level for a list or library, they can manually start a workflow in either Office 2007 or Office 2010. Regardless of the version of Office being used, the user must save the relevant Office file to the list or library before you proceed with these steps.
Manually Starting a Workflow in Office 2007
Follow these steps:
1. In the SharePoint list or library, open the desired file.
2. In Office 2007, click the Microsoft Office Button and then select Workflows.
3. When the list of available workflows appears, click Start next to the desired workflow.
4. If the workflow form appears, enter the requested information and then click Start.
Manually Starting a Workflow in Office 2010
Follow these steps:
1. In the relevant list or library, open the desired file.
2. In the Office 2010 client application, click Save & Send on the File tab.
3. Under Workflows, click the desired workflow.
4. In the right pane, click Start Workflow.
5. If the workflow form appears, enter the requested information and then click Start.
In Exercise 11-8, you learned how to start an instance of a workflow. You can also cancel or terminate the instance. When you cancel the workflow, any tasks created in the workflow are lost, and the workflow is ended.
You cannot restart a workflow instance once canceled or terminated. You must start a new instance. You terminate a workflow instance when it cannot be canceled. This usually occurs when the workflow stops responding or a workflow error occurs. Exercise 11-9 shows you how to cancel a workflow instance. You must be the Site Owner on the relevant site to complete this task.
Exercise 11-9: Canceling a Workflow for a List or Library
1. Navigate to the desired list or library, click the document for which you want to stop the workflow, and click Workflows in the menu.
2. On the Workflows page, click the name of the desired workflow under Running Workflows.
3. On the Workflow Status page, click Cancel All <name of workflow> Tasks under Workflow Information. When prompted, click Yes.
The Cancel All <name of workflow> Tasks link will not be available if the cancel operation isn’t supported or a workflow error has occurred. In that case, your only option is to terminate the workflow.
To cancel a site workflow, on the home page for the site on which you want to cancel the workflow, click All Site Content and then click Site Workflows. Then follow steps 2 and 3 in Exercise 11-9 to finish the job.
To terminate a workflow for either a list or library or site, navigate to the Workflows page as you did in the previous exercise and click Terminate This Workflow Now under Workflow Information. When prompted, click OK.
Monitoring Workflows
Once the workflow feature is active and people are using workflows, you can monitor workflow health and well being by checking workflow status and viewing workflow reports. You may also have to troubleshoot workflow errors should they occur.
Checking Workflow Status
Checking the status for a list or library workflow is as easy as browsing to the relevant list or library and, in the row for the specific item, clicking the link in the Workflow Status column. You only need Edit Items permission for the list or library in question. Then, on the Workflow Status page, you can check the status details, such as the name of the person who started the workflow, the date and time it was started, the name and link to the document or item in the workflow, the list of tasks assigned to workflow participants, and so on.
To do the same thing for a workflow associated with a site, in Quick Launch on the relevant site, click All Site Content and then click Site Workflows. On the Workflows page, you can click either My Running Workflows to view the status of current workflows or My Completed Workflows to see the status of workflows that have finished. From either area, click the name of the desired workflow, and view the available information on the Workflow Status page.
Checking Workflow Reports
To view the workflow report for the entire site collection, on the top-level page for the site collection, click Site Actions and then click Site Settings. On the Site Settings page, click Workflows under Site Administration. The Site Collection Workflows report will become available.
If you want to view reports for custom workflows, the specific parameters for the reports must be defined in the workflow template so that the reports will be generated. The designer must create these specifications while creating the custom workflow template in Microsoft Visual Studio. This will not be a task for which the SharePoint administrator will be responsible.
SharePoint generates two different reports for individual workflows as Excel documents: the Activity Duration report, which provides information about how long each activity lasts, and the Cancellation and Error report, which displays a list of the workflows that have been canceled or where errors occurred during the workflow process.
Exercise 11-10 will show you how to view an individual workflow report. Anyone with Edit Item permissions to view workflow reports can complete the following task.
Exercise 11-10: Viewing an Individual Workflow Report
1. Browse to the desired list or document library.
2. Click the item or document to open the menu and then click Workflows.
3. On the Workflows page, click the name of the desired workflow under Running Workflows.
4. On the Workflow Status page, click View Workflow Reports under Workflow History.
5. On the View Workflow Reports page, locate the desired workflow association and then click either Activity Duration Report or Cancellation & Error Report.
6. Under File Location, click Browse and navigate to the location to which you want to save the report.
7. Click OK.
If no workflows are listed under Running Workflows, it means no workflows are currently active. On the View Workflow Reports page, the reports are listed alphabetically by workflow association name.
Troubleshooting Workflow Errors
The most common problems you will encounter with workflow failures are network issues, permissions issues, and problems with the design of the workflow itself. For instance, a workflow might be designed to interact with a list or library, but the list or library has been deleted; or a user may have originally had permissions to access a workflow but subsequently their permissions changed, removing that access. These are only a few examples of what might cause a workflow to fail. In actuality, the number of reasons for workflow failures is vast.
Besides receiving user notifications that a workflow is having problems, one way to determine the state of a workflow is to check its operating status. In addition to the expected Completed status of a workflow, you may see messages such as the following:
- Error Occurred
- Failed On Start
- Failed On Start (Retrying)
- Stopped
Troubleshooting workflow errors is complicated by having to accommodate the type of workflow. For a simple status message such as Error Occurred, the cause can be different depending on workflow type, including custom workflows created using Visual Studio. If you are working with the predefined, out-of-the-box workflow, using workflow history is a good starting place for diagnosing the problem. In reviewing the workflow’s history, the last item in the history list will contain the error message. Although the details may not be present (by design to avoid revealing security information), look for network, permissions, and incorrect email setting problems.
If a problem occurs with a custom-made workflow and you cannot determine the cause, you may have to turn to the design team that created the workflow so they can debug the workflow. Although this issue is beyond the scope of your duties as a SharePoint administrator, you can find out more about this process by going to http://blogs.msdn.com/b/sharepoint/archive/2006/11/30/developing-workflows-in-vs-part-6-deploy-and-debug-your-workflow.aspx or by searching TechNet for deploy and debug your workflow.
Configuring Global Workflow Settings
Global workflow settings determine the behavior of workflows across all sites in a web application. The following section shows you the various tasks associated with global workflow settings.
Enabling Declarative Workflows
Classic workflows are generally good for offering process support for structured processes but do not provide much flexibility. Declarative workflows offer a balance between flexibility and support by declaring a framework that simultaneously provides wider flexibility and supports user recommendations and other process-mining diagnostics.
Although you don’t have to be an expert in understanding declarative workflows, you will need to know how to enable and disable them. When you enable a declarative workflow, you can determine whether users with Design-level permissions can create and deploy such workflows using the Workflow Editor in SharePoint Designer 2010. Exercise 11-11 will show you how. You must be a member of the Farm Administrators group to successfully complete this exercise.
Exercise 11-11: Enabling and Disabling Declarative Workflows
1. On the Central Administration main page, click Application Management.
2. On the Application Management page, click Manage Web Applications under Web Applications.
3. On the Web Applications Management page, select the desired web application.
4. On the Ribbon, click General Settings and then click Workflow.
5. In the Workflow Settings dialog box, under User-Defined Workflows, select Yes to enable declarative workflows or No to disable declarative workflows, as shown here.
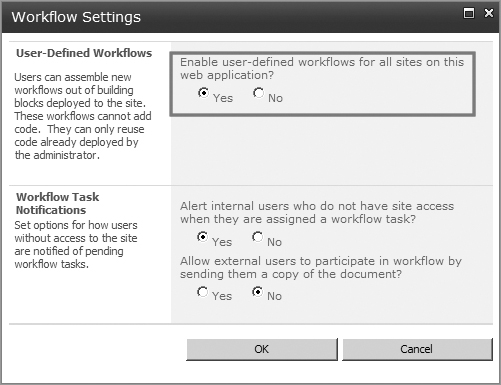
6. Click OK to close the dialog box.
Nonauthenticated Users Accessing Workflows
Although there is a risk of breaching security by allowing nonauthenticated users to participate in SharePoint workflows, you may encounter situations where it is to the company’s advantage to do so. As a SharePoint administrator, you can allow internal SharePoint users who normally don’t have access to a workflow to participate. You can also allow people who normally do not have access to your SharePoint environment at all to participate in a workflow.
To allow internal users to participate in a workflow, you can approve an email message being sent to the required user describing the request process. External users typically are required to sign a nondisclosure agreement or other similar document before being allowed to participate. You must be careful that such messages do not contain confidential or sensitive information the user is not entitled to possess. You must also consider what information the user may be able to access unintentionally, once allowed access to the workflow.
This feature allowing internal workers to access workflows where they are not participants is enabled by default.
Exercise 11-12 will show you how to allow an internal user to access a workflow. You must belong to the Farm Administrators group to complete this task.
Exercise 11-12: Allowing Internal Nonauthenticated Users Access to a Workflow
1. On the Central Administration main page, click Application Management.
2. On the Application Management page, under Web Applications, click Manage Web Applications.
3. On the Web Applications Management page, select the desired web application.
4. On the Ribbon, click General Settings and then click Workflow.
5. In the Workflow Settings dialog box, under Workflow Task Notifications, click Yes for Alert Internal Users Who Do Not Have Site Access When They Are Assigned A Workflow Task?, which will send an email to any internal user without access to the workflow, assigning them a workflow task when a site administrator makes that user a workflow participant.
6. Click OK to close the dialog box.
To allow external users permission to access an internal workflow task, follow steps 1 through 4 from Exercise 11-12; in the Workflow Settings dialog box under Workflow Task Notifications, for Allow External Users To Participate In Workflow By Sending Them A Copy Of The Document, click Yes, which allows external users participation rights by sending them a copy of the document being “workflowed” via email when a site administrator makes that person a workflow participant. Click OK to close the dialog box.
This setting allowing external nonauthenticated users access to a SharePoint workflow is disabled by default.
Disabling Automatic Workflow Cleanup
When you enable workflows and workflows are created, a workflow task list and history list are created with the workflow. By default, these records are removed every 60 days to prevent cluttering up the system. Although the workflow history items themselves aren’t deleted, the cleanup process removes the entry point to view the items on the status page for the specific instance of the workflow. You can disable the cleanup process if you need to retain access to the items beyond the default 60-day period. Just keep in mind that the longer the cleanup process is disabled, the longer the list can potentially grow and possibly affect site performance.
Exercise 11-13 shows you the steps in disabling automatic workflow cleanup. You need to belong to the Farm Administrators group to complete this task.
Exercise 11-13: Disabling Automatic Cleanup in Workflow
1. On the Central Administration main page, click Monitoring.
2. On the Monitoring page, under Timer Jobs, click Review Job Definitions.
3. On the Job Definitions page, under Title, click the Workflow Auto Cleanup link next to the desired web application (you may have to scroll to the bottom of the page and switch to a subsequent page to see the entry, because the list is quite long).
4. On the Edit Timer Job page, click Disable to disable the cleanup process, as shown here.

If you want to enable the process again for the web application, follow steps 1 through 4, and click Enable to enable the process.
Deploying Workflow Templates
When you or someone uses SharePoint Designer 2010 to create custom workflows, the workflows can be saved as workflow templates with a .wsp file extension. You can then use the .wsp file to deploy the workflow on different sites and site collections. This section of the chapter shows you how to work with workflow template files.
Managing Workflow Templates
When a workflow template (.wsp) file is created, it is stored in the Site Assets document library on the top-level site of the site collection for which it was created. You can download the .wsp file to a local folder and subsequently deploy the template. Exercise 11-14 describes the procedure.
Exercise 11-14: Downloading a Workflow Template
1. On the top-level site for the desired site collection, click All Site Content in Quick Launch.
2. On the All Site Content page, click Site Assets under Document Libraries.
3. On the Site Assets page, click the workflow you want to edit; on the menu that appears, click Send To and then click Download A Copy.
4. In the File Download dialog box, navigate to the location where you want to save the template and then click Save.
5. When the Download Complete dialog box appears, click Close.
Once you have the .wsp file saved locally, you can choose to upload it to the Solution Gallery for a desired site collection to make the template available as a feature you can then activate for the site collection. Activating the feature can be handled as a separate process or as part of the upload process. You can upload the .wsp file either using the Site Actions menu on the top-level of the desired site collection or with Windows PowerShell. Exercise 11-15 shows you the GUI method.
Exercise 11-15: Uploading a Workflow Template to a Site Collection
1. On the top-level site for the desired site collection, click Site Settings in Quick Launch.
2. On the Site Settings page, click Solutions under Galleries.
3. On the Solutions tab on the Ribbon, in the New box, click Upload Solution, as shown here.

4. When the Upload Document dialog box appears, click the Browse button and browse to the location of the desired .wsp file.
5. In the Choose File To Upload dialog box, select the desired .wsp file and thenclick Open.
6. When the Upload Document dialog box appears, click OK.
7. When the Solution Gallery – Activate Solution dialog box appears, click Activate.
The name of the workflow will now appear in the Solutions Gallery with its Status set to Activated for the site collection.
To perform the same task using Windows PowerShell, open PowerShell, type the following, and then Press Enter, substituting the sample values with your production values:
Add-SPUserSolution -LiteralPath <LiteralPath> -Site <SiteURL>
To activate the feature for the site collection, type the following at the prompt, and then press Enter, substituting the sample values with your production values:
Install-SPUserSolution -Identity <Solution> -Site <SiteURL>
You can also activate a workflow template for a specific site using either the Site Actions menu or Windows PowerShell. To activate the template using the menu, click Site Actions on the main page for the desired site and then click Site Settings. On the Site Settings page, click Manage Site Features under Site Actions. On the Manage Site Features page, click Activate next to the desired workflow template.
To perform the same task using Windows PowerShell, type the following at the PowerShell prompt, and then press Enter, substituting the sample values for your production values:
Enable-SPFeature -Identity <Feature> -Url <URL>
The InfoPath Forms Services in SharePoint 2010 provides the ability to deploy an organization’s forms in the SharePoint environment, allowing users to fill out any and all required forms within a web browser. SharePoint users can publish form templates to a list or form library in a site collection as long as the form does not use business logic, does not require full trust, and does not use data connections managed by an administrator. A site collection administrator can publish form templates containing code used by sandboxed solutions. Form templates requiring full trust or that use data collections must always be deployed by a farm administrator.
Configuring InfoPath Form Services and Templates
You may be called upon to manage a number of InfoPath Forms Services configuration settings including browser-related settings, authentication and connection settings, and user session settings. These settings are universally managed using the Central Administration interface.
Exercise 11-16 teaches you how to configure browser-enabled user form templates. You must belong to the Farm Administrators group to perform this task.
Exercise 11-16: Configuring Browser-Enabled User Form Templates
1. On the Central Administration main page, click General Application Settings.
2. On the General Application Settings page, click Configure InfoPath Forms Services under InfoPath Forms Services.
3. On the Configure InfoPath Forms Services page, under User Browser-Enabled Form Templates, select the Allow Users To Browser-Enable Form Templates check box if you want to allow users to publish browser-enabled form templates.
4. Select the Render Form Templates That Are Browser-Enabled By Users check box if you want to allow browser-enabled form templates that users publish to be rendered in a web browser.
5. Click OK to apply your settings.
If you clear the Allow Users To Browser-Enable Form Templates check box as described in the previous exercise, you will disable browser-enabled form templates for the entire server farm. If you clear the Render Form Templates That Are Browser-Enabled By Users check box in the previous exercise, users can still publish browser-enabled form templates to form libraries, but the templates that have been published to form libraries will be unable to be filled out in a web browser. Templates published to lists will be unaffected.
You can make other configuration changes on the Configure InfoPath FormsServices page including settings for HTTP data connections. These will be describedin Exercise 11-17.
InfoPath Form templates can contain data connections that access data sources located outside the site collection. This feature is disabled by default, but you can choose to allow form templates to perform cross-domain data access for the entire server farm as well as performing other configuration tasks. Exercise 11-17 shows you how. You will need to be a member of the Farm Administrators group to perform this task.
InfoPath Forms Services uses the State Service to store the transient data generated while the form is being filled out by a user. This means front-end web servers remain stateless between round-trips and user session data isn’t required to be sent repeatedly, consuming additional network bandwidth. You can manage a variety of user session settings for the server farm to optimize the user session and prevent the loss of user data because of premature session termination. You may have to perform these actions when the default settings are not adequate, though this should be fairly rare. If you do change the default settings, verify afterward that user form sessions behave as expected.
Exercise 11-17: Configuring InfoPath Forms Data Connectionand Authentication Settings
1. On the Central Administration main page, click General Application Settings.
2. On the General Application Settings page under InfoPath Forms Services, click Configure InfoPath Form Services.
3. On the Configure InfoPath Form Services page, set the connection timeout under Data Connection Timeouts by typing the time in milliseconds that will elapse before timeout in the Default Data Connection Timeout field.
4. To set the maximum amount of time that can elapse before connection timeout, type the time in milliseconds in the Maximum Data Connection Timeout field.
5. To set the maximum size of responses that data connections are allowed to process, type the value in kilobytes in the Data Connection Response Size field so that any responses that exceed the set size will throw an error message.
6. Under HTTP Data Connections, select the Require SSL For HTTP Authentication check box if you want to require SSL-encrypted connections for data connections using Basic or Digest authentication.
7. Under Embedded SQL Authentication, select the Allow Embedded SQL Authentication check box if you want to allow forms to use embedded SQL Server credentials.
8. Under Authentication To Data Sources (User Form Templates), select the Allow User Form Templates To Use Authentication Information Contained In Data Connection Files check box if you want to allow user form templates to use embedded authentication data.
9. Under Cross-Domain Access For User Form Templates, select the Allow Cross-Domain Data Access For User Form Templates That Use Connection Settings In A Data Connection File check box if you want to allow user form templates to access data from another domain.
10. When you are finished, click OK.
Follow the steps in Exercise 11-18 to learn how to configure the session state for InfoPath Services. You must be a member of the Farm Administrators group to complete this task.
Exercise 11-18: Configuring InfoPath Forms Service Session State
1. On the Central Administration main page, click General Application Settings.
2. On the General Application Settings page, click Configure InfoPath Forms Services under InfoPath Forms Services.
3. On the Configure InfoPath Forms Services page, under Thresholds, type the maximum number of postbacks you want to allow in the Number Of Postbacks Per Session field, with 75 being the default value.
4. In the Number Of Actions Per Postback field, type the value for the maximum number of actions per postback you want to allow, with 200 being the default value.
5. Under User Sessions, type the value for the maximum session duration in minutes in the Active Sessions Should Be Terminated After field, with the default value being 1440 minutes.
6. In the Maximum Size Of User Session Data field, type the maximum session state size in kilobytes, with 4096 kilobytes being the default value.
7. Click OK to apply your changes.
As previously mentioned, depending on the form template requirements, there are some templates that users can upload without administrator approval. Forms that use business logic using managed code, that access external resources, or that use administrator-managed data connections must be granted trust to execute code and access data. This trust originates either from sandboxed solutions or from administrator-approved form templates.
Forms uploaded in sandboxed environments don’t require full trust because the environment is isolated from the larger server farm. Administrator-approved templates require individual verification and must be uploaded and activated by an administrator with full trust to the domain. These forms are stored in a special document library accessible only by administrators.
The following tasks focus on activities-related administrator-approved form templates.
Exercise 11-19 shows you the process of uploading administrator-approved form templates using Central Administration. You must be a member of the Farm Administrators group to complete this task.
Exercise 11-19: Uploading Administrator-Approved InfoPath Form Templates
1. On the Central Administration main page, click General Application Settings.
2. On the General Applications Settings page, click Upload Form Template underInfoPath Forms Services.
3. On the Upload Form Template page, browse to the location of the desired template under Upload Form Template.
4. In the Choose File To Upload dialog box, select the desired template and thenclick Open.
5. Click Verify to make sure the template doesn’t register any errors; if errors exist, they will be displayed in the Report Details section of the Form Verification Report.
6. After the verification is complete and no errors appear, click OK to return to the Upload Form Template page.
7. Browse to the location of the template again and choose and open the template.
8. Under Upgrade, clear the Upgrade The Form Template If It Already Exists check box if the template does not already exist on the server or if it exists but you do not want to upgrade the template.
9. If you have chosen to upgrade a template but you want currently running browser sessions to use the current version of the template, make sure the Allow Existing Browser-Based Form Filling Sessions To Complete Using The Current Version Of The Form Template is selected; otherwise, select the Terminate Existing Browser-Based Form Filling Sessions check box, which will result in all data from the current sessions being lost.
10. Click Upload to finish the process.
When you upload a form template, if the same template already exists on the server, you may receive different messages depending on the circumstances. If you try to upload an earlier version of the form, you will receive a message indicating that you already have a more recent version of the template on the server. You can either remove the form currently stored on the server, increase the version number of the new template, or cancel the upload.
If you try to upload the same version of the form as the one already on the server, you will receive an error saying that the same version exists on the server. You can increase the version number of the template you are uploading or cancel the upload.
If you are uploading a newer version of the form than the one currently on the server, you can choose to upgrade the current form while allowing currently running sessions to use the older versions. You can also terminate all currently running sessions, causing users to lose their data and forcing them to use the newer form. Additionally, you can perform a gradual upgrade, which causes the newer version to be adopted for use as a separate template while gradually removing the older template. You can quiesce the older form template prior to upgrading to the newer version, gradually transitioning the template from an active to inactive state.
You can optionally upload an administrator-approved form template using Windows PowerShell. To do so, open PowerShell as an administrator, type the following string at the prompt, and then press Enter, replacing the sample values with your production values:
Install-SPInfoPathFormTemplate -Path <FormTemplateLocation>
Once an administrator-approved form template is uploaded, you must still activate it before the form becomes available to users. The form template can be activated either from Central Administration or from the site collection features page. Exercise 11-20 shows you how to activate a template from Central Administration. You must be a member of the Farm Administrators group to complete this task.
Exercise 11-20: Activating a Form Template in Central Administration
1. On the Central Administration main page, click General Application Settings.
2. On the General Applications Settings page, click Manage Form Templates under InfoPath Forms Services.
3. On the Manage Form Templates page, click the name of the form template you want to activate and then click Activate To A Site Collection.
4. If you need to change to a different site location, click the Site Collection box under Activation Location and then click Change Site Collection.
5. When the Select Site Collection dialog box appears, click the URL of the desired site collection and then click OK.
6. Click OK again to activate the template.
You can also change the web application in the Select Site Collection dialog boxif necessary.
To activate a form template from the features page of a site collection, click Site Actions on the top-level site of the site collection and then click Site Settings. On the Site Settings page under Site Actions, click Manage Site Collection Features. On the Manage Site Collection Features page, click Activate next to the desired form template. To verify that the form template is available, on the top-level site for the site collection, click Site Actions and then click View All Site Content. On the All Site Content page, under Document Libraries, click the Form Templates document library and make sure the desired template is in the Form Templates list.
You can deactivate an administrator-approved form template for a site collection in Central Administration. This action removes the template from any document library in the site collection, and any currently running form-filling session will be terminated, causing all form data to be lost. To prevent such a loss of data, you must quiesce the form template before deactivating the template. Exercise 11-21 shows you how to deactivate a form template. You must be a member of the Farm Administrators group to successfully perform this task.
Exercise 11-21: Deactivating a Form Template in Central Administration
1. On the Central Administration main page, click General Application Settings.
2. On the General Applications Settings page, click Manage Form Templates under InfoPath Forms Services.
3. On the Manage Form Templates page, click the name of the desired form template and then click Deactivate From The Site Collection.
4. If necessary, under Deactivation Location, click Site Collection and then click Change Site Location.
5. When the Select Site Collection dialog box appears, click the URL of the desired site collection and then click OK.
6. Click OK to deactivate the template for the site collection.
On the Select Site Collection dialog box, you can also select a different web application if necessary.
You can quiesce an administrator-approved template prior to deactivating it in order to prevent users from losing data during currently running browser sessions. Exercise 11-22 shows you how. You must be a member of the Farm Administrators group in order to complete this task.
Exercise 11-22: Quiescing a Form Template in Central AdministrationPrior to Deactivation
1. On the Central Administration main page, click General Application Settings.
2. On the General Applications Settings page, click Manage Form Templates under InfoPath Forms Services.
3. On the Manage Form Templates page, click the name of the desired form template and then click Quiesce Form Template.
4. On the Quiesce Form Template dialog box, under Quiesce, type the number ofminutes to quiesce form sessions prior to the form template becoming deactivated, with 240 minutes being the default.
5. Click Start Quiescing, and verify that the status under Quiesce changes to Quiescing.
6. Once the status changes to Quiesced, indicating the process has completed, you can upload the new version of the form or deactivate the existing version of the form.
To completely delete an administrator-approved form template using Central Administration, navigate to the Manage Form Templates page as you’ve done in the previous exercises, click the name of the desired form template, and then click Remove Form. On the Remove Form Template page, click Remove.
To view the properties of a form template, click the name of the desired form template on the Manage Form Templates page and then click View Properties.
Managing Data Connection Files for InfoPath Forms
InfoPath forms can use data connection files to specify which settings to use when connecting to data sources. The main data connection is created automatically when you create a form template from a database, when you create one from a web service, or when creating a customized form. You can optionally create additional data connections to be used as secondary data connections.
Data connection files are XML documents saved as XML or UDCX files, and they contain connection information for an individual external data connection. These files are stored in a data connection library on the same SharePoint server where the forms templates are stored. They can also be centrally managed in a library on the Central Administration site. Typically developers create data connection files using InfoPath Designer 2010 or using an XML editor.
By default, data connection files in the library in Central Administration can be used only as web browser forms, although farm administrators can decide to allow for HTTP access by clients such as Microsoft InfoPath Filler 2010. Data connection files manage connections either across servers in the same farm or across server farms. Data connection types can include query data connections, database data connections, SharePoint list data connections, SOAP web service data connections, REST web service data connections, and XML file data connections.
Converting a Data Connection to a Data Connection File
Form developers create data connections and data connection files when they design form templates. Data connections can be converted into data connection files using InfoPath Designer 2010. The designer must be a member of the Site Members SharePoint group or a group with Add Items permissions to be able to perform this task.
1. In InfoPath Designer 2010, open the desired form template.
2. On the Data tab, click Data Connections under Get External Data.
3. When the Data Connections dialog box opens, under Data Connections For The Form Template, click the desired data connection.
4. Click Convert To Connection File.
5. In the Convert Data Connection dialog box, in the Specify The URL Of The New Data Connection field, type the URL of the data connection library you want to use with the filename for the data connection file such as http://server/library/filename.udcx.
6. Under Connection link type, select Relative To Site Collection to link to the data connection file in the same site collection.
7. Click Centrally Managed Connection Library to upload the file to the library in Central Administration.
8. Click OK.
9. Click Close in the Data Connections dialog box to close it.
Once the data connection file is created, farm administrators can upload such files into a data connection files library in Central Administration for central management. These files can then be used by any form templates that have been uploaded using the Manage Form Templates page in Central Administration. Exercise 11-23 shows you this process. You need to be a member of the Farm Administrators group to successfully accomplish this task.
Exercise 11-23: Uploading a Data Connection File Using Central Administration
1. On the Central Administration main page, click General Application Settings.
2. On the General Application Settings page, click Manage Data Connection Files under InfoPath Forms Services.
3. On the Manage Data Connections Files page, click Upload.
4. On the Upload Data Connections File page, under Select File, browse to the location of the desired file, click the filename, and then click Save in the Choose File To Upload dialog box.
5. Under Category, specify the desired category for the file, which can be any name.
6. Under Web Accessibility, click Allow HTTP Access To This File if you want to letclient applications such as InfoPath Filler to be able to access the data connection file using HTTP.
7. Click Upload.
Managing the Web Service Proxy for InfoPath Forms
The InfoPath Forms Services web service proxy lets InfoPath forms displayed in a web browser connect to web services with credentials trusted by the web service. This also separately passes the identity of the user filling out the form to the web service to authenticate the user. If InfoPath Services didn’t use the web service proxy, InfoPath wouldn’t be able to authenticate to a web service on a third tier when NTLM would usually prevent user credentials from being reused. The use of symmetrical authentication between a form displayed in InfoPath Filler 2010 and the same form being viewed in a web browser would also not be able to occur.
For InfoPath to use the web service proxy, the InfoPath forms designer must create a web service connection when creating the form in InfoPath Designer 2010. Then the designer must convert the web service data connection to use settings from a data connection file and edit the file to set the useFormsServiceProxy value to True and add an Authentication element referencing a valid Secure Store application ID.
As a SharePoint administrator, you won’t necessarily need to know how to perform designer tasks, unless you are also a forms designer, but you will need to know how to enable InfoPath Forms Service web service proxy and to enable server-specific authentication settings.
Exercise 11-24 shows you the former process. You will need to belong to the Farm Administrators group to complete the task.
Exercise 11-24: Enabling InfoPath Forms Web Service Proxy
1. On the Central Administration main page, click General Application Settings.
2. On the General Application Settings page, click Configure InfoPath Forms Services Web Service Proxy under InfoPath Forms Services.
3. On the Configure InfoPath Forms Services Web Service Proxy page, click the Enable check box for Enable InfoPath Forms Services Web Service Proxy.
4. Click OK.
Once you have enabled this feature, user form templates will be able to use this service. All administrator-approved form templates have access to the web service proxy even when you have not enabled the feature using the steps in the previous exercise.
To allow user form templates to use the Secure Store Service, these templates must be authorized to use server-specific authentication settings. To permit this, you must enable this authentication form in Central Administration. Exercise 11-25 shows you how. You must be a member of the Farm Administrators group to complete this task.
Exercise 11-25: Enabling Server-Specific Authentication
1. On the Central Administration main page, click General Application Settings.
2. On the General Application Settings page, click Configure InfoPath Forms Services under InfoPath Forms Services.
3. On the Configure InfoPath Forms Services page, under Authentication To Data Sources (User Form Templates), select the Allow User Form Templates To Use Authentication Information That Is Contained In Data Connection Files check box.
4. Click OK.
In this chapter, you learned a great deal of information regarding deploying and managing SharePoint solutions, including the following:
- Sandbox environment planning and deployment
- Setting up and managing the State Service to support workflow and InfoPathForms Services
- Creating, provisioning, and managing SharePoint workflows
- Enabling and managing features related to InfoPath Forms Services
Understanding the Various Tasks Associated with Enabling and Managing a Sandboxed Environment Understand the concepts behind planning a sandboxed environment and running a separate, isolated SharePoint platform that can be used for testing new SharePoint implementations or modified and customized elements such as web parts.
Understand the Activities Related Enabling Workflows and InfoPath Forms Services Comprehend the various functions related to enabling the different types of workflows in SharePoint as well as enabling and provisioning InfoPath Forms Services, including their dependence on the State Service and its proper configuration.
1. You are a SharePoint administrator for your company, and you have been tasked with planning a sandbox solution for deployment. You are conducting a high-level review of SharePoint sandboxes, including the steps that must be performed by a farm administrator. Of the following, which steps are considered valid for preparing sandbox deployment? (Choose all that apply.)
A. The farm administrator must enable and start the sandboxing service on each server that will run the sandbox solution.
B. The farm administrator must activate and validate the sandbox solution.
C. The farm administrator must apply a load balancing scheme to all sandbox solutions if load balancing is a requirement.
D. The farm administrator must set resource quotas that cannot be exceeded by all the combined site collections in the solution if resource quotas are a requirement.
2. You are a SharePoint administrator for your company, and you have been tasked with planning a sandbox solution for deployment. You are conducting a high-level review of SharePoint sandboxes, including sandbox isolation management and resources that an isolated sandbox environment is unable to access. Of the following, what are the resources an isolated sandbox cannot access? (Choose all that apply.)
A. Cannot access resources on a different site collection within the sandbox
B. Cannot access a database
C. Cannot access the manifest.xml file
D. Cannot access resources on the local server
3. You are a SharePoint administrator for your company, and you have been tasked with planning a sandbox solution for deployment. You are conducting a high-level review of SharePoint sandboxes, including planning for load balancing in the sandbox. As a SharePoint administrator, you can choose between two possible load-balancing schemes for the sandbox. Of the following, which two schemes are valid? (Choose two.)
A. Local load balancing will always run the solution on the same hard drive of the server that received the request.
B. Local load balancing will always run the solution on the same server that received the request.
C. Remote load balancing will select the server that the solution previously ran on and for which it has an affinity.
D. Remote load balancing will select a different server that the solution previously ran on to balance resource load.
4. You are a SharePoint administrator for your company, and you have been tasked with planning a sandbox solution for deployment. You are conducting a high-level review of SharePoint sandboxes, including deployment tasks. You have included the relevant site collection administrators involved in the sandbox project, since they will be responsible for much of the work, once the sandboxed environment is enabled. Of the following tasks, which can be performed both in a web browser and using Windows PowerShell? (Choose all that apply.)
A. Enabling sandbox solutions
B. Configuring sandbox load balancing
C. Blocking a sandbox solution
D. Managing user solutions
5. You are a SharePoint administrator for your company, and you are planning to configure the State Service pursuant to enabling workflows and InfoPath Forms Services in your SharePoint environment. What is the most common method of configuring the State Service?
A. Using Central Administration and clicking Manage Services On The Farm
B. Using Central Administration and clicking Service Management
C. Opening Windows PowerShell and executing the relevant cmdlets
D. Enabling the State Service while running the Server Farm Configuration Wizard when you first install SharePoint
6. You are a SharePoint administrator for your company, and you are planning to enable and activate workflows in your environment. You are working with the site collection administrators who have requested that workflows be enabled for their collections. The site collection administrators want to know which tasks they can perform within their site collections. Of the following, what are the valid answers? (Choose all that apply.)
A. Enabling declarative workflows
B. Activating workflows in a site collection
C. Associating a workflow with a list or document library
D. Associating a workflow with a content type
7. You are a SharePoint administrator for your company, and you are planning to enable and activate workflows in your environment. You are working with the site collection administrators who have requested that workflows be enabled for their collections. The site collection administrators want to avoid confusion about which tasks they must perform to enable workflows and in which order the tasks must be performed. As part of your response to these administrators, what valid answers to you give? (Choose all that apply.)
A. The first task is to activate workflows at the site collection level on the top-level site of the collection.
B. Once workflows have been activated at the top-level site for a site collection, it is activated for all the subsites in the collection.
C. If workflows are activated at the web application level, they are available for all site collections in the web application.
D. Once workflows are active for a site collection, the next step is to create one or more workflow associations.
8. You are a site collection administrator who is configuring workflows for your site collection. You are associating a workflow to a document library that assigns a task list and history list for the workflow. The documents that will be processed through the workflow contain sensitive material, and you don’t want all workflow participants to be able to view any task lists containing such confidential material. To prevent this, what must you do?
A. You can associate specific tasks lists to the specific workflows containing the sensitive material so that only the participants for those workflows can see the tasks lists.
B. You can set the permissions on the workflows containing the sensitive material so that only the assigned users for those workflows can see the relevant tasks lists.
C. You can create a security workflow requiring higher than normal permissions and then give the relevant participants those permission levels.
D. There is no option for isolating a task list. All workflow participants in the site collection can automatically see all workflow tasks lists.
9. You are a site collection administrator who is configuring workflows for your site collection. By default, a wide variety of SharePoint users can start a workflow, but you want to restrict this ability to a smaller number of document authors. What method can you use to limit who can start a workflow?
A. You can specify that only users with Edit Item permissions can start a workflow.
B. You can specify that only users with Manage List permissions can start a workflow.
C. You can specify that only users with Edit Library permissions can start a workflow.
D. You can specify that only users with Workflow Design permissions can start a workflow.
10. You are a site collection owner and administrator who is configuring workflows for your site collection. You have heard that you can associate a workflow with different content types, but you aren’t sure of the specifics. You consult with a SharePoint farm administrator, and she tells you that you have the ability to associate a workflow with the following content types. (Choose all that apply).
A. List content types
B. Library content types
C. Site collection content types
D. Site content types
11. You are a site collection owner and administrator who is configuring workflows for your site collection, and you want to associate a workflow with a specific site content type on a particular site. Where must this task be performed?
A. Start on the Site Settings page under Galleries for the specific site.
B. At the top-level site for the site collection containing the site.
C. In Central Administration, in the web application containing the site collection containing the site.
D. The task must be performed using Windows PowerShell.
12. You are the site collection administrator for a site collection that has workflows enabled. Users for the sites in your collection use either Microsoft Office 2007 or Microsoft Office 2010 to create documents that need to enter the workflow. These users want to know if it’s possible to set up the workflow so they can submit documents directly from their versions of Office. What do you tell them? (Choose two answers.)
A. After opening the relevant list or library in the site the user wants, click Save & Send. Under Workflows, select the desired workflow on the File tab in the desired Office 2007 application. Then click Start Workflow.
B. After opening the relevant document in the list or library in the site the user wants, click Save & Send on the File tab in the desired Office 2010 application. Under Workflows, select the desired workflow. Then click Start Workflow.
C. After opening the relevant document in the list or library in the site the user wants, click the Microsoft Office Button in Office 2007. Select Workflows. Then, in the list that appears, click Start next to the desired workflow.
D. After opening the relevant list or library in the site the user wants, click the Microsoft Office Button in Office 2010 and select Workflows. In the list that appears, click Start next to the desired workflow.
13. You are the site collection administrator for a collection with workflows enabled. The SharePoint farm administrator who originally enabled workflows has suggested that you regularly monitor the performance of the workflows in your site collection. You review the different ways of performing these tasks and want to view an individual workflow report. What must you do?
A. On the desired site, browse to the list or library for the workflow, click the item or document to open the menu, click Workflows, and click View Workflow Reports under Workflow History on the Workflow Status page.
B. On the desired site, browse to the list or library for the workflow. In the row for the specific item, click the link in the workflow status column to view the reports.
C. On the desired site, click All Site Content and then click Site Workflows. On the Workflows page, click the name of the desired workflow to view the reports.
D. On the top-level site for the site collection, click Site Actions and then click Site Settings. Under Site Administration, click workflows and then click the name of the specific workflow to view the reports.
14. You are a SharePoint administrator for your company, and you are reviewing your workflow deployment and maintenance strategy. Although classic workflows fulfill most of the workflow requirements for the users you support, you believe some of them may benefit from using declarative workflows, which provide a better balance between flexibility and support for user recommendations. What is the easiest way for you to enable declarative workflows?
A. Declarative workflows are enabled automatically when you run the Farm Configuration Wizard.
B. In Central Administration, navigate to the desired web application and click Manage, General Settings. Then click Workflows and enable declarative workflows in the Workflow Settings dialog box.
C. In Central Administration, navigate to System Settings, Farm Management. Then click Workflows and enable declarative workflows on the Workflows page.
D. On the top-level site for the site collection on which you want to enable declarative workflows, click Site Actions, Site Settings, Galleries, Workflows. Then enable declarative workflows by selecting the relevant check box.
15. You are a SharePoint administrator for your company, and you have enabled workflows in your environment. You have received requests from some of the site collection administrators for web applications you maintain that they would like to be able to invite nonauthenticated users to participate in some of their workflows. Initially, this seems like an unacceptable security risk, but you check with the CIO, and there appears to be a business case for this activity. Of the following, which nonauthenticated user types can you allow access to SharePoint workflows? (Choose all that apply.)
A. You can allow SharePoint users who are not normally able to access the specific workflows to participate by adding them to the access workflow list.
B. You can allow non-SharePoint users to participate as long as they agree to the conditions of a nondisclosure agreement.
C. You can allow SharePoint users who are not normally able to access the specific workflows to participate by sending them an email with instructions on how to request access.
D. You can allow non-SharePoint uses to participate in workflows by creating SharePoint accounts with limited workflow access.
16. You are a SharePoint administrator for your company, and you have received requests from some site collection administrators that the workflow history items become unavailable too soon, and they’d like to have access to these records beyond the default 60 days. These links are removed as part of an automatic maintenance system for workflow. What can you do to accommodate the request?
A. At the top-level site for the site collections that want to have access to workflow reports beyond the default period, click Site Actions, Site Settings, Workflow Settings, Reports. In the Workflow Reports dialog box, clear the Automatically Delete Workflow Reports After 60 Days check box.
B. At the top-level site for the site collections that want to have access to workflow reports beyond the default period, click Site Actions, Site Settings, Site Collection Administration, Workflows. On the Workflows page, clear the Automatically Delete Workflow Reports After 60 Days check box.
C. In Central Administration, click Monitoring, Timer Jobs, Review Job Definitions. On the Job Definitions page, click Auto Cleanup and then click Disable on the Edit Timer Job page.
D. The Auto Cleanup feature cannot be disabled.
17. You are the site collection administrator for a site collection with workflows enabled. You have requested a custom-made workflow template be designed and deployed for your site collection and have just been notified that the template is now available as a .wsp file. What must you do you enable this template so it can be used on sites in your site collection?
A. You must first download the template from the Site Assets page under Document Libraries in the top-level site in your site collection, save it in a location on your hard drive, and then upload it to the Solution Gallery on the top-level site in your site collection.
B. You must first download the template from the Solutions Gallery in the top-level site in your site collection, save it in a location on your hard drive, and then upload it to the Site Assets page under Document Libraries in your site collection.
C. You must download the template from the Solution Gallery on the designer’s SharePoint site collection and then upload it to the Site Assets page under Document Libraries in the top-level site of your site collection.
D. You must download the template from the Site Assets page of the Document Library of the designer’s SharePoint site and upload it to the Solution Gallery in the top-level site in your site collection.
18. You are a SharePoint administrator for your company, and you are enabling InfoPath Form Services in your environment. You must perform a number of tasks to make InfoPath forms available to users in SharePoint. What are the first steps you must take to begin the process of performing most InfoPath-related tasks?
A. In Central Administration, click System Settings. Then under InfoPath Forms Services, click Configure InfoPath Forms Services.
B. In Central Administration, click Services on a server. Then under InfoPath Forms Services, click Configure InfoPath Forms Services.
C. In Central Administration, click General Application Settings. Then under InfoPath Forms Services, click Configure InfoPath Forms Services.
D. Configuring InfoPath Forms Services is usually done using Windows PowerShell.
19. You are a SharePoint administrator for your company, and you are enabling InfoPath Form Services in your environment. InfoPath Forms can use data connection files to specify which settings to use when connecting to a data source. You want to be able to convert a data connection to a data connection file so you can store the configuration settings in XML format. What tool or utility must you use to perform this task?
A. Central Administration
B. Windows PowerShell
C. InfoPath Designer 2010
D. Visual Studio
20. You are a SharePoint administrator for your company, and you are enabling InfoPath Form Services in your environment. InfoPath Forms Services web service proxy lets InfoPath Forms displayed in a web browser to connect to web services with credentials trusted by the web service. You have been tasked with enabling InfoPath Forms web service proxy in your environment. What must you do to accomplish your task?
A. Enable the web service proxy on the Configure InfoPath Forms Services Web Service Proxy page in Central Administration.
B. Use Windows PowerShell cmdlets.
C. Edit the service connection data file using InfoPath Designer 2010 and set theuseFormsServiceProxy value to True.
D. Enable the web service proxy on the Configure InfoPath Forms Services page inCentral Administration.
1. A, C, D. The site collection administrator can activate and validate the sandboxed solution as well as upload the solution to the site collection’s Solution Gallery.
2. A, B. The sandbox must be able to connect to the local server and access the manifest.xml file, which contains the configuration information defining the sandbox environment.
3. B, C. Local load balancing will always run the solution on the same server that received the request. Remote load balancing will select the server that has the most solution affinity; that is, the solution will run on the server where it has previously been loaded and been run.
4. A. Only enabling sandbox solutions can be performed both in the browser and using Windows PowerShell. This task must also be performed by the farm administrator.
5. D. In all likelihood, you enabled the State Service as part of the SharePoint installation process when you ran the Farm Configuration Wizard.
6. B, C, D. All the listed tasks can be performed by the site collection administrator within the site collection except enabling declarative workflows, which must be performed by a farm administrator using Central Administration.
7. A, B, D. You cannot activate workflows at the web application level.
8. A. You can create specific lists for workflows rather than using the default list or a list already created for other workflows to isolate the list information to the participants of the specific workflows only.
9. B. Normally, any user with Edit Item permissions can start a workflow, but if you want to restrict this activity further, you can specify that Require Manage List permissions be required. Then, only users with Manage List or Web Designer permissions will be able to initiate a workflow. The Edit Library and Workflow Design permissions are bogus.
10. A, B, D. You cannot specifically associate a workflow with a site collection content type. All of the other options are valid.
11. AGo the specific site where you want to make the association and navigate to the Site Settings page; then under Galleries, click Site Content Types and make the association by clicking the desired content type.
12. B, C. These two options show how to begin a workflow from within their respective versions of Microsoft Office.
13. A. Option B will let you check on a workflow’s status but not view the report. Option C will let you check the status of a workflow associated with a site, and option D will let you check the workflow reports for the entire site collection but not for a specific workflow.
14. B. Declarative workflows must be enabled at the web application level in Central Administration. All the other options are bogus.
15. C. Internal SharePoint users can be allowed to participate in workflows they normally wouldn’t be able to access by following the request procedure in the email you send them. External users can be allowed to participate in workflows upon their signing a nondisclosure agreement; however, this isn’t an actual SharePoint requirement.
16. C. This feature must be disabled in Central Administration as described in option C.
17. A. Only the first options gives the correct procedure. The other options are bogus.
18. C. Only option C provides the correct procedure. The other options are bogus.
19. C. You typically will use Microsoft InfoPath Designer 2010 to open the desired form template and convert the data connection to a data connection file.
20. A. Only option A describes the correct procedure. Windows PowerShell cannot be used and, while a designer must perform the task in option C before you enable the InfoPath Forms web service proxy service in your environment, it’s not part of the actual enabling procedure. Option D is bogus.