Chapter 5
A Nerd’s Guide to System Preferences
IN THIS CHAPTER
![]() Navigating System Preferences
Navigating System Preferences
![]() Locating specific controls
Locating specific controls
![]() Customizing Big Sur from System Preferences
Customizing Big Sur from System Preferences
Remember the old TV series Voyage to the Bottom of the Sea? You always knew you were on the bridge of the submarine Seaview because it had an entire wall made up of randomly blinking lights, crewmen darting about with clipboards, and all sorts of strange and exotic-looking controls on every available surface. You could fix just about anything by looking into the camera with grim determination and barking an order. After all, you were On the Bridge. That’s why virtually all the dialogue and action inside the sub took place on that one (expensive) set: It was the nerve center of the ship and a truly happenin’ place to be, just like the bridge of your favorite starship from an entire host of TV shows and movies.
In the same vein, I devote this chapter to the System Preferences window and the most commonly used settings within it. After all, if you want to change how Big Sur works or customize the features of your favorite operating system, you should head toward System Preferences. This one window is the nerve center of macOS and a truly happenin’ place to be. Sorry, there’s no built-in wall of randomly blinking lights — but you do find exotic controls just about everywhere.
An Explanation — without Jargon, No Less
The System Preferences window, shown in Figure 5-1, is a self-contained beast. You can reach it in the following ways:
- Click the Apple menu (
 ) and choose System Preferences.
 - Right-click any uninhabited area of your Desktop and choose Change Desktop Background from the shortcut menu. (Granted, doing so will bring you to a specific group of settings — Desktop & Screen Saver — but it’s still a single click away from the full System Preferences window.)
- Last, but not least, click the Launchpad icon on the Dock and then click the System Preferences icon (which looks like a collection of gears).
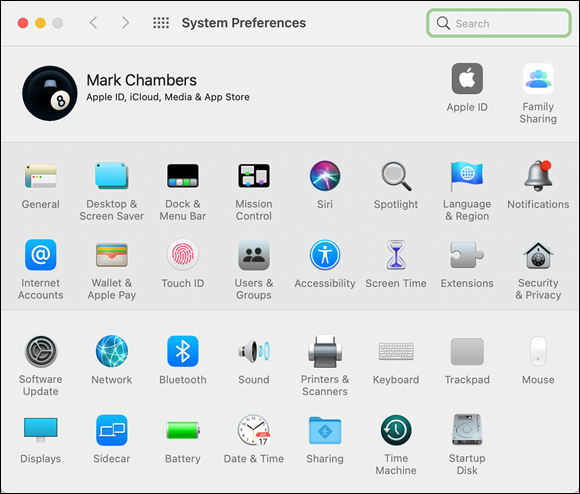
FIGURE 5-1: The powerhouse of settings and switches: System Preferences.
When the System Preferences window is open, you can click any of the icons to switch to that pane. The entire window morphs to display the settings for the selected pane. Figure 5-2 shows the Sound pane, which allows you to set a system alert sound, configure your MacBook’s built-in microphone, and choose among several audio output options.

FIGURE 5-2: The Sound pane, proudly showing off the Sound Effects panel.
Many panes also include tabbed buttons at the top — in this case, Sound Effects, Output, and Input. You can click these tabs to switch to another section of the same pane. Many panes in System Preferences have multiple sections. This design allows our friends at Apple to group a large number of related settings in the same pane (without making things too confusing).
To return to the top-level System Preferences pane from any other pane, just click the Show All button (located in the top-left corner of the pane, bearing a grid of dots) or press ⌘ +L. You can also click the familiar Previous and Next buttons to move backward through the panes you’ve already visited and then forward again, in sequence. (Yep, these buttons work just like the browser controls in Safari. Sometimes, life is funny that way.)
Although the System Preferences panes are arranged by category when you install Big Sur, you can also display the panes in alphabetical order. To arrange the panes in this way, choose View ⇒ Organize Alphabetically. Note that you can also choose any pane directly from the View menu. Choose View ⇒ Customize, and you can hide specific icons from the System Preferences window. Just deselect the check box next to each icon you want to hide and then click Done. You can still reach hidden icons from the System Preferences View menu, so they’re not banished forever.
You won’t find an OK button that you have to click to apply any System Preferences changes. Apple’s developers do things the right way. Your changes to the settings in a pane are automatically saved when you click Show All or when you click the Close button in the System Preferences window. You can also press ⌘ +Q to exit the window and save all your changes automatically. This is one of my favorite shortcuts.
Locating That Certain Special Setting
Wouldn’t it be great if you could search all the panes in System Preferences — with those countless radio buttons, check boxes, and slider controls — from one place, even when you’re not quite sure what you’re looking for?
Figure 5-3 shows exactly that kind of activity taking place. Just click in the System Preferences Spotlight search box (located in the top-right corner of the pane, with the magnifying-glass icon), and type just about anything. If you know part of the name of a particular setting you need to change, for example, type that. Big Sur highlights the System Preferences panes that might contain matching settings. And if you’re a switcher from the Windows world, you can even type what you might have called the same setting in Windows.
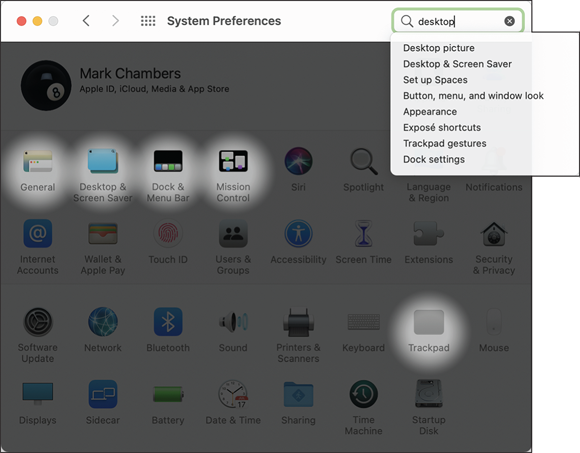
FIGURE 5-3: Searching for specific settings is a breeze with the search box.
The System Preferences window dims, and the icons that might contain what you’re looking for stay highlighted. Slick.
If you need to reset the search box to try again, click the X icon that appears at the right end of the box to clear it.
Popular Preferences Panes Explained
It’s time to get down to brass tacks: Open the most-often-used panes in System Preferences to see what magic you can perform. I don’t discuss all the panes because I cover many of them in other chapters. In fact, you may never need to open some System Preferences panes, such as the Language & Region pane. This chapter covers just about all the settings you’re likely to use on a regular basis.
The Displays pane
If you’re a heavy-duty gamer, or if you work with applications such as Keynote and Adobe Photoshop, you probably switch your monitor’s characteristics regularly. To switch easily, visit the Displays pane, shown in Figure 5-4.
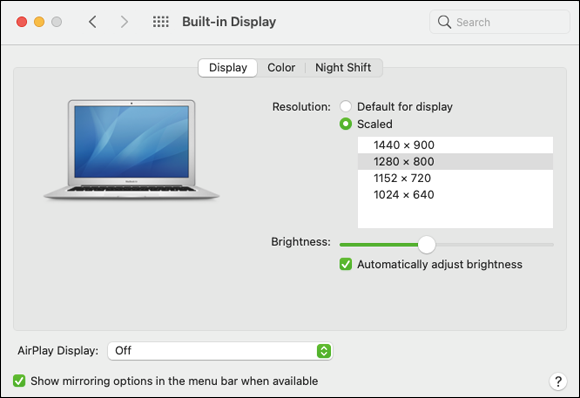
FIGURE 5-4: The Display pane makes it easy to change your screen resolution.
This pane includes three sections:
Display: To allow Big Sur to choose the best resolution for your display, select the Default for Display radio button. To select a resolution manually, select the Scaled radio button and then select the resolution you want to use in the Resolutions list that appears. In most cases, you want to use the highest resolution.
Move the Brightness slider to adjust the brightness level of your MacBook’s display. If you like, you can enable the Automatically Adjust Brightness check box to allow your MacBook to select a brightness level.
 Ready to stream content to your TV directly from your MacBook — without cables? You can use Big Sur’s wireless AirPlay Display feature to send the display from your MacBook to your HDTV. AirPlay requires an Apple TV unit that supports this feature. You can also send the audio from your MacBook directly to an AirPlay-enabled receiver or speaker system. To make it easier to control AirPlay, select the check box titled Show Mirroring Options in the Menu Bar When Available. (Note that the icon will appear on your menu bar only when an Apple TV unit is within range.)
- Color: Click a display color profile to control the colors on your screen. To load a profile, click the Open Profile button. To create a custom ColorSync profile and calibrate the colors that you see, click the Calibrate button to launch the Display Calibrator. This easy-to-use assistant walks you step by step through creating a ColorSync profile matched to your MacBook’s gamma and white-point values.
Night Shift: If your MacBook was built in 2012 or later, the Night Shift feature allows Big Sur to automatically adjust your display to provide warmer colors during nighttime operation. Click Schedule to choose either Sunset to Sunrise operation, or create your own custom schedule. You can also turn on Night Shift manually by selecting the Turn On Until Tomorrow check box. Finally, adjust the Color Temperature slider to increase or decrease the warmth of colors on your display.
 If you connect your MacBook to one (or more) external monitors, don’t be surprised to see the Arrangement section appear as well. You can drag the output to a different monitor, drag the menu bar to another screen, or mirror the same output to all displays connected to your MacBook.
The Desktop & Screen Saver pane
No offense to the awesome Big Sur mountainous default background, but what if you want to choose your own background? And what about one of those nifty Apple screen savers? You can change both the background and screen saver by using these options in the Desktop & Screen Saver pane.
The settings on the Desktop panel, shown in Figure 5-5, are
- Current Desktop picture: You can click a picture in the thumbnail list in the right half of the pane to use it as your Desktop background. The Desktop is updated immediately, and the thumbnail appears in the well (the top-left box in Figure 5-5). To display a different image collection or open a folder of your own images, navigate to it using the folder display at the left of the pane. If you need to add a new location, click the Add Folder button in the bottom-left corner of the window (a plus sign) and browse to your heart’s desire; then click Choose to select a folder and display the images it contains.
- Layout: You can tile your background image, center it, fill the screen with it (cropping the edges if necessary), and stretch it to fill the screen (without cropping). Note that filling the screen in either case may distort the image. The layout pop-up menu appears only when you’re using your own pictures, so you don’t see it if you’re using a Desktop image supplied by Apple; instead, you see a drop-down list that allows you to choose a light or dark version of the Apple image. Or you can choose Dynamic to allow Big Sur to automatically switch between the two images depending on your local time. Neat!

FIGURE 5-5: Pick your own Desktop background.
- Change Picture: When you select this check box, the Desktop background changes automatically after the delay period you set, including each time you log in and each time your Mac wakes up from sleep mode.
- Random Order: To display screens randomly, enable the Random Order check box. Otherwise, the backgrounds are displayed in the sequence in which they appear in the thumbnail list.
The settings on the Screen Saver tab are
- Screen Saver: In the Screen Saver list on the left side of the pane, click any screen saver to preview (on the right side). To try out the screen saver in full-screen mode, hover your pointer over the display on the right and click the Preview button that appears. (You can end the test by moving the cursor.) If the screen-saver module you select has any configurable settings, they appear in the right display. Click the Use Random Screen Saver check box to display a different screen-saver module each time the screen saver is activated.
- Start After: Specify the period of inactivity that triggers the screen saver. To disable the screen saver, select the Never setting at the top of the list. (Your Start After delay should be a shorter time than the Turn Display Off After delay you set in the System Preferences Energy Saver pane. Otherwise, you won’t see the great screen saver at all. I describe the Energy Saver pane later in this chapter.)
- Show with Clock: If you want your selected screen saver to display the time as well, select this check box.
Hot Corners: Click the Hot Corners button and then click any of the four pop-up menus in the four corners of the screen. Doing so designates that corner as an activation hot corner for several functions within Big Sur. When you move your cursor to that hot corner, the function you specified is triggered automatically.
 For additional security, check out the Security & Privacy pane in System Preferences, where you find the Require Password After Sleep or Screen Saver Begins check box. When you select this check box and choose a delay period from the drop-down menu, Big Sur requires your user account password before allowing anyone to turn off the screen saver (a great idea for use when you’re traveling, as you can imagine).
Mission Control preferences
Figure 5-6 shows the Mission Control and Spaces settings you can configure in this group. You can use Mission Control to view all the application windows you’re using at one time so that you can select a new active window, or you can move all windows aside so that you can see the Desktop.
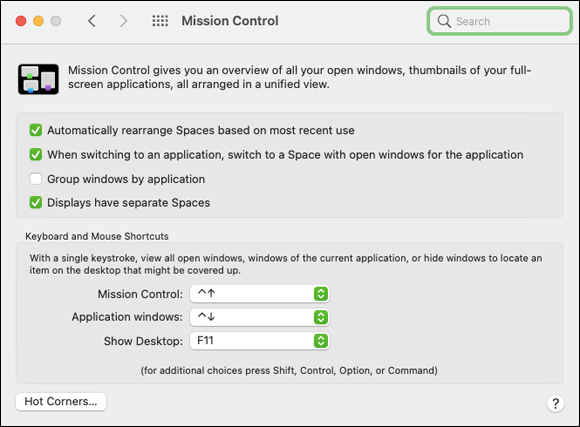
FIGURE 5-6: Set your Mission Control preferences here.
The settings are
- Automatically Rearrange Spaces Based on Most Recent Use: If this check box is selected, Mission Control presents your most recently used Spaces first in the thumbnails at the top of the screen.
- When Switching to an Application … : When selected, this check box allows you to switch applications between Spaces desktops by using the ⌘ +Tab shortcut. Big Sur jumps to the Desktop that has an open window for the application you choose, even if that Desktop isn’t currently active.
- Group Windows by Application: When selected, this check box automatically arranges windows in the Mission Control screen by the applications that created them.
- Displays Have Separate Spaces: If you have multiple monitors connected to your Mac, you can select this check box to create a separate Spaces display for each monitor.
Keyboard and Mouse Shortcuts: From each pop-up menu, set the key sequences (and mouse settings) for Mission Control, Application Windows, Show Desktop, and Show Dashboard.
 You’re not limited to keyboard and mouse shortcuts in the pop-up menus. Press the Shift, Control, Option, and ⌘ keys while a pop-up menu is open, and these modifiers appear as menu choices! (Heck, you can even combine modifiers, such as ⌘ +Shift+F9 instead of just F9.)
Hot Corners: Click the button in the bottom-left corner of the pane to specify your hot-corner settings. These four pop-up menus mirror those of the Desktop & Screen Savers pane, allowing you to control the operation of the screen management features within Big Sur. Click one menu to designate that corner as one of the following:
- A Mission Control corner displays the Mission Control screen.
- An Application Windows corner displays only the windows from the active application.
- A Desktop corner moves all windows to the outside of the screen to uncover your Desktop.
- A Launchpad corner activates the Launchpad screen.
- A Notification Center corner displays the Notification Center strip on the right side of your Desktop.
Note that you can also set the Screen Saver Start and Disable corners from the Hot Corners pop-up menus, as well as put your display to sleep or lock it.
The General pane
The talented General pane, shown in Figure 5-7, determines the look and operation of the controls that appear in application windows and Finder windows. It looks complex, but I cover each option in this selection.
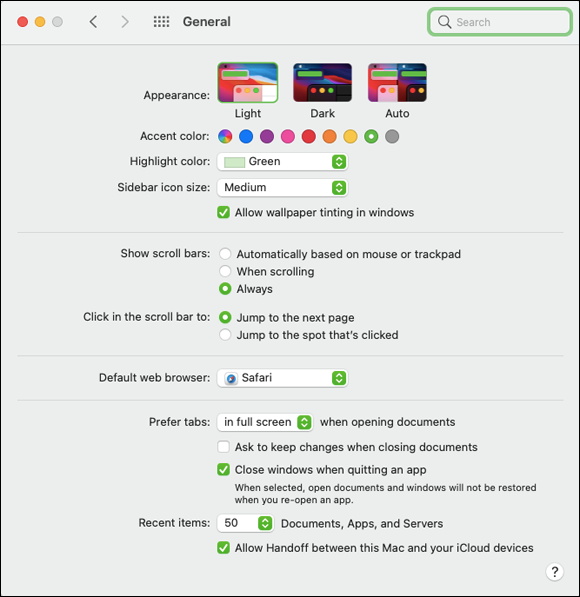
FIGURE 5-7: Appearances may not be everything, but they’re easy to find here.
The settings are
- Appearance: Choose a color to use for buttons, menus, and windows. Choose Light mode for the familiar bright scheme or switch to Dark mode for your Finder menu bar and Dock (which is perfect for low-light environments). Choose Auto and watch in amazement as macOS switches between Light and Dark modes based on the time of day!
- Accent Color: Choose a color for radio button, check box, and drop-down menu controls.
- Highlight Color: Choose a color to highlight selected text in fields and pop-up menus.
- Sidebar Icon Size: Choose the size of the icons in the Finder window’s Sidebar — the strip on the left side of the Finder window that displays devices and favorite locations on your system. If you have a large number of hard drives, or if you’ve added several folders to the Sidebar, reducing the size of the icons allows you to display more of them without scrolling.
- Allow Wallpaper Tinting in Windows: When this check box is selected, macOS displays open windows with a tinted background when you’re using Dark mode. (The tint reflects the primary color used in your desktop background.)
- Show Scroll Bars: Specify when Big Sur should display scroll bars in a window. By default, they’re placed automatically when necessary, but you can choose to display scroll bars always or only when you’re scrolling through a document.
- Click in the Scroll Bar To: By default, macOS jumps to the next or previous page when you click an empty portion of the scroll bar. Select the Jump to the Spot That’s Clicked radio button to scroll the document to the approximate position in relation to where you click.
- Default Web Browser: Click this pop-up menu to specify which application Big Sur should use to display web pages. By default, macOS uses the Safari web browser.
- Prefer Tabs: This setting allows you to specify when your applications should open documents in a new tab display or within a new document window. You can choose to use tabs always, only in full-screen mode, or only when you create a new tab in the application itself. (Note that if an application doesn’t support tab display, new documents open in a window.)
- Ask to Keep Changes When Closing Documents: If you select this check box, Big Sur prompts you for confirmation if you attempt to close a document with unsaved changes. If the check box is deselected, Big Sur allows you to close an unsaved document without saving a new version.
- Close Windows When Quitting an App: If this check box is deselected, the macOS Resume feature automatically saves the state of an application when you quit. When you launch the application again, Big Sur restores all application windows and opens the documents you were working on when you quit. In effect, you can continue using the application just as though you’d never quit. If you select the check box, Big Sur doesn’t restore your work, and you have to reload your document.
- Recent Items: The default number of recent applications, documents, and servers (available from the Recent Items item on the Apple menu [
 ]) is 10. To change the default, open the pop-up menu here and choose up to 50. (I like 20 or 30.)
 - Allow Handoff Between This Mac and Your iCloud Devices: If this check box appears in the General pane, you can enable it to turn on Handoff functionality within Big Sur. (I discuss Handoff within the confines of Chapter 9.) Note that this check box doesn’t appear on older MacBooks without compatible Bluetooth hardware.
The Battery pane
I’m an environmentalist — it’s not surprising how many techno types are colored green — so the four sections of the Battery pane (shown in Figure 5-8) are pretty doggone important. When you use them correctly, you not only conserve battery power but also invoke the features of Big Sur to automatically start up and shut down your laptop whenever you like!
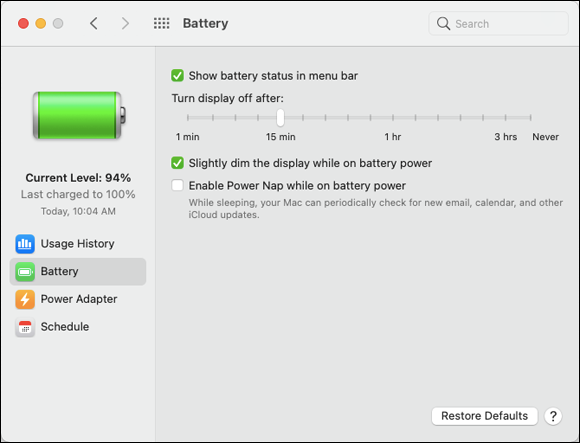
FIGURE 5-8: Reduce your MacBook’s power consumption from the Battery pane.
Click the Usage History item to display both your Battery Usage and your Screen On usage (the amount of time you’re actually using your MacBook). You can switch between the last 24 hours and the last 10-day period.
Click the Battery item to make changes that apply when your MacBook is running on battery power. You can choose to display your battery level as an icon in your Finder menu bar by selecting the Show Battery Status in Menu Bar check box. To choose a delay period for blanking your screen, drag the Turn Display Off After slider to the desired period (or choose Never to disable display sleep). Enable the check box titled Slightly Dim the Display While on Battery Power to save additional power by reducing the brightness of your MacBook’s screen. (I can hardly notice the difference, but your laptop’s battery will thank you!) Click the check box titled Enable Power Nap While on Battery Power to allow Big Sur to download updates, update iCloud data, and check for new mail and messages while your MacBook is closed. (Note that the Power Nap feature causes your laptop to use significantly more energy in sleep mode, and it’s possible for the battery to drain completely.)
Click the Power Adapter item to specify settings that apply when your laptop is connected to an AC outlet. (Your MacBook automatically switches to the proper configuration — Battery or Power Adapter — when you plug in or unplug your laptop.) The Power Adapter settings closely mirror those in the Battery section, with a couple of exceptions:
- Prevent Computer From Sleeping Automatically When the Display is Off: If this check box is selected, your MacBook will remain active and not enter sleep mode even if the display is blanked. (Because you’re hooked up to AC power, sleep mode becomes less important.)
- Wake for Wi-Fi Network Access: If selected, this feature allows other computers to access your MacBook over a Wi-Fi connection while it’s in sleep mode.
Click the Schedule entry if you want to start up or shut down your laptop at a scheduled time. Select the desired schedules (the Start Up or Wake check box and the Shut Down/Sleep check box) to enable them. Then click the up and down arrows next to the time display to set the trigger time. Click OK to return to the Energy Saver pane.
The Dock & Menu Bar pane
I’ll come clean: I think the Dock is the best thing since sliced bread. (I wonder what people referred to before sliced bread was invented?) Click the Dock & Menu Bar item in the list on the left, and you can use the settings shown in Figure 5-9 to configure the Dock’s behavior until it fits your personality like a glove.

FIGURE 5-9: Customize your Dock with these controls.
These settings are
- Size: This control is pretty self-explanatory. Just drag the slider to change the Dock’s scale.
- Magnification: When you select this check box, each icon in the Dock swells like a puffer fish when you move the cursor over it. (The Magnification slider determines just how much it magnifies.) I really like this feature because I resize my Dock to make it smaller, and I have a large number of Dock icons.
- Position on Screen: Select a radio button to position the Dock on the left, bottom, or right edge of the Desktop.
- Minimize Windows Using: Big Sur includes two cool animations that you can choose to shrink a window to the Dock and expand it back to the Desktop. Click the Minimize Windows Using pop-up menu to specify the Genie (genie-in-a-bottle) or Scale (scale-up-or-down-incrementally) effect.
- Double-Click a Window’s Title Bar to Minimize/Zoom: Select this check box to minimize or zoom a Finder or application window by double-clicking the window’s title bar.
- Minimize Windows into Application Icon: If this check box isn’t enabled, minimized application windows appear as thumbnail icons on the Dock. To minimize application windows into the application icon on the Dock — which can save space on your Dock — select this check box. (To restore a window that’s been minimized into the application icon, right-click the icon on the Dock and choose Restore from the shortcut menu that appears.)
- Animate Opening Applications: Active souls who like animation probably get a kick out of the bouncing application icons in the Dock, which indicate that you’ve launched an application and that it’s loading. If you find this effervescence to be overly buoyant or distracting, deselect this check box.
- Automatically Hide and Show the Dock: Select this check box, and the Dock disappears until you need it. (Depending on the size of your Dock, the Desktop real estate you gain can be significant.) To display a hidden Dock, move the cursor over the corresponding edge of the Desktop.
- Show Indicators for Open Applications: macOS indicates which applications are running in the Dock by displaying a small gray dot in front of the icon. To disable these indicators, deselect this check box.
- Show Recent Applications in Dock: I love this feature! Select this check box to display the icons for applications you’ve been using recently in a separate section of the Dock. (The Recent Applications section is demurely positioned between your static Dock icons and the Downloads folder, toward the right end of the Dock.) Naturally, there’s not enough space to rival the lengthy Recent Items list on the Apple menu, but the convenience of launching that one application you use all the time is still pretty nifty.
- Automatically Hide and Show the Menu Bar: Like the Dock hide and show feature, you can select this check box to banish the Finder menu bar until you need it. To display the hidden menu bar, move your cursor over the top edge of your Desktop.
Click any of the entries at the left of the pane to specify where you can quickly change settings for that feature from the macOS Desktop: the new Control Center display; the Finder menu bar; or (with some entries) you can even choose both! Each entry has its own panel that appears, as well as a visual representation of the location and its appearance in macOS. Note that some settings can appear only in the Finder menu (like the icons for the Clock and Time Machine).
The Sharing pane
So you’re in a neighborly mood and want to share your toys with others on your local wired or wireless network. Perhaps you’d like to start your own website or protect yourself from the Bad Guys on the Internet. All these fun diversions are available from the Sharing pane in System Preferences, shown in Figure 5-10.
Click the Edit button to change the default network name assigned to your MacBook during the installation process. Your current network name is listed in the Computer Name text field.

FIGURE 5-10: Use the controls in the Sharing pane to share your toys.
Each entry in the services list controls a specific type of sharing, including Screen Sharing, File Sharing (with other Macs and PCs running Windows), Media Sharing, Printer Sharing, Remote Login, Remote Management (using Apple Remote Desktop), Remote Apple Events, Bluetooth Sharing, Internet Sharing, and Content Caching (which stores updates and other content for later installation). To turn on any of these services, select the On check box for that service. To turn off a service, click its On check box to deselect it.
From a security standpoint, I highly recommend that you enable only the services you actually use. Each service you enable automatically opens your Big Sur firewall for that service. Here’s a Mark’s Maxim to remember:
When you click one of the services in the list, the right side of the Sharing pane changes to display the settings you can specify for that particular service.
The Time Machine pane
MacBook users are thrilled with the Time Machine automatic backup feature that’s built into Big Sur. It has saved my stuff numerous times. You can easily configure how Time Machine handles your backups from this pane, shown in Figure 5-11. (Chapter 21 covers how to use Time Machine.) You need an external drive (or an AirPort Time Capsule wireless backup device) for the best backup security, of course. Note that Time Machine doesn’t work with a CD or DVD rewritable drive; you must use an external drive, a Time Capsule device, or a high-capacity USB flash drive.

FIGURE 5-11: Put Time Machine to work, and your data is always backed up.
To enable Time Machine, click the Back Up Automatically check box and then select a disk to hold your Time Machine backup data on the sheet that appears. Click Use Disk on the sheet to confirm your choice. (Your external backup drive should be at least twice the capacity of your internal drive, ensuring that your backup files have the elbow room they need.) If you have an external Time Capsule wireless unit, click Set Up (instead of Use Disk) on the sheet.
By default, Time Machine backs up all the drives on your system, but you may not need to back up some folders on your MacBook. To save time and backup-drive space, Time Machine allows you to exclude specific folders from the backup process. Click Options and then click the Add button (with the plus sign) to select the drives or folders you want to exclude. They appear in the Exclude These Items From Backups list.
If you’d rather not back up while your MacBook is running on battery power, click the Options button and disable the Back Up While on Battery Power check box, then click Save.
Apple ID preferences
From the iCloud section of the Big Sur Apple ID Preferences pane, shown in Figure 5-12, you can specify which types of data are automatically pushed to your MacBook and iOS devices. If you haven’t created an iCloud account yet — or if you signed out of an existing account earlier — System Preferences prompts you to enter your Apple ID and password. Click Sign In to display the contents of the iCloud pane.

FIGURE 5-12: Control and configure your iCloud activity with these settings.
The check boxes for each category are
- iCloud Drive: Enable and disable iCloud Drive access for specific applications.
- Photos: Push the latest photos and video clips you’ve added in Photos to other devices, and update your Photos library with photos and video clips pushed from your iOS devices.
- Mail: Synchronize your Mail account settings between devices.
- Contacts: Push your Contact cards between devices.
- Calendars: Push your calendar events to and from your iOS devices.
- Reminders: Synchronize the reminders you’ve set between devices.
- Notes: Synchronize your Notes between devices.
- Safari: Synchronize your Safari bookmarks.
- Siri: Synchronize your Siri configuration.
- Keychain: Share passwords for applications and websites between your devices.
Find My Mac: Locate your MacBook from a web browser or your iOS device. You can also choose to lock your computer remotely — or even wipe your laptop’s hard drive to prevent someone from stealing your data.
 Wiping your MacBook remotely is a drastic step that will prevent you from locating it in the future.
- News: Synchronize the articles you’ve read, articles you’ve saved, and sources you’re following in the News application.
- Stocks: Synchronize stocks that you’re following between devices.
- Home: Share video from a HomeKit-enabled camera between devices, using Big Sur’s Home application.
- Siri: Synchronize your Siri configuration.
To display the storage currently being used by your mail, backups, documents, and application data, click the Manage button in the bottom-right corner of the pane. Apple provides each iCloud account 5GB of space for free, but you can elect to buy additional storage from the Manage sheet.
Notifications preferences
The Notifications pane is shown in Figure 5-13. Each application that can display notifications appears in the list on the left side of the pane.

FIGURE 5-13: Each application that uses notifications can be configured individually.
Click an application in the list on the left side of the pane to configure its notifications. Different applications display different options, but the settings can include the following:
- Alert Style: These three buttons specify which type of alert should appear below the Notification Center icon on the menu bar. You don’t need to display Notification Center to see alerts, which appear on your Desktop. Choose None to disable alerts for this application. Choose Banners to display alert messages that automatically disappear after a delay. Choose Alerts to display alert messages that remain onscreen until you click the confirmation button on the Alert dialog.
- Show Notifications on Lock Screen: If it appears, you can select this check box to allow notifications even if your MacBook is displaying the Lock screen.
- Show Notification Preview: Click this drop-down list to set how macOS display preview information for news articles, Mail content, and Messages. You can choose to display preview notifications always, never, or only when your MacBook is unlocked.
- Notification Grouping: From this drop-down list, you can specify that multiple notifications from the same source are displayed by application or by automatic arrangement, or turn off grouping altogether.
- Show in Notification Center: To display notification messages from this application in the Notification Center, select this check box. You can also specify how many recent messages from this application are displayed.
- Badge App Icon: This check box toggles the display of this application’s icon in alert boxes and in the Notification Center. It also activates the numeric display of pending items on the icon itself (such as unread mail and messages).
- Play Sound for Notifications: To play a sound when alerts appear, select this check box.

 Poking too many holes in your firewall is not A Good Thing.™