![]()
Accessing the Database Using PHP
On an e-commerce site, it is essential to display product information next to its image in as much detail as possible. Because there can be a huge number of products, the information is stored in a database. Recall that you already created a products table that contains several products categorized into different areas. This chapter begins by explaining how product information is accessed from the products table and displayed on the screen.
In this chapter, you are going to learn about the following:
- Accessing products and displaying them on screen
- Creating a drop-down menu
- Displaying products in specific categories
- Adding a web site header
- Implementing a search feature
- Showing product details
- Session handling
- Signing in and out
- Defining a home page for the site
Accessing Products and Displaying Them on Screen
You have already learned about the functions that are used to establish a connection with the MySQL server and to open the database to perform operations. You also learned about the procedure to execute a SQL query on a specified database. The allitemslist.php script, shown in Listing 3-1, uses those functions to access product information from the products table and display them on the screen in a tabular format.
This code first connects to the MySQL server as a user root and selects the shopping database. Then, a SQL statement is written to retrieve all the rows from the products table. The SQL query is executed and the rows are fetched from the products table and then assigned to the $results array. After that, with the help of the while loop, one row at a time is fetched from the$results array and the product information is displayed on the screen in the form of a table (see Figure 3-1). Variable x is used to display three products in a row.

Figure 3-1. All items in the products table displayed along with their images
To link to different web pages and enable users to access the required information from the site, you need to create a drop-down menu. Let’s see how that is done.
Creating a Drop-Down Menu
Assuming that your site sells electronics, home and furniture products, and books, the drop-down menu needs to provide links to these product sections. Also, assuming that the site sells smart phones, laptops, cameras, and televisions, these product categories must be grouped under the Electronics section. The menu.php file, shown in Listing 3-2, defines a drop-down menu that provides links to these product categories.
You can see in this code that the drop-down menu is made using the unordered list element. The menu contains four main sections called Home, Electronics, Home & Furniture, and Books. The Electronics menu has four submenu options—Smart Phones, Laptops, Cameras, and Televisions. Similarly, the Home & Furniture menu shows different submenu options. When a product category is chosen via any submenu option, the users will be navigated to the PHP script called itemlist.php. The product category they chose is also sent to the itemlist.php script, which in turn fetches all the products in that category from the database table and displays them on the screen.
To apply foreground and background colors to the drop-down menu and to the menu option when a mouse pointer hovers over it, the script uses a cascading style sheet called style.css. It is linked to the script. Next is a quick introduction to CSS.
CSS
CSS stands for Cascading Style Sheets, which contain different styles, layouts, fonts, and colors for a web site. The advantages of using style sheets are:
- Because all the styles are kept in one place, it is easy to maintain them. To change the style of an element, you don’t have to search the entire site. You simply edit it in one place.
- You can change the layout and design of the site very easily.
- Applying styles through CSS makes the code efficient and reduces the website loading time.
Back to the web site, Listing 3-3 shows the styles that are defined in thestyle.css file.
This code gives the drop-down menu a dynamic look. The CSS style shown in Listing 3-3 performs the following tasks:
- Sets the height and width of the images
- Hides the list-item markers (circle, square, etc.) for the ordered and unordered lists
- Sets the height and bottom borders of the drop-down menu
- Sets the width and margins of the drop-down menu
- Removes the default underlines from the hyperlinks displayed in the menu and submenus
- Sets the list items, i.e. the submenu options, to float to the left in the drop-down menu, keeping the margin on the right
- Sets the height, padding of the text (from the boundary of the drop-down), foreground, and background color of the text, and removes the default underlines from the hyperlinks
- Sets the background and foreground color of the text when the mouse hovers over the menu and submenu options
Upon running the menu.php script with the CSS styles in style.css applied to it, you get the drop-down menu shown in Figure 3-2.

Figure 3-2. Drop-down menu displaying different product categories
The allitemslist.php script shown in Listing 3-1 displays all the products defined in the products table. The script works fine, but the users will spend lots of time searching for their desired products from the list. How about displaying only the products of the category selected by the users from the drop-down menu?
The itemlist.php script shown in Listing 3-4 does exactly this. It displays only the products whose category the users chose from the drop-down menu.
At the top of the script, another script called menu.php is included to make the drop-down menu appear in the web site. Recall that the menu.php displays different categories of products. When a user selects a category, navigation takes place to the itemlist.php file and the selected product category is also passed.
The selected product category is accessed through the $_REQUEST array and assigned to the category’s variable.
As expected, a connection to the MySQL server is established as the user, root, and the shopping database is selected for performing operations. A SQL query is executed to fetch all the products from the products table that match the category selected by the user. The fetched rows are assigned to the results recordset. From the results recordset, products are assigned one by one and displayed on the screen.
This script is set to display only three products in a line; hence, a variable x is used (see statement #1) that makes only three products appear in a line. You can always change the value of the variable x to display your desired number of products in a row.
The information that is displayed is the product image, its name, and price. To enable users to display detailed product information, a hyperlink is created on the product’s image and its name via statement #2. That means that if the user clicks on any product’s image or name, navigation will take place to the itemdetails.php script, which will display more details about that product. While navigating to the itemdetails.php script, the code of the selected product is also passed. The itemdetails.php script in turn will use the product code to fetch more information about the product, like its description and features, from the products table. Products are displayed in the format shown in Figure 3-3. You can see that only three products are displayed in a row and hyperlinks are created on the products’ images and names.

Figure 3-3. The web page displaying all the smartphones available for sale on the site
Upon looking at the output shown in Figure 3-3, you will find something important missing, and that is the web site header. The header not only displays the web site’s name and Search box, but it also shows frequently used icons and links.
To display the web site header, you’ll modify the menu.php script shown in Listing 3-2 to appear as the topmenu.php script shown in Listing 3-5. Only the code in bold is new; the rest of the code is same as you saw in Listing 3-2.
To display a header, a table element is defined consisting of three columns. To display the web site title, Search box, and cart icon, the width of the columns is defined in the ratios—30%, 40%, and 20%. The background color of the table is set to cyan and the foreground color is set to blue. To display the web site title, “Bintu Online Bazar,” the font size is set to 35px through statement #1. Statement #2 navigates the users to the searchitems.php script when they click the Search button. The text entered by the user in the Search box is also passed to the searchitems.php script through the $_POST array.
Following the Search box, a cart icon is displayed through statement #3. The width and height of the icon is set to 30px. The cart icon, when clicked, will navigate to the cart.php script, which in turn displays the information about the products that are selected in the cart. The span ID, cartcountinfo, will be used to display the count of the products chosen in the cart.
The topmenu.php script, when executed, displays the web site header shown in Figure 3-4.

Figure 3-4. The header of the web site showing the title, the Search box, and the cart image with the drop-down menu
Most of your site visitors will not have enough time to view the entire range of products you sell. They simply want to search for their desired product and see its details immediately on the screen. To add such a feature, you have to add a Search box to your site, which you’ll learn to do in the next section.
Recall that you added a Search box to the web site header. Users can enter text in the Search box and then click the Search button. The entire products table will be searched for the specified text and all the products that contain that text (whether in their name, description, features, and so on) will be displayed on the screen.
The searchitems.php script shown in Listing 3-6 searches the text entered in the Search box in all the columns of the products table. If the text appears in any of the columns, that row will be displayed on the screen.
The topmenu.php script is included at the top to display the web site header and the drop-down menu. The code first connects to the MySQL server as a user, root, and the shopping database are selected for performing operations. The text entered by the user in the Search box in the topmenu.php script is accessed and assigned to the tosearch variable.
Because you want to search the text in the tosearch variable in all columns of the products table, all the column names of the products table are accessed (see statement #1) and assigned to the columnlist variable through statement #2. Using a while loop, a SQL query is created that accesses every column of the products table and checks if the desired text is found in it (see statement #3). The SQL query is executed and all the products that contain the searched text in any of the columns are displayed on the screen. For example, if you enter lenovo into the Search box, you will get all the products that contain that text, as shown in Figure 3-5.

Figure 3-5. Web page displaying the products that match the text entered in the Search box
All the scripts that you have created so far in this chapter display the minimum information about the product—the product image, name, and price. What if the user wants to see more details about a product?
So, how do you display additional product details, like a description and its different features? Recall from Chapter 1 that all the information about the product—including its code, name, price, description, and so on—is stored in the products table. The product features are stored in a separate table called productfeatures. The itemdetails.php script, shown in Listing 3-7, displays detailed information about the selected product.
After establishing a connection with the SQL server and selecting the shopping database, the product code sent by the itemlist.php and searchitems.php scripts is accessed and assigned to the code variables. Recall that the itemlist.php and searchitems.php scripts display the products list consisting of the product’s image, its name, and its price. When a user clicks on any product’s image or name, the user is navigated to the itemdetails.php script and the code of the selected product is sent to the script.
Statement #1 executes the SQL command that accesses the item name, description, image name, and price of the product that matches the product code.
The fetched product information is displayed on the screen. Besides the product’s description and price, you want to display its features too. So, statement #2 defines a SQL statement that accesses the feature1, feature2, etc. columns from the productfeatures table. The SQL statement is executed and the features of the product are displayed on the screen.
Below the product features, a text box is provided so users can enter the required quantity of the product being displayed. The quantity entered by the user is assigned to the quantity variable and is sent to the cart.php script along with the item_code, item_name, and price of the item when the user presses the Add to Cart button.
The itemdetails.php script is executed from the itemlist.php and searchitems.php scripts when any product image or its name is clicked. Upon clicking on any product image or name, its detailed information will be displayed, as shown in Figure 3-6.

Figure 3-6. Web page displaying the detailed information of the selected product
After learning the technique for displaying products and their information, you’re ready to learn how a web site can remember user information.
Session Handling
Because HTTP is a stateless protocol, the interaction between browsers and web servers is stateless. This means that each HTTP request that a browser sends to a web server is independent of any other request. The stateless nature of HTTP allows users to browse the web by following hypertext links and visiting pages in any order. HTTP also allows applications to distribute or even replicate content across multiple servers to balance the load generated by a high number of requests. These features are possible because of the stateless nature of HTTP.
The drawback of HTTP being stateless is that a web page does not remember the user’s information. If the user inserts some information on one web page and moves to another page, that data will be lost. For example, if the user has signed in through a sign-in page, the moment the user clicks on some link and navigates to another page, that information is lost. In order to remember certain data between web pages, like the items that are selected in the cart by a particular user, sites must use session handling. The session enables storing of user information in the server’s memory. It can store any type of object along with the custom objects. Session data is stored separately for every client.
Because HTTP is a stateless protocol, to keep track of the user, the session ID needs to be continually correlated with the user. This correlation is done through the following methods:
- Cookies—When the client connects to the server for the first time, the server drops the cookies on the client's machine. In every subsequent request, the server uses the cookies to recognize the user and his settings.
- URL Rewriting—The session ID is often appended to the query string of the URL, as shown in this example:
http://www.bmharwani.com/productdetails.php;jsessionid=2243781FG55544K1 - Hidden fields—A hidden field is embedded into the session ID within a web form. The session ID is extracted from the hidden field to recognize the user.
Let’s take a quick look at the different functions that are required in session handling.
Functions Used in Session Handling
A session is a combination of a server-side file containing all the data you want to store and a client-side cookie containing a reference to the server data. The file and the client-side cookie are created using the session_start() function, as explained next.
The session_start() function initializes the session data. It creates a session or resumes the current one based on the current session ID. The syntax for using this function is:
bool session_start ( void )
This function always returns true. If you want to use a named session, you must call the session_name()function before calling session_start().
When session_start() is called, PHP checks to see whether the visitor sent a session cookie. If it did, PHP loads the session data. Otherwise, PHP creates a new session file on the server and sends an ID back to the visitor to associate the visitor with the new file. Because each visitor has her own data locked away in a unique session file, you need to call session_start() every time before you try to read session variables. As session_start() needs to send the reference cookie to the user’s computer, you write this statement before the body of the web page—even before any spaces.
session_id( )
The session_id() function gets or sets the session ID for the current session. More precisely, the session_id() function returns either the session ID for the current session or an empty string ("") if there is no current session (no current session ID exists). The syntax is as follows:
string session_id ([ string $id ] )
When the id parameter is not supplied, the function returns the session ID of the current session. If the id parameter is supplied, the function replaces the current session with the session whose ID is given. In that case, the session_id() function must be called before session_start() is invoked.
isset( )
The isset() function determines whether a variable is set, i.e., whether it is assigned some value or is NULL. The syntax is as follows:
bool isset ( variable/variable list)
The function returns true if the mentioned variable(s) is set. If the mentioned variable is already unset by the invokingunset() function or is set to NULL, the isset() function will return false.
If multiple parameters are supplied, then isset() will return true only if all of the parameters are set. Evaluation goes from left to right and stops as soon as an unset variable is encountered.
The PHP script called sessionscript1.php is shown in Listing 3-8. It shows how a session is started and how certain variables are set.
Statement #1 ensures that if the session is not yet started, it invokes the session_start() function to create a new session. Statement #2 sets the username variable to the value John. Similarly, the following two statements set the cartquantity and cartprice variables to 3 and 19.99, respectively.
After setting the session variables, the script shows a hyperlink called View Cart, which will navigate the user to another script, calledsessionscript2.php. As expected, the sessionscript2.php script will access values from the session variables and display them on the screen. Upon running this script, the View Cart hyperlink is displayed along with a message, as shown in Figure 3-7.
![]() Note The session information can even be stored permanently in a database if required.
Note The session information can even be stored permanently in a database if required.

Figure 3-7. The values of the session variables are set and a link is displayed to access and view the session variables
The sessionscript2.php script shown in Listing 3-9 completes the following tasks:
- Checks whether a session exists. If not, it starts a new session.
- Checks if the username variable is set and displays a welcome message.
- Retrieves the values in the session variables, cartquantity and cartprice, which were set in the sessionscript1.php script, and displays them on the screen.
When the script runs, the session ID is displayed along with a welcome message to the user. Also, the cart quantity and cart price are displayed, as shown in Figure 3-8.

Figure 3-8. The web page displaying the session ID, user name, cart quantity, and price
How about adding the user’s sign-in information to the header of the site, displayed through the topmenu.php script shown in Listing 3-5?
You can display the Login and Signup links in the header, and they will complete the following tasks:
- Display the username of the user who is signed in or display the Login link that will enable a user to sign in.
- Display the Signup link, which will display a form that enables the user to register on your site.
To do these tasks, modify the topmenu.php script to appear as shown in Listing 3-10. Only the code in bold is new; the rest is the same as shown in Listing 3-5.
The code in bold starts a session. Thereafter, it adds a span with the ID userinfo to the header. The span displays two hyperlinks—Login and Signup (see Figure 3-9). The Login hyperlink will navigate users to the signin.php script, which in turn will display a form prompting the user to enter credential information to sign in to your site. The Signup link will navigate the user to the validatesignup.php script, which displays a form that enables the user to register to your site.

Figure 3-9. The header modified to display the Login and Signup links, which enable visitors to signup and signin to the site
Signing In and Out
Obviously, it’s beneficial to store information about your regular customers. Doing so will relieve them from having to enter their addresses, contact information, and so on every time they buy a product from your site. To store information about your frequent customers, you need to enable them to register at your site. The registered customers can sign in any time by entering their e-mail addresses and passwords. When users have completed a purchase, they can then log out from your site. In this section, you’ll learn how visitors to your site can be allowed to sign in and sign out.
![]() Note The session usually sets a user key on the user’s computer, which looks like a long string of chars like 234hjg5hg34g5hj23g532hjg34hjg5k4. When a session is opened on another page for instance, it will scan the computer for a user key. If there is a match, it will access that session; if not, it will start a new session.
Note The session usually sets a user key on the user’s computer, which looks like a long string of chars like 234hjg5hg34g5hj23g532hjg34hjg5k4. When a session is opened on another page for instance, it will scan the computer for a user key. If there is a match, it will access that session; if not, it will start a new session.
The signin.php script shown in Listing 3-11 prompts the users to enter credential information so that they can sign in to your site.
The code displays a form that displays two input boxes for the users to enter their e-mail addresses and passwords. The form also shows a button that can be clicked after entering the e-mail address and password. Clicking the button will navigate the users to the validateuser.php script. Because the form will be submitted through the HTTP POST method, the e-mail address and password entered in this form can be accessed in the validateuser.php script through the $_POST array.
Upon running the script, you get a screen prompting the user to enter an e-mail address and password, as shown in Figure 3-10.

Figure 3-10. The sign-in web page along with the header and drop-down menu
After a user enters an e-mail address and password, the next task is to confirm if the information entered is valid. The validateuser.php script shown in Listing 3-12 does the following tasks:
- It validates the user, i.e., it determines whether the user has entered a valid e-mail address and password.
- It displays a welcome message if the user is authenticated.
- If an invalid e-mail address or password is entered, it displays an error message followed by two links that enable the users to enter their credentials again or create a new account.
- If the user is authenticated successfully, it updates the header of the site, replacing the Login link with the name of the user along with the welcome message. Also, the Signup link is replaced with the Log Out link.
In this code, statement #1 defines a JavaScript function called updateUser that is invoked when users enter a valid e-mail address and password. Statement #2 displays a welcome message along with the user’s name in the span ID called userinfo. It also displays a link, called Log Out, which navigates the users to the logout.php script and enables them to log out of your site.
Statement #3 executes a SQL query that determines whether any row exists in the customers table that contains the e-mail address and password that was entered by the user in the signin.php script. Statement #4 displays a welcome message along with the user’s name if such a row exists.
Statement #5 invokes the JavaScript function, updateUser, to display a welcome message in the header of the site. Statement #6 and on display an error message and links that enable the user to try to sign in again or create a new account.
If users enter an e-mail address or password that the site doesn’t recognize, two links will be displayed on the screen. These links enable users to try to sign in again or create a new account, as shown in Figure 3-11.
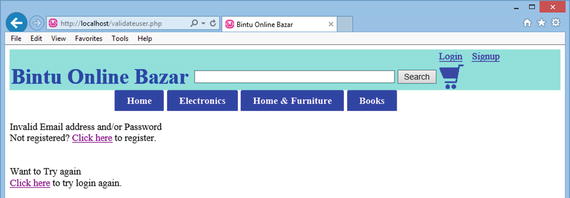
Figure 3-11. Messages that appear when users enter an unknown e-mail address or password
If users enter a valid e-mail address and password, a welcome message will be displayed along with their name. This is displayed in the body of the site as well as in the header, as shown in Figure 3-12.

Figure 3-12. Welcome message displayed when users enter an existing e-mail address and password
The logout.php script shown in Listing 3-13 destroys the user’s session, which then enables them to log out.
The following two methods are used in this script:
- unset()—Unsets or destroys the specified session variable.
- session_destroy()—Destroys all the data associated with the current session. That is, all global and local session variables are destroyed.
The script checks if the e-mail address session variable is set. If it is set, it is destroyed. Also, any data associated with the current session is destroyed. After destroying all the session information, the home page, index.php, is opened.
Defining the Home Page of the Site
The home page is the introductory page of the site and it plays a major role in attracting visitors.
The home page of this e-commerce site displays the site header, a drop-down menu, and images of some of the products that the site sells. The product images being displayed will fade out after a few seconds and will be replaced with others. The process continues to display different images. Upon clicking any image, users will be navigated to the page that shows the complete list of that type of product. For example, when users click on any laptop image, they will be navigated to the page that shows the complete list of all the laptops that are available for sale.
The index.php script shown in Listing 3-14 displays the home page. It contains the site header, a drop-down menu, and three product images that are continuously replaced with other images.
In this code, you can see that images of the Apple iPhone 4s smart phone, the Micromax Knight 2E471 smart phone, and the Microsoft Lumia laptop are displayed initially. After a couple of seconds, when these product images fade, images of the Xperia T3 white smart phone, Dell Vostro1, and HP Probook 6570 laptop appear.
The code shown in Listing 3-15 implements the cross-fading technique shown on the home page.
This code fades the current images after five seconds and makes the next three images visible. This process continues looping. When you run the site, you get the home page shown in Figure 3-13.
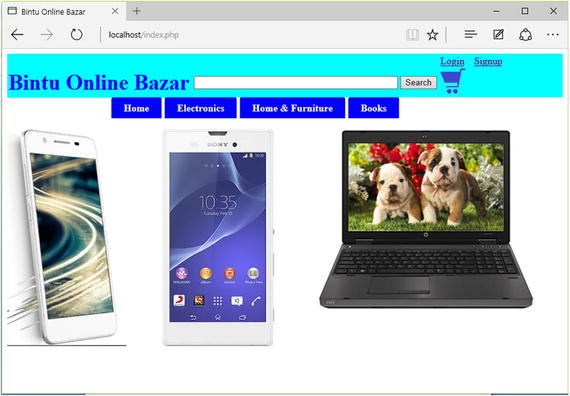
Figure 3-13. The home page of the site showing the site’s header, the drop-down menu, and three images
After a couple of seconds, the current product images fade out and the other product images become visible, as shown in Figure 3-14.

Figure 3-14. The images on the home page fade out and are replaced with three new images
Summary
In this chapter, you learned to access products from the products table and display them on the screen in tabular format. You also learned to create a drop-down menu that shows different product categories and implements navigation from one page to another. You also learned to display products that belong to a specific category, define a web site header, implement a search feature, and display detailed information about the selected product. You also learned how a web site remembers information about a visitor via session handling. You learned to apply sign in and sign out features to your site before coding the site’s home page.
The next chapter focuses on the items that users choose to place in their carts. You will learn to display the cart and edit the items in the cart. You will also learn how a purchase order is placed and how the user’s shipping information is entered and saved. Finally, you will learn to provide different payment modes that users can use to purchase your product(s).