
Implementing a custom view controller transition is one of those things that can take a little while to get used to. There are several moving parts involved that aren't easy to place inside of your own mental modal of how things work.
However, once you get the hang of how it all ties together and you're able to implement your own transitions, you have a very powerful tool at your disposal. Proper custom view controllers can entertain and amaze your users. Making your transitions interactive could even ensure that your users will spend some extra time with your app, which is exactly what you would want. We'll implement a custom transition for the HelloContacts app. First, we'll see how we can perform a custom modal transition. Once you've implemented that we'll also explore custom transitions for UINavigationController, so we can show and hide the contact details page with a custom transition. We'll make the dismissal of both the modal view controller and the contact detail page interactive, so users can swipe to go back to where they came from.
To reiterate, the following are the steps we will follow:
- Implementing a custom modal presentation transition.
- Making the transition interactive.
- Implementing a custom
UINavigationControllertransition.
A lot of applications implement modally presented view controllers. A modally presented view controller is typically a view controller that overlays the entire screen. By default, they animate up from the bottom of the screen and are often used to present forms or other temporary content to the user. In this section, we'll take a look at the default transition and how to customize it to suit your own needs.
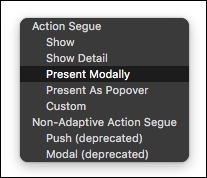
The first thing you will need to do is create a view controller to be presented modally. Start by creating a new file, pick Cocoa Touch Class and name it CustomPresentedViewController. Make sure that it subclasses UIViewController. Open Main.storyboard and drag out a new UIViewController from the Object Library and set its class to CustomPresentedViewController. Next, drag out a bar button item to the left side of the navigation bar on the contacts overview page. Set the bar button's label text to Show Modal and press ctrl and drag from the bar button item to the new view controller. Select the present modally segue (refer to the next figure). Finally, give the view a bright blue background color, so it will be easier to see the transition later. If you run your app now, you can click on the Show Modal button and you'll see an empty view controller pop up from the bottom. You can't dismiss this view controller right now. That's okay, we'll get to that later. Let's work on a custom transition to display this view controller first.
Now that we have a view controller to play with, it's time to explore how to actually implement a custom modal transition. The first object we will look at is transitioningDelegate for UIViewController. The transitioningDelegate method is responsible for creating an animation controller for the custom transition. Under the hood, the created animation controller makes use of a transitioning context that contains information about the view controllers involved in the transition.
The transitioning flow can be described in the following steps:
- A transition begins; the target view controller is asked for its
transitioningDelegate. - The
transitioningDelegateis asked for an animation controller. - The animation controller is asked for the animation duration.
- The animation controller is told to perform the animation.
- When the animation is complete, the animation controller calls
completeTransition(_:)on the transitioning context to inform it about the successful transition.
If step 1 or step 2 returns nil, or isn't implemented at all, the default animation for the transition is used. The objects involved in a custom transition are displayed in the following figure:
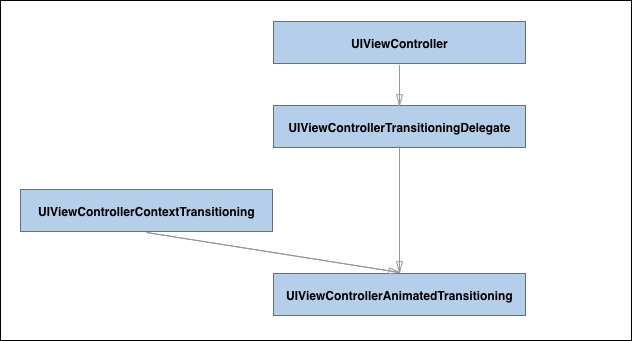
The view controller we're going to present will be its own transitioningDelegate. The animation controller will be a separate object that conforms to UIViewControllerAnimatedTransitioning, and it will take care of animating the presented view onto the screen. Before we implement this, we'll create the animation controller that's responsible for performing our animation.
Create a new Cocoa Touch class and name it CustomModalShowAnimator. Pick NSObject as its superclass. This class will act as both the transitioning delegate and the animation controller. After creating the new file, open it and change the class declaration as follows:
class CustomModalShowAnimator: NSObject, UIViewControllerAnimatedTransitioning {
}
This makes our new class conform to the protocol that's required to be an animation controller. Xcode will show a build error because we haven't implemented all the required methods yet. Let's go over the methods one by one until we end up with a full implementation for our animation controller.
The first method we will need to implement on the animation controller is transitionDuration(_:). This implementation is shown below:
func transitionDuration(using transitionContext: UIViewControllerContextTransitioning?) -> TimeInterval {
    return 0.6
}
This method returns a TimeInterval. This is the time (in seconds) we want the transition to last.
The second method we will need to implement is animateTransition(_:). Its purpose is to take care of the actual animation for the custom transition. Our implementation will take the target view controller and its view will be animated from the top down to its final position. It will also do a little bit of scaling, and the opacity for the view will also be animated; to do this, we'll use UIViewPropertyAnimator, as follows:
func animateTransition(using transitionContext: UIViewControllerContextTransitioning) {
    guard let toViewController = transitionContext.viewController(forKey: UITransitionContextViewControllerKey.to) else {
            return
    }

    let transitionContainer = transitionContext.containerView

    var transform = CGAffineTransform.identity
    transform = transform.concatenating(CGAffineTransform(scaleX: 0.6, y: 0.6))
    transform = transform.concatenating(CGAffineTransform(translationX: 0, y: -200))

    toViewController.view.transform = transform
    toViewController.view.alpha = 0

    transitionContainer.addSubview(toViewController.view)

    let animationTiming = UISpringTimingParameters(
            dampingRatio: 0.8,
            initialVelocity: CGVector(dx: 1, dy: 0))

    let animator = UIViewPropertyAnimator(
            duration: transitionDuration(using: transitionContext),
            timingParameters: animationTiming)

    animator.addAnimations {
        toViewController.view.transform = CGAffineTransform.identity
        toViewController.view.alpha = 1
    }

    animator.addCompletion { finished in
        transitionContext.completeTransition(!transitionContext.transitionWasCancelled)
    }

       animator.startAnimation()
}
The first thing this snippet does is read the target view controller from the context. Then, the view that's going to contain the transition is fetched and the final frame for the target view controller is read.
The next step is to set up the initial frame for the target view controller. This is the position we're going to animate from. For this transition, the target view's alpha is set to 0, and a combined transition is used to create an offset on the Y-axis and to scale the target view down.
Then, the target view is added to the transitionContainer and the actual animation is kicked off. Once the animation completes, the completeTransition(_:) method is called on the context to inform it about the result of the transition.
Now that the animation controller is complete, we should implement the UIViewControllerTransitioningDelegate protocol on CustomPresentedViewController and make it its own transitioningDelegate. Open the file and add the following implementation code:
class CustomPresentedViewController: UIViewController, UIViewControllerTransitioningDelegate {

    override func viewDidLoad() {
        super.viewDidLoad()
        transitioningDelegate = self
    }

    func animationController(forPresentedController presented: UIViewController, presenting: UIViewController, sourceController source: UIViewController) -> UIViewControllerAnimatedTransitioning? {
        return CustomModalShowAnimator()
    }

    func animationController(forDismissedController dismissed: UIViewController) -> UIViewControllerAnimatedTransitioning? {
        return nil
    }
}
This code adds conformance for the UIViewControllerTransitioningDelegate protocol and assigns the view controller as its own transitioning delegate. The animationController(forPresentedController:presenting:source) method returns our animation controller. The animationController(forDismissedController:) method returns nil for now. Go ahead and test your custom transition! This is all the code required to create a custom display transition. Now that we can display our view controller with a custom transition, let's add an interactive dismiss transition.
Implementing an interactive transition requires a bit more work than the non-interactive version, and the way it works is also somewhat harder to grasp. The non-interactive transition worked by returning an object that took care of the animations in the animationController(forPresentedController:presenting:source) method.
For our interactive dismiss transition, there will be two methods that work together. The first is the animationController(forDismissedController:) method. This method will return an object that will perform animations, just like its presenting counterpart. However, to make the animation interactive, we must also implement the interactionController(forDismissal:) method. This method will return an object that works in conjunction with the object we returned from animationController(forDismissedController:). The way this all ties together can roughly be summed up as follows:
- A
UIViewControllerAnimatedTransitioningobject is requested by callinganimationController(forDismissedController:). - A
UIViewControllerInteractiveTransitioningobject is requested by callinginteractionController(forDismissal:). TheUIViewControllerAnimatedTransitioningobject that was retrieved earlier is passed to this method. If this method returnsnil, the transition will be executed without being interactive. - If both methods return a valid object, the transition is interactive.
Let's take a look at how this compares to the previous flow of animation we've looked at in the following diagram:
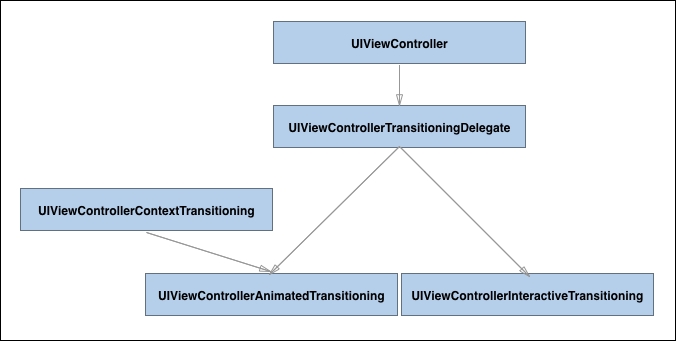
For convenience, we'll implement both UIViewControllerAnimatedTransitioning and UIViewControllerInteractiveTransitioning in a single class. This will make it a little bit easier to see how everything ties together.
Start off by creating a new Cocoa Touch Class and name it CustomModalHideAnimator. Choose UIPercentDrivenInteractiveTransition as its superclass. This class implements convenience methods to easily update the interactive transition. It also conforms to UIViewControllerInteractiveTransitioning, so we don't have to add conformance ourselves.
Let's start off by implementing a custom initializer that will tie the CustomPresentedViewController instance to CustomModalHideAnimator. This will enable us to add a gesture recognizer to the view and update the animation based on the status of the gesture recognizer. Add the following code to the implementation for CustomModalHideAnimator:
let viewController: UIViewController

init(withViewController viewController: UIViewController) {
    self.viewController = viewController

    super.init()

    let panGesture = UIScreenEdgePanGestureRecognizer(
            target: self,
            action: #selector(self.onEdgePan(gestureRecognizer:)))

    panGesture.edges = UIRectEdge.left
    viewController.view.addGestureRecognizer(panGesture)
}

func onEdgePan(gestureRecognizer: UIScreenEdgePanGestureRecognizer) {
    let panTranslation = gestureRecognizer.translation(in: viewController.view)
    let animationProgress = min(max(panTranslation.x / 200, 0.0), 1.0)

    switch gestureRecognizer.state {
    case .began:
        viewController.dismiss(animated: true, completion: nil)
    case .changed:
        update(animationProgress)
        break
    case .ended:
        if animationProgress < 0.5 {
            cancel()
        } else {
            finish()
        }
        break
    default:
        cancel()
        break
    }
}
This snippet starts off with a custom initializer that immediately ties a UIViewController instance to itself. Then, it completes initialization by calling the superclass' initializer, and then the pan gesture is added to the view. We're using UIScreenEdgePanGestureRecognizer so we can bind it to swiping from the left edge of the screen. This mimics the standard gesture that's normally used to go back a step.
Next, the onEdgePan(_:) method is implemented. This method figures out the distance that is swiped. Then, the state of the gesture is checked. If the user just started the gesture, we tell the view controller to dismiss. This will trigger the sequence of steps that was outlined before, and it will start the interactive dismissal.
If the gesture just changed, we update the progress of the animation. We do this by calling the update(_:) method that is implemented in UIPercentDrivenInteractiveTransition. If the gesture ended, we check the progress made so far. If there is enough progress, we finish the transition, otherwise we cancel it. If we receive any other status for the gesture, we assume it got canceled so we also cancel the transition.
Next, we implement the UIViewControllerAnimatedTransitioning methods that describe the transition we're executing. This transition basically does the opposite from the transition we used to display our modal view controller. The following snippet implements this:
func transitionDuration(using transitionContext: UIViewControllerContextTransitioning?) -> TimeInterval {
    return 0.6
}

func animateTransition(using transitionContext: UIViewControllerContextTransitioning) {

    guard let fromViewController = transitionContext.viewController(
            forKey: UITransitionContextViewControllerKey.from),
        let toViewController = transitionContext.viewController(
            forKey: UITransitionContextViewControllerKey.to) else {
                return
    }

    let transitionContainer = transitionContext.containerView

    transitionContainer.addSubview(toViewController.view)
    transitionContainer.addSubview(fromViewController.view)

    let animationTiming = UISpringTimingParameters(
        dampingRatio: 0.8,
        initialVelocity: CGVector(dx: 1, dy: 0))

    let animator = UIViewPropertyAnimator(
        duration: transitionDuration(using: transitionContext),
        timingParameters: animationTiming)

    animator.addAnimations {
        var transform = CGAffineTransform.identity
        transform = transform.concatenating(CGAffineTransform(scaleX: 0.6, y: 0.6))
        transform = transform.concatenating(CGAffineTransform(translationX: 0, y: -200))

        fromViewController.view.transform = transform
        fromViewController.view.alpha = 0
    }

    animator.addCompletion { finished in
        transitionContext.completeTransition(!transitionContext.transitionWasCancelled)
    }

    animator.startAnimation()
}
If you study this code, you'll find that it's not very different from its counterpart that was responsible for displaying the modal view. All that's left to do now is to make sure that our CustomPresentedViewController uses this custom animation to create an instance of our CustomModalHideAnimator and implement the interactionController(forDismissal:) and animationController(forDismissedController:) methods. Replace the current viewDidLoad implementation in your CustomPresentedViewController with the following code:
var hideAnimator: CustomModalHideAnimator?

override func viewDidLoad() {
    super.viewDidLoad()

    transitioningDelegate = self
    hideAnimator = CustomModalHideAnimator(withViewController: self)
}
The preceding code creates an instance of CustomModalHideAnimator and binds the view controller to it by passing it to the initializer. Next, update the code in animationController(forDismissedController:) so it returns hideAnimator instead of nil, as follows:
func animationController(forDismissedController dismissed: UIViewController) -> UIViewControllerAnimatedTransitioning? {
    return hideAnimator
}
Finally, implement the interactionController(forDismissal:) method so the transition becomes interactive, as follows:
func interactionController(forDismissal animator: UIViewControllerAnimatedTransitioning) -> UIViewControllerInteractiveTransitioning? {
    return hideAnimator
}
Try to run your app now and swipe from the left edge of the screen once you've presented your custom modal view. You can now interactively make the view go away by performing a gesture. Clever implementations of custom transitions can really make users feel in control of your application and the way it responds to them.
Implementing a custom transition is a task that isn't easy by any means. There are a lot of moving parts involved and the amount of delegation and protocols used can be daunting. Take the time to go over the code you've written a few more times to figure out what exactly is going on if you must. Again, this isn't an easy topic to understand or grasp.
The view controller transition technique that we've explored is very nice whenever you want to create a custom modal presentation. However, if you want to customize transitions in UINavigationController or UITabBarController that persists throughout your app, you will need to implement the transitions in a slightly different way.
Let's take a look at how the setup for animating push animation for a UINavigationController differs from the setup we saw before:
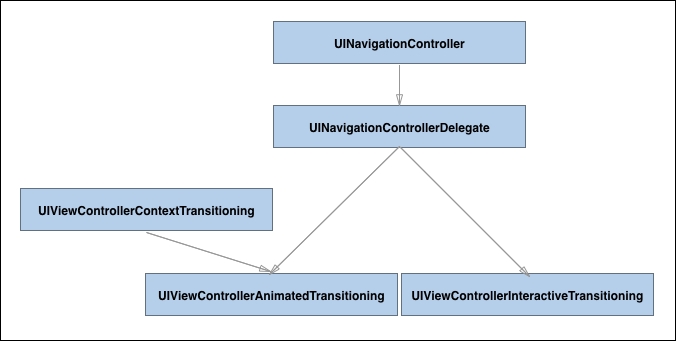
The depicted flow is one for an interactive transition. It's very similar to the way a view controller transition works; except this time, UINavigationControllerDelegate is the object that provides the UIViewControllerAnimatedTransitioning and the UIViewControllerInteractiveTransitioning objects that are used to perform the transitions between views.
As the delegate responsible for the transitions is set on the navigation controller instead of on a displayed view controller, every push and pop that is performed by the navigation controller that has a custom delegate will use the same custom transition. This can really come in handy when you want to have consistent behavior throughout your app without manually assigning transitioning delegates all of the time.
To see how exactly a custom navigation controller transition can be implemented, we will create a custom transition that zooms in on a contact. Whenever a user taps a contact, the contact's detail page will expand and grow from the contact's picture until it covers the entire window like it's supposed to. Pressing the back button will shrink the view back down onto the tapped contact's image. Swiping from the left edge of the screen will interactively shrink the view, using the same animation that gets triggered by the back button.
To implement this custom transition, we'll use three classes. A NavigationDelegate class will implement the UINavigationController delegate and will use a UIPercentDrivenInteractiveTransition object to manage the interactive back transition. The other two classes are the animator classes; they both implement the UIViewControllerAnimatedTransitioning protocol. One is responsible for the hide transition; the other will handle the show transition. Create three files and name them NavigationDelegate, ContactDetailShowAnimator, and ContactDetailHideAnimator. All three should inherit the NSObject class.
Let's begin with implementing ContactDetailShowAnimator. The first thing you should do with this class is add conformance to the UIViewControllerAnimatedTransitioning protocol by listing it after the NSObject superclass declaration. Just like before, we have to implement two methods. One for the duration and one for the animation. In the following implementation, there will be two parts of code that are highlighted; these parts are of interest because they are quite different than we've seen before, and they play an interesting role in the animation:
func transitionDuration(using transitionContext: UIViewControllerContextTransitioning?) -> TimeInterval {
    return 0.3
}

func animateTransition(using transitionContext: UIViewControllerContextTransitioning) {
    guard
        let toViewController = transitionContext.viewController(
                forKey: UITransitionContextViewControllerKey.to),
        let fromViewController = transitionContext.viewController(
                forKey: UITransitionContextViewControllerKey.from),
        let overviewViewController = fromViewController as? ViewController,
        let selectedCell = overviewViewController.collectionView
                .indexPathsForSelectedItems?.first,
        let sourceCell = overviewViewController.collectionView
                .cellForItem(at: selectedCell) as? ContactCollectionViewCell
    else {
        return
    }

    let transitionContainer = transitionContext.containerView
    let toEndFrame = transitionContext.finalFrame(for: toViewController)

    let imageFrame = sourceCell.contactImage.frame
    let targetFrame = overviewViewController.view.convert(imageFrame,
                                                          from: sourceCell)

    toViewController.view.frame = targetFrame
    toViewController.view.layer.cornerRadius = sourceCell.frame.height / 2

    transitionContainer.addSubview(toViewController.view)

    let animationTiming = UICubicTimingParameters(
                            animationCurve: .easeInOut)

    let animator = UIViewPropertyAnimator(
        duration: transitionDuration(using: transitionContext),
        timingParameters: animationTiming)

    animator.addAnimations {
        toViewController.view.frame = toEndFrame
        toViewController.view.layer.cornerRadius = 0
    }

    animator.addCompletion { finished in
        transitionContext.completeTransition(!transitionContext.transitionWasCancelled)
    }

    animator.startAnimation()
}
The first highlight shows how we're extracting information about the tapped cell by casting the fromViewController to an instance of ViewController, the view controller that contains the overview page. We ask its collection view for the selected index path and use that to extract a cell. All of the work we're doing here return Optionals, which means that the values might not be present according to the compiler. Even though we know these values should always be present, we're safely unwrapping the optional values into variables we can use later in the method.
The second highlight is the code that sets up the detail view controller's initial frame. To determine this frame, the frame for contactImage in sourceCell is extracted. Then, this frame is converted to the coordinates of overviewViewController. If you don't do this, the y position of the frame will be off by about 64 points. That's because the collection view has a content inset of 64 so it can extend below the navigation bar.
After converting the image's frame, it's used as the frame for the target view. The target also gets rounded corners so as to aid the zooming in effect. The animation is set up to remove the rounded corners and to adjust the frame to the planned end frame.
The next step is to implement the back transition. This transition is nearly identical to the show transition. Open up the ContactsDetailHideAnimator.swift file and add conformance to the UIViewControllerAnimatedTransitioning protocol. After doing this, use the code from the show animator to implement the duration delegate method. The following snippet omits the animation setup, the completion handler, and the animation start code. You can use the same implementation for these parts of the method as you did before. The optional unwrapping is also omitted; implement this identically to the way you did before, except this time, the toViewController should be cast to ViewController instead of the fromViewController, as follows:
func animateTransition(using transitionContext: UIViewControllerContextTransitioning) {
    // Optional unwrapping

    let transitionContainer = transitionContext.containerView()

    transitionContainer.addSubview(toViewController.view)
    transitionContainer.addSubview(fromViewController.view)

    // animation setup

    animator.addAnimations {
        let imageFrame = sourceCell.contactImage.frame

        let targetFrame = overviewViewController.view.convert(imageFrame,
                                                              from: sourceCell)

        fromViewController.view.frame = targetFrame
        fromViewController.view.layer.cornerRadius = sourceCell.contactImage.frame.height / 2
    }

    // animation completion and start
}
Now that we have the animations implemented, it's time to implement the UINavigationControllerDelegate. As discussed before, this delegate is responsible for providing the animations and managing the interactive back gesture. First, we'll set up the basics for this class. Add the following code to the NavigationDelegate class:
let navigationController: UINavigationController
var interactionController: UIPercentDrivenInteractiveTransition?

init(withNavigationController navigationController: UINavigationController) {
    self.navigationController = navigationController

    super.init()

    let panRecognizer = UIPanGestureRecognizer(target: self,
                                               action: #selector(self.pan(gestureRecognizer:)))
    navigationController.view.addGestureRecognizer(panRecognizer)
}
This code allows us to instantiate the NavigationDelegate and immediately associate a navigation controller with it. We also add a UIPanGestureRecognizer to the view of the navigation controller. This gesture recognizer will drive our interactive transition. Next, let's implement the pan(gestureRecognizer:) method. This method is called whenever the pan gesture recognizer updates, as follows:
func pan(gestureRecognizer: UIPanGestureRecognizer) {
    guard let view = self.navigationController.view
        else { return }

    switch gestureRecognizer.state {
    case .began:
        let location = gestureRecognizer.location(in: view)
        if location.x < view.bounds.midX &&
            navigationController.viewControllers.count > 1 {

            interactionController = UIPercentDrivenInteractiveTransition()
            navigationController.popViewController(animated: true)
        }
        break
    case .changed:
        let panTranslation = gestureRecognizer.translation(in: view)
        let animationProgress = fabs(panTranslation.x / view.bounds.width)
        interactionController?.update(animationProgress)
        break
    default:
        if gestureRecognizer.velocity(in: view).x > 0 {
            interactionController?.finish()
        } else {
            interactionController?.cancel()
        }

        interactionController = nil
    }
}
This method is very similar to the one we saw before for the regular view controller transition. The major difference here is that we're creating the UIPercentDrivenInteractiveTransition when the gesture begins. We destroy it when the gesture ends. This way of managing the interactive transition is not better or worse than the other method. It's just a different way of doing the same thing.
There are two methods left to implement. Before we do this, add conformance to UINavigationControllerDelegate to your class definition, as follows:
func navigationController(_ navigationController: UINavigationController,
animationControllerFor operation: UINavigationControllerOperation,
from fromVC: UIViewController, to toVC: UIViewController) -> UIViewControllerAnimatedTransitioning? {

    if operation == .pop {
        return ContactsDetailHideAnimator()
    } else {
        return ContactDetailsShowAnimator()
    }
}

func navigationController(_ navigationController: UINavigationController, interactionControllerFor animationController: UIViewControllerAnimatedTransitioning) -> UIViewControllerInteractiveTransitioning? {
    return interactionController
}
These two methods are responsible for providing the required objects for the animations. Previously, we had one method that got called whenever a view controller got showed, and one when it got dismissed. The UINavigationControllerDelegate has only one method for this. You can check whether the navigation controller is pushing or popping a view controller, and based on that, you can return a different animator.
That's it, we've successfully implemented an interactive transition for a navigation controller. Build and run your app, tap on a cell, and see our freshly created zoom in and out effect in action. Also, try swiping from the left edge of the screen to interactively go back to the overview page.