
In the previous chapter, we learned what an end-to-end Machine Learning (ML) process looks like. We went through the different steps, from data exploration to data pre-processing, training, optimization, deployment, and operation. In this chapter, we want to find out how to best navigate through all available ML services in Azure and how to select the right one for your goal. Finally, we will explain why the Azure Machine Learning is the best choice for building custom ML models. This is the service that we will use throughout the book to implement an end-to-end ML pipeline.
First, we will take a look at the different Azure services for ML and Artificial Intelligence (AI), and discuss their differences and similarities. Some of the services will be completely managed with little flexibility, whereas other services will give you great flexibility but not everything will be managed. We will also take a look into the different execution runtimes and compute targets.
In the next section, we jump right into Azure Cognitive Services, a pre-trained ML endpoint for many domains and prediction tasks. We will then cover customized Cognitive Services, which is a way to fine-tune a Cognitive Service for a specific task or domain. The Custom Vision tool is a great example of a customizable computer vision service.
Next, we will cover ML tools with Graphical User Interfaces (GUIs) in Azure. The best tool for building ML workflows in Azure is Azure Machine Learning designer, the successor of the popular service Azure ML Studio (classic). It is easy to use and has tight integration into the Azure Machine Learning workspace. We will also take a look at Azure Automated Machine Learning (especially the visual interface) and its advantages over Azure Machine Learning designer.
Finally, in the last section, we will cover the basics of Azure Machine Learning, the tool that we will use throughout this book to build a fully automated end-to-end ML pipeline in Azure. Besides the main terminology and functionality, we will also propose how to gradually move an existing ML project to Azure Machine Learning. This will give you the same benefits as starting a completely new project in Azure Machine Learning, ranging from model tracking to automated deployments and auto-scaling training clusters.
The following topics will be covered in this chapter:
- Demystifying the different Azure services for ML
- Azure Cognitive Services and Custom Vision
- Azure Machine Learning with GUIs
- Azure Machine Learning workspace
Let's jump right in and start demystifying the different Azure services for AI and ML!
Demystifying the different Azure services for ML
Azure offers many services that can be used to perform ML – you can use a simple Virtual Machine (VM), a pre-configured VM for ML (also called Data Science Virtual Machine (DSVM)), Azure Notebooks using a shared free kernel, or any other service that gives you compute resources and data storage. Due to this flexibility, it is often very difficult to navigate through these services and pick the correct service for implementing an ML pipeline. In this section, we will provide clear guidance about how to choose the optimal ML and compute services in Azure.
First, it is important to discuss the difference between a simple compute resource, an ML infrastructure service, and an ML modeling service. This distinction will help you to better understand the following sections about how to choose these services for a specific use case:
- A compute resource can be any service in Azure that provides you with computing power, such as VMs, managed clusters of VMs (Azure Batch, Azure Databricks, and so on), container execution engines (Azure Kubernetes Services, Azure Container Instance, Azure Functions, Azure IoT Edge, and so on), or hybrid compute services such as App Service. This service is usually used for experimentation or is managed from an ML infrastructure service.
- An ML infrastructure service helps you implement, orchestrate, automate, and optimize your ML training, pipelines, and deployments. Using such a service, you would usually implement your own preprocessing and ML algorithms using your own frameworks. However, the service would support you with infrastructure for the training, optimization and deployment process. Azure Machine Learning is a service in Azure that falls into this category and will be the service that we use throughout this book.
- Finally, an ML modeling service is a service that helps you to create or use ML models without writing your own code. Services such as Cognitive Services, Azure Automated Machine Learning, Azure Machine Learning designer, and Custom Vision can be found in this category. While this division into three different categories might seem intuitive, there are many overlaps between the services, such as the graphical model designer in Azure Machine Learning, and others.
The following pipeline is a typical choice of Azure Machine Learning and compute services in a real-world example for a predictive quality model that can be deployed on an on-premise edge device for stream processing:
- Track experiments, pipelines, trained models, and containers using Azure Machine Learning
- Run experiments in Azure Notebook using a DSVM
- Preprocess a large dataset using Azure Databricks
- Label the dataset using Custom Vision
- Create an object detection mode without code using Custom Vision
- Deploy the model to Azure IoT Edge
As you can see, there are many ways to combine services to build a pipeline. There are many different aspects to consider when choosing the best ML and compute services for an ML use case, which depend greatly on the problem statement, domain, team, skills, preferences, budget, and so on. Evaluating the trade-offs for every use case is an essential task when comparing the different services.
Choosing an Azure service for ML
Let's start with choosing a service for ML and hence, a service to implement, orchestrate, and augment your ML pipeline. The trade-offs are similar when evaluating a managed Platform-as-a-Service (PaaS) offering versus the more flexible Infrastructure-as-a-Service (IaaS) software. In general, the Azure Machine Learning can be ordered by increasing flexibility and operational effort. Here is a list in sorted order of its flexibility and operational effort:
- A fully managed service with pre-trained models for scoring only.
- A managed service with pre-trained models and customization through transfer learning.
- A managed service with GUI to experiment, build, train, and deploy models.
- A managed service to orchestrate compute resources and facilitate ML processes.
- Individual compute services to experiment, train, and deploy models.
Before we look into a decision tree that helps you to decide which service to use, you should think about the trade-off between flexibility and operational complexity.
Consuming an object detection algorithm through an API is many magnitudes easier, faster, and cheaper than training and deploying your own object detection model.
However, if you need the flexibility of choosing a specific model or algorithm that is not supported as a service (for example, segmentation), then you don't have a choice but to implement it on your own.
A good rule of thumb is to always prefer a managed and trained ML service when possible. If this is not possible, you should evaluate whether the ML algorithm can be consumed as a service and fine-tuned for your domain or if it has to be built from scratch. If the model has to be built, then the next step to consider is whether it should be done from within a GUI or programmatically. Ultimately, if the model is trained programmatically, you need to choose the underlying data storage and compute infrastructure. Our advice is to choose or build on top of pre-trained APIs and models whenever possible.
Figure 2.1 shows the guideline toward choosing the correct ML service according to the logic that we've just discussed:
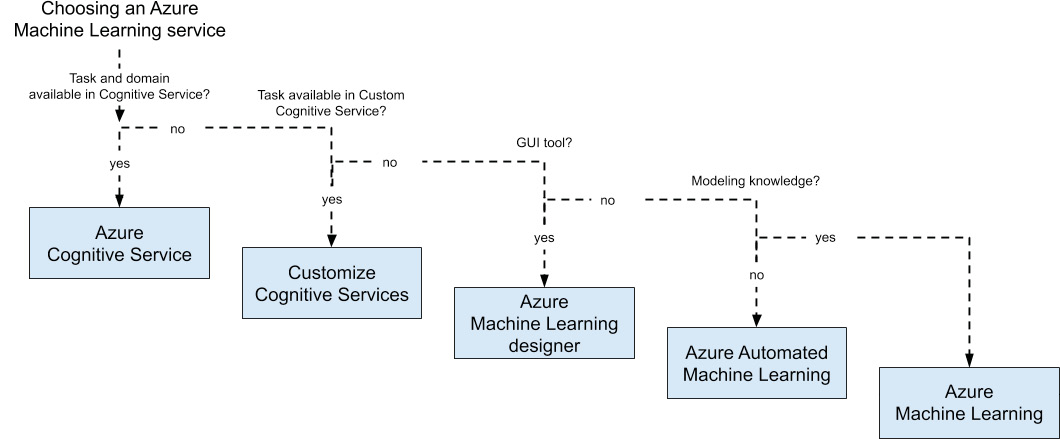
Figure 2.1: Guidelines for choosing an Azure Machine Learning service
According to the previous diagram, we are asking the following question: Can you consume a pre-trained model or do you have to build a custom model on your own?
This is the first and most important question to ask yourself. Does the ML problem you are trying to solve already exist, and did someone already solve it? If, for example, you want to detect faces in images, you could use an existing pre-trained model from the Cognitive Services API rather than building, training, and deploying this functionality on your own. As a rule of thumb, if you are working with vision, language (audio), or text, the chance is high that such a model already exists.
If you are building on top of an existing algorithm but for a specialized domain, you can use custom Cognitive Services to fine-tune a pre-trained model for your domain. If you want to detect faulty products on a production line using camera images, you can use Custom Vision for fine-tuning the Vision Cognitive Service API for the domain of your products. The same rule of thumb is true for custom Cognitive Services: if you are working with vision, language (audio), or text, the chance is high that such a model already exists and can be fine-tuned.
In both of the previous cases, you don't have to implement a full end-to-end ML pipeline on your own but rather can consume the service as a fully managed API or service. Likewise, when you are developing a completely new model, you have to manage your ML pipeline on your own. As a rule of thumb, if you are working with Internet-of-Things (IoT) sensor data (and you're doing more than statistical anomaly detection), you most likely need to build the prediction model on your own.
In Azure, you have various choices to build your end-to-end ML pipelines for training, optimizing, and deploying custom ML models:
- Build your own tools
- Use open source tools, such as Azure Databricks with ML Flow
- Use a GUI tool, such as Azure Machine Learning designer
- Use Azure Machine Learning
While we completely understand that it sounds like a lot of fun to build your custom solution on top of open source tools, or that it sounds easy to start with a GUI tool, we strongly advise you to first look into Azure Machine Learning. It is a really fantastic service that provides you with a common workspace for all your ML experiments, pipelines, compute resources, datasets, Conda environments, Docker images, and trained models, and a comprehensive SDK to interact with these resources. Hence, it is an excellent choice as your ML infrastructure service.
In Azure Machine Learning, you can decide between code-first usage through the Python SDK or a GUI tool Azure Machine Learning designer which is replacing the deprecated Azure ML Studio (classic) service. It's worth mentioning that the SDK is absolutely brilliant and offers more functionality than the GUI or the service accessed via the Azure portal. It also helps you a lot to automate and orchestrate your infrastructure. Hence, we strongly recommend you to build your ML infrastructure through the Azure Machine Learning SDK.
Note
If you are not a Python user, the Azure Machine Learning SDK is also available for the R language.
If you are still not convinced, let me give you a teaser of what you can do from within a Python script or Notebook with a few lines of code:
- Create and start an auto-scaling training cluster using GPUs.
- Submit multiple training experiments to the cluster and track their results.
- Store the best models in the model registry.
- Create an Azure Kubernetes cluster.
- Deploy the best model from your experiments to the Kubernetes cluster.
- Shut down and remove the GPU cluster.
- Implement a Continuous Integration/Continuous Deployment (CI/CD) pipeline that does all the preceding points.
If this sounds intriguing, we strongly recommend you to read the book and follow all discussed code examples in the following chapters, as we will perform everything mentioned in the preceding steps.
Choosing a compute target for Azure Machine Learning
In a typical ML project, you easily move between exploring data, labeling data, pre- processing data, exploring models, training models, optimizing models, and deploying a scoring service. Hence it probably means that you need different compute services for the different stages in your ML pipeline, for example, training a deep learning image recognition model has different requirements than preprocessing image data and scoring the model for single images.
Before we jump into compute targets, we want to clarify two important terms that we will use frequently in this book. When using the Azure Machine Learning SDK, we usually deal with two different compute targets which both run a Python interpreter:
- The authoring runtime
- The execution runtime
The authoring runtime is a lightweight Python runtime used to call the Azure Machine Learning SDK and orchestrate your infrastructure. You usually use the authoring environment to create compute resources, trigger training runs, build environments, and deploy models. No real compute is done in this environment, and hence lightweight Python interpreters such as Visual Studio Code running Python locally, an Azure Notebook, or a single Azure Machine Learning compute instance are commonly used.
The execution environment, on the other hand, is used to execute your ML training or scoring code. The Python interpreter does the real work; you likely need a beefy machine if you want to train a deep learning model. You will often use Azure Machine Learning training cluster (also called AML Compute), Azure Kubernetes Service (AKS), or Azure Container Instance (ACI) as execution environments.
In a typical workflow, you use an authoring environment to create a compute cluster (the execution environment) through the Azure Machine Learning SDK, and then submit the training script to this cluster again using the Azure Machine Learning SDK. Here is a tiny example:
- First, we create a cluster and deploy an ML training script to that cluster. This is the code we would run in the authoring environment:
from azureml.core.compute import ComputeTarget, AmlCompute
from azureml.core.compute_target import ComputeTargetException
from azureml.train.estimator import Estimator
# Create the cluster
config = AmlCompute.provisioning_configuration(
vm_size='STANDARD_D2_V2', max_nodes=4)
cluster = ComputeTarget.create(ws, "cluster", config)
cluster.wait_for_completion(show_output=True)
# Submit the training script to the cluster
estimator = Estimator(
compute_target=cluster, entry_script='train.py',
conda_packages=['tensorflow'])
run = experiment.submit(estimator)
run.wait_for_completion(show_output=True)
As you can see in the preceding code, we create AmlCompute cluster with 4 nodes. Then we submit an experiment to this cluster, which is an abstraction of an environment and a training script, train.py. Under the hood, Azure Machine Learning will do all the work for us to create the cluster, schedule the script and return the results.
- On the execution environment, the Python interpreter will now run the train.py script. This is how the script would look and what work would be done in the execution environment. First, we pre-process the training data and convert labels to one-hot encoded feature vectors:
import keras
# Normalize training data
x_train = x_train.astype('float32')
x_test = x_test.astype('float32')
x_train /= 255
x_test /= 255
# Convert class vectors to binary class matrices.
y_train = keras.utils.to_categorical(y_train, num_classes)
y_test = keras.utils.to_categorical(y_test, num_classes)
- Next, we build a simple Convolutional Neural Network (CNN) architecture, using a two-dimensional convolution with pooling, a fully connected hidden layer, and softmax output (we will discuss similar architectures in more detail in Chapter 8, Training deep neural networks on Azure:
from keras.models import Sequential
from keras.layers import Dense, Dropout, Activation, Flatten
from keras.layers import Conv2D, MaxPooling2D
model = Sequential()
model.add(Conv2D(32, (3, 3), input_shape=x_train.shape[1:]))
model.add(Activation('relu'))
model.add(MaxPooling2D(pool_size=(2, 2)))
model.add(Flatten())
model.add(Dense(128))
model.add(Activation('relu'))
model.add(Dense(num_classes))
model.add(Activation('softmax'))
- Next, we define an optimizer and a learning rate, and compile the Keras model:
# initiate RMSprop optimizer
opt = keras.optimizers.rmsprop(lr=0.0001, decay=1e-6)
model.compile(loss='categorical_crossentropy',
optimizer=opt,
metrics=['accuracy'])
- Finally, we can train and evaluate the model:
model.fit(x_train, y_train, batch_size=batch_size, epochs=epochs, validation_data=(x_test, y_test), shuffle=True)
# Score trained model
scores = model.evaluate(x_test, y_test) print('Test loss:', scores[0])
In the preceding code, we build a simple Keras CNN and fit it using the RMSProp optimizer. Here is where all the work is done regarding the training of the ML model – in the execution environment.
Note
It's worth noting that you can train your models on your own (such as by using PySpark in Azure Databricks) in the authoring runtime and use the Azure Machine Learning only to track experiments and models.
If you are working in Azure, popular choices for compute are the following:
- Authoring runtime:
- Experimentation: Azure Notebooks (example, with DSVM or shared compute)
- Training: An Azure Machine Learning compute instance
- Execution runtime:
- Training and optimization: An Azure Machine Learning training cluster
- Deployment: Azure Kubernetes Service
As you can see, picking the right compute service is not that simple because it depends on the current task you are performing. You should always try to find the right trade-off between flexibility and costs. This overview should help you to pick the correct service for either running your authoring or execution environment for training custom ML model using Azure Machine Learning as your infrastructure service. In the next section, we will take a look into how we can leverage pre-trained models as a service without worrying about any infrastructure or compute target.
Azure Cognitive Services and Custom Vision
If you are dealing with a well-defined general ML problem, such as classification, object or face detection in computer vision, Optical Character Recognition (OCR) and handwriting recognition, speech-to-text and text-to-speech, translation, spell-checking, key word and entity extraction, or sentiment analysis, the chances are high that these services have already been implemented and battle-tested in Azure. In a lot of cases, it greatly saves you time, resources, and effort by reusing these services instead of training similar models from scratch.
If your problem space is very general—such as detecting and matching faces from a camera image to an ID image—or detecting adult content in user-uploaded media, then you can look into Cognitive Services. The Cognitive Services website features demos for almost all the APIs and you can go and try them out for your use case.
If your domain is very specific but uses one of the previously discussed algorithms, it is very likely that you can use a custom Cognitive Service, that is, a pre-trained Cognitive Service model fine-tuned for your customized domain. This works very well in general for image classification and object detection, for example, for detecting manufacturing errors and automated quality control. Using such a customized model is a good trade-off between costs, resources, and effort. Due to fine-tuning, these models usually result in a fairly good performance with a low number of training samples, which is optimal for a small Proof of Concept (PoC).
Azure Cognitive Services
Cognitive Services is a collection of APIs for pre-trained ML models divided into six categories: Vision, Speech, Knowledge, Search, Language, and Anomaly Detection. They implement well-defined common problems in these categories, such as image classification, speech-to-text, anomaly detection, and many more. Cognitive Service models can be consumed using a REST API from any programming language.
In general, it is a best practice to not reinvent the wheel and hence to reuse functionality that is already available. It will most likely be more efficient to use the Face Detection API from the Azure Cognitive Services than to build a complete and continuous end-to-end ML pipeline and train the same model from scratch. While it is a lot easier to use the Cognitive Services API instead, your application requires an internet connection to reach the API.
The following is a simple example for calling the Cognitive Services API for computer vision. We will use the Analyze Image API to extract categories, tags, and description from the image:
import requests
def cs_vision_analyze(img_url, key, features=['Tags'], ...):
endpoint = 'https://%s.api.cognitive.microsoft.com' % region
baseurl = '%s/vision/v1.0/analyze' % endpoint
headers = {'Content-Type': 'application/json',
'Ocp-Apim-Subscription-Key': key}
params = {'visualFeatures': ','.join(features), 'language': lang}
payload = {'url': img_url}
r = requests.post(baseurl, json=payload, params=params, headers=headers)
return r.json()
url = 'https://..Tour_Eiffel_Wikimedia_Commons.jpg'
key = '<insert subscription key>'
features = ['Categories', 'Tags', 'Description']
res = cs_vision_analyze(url, key, features=features)
print(res)
As you can see in the preceding code example, using Cognitive Services boils down to sending an HTTP request. In Python, this is straightforward using the fantastic requests library. The response body contains standard JSON and encodes the results of the Cognitive Service API. The resulting JSON output from the API will have the following structure:
{
"categories": [...],
"tags": [...],
"description"" {...},
"requestId": "...",
"metadata":
{
"width": 288,
"height": 480,
"format": "Jpeg"
}
}
The categories key contains object categories and derived classifications, such as a landmark detection result including a confidence score:
"categories":
[
{
"name": "building_",
"score": 0.9453125,
"detail":
{
"landmarks":
[
{
"name": "Eiffel Tower",
"confidence": 0.99992179870605469
}
]
}
}
]
The tags key shows you multiple tags for the image with a confidence score that is relevant for the whole image:
"tags": [
{
"name": "outdoor",
"confidence": 0.99838995933532715
},
{
"name": "tower",
"confidence": 0.63238395233132431
}, ...
]
Finally, the description tag gives you more tags and an auto-generated image caption—isn't that amazing?
"description":
{
"tags":
[
"outdoor", "building", "tower", ...
],
"captions":
[
{
"text": "a large clock tower in the background with Eiffel Tower in the background",
"confidence": 0.74846089195278742
}
]
}
The result of the Cognitive Services computer vision API is just one example of how this service can be used. We requested the image features of categories, tags, and description from the API, which are returned as keys of the JSON object. Each of the category and tag predictions returns the top results in combination with a confidence value. Some categories might trigger other detection models, such as faces, handwritten text recognition, and OCR. From the preceding example, you can see that it would be straightforward to automatically add image captions to your product images in a retail application using the following code:
for url in product_image_urls:
res = cs_vision_analyze(url, key, features=['Description'])
caption = res['description']['captions'][0]['text']
print (caption)
You can see that this is the fastest way to implement/use a scalable deep learning-based image analysis service, such as creating a caption for an image. It takes you literally no more than five minutes to integrate this functionality into your own application. However, you also see that you can only use the functionalities (for example, labels in classification) that are provided by Microsoft. A good example is object detection or instance segmentation in medical images. There doesn't exist any out-of-the-box model for these use cases in the computer vision API of Cognitive Services. In this case, you can still benefit from Cognitive Services by customizing the model for your specific domain – this is exactly what Custom Vision does for common computer vision tasks.
Custom Vision—customizing the Cognitive Services API
Many developers find Cognitive Services pretty useful but limited in terms of the application domain. Here are two common examples showing this limitation:
- For a plastics manufacturer, the class labels offered by the object detection API doesn't cover all of their product categories.
- For a service dealing with transcribing medical records, many of the medical terms are not recognized or are transcribed incorrectly.
You can customize an increasing amount of ML services in Azure. The following customizable Cognitive Services are available at the time of writing this book:
- Custom Vision (classification and object detection)
- Customizable speech recognition and transcription
- Customizable voices for text-to-speech
- Customizable translation
- Custom intent and entity recognition in text
In these situations, you can still benefit from the ease of use, technology and service infrastructure behind Cognitive Services. Custom Cognitive Services let you train your models on top of existing Cognitive Service models by using transfer learning. For computer vision services, you are offered a nice UI to classify your images and tag your objects, and subsequently train the model using a state-of-the-art model and error metrics. Figure 2.2 shows what the training looks like in the Custom Vision service for object detection:

Figure 2.2: A custom Vision service for object detection
You can see in Figure 2.2 that training is as easy as clicking the Train button in the top right. You don't have to write any code or select an error metric to be optimized, it's all managed for you. In the screenshot you see the result of training, with three metrics that are automatically computed on a validation set. By moving the classification probability threshold on the top left, you can even shift the weight toward higher precision or higher recall depending on whether you want to avoid false positives or maximize true positives.
Once the model is trained and published, it can be consumed using a REST API like we did with Cognitive Services. The following code block is a sample snippet for Python using the requests library:
import requests
def cs_custom_vision(img_url, key, project_id, iteration_name, ...):
endpoint = 'https://%s.api.cognitive.microsoft.com' % region
url = '%s/customvision/v3.0/Prediction/%s/detect/iterations/%s/url'
% (endpoint, project_id, iteration_name)
headers = {'Content-Type': 'application/json', 'Prediction-Key': key}
payload = {'url': img_url}
r = requests.post(url, json=payload, headers=headers)
return r.json()
In the preceding code, we implement a function that looks very similar to the one we used with Cognitive Services. In fact, only the endpoints and requests parameter have changed. We can now call the function as before:
url = 'https://..Wood_Plate.jpg'
key = '<insert custom vision key>'
project_id = '00ae2d88-a767-4ff6-ba5f-33cdf4817c44'
iteration_name = 'Iteration2'
res = cs_custom_vision(url, key, project_id, iteration_name)
print(res)
The response is also a JSON object and now looks like the following:
{
"Id":"7796df8e-acbc-45fc-90b4-1b0c81b73639",
"Project":"00ae2d88-a767-4ff6-ba5f-33cdf4817c44",
"Iteration":"59ec199d-f3fb-443a-b708-4bca79e1b7f7",
"Created":"2019-03-20T16:47:31.322Z",
"Predictions":
[
{
"TagId":"d9cb3fa5-1ff3-4e98-8d47-2ef42d7fb373",
"TagName":"defect",
"Probability":1.0
},
{
"TagId":"9a8d63fb-b6ed-4462-bcff-77ff72084d99",
"TagName":"defect",
"Probability":0.1087869
}
]
}
The preceding response now contains a Predictions key with all the predictions and confidence values from Custom Vision. As you can see, the example looks very similar to the Cognitive Services example. However, we need to pass arguments to specify the project and published iteration of the trained model. Using this built-in serving API we save ourselves a lot of effort in implementing and operating a deployment infrastructure. However, if we want to use the trained model somewhere else (for example, in an iPhone or Android application, or in a Kubernetes cluster), we can export the model in many different formats (including Tensorflow, CoreML, ONNX, and so on).
Custom Cognitive Services are a fantastic way to efficiently test or showcase an ML model for a custom application domain when dealing with a well-defined ML problem. You can use either the GUI or API to interact with these services and consume the models through a managed API or export them to any device platform. Another benefit is that you don't need deep ML expertise to apply the transfer learning algorithm, and can simply use the predefined models and error metrics.
If you require full customization of the algorithms, models, and error metrics, you need to implement the model and ML pipeline on your own. In the following sections, we will discuss how this can be done using either GUI or code-first tools.
Azure Machine Learning with GUIs
Azure provides a few great tools with GUIs that can be used to directly train and deploy a data pipeline and ML model or reuse this functionality from a different service.
We will look into three different services: Azure Machine Learning designer, Azure Automated Machine Learning, and Power BI. From these three services, only Azure Machine Learning designer is a traditional GUI-based service with which you can customize data pipelines, transformations, feature extraction, and ML model validations in an interactive block-based environment.
The other two services are both based on the power of the Automated Machine Learning engine, which we can access either through the Automated Machine Learning GUI, through an SDK, or through Power Query transformations in Power BI. Automated Machine Learning provides fantastic capabilities to create powerful ML models using zero code. Let's take a look at the individual services, how they are used, and how they compare to each other.
Azure Machine Learning designer
Azure Machine Learning designer is replacing the deprecated yet widely adopted Azure ML Studio (classic) service to build, train, optimize, and deploy ML models using a GUI. It provides a robust and large amount of features, algorithms, and extensions through R and Python support. It's a fantastic no-code environment in which to build complex ML models for clustering, regression, classification, anomaly detection, and recommendation models as well as data, statistical, and text analysis.
The main interface in Azure Machine Learning designer lets you build ML models by connecting functional blocks to the graph of operations. Figure 2.3 shows an overview of the interface. It's easy to get started, pull in functional blocks from the left to read in data, preprocess data, perform feature selection, or use an ML algorithm for model training:

Figure 2.3: An overview of the main interface in Azure Machine Learning designer
In Figure 2.3, we can see the default view when opening a project. Once we put all blocks in place and connect them using the block connections, we can press SUBMIT to evaluate the graph of operations. This will spin compute resources for you and train the model for you – you only have to specify your compute instances.
Azure Machine Learning designer lets you easily import data from many different sources, and many from within Azure. Loading a CSV file from Blob Storage is just a click away. It also provides many powerful conversions for data formats and data types, normalization, and cleaning blocks.
As more and more functional block modules get added to your workspace, you can create complex data preprocessing, model training, and validation pipelines. Figure 2.4 shows a typical pipeline for a regression model using a Linear Regression block. First we read the data, clean it, and split it into training and testing sets. We use the training set to train the regression model and the testing data score and evaluate it.

Figure 2.4: A pipeline for Automobile Price Prediction
As you can see in Figure 2.4, while it is nice to structure your data flow in functional blocks, the whole workspace can get quite convoluted and hard to reason with. You can also extend the functionality of Azure Machine Learning designer by using custom code blocks for Python or R. We actually used two Rscript blocks in the preceding data flow. This is very convenient as we can now build reusable blocks of abstracted functionality.
In each Python code block, we define a function that takes up to two Pandas DataFrames as inputs and can output the transformed dataset. This is the skeleton of the Python code block function where we need to define the transformation code:
# imports up here can be used to
import pandas as pd
# The entry point function can contain up to two input arguments:
# Param<dataframe1>: a pandas.DataFrame
# Param<dataframe2>: a pandas.DataFrame
def azureml_main(df_1 = None, df_2 = None):
# Return value must be of a sequence of pandas.DataFrame
return df_1,
One of the reasons why Azure Machine Learning designer is very popular lies in its deployment capabilities. If you have created a data pipeline and trained a model, you can save the trained model within your Azure Machine Learning workspace. Now, within a few clicks you can create a web service using this model to either retrain the model with new data or deploy a scoring service. The user input is defined through the very same data import block that we used previously for the training data. We then connect the user input with the trained model, score the model, and return the output to the web service. With another click you can deploy the pipeline to production using a web service plan. It's literally 5 minutes of work and a couple of clicks to deploy a trained model, which is absolutely convenient.
Azure Machine Learning designer is a great tool if you want to get started quickly building complex workflows and preconfigured ML models in a GUI environment and deploy them as services to production. Despite being used by many companies, I don't think it is the best tool to implement ML models in Azure for complex end-to-end workflows. The models and blocks are too difficult to use properly for people with no coding or ML experience, and not flexible enough for those people with experience. Therefore, it sits in a difficult spot and is often misused by users who don't know exactly what they are doing.
However, not knowing about ML shouldn't stop users from training ML models using the right tools. I just think there are better tools that fit this audience – and one of those is definitely Automated Machine Learning, which provides a better level of abstraction to non-experienced users. Let's take a look!
Azure Automated Machine Learning
Users that have no experience with training ML models should not have to choose, parameterize, or configure algorithms for training. At the same time, everyone should be given the possibility to create a prediction model for a conforming dataset. In the democratization of AI we aim to give every user that can use a spreadsheet application the possibility to train ML models on a specified region of data in the spreadsheet. But how should this be done if a user has no or limited knowledge about ML?
Azure Automated Machine Learning to the rescue! Azure Automated Machine Learning is a no-code tool that lets you specify a dataset, a target column, and ML tasks to train an ML model for you. That's what we think is a great abstraction for a user who just wants to fit training data to a target variable. Figure 2.5 shows the last step in the Automated Machine Learning interface, where the user needs to choose the ML task to be solved for the specified data:

Figure 2.5: Creating an Automated Machine Learning run
As we see in Figure 2.5, Automated Machine Learning currently supports classification, regression, and time series forecasting tasks. Together with the informative explanations for each task, this is something we can put into the hands of ordinary Excel users or help ML engineers to quickly build and deploy a great baseline model. We will see this in much more detail in Chapter 10, Distributed machine learning on Azure.
However, to get you excited already, you can see in Figure 2.6, some additional output that you get in Automated Machine Learning for each tested and optimized model. Automated Machine Learning gives you access to all training runs, all trained models and their performances, and useful metrics and insights, such as the ROC curve, the gain curve, and a confusion matrix (the latter in the case of a classification task):

Figure 2.6: Additional output for each tested and optimized model using Automated Machine Learning
Note
Automated Machine Learning is also provided through the Azure Machine Learning SDK in Python. There you have the same functionality available directly from your authoring environment.
Automated Machine Learning is a fantastic milestone in providing a true ML-as-a-Service platform with a great abstraction for non-experienced and highly skilled users. This service will power the AI capabilities in tomorrow's products. What if automated training of ML models would be available as a single button in Excel, such as a single button to transform a given data range using Automated Machine Learning? While this sounds really cool, it is already reality in the Power Query transformation view of Power BI – the same thing that also powers Excel's data transformation capabilities. We will see what this looks like in action in the following section.
Microsoft Power BI
Microsoft Power BI is a fantastic self-service Business Intelligence (BI) tool that can connect to multiple data sources, load, transform, and join data there, and create custom visualization and insights. It looks and feels just like another Microsoft Office tool, similar to using Excel or PowerPoint. This makes it a self-service BI tool as it is very easy to use, fast, and extremely flexible.
Power BI or actually the Power Query editor of Power BI Service premium—the Power BI online service—has a very similar Automated Machine Learning interface built in as we just saw in the previous section. In fact, they are based on the same Automated Machine Learning engine that can be now configured through multiple services and the Automated Machine Learning package of the Azure Machine Learning SDK. This gives us access to all of the capabilities of Automated Machine Learning directly within Power BI for data transformations based on classification or regression tasks.
Figure 2.7 shows an overview of the Automated Machine Learning view in Power BI after selecting the Add a machine learning model action in the entities view. At the time of writing, this feature is only available as a preview in the Power BI premium online service:

Figure 2.7: Adding a machine learning model using Power BI premium online service
While I understand that you won't start training your models in Power BI using Automated Machine Learning right now, it is important to know what is currently possible and what the trends are for the future. And one thing is for sure: the democratization of AI and ML for ordinary office users is advancing fast.
If you found the GUI tools interesting, but you're aiming to create your custom ML code using your own frameworks and training code, then the best service to support you is Azure Machine Learning.
Azure Machine Learning workspace
Azure Machine Learning is the newest member of the ML service family in Azure. It was initially built as an umbrella to combine all other ML services under a single workspace, and hence is also often referred to as the Azure Machine Learning workspace. Currently, it provides, combines, and abstracts many important ML infrastructure services and functionality such as tracking experiment runs and outputs, a model registry, an environment and container registry based on Conda and Docker, a dataset registry, pipelines, compute and storage infrastructure, and much more.
Besides all of the infrastructure services, it also integrates Azure Automated Machine Learning, Azure Machine Learning designer (, and a data-labeling UI in a single workspace that can share the same infrastructure resources. It is, in fact, the ML service that you are looking for if you want to do something serious. In many cases, it does all you can ask for and more. In this section, we will look primarily at the ML infrastructure functionality.
While Azure Machine Learning provides a great new UI (which unfortunately is called Machihne Learning Studio and should not be confused with ML Studio classic), we will mostly use its functionality through the SDK instead. We will use the Python SDK in order to run the orchestration commands in an environment that we are already using for data visualization and exploration in a Jupyter notebook. Figure 2.8 shows the UI of Azure Machine Learning in the Azure portal:

Figure 2.8: The UI of Azure Machine Learning in the Azure portal
In Azure Machine Learning, we can easily manage different compute resources through the UI and SDK. Most of the time, we will use three types of compute resources throughout the different steps in the ML process:
- A compute instance for the authoring runtime and Jupyter: This is similar to a DSVM.
- An auto-scaling training cluster for the ML execution runtime during training: This is an Azure Machine Learning compute cluster.
- An inferencing cluster for the execution runtime during scoring: This is a managed Kubernetes cluster using Azure Kubernetes Service.
It's worth mentioning that each of those services can be created from Python using the SDK in less than 10 lines of code. The same is true for storage resources. We can use the ML SDK to manage Blob Storage containers in the ML workspace. This is very neat as it allows us to efficiently store outputs from training runs, artifacts such as trained models or training scripts, dataset snapshots, and much more.
Besides managing infrastructure, Azure Machine Learning can do a lot more for us. Most importantly, it can track our experiment runs and collect output files, artifacts, logs and custom metrics—such as training loss and more. This is by far the most powerful gateway drug into the Azure Machine Learning world. By simply annotating your existing ML project, you can track all your model scores – even during the training per epoch – stream your log output, collect all your output images, and collect and store the best model for each iteration or run. This is like magic, as with a few simple statements you won't lose a model for a particular training run ever again and you can keep track of training losses per run.
Datasets, environments, and models can be tracked and versioned in Azure Machine Learning using a few lines of code. This gives you the great benefit of being able to keep a predictable history of changes in your workspace. By doing this you can create repeatable experiments that always read the same data snapshot for a training run, use the same specified Conda environment, and update the trained model in the model history and artifact store. This brings you on track toward a CI/CD approach for your training pipeline.
Speaking of pipelines, Azure Machine Learning lets you abstract pieces of authoring code into pipelines. A pipeline could run data preparation jobs in parallel, create and start training clusters, and execute a training script on the cluster. You can see how everything guides you toward a repeatable, versioned, end-to-end pipeline for your training process. The greatest part, however, is that you don't have to go all-in to benefit from Azure Machine Learning.
Instead, you can start little by little, adding more and more useful things into the training process and then gradually move an existing or new ML project to the Azure Machine Learning workspace. We will take a brief look at the deployment capabilities of Azure Machine Learning in Chapter 12, Deploying and operating machine learning models.
Let's first explore how you can track experiments in Azure Machine Learning, before seeing how we can train models using our own frameworks and tools.
Organizing experiments and models in Azure Machine Learning
Azure Machine Learning provides you with all necessary infrastructure and service so that you as a user can concentrate on writing implementing your ML code. The easiest way to start using Azure Machine Learning and experience its capabilities is to start organizing your training experiments and runs in Azure Machine Learning. Through a few small changes, you can get real-time training insights, tracking performance per run, exported logs, exported outputs, and tracked and versioned trained models. The best part is that this works on any machine on any Python interpreter.
Figure 2.9 gives you a good reference for what you can expect. Simply getting all your experiment runs tracked and collected at a single place. The view is fully configurable, with metrics on the left, charts on the top, and the table on the bottom can be configured to your liking. And you get all this (and a lot more) by not changing anything to do with your current behavior by simply adding a few lines of code to your training script:

Figure 2.9: Organizing experiments and models in Azure Machine Learning
You can see in Figure 2.9, all your ML experiment runs tracked. You see automatic parameters such as training duration, when it started, what's the status, and how the run performed. Besides that, you can send custom metrics, tags, and a lot more. We will hopefully cover all possibilities throughout this book, but it's worth mentioning that you can get from no tracking in your code to the preceding screenshot in 10 minutes.
Note
By start using Azure Machine Learning you don't have to change anything in your current workflow, but simplify your life by using the tracking and logging features for experiment runs, metrics, logs, and models.
In Azure Machine Learning, your ML tasks are organized as experiments. Each experiment now can have multiple runs, and run output and metrics will be aggregated per experiment. Hence, if you are trying to implement a credit score prediction service, you can call your experiment credit-score-regression. Here is an example of how to add this information to your Python project using Azure Machine Learning. Please note that all experiments and runs that don't yet exist will automatically be created for you by default:
from azureml.core import Workspace, Experiment
# Configure workspace and experiment
ws = Workspace.from_config()
exp = Experiment(workspace=ws, name="credit-score-regression")
Next, you experiment with different features, models, and parameters and hence we want to track all these efforts to see which one was the best. This is called a run in Azure Machine Learning; to start a run and to track a few epochs of our training we add the following code to the project:
run = exp.start_logging()
for i in range(1, n_epochs):
loss = model.train_epoch(...)
run.log('loss (train)', loss)
The preceding code will now send all loss values per iteration to Azure Machine Learning and make these values available under the run. What is really amazing here is that we can either send the same metric with multiple values (as we just saw) or with a single value (in the next example). When sending multiple values like the training loss per epoch, Azure Machine Learning automatically creates a visualization for you – when sending a single value, it will show as a single value in the UI and use the value for the runs in the overview table and in aggregations. Per the default configuration, Azure Machine Learning will show you (for example) the max accuracy from all of your training runs in the overview if you add accuracy as a single metric in your run. The following snippet shows how to log a single metric:
# Save model scores
scores = model.evaluate(X_test, y_test, verbose=1)
run.log('accurcay (test)', scores[1])
This section is non-exhaustive; we won't cover everything Azure Machine Learning can track. However, it's essential to mention that you can track any additional outputs of your pipeline similar to how we collect metrics. The following snippet shows you how to track a trained model that has previously been saved to disk:
# Upload the best model
run.upload_file(model_name, model_path)
The file you want to save doesn't need to be a trained model, it can be anything that you want to save additionally with your run. Please note that the run can be configured to automatically upload your current training script, collect everything from an outputs folder, and stream everything from a logs folder to Azure Machine Learning. However, if the artifact is a model, you can also register this model in the model registry. Again, this is one simple command to track your trained model, which will be automatically connected with the run:
# Register the best model
run.register_model(model_name, model_path=model_name,
model_framework='TfKeras')
We don't necessarily need to specify additional information, such as the framework used for training the model. However, if we do so we will get many additional benefits including, model explanations, no-code deployments, and much more. We will see more of this in Chapter 7, Building ML models using Azure Machine Learning, and Chapter 12, Deploying and operating machine learning models, respectively.
In Figure 2.10, you see what you get when uploading and registering a model with your run: a central place where your models are linked with your experiment runs and their metrics. You won't ever lose a trained model again, nor run out of disk space to save trained models, nor have to remember which parameters were used to train this model or what the test performance was like during that run, among many other things:

Figure 2.10: Details of the uploaded and registered model in Azure Machine Learning
In the summary of a run, we can also find a button to directly deploy a model. With a few more clicks or just three lines of code in Python, we can get from a training run to a trained model, and on to a model deployed as a container service in the cloud. It allows you to turn a model into a scoring service in seconds. This is simply impressive and there are so many great benefits from this—imagine serving all your trained models effortlessly in a staging environment, being able to run end-to-end testing on your models, and using fully automated CI/CD pipelines.
Deployments through Azure Machine Learning
We hope you've got a good impression of what is possible with Azure Machine Learning, and we have covered only a tiny part of its functionality. However, the same is true for all other features – Azure Machine Learning solves your infrastructure problems and lets you focus on developing great data pipelines, feature extractors, and predictive models. This becomes extremely obvious when looking at the deployment features of Azure Machine Learning.
In Azure Machine Learning, we broadly differentiate between two types of deployments:
- The first type is deploying trained models as a web service for online scoring. We can automatically deploy models to Azure Kubernetes Services to benefit from containerization, auto-scaling, and blue-green deployments. There are many additional enterprise features, including authentication, multiple endpoints for A/B testing, telemetry collection, and much more.
- The second deployment type is for batch scoring large amounts of data through a service. In Azure Machine Learning, this works through the usage of pipelines. Your scoring script is parameterized and wrapped into an Azure Machine Learning Pipeline, which itself can be deployed as a web service. Calling this web service can now parameterize and trigger any task that you implement in the batch scoring script, such as reading files from Blob storage, scoring them, and writing the results back into a CSV file. Besides that, you can use the same deployment type to trigger the re-training of your models.
Besides standard deployment, you can always pull in the trained models from the model registry into any Python interpreter. This means you can download your model in any Python environment, be it PySpark on Azure Databricks or the Python runtime within Azure Data Explorer. This opens the door for many advanced custom deployment methods, where only the sky is the limit.
If you use standard ML models trained via sklearn and other supported frameworks, you can use no-code deployments to deploy the model directly from the model registry. This will automatically configure your environment, pull in the right Docker base image and Python packages, use a default scoring script, and deploy the model as a web service to an Azure Container Instance. This is a fantastic feature for integration and end-to-end testing, as well as for staging and QA environments. Again, this might be something you could implement yourself given enough time, but it is really convenient to use straight out of the box.
Another great point to mention is that Azure allows you to deploy multiple models to the same endpoint on Azure Kubernetes Service. For each endpoint, you can configure the amount of traffic in percentage that should be automatically routed there. On top of this – as for all deployed services – we get automated telemetry data and monitoring out of the box. The amazing part is that all this works with a couple of lines of Python code through your authoring environment. We will see this in great depth in Chapter 12, Deploying and operating machine learning models.
Azure Machine Learning can do a lot more besides tracking experiment metrics and models, and deploying these models to Kubernetes. However, this should simply give you an understanding of what can be done with minimal effort, 30 minutes of your precious time, and an existing training pipeline. You also saw that there was no restriction in any way toward which frameworks, models, or functionalities you used; it will work in a straightforward way if you use Python (or R).
Summary
In this chapter, we learned the differences between multiple ML and AI services in Azure. You can now easily navigate through various Azure services and know which ML task requires which service. If your task and data is available for Cognitive Services, then it is very convenient to simply use the Cognitive Services API for prediction. This is the case for common computer vision tasks, such as object detection of common objects, image captioning and tagging, face detection, handwritten text recognition, landmark detection, and many other text and language tasks.
If you need to build custom models for data from custom domains, you can choose to pick a tool with a GUI such as Azure Machine Learning designer. However, if you don't know how to select and configure a good custom ML model, Automated Machine Learning would be a better choice for you.
Finally, if you want to create your own custom model, your best choice is the Azure Machine Learning. It is a great tool that enables you to build fully automated end-to-end ML pipelines and deployments using your own frameworks and environments. You learned that orchestrating all infrastructure automation is done through the authoring environment, which will automatically schedule your training runs on the execution runtime – this could, for example, be an auto-scaling GPU cluster.
Azure Machine Learning is also the service that we use throughout this book to help you implement such a pipeline. In the next chapter, we will take a look at how to set up and prepare your Azure Machine Learning workspace and master data exploration in Azure using embeddings and data visualizations.