
10
Ethereum in Practice
This chapter introduces the Ethereum development environment. Several examples will be presented in this chapter to complement the theoretical concepts provided in the previous chapter.
We will begin by considering the practical payment process in Ethereum, and some recent and upcoming innovations to the blockchain. We will then look at test nets, which can play a vital role in testing the smart contracts before deploying on the main net. Then, we will look at the private net option in Ethereum, which allows the creation of an independent private network. This private network can be used as a shared distributed ledger between participating entities and for the development and testing of smart contracts.
While there are other clients available for Ethereum, Geth is the leading client for Ethereum and the standard tool of choice, and as such, this chapter uses Geth for the examples. We will also use Remix IDE to write smart contracts and MetaMask to deploy contracts on a private network that we create.
Along the way, we consider the following topics:
- Ethereum payments
- Innovations in Ethereum
- Programming with Geth
- Setting up a development environment
- Introducing Remix IDE
- Interacting with the Ethereum blockchain with MetaMask
Ethereum payments
In this section, we will see how Ethereum works from a user’s point of view. For this purpose, we will present the most common use case of transferring funds—in our use case, from one user (Bashir) to another (Irshad). We will use two Ethereum clients, one for sending funds and the other for receiving. There are several steps involved in this process, as follows:
- First, either a user requests money by sending the request to the sender, or the sender decides to send money to the receiver. We can use any Ethereum wallet software. The request can be sent by sending the receiver’s Ethereum address to the sender.
For example, there are two users, Bashir and Irshad. If Irshad requests money from Bashir, then she can send a request to Bashir by using a QR code. Once Bashir receives this request, he will either scan the QR code or manually type in Irshad’s Ethereum address and send the Ether to Irshad’s address. This request is encoded as a QR code, shown in the following screenshot, that can be shared via email, text, or be made available for visual scanning or any other communication method:

Figure 10.1: QR code as shown in a blockchain wallet application
- Once Bashir receives this request, he will either scan this QR code or copy or type the Ethereum address in the Ethereum wallet software and initiate a transaction. Imagine Bashir wants to send funds to Irshad. The sender enters both the amount and the destination address in a wallet software to send the Ether to the receiver. Just before sending the Ether, the final step is to confirm the transaction.
The transaction flow works in fundamentally the same way in all wallet software, so any wallet software can be used. There are many different types of wallet software available online for the iOS, Android, and desktop operating systems.
- Once the request (transaction) for money to be sent is constructed in the wallet software, it is then broadcasted to the Ethereum network. The transaction is digitally signed by the sender as proof that they are the owner of the Ether.
- This transaction is then picked up by nodes called miners on the Ethereum network for verification and inclusion in the block. At this stage, the transaction is still unconfirmed.
- Once it is verified and included in the block, the Proof of Work (PoW) process starts.
- Once a miner finds the answer to the PoW problem by repeatedly hashing the block with a new nonce, this block is immediately broadcast to the rest of the nodes, which then verify the block and PoW.
- If all the checks pass, then this block is added to the blockchain, and miners are paid rewards accordingly.
- Finally, Irshad gets the Ether, which will be displayed in the wallet software in use.
On the blockchain, this transaction is identified by the following transaction hash: 0xc63dce6747e1640abd63ee63027c3352aed8cdb92b6a02ae25225666e171009e. This can be visualized on the block explorer at https://etherscan.io/tx/0xc63dce6747e1640abd63ee63027c3352aed8cdb92b6a02ae25225666e171009e
With this example, we complete our discussion on the most common usage of the Ethereum network: transferring Ether from one user to another.
Innovations in Ethereum
In this section we will cover some of the innovations in Ethereum. Ethereum is under constant development. Just like BIPs, we have Ethereum improvement proposals (EIPS) in Ethereum to suggest and implement improvements in Ethereum. You can track EIPs here: https://eips.ethereum.org. Now we will cover some important improvements.
Difficulty time bomb
In addition to timestamp difference-based difficulty adjustment, there is also another element that increases mining difficulty exponentially after every 100,000 blocks. This is the so-called difficulty time bomb, or ice age, introduced in the Ethereum network, which will make it very hard to mine on the Ethereum blockchain at some point in the future.
Once activated, over time, the difficulty bomb makes mining on Ethereum 1.x so prohibitively slow that it becomes infeasible, resulting in a so-called “ice age.” In other words, this mechanism exponentially increases the PoW mining difficulty to a level where block generation becomes impossible, thus forcing the miners to migrate to Ethereum’s Proof of Stake (PoS) system called Casper.
More information about Casper is available here: https://github.com/ethereum/research/blob/master/papers/casper-basics/casper_basics.pdf.
The London upgrade (https://ethereum.org/en/history/#london) introduced EIP-1559. The most recent upgrade is Paris (The Merge: https://ethereum.org/en/history/#paris), which we will discuss in more detail in Chapter 13, The Merge and Beyond.
EIP-1559
A way to mitigate high transaction fees to some extent is EIP 1559. However, note that EIP-1559 does not aim to reduce the gas fee; it just helps to better predict the fee, which can mean that users won’t end up overpaying, resulting in an overall reduction in fees paid over time.
EIP-1559 was implemented as part of the London upgrade. EIP-1559 enforces a base fee (per gas unit) that must be paid and aims to match supply and demand. This fee is burnt forever, which can decrease the Ether inflation rate. The base fee recalibrates with every block depending on the “target.” Blocks can expand in size by changing MaxGasLimit, and if the block is larger than the target, then the fee is higher, and lower otherwise. Users can also pay the miners a tip to prioritize their transactions in addition to the base fee.
With the increased block size, it might be possible to launch a DoS attack where the network could be flooded with successive large-size blocks. EIP-1559 makes gas fee calculation more predictable and improves user experience, which can result in users not overpaying too much.
Note that EIP-1559 is not a mechanism to reduce the transaction fee because a high transaction fee is a problem due to an inherent scalability problem, i.e., a fixed block size, and consequently a supply and demand mechanism. When the network is busy, a fixed block size results in users waiting for their transaction to be included in the block for indefinite periods of time.
Simple solutions do come to mind in resolving this issue, but they are not as simple as they may seem. If we can somehow enforce a set fee and strict consensus-driven universal transaction ordering along with flexible block sizes, then this problem can be solved. However, if there is no incentive for the miners left due to set fee restrictions, then perhaps miners will leave the blockchain.
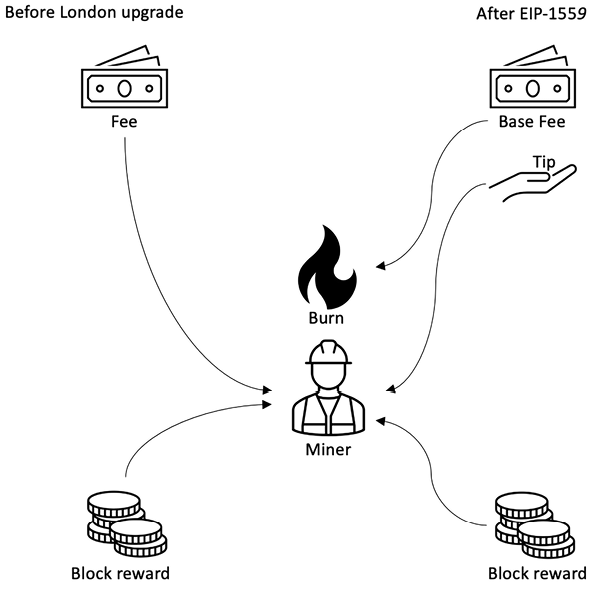
Figure 10.2: EIP 1559 mechanism, before and after the London upgrade
EIP-1559 works on the basis of three variables:
- baseFeePerGas: This is a new field introduced in the block structure. It represents the reserve price that must be paid for a transaction to be included in a block. With EIP-1559, blocks can increase or decrease in size as per the network demand until the block limit of 30 million gas.
The base fee is calculated based on previous blocks, which makes predicting gas fees more predictable for users. The calculation is based on a formula that compares the size of the previous block with the target size. The base fee increases or decreases based on how far the current block size is from the target, which is 15 million gas for each block. If a block is 100% full the base fee will increase by 12.5%, if the block is only 50% full the base fee will remain the same, and if the block is 0% full the base fee decreases by 12.5%. This means that the network achieves equilibrium at 50% capacity by calibrating fees according to the level of network utilization.
This exponential growth makes it economically non-viable for block size to remain high indefinitely. Wallets can calculate the base deterministically based on the information available in the previous blocks. Also, the base fee is burnt to thwart an attack where miners could collude to increase the base fee permanently.
- maxPriorityFeePerGas: This is a variable controlled by the users. Users set this and add it to the transactions. It represents the part of the transaction fee that goes to the miner. This is the miner tip that allows transactions to be executed quicker.
- maxFeePerGas: This is another user-settable material. It represents the maximum amount that a user is willing to pay for their transaction. It is inclusive of
baseFeePerGasandmaxPriorityFeePerGas. The difference betweenmaxFreePerGasandbaseFeePerGas+maxPriorityFeePerGasis refunded to the user.
In summary, EIP-1559 makes transaction fees more predictable, reduces delay in transaction inclusion and confirmation, improves user experience through an automated fee/bid mechanism, and adjusts fees based on network activity, i.e., demand and supply.
One way to think about this is that EIP-1559 replaces the volatile fee prices with volatility in block size, and over time, the block size smoothes out because the users who cannot pay for a miner tip to prioritize their block will drop off, and eventually the equilibrium of 50% block sizes will be maintained again.
In summary, before the London upgrade, the gas calculation was:
Gas units (limit) * Gas price per unit
After the London upgrade, the gas calculation works out as:
Gas units (limit) * (Base fee + Tip)
The merge and upcoming upgrades
Upcoming upgrades are the so-called “merge” and shard chains. The merge merged the current main net Ethereum on September 15, 2022 with the Beacon chain. The Beacon chain is a PoS chain and is currently live, providing the core chain for shards and the merged Ethereum chain.
Note that there is no Ethereum 2.0 now, as was originally planned. Eth2 or Ethereum 2.0 was a term used for a new distinct version of Ethereum 2.0, but it has now been replaced with The Merge. The Merge upgrade has merged both Ethereum1 and what was supposed to be Ethereum 2.0, and a single platform has emerged, called Just Ethereum, not Ethereum 2.0. A mental model to clarify this is that Eth1 is now the so-called execution layer where transaction execution occurs, and Eth2 is the consensus layer that is responsible for PoS. We will cover more about this in a separate chapter on Ethereum Merge and future upgrades in Chapter 13, The Merge and Beyond.
Next, we discuss the installation procedure and usage of some of the Ethereum clients.
Programming with Geth
First, we describe Geth and explore various operations that can be performed using this client.
Installing and configuring the Geth client
The installation procedure detailed at https://geth.ethereum.org/docs/getting-started/installing-geth describes the installation of Ethereum clients on macOS and Linux. Instructions for other operating systems are also available.
Once installation is complete, Geth can be launched simply by issuing the geth command at the terminal. It comes preconfigured with all the required parameters to connect to the live Ethereum network (main net):
$ geth
When the Ethereum client starts up, it starts to synchronize with the rest of the network. There are three types of synchronization mechanisms available, namely, snap, full, and light:
- Snap: This is the default mode that keeps the most recent 128 blocks’ states in memory, enabling immediate access to transactions in this range. The node in this mode also stores checkpoints between the initial sync block (a recent block) and the 128 most recent blocks that allow you to rebuild states. This mode starts by downloading the headers for a set of blocks. Once the headers are verified, the rest of the data, such as receipts and block bodies, is downloaded. It also downloads raw state data and builds state tries in parallel.
- Full: In this synchronization mode, the Geth client generates the latest state by executing and verifying all blocks since the genesis block. In this mode only the most recent 128 block states are stored. Older blocks are pruned regularly and represented with checkpoints that can be used to regenerate the state if required. There are also “full archive” nodes that keep all data since the genesis block, and old data is never deleted. Currently, the Ethereum blockchain size is too large to download and maintain without difficulty on entry-level hardware. Therefore, usually, SSDs are recommended for a full archive node so that disk latency cannot cause any processing delays.
- Light: This is the quickest mode and only downloads and stores the current state trie. In this mode, the client does not download any historic blocks and only processes newer blocks.
Synchronization mode is configurable on the Geth client via the flag:
--syncmode value
Here, the value can be either snap, full, or light, e.g., --syncmode light starts up the Geth client in light sync mode.
Creating a Geth new account
New accounts can be created via the command line using Geth or any other client’s command-line interface. Execute the following command to add a new account:
$ geth account new
This command will produce output similar to the following:
INFO [11-23|21:51:53.440] Maximum peer count                      ETH=50 LES=0 total=50
Your new account is locked with a password. Please give a password. Do not forget this password.
Password:
Repeat password:
Your new key was generated
Public address of the key:   0x26Ef606C24682D0C73933389d42D9023D1E29679
Path of the secret key file: /Users/imran/Library/Ethereum/keystore/UTC--2022-11-23T21-51-55.579586000Z--26ef606c24682d0c73933389d42d9023d1e29679
- You can share your public address with anyone. Others need it to interact with you.
- You must NEVER share the secret key with anyone! The key controls access to your funds!
- You must BACKUP your key file! Without the key, it's impossible to access account funds!
- You must REMEMBER your password! Without the password, it's impossible to decrypt the key!
The list of accounts can be displayed using the Geth client by issuing the following command:
$ geth account list
This command will produce output similar to the following:
INFO [11-23|21:53:12.201] Maximum peer count                       ETH=50 LES=0 total=50
INFO [11-23|21:53:12.204] Set global gas cap                       cap=50,000,000
Account #0: {bbe89c77e56c109d4ac91e79dbaf68e5b6955123} keystore:///Users/imran/Library/Ethereum/keystore/UTC--2022-05-20T16-57-01.035303000Z--bbe89c77e56c109d4ac91e79dbaf68e5b6955123
Account #1: {38f5b137676a960ad52bce7b35e597b23c3e3121} keystore:///Users/imran/Library/Ethereum/keystore/UTC--2022-05-20T17-07-51.380957000Z--38f5b137676a960ad52bce7b35e597b23c3e3121
Account #2: {26ef606c24682d0c73933389d42d9023d1e29679} keystore:///Users/imran/Library/Ethereum/keystore/UTC--2022-11-23T21-51-55.579586000Z--26ef606c24682d0c73933389d42d9023d1e29679INFO [01-18|17:59:25.595] Maximum peer count        ETH=50 LES=0
Note that you will see different addresses and directory paths when you run this on your computer.
Next, we’ll see different methods to interact with the blockchain.
Querying the blockchain using Geth
There are different methods available to query with the blockchain. First, in order to connect to the running instance of the client, either a local IPC or RPC API can be used.
There are three methods of interacting with the blockchain using Geth:
- Geth console
- Geth attach
- Geth JSON RPC
Geth console and Geth attach are used to interact with the blockchain using an REPL JavaScript environment. JSON RPC is a remote procedure call mechanism that makes use of JSON data format to encode its calls. In simpler terms, it is an RPC encoded in JSON.
Geth console
Geth can be started in console mode by running the following command:
$ geth console
This will start the interactive JavaScript environment in which JavaScript commands can be run to interact with the Ethereum blockchain, e.g., getting balance, block numbers, and many other commands.
Geth attach
When a Geth client is already running, the interactive JavaScript console can be invoked by attaching to that instance. This is possible by running the geth attach command.
The Geth JavaScript console can be used to perform various functions. For example, an account can be created by attaching Geth.
Geth can be attached with the running daemon, as shown in the following screenshot:
$ geth attach
This command will produce output similar to the following:
Welcome to the Geth JavaScript console!
instance: Geth/v1.10.14-stable/darwin-arm64/go1.17.5
coinbase: 0xbbe89c77e56c109d4ac91e79dbaf68e5b6955123
at block: 0 (Thu Jan 01 1970 01:00:00 GMT+0100 (BST))
 datadir: /Users/imran/Library/Ethereum
 modules: admin:1.0 debug:1.0 eth:1.0 ethash:1.0 miner:1.0 net:1.0 personal:1.0 rpc:1.0 txpool:1.0 web3:1.0
To exit, press ctrl-d or type exit
>
Once Geth is successfully attached to the running instance of the Ethereum client, it will display the command prompt, >, which provides an interactive command-line interface to interact with the Ethereum client using JavaScript notations.
For example, a new account can be added using the following command in the Geth console:
> personal.newAccount()
Password:
Repeat password:
"0x76bcb051e3cedfcc9c7ff0b25a57383dacbf833b"
Note that readers will see a different address.
The list of accounts can also be displayed similarly:
> eth.accounts
["0x07668e548be1e17f3dcfa2c4263a0f5f88aca402", "0xba94fb1f306e4d53587fcdcd7eab8109a2e183c4", "0x1df5ae40636d6a1a4f8db8a0c65addce5a992a14", "0x76bcb051e3cedfcc9c7ff0b25a57383dacbf833b"]
Geth JSON RPC API
JSON stands for JavaScript Object Notation. It is a lightweight and easy-to-understand text format used for data transmission and storage. A remote procedure call is a distributed systems concept. It is a mechanism used to invoke a procedure in a different computer. It appears as if a local procedure call is being made because there is a requirement to write code to handle remote interactions.
Further details on RPC and JSON can be found here: https://www.jsonrpc.org.
For this chapter, it is sufficient to know that the JSON-RPC API is used in Ethereum extensively to allow users and dApps to interact with the blockchain.
There are several methods available to interact with the blockchain. One is to use the Geth console, which makes use of the Web3 API to query the blockchain. The Web3 API makes use of the JSON-RPC API. Another method is to make JSON-RPC calls directly, without using the Web3 API. In this method, direct RPC calls can be made to the Geth client over HTTP. By default, Geth RPC listens at TCP port 8545.
Now, we will look at some examples involving the utilization of the JSON RPC API. We will use a common utility called curl (https://curl.haxx.se) for this purpose.
For these examples to work, first, the Geth client needs to be started up with appropriate flags. If there is an existing session of Geth running with other parameters, stop that instance and run the geth command, as shown here, which will start Geth with the RPC available. The user can also control which APIs are exposed:
$ geth --http --http.api "eth,net,web3,personal"
In this command, Geth is started up with the --rpc and --rpcapi flags, along with a list of APIs that are exposed:
- The
rpcflag enables the HTTP-RPC server. - The
rpcapiflag is used to define which APIs are made available over the HTTP-RPC interface. This includes a number of APIs such aseth,net,web3, andpersonal.
For each of the following examples, run the curl command in the terminal, as shown in each of the following examples.
The list of accounts can be obtained by issuing the following command:
$ curl -X POST --insecure -H "Content-Type: application/json" --data '{"jsonrpc":"2.0","method":"eth_accounts","params":[], "id":64}' http://localhost:8545
This will display the following JSON output, which lists all the Ethereum accounts owned by the client:
{"jsonrpc":"2.0","id":64,"result":["0x07668e548be1e17f3dcfa2c4263a0f5 f88aca402","0xba94fb1f306e4d53587fcdcd7eab8109a2e183c4","0x1df5ae4063 6d6a1a4f8db8a0c65addce5a992a14","0x76bcb051e3cedfcc9c7ff0b25a57383dac bf833b"]}
We can query if the network is up by using the command shown here:
$ curl -X POST --insecure -H "Content-Type: application/json" --data '{"jsonrpc":"2.0","method":"net_listening","params":[], "id":64}' http://localhost:8545
This will display the output as shown here with the result true, indicating that the network is up:
{"jsonrpc":"2.0","id":64,"result":true}
We can find the Geth client version using this command:
$ curl -X POST --insecure -H "Content-Type: application/json" --data '{"jsonrpc":"2.0","method":"web3_clientVersion","params":[], "id":64}' http://localhost:8545
This will display the Geth client version:
{"jsonrpc":"2.0","id":64,"result":"Geth/v1.9.9-stable-01744997/linux-amd64/go1.13.4"}
To check the latest synchronization status, we can use the following command:
$ curl -X POST --insecure -H "Content-Type: application/json" --data '{"jsonrpc":"2.0","method":"eth_syncing","params":[], "id":64}' http://localhost:8545
This will display the data pertaining to the synchronization status or return false:
{"jsonrpc":"2.0","id":64,"result":{"currentBlock":"0x1d202","highest lock":"0x8a61c8","knownStates":"0x23b9b","pulledStates":"0x2261a","startingBlock":"0xa5c5"}}
The coinbase address can be queried using:
$ curl -X POST --insecure -H "Content-Type: application/json" --data '{"jsonrpc":"2.0","method":"eth_coinbase","params":[], "id":64}' http://localhost:8545
This will display the output shown here, indicating the client coinbase address:
{"jsonrpc":"2.0","id":64,"result":"0x07668e548be1e17f3dcfa2c4263a0f5f88aca402"}
These are just a few examples of extremely rich APIs that are available in Ethereum’s Geth client.
More information and official documents regarding Geth RPC APIs are available at the following link: https://eth.wiki/json-rpc/API.
In this section, we have covered Geth JSON RPC APIs and seen some examples of how to query the blockchain via the RPC interface. With this, we have completed the introduction to Geth.
Setting up a development environment
A usual and sensible approach to develop and test Ethereum smart contracts is within a local private net or a simulated environment like Ganache. After all the relevant tests are successful on a public test net, the contracts can then be deployed to the public main net. There are, however, variations in this process.
Many developers opt to only develop and test contracts on a local simulated environment and then deploy them onto the public main net or their private/enterprise production blockchain networks. Developing first on a simulated environment and then deploying directly to a public network can lead to faster time to production, as setting up private networks may take longer compared to setting up a local development environment with a blockchain simulator.
There are new tools and frameworks available, like Truffle and Ganache, which make development and testing for Ethereum easier. We will look into these tools in more depth in Chapter 11, Tools, Languages, and Frameworks for Ethereum Developers, but first, we will use a manual approach whereby we develop a smart contract and deploy it manually via the command line to the private network. Frameworks and tools make development easier but hide most of the finer “under the hood” details that are useful for beginners to build a strong foundation of knowledge.
Let us start by connecting to a test network.
Connecting to test networks
The Ethereum Go client (https://geth.ethereum.org), Geth, can be connected to a test network using one of the following switches available with Geth. Geth can be issued with a command-line flag to connect to the desired network:
--goerli: Görli network: pre-configured proof-of-authority test network--rinkeby: Rinkeby network: pre-configured proof-of-authority test network--ropsten: Ropsten network: pre-configured proof-of-work test network--sepolia: Sepolia network: pre-configured proof-of-work test network
This command will connect to the Sepolia network:
$ geth --sepolia
A blockchain explorer for the sepolia test net is located at https://sepolia.etherscan.io and can be used to trace transactions and blocks on the Ethereum test network.
Now let us experiment with building a private network and then we will see how a contract can be deployed on this network using command-line tools.
Creating a private network
In this section, we will start up a private network and prepare it for use. We will use the following components, as specified in the previous chapter:
- Network ID: Network ID
786has been chosen for the example private network. - Genesis file: A custom genesis file that will be used is shown here:
{
"nonce": "0x0000000000000042",
"timestamp": "0x00",
"parentHash ": "0x0000000000000000000000000000000000000000000000000000000000000000",
"extraData": "0x00",
"gasLimit": "0x8000000",
"difficulty": "0x0400",
"mixhash": "0x0000000000000000000000000000000000000000000000000000000000000000",
"coinbase": "0x3333333333333333333333333333333333333333",
"alloc": {},
"config": {
"chainId": 786,
"homesteadBlock": 0,
"eip150Block": 0,
"eip155Block": 0,
"eip158Block": 0,
"byzantiumBlock": 0,
"constantinopleBlock": 0
    }
}
This file is saved as a text file with the JSON extension, for example,
privategenesis.json. Optionally, Ether can be pre-allocated by specifying the beneficiary’s addresses and the amount of Wei, but this is usually not necessary, as being on a private network, Ether can be mined very quickly.In order to pre-allocate an account with Ether, a section can be added to the genesis file, as shown here:
"alloc": {
        "0xcf61d213faa9acadbf0d110e1397caf20445c58f ":
            {"balance": "100000"},
}
- Data directory: In the following example, it is
~/etherprivate/.
In addition to the aforementioned three components, it is desirable that you disable node discovery so that other nodes on the internet cannot discover your private network and that it is secure. This can be achieved by running Geth with the flag --nodiscover, which disables the peer discovery mechanism. If other networks happen to have the same genesis file and network ID, they may connect to your private net, which can result in security issues. The chance of having the same network ID and genesis block is very low, but, nevertheless, disabling node discovery is a good practice, and is recommended.
Another network or node connecting to your private network can result in security breaches, information leakage, and other undesirable security incidents. However, note that private networks are usually run within enterprise environments and are protected by usual enterprise security practices such as firewalls.
Disabling peer discovery also allows us to define a list of static peers that we have on our network. This gives us the additional ability to control who can join our private network.
In order to configure this list, the node IDs of these nodes are added to a configuration file called static-nodes.json. This file is usually placed in the data directory of the Geth (Ethereum client) executable. This directory is also where the chaindata (database) and keystore files are saved. By default, the data directory is located at <user's home directory>/Library/Ethereum but can be configured by using the flag --datadir.
The filename should be static-nodes.json under the data directory. This is valuable in a private network because this way, the network is limited to only known nodes. An example of the static-nodes.json file is shown as follows:
[
"enode:// 44352ede5b9e792e437c1c0431c1578ce3676a87e1f588434aff1299d30325c233c8d426fc5 7a25380481c8a36fb3be2787375e932fb4885885f6452f6efa77f@xxx.xxx.xxx.xxx:TCP_PORT"
]
Here, xxx is the IP address and TCP_PORT can be any valid and available TCP port on the system. The long hex string is the node ID.
As we now understand the various aspects and components required to set up a private network, including the genesis file and other relevant configuration files, let’s now move on to setting up our own private network using Ethereum.
Before starting, it is useful to note that there are many configurations and settings options available with Geth, help can be retrieved by issuing the command:
$ geth help
Starting up the private network
The first step is to create a directory named etherprivate under the home directory of the user.
$ mkdir ~/etherprivate
This command will create the directory. Once the directory is created, place the privategenesis.json file shown earlier in it. At this point, stored under the home directory of the user, we have a directory named ~/etherprivate, which contains the genesis file called privategenesis.json. We are ready to start our network. The initial command to start the private network is shown as follows:
$geth init ~/etherprivate/privategenesis.json --datadir ~/etherprivate
This will produce an output similar to what is shown in the following:
INFO [05-21|13:35:40.359] Maximum peer count
ETH=50 LES=0 total=50
INFO [05-21|13:35:40.361] Set global gas cap                       cap=50,000,000
INFO [05-21|13:35:40.361] Allocated cache and file handles         database=/Users/imran/etherprivate/geth/chaindatacache=16.00MiB handles=16
INFO [05-21|13:35:40.433] Writing custom genesis block
INFO [05-21|13:35:40.433] Persisted trie from memory database      nodes=0 size=0.00B time="205.416µs" gcnodes=0 gcsize=0.00B gctime=0s livenodes=1 livesize=0.00B
INFO [05-21|13:35:40.434] Successfully wrote genesis state         database=chaindatahash=6650a0..b5c158
INFO [05-21|13:35:40.434] Allocated cache and file handles         database=/Users/imran/etherprivate/geth/lightchaindatacache=16.00MiB handles=16
INFO [05-21|13:35:40.491] Writing custom genesis block
INFO [05-21|13:35:40.491] Persisted trie from memory database      nodes=0 size=0.00B time="4.084µs"   gcnodes=0 gcsize=0.00B gctime=0s livenodes=1 livesize=0.00B
INFO [05-21|13:35:40.491] Successfully wrote genesis state         database=lightchaindatahash=6650a0..b5c158
If you see a Successfully wrote genesis state message, then all is well and you should see a directory structure as shown below:
├── geth
│   ├── LOCK
│   ├── chaindata
│   │   ├── 000001.log
│   │   ├── CURRENT
│   │   ├── LOCK
│   │   ├── LOG
│   │   └── MANIFEST-000000
│   ├── lightchaindata
│   │   ├── 000001.log
│   │   ├── CURRENT
│   │   ├── LOCK
│   │   ├── LOG
│   │   └── MANIFEST-000000
│   └── nodekey
├── keystore
└── privategenesis.json
This director structure contains chain data, logs, and a keystore. In order for Geth to start, the following command can be issued:
$ geth --datadir ~/etherprivate/ --networkid 786 --http --http.api 'web3,eth,net,debug,personal' --http.corsdomain '*'
This will produce many output messages as Geth starts up. An important part of the output to note is the following log lines:
INFO [05-21|17:12:54.789] IPC endpoint opened                      url=/Users/imran/etherprivate/communication
INFO [05-21|17:12:54.790] HTTP server started                      endpoint=127.0.0.1:8545 prefix= cors=* vhosts=localhost
These lines show the information about the Inter-Process Communication (IPC) endpoint, HTTP endpoint, and Etherbase (coinbase) account information. This information is useful for the examples provided later in this section.
IPC mechanisms are used to allow communication between different processes or threads running in an operating system locally on a computer. There are different IPC mechanisms including pipes and signals. A pipe is a bounded buffer between processes realized in practice by a file descriptor shared between processes. A signal is a method used to get a process’s attention. Geth uses pipes to enable communication between Geth instances.
Now Geth can be attached via IPC to the running Geth client on a private network using the following command:
$geth attach ~/etherprivate/geth.ipc
This command will open the interactive JavaScript console to run the private net session:
Welcome to the Geth JavaScript console!
instance: Geth/v1.10.14-stable/darwin-arm64/go1.17.5
coinbase: 0x6e94bdb15141491bc3b9de3a9cab9d87ae2af82f
at block: 188 (Sat May 21 2022 17:47:53 GMT+0100 (BST))
datadir: /Users/imran/etherprivate
 modules: admin:1.0 debug:1.0 eth:1.0 ethash:1.0 miner:1.0 net:1.0 personal:1.0 rpc:1.0 txpool:1.0 web3:1.0
To exit, press ctrl-d or type exit
You may notice that a warning message appears when Geth starts up:
WARNING: No etherbase set and no accounts found as default.
This message appears because there are no accounts currently available in the new test network and no account is set as etherbase to receive mining rewards. This issue can be addressed by creating a new account and setting that account as etherbase. This will also be required when mining is carried out on the test network.
This is shown in the following commands. Note that these commands are entered in the Geth JavaScript console. The following command creates a new account. In this context, the account will be created on the private network ID 786, as this is the network we created earlier:
>personal.newAccount("Password123")
"0x6e94bdb15141491bc3b9de3a9cab9d87ae2af82f"
Once the account is created, the next step is to set it as an etherbase/coinbase account so that the mining reward goes to this account. This can be achieved using the following command:
>miner.setEtherbase(personal.listAccounts[0])
true
Currently, the etherbase account has no balance, as can be seen by using the following command:
>eth.getBalance(eth.coinbase).toNumber();
0
In this section, we created a private network with a custom genesis file. Also, we created a new account in our private network. Now, before further exploration of different methods, let’s understand some basics of using the JavaScript console.
Experimenting with the Geth JavaScript console
In the JavaScript console, we can perform several operations. A general tip is that if two spaces and two tabs on the keyboard are pressed in a sequence, a complete list of the available objects will be displayed.
Furthermore, when a command is typed, it can be autocompleted by pressing Tab twice. If Tab is pressed twice, then the list of available methods is also displayed. In addition to the aforementioned command, in order to get a list of available methods of an object, just press Enter. An example is shown below, which shows a list of all the methods available for net:
> net
{
  listening: true,
peerCount: 0,
  version: "786",
getListening: function(callback),
getPeerCount: function(callback),
getVersion: function(callback)
}
There is also the eth object available, which has several methods. While there are several methods under this object, the most common is getBalance, which we can use to query the current balance of Ether. This is shown in the following example:
> eth.getBalance(eth.coinbase)
150000000000000000000
After mining, a significant amount can be seen here. Mining is extremely fast as it is a private network with no competition for solving the PoW, and also in the genesis file, the network difficulty has been set to quite low.
The preceding balance is shown in Wei. If we want to see the output in Ether, we can use the web3 object, as shown here:
> web3.fromWei(eth.getBalance(eth.coinbase), "ether")
150
There are a few other commands that can be used to query the private network. Some examples are shown as follows:
Get the current gas price:
> eth.gasPrice
1000000000
Get the latest block number:
> eth.blockNumber
30
debug can come in handy when debugging issues. A sample command is shown here; however, there are many other methods available. A list of these methods can be viewed by typing debug.
The following method will return the RLP of block 0:
> debug.getBlockRlp(0)
"0xf901f8f901f3a00000000000000000000000000000000000000000000000000000000000 000000a01dcc4de8dec75d7aab85b567b6ccd41ad312451b948a7413f0a142fd40d49347943 333333333333333333333333333333333333333a056e81f171bcc55a6ff8345e692c0f86e5b 48e01b996cadc001622fb5e363b421a056e81f171bcc55a6ff8345e692c0f86e5b48e01b996 cadc001622fb5e363b421a056e81f171bcc55a6ff8345e692c0f86e5b48e01b996cadc00162 2fb5e363b421b9010000000000000000000000000000000000000000000000000000000000000000000000 000000000000000000000000000000000000000000000000000000000000000000000000000000000000000000000000000000000000000000000000000000000000000000000000000000000000000000000000000000000000000000000000000000000000000000000000000000000000000000000000000000000000000000000000000000000000000000000000000000000000000000000000000000000000000000000000000000000000000000000000000000000000000000000000000000000000000000000000000000000000000000000000000000000000820400808408000000808000a00000000000000000000000000000000000000000000000000000000000000000880000000000000042c0c0"
The preceding output shows block 0 in RLP-encoded format.
Now we are ready to start mining on our private network.
Mining and sending transactions
Now that we have started up our private network, mining can start by simply issuing the following command. This command takes one parameter: the number of threads. In the following example, two threads will be allocated to the mining process by specifying 2 as an argument to the start function:
> miner.start(2)
Here we can also provide an integer parameter. For example, if we provide 1, it will only use one CPU core for mining, which helps with performance issues, if using all CPU resources is reducing system performance. An example command of using only one CPU is miner.start(1). On systems where there is only one CPU, issuing the preceding command will inevitably use only one CPU. However, on a multicore system, providing the number of cores that can be used for mining helps to address any performance concerns, as multiple mining threads can run in parallel on multiple cores.
After the preceding command is issued as preparation for mining, the DAG generation process starts, which produces an output similar to the one shown here:
INFO [05-21|17:17:54.075] Commit new mining work                   number=1 sealhash=d18bb2..2acb58 uncles=0 txs=0 gas=0 fees=0 elapsed=2.161ms
INFO [05-21|17:17:54.798] Generating DAG in progress               epoch=0 percentage=0 elapsed=335.435ms
INFO [05-21|17:17:55.135] Generating DAG in progress               epoch=0 percentage=1 elapsed=673.142ms
INFO [05-21|17:17:55.524] Generating DAG in progress               epoch=0 percentage=2 elapsed=1.062s
INFO [05-21|17:17:55.926] Generating DAG in progress               epoch=0 percentage=3 elapsed=1.463s
INFO [05-21|17:17:56.343] Generating DAG in progress               epoch=0 percentage=4 elapsed=1.880s
DAG stands for Directed Acyclic Graph. In the context of Ethereum’s Ethash PoW algorithm, DAG refers to Dagger, which is a memory-hard PoW algorithm based on moderately connected directed acyclic graphs. The aim of the Dagger algorithm is to provide an ASIC-resistant, memory-hard PoW algorithm. The Dagger algorithm works by generating a DAG of a few gigabytes every 30,000 blocks. This DAG serves as a resource for PoW where the PoW mechanism needs to choose subsets from the DAG, which is dependent on the nonce and the block header.
Once DAG generation is finished, the mining process starts and blocks are produced. Geth will produce an output similar to that shown in the following. It can be seen that blocks are being mined successfully with the mined potential block message:
INFO [05-21|17:19:21.154] Successfully sealed new block number=8 sealhash=c4e772..dff715 hash=83f1a1..2409db elapsed=16.735s
INFO [05-21|17:19:21.154]  block reached canonical chain number=1 hash=b0e469..54acc8
INFO [05-21|17:19:21.154]
block reached canonical chain number=1 hash=b0e469..54acc8
INFO [05-21|17:19:21.154]  mined potential block number=8 hash=83f1a1..2409db
INFO [05-21|17:19:21.155] Commit new mining work number=9 sealhash=07728b..be7c03 uncles=0 txs=0 gas=0 fees=0 elapsed=1.224ms
INFO [05-21|17:19:23.255] Successfully sealed new block number=9 sealhash=07728b..be7c03 hash=6ecea5..43c4bd elapsed=2.101s
INFO [05-21|17:19:23.255] block reached canonical chain number=2 hash=c1b8eb..8176e1
mined potential block number=8 hash=83f1a1..2409db
INFO [05-21|17:19:21.155] Commit new mining work number=9 sealhash=07728b..be7c03 uncles=0 txs=0 gas=0 fees=0 elapsed=1.224ms
INFO [05-21|17:19:23.255] Successfully sealed new block number=9 sealhash=07728b..be7c03 hash=6ecea5..43c4bd elapsed=2.101s
INFO [05-21|17:19:23.255] block reached canonical chain number=2 hash=c1b8eb..8176e1
Mining can be stopped using the following command:
> miner.stop()
null
Now let’s see how to create a new account and send a transaction on our private network.
- Create a new account. Note that
Password123is the password chosen as an example, but you can choose any:> personal.newAccount("Password123") "0x0f044cb4a0f924b6cfcf07c6c57945a0af75ec5b" - Unlock the account before sending transactions. We use
allow unsecure unlocking; otherwise, the accounts cannot be unlocked with HTTP access. If that is the case you will see an error message as follows:> personal.unlockAccount("0x0f044cb4a0f924b6cfcf07c6c57945a0af75ec5b") Unlock account 0x0f044cb4a0f924b6cfcf07c6c57945a0af75ec5b Passphrase: GoError: Error: account unlock with HTTP access is forbidden at web3.js:6365:37(47) at github.com/ethereum/go-ethereum/internal/jsre.MakeCallback.func1 (native) at <eval>:1:24(3)
To circumvent the error, restart Geth using the –allow-insecure-unlock flag:
$ geth --datadir ~/etherprivate/ --allow-insecure-unlock --networkid 786 --http --http.api 'web3,eth,net,debug,personal' --http.corsdomain '*'
Now we unlock both accounts that we created earlier with the personal.newAccount() command at the start of the private network we’re creating, and just before the unlockAccount() command on this page.
The first account we created at the start of our private network is 0x6e94bdb15141491bc3b9de3a9cab9d87ae2af82f and another one, 0x0f044cb4a0f924b6cfcf07c6c57945a0af75ec5b, is just at the start of this page:
> personal.listAccounts
["0x6e94bdb15141491bc3b9de3a9cab9d87ae2af82f", "0x0f044cb4a0f924b6cfcf07c6c57945a0af75ec5b"]
> personal.unlockAccount("0x6e94bdb15141491bc3b9de3a9cab9d87ae2af82f")
Unlock account 0x6e94bdb15141491bc3b9de3a9cab9d87ae2af82f
Passphrase:
true
> personal.unlockAccount("0x0f044cb4a0f924b6cfcf07c6c57945a0af75ec5b")
Unlock account 0x0f044cb4a0f924b6cfcf07c6c57945a0af75ec5b
Passphrase:
true
Now once we have these accounts unlocked we can issue some further commands to query the balances they hold. First, let’s check the balance of our account that we created earlier when we started our private network for the first time:
> web3.fromWei(eth.getBalance("0x6e94bdb15141491bc3b9de3a9cab9d87ae2af82f"), "ether")
150
As this account is also our coinbase account, which is the default account that receives the mining reward; we can also query the balance slightly differently by specifying eth.coinbase in the command, as shown here:
> web3.fromWei(eth.getBalance(eth.coinbase), "ether")
150
Finally, we check the balance of the other account that we created. As this has not received any mining reward, the balance is 0 as expected:
> web3.fromWei(eth.getBalance("0x0f044cb4a0f924b6cfcf07c6c57945a0af75ec5b"), "ether")
0
Now let’s try to send transactions from one account to another. In this example we’ll send Ether from account 0x6e94bdb15141491bc3b9de3a9cab9d87ae2af82f to 0x0f044cb4a0f924b6cfcf07c6c57945a0af75ec5b using the sendTransaction command, shown as follows.
First, we send a value of 100:
>eth.sendTransaction({ from: "0x6e94bdb15141491bc3b9de3a9cab9d87ae2af82f", to: "0x0f044cb4a0f924b6cfcf07c6c57945a0af75ec5b", value: 100 })
This command outputs the transaction hash, which is a unique identifier used to identify a specific transaction. The output is shown as follows:
"0xba427f7c5590530d75375e3670b856200c684141f9c787bf8e1bf622305880d9"
This command will transfer 100 Wei (the smallest Ether unit) to the target account. To transfer the value in Ether, 100 ETH in our example, we can use the command slightly differently and use web3.toWei, which will convert the value from Ether into Wei. To achieve this we issue the command as shown here:
>eth.sendTransaction({ from: "0x6e94bdb15141491bc3b9de3a9cab9d87ae2af82f", to: "0x0f044cb4a0f924b6cfcf07c6c57945a0af75ec5b", value: web3.toWei(100, "ether") })
This command outputs the transaction hash as shown here:
"0xd33390a61dc91cdeefdf51af302f13b731f94d042718f7749e169c0a7266ca80"
The preceding command makes use of web3.toWei, which takes two parameters, value, which is 100 in our example, and a string, Ether, which is the unit of value. This means that 100 ETH will be converted into its equivalent Wei and will be used in the sendTransaction command. The result of this command will be transferring 100 ETH from our source account to the target account. Also notice the log message in the logs in the other console/terminal window, from where we ran the Geth command to run our private network earlier at the start of the private network:
INFO [05-21|17:44:14.565] Submitted transaction hash=0xd33390a61dc91cdeefdf51af302f13b731f94d042718f7749e169c0a7266ca80 from=0x6E94BDb15141491bC3B9De3A9CaB9d87ae2af82f nonce=1 recipient=0x0F044cb4A0F924b6CfCF07c6c57945A0AF75Ec5b value=100,000,000,000,000,000,000
This message shows that the transaction has been submitted, but it needs to be mined first in order for the transaction to take effect. As we stopped mining earlier, for this transaction to go through we need to start mining again; otherwise, the transaction won’t be processed:
> miner.start()
null
Now check in the logs that the mining has started to work:
INFO [05-21|17:45:27.215]  mined potential block                  number=70 hash=d4eb33..b0ce2a
INFO [05-21|17:45:27.215] Commit new mining work                   number=71 sealhash=910916..cfad54 uncles=0 txs=0 gas=0     fees=0       elapsed="68.166µs"
INFO [05-21|17:45:27.374] Successfully sealed new block            number=71 sealhash=910916..cfad54 hash=04c1c2..8200b5 elapsed=159.180ms
INFO [05-21|17:45:27.374]  block reached canonical chain          number=64 hash=5e852c..204f33
INFO [05-21|17:45:27.374]  mined potential block                  number=71 hash=04c1c2..8200b5
INFO [05-21|17:45:27.374] Commit new mining work                   number=72 sealhash=3f2d41..8b73bc uncles=0 txs=0 gas=0     fees=0       elapsed="94.459µs"
INFO [05-21|17:45:27.502] Successfully sealed new block            number=72 sealhash=3f2d41..8b73bc hash=744a22..c3f5e0 elapsed=127.906ms
Note that the amount of funds has been transferred:
> web3.fromWei(eth.getBalance("0x0f044cb4a0f924b6cfcf07c6c57945a0af75ec5b"), "ether")
100.0000000000000001
> web3.fromWei(eth.getBalance("0x6e94bdb15141491bc3b9de3a9cab9d87ae2af82f"), "ether")
839.9999999999999999
Remember that as the mining progresses, you will see slightly different numbers and more Ether in the source account (coinbase) and the target account will now have 100 ETH, which we transferred.
It could be a bit cumbersome to type all these account IDs. Instead of typing these long account IDs, we can also use the listAccounts[] method, which takes an integer parameter to address the account, for example, 0, which represents the first account that we created.
Now let’s see an example of using the listAccounts[] method, as shown here:
> eth.sendTransaction({from: personal.listAccounts[0], to: personal.listAccounts[1], value: 100})
"0x479c9d07361bf60c97c45ee286c188d59953b60499ee62eb2033f98a7ab905b9"
We can also now query information about the transaction that we executed earlier. Remember how it returned a transaction hash? We can use that to find out details about the transaction:
eth.getTransactionReceipt("0x479c9d07361bf60c97c45ee286c188d59953b60499ee62eb2 033f98a7ab905b9")
This will produce the output shown as follows:
{
blockHash: "0xe90f08d4836e58689b59788d3f8f554f859bbc8b122b574d9493ddae778c7c6f",
blockNumber: 189,
contractAddress: null,
cumulativeGasUsed: 42000,
effectiveGasPrice: 1000000000,
  from: "0x6e94bdb15141491bc3b9de3a9cab9d87ae2af82f",
gasUsed: 21000,
  logs: [],
logsBloom: "0x00000000000000000000000000000000000000000000000000000000000 0000000000000000000000000000000000000000000000000000000000000000000000000 0000000000000000000000000000000000000000000000000000000000000000000000000 0000000000000000000000000000000000000000000000000000000000000000000000000 0000000000000000000000000000000000000000000000000000000000000000000000000 0000000000000000000000000000000000000000000000000000000000000000000000000 0000000000000000000000000000000000000000000000000000000000000000000000000 000000000000000",
  root: "0xd71daf69bdee5d1aaaa0ea1bedaa3019967b965b865a747169fa13124de7706b",
  to: "0x0f044cb4a0f924b6cfcf07c6c57945a0af75ec5b",
transactionHash: "0x479c9d07361bf60c97c45ee286c188d59953b60499ee62eb2033f98a7ab905b9",
transactionIndex: 1,
  type: "0x0"
}
If you see no transaction receipt, make sure mining is running, issue miner.start() to start mining. The block containing this transaction must have been mined in order for receipts to be produced.
Notice the root in the preceding output, the transaction root, which will be available in the block header as the Merkle root of the transaction trie. Similarly, we can query more information about the transaction using the getTransaction method:
> eth.getTransaction("0x479c9d07361bf60c97c45ee286c188d59953b60499ee62eb20 33f98a7ab905b9")
This will produce the output shown as follows:
{
blockHash: "0xe90f08d4836e58689b59788d3f8f554f859bbc8b122b574d9493ddae778c7c6f",
blockNumber: 189,
  from: "0x6e94bdb15141491bc3b9de3a9cab9d87ae2af82f",
  gas: 21000,
  gasPrice: 1000000000,
  hash: "0x479c9d07361bf60c97c45ee286c188d59953b60499ee62eb2033f98a7ab905b9",
  input: "0x",
  nonce: 3,
  r: "0x4b451415fe581c9ad4b7413f0b2a08128133ae35265f9683b402ceb2486b09b8",
  s: "0x524cb5ee0fa1496c7caf593f8a47cbbcf499987a26208e9657d75ad7de8a7371",
  to: "0x0f044cb4a0f924b6cfcf07c6c57945a0af75ec5b",
transactionIndex: 1,
  type: "0x0",
  v: "0x648",
  value: 100
}
In this section, we covered how to start mining on a private network and ran some transactions. We also saw how transactions can be created, balance can be queried, and we performed an Ether transfer transaction from one account to another. We also covered how the transaction results can be queried using a transaction receipt and other relevant methods available via RPC in the Geth client.
We’ve seen in the examples previously that there is a rich interface available with hundreds of methods to interact with the blockchain. While this console- and terminal-based mechanism is quite useful, it can become a bit difficult to manage and deploy smart contracts using the command-line console. For this, we need better alternatives, which we will discuss next.
Introducing Remix IDE
There are various Integrated Development Environments (IDEs) available for Solidity development. Most of the IDEs are available online and are presented via web interfaces. Remix (formerly Browser-Solidity) is the most commonly used IDE for building and debugging smart contracts. It is discussed here.
Remix is a web-based environment for the development and testing of contracts using Solidity. It is a feature-rich IDE that does not run on a live blockchain; in fact, it is a simulated environment in which contracts can be deployed, tested, and debugged. It is available at https://remix.ethereum.org.
An example interface is shown as follows:

Figure 10.3: Remix IDE
On the left-hand side, there is a column with different icons. These icons represent various plugins of the Remix IDE. When you run Remix for the first time, it won’t show any of the plugins. In order to add plugins to Remix IDE, you need to access the plugin manager to activate the plugins you need.
There are a number of plugins available, including but not limited to a Ganache provider, solidity static analysis, and a contract deployer, just to name a few; there are many others. They can be accessed by clicking on the plugin icon in the left bottom corner of the IDE.
Once activated, the plugins will appear in the leftmost column of the IDE, as shown in the following image. Again, note that this will only show the plugins that are activated, and other plugins or local plugins can be activated as required.
On the right-hand side, there is a code editor with syntax highlighting and code formatting, and on the left-hand side, there are a number of plugins available that can be used to deploy, debug, test, and interact with the contract.
Various features, such as transaction interaction, options to connect to the JavaScript VM, the configuration of an execution environment, a debugger, formal verification, and static analysis are available. They can be configured to connect to execution environments such as the JavaScript VM, injected Web3—where Mist, MetaMask, or a similar environment has provided the execution environment—or the Web3 provider, which allows connection to the locally running Ethereum client (for example, geth) via IPC or RPC over HTTP (a Web3 provider endpoint).
Remix also has a debugger plugin for EVM that is very powerful and can be used to perform detailed level tracing and analysis of the EVM bytecode. An example is shown here:

Figure 10.4: Remix IDE, debugging
The preceding screenshot shows different elements of the Remix IDE when DEBUGGER is running. The debugger has the source code decoded into EVM instructions. The user can step through the instructions one by one and examine what the source code does when executed.
On the right-hand side, the source code is shown. Below that is the output log, which shows informational messages and data related to compilation and the execution status, and transaction information of the transaction/contract.
In the debugger, the opcodes are displayed, along with memory, state, and stack information, which makes debugging easier and intuitive. This is a very useful feature and comes in handy, especially in complex code debugging.
In the next section, we’ll be using MetaMask, a browser extension that serves as a cryptocurrency wallet and an interface to blockchains and dApps.
Interacting with the Ethereum Blockchain with MetaMask
MetaMask allows interaction with the Ethereum blockchain via the Firefox and Chrome browsers. It injects a web3 object within the running website’s JavaScript context, which allows immediate interface capability for dApps. This injection allows dApps to interact directly with the blockchain.
Further information is available at https://github.com/MetaMask/metamask-plugin.
MetaMask also allows account management and records all transactions for these accounts. This acts as a verification method before any transaction is executed on the blockchain. The user is shown a secure interface to review the transaction for approval or rejection before it can reach the target blockchain.
It allows connectivity with various Ethereum networks. An interesting feature to note is that MetaMask can connect to any Ethereum blockchain via the custom RPC connection. It can connect to not only remote blockchains but also to locally running blockchains. All it needs is an RPC connection exposed by a node running on the blockchain. If it’s available, MetaMask can connect and will allow a web browser to connect to it via the web3 object. MetaMask can also be used to connect to a locally running test (or simulated) blockchain like Ganache and TestRPC.
Installing MetaMask
MetaMask runs as a plugin or add-on in the web browser. It is available for Chrome, Firefox, Opera, and Brave browsers. The key idea behind the development of MetaMask is to provide an interface with the Ethereum blockchain. It allows efficient account management and connectivity to the Ethereum blockchain without running the Ethereum node software locally. MetaMask allows connectivity to the Ethereum blockchain through the infrastructure available at Infura (https://infura.io). This allows users to interact with the blockchain without having to host any node locally.
Here, we’ll go over the installation process. We are using Chrome for this example; however, instructions are the same for Firefox and Brave:
- Browse to https://metamask.io/, where links to the relevant source are available to download the extension for your browser.
- Install the extension for the browser. It will install quickly, and if all goes well, you will see a message saying
Welcome to MetaMask. - Click on Get Started, and it will show two options, either to import an already existing wallet using the seed, or to create a new wallet. We will select Create a Wallet here.
- Next, create a Password.
- Optionally, set up a Secret Backup Phrase.
- Once everything has been completed, you will see a congratulatory message.
- After clicking on the All Done button, the MetaMask main view will open.
- After the setup is completed, you will see the main accounts view.
Once installed, the Ethereum provider API will be available in the browser context, which can be used to interact with the blockchain. MetaMask injects a global API into websites at window.ethereum. An example of the Ethereum API is shown here using the JavaScript console in Chrome:
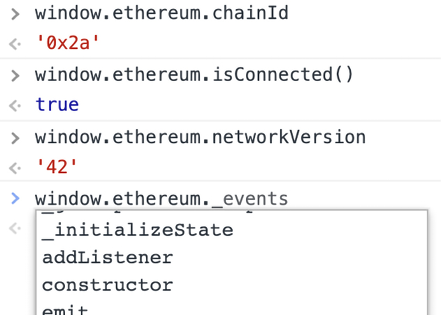
Figure 10.5: Ethereum object
MetaMask can connect to various networks. By default, it connects to the Ethereum main net. Other networks include, but are not limited to, the Sepolia test network, and the Goerli test network. In addition, it can connect to any local node via Localhost 8545, and to a custom RPC, which means that it can connect to any network as long as RPC connection information is available.
Now, let’s see how account management works in MetaMask.
Creating and funding an account with MetaMask
Let’s now create an account and fund it with some ETH, all using MetaMask. Note that we are connected to the Sepolia test network. Open MetaMask and ensure that it is connected to the Sepolia test network:
- Open the MetaMask extension and click on the circle in the top-right corner. The menu will open; click Create Account.
- Enter the new account name,
SepoliaTestAccount, and click on Create, which will immediately create a new account.Once created, we can fund the account with the following steps.
- Copy the account address to the clipboard.
- Go to https://sepolia-faucet.pk910.de and enter the
SepoliaTestAccountaddress. You will receive some ETH in your account.An alternative faucet can be found at https://sepolia-faucet.pk910.de/. If you don’t see any faucet working, then simply search for
sepolia testnet fauceton your favorite internet search engine.Now, notice in MetaMask that some ETH is available.
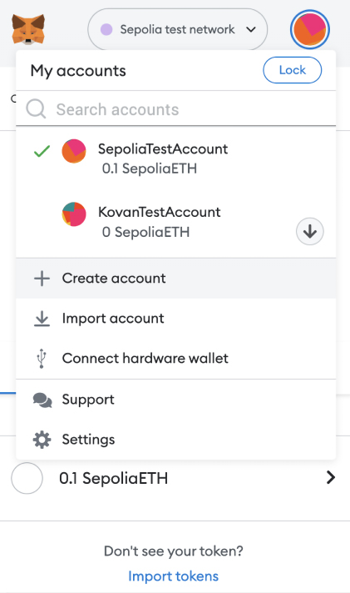
Figure 10.6: MetaMask My accounts menu
- Now create another account and transfer some ETH from
SepoliaTestAccountto the new account. You can do this by taking the following steps: - Click on the send icon.
- Select the target account from the Transfer between my accounts option.
- Press next.
- Click the EDIT option item in the top right-hand corner to edit the priority for the transaction, either low, medium, or high.
- Further click on Advanced options to change the gas limit (the gas limit is the maximum units of gas you are willing to use).
Units of gas are can be specified for “Max priority fee” and “Max fee”. Max priority fee (aka the “miner tip”) goes directly to miners and incentivizes them to prioritize your transaction. You’ll most often pay your max setting. Max fee is the most you’ll pay (base fee + priority fee). We usually don’t need to change any of the settings, but to control the transaction fee and transaction speed, these options are adjusted accordingly. The higher the miner tip, the greater the transaction speed because miners will pick it up because of higher transaction fees.
- Confirm the transaction.
- Now, notice that the Ether has been sent to the other account.
Also note the detailed logs and information pertaining to the transaction by clicking on the transaction. Detailed information can also be viewed in the relevant block explorer by clicking the View on block explorer option, which takes to this link to the transaction summary on etherscan: https://sepolia.etherscan.io/tx/0x96e3688cba95c68c2922453872a3fd1d98060b5884f74866f69bda1db8f610cd
As we now understand what MetaMask is, we can now delve deeper and see how the Remix IDE can deploy smart contracts through MetaMask.
Using MetaMask and Remix IDE to deploy a smart contract
As MetaMask injects a web3 object into the browser, we can use it with Remix IDE to deploy contracts to the blockchain. It is very easy to deploy new contracts using MetaMask and Remix. Remix IDE provides an interface where contracts can be written in solidity and then deployed onto the blockchain.
We will use Remix IDE and MetaMask to deploy a sample smart contract to the locally running private blockchain that we created earlier in the chapter. In the exercise, a simple contract that can perform various simple arithmetic calculations on the input parameter will be used. As we have not yet introduced Solidity, the aim here is to demonstrate the contract deployment and interaction process only.
More information on coding and Solidity will be provided later in Chapter 11, Tools, Languages, and Frameworks for Ethereum Developers, after which the following code will become easy to understand. Those of you who are already familiar with JavaScript or any other similar language such as the C language will find the code almost self-explanatory.
Now, let’s look at some examples of how MetaMask can be used in practice with the private net that we created earlier in this chapter.
Adding a custom network to MetaMask and connecting it with Remix IDE
First, ensure that you have MetaMask available as we set it up earlier. In this section, we will add our local private network in MetaMask and then interact with it using Remix IDE.
- Open the Google Chrome web browser, where MetaMask is installed. Select Localhost 8545, where the Geth instance of our private net is listening on:
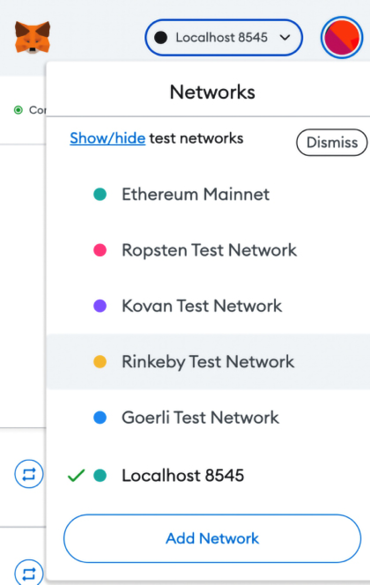
Figure 10.7: MetaMask network selection
- Navigate to Remix IDE for Ethereum smart contract development on your browser at https://remix.ethereum.org.
- Once on the website, notice the DEPLOY & RUN TRANSACTIONS option in the left-hand column. Choose Injected Web3 as the ENVIRONMENT, and a MetaMask window will open:
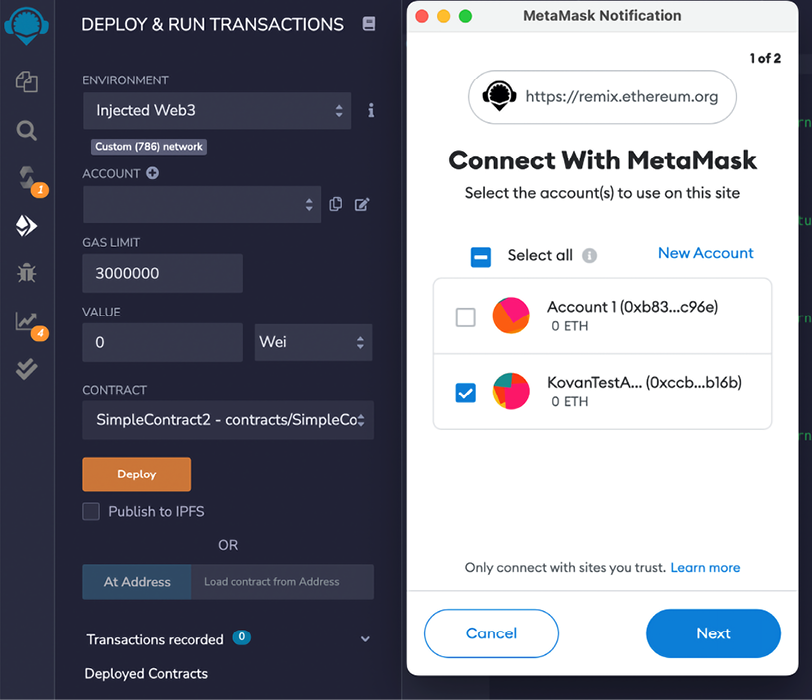
Figure 10.8: Remix IDE and interaction with MetaMask
Note that when Remix IDE is connected to MetaMask, it will show network information, such as Custom (786) network, and account information, as shown in the following screenshot.
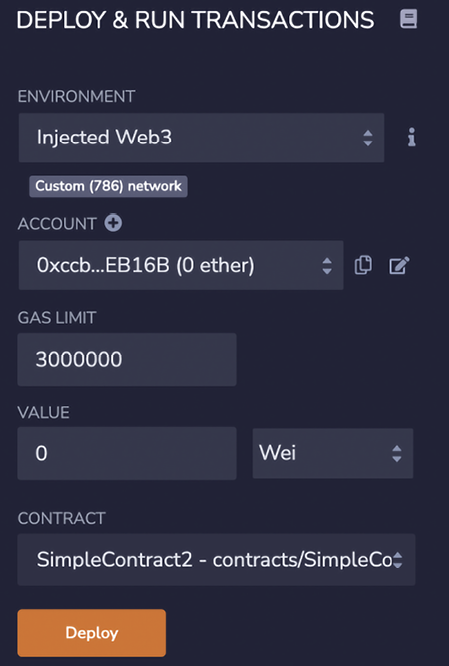
Figure 10.9: Network information and account information in Remix
In this section, we saw how Remix can connect to MetaMask using the injected Web3 environment. MetaMask can be connected to the main net or any other network (a local or test network) but from Remix’s point of view, as long as the injected Web3 object is available, it will connect to it.
In our example, as we are using a private network, we have connected to our private network through MetaMask, and Remix is connecting to MetaMask using the injected Web3 environment. Now even if we have this connectivity available, MetaMask does not know about the accounts that we have created in our private network. In order for MetaMask to operate on existing accounts, we need to import them from the existing keystore, in our case, the private network 786 keystore. We will see how this is done in the next section.
Importing accounts into MetaMask using keystore files
We can import existing Ethereum accounts into MetaMask by importing the keystore files generated by Geth as a result of creating accounts. To demonstrate how this works we will now import the accounts from our private network blockchain, named 786, into MetaMask.
In MetaMask, the Import Account option is available under the My Accounts menu, as shown in the following screenshot.
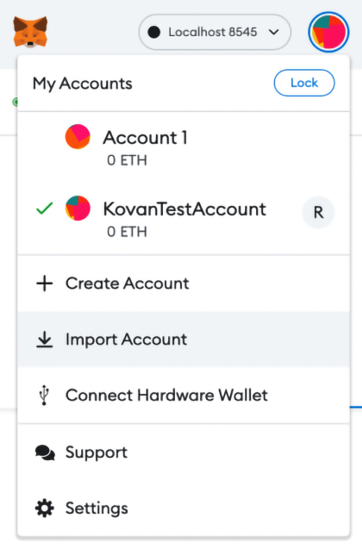
Figure 10.10: MetaMask Import Account option
Now let’s import the accounts. Remember we created two accounts earlier in our private network 786:
>eth.accounts
["0x6e94bdb15141491bc3b9de3a9cab9d87ae2af82f","0x0f044cb4a0f9 24b6cfcf07c6c57945a0af75ec5b"]
We can import these accounts into MetaMask using their associated keystore JSON files.
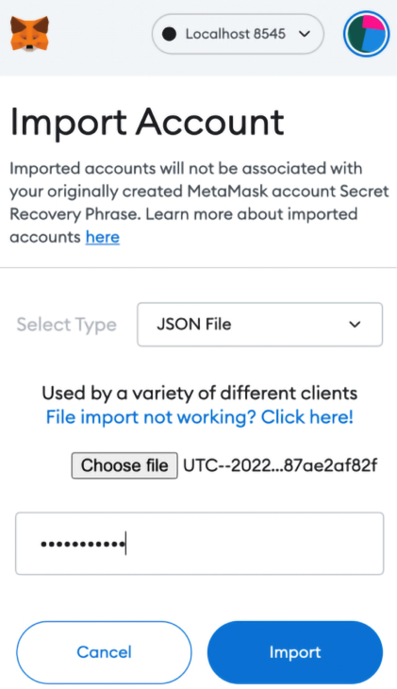
Figure 10.11: MetaMask JSON import file
The steps are as follows:
- First, choose the JSON file from the private net
keystoredirectory,~/etherprivate/keystore. Thekeystorefiles for our private net are listed here:UTC--2022-05-21T16-16-47.193932000Z--6e94bdb15141491bc3b9de3a9cab9d87ae2af82f UTC--2022-05-21T16-28-12.270088000Z--0f044cb4a0f924b6cfcf07c6c57945a0af75ec5b - Simply browse to the key store and select the
keystorefile, then enter the password (earlier, when we created the accounts for the first time, we set the password asPassword123), and click Import. It may take a few seconds to import. When imported, the account will be visible in the MetaMask window as shown here:

Figure 10.12: Account imported in MetaMask
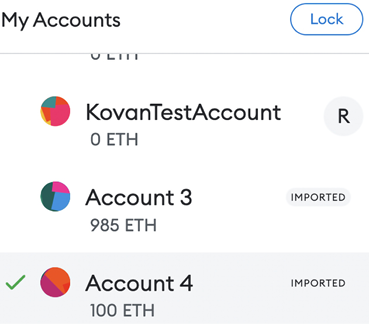
- Similarly, we can import the other account, by selecting the
keystorefile and importing it. Finally, we will have two accounts listed in MetaMask, as shown in the following image:
Now that our accounts have been imported successfully, we can move on to using MetaMask to deploy a contract in our private network.
Deploying a contract with MetaMask
In this section, we will write a simple smart contract and deploy it on our private network using MetaMask. First, in Remix, we create a new file. Enter the code shown for SimpleContract2 as follows:
pragma solidity 0.5.0;
contract SimpleContract2
{
uint z;
function addition(uint x)public returns(uint y)
{
    z=x+5;
    y=z;
  }
function difference(uint x)public returns(uint y)
{
    z=x-5;
    y=z;
  }
function division(uint x)public returns(uint y)
{
    z=x/5;
    y=z;
  }
function currValue()public view returns(uint)
{
return z;
  }
}
The code will look like this in Remix.
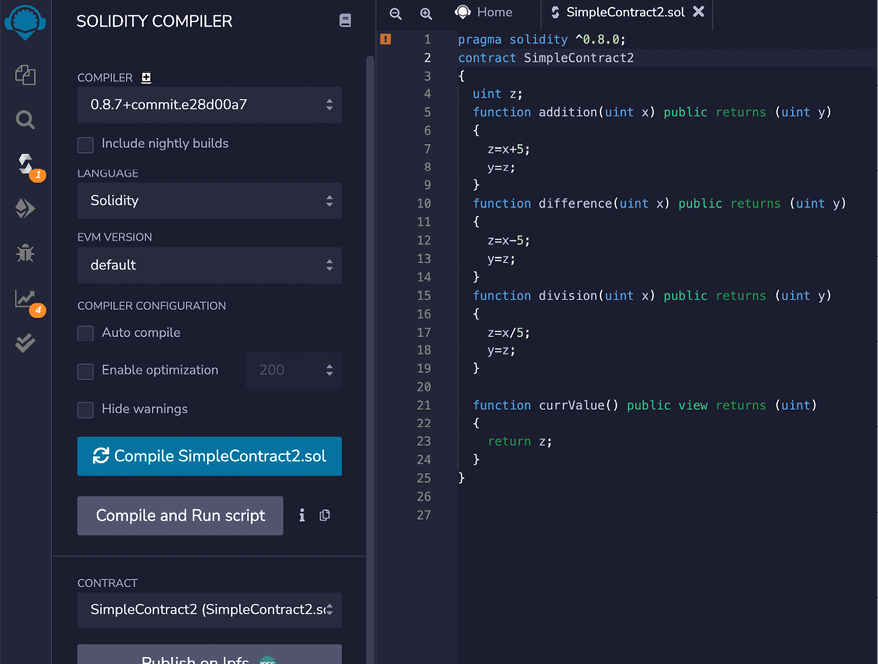
Figure 10.14: SimpleContract2 in Remix
Now we compile the smart contract SmartContract2 by clicking on the Compile SimpleContract2.sol button, as shown above.
Once compiled successfully, we deploy the smart contract in the private net:
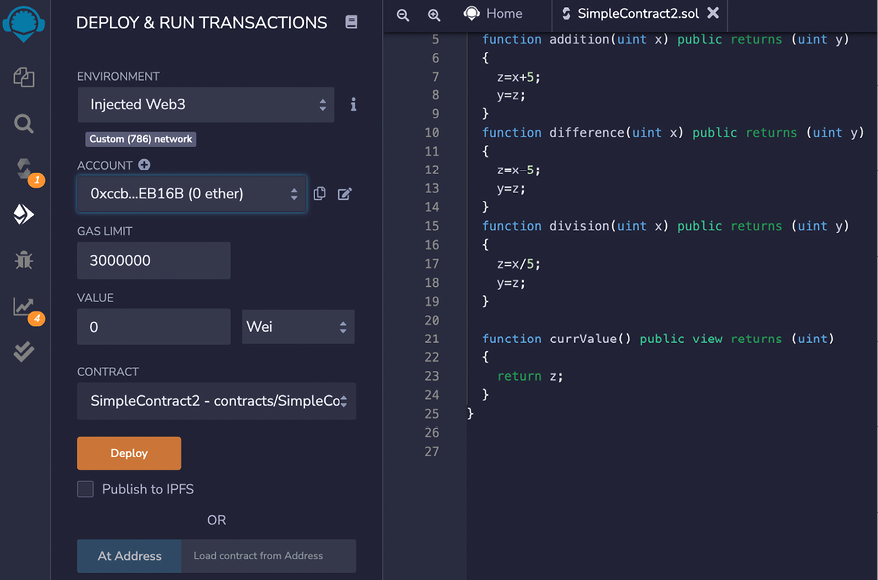
Figure 10.15: Smart contract deployment
Click Deploy, and review the contract details. In the DATA tab, you can see the contract code. Then click on the Confirm button.

Figure 10.16: MetaMask contract deployment
Notice how in the Geth logs, we see Submitted contract creation, which means that a contract creation transaction has been submitted and acknowledged as a result of the deploy action from the Remix IDE and the Confirm action from MetaMask. Note that it also shows the full hash and contract address:
INFO [05-21|19:21:39.357] Submitted contract creation hash=0xb2b13506270dcfbc5256b2d61944b3a6240cfe9b9067d64fda61f82a1f200e5b from=0x0F044cb4A0F924b6CfCF07c6c57945A0AF75Ec5b nonce=1 contract=0x0810f73FF422Dc7D6c27BCee611dc3F325EA9030 value=0
Now we start mining again, by issuing the following command in the JavaScript console of Geth. If mining is already running, this step is not required:
> miner.start()
null
Once the contract is mined and deployed, you can see it in Remix, under the Deployed Contracts view:

Figure 10.17: MetaMask deployed contract
With this, we have successfully deployed our example smart contract on the private network. Next, we’ll see how we can interact with this contract using Remix IDE and MetaMask.
Interacting with a contract through MetaMask using Remix IDE
Now we can interact with the contract using MetaMask. We run the addition option, enter a value of 100 in the box, and click on the addition button, as shown in the following screenshot, on the left-hand side.

Figure 10.18: Smart contract functions
This will invoke the MetaMask window, as shown in the following screenshot, on the right-hand side.

Figure 10.19: MetaMask contract interaction
Click Confirm, and the transaction will be mined as usual because we have a miner running the background in Geth.
Now click on the currValue button, which will read the contract to find the current value, which is, as expected, 105. This value is the result of the addition operation being performed.
Recall that we provided a value of 100, and in the smart contract we have already hardcoded 5 in the addition function, as shown here:
function addition(uint x)publicreturns(uint y)
{
    z=x+5;
    y=z;
  }
This means that 100 provided by us as input is added to 5, which is hardcoded in the smart contract addition function, and the result of this calculation is 105, as expected.
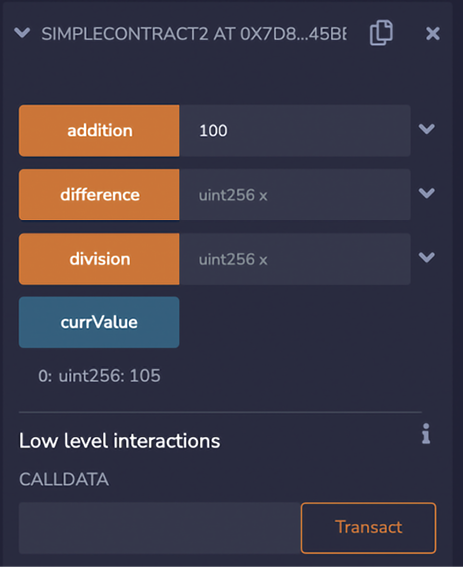
Figure 10.20: Retrieve the current value from the smart contract
This is a very simple program, but the aim of this exercise is to demonstrate the use of MetaMask and how it can connect with the local private chain, using the localhost RPC provider running in Geth on port 8545.
Pay special attention to the Solidity compiler settings. Choose the appropriate compiler version and the EVM version according to your source code and your Geth client’s EVM version. If this is not selected appropriately, you can run into issues. For example, if an incorrect version of EVM is chosen, then when interacting with the contract, you may see a Gas estimation failed error.
Similarly, if an incorrect EVM version is chosen, then you will also see an error message in the Remix window. It’s best to configure the settings correctly, which can just default in most cases, unless there are specific features of an EVM version that you are testing. Compiling for the wrong version of the EVM can result in incorrect and failing behavior. For example, if you have chosen an outdated EVM version, then even if the compilation is successful, the bytecode at runtime may fail to run correctly and will report an error saying that the opcode is invalid. In some other cases, the runtime may even fail silently or with little indication in the Geth logs about what happened, leading to hours of wasted time in debugging. This is especially true in private networks; therefore, make sure that the correct EVM version that matches the Geth client release is used.
Also notice that the compiler version in the Remix IDE is set to the version of EVM specified in the Solidity source code in the line pragma solidity 0.8.0. Also, the EVM version should be left to default, which is the latest EVM release.
In the MetaMask view, you can also see the transaction history of the contract by clicking on the activity tab:

Figure 10.21: Transaction history in MetaMask
Another way to connect to the local private net (Geth node) is to directly connect using the Web3 provider, available under DEPLOY & RUN TRANSACTIONS. This will allow direct communication with the blockchain through Remix via RPC without requiring an injected Web3 environment:

Figure 10.22: Deploy and run transactions in Remix IDE
Notice in the preceding screenshot that ENVIRONMENT is set to Web3 Provider, which simply connects to http://localhost:8545.
One advantage of this method is that it is a quick and easy method to connect Remix with the underlying blockchain (the Geth node). There is no need for any additional tools; all you need is Remix IDE (which is also browser-based) and your local running Geth node. The disadvantage, however, is that this method is not very secure. In order to connect Remix IDE to a local node, you can run the Geth client using the --http.corsdomain flag, as shown in the screenshot below:

Figure 10.23: Remix Web3 provider
Notice that our Geth process is running on the private network with the required parameters already, which allows Web3 provider connection, as shown here. Notice the --http.corsdomain flag in Figure 10.22 is used here. If the c process is not already running, issue the following command:
$ geth –datadir ~/etherprivate/ --networkid 786 --http --http.api 'web3,eth,net,debug,personal' --http.corsdomain '*'
As we are using a private network our command looks different from what is shown previously but makes use of the --http.corsdomain flag, which is essential to allow connectivity of the local Geth node with Remix.
Notice that in the preceding command, we have the –-http.corsdomain flag set. If we didn’t have this flag set, then the only option would have been to connect via injected Web3, which in fact is a more secure way to connect to the chain using MetaMask. As such, we use that as a standard, but if you have a simple local test network, you can always use the Web3 Provider option to quickly interact with the blockchain using Remix IDE.
Using the flag –-http.corsdomain with the wildcard (--http.corsdomain '*') can be used with a local test chain with test accounts. However, it is not advisable on public networks, as the wildcard * will allow everyone to connect to the node. Therefore, it is recommended that the access is restricted by specifying only trusted URLs.
Now, we can stop the miner; recall that this is the miner we started up earlier when setting up the private network:
> miner.stop()
null
With this example, we have now covered how MetaMask can be used to connect to a local network and how Remix and MetaMask, or only Remix, can be used to connect to the local network and deploy smart contracts. We also saw how to interact with a deployed contract.
Remix is a very feature-rich IDE and we have not covered everything; however, this chapter has formally introduced you to Remix, describing most of the main features in detail, and we will keep using it in the chapters to come.
It is also useful to have a mechanism to view a consolidated list and details of all the transactions in the blockchain. For this purpose, block explorers are used. There are many services available for public blockchains on the internet. There are many open source projects available as well. As there are many choices we are not going to describe a specific one here; they all work in more or less the same way. Do a search on GitHub at https://github.com/search?q=blockchain+explorer to find an appropriate one and explore further.
Summary
In this chapter, we have explored Ethereum test networks and how to set up private Ethereum networks. After the initial introduction to private network setup, we also saw how the Geth command-line tool can be used to perform various functions and how we can interact with the Ethereum blockchain. We also saw how MetaMask and Remix can be used to deploy smart contracts.
In the next chapter, we will see in greater detail what tools, programming languages, and frameworks are available for the development of smart contracts on Ethereum.
Join us on Discord!
To join the Discord community for this book – where you can share feedback, ask questions to the author, and learn about new releases – follow the QR code below:
