
8
Adding Authentication and Authorization
Any kind of application must deal with authentication and authorization. Often, these terms are used interchangeably, but they actually refer to different scenarios. In this chapter of the book, we will explain the difference between authentication and authorization and show how to add these features to a minimal API project.
Authentication can be performed in many different ways: using local accounts with external login providers, such as Microsoft, Google, Facebook, and Twitter; using Azure Active Directory and Azure B2C; and using authentication servers such as Identity Server and Okta. Moreover, we may have to deal with requirements such as two-factor authentication and refresh tokens. In this chapter, however, we will focus on the general aspects of authentication and authorization and see how to implement them in a minimal API project, in order to provide a general understanding of the topic. The information and samples that will be provided will show how to effectively work with authentication and authorization and how to customize their behaviors according to our requirements.
In this chapter, we will be covering the following topics:
- Introducing authentication and authorization
- Protecting a minimal API
- Handling authorization – roles and policies
Technical requirements
To follow the examples in this chapter, you will need to create an ASP.NET Core 6.0 Web API application. Refer to the Technical requirements section in Chapter 2, Exploring Minimal APIs and Their Advantages, for instructions on how to do so.
If you’re using your console, shell, or Bash terminal to create the API, remember to change your working directory to the current chapter number: Chapter08.
All the code samples in this chapter can be found in the GitHub repository for this book at https://github.com/PacktPublishing/Minimal-APIs-in-ASP.NET-Core-6/tree/main/Chapter08.
Introducing authentication and authorization
As said at the beginning, the terms authentication and authorization are often used interchangeably, but they represent different security functions. Authentication is the process of verifying that users are who they say they are, while authorization is the task of granting an authenticated user permission to do something. So, authorization must always follow authentication.
Let’s think about the security in an airport: first, you show your ID to authenticate your identity; then, at the gate, you present the boarding pass to be authorized to board the flight and get access to the plane.
Authentication and authorization in ASP.NET Core are handled by corresponding middleware and work in the same way in minimal APIs and controller-based projects. They allow the restriction of access to endpoints depending on user identity, roles, policies, and so on, as we’ll see in detail in the following sections.
You can find a great overview of ASP.NET Core authentication and authorization in the official documentation available at https://docs.microsoft.com/aspnet/core/security/authentication and https://docs.microsoft.com/aspnet/core/security/authorization.
Protecting a minimal API
Protecting a minimal API means correctly setting up authentication and authorization. There are many types of authentication solutions that are adopted in modern applications. In web applications, we typically use cookies, while when dealing with web APIs, we use methods such as an API key, basic authentication, and JSON Web Token (JWT). JWTs are the most commonly used, and in the rest of the chapter, we’ll focus on this solution.
Note
A good starting point to understand what JWTs are and how they are used is available at https://jwt.io/introduction.
To enable authentication and authorization based on JWT, the first thing to do is to add the Microsoft.AspNetCore.Authentication.JwtBearer NuGet package to our project, using one of the following ways:
- Option 1: If you’re using Visual Studio 2022, right-click on the project and choose the Manage NuGet Packages command to open Package Manager GUI, then search for Microsoft.AspNetCore.Authentication.JwtBearer and click on Install.
- Option 2: Open Package Manager Console if you’re inside Visual Studio 2022, or open your console, shell, or Bash terminal, go to your project directory, and execute the following command:
dotnet add package Microsoft.AspNetCore.Authentication.JwtBearer
Now, we need to add authentication and authorization services to the service provider, so that they are available through dependency injection:
var builder = WebApplication.CreateBuilder(args);
//...
builder.Services.AddAuthentication(JwtBearerDefaults.AuthenticationScheme).AddJwtBearer();
builder.Services.AddAuthorization();
This is the minimum code that is necessary to add JWT authentication and authorization support to an ASP.NET Core project. It isn’t a real working solution yet, because it is missing the actual configuration, but it is enough to verify how endpoint protection works.
In the AddAuthentication() method, we specify that we want to use the bearer authentication scheme. This is an HTTP authentication scheme that involves security tokens that are in fact called bearer tokens. These tokens must be sent in the Authorization HTTP header with the format Authorization: Bearer <token>. Then, we call AddJwtBearer() to tell ASP.NET Core that it must expect a bearer token in the JWT format. As we’ll see later, the bearer token is an encoded string generated by the server in response to a login request. After that, we use AddAuthorization() to also add authorization services.
Now, we need to insert authentication and authorization middleware in the pipeline so that ASP.NET Core will be instructed to check the token and apply all the authorization rules:
var app = builder.Build();
//..
app.UseAuthentication();
app.UseAuthorization();
//...
app.Run();
Important Note
We have said that authorization must follow authentication. This means that the authentication middleware must come first; otherwise, the security will not work as expected.
Finally, we can protect our endpoints using the Authorize attribute or the RequireAuthorization() method:
app.MapGet("/api/attribute-protected", [Authorize] () => "This endpoint is protected using the Authorize attribute");
app.MapGet("/api/method-protected", () => "This endpoint is protected using the RequireAuthorization method")
.RequireAuthorization();
Note
The ability to specify an attribute directly on a lambda expression (as in the first endpoint of the previous example) is a new feature of C# 10.
If we now try to call each of these methods using Swagger, we’ll get a 401 unauthorized response, which should look as follows:

Figure 8.1 – Unauthorized response in Swagger
Note that the message contains a header indicating that the expected authentication scheme is Bearer, as we have declared in the code.
So, now we know how to restrict access to our endpoints to authenticated users. But our work isn’t finished: we need to generate a JWT bearer, validate it, and find a way to pass such a token to Swagger so that we can test our protected endpoints.
Generating a JWT bearer
We have said that a JWT bearer is generated by the server as a response to a login request. ASP.NET Core provides all the APIs we need to create it, so let’s see how to perform this task.
The first thing to do is to define the login request endpoint to authenticate the user with their username and password:
app.MapPost("/api/auth/login", (LoginRequest request) =>
{
    if (request.Username == "marco" && request.Password ==
        "P@$$w0rd")
    {
        // Generate the JWT bearer...
    }
    return Results.BadRequest();
});
For the sake of simplicity, in the preceding example, we have used hardcoded values, but in a real application, we’d use, for example, ASP.NET Core Identity, the part of ASP.NET Core that is responsible for user management. More information on this topic is available in the official documentation at https://docs.microsoft.com/aspnet/core/security/authentication/identity.
In a typical login workflow, if the credentials are invalid, we return a 400 Bad Request response to the client. If, instead, the username and password are correct, we can effectively generate a JWT bearer, using the classes available in ASP.NET Core:
var claims = new List<Claim>()
{
    new(ClaimTypes.Name, request.Username)
};
var securityKey = new SymmetricSecurityKey(Encoding.UTF8.GetBytes("mysecuritystring"));
var credentials = new SigningCredentials(securityKey, SecurityAlgorithms.HmacSha256);
var jwtSecurityToken = new JwtSecurityToken(
    issuer: "https://www.packtpub.com",
    audience: "Minimal APIs Client",
    claims: claims, expires: DateTime.UtcNow.AddHours(1),
      signingCredentials: credentials);
var accessToken = new JwtSecurityTokenHandler()
  .WriteToken(jwtSecurityToken);
return Results.Ok(new { AccessToken = accessToken });
JWT bearer creation involves many different concepts, but through the preceding code example, we’ll focus on the basic ones. This kind of bearer contains information that allows verifying the user identity, along with other declarations that describe the properties of the user. These properties are called claims and are expressed as string key-value pairs. In the preceding code, we created a list with a single claim that contains the username. We can add as many claims as we need, and we can also have claims with the same name. In the next sections, we’ll see how to use claims, for example, to enforce authorization.
Next in the preceding code, we defined the credentials (SigningCredentials) to sign the JWT bearer. The signature depends on the actual token content and is used to check that the token hasn’t been tampered with. In fact, if we change anything in the token, such as a claim value, the signature will consequentially change. As the key to sign the bearer is known only by the server, it is impossible for a third party to modify the token and sustain its validity. In the preceding code, we used SymmetricSecurityKey, which is never shared with clients.
We used a short string to create the credentials, but the only requirement is that the key should be at least 32 bytes or 16 characters long. In .NET, strings are Unicode and therefore, each character takes 2 bytes. We also needed to set the algorithm that the credentials will use to sign the token. To this end, we have specified the Hash-Based Message Authentication Code (HMAC) and the hash function, SHA256, specifying the SecurityAlgorithms.HmacSha256 value. This algorithm is quite a common choice in these kinds of scenarios.
Note
You can find more information about the HMAC and the SHA256 hash function at https://docs.microsoft.com/dotnet/api/system.security.cryptography.hmacsha256#remarks.
By this point in the preceding code, we finally have all the information to create the token, so we can instantiate a JwtSecurityToken object. This class can use many parameters to build the token, but for the sake of simplicity, we have specified only the minimum set for a working example:
- Issuer: A string (typically a URI) that identifies the name of the entity that is creating the token
- Audience: The recipient that the JWT is intended for, that is, who can consume the token
- The list of claims
- The expiration time of the token (in UTC)
- The signing credentials
Tip
In the preceding code example, values used to build the token are hardcoded, but in a real-life application, we should place them in an external source, for example, in the appsettings.json configuration file.
You can find further information on creating a token at https://docs.microsoft.com/dotnet/api/system.identitymodel.tokens.jwt.jwtsecuritytoken.
After all the preceding steps, we could create JwtSecurityTokenHandler, which is responsible for actually generating the bearer token and returning it to the caller with a 200 OK response.
So, now we can try the login endpoint in Swagger. After inserting the correct username and password and clicking the Execute button, we will get the following response:

Figure 8.2 – The JWT bearer as a result of the login request in Swagger
We can copy the token value and insert it in the URL of the site https://jwt.ms to see what it contains. We’ll get something like this:
{
  "alg": "HS256",
  "typ": "JWT"
}.{
  "http://schemas.xmlsoap.org/ws/2005/05/identity/claims/name": "marco",
  "exp": 1644431527,
  "iss": "https://www.packtpub.com",
  "aud": "Minimal APIs Client"
}.[Signature]
In particular, we see the claims that have been configured:
- name: The name of the logged user
- exp: The token expiration time, expressed in Unix epoch
- iss: The issuer of the token
- aud: The audience (receiver) of the token
This is the raw view, but we can switch to the Claims tab to see the decoded list of all the claims, with a description of their meaning, where available.
There is one important point that requires attention: by default, the JWT bearer isn’t encrypted (it’s just a Base64-encoded string), so everyone can read its content. Token security does not depend on the inability to be decoded, but on the fact that it is signed. Even if the token’s content is clear, it is impossible to modify it because in this case, the signature (which uses a key that is known only by the server) will become invalid.
So, it’s important not to insert sensitive data in the token; claims such as usernames, user IDs, and roles are usually fine, but, for example, we should not insert information related to privacy. To give a deliberately exaggerated example, we mustn’t insert a credit card number in the token! In any case, keep in mind that even Microsoft for Azure Active Directory uses JWT, with no encryption, so we can trust this security system.
In conclusion, we have described how to obtain a valid JWT. The next steps are to pass the token to our protected endpoints and instruct our minimal API on how to validate it.
Validating a JWT bearer
After creating the JWT bearer, we need to pass it in every HTTP request, inside the Authorization HTTP header, so that ASP.NET Core can verify its validity and allow us to invoke the protected endpoints. So, we have to complete the AddJwtBearer() method invocation that we showed earlier with the description of the rules to validate the bearer:
builder.Services.AddAuthentication(JwtBearerDefaults.AuthenticationScheme)
.AddJwtBearer(options =>
{
    options.TokenValidationParameters = new TokenValidationParameters
    {
        ValidateIssuerSigningKey = true,
        IssuerSigningKey = new SymmetricSecurityKey(
          Encoding.UTF8.GetBytes("mysecuritystring")),
        ValidIssuer = "https://www.packtpub.com",
        ValidAudience = "Minimal APIs Client"
    };
});
In the preceding code, we added a lambda expression with which we defined the TokenValidationParameter object that contains the token validation rules. First of all, we checked the issuer signing key, that is, the signature of the token, as shown in the Generating a JWT bearer section, to verify that the JWT has not been tampered with. The security string that has been used to sign the token is required to perform this check, so we specify the same value (mysecuritystring) that we inserted during the login request.
Then, we specify what valid values for the issuer and the audience of the token are. If the token has been emitted from a different issuer, or was intended for another audience, the validation fails. This is an important security check; we should be sure that the bearer has been issued by someone we expected to issue it and for the audience we want.
Tip
As already pointed out, we should place the information used to work with the token in an external source, so that we can reference the correct values during token generation and validation, avoiding hardcoding them or writing their values twice.
We don’t need to specify that we also want to validate the token expiration because this check is automatically enabled. A clock skew is applied when validating the time to compensate for slight differences in clock time or to handle delays between the client request and the instant at which it is processed by the server. The default value is 5 minutes, which means that an expired token is considered valid for a 5-minute timeframe after its actual expiration. We can reduce the clock skew, or disable it, using the ClockSkew property of the TokenValidationParameter class.
Now, the minimal API has all the information to check the bearer token validity. In order to test whether everything works as expected, we need a way to tell Swagger how to send the token within a request, as we’ll see in the next section.
Adding JWT support to Swagger
We have said that the bearer token is sent in the Authorization HTTP header of a request. If we want to use Swagger to verify the authentication system and test our protected endpoints, we need to update the configuration so that it will be able to include this header in the requests.
To perform this task, it is necessary to add a bit of code to the AddSwaggerGen() method:
var builder = WebApplication.CreateBuilder(args);
//...
builder.Services.AddSwaggerGen(options =>
{
    options.AddSecurityDefinition(JwtBearerDefaults.AuthenticationScheme, new OpenApiSecurityScheme
    {
        Type = SecuritySchemeType.ApiKey,
        In = ParameterLocation.Header,
        Name = HeaderNames.Authorization,
        Description = "Insert the token with the 'Bearer '
                       prefix"
    });
    options.AddSecurityRequirement(new
      OpenApiSecurityRequirement
    {
        {
            new OpenApiSecurityScheme
            {
                Reference = new OpenApiReference
                {
                    Type = ReferenceType.SecurityScheme,
                    Id =
                     JwtBearerDefaults.AuthenticationScheme
                }
            },
            Array.Empty<string>()
        }
    });
});
In the preceding code, we defined how Swagger handles authentication. Using the AddSecurityDefinition() method, we described how our API is protected; we used an API key, which is the bearer token, in the header with the name Authorization. Then, with AddSecurityRequirement(), we specified that we have a security requirement for our endpoints, which means that the security information must be sent for every request.
After adding the preceding code, if we now run our application, the Swagger UI will contain something new.

Figure 8.3 – Swagger showing the authentication features
Upon clicking the Authorize button or any of the padlock icons at the right of the endpoints, the following window will show up, allowing us to insert the bearer token:
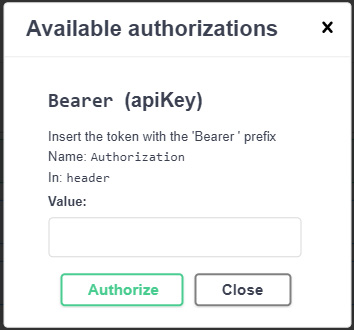
Figure 8.4 – The window that allows setting the bearer token
The last thing to do is to insert the token in the Value textbox and confirm by clicking on Authorize. From now on, the specified bearer will be sent along with every request made with Swagger.
We have finally completed all the required steps to add authentication support to minimal APIs. Now, it’s time to verify that everything works as expected. In the next section, we’ll perform some tests.
Testing authentication
As described in the previous sections, if we call one of the protected endpoints, we get a 401 Unauthorized response. To verify that token authentication works, let’s call the login endpoint to get a token. After that, click on the Authorize button in Swagger and insert the obtained token, remembering the Bearer<space> prefix. Now, we’ll get a 200 OK response, meaning that we are able to correctly invoke the endpoints that require authentication. We can also try changing a single character in the token to again get the 401 Unauthorized response, because in this case, the signature will not be the expected one, as described before. In the same way, if the token is formally valid but has expired, we will obtain a 401 response.
As we have defined endpoints that can be reached only by authenticated users, a common requirement is to access user information within the corresponding route handlers. In Chapter 2, Exploring Minimal APIs and Their Advantages, we showed that minimal APIs provide a special binding that directly provides a ClaimsPrincipal object representing the logged user:
app.MapGet("/api/me", [Authorize] (ClaimsPrincipal user) => $"Logged username: {user.Identity.Name}");The user parameter of the route handler is automatically filled with user information. In this example, we just get the name, which in turn is read from the token claims, but the object exposes many properties that allow us to work with authentication data. We can refer to the official documentation at https://docs.microsoft.com/dotnet/api/system.security.claims.claimsprincipal.identity for further details.
This ends our overview of authentication. In the next section, we’ll see how to handle authorization.
Handling authorization – roles and policies
Right after the authentication, there is the authorization step, which grants an authenticated user permission to do something. Minimal APIs provide the same authorization features as controller-based projects, based on the concepts of roles and policies.
When an identity is created, it may belong to one or more roles. For example, a user can belong to the Administrator role, while another can be part of two roles: User and Stakeholder. Typically, each user can perform only the operations that are allowed by their roles. Roles are just claims that are inserted in the JWT bearer upon authentication. As we’ll see in a moment, ASP.NET Core provides built-in support to verify whether a user belongs to a role.
While role-based authorization covers many scenarios, there are cases in which this kind of security isn’t enough because we need to apply more specific rules to check whether the user has the right to perform some activities. In such a situation, we can create custom policies that allow us to specify more detailed authorization requirements and even completely define the authorization logic based on our algorithms.
In the next sections, we’ll see how to manage both role-based and policy-based authorization in our APIs, so that we can cover all our requirements, that is, allowing access to certain endpoints only to users with specific roles or claims, or based on our custom logic.
Handling role-based authorization
As already introduced, roles are claims. This means that they must be inserted in the JWT bearer token upon authentication, just like any other claims:
app.MapPost("/api/auth/login", (LoginRequest request) =>
{
    if (request.Username == "marco" && request.Password ==
        "P@$$w0rd")
    {
        var claims = new List<Claim>()
        {
            new(ClaimTypes.Name, request.Username),
            new(ClaimTypes.Role, "Administrator"),
            new(ClaimTypes.Role, "User")
        };

    //...
}
In this example, we statically add two claims with name ClaimTypes.Role: Administrator and User. As said in the previous sections, in a real-world application, these values typically come from a complete user management system built, for example, with ASP.NET Core Identity.
As in all the other claims, roles are inserted in the JWT bearer. If now we try to invoke the login endpoint, we’ll notice that the token is longer because it contains a lot of information, which we can verify using the https://jwt.ms site again, as follows:
{
  "alg": "HS256",
  "typ": "JWT"
}.{
  "http://schemas.xmlsoap.org/ws/2005/05/identity/claims/name": "marco",
  "http://schemas.microsoft.com/ws/2008/06/identity/claims/role": [
    "Administrator",
    "User"
  ],
  "exp": 1644755166,
  "iss": "https://www.packtpub.com",
  "aud": "Minimal APIs Client"
}.[Signature]
In order to restrict access to a particular endpoint only for users that belong to a given role, we need to specify this role as an argument in the Authorize attribute or the RequireAuthorization() method:
app.MapGet("/api/admin-attribute-protected", [Authorize(Roles = "Administrator")] () => { });
app.MapGet("/api/admin-method-protected", () => { })
.RequireAuthorization(new AuthorizeAttribute { Roles = "Administrator" });
In this way, only users who are assigned the Administrator role can access the endpoints. We can also specify more roles, separating them with a comma: the user will be authorized if they have at least one of the specified roles.
Important Note
Role names are case sensitive.
Now suppose we have the following endpoint:
app.MapGet("/api/stackeholder-protected", [Authorize(Roles = "Stakeholder")] () => { });This method can only be consumed by a user who is assigned the Stakeholder role. However, in our example, this role isn’t assigned. So, if we use the previous bearer token and try to invoke this endpoint, of course, we’ll get an error. But in this case, it won’t be 401 Unauthorized, but rather 403 Forbidden. We see this behavior because the user is actually authenticated (meaning the token is valid, so no 401 error), but they don’t have the authorization to execute the method, so access is forbidden. In other words, authentication errors and authorization errors lead to different HTTP status codes.
There is another important scenario that involves roles. Sometimes, we don’t need to restrict endpoint access at all but need to adapt the behavior of the handler according to the specific user role, such as when retrieving only a certain type of information. In this case, we can use the IsInRole() method, which is available on the ClaimsPrincipal object:
app.MapGet("/api/role-check", [Authorize] (ClaimsPrincipal user) =>
{
    if (user.IsInRole("Administrator"))
    {
        return "User is an Administrator";
    }
    return "This is a normal user";
});
In this endpoint, we only use the Authorize attribute to check whether the user is authenticated or not. Then, in the route handler, we check whether the user has the Administrator role. If yes, we just return a message, but we can imagine that administrators can retrieve all the available information, while normal users get only a subset, based on the values of the information itself.
As we have seen, with role-based authorization, we can perform different types of authorization checks in our endpoints, to cover many scenarios. However, this approach cannot handle all situations. If roles aren’t enough, we need to use authorization based on policies, which we will discuss in the next section.
Applying policy-based authorization
Policies are a more general way to define authorization rules. Role-based authorization can be considered a specific policy authorization that involves a roles check. We typically use policies when we need to handle more complex scenarios.
This kind of authorization requires two steps:
- Defining a policy with a rule set
- Applying a certain policy on the endpoints
Policies are added in the context of the AddAuthorization() method, which we saw in the previous section, Protecting a minimal API. Each policy has a unique name, which is used to later reference it, and a set of rules, which are typically described in a fluent manner.
We can use policies when role authorization is not enough. Suppose that the bearer token also contains the ID of the tenant to which the user belongs:
var claims = new List<Claim>()
{
    // ...
    new("tenant-id", "42")
};
Again, in a real-world scenario, this value could come from a database that stores the properties of the user. Suppose that we want to only allow users who belong to a particular tenant to reach an endpoint. As tenant-id is a custom claim, ASP.NET Core doesn’t know how to use it to enforce authorization. So, we can’t use the solutions shown earlier. We need to define a custom policy with the corresponding rule:
builder.Services.AddAuthorization(options =>
{
    options.AddPolicy("Tenant42", policy =>
    {
        policy.RequireClaim("tenant-id", "42");
    });
});
In the preceding code, we created a policy named Tenant42, which requires that the token contains the tenant-id claim with the value 42. The policy variable is an instance of AuthorizationPolicyBuilder and exposes methods that allow us to fluently specify the authorization rules; we can specify that a policy requires certain users, roles, and claims to be satisfied. We can also chain multiple requirements in the same policy, writing, for example, something such as policy.RequireRole(“Administrator”).RequireClaim(“tenant-id”). The full list of methods is available on the documentation page at https://docs.microsoft.com/dotnet/api/microsoft.aspnetcore.authorization.authorizationpolicybuilder.
Then, in the method we want to protect, we have to specify the policy name, as usual with the Authorize attribute or the RequireAuthorization() method:
app.MapGet("/api/policy-attribute-protected", [Authorize(Policy = "Tenant42")] () => { });
app.MapGet("/api/policy-method-protected", () => { })
.RequireAuthorization("Tenant42");
If we try to execute these preceding endpoints with a token that doesn’t have the tenant-id claim, or its value isn’t 42, we get a 403 Forbidden result, as happened with the role check.
There are scenarios in which declaring a list of allowed roles and claims isn’t enough: for example, we would need to perform more complex checks or verify authorization based on dynamic parameters. In these cases, we can use the so-called policy requirements, which comprise a collection of authorization rules for which we can provide custom verification logic.
To adopt this solution, we need two objects:
- A requirement class that implements the IAuthorizationRequirement interface and defines the requirement we want to manage
- A handler class that inherits from AuthorizationHandler and contains the logic to verify the requirement
Let’s suppose we don’t want users who don’t belong to the Administrator role to access certain endpoints during a maintenance time window. This is a perfectly valid authorization rule, but we cannot afford it using the solutions we have seen up to now. The rule involves a condition that considers the current time, so the policy cannot be statically defined.
So, we start by creating a custom requirement:
public class MaintenanceTimeRequirement : IAuthorizationRequirement
{
    public TimeOnly StartTime { get; init; }
    public TimeOnly EndTime { get; init; }
}
The requirement contains the start and end times of the maintenance window. During this interval, we only want administrators to be able to operate.
Note
TimeOnly is a new data type that has been introduced with C# 10 and allows us to store only only the time of the day (and not the date). More information is available at https://docs.microsoft.com/dotnet/api/system.timeonly.
Note that the IAuthorizationRequirement interface is just a placeholder. It doesn’t contain any method or property to be implemented; it serves only to identify that the class is a requirement. In other words, if we don’t need any additional information for the requirement, we can create a class that implements IAuthorizationRequirement but actually has no content at all.
This requirement must be enforced, so it is necessary to create the corresponding handler:
public class MaintenanceTimeAuthorizationHandler
    : AuthorizationHandler<MaintenanceTimeRequirement>
{
    protected override Task HandleRequirementAsync(
        AuthorizationHandlerContext context,
        MaintenanceTimeRequirement requirement)
    {
        var isAuthorized = true;
        if (!context.User.IsInRole("Administrator"))
        {
            var time = TimeOnly.FromDateTime(DateTime.Now);
            if (time >= requirement.StartTime && time <
                requirement.EndTime)
            {
                isAuthorized = false;
            }
        }
        if (isAuthorized)
        {
            context.Succeed(requirement);
        }
        return Task.CompletedTask;
    }
}
Our handler inherits from AuthorizationHandler<MaintenanceTimeRequirement>, so we need to override the HandleRequirementAsync() method to verify the requirement, using the AuthorizationHandlerContext parameter, which contains a reference to the current user. As said at the beginning, if the user is not assigned the Administrator role, we check whether the current time falls in the maintenance window. If so, the user doesn’t have the right to access.
At the end, if the isAuthorized variable is true, it means that the authorization can be granted, so we call the Succeed() method on the context object, passing the requirement that we want to validate. Otherwise, we don’t invoke any method on the context, meaning that the requirement hasn’t been verified.
We haven’t yet finished implementing the custom policy. We still have to define the policy and register the handler in the service provider:
builder.Services.AddAuthorization(options =>
{
    options.AddPolicy("TimedAccessPolicy", policy =>
    {
        policy.Requirements.Add(new
          MaintenanceTimeRequirement
        {
            StartTime = new TimeOnly(0, 0, 0),
            EndTime = new TimeOnly(4, 0, 0)
        });
    });
});
builder.Services.AddScoped<IAuthorizationHandler, MaintenanceTimeAuthorizationHandler>();
In the preceding code, we defined a maintenance time window from midnight till 4:00 in the morning. Then, we registered the handler as an implementation of the IAuthorizationHandler interface, which in turn is implemented by the AuthorizationHandler class.
Now that we have everything in place, we can apply the policy to our endpoints:
app.MapGet("/api/custom-policy-protected", [Authorize(Policy = "TimedAccessPolicy")] () => { });When we try to reach this endpoint, ASP.NET Core will check the corresponding policy, find that it contains a requirement, and scan all the registrations of the IAuhorizationHandler interface to see whether there is one that is able to handle the requirement. Then, the handler will be invoked, and the result will be used to determine whether the user has the right to access the route. If the policy isn’t verified, we’ll get a 403 Forbidden response.
We have shown how powerful policies are, but there is more. We can also use them to define global rules that are automatically applied to all endpoints, using the concepts of default and fallback policies, as we’ll see in the next section.
Using default and fallback policies
Default and fallback policies are useful when we want to define global rules that must be automatically applied. In fact, when we use the Authorize attribute or the RequireAuthorization() method, without any other parameter, we implicitly refer to the default policy defined by ASP.NET Core, which is set to require an authenticated user.
If we want to use different conditions by default, we just need to redefine the DefaultPolicy property, which is available in the context of the AddAuthorization() method:
builder.Services.AddAuthorization(options =>
{
    var policy = new AuthorizationPolicyBuilder()
      .RequireAuthenticatedUser()
        .RequireClaim("tenant-id").Build();
    options.DefaultPolicy = policy;
});
We use AuthorizationPolicyBuilder to define all the security requirements, then we set it as a default policy. In this way, even if we don’t specify a custom policy in the Authorize attribute or the RequireAuthorization() method, the system will always verify whether the user is authenticated, and the bearer contains the tenant-id claim. Of course, we can override this default behavior by just specifying roles or policy names in the authorization attribute or method.
A fallback policy, on the other hand, is the policy that is applied when there is no authorization information on the endpoints. It is useful, for example, when we want all our endpoints to be automatically protected, even if we forget to specify the Authorize attribute or just don’t want to repeat the attribute for each handler. Let us try and understand this using the following code:
builder.Services.AddAuthorization(options =>
{
    options.FallbackPolicy = options.DefaultPolicy;
});
In the preceding code, FallbackPolicy becomes equal to DefaultPolicy. We have said that the default policy requires that the user be authenticated, so the result of this code is that now, all the endpoints automatically need authentication, even if we don’t explicitly protect them.
This is a typical solution to adopt when most of our endpoints have restricted access. We don’t need to specify the Authorize attribute or use the RequireAuthorization() method anymore. In other words, now all our endpoints are protected by default.
If we decide to use this approach, but a bunch of endpoints need public access, such as the login endpoint, which everyone should be able to invoke, we can use the AllowAnonymous attribute or the AllowAnonymous() method:
app.MapPost("/api/auth/login", [AllowAnonymous] (LoginRequest request) => { });
// OR
app.MapPost("/api/auth/login", (LoginRequest request) => { })
.AllowAnonymous();
As the name implies, the preceding code will bypass all authorization checks for the endpoint, including the default and fallback authorization policies.
To deepen our knowledge of policy-based authentication, we can refer to the official documentation at https://docs.microsoft.com/aspnet/core/security/authorization/policies.
Summary
Knowing how authentication and authorization work in minimal APIs is fundamental to developing secure applications. Using JWT bearer authentication roles and policies, we can even define complex authorization scenarios, with the ability to use both standard and custom rules.
In this chapter, we have introduced basic concepts to make a service secure, but there is much more to talk about, especially regarding ASP.NET Core Identity: an API that supports login functionality and allows managing users, passwords, profile data, roles, claims, and more. We can look further into this topic by checking out the official documentation, which is available at https://docs.microsoft.com/aspnet/core/security/authentication/identity.
In the next chapter, we will see how to add multilanguage support to our minimal APIs and how to correctly handle applications that work with different date formats, time zones, and so on.