To create a standard vSwitch, follow these steps:
- Connect to the ESXi server using the host client
- Select Networking from the navigator
- Switch to the Virtual Switches tab
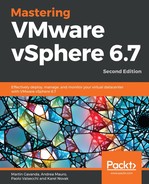
- Click Add standard virtual switch and a new window will open, as shown in the following screenshot:

Let's have a look at the fields in the preceding screenshot:
- vSwitch Name: Each virtual switch has a name. Please keep in mind that the name can not be changed after creation.
- MTU: As we have discussed, if you want to use jumbo frames, all devices within the network must be able to handle those, including the vSwitch.
- Uplink 1: Usually, each virtual switch has a physical NIC assigned as an uplink. By default, the first unassigned physical NIC will be chosen as Uplink1 of the new vSwitch. You can assign multiple physical NICs as an uplink using the Add uplink button, and as a best practice you should do so to eliminate any single point of failure within your network.
- Link discovery: Standard vSwitches support Cisco Discovery Protocol (CDP), so you can use your standard network management tools to discover network devices. You can choose which mode will be used:
- Listen (default): The vSwitch will accept CDP frames from the network, and based on these it will show you, for example, to which physical switch the uplink port is connected.
- Advertise: The vSwitch will advertise itself to the physical network, so on the physical switch you will see which physical ports are connected to which virtual switch on which ESXi server.
- Both: The ESXi server will listen and advertise.
- None: CDP will not be used at all.
- Security: You can choose how the vSwitch will be configured regarding specific security features:
- Promiscuous mode:
- Reject: This is the default option. The guest OS does not receive frames for another VM.
- Accept: All frames that pass the virtual switch are forwarded to all VMs connected to the virtual switch (or port group).This can be useful to detect and monitor traffic or when you want to use traffic sniffer analyzers.
- MAC address changes:
- Reject: The guest OS changes the MAC address of the adapter to a value different from the address in the .vmx configuration file. The switch will block the port.
- Accept: This is the default option. The guest OS can change the MAC address of the network adapter, and the adapter receives frames at its new address.
- Forged transmits:
- Reject: The switch drops any outbound frame with a source MAC address that is different from the one in the .vmx configuration file.
- Accept: The switch does not perform filtering and permits all outbound frames.
- Promiscuous mode:
Once the standard vSwitch is created, you can access its configuration and view the topology. In the following screenshot, you can see the topology of a standard vSwitch:

Once the vSwitch is created, we have more configuration options compared to the new virtual switch wizard. We can change the settings we configured during creation, but we also have two new configuration options:
- NIC teaming
- Traffic shaping
In NIC teaming, we can specify how the traffic will be balanced between multiple physical NICs, as well how the failure detection is configured:

- Load balancing: This option determines how network traffic is distributed between the network adapters in a NIC team, according to one of these algorithms:
- Route based on originating virtual port (default): The virtual switch selects uplinks based on the VM port IDs on the vSS or vDS. This method is without extra configuration on the physical switch and has low overhead.
- Route based on source MAC hash: The virtual switch selects an uplink for a VM based on the VMs MAC address. To calculate an uplink for a VM, the virtual switch uses the VM MAC address and the number of uplinks in the NIC team. This method is a support for all physical switches and has low overhead.
- Route based on IP hash: The virtual switch select uplinks for VMs based on the source and destination IP address of each packet. The IP-based method requires 802.3ad link aggregation support or EtherChannel.
- Use explicit failover order: There's no actual load balancing with this policy. The virtual switch always uses the first uplink that is in the active adapter list. If not possible, one of the other active adapters will be used instead of the standby adapter.
- Network failure detection: This option is how you understand that one link is not usable. You can specify two methods for failover detection:
- Link status only: This is the default option. Only link failures are detected. For example unplugged cables or problem on the physical switch.
- Beacon probing: When you want to use this detection mode, you must have at least three NICs in the team for beacon probing. How does it work? It sends out and listens for Ethernet broadcast frames that physical NICs send to detect a link failure in all physical NICs in a team. ESXi hosts send beacon packets every second.
- Notify switches: This option is a single option (by default it's enabled) used to speed up the change of the network topology at the physical switch level. When the physical port used for the VM traffic must be re routed to a different physical port (for example, due to link failure), then the virtual switch sends notifications over the network to update the lookup tables on the physical switch. The same happens during vSphere vMotion migration. The protocol used is Reverse Address Resolution Protocol (RARP).
- Failback: This option is another single option (again, by default it's enabled) that determines how a physical adapter is returned to active duty after recovering from a failure. By default, the adapter returns to active duty immediately.
- Failover order: This option specifies how the different uplinks (the physical NICs) are used:
- Active adapters: These continue to use the uplink when it is up as active.
- Standby adapters: If there are no active adapters that are up, then the next uplink from the standby adapter list will be used.
- Unused adapters: Never use this uplink.
- Traffic shaping: This can be used to allow only specific bandwidth to traverse over the virtual switch. With only the standard virtual switch on outbound network traffic can be shaped. When you need bidirectional control, you must use vDS inbound and outbound traffic. This option is disabled by default.
The following configuration options are available:- Average bandwidth (kbit/s): Establish the number of bits per second to allow across a port, averaged over time. This number is the allowed average load.
- Peak bandwidth (kbit/s): The maximum number of kilobits per second to allow across a port when it is sending a burst of traffic. This number is more than the bandwidth that is used by a port whenever the port is using its burst bonus.
- Burst size (KB): The maximum number of kilobytes to allow in a burst. This is useful if you want a permit whenever bandwidth peaks (a larger amount than the average bandwidth) for a limited time. Note that the burst is not expressed in time, but size.