
- Migrating a monolithic application to a micro frontends architecture
- Setting up a local development environment and examining techniques like micro frontend mocks to ensure independence
- Implementing automated testing in a micro frontends architecture
Micro frontends is not the first architecture for most companies. It’s something you migrate to because the old architecture has trouble keeping up with new demands like increasing team size or high demand for features.
If you are a fresh startup that needs to grow quickly, it might be a good idea to start with micro frontends from scratch. However, most larger companies use micro frontends to replace a functioning but slow or unmaintainable monolith. If you find yourself in the latter camp, this chapter will help you by highlighting some good migration strategies.
In the second part of this chapter, we’ll take a closer look at the developers’ day-to-day life in a micro frontends project. A team only works on its slice of the complete application. Developing a feature locally without seeing it integrated with the rest of the software will feel strange at first. You’ll learn techniques and tricks that make developing and testing easier.
14.1 Migration
Migrating a non-trivial project from one architecture to another is a scary and often costly task. You can take different roads, which all have their benefits and drawbacks. On the following pages, we’ll discuss three ways to move to a micro frontends architecture. This chapter will not be the definitive guide for software migrations. Lots of publications describe the essential parts you should think about when migrating a large project. Instead, we will focus on the micro frontend-specific aspects.
Having a somewhat realistic idea of the complexity and effort a migration takes is vital to set expectations and calculate costs. But when your team doesn’t have experience with the target architecture, it’s hard to come up with reasonable estimates. Playing around with the technology in a sandbox project helps to reduce the fuzziness. The examples in this book can be a good starting point for these experiments.
Micro frontends’ user-interface integration techniques are a valuable asset for incremental migrations. The micro frontends paradigm and its frontend integration techniques lend themselves well to building and integrating a proof of concept and even verifying it in your production application. Before we go into the migration strategies, let’s have a closer look at this proof of concept idea.
14.1.1 Proof of concept and building a lighthouse
You can adopt micro frontends by building a single feature as its own end-to-end system and integrating it into your existing application. Figure 14.1 shows a two-part diagram that illustrates this.
A real world example
Let’s look at a concrete example. The company Miniature Farming Industries, one of Tractor Model, Inc’s rivals, has a monolithic e-commerce shop that doesn’t perform well. They consider moving to a micro frontends architecture. To test out the waters and avoid losing a lot of time, they decide to develop one of their already planned features as a micro frontends application.
Miniature Farming Industries forms a new team dedicated to building this new feature: the wishlist. The core user-facing aspect is the wishlist overview page, where the users can see and manage their favorite products. Also, a user should be able to add products to the wishlist by clicking a small heart icon button on a product tile. The new team builds and owns both the wishlist page and the add-to-wishlist button.
The wishlist page should have the same header and footer as the other pages of the shop. Since the new team doesn’t want to duplicate the header and footer, they decide to include it from the existing application as a fragment. To make this possible, the team working on the monolith has to provide the header and footer as standalone micro frontends. In reverse, the wishlist team provides the add-to-wishlist button as a fragment for the monolith to include in every product tile.
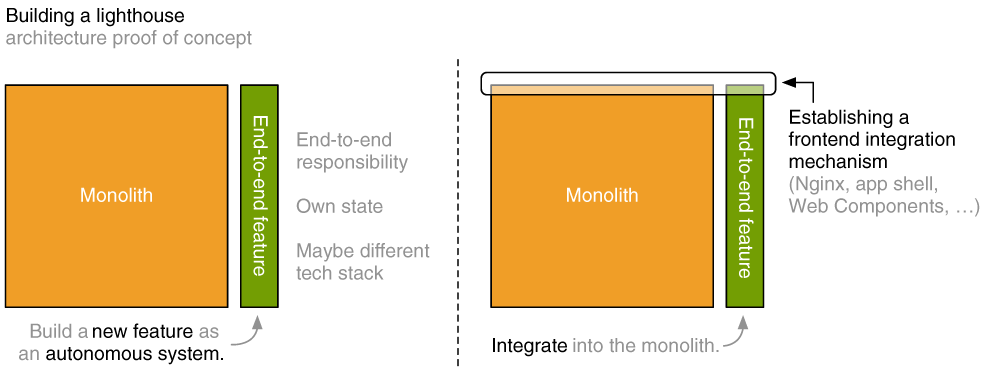
Figure 14.1 To try out the micro frontends architecture, you build a new feature as a dedicated application that has its own state but also includes the associated user interface. It’s decoupled from the existing monolith. That’s why the team responsible for this new feature can build it based on a new technology stack if it wants to (left). A frontend integration mechanism is established to integrate this new application with the monolith (right). The frontend integration can be as simple as using hyperlinks between both applications, but depending on your architecture choice, it might also be the introduction of a frontend proxy or application shell.
The teams must establish a shared integration technique. They go with a server-side composition using SSI. Therefore they install an Nginx server as a frontend proxy that sits in front of both applications. This server has two tasks: routing and composition. All requests starting with /wishlist get routed to the new application; all others hit the monolith. The web server also handles composition. It replaces the header/footer SSI directives of the wishlist page with the actual markup from the monolith.
That’s everything required to make the integration work. Ok, not quite. The teams also needed to work on some other relevant topics. The frontend developers refactored the CSS code of both systems to ensure that the old and the new application don’t over-style each other. The backend developers had to build an import for necessary product data like image, name, and price. The data import is necessary to ensure that the new system has its own data store and doesn’t depend on the monolith at runtime.
The role model
If everything goes as planned, this first vertical system can act as a lighthouse for your migration project. We’ve established a frontend integration mechanism that new systems can use. The “proof of concept” can become the role model other teams can follow to build new features.
14.1.2 Strategy #1: Slice-by-slice
The first migration strategy, slice-by-slice, is a natural progression from our earlier proof-of-concept. Figure 14.2 shows a monolith that’s migrated to a three-team micro frontend architecture.

Figure 14.2 Migrating a monolithic application (left) to a three-team micro frontends architecture (right). In this diagram, we create three new applications (Team A-C), which take over functionality from the monolith step by step until the monolith has vanished (middle). Like in the previous example, we start with establishing the required frontend integration mechanism that handles the routing and composition of the different applications.
How it works
First of all, we need a shared plan for what the final team boundaries should look like. Which team owns which feature? We talked about methods to identify these boundaries in the previous chapter. After these decisions, the teams can go ahead, set up their new applications, and start migrating functionality from the monolith into their micro frontend application. They migrate the system feature by feature. The first feature to extract might be product reviews. One team moves the feature over to their application, from user interface to the database.
The teams establish a frontend integration mechanism that handles routing and composition. After migrating a feature, the team replaces the associated user interface in the monolith with the new micro frontend’s UI. Then they tackle the next feature.
The teams repeat this process until the monolith has vanished. This migration follows the Strangler Fig Pattern. 1 This pattern describes how a new application gradually replaces the existing one. During the migration phase, both applications are still in business.
Benefits and challenges
The main benefit of this incremental migration approach is that it introduces little risk. The newly created software goes into production regularly. There’s no big-bang moment when switching from the old to the new system. The system is always in a working state. Even if you decide to cancel the migration project in the middle of the process, you have a functioning application. All software that’s written goes to production quickly.
Projects where legacy code works together with newly created systems are often called brownfield projects. 2 This term is in contrast to greenfield projects, where you build a new system from scratch on a “clean sheet” without caring about the existing architecture.
Compared to a greenfield project, our incremental approach requires more thought, understanding of the existing system, and coordination. Extracting features from the monolith does not mean that you have to remove them. However, you will at least have to adapt the monolith’s user interface along the process to play nice with the new micro frontends. Depending on the software quality, the CSS code and lack of proper scoping are often the most significant tasks that you face. Web Components and Shadow DOM can be of help. Revisit section 5.2 for more details on this.
14.1.3 Strategy #2: Frontend first
The frontend-first approach follows a similar pattern, but avoids mixing the old and the new frontend code. Not having to care about the “old frontend code” can make your life easier, especially when you are planning to do a frontend facelift along the way. Figure 14.3 shows the migration process.

Figure 14.3 We start with a monolith (left). The migration has two phases. In the first phase, we replace the frontend of the monolith with three new frontend applications, which are each owned by one team. The frontends communicate via APIs with the old monolith. In the second phase, we migrate the backend with the slice-by-slice approach, migrating each API endpoint into the new backend application of the responsible team. After the backend migrations, we’ve reached our goal: a vertically sliced application (right).
How it works
Here the migration is a two-phase process. We start with the frontend. It’s rebuilt to fit into the desired vertical structure. You need to plan team boundaries and responsibilities ahead of time. Each team builds its own part of the frontend. Teams integrate their user interface via the known routing and composition techniques. The new frontends receive their data from the old monolith. In this process, new APIs are added to the monolith to serve the data needs of the frontend applications.
In the second phase, we start splitting up the backend. The APIs we’ve implemented in the previous step define the boundaries and guide the way for the backend. Each team creates a backend application that’s able to replace the monolith APIs its frontend relies on. In this phase, we can again apply the slice-by-slice pattern. The teams replace API after API until the monolith isn’t required any more.
Now we’ve reached our desired state. The monolith has vanished, and each team owns a system that reaches from frontend to backend.
Benefits and challenges
As I said before, the most significant benefit with the frontend-first approach is that we don’t have a phase where the old and new frontend code mixes. There are no issues with leaking styles or unexpected side effects because we create a clean, new frontend landscape in one step. If your frontend does not contain too much business logic and complexity, this approach also has the benefit of delivering fast results.
We had good experiences with this approach. However, it has two disadvantages that you should consider.
The required frontend and backend work will not be distributed evenly. The first phase is more frontend-heavy, and in the second phase, the backend work dominates. You can counteract this by overlapping the phases or, even better, encourage your teams to work cross-functionally.
The second aspect you should keep in mind is that visible progress in this model is non-linear. From an outsider’s or the management’s perspective, the first phase, rebuilding the frontend, will introduce a lot of improvements. Even if you don’t build new features, the use of modern technology or the introduction of a new design will make the site feel faster and fresher. The second phase will, at best, not introduce any visible change to the user at all. This lack of visual progress might not be a problem, but you should manage expectations accordingly.
14.1.4 Strategy #3: Greenfield and big bang
The greenfield and big bang approach is the easiest from a conceptual standpoint. The old system stays as is, and you build a new system in a clean environment in parallel: a greenfield project. When the new system is ready, we switch over to the new system: the big bang. Figure 14.4 illustrates this approach.

Figure 14.4 We set up our new team structure and system architecture beside the existing monolith (left). The new and old systems don’t share anything. During the development phase, all incoming traffic still arrives at the monolith (middle). When the teams finish building the new system, we direct the incoming traffic to the new system, and the monolith is out of use (right).
How it works
We make a plan for how the new system should look and set it up in a new environment that’s separate from the existing monolith. The development of the old system is often halted to avoid extending the migration phase. The teams start building their slices of the system. When all teams are finished implementing the features that are necessary for production, we route the incoming traffic to the new system and retire the old one. The old and the new systems don’t mix at any time. Users are either using the old or the new system.
Benefits and challenges
The main benefit of a greenfield approach is the fact that we can start fresh and don’t have to deal with legacy code. The clean slate makes it easy to adopt techniques like continuous delivery or introduce a new design system that can be free of hacks and compromises. Because teams can focus on building the new architecture and don’t have to wrestle with the legacy system, development will be faster.
We’ve used this migration strategy in different projects. It’s attractive when it’s hard to adapt the existing monolith during the migration process. This inflexibility may be the case when the monolith relies on proprietary technology that you can’t change, or when it’s on a very long deployment cycle that would slow down your development.
But as the big bang in the title implies, there’s a considerable amount of risk associated with this approach. The teams develop the new system over a long period without receiving real user feedback. Verifying that the system works in production is extremely valuable. Consider moving users to your new system as early as possible. Having actual users reduces risk and increases confidence in the system you’re building. Concepts like releasing it as a beta version or testing it in smaller markets can be of help.
Now you’ve seen a couple of strategies for getting from monolith to micro frontends. There’s no golden way, and it always depends on the system you have and the goals you want to reach with the new architecture. But leveraging frontend integration techniques to gradually replace the old monolith with new micro frontend applications is a powerful tool that you should consider.
14.2 Local development
Now we’ll leave the architecture level and zoom into the day-to-day life of a developer working in a micro frontends project. Running and developing a classical monolith is pretty straightforward. You can check out one source code repository, which contains everything required to start the complete application on your local machine. Everything should work, and you can try the application in your browser from start to finish. With a distributed architecture like micro frontends, this gets more complicated.
14.2.1 Don’t run another team’s code
Each team has its source code repository, and teams may have different tech stacks. Yes, it might be possible for a developer to not only have their team’s repository checked out but also pull an up-to-date copy of the other team’s source code regularly. While this might work, it can become cumbersome very quickly. Having to know about the development environment of other teams introduces friction.
What do you do if the other team has a bug that prevents their application from starting? Has Team B upgraded to the latest version of Node.js or are they still on the old one? You shouldn’t have to care about these kinds of problems to do your job. You should be able to focus on the code your team owns. So, let’s talk about how we can develop without running other people’s code.
14.2.2 Mocking fragments
TIP You can find the sample code for this chapter in the 21_local _development folder.
Ok, so if I can’t run the code from other teams, how can I develop? On a page level, the answer is simple: replace other teams' fragments with mock versions of them. Let’s look at Team Decide’s product page.
Go into the sample code and run the following command:
npm run 21_local_development |
|
Open up http://localhost:3001/product/porsche to see the product page in local development mode. Figure 14.5 shows the result.

Figure 14.5 Team Decide’s product page in local development mode. The fragments from the other teams are replaced by simple mock micro frontends.
We see the product page, but the fragments from the other teams (recommendations, Buy button, and mini-cart) got replaced with mock versions of these micro frontends. But the page itself is working as expected. You can toggle the platinum option and the product image updates accordingly.
The product page you are seeing does not include any code from other teams. In development mode, Team Decide omits the script and style tags from the other teams’ fragment definitions. Not loading these files would lead to empty blocks where the fragments should be.
To improve this, Team Decide created its simple mock implementations for the three fragments. You can find the associated code in team-decide/static/mock -fragments.(css|js). Since we are using Custom Elements for integration, it’s pretty easy to mock the fragments. Here is the code for one mock.
Listing 14.1 team-decide/static/mock-fragments.js
...
class CheckoutMinicart extends HTMLElement {
  connectedCallback() {
    this.innerHTML = `<div>minicart dummy</div>`;
  }
}
window.customElements.define("checkout-minicart", CheckoutMinicart);
...
This code is a pretty simple mock that just shows a text. But if you expect a fragment to throw an event, you can get more sophisticated and, for example, add a button that triggers the event.
NOTE The example uses client-side rendering, but the concepts are also applicable for a server-generated application. Instead of replacing Custom Element definitions, you’d route the fragment’s HTTP request to an endpoint that returns mock markup.
Using mock fragments instead of pulling in real components will make development more straightforward and more robust. You only have to fire up your application, and if something breaks, you can be sure that it’s the fault of your code.
Each team that provides a fragment should document its interface. The interface lists the parameters it understands and the events it can emit. The fragment documentation can be the basis for creating your local mock.
Warning If you find yourself in a situation that requires building a lot of sophisticated mocks to develop and test your software, you might have issues with your team boundaries. Make sure the responsibility for one use case is not spread across different teams.
14.2.3 Fragments in isolation
Let’s see what developing a fragment looks like. Keep the sample application running and open your browser at http://localhost:3003/sandbox to find Team Checkout’s sandbox page, which shows both of their fragments. Team Inspire has a similar page running on port 3002. Figure 14.6 shows both sandbox pages.

Figure 14.6 Each team has its own sandbox page where it can develop and test fragments in isolation. The sandbox page also contains some toggles to simulate communication.
Development page
The sandbox page acts as the development environment for fragments. It’s an empty page (in this case with a stripy background) that contains a team’s fragments. The page itself also includes basic global styles like root font definitions and some CSS resets, since you don’t want every fragment to redefine these styles itself. Tools like Podium create such a page out of the box, 3 but building this page from scratch is also not complicated. You’d also use your favorite live-reload or hot-code-replacement solution here to make development more enjoyable.
Simulating interactions
Now we have an environment to develop our fragments in, but how do you test communication across micro frontends? You might have noticed the “sandbox toggles” section at the top of our pages. It contains a set of actions our fragments can react to.
You can, for example, use the “change sku” control to switch from one tractor to another. Changing the option will toggle the associated sku attribute of the Buy button fragment, which should then update its price accordingly. In the example, the toggle mechanics are a few lines of plain JavaScript in the sandbox file.
The mini cart also updates itself when someone clicks the Buy button. You can test this fragment-to-fragment communication on the sandbox page. Click the button, and the product will appear in the mini-cart. The mini-cart listens to the checkout:item _added event on the window, just as it would on a fully integrated page. The sandbox page also has a dedicated add random product button that triggers such an event.
Independence through mocks
Working with mocks can give you a lot of independence and reduces inter-team friction. When tests fail, you can be sure that your own code caused the issue. It can’t be the fault of another team’s script, because they aren’t even included. This approach makes your integration pipeline run reliably. Investing some effort in good mocks will make your life easier and can save a lot of time down the road.
14.2.4 Pulling other teams micro frontends from staging or production
But in some cases, mocking is not sufficient. If you are trying to reproduce a mysterious bug, you might want to test with the real code.
If you’re doing client-side rendering, this can be easy. You don’t have to check out and build the other team’s code from scratch. Point the associated script and style tags to your staging or production environment and fetch the code for the other teams' fragments from there. Now you can debug how your local code plays with the released code from the others.
Single-spa even goes a step further. They’ve built a tool called single-spa-inspector that lets you do it the other way around. 4 You can open up a production page in the browser, and the inspector makes it possible to replace the released version of your code with your local development code. Single-spa uses import-maps to do the trick.
Pulling in fragments from a remote server is also possible with server-side rendering. There you’d advise your HTML assembly mechanism to fetch the markup for some routes directly from production. If you’re using Nginx and SSI, you can achieve this by changing the upstream configuration for the other teams to the production server but keeping your upstream pointing to localhost.
14.3 Testing
Automated testing has become the centerpiece of modern software development. Having good test coverage reduces the need for manual testing and enables you to adopt techniques like continuous delivery.
How does testing look in a micro frontends project? It’s not so different from testing in a monolithic project. Every team tests its application on different levels. They’ll have a bunch of fast-running unit and service tests and a couple of browser-based end-to-end tests.
You probably know about the testing pyramid. 5 It describes that tests with a low level of integration (for example, unit tests) are cheap to write and run quickly. Tests with a high level of integration run slowly and are expensive to maintain. Figure 14.7 shows a variant of the classic testing pyramid.

Figure 14.7 The testing pyramid shows that low-level tests are fast and cheap (bottom). Tests with a high level of integration, like browser-based end-to-end tests, are slow and expensive to maintain. In a micro frontends project, we can split the end-to-end test category (top) into types of tests: those that only run on one team’s UI and those that run across team boundaries.
In a micro frontends project, we can split the topmost category (UI or end-to-end tests) into two parts:
-
Isolation (most tests)--A team should perform the largest part of their user interface tests in an isolated environment without the code from other teams. These tests would run against a version of the software with mocked fragments. The team’s own fragments are tested in an isolated environment (sandbox), as shown in the previous section.
-
Full integration (very few tests)--Even if every team tests its fragments and pages accurately, there is a possibility of errors at the user interface boundaries. You should test critical transition points in full integration.
Full integration tests are hard to write because they require knowledge about the markup structure from at least two teams. We didn’t have good experiences with introducing an overarching integration test-suite that runs against the complete software. All our attempts ended in brittle solutions with lots of false positives. Also, the question “Who owns the overarching integration tests?” is hard to answer if you don’t want to introduce a horizontal testing team.
Instead, we go for a distributed approach. Every team can decide to test across the borders of their direct neighbors. Team Checkout could test if its Buy button micro frontend works when it’s integrated on Team Decide’s product page. Team Decide might check if Team Inspire’s recommendation fragment is not empty.
Summary
-
You can use the micro frontend’s user interface integration techniques to test out this architecture with your existing project. These techniques also enable gradual migrations, where new micro frontends replace the old monolith user interface slice by slice.
-
Replacing a current system slice by slice introduces low risk, because you have a working application at all times. However, mixing the new frontends with the monolith’s frontend can be challenging due to leaking styles. Using Shadow DOM for the new micro frontends can help.
-
If mixing user interfaces with the monolith doesn’t work, the frontend-first or a greenfield approach are good alternatives, but they come with a higher risk.
-
It’s a good idea to disable code from other teams in your local development and testing environment. Eliminating foreign code reduces complexity and makes the environment more stable. Creating simple mock micro frontends helps to get a more realistic impression of the layout.
-
Mock micro frontends can be static placeholders, but they can also include simple functionality like emitting events.
-
You can develop fragments on a dedicated sandbox page. It shows the fragment in isolation. This sandbox page can also contain some custom user interface to test communication (trigger events) or simulate changes in the environment (for example, change SKU).
-
Nearly all your tests should run against your own team’s code. Test in isolation where possible. In some cases, it might be necessary to test across team boundaries. A central testing team can be responsible for this. Another solution is that teams test the integration point to the neighboring teams themselves.
1.See http://mng.bz/yymy.
2.See http://mng.bz/aRno.
3.See https://podium-lib.io/docs/podlet/local_development.
4.See https://single-spa.js.org/docs/devtools.
5.See Martin Fower, “TestPyramid,” https://martinfowler.com/bliki/TestPyramid.html.