Chapter 11. Building your Microservice Pipeline: From Test to Release
We’re getting to an exciting stage in our Microservices architecture - the point where we actually deploy and test everything working together. So far, we’ve built principles, an operating model, an infrastructure foundation, a service design and two working Microservices. Now, we’ll take all those pieces and put them together as an implementation.
We’ll be covering a lot of ground in this chapter. We’ll build a new infrastructure environment called “staging”. Next, we’ll augment our code repository with a container build process. With a container ready to go, we’ll implement a deployment process using the ArgoCD tool. Finally, we’ll provision an AWS API Gateway to host an API for the system.
Note
Because of the scope of things we need to cover, we’ll only deploy the flight information microservice. However, you’ll be able to use all of the mechanisms we describe here to deploy the reservations service as well.
That’s a lot of parts! To make all this work, we’ll be using four different GitHub repositories with their own pipelines and assets (as shown in Figure 11-1). One of the reasons we’ve done it this way is that it matches up well with the operating model we defined in [Link to Come] and gives each of our teams their own responsibilities and domains to work in.

Figure 11-1. Deployment Overview
There’s a lot to cover, so let’s get stuck in with our first step: provisioning the AWS based staging environment.
Setting up the Staging Environment
Up until now, we’ve been deploying Microservices into a local developer environment. Now, we’ll take the same services we’ve built and tested and deploy them into the AWS based cloud infrastructure we developed in Chapter 5. Before we can do that we’ll need to make sure we have enough resources in the Cloud stack to let our Microservices run. If you’ve been paying attention, you’ll have noticed that the stack we built for our Sandbox environment doesn’t quite have everything we need for the Microservices we need to run.
When Microservices teams have autonomy over the design and build of their stack, infrastructure changes are common. In practice, you’ll need to find the right balance between of choice autonomy for your Microservices teams. Unlimited freedom can result in too much of an operations management and maintenance overhead. Too much restriction can result in inefficient and low value Microservices.
In our build, we started with two concrete choices: AWS hosting and container based deployment. Our Microservices teams have built on that foundation with their choices for programming languages, databases and even a new infrastructure component: the API gateway. The first thing we’ll need to do is identify Cloud versions of the local stack that’s been developed. Table 11-1 shows the stack decisions we’ve made.
| Capability | Local | Cloud |
|---|---|---|
Network |
Local |
VPC |
Container Orchestration |
None |
K8s |
Gateway |
Traefik |
Nginx and AWS API Gateway |
Relational Database |
MySQL |
AWS RDS MySQL |
In Memory DB |
Redis |
AWS Elasticache Redis |
Deployment |
make |
ArgoCD |
We’ve already written Terraform code for most of the parts of the stack we need. But, we’ll need to add four new components to our infrastructure foundation before we can deploy our Microservices:
-
An AWS API gateway that routes messages into our environment
-
An Nginx gateway that routes messages into Kubernetes managed services
-
An AWS based MySQL database instance for the flights microservice
-
An AWS based Redis database instance for the reservations microservice
This is when our our immutable infrastructure and infrastructure as code approach really starts to payoff! We know exactly what our current environment build looks like, because all of it is in our Terraform code. All we need to do now is create new modules for each of these new components, update an environment definition and run the build through our pipeline.
In Chapter 5, we walked through the process of writing each Terraform module together. But, since we’ve already covered that in detail, this time we’ll use code and configuration assets that we’ve already written for you. You’ll just need to customize them a bit to fit your needs.
Let’s start by taking a quick tour of the two new modules we’ll be using to provision our new components. Starting with the Nginx ingress gateway module
The Nginx Ingress Module
In chapter Chapter 10, we introduced the concept of an edge router to encapsulate Microservices in an API. In our development environment, we setup and used a Traefik gateway to test this functionality. But, in the cloud environment, we’ve made a decision to use a cloud-specific managed service for this function - the AWS API gateway. All of the major cloud providers have API gateway services available to use. Using a cloud vendor’s service means we’ll have one less infrastructure component to manage ourselves.
However, the AWS API gateway won’t be able to route messages to our Kubernetes hosted services without a few changes to our design. That’s because the API gateway needs a way to send messages from its Amazon managed network into the private Kubernetes cluster that our Microservices are hosted in. In the language of AWS, that means we’ll need to create a VPC link and a Network Load Balancer (NLB) resource. Together, these components will let the AWS API gateway communicate with our private Microservices via HTTP.
Tip
The network configuration and ingress into the Kubernetes cluster that we are describing here is very specific to AWS. It’s a good example of how your decision on multi-cloud, cloud-agnostic or cloud-specific will have a big impact on the architecture you end up with.
This setup would be enough to get us going and would let us make calls to a public API that can invoke our private services. But, the downside is that it’s AWS specific and doesn’t take advantage of any of the features of the Kubernetes platform. For example, when you deploy a container in Kubernetes you can configure an ingress path that will be automatically provisioned for you. This is a nice way of allowing our Microserivce teams to declaratively, self-describe their access path. But, because the AWS NLB isn’t designed to understand anything in Kubernetes, we’d need to update the load balancer rules ourselves whenever a Microservice is deployed or changed.
Instead, we’re adding one more component into the mix - the Nginx Kubernetes ingress controller. This controller will do the work of “wiring” our Microserives’ ingress paths whenever they are deployed and routing messages to them in runtime. Now, messages will be received by an AWS API gateway, routed to an NLB in our Kubernetes cluster, handled by an Nginx ingress controller and finally routed to a target Microservice.
Nginx isn’t the only gateway that could do the work that we’ve just described. We could have used Traefik, the Istio service mesh that we’ve already installed in the foundation or a host of other Kubernetes friendly gateway products. We chose Nginx for this implementation because we wanted something lightweight and easy to install.
The terraform code to install the Nginx ingress controller is located at TK. It performs the following activities:
-
Declares the use of the Helm Terraform provider
-
Identifies an Nginx Ingress Helm package to install
-
Sets custom variables to ensure that an AWS NLB will be provisioned as part of the installation
When the module’s terraform is applied, our infrastructure will have a network load balancer and Nginx ingress controller installed and ready to use.
We’ll configure the API gateway and VPC link later in this chapter, when we properly deploy our Microservices. For now, let’s take a quick tour of the Terraform module that will provision the databases we need in AWS.
The Database Module
Each of our microservices use different databases, so we’ll need to make sure we have modules for both of them so they are provisioned and available to use. There are a few different paths you can take when you setup a database for your Microserivce teams to use:
- Shared Cloud Service
-
Use a shared database service managed by a Cloud provider (e.g. use an AWS database product)
- Shared Cloud Agnostic
-
Install and manage cloud agnostic shared database service (e.g. install a Redis container ourselves)
- Independent Database
-
Let your Microservices teams own, install and manage their own data stores (e.g. provisioning databases in Kubernetes along with their microserivces)
In keeping with our design principles of preferring to use existing services and products, we’ve decided to choose the first option and use AWS managed services for our data stores. This helps us remove some of the overhead that comes with software installation and operation, but comes with the trade-off that we are further tied to the AWS platform.
We’ll use the AWS Elasticache service to provision a Redis data store and the AWS RDS service to provision a MySQL instance. We’ve already written a Terraform module that does this, which you can find at https://github.com/implementing-microservices/module-aws-db. This Terraform module declares the following resources:
-
An AWS Terraform provider
-
Two subnets in a specified VPC for both databases to run in
-
A security group that allows traffic to flow between the Microservices and the databases
-
An RDS MySQL instance using the declared subnets and the security group
-
An Elasticache Redis instance using the declared subnets and the security group
When the module is applied to the staging environment, we’ll have both a Redis and a MySQL database instance running and ready for use. All we need to do now is update the environment configuration to use our new modules. To save time, we’ve already written a staging environment file that does this for you. To use it, you’ll just need to fork it from our repository and customize it for your environment.
Fork the Staging Infrastructure Project
Our staging environment is going to be very similar to the sandbox environment we created earlier. We’ll continue to follow DevOps principles, so we’ll need a Terraform environment definition and an automated pipeline to clean, test and apply changes.
In GitHub, a fork lets you make a copy of someone else’s code project in your own account. Forking isn’t a native feature of the git tool, but it’s a core feature of most Git hosting tools and both GitLab and GitHub will let you fork their projects.
To fork the staging environment repository: 1. Open your browser and sign in to your Github account 2. Navigate to https://github.com/implementing-microservices/infra-staging-env 3. Click the “Fork” button in the top right corner of the screen
Tip
If you are having trouble forking the repository, you can follow the instructions in the official Github documentation at https://help.github.com/en/github/getting-started-with-github/fork-a-repo.
Once the operation is complete you’ll have your own forked copy of the repository. The staging environment repository that you’ve just forked is almost identical to the infrastructure as code repository we created earlier in the book. In order to use it, we’ll need to make some customizations so that it will be able to operate with your AWS account and use the operations user we created earlier.
Configure the Staging Workflow
The first thing we’ll need to do is add AWS access management credentials and our mysql password to the GitHub repository configuration. You should have received AWS credentials in Chapter 4, back when we first setup the infrastructure pipeline. If you don’t have your AWS keys anymore, you can open the AWS management console in a browser and create a new set of credentials for your operations user.
When you’ve got your credentials in hand, navigate to the Settings pane of your forked GitHub repository and choose Secrets from the left navigation menu. Add the following secrets by clicking the New secret button:
| Key | Value |
|---|---|
AWS_ACCESS_KEY_ID |
The access key ID for your AWS |
AWS_SECRET_ACCESS_KEY |
The secret key for your |
TF_VAR_MYSQL_PASSWORD |
microservices |
Make sure you use type these key names exactly as described. If you don’t, the pipeline won’t be able to access your AWS instance and create resources.
When we forked the infra-staging-env repository, we made a copy of the GitHub Actions workflow that defines the pipeline. But, GitHub doesn’t automatically activate the GitHub Actions feature when you fork a repository. So, we’ll need to enable it by doing the following:
-
Click on the Actions tab in the Github management console for your forked repository.
-
If challenged, instruct Github to enable the workflow that we’ve forked

Figure 11-2. Enable GitHub Actions
Note
Github changes their user experience quite often, so the specific steps and screens you encounter might be different.
We are almost ready to run the pipeline and instantiate a new staging environment. But, we still need to customise a few local variables and configuration values in the Terraform code. We’ll make those changes in a local copy of the repository rather than in the GitHub browser interface. That means, you’ll need to create a clone of your forked repository on your local machine.
If you aren’t sure how to do this, follow the instructions at https://docs.github.com/en/github/creating-cloning-and-archiving-repositories/cloning-a-repository for your operating system. When you’re done, you’ll have a local copy of the repository’s files and we’ll be able to start customising the code.
Edit The Staging Infrastructure Code
The Terraform code that you’ve forked (and cloned) will provision a staging environment using Terraform modules that we’ve written for you. But, a few of the module’s variables will need be tweaked so that they’ll work in your environment. In particular we’ll need to set values for the properties identified in Table 11-3.
| Resource | Property Name | Description |
|---|---|---|
terraform |
bucket |
The name of the S3 bucket for your Terraform backend |
terraform |
key |
The identifier to use for your backend data in S3 |
terraform |
region |
Your AWS region |
locals |
aws_region |
Your AWS region |
To make these changes, you’ll need to edit the main.tf file in your local repository and update the property values. Table 11-3 identifies the Terraform resource block where you’ll find the property you need to update. When you are done, you’ll have something that looks similar to this:
terraform {
backend "s3" {
  bucket = "rm-terraform-backend"
  key = "terraform-env"
  region = "eu-west-2"
  }
}

locals {
  env_name = "staging"
  aws_region = "eu-west-2"
  k8s_cluster_name = "ms-cluster"
}
Since we’ve made a few changes to the Terraform file, it’s good practice to format the updated code. You may recall, we’ve done this a few times already using Terraform’s fmt command.
infra-staging-env$ terraform fmt
Our infrastructure code is almost ready to be validated and committed. But, if we were to try and test it we would find that the calls to create the MySQL and Redis database resources would fail. That’s because the user account we are using to call the AWS APIs doesn’t yet have permission to work on those kinds of resources. That means, we’ll need to update our user permissions using the aws client, just like we did earlier in the book.
Run the following AWS commands to add the required permissions to the Ops-Accounts group we created earlier:
$ aws iam attach-group-policy --group-name Ops-Accounts
 --policy-arn arn:aws:iam::aws:policy/AmazonRDSFullAccess &&
aws iam attach-group-policy --group-name Ops-Accounts
 --policy-arn arn:aws:iam::aws:policy/AmazonElastiCacheFullAccess
With those permissions set, we should be able to initialize, validate and plan the staging environment changes. If you recall, you can do that by running the following Terraform commands and troubleshooting any errors that you encounter:
infra-staging-env$ terraform init
[...]
infra-staging-env$ terraform validate
[...]
infra-staging-env$ terraform plan
[...]
When you’re satisfied that the proposed changes to the environment look good, we can apply the updated Terraform file and create a staging environment instance. We’ll do this using our automated pipeline by committing the files and tagging the release.
Commit and push your changes with the following git commands to tag a release it as v1.0:
$ git add .
$ git commit -m "Staging environment with databases"
$ git tag -a v1.0 -m "Initial staging environment build"
$ git push origin v1.0
You can validate the status of your pipeline run in the browser based Github console. If the pipeline job has succeeded, you now have a staging environment with a Kubernetes cluster and mysql and Redis databases running and ready to use. We’ll use the local kubectl command line application to access the cluster and make sure it’s running.
Testing Access to the Kubernetes Cluster
In order to communicate with the staging Kubernetes cluster we’ll need configuration details for the kubectl application. To get those details we’ll use the same process we used in Chapter 5 - download a configuration file and update our local environment settings.
Setup your Kubernetes client environment by downloading the kubecconfig file that our Github Action staging pipeline generated. Then set the KUBECONFIG environment variable to point to the configuration that you’ve just downloaded. If you don’t remember how to do this, you can review the steps in [Link to Come].
When the environment is setup, run kubectl get svc --all-namepaces to confirm that our staging cluster is running and the Kubernetes objects have been deployed. You should see a result that looks similar to Example 11-1
Example 11-1. Example of a get services result.
$ kubectl get svc --all-namespaces
NAMESPACE      NAME                                 TYPE           CLUSTER-IP       EXTERNAL-IP                                                                     PORT(S)                                                      AGE
argocd         msur-argocd-application-controller   ClusterIP      172.20.133.240   <none>                                                                          8082/TCP                                                     3h30m
argocd         msur-argocd-dex-server               ClusterIP      172.20.74.68     <none>                                                                          5556/TCP,5557/TCP                                            3h30m
default        ms-ingress-nginx-ingress             LoadBalancer   172.20.239.114   a2.elb.eu-west-2.amazonaws.com   80:32677/TCP,443:32466/TCP   3h34m
[... lots more services ...]
The result you see should list all of the Kubernetes services that we’ve deployed. That should include services for the ArgoCD application and the Nginx Ingress service. That means that our cluster is up and running and the services we need have been succesfully provisioned.
We’re almost ready to move onto the Microservice deployment steps, but before we do that we’ll setup one last thing that our Microservice will need - a Kubernetes Secret. When our Flights information microservices connects to MySQL, it will need a password. To avoid storing that password in plain text, we’re going to store it in a special Kubernetes object that keeps it hidden from unauthorized viewers.
Run the following command to create and populate the Kubernetes secret for the MySQL password:
$ kubectl create secret generic mysql --from-literal=password=microservices -n microservices
Note
The built in secrets functions of Kubernets are useful, but we recommend that you use something more feature rich for a proper implementation. There are lots of options available in this area including Hashicorp’s Vault product.
We now have a staging environment with an infrastructure that fits the dependencies of our Microservices. The next step will be to build and publish those services as containers so that we can deploy them into the environment.
Microservices Continuous Integration
In Chapter 10, we used make to test, build and run Microservices locally in a development environment. But, in order to build and deploy our services into testing, staging and beyond, we’ll want a more repeatable and automated process.
Using automation and DevOps techniques to build our services is a good idea because it improve the predictability, quality and speed of our Microservice deployments. This is the same principle we applied to our infrastructure build. In this section, we’ll build a continuous integration (CI) pipeline to build and publish the flights Microservice to a container registry.
Let’s start by introducing the container registry we’ve chosen to use for this project: Docker Hub.
Introducing Docker Hub as our Container Registry
Deploying our Microservices in containers gives us a lot of advantages that align really well with the 12 factor app principles that we are trying to embrace. When we run on containers we know that we are testing and running exactly the same code in every environment, because our containers are immutable. Containers allow us to be explicit about the environment variables that need to be set, so we know exactly what inputs are needed. They also force us to design applications that run in a single process, limiting the complexity of any single container. All of this makes our Microservices easier to manage and operate in a production environment.
In the previous chapter our make based build process used docker-compose and docker to produce containers for testing and release. But, in order to get those release-ready containers into our test and run environments, we’ll need a way to move them, or “ship” them over. Containers are a lot like binary applications, so we could just upload them as a packaged file into the filesystem of the target environment. But, this could get messy quickly as the number of containers we want to manage grows.
Instead, we’ll ship our containers into a container registry. A registry is a way of keeping all of our containers organised so that they are easy to discover, easy to retrieve, reliably stored and easy to manage and change. The registry is a vital part of the container lifecycle and we’ll need one in order to deploy our Microservices properly. Docker even defines an [https://docs.docker.com/registry/spec/api]API for registry operations and the Docker engine has in-built support for pulling images using it.
There are plenty of registry hosting options available that support the Docker registry API. All the major cloud providers can host a secure, private registry for you. You can also host your own registry server using Docker’s open source implementation. For this book, we’ll use Docker’s publicly hosted registry called DockerHub. We’ve chosen DockerHub because it’s free to use, it’s popular and it has good integration options with Github Actions. As always, you can revisit this decision on your next Microservices architecture build.
Configuring DockerHub
In order to use the Docker Hub registry you’ll need to have a Docker account. If you installed Docker when you setup your developer environment, you’ll have setup your Docker ID already. If you don’t have one yet, visit https://hub.docker.com to create one.
-
Login to DockerHub (if you haven’t already)
-
Click the Create Repository button
-
Give the repository the name
flights -
Click the Create button
If you run into problems, you can visit the documentation site at https://docs.docker.com/docker-hub/repos/.
Now that we are armed with a Docker account and a container repository, we’re ready to build and push containers into it with a CI pipeline.
Configuring the CI Workflow
So far, we’ve been using GitHub Actions as our pipeline tool for all of our infrastructure as code based provisioning work. It does the job well enough for our needs, so for the sake of consistency we’ll use Actions again as the pipeline for our Microservices container builds. As an added bonus, we’ll be able to take advantage of actions that Docker has published that will make our workflow easier to integrate with DockerHub.
In Chapter 10, you should have created your own forked repository of the flights microservices code. We’re going to create our GitHub Actions workflow inside your forked repository so that our CI pipeline can live right alongside the code.
Note
If you haven’t already created a forked version of the flights microservice, you can do that now. The GitHub repository is located at https://github.com/implementing-microservices/ms-flights
Just as we’ve done before, we’ll need to add secrets to our repository settings, define a trigger for the workflow and come up with some job activities that need to be performed. When we’re done we should have a workflow that tests, builds and pushes a containerized service into DockerHub.
Configuring DockerHub Secrets
Our workflow will need to communicate with DockerHub in order to publish a container. That means, we’ll need to add our DockerHub access information as secrets in the flights GitHub repository. Specifically, we’ll need to create and populate two secret keys as defined in Table 11-4.
| Key | Description |
|---|---|
DOCKER_USERNAME |
Your Docker account identity |
DOCKER_PASSWORD |
Your Docker account password |
We’ve gone through the details of setting up secrets a few times already, but just as a reminder, you’ll need to do the following:
-
Using your browser, navigate to the settings page of your forked
ms-flightsrepository in GitHub. -
Select Secrets from the side navigation
-
Add the secret you want to define by pushing New Secret.
You may have noticed that we aren’t adding any AWS account secrets to this repository. That’s because we won’t be deploying into an AWS instance in this pipeline. This workflow will only focus on pushing containers into the DockerHub registry - not the deployment of the containers into our staging environment.
This is a useful separation to create because we want our microservice containers to be portable and environment agnostic. That means we won’t be adding any environment specific logic or values into the build. This aligns well with our principles of 12 factor app development. Using the same built container in all of our test and release environments should improve the reliability of our system overall.
All we need to do now is create the workflow that does the work of building, testing and publishing.
Understanding the MS-Flights Workflow
To save some time, we’ve already written a GitHub Action workflow which we’ve included in the ms-flights repository that you’ve forked. But, to use it you’ll need to enable it. You can do this by navigating to the Actions tab in your forked repository, where you’ll be prompted to enable the workflows we’ve given you.
Once the workflow is enabled, you can take a look at the code in /.github/workflows/main.yml. Let’s take a look at the Action workflow to understand what it does.
Every GitHub Action workflow needs to define a trigger for execution. Our CI workflow uses the same trigger we’ve used previously, as shown in Example 11-2.
Example 11-2. CI Pipeline: Trigger
name:Flights CICDon:create:tags:-v*
As before, our workflow will be triggered by a git tag that starts with the pattern “v”. This will allow us to label releases of our Microserivce code that we’ve pushed into DockerHub. It also means that we can trigger a test, build and deploy job from the development environment, whenever we push a “v*” tag into this repository.
One of the goals of our pipeline is to make sure that our code works before we create a container build. So, the first thing we need to do after checkout out the source code is to run unit tests, as shown in Example 11-3.
Example 11-3. CI Pipeline: Run Unit Tests
[...]jobs:build:runs-on:ubuntu-latest-uses:actions/checkout@v2-name:Run Unit Testsrun:make test
We’re using the same make test function that we used in the development environment, so the test quality will only be as good as the tests we create. That means our Microservices teams are responsible for the quality of their own code and services - which fits in well with the operating model we defined earlier.
Note
We’ve chosen to implement a bare-bones testing step for the sake of brevity. But, when you build your own Microservice architecture, it’s a good idea to add testing steps that can automatically check for test coverage, code formatting, code security and dependency scanning before you move to the build stage of the pipeline.
Finally, we need to create a containerised build of our Microservice and push it to DockerHub using our Docker account credentials. In the development environment, we used make to quickly build and run the service. But, in our CI pipeline we’ll use an action developed by the Docker team to do that work, as showin in Example 11-4.
Example 11-4. CI Pipeline: Build and Push Container
[...]jobs:[...]-name:Build and push containeruses:docker/[email protected]with:username:${{ secrets.DOCKER_USERNAME }}password:${{ secrets.DOCKER_PASSWORD }}repository:${{ secrets.DOCKER_USERNAME }}/flightstarget:releaseadd_git_labels:truetag_with_ref:true
This GitHub Action provides a nice, concise way of combining the build step and the push step that we need in our workflow. We’ve configured this action to use the GitHub secrets we created earlier. We’ve also set the action property add_git_labels and tag_with+ref to true. This means that the container we push will have the same “v*” label that we’ve used to tag the build, making it easier for us to identify the source code associated with a container in the registry.
Tip
Make sure that the repository value that we’ve used (flights), matches the name of the repository that you created when you configured DockerHub.
That’s the last step in the workflow. All we need to do now is trigger the workflow and build our first Microservice.
Build and Push the MS-Flights Container
As we’ve done throughout this book, we’ll shift over to a local development environment to make changes and create a tag to trigger our GitHub Action pipeline. You should already have a local copy of the MS-Flights repository in your local environment, so we’ll create our tag using that cloned repo.
It’s good practice to pull changes before we start working with our clone, so use git pull to get up to date with the origin repository:
ms-flights $ git pull
Now, we just need to create a new tag and push it to the repository. We’ve done this before with our infrastructure code. We’ll the same thing for our Microservices code using the following commands:
ms-flights $ git tag -a v1.0 -m "Initial release"
ms-flights $ git push origin v1.0
Pushing the “v1.0” tag should trigger our Github Action workflow and the associated job. If all of our tests pass, the Docker action will run, building and pushing the container into the DockerHub registry.
Validate that your job has run successfully by visiting the GitHub action tab in your forked MS-Flights repository. You should see something that looks like Figure 11-3

Figure 11-3. MS-Flights CI Successful
If the job has run without any errors, visit DockerHub and verify that your container has been pushed into your msupandrunning repository. You should see something like Figure 11-4.

Figure 11-4. MS-Flights container pushed
We now have a containerized ms-flights microserivice ready to be deployed into our staging environment. We’ve also included a GitHub Actions workflow in the ms-reservations repository. We’ll leave it to you to make similar changes in a forked version of that service so you can build and release a container for it as well.
With our Microservices available in a container registry, we can move on to the work of deploying them into our staging environment.
Deploying the Flights Service
We’ve now got all the pieces in place to deploy a Microservice. We’ve provisioned a test environment using our infrastructure pipeline and we’ve created a deployable containerized image for the service. To complete our deployment work, we’ll use the ArgoCD continuous deployment tool we installed in our infrastructure stack in Chapter 5. When we are finished this section we’ll have a running version of the flight information Microservice deployed and ready to be used.
To make repeatable deployment easier, we’ll be creating a new deployment respository that will contain Helm packages. These packages will describes how a microservice should be deployed. Then, we’ll point ArgoCD at that repository so we can perform “push button” deployments. But, before we get into the details of using a continuous deployment tool, let’s get a better understanding of how deployment works in a Kubernetes environment.
Understanding Kubernetes Deployments
In Chapter 5, we introduced and installed Kubernetes to help with operating and running our container based Microservices. Kubernetes is popular because it handles a lot of the work that needs to be done to start containers, check on their health, find services, replicate them and start them again when they fail. This gives our system the resilience and self-healing qualities that will help us meet our guiding principles.
But, a Kubernetes cluster still needs to be told what to do. It can’t deploy your Microservices without knowing where to find the container image. It can’t check on the health of a Microservices without knowing which API to call. We also need to provide Kubernetes with some limits for the number of container instances we want it to create and how those services should be accessed over the network.
Kubernetes sees the world as a set of declarative configuration objects. To configure a microservices deployment, you need to describe the optimal state for a running version of your container. Provided that you’ve described your running configuration correctly, Kubernetes will do the work behind the scenes to bring your service to life - and keep it that way.
This declarative approach is similar to the way we used Terraform to describe our infrastructure resources. In Kubernetes, we’ll define a set of special deployment objects using the YAML format. The truth is that Kubernetes is incredibly complicated, so we won’t be able to go into a lot of detail in this book. But, it’s helpful to cover a few of the core objects so that we can understand how our microservices will be deployed.
Understanding Kubernetes Objects and Controllers
There are a lot of object to learn about if you want to properly understand how to run a Kubernetes platform. But, for our purposes, we’ll just need a surface level understanding of five key objects in order to create a simple deployment package for our flights microserivce: Pods, Replicasets, Deployments, Services and Ingress.
- Pods
-
A pod is an object that describes a basic workload unit. It defines one or more docker containers that need to be started and managed together. Generally, you don’t need to create pods yourself, instead you define controllers that will create Pods for you.
- ReplicaSets
-
ReplicaSets let Kubernetes know how many instances of a specific pod it should start up and run at the same time. You usually won’t need to work with ReplicaSets directly.
- Deployment
-
The Deployment controller declares a desired state for a Pod and associated ReplicaSets. This is the main object you need to work with to create a Kubernetes deployment.
- Service
-
A Service defines how applications in the Kubernetes cluster can access this Pod over the network - even when there are multiple replicas running at the same time. The Service object lets you define a single IP and port for accessing a group of replicated Pods. You’ll almost always want to define a service for a Microservice deployment.
- Ingress
-
The Ingress object allows you to identify an ingress route to your Service for applications that are outside of the cluster. The Ingress declaration can include routing rules so that an Ingress controller can route messages to the right services.
In order to deploy our microservice, we’ll need to write declarative configurations for Ingress, Service and Deployment objects. Although we won’t be writing configurations for Pods and ReplicaSets directly, we will need to write specifications for them in the Deployment object. To make the work of creating this deployment a little bit easier, we’ll be using a Kubernetes packaging tool called Helm.
Creating a Helm Chart
The managed Kubernetes cluster we created in our staging environment provides an API that we can use to create some of the objects that we’ve just described. We could write these objects as YAML files and use the kubectl command line application to apply them in our cluster. But, the problem with that approach is that managing all of those Kubernetes files for lots of microserivces across different enviroments can be difficult.
Instead, we’ll use a tool that most microserivces practitioners use with Kubernetes - Helm. Helm is a packaging tool that makes it easier to describe a Kubernetes deployment in a templated way. We’ve used Helm in our infarstructure configuration to install packages that other people have written for some of our installations. Now, we’ll write our own Helm package to make it easier to deploy our flight information services.
To use Helm properly, we’ll need to understand three important concepts: charts, templates and values.
- Charts
-
A Chart is a bundle of files that describe a Kubernetes resource or deployment. The chart is the core unit of deployment in Helm. We’ve used charts that other people have made earlier in this book when we’ve deployed Kubernetes based applications like ArgoCD.
- Templates
-
Templates are files in a Chart that describe a specific Kubernetes resource. They’re called templates because they contain special instructions that Helm uses to replace values in the file. For example, you can create a Service template for a microservice and make the port number of the service a templated value.
- Values
-
Every chart has a values file that defines the values that should be used to populate a template. Value files are a useful way of managing the differences between environments. Values can also be overridden when the Helm chart is installed.
Our goal will be to build a Helm chart for our flights service. This is useful because we’ll be defining templated files that describe our Kubernetes deployment that we can re-use with different values depending on how or where we want to deploy the service. For example, the network address of a database server or the number of instances of a microservice we need may be different between a development versus a production environment.
We’ll be keeping our Helm chart files in Github, so the first thing we need to do is create a new repository.
Create the Microservice Deployment Repository
So far, in this chapter we’ve used a repository for the staging environment infrastructure code and a repository for the microservice code. Now, we’re going to create yet another repository - this time for our microserivces Helm packages. Unlike our previous repos, this one will be a monorepo, which means that we’ll keep all of the deployment packages for all of our microservices in a single Git repository.
This decision has the impact of forcing us to keep our deployment files separate from the code files as well as managing all the deployment assets together in a single place. This model is a good fit for our operating model because it lets our operations team own and manage Microservice deployment work with less co-ordination costs with individual teams.
To get started with our deployment monorepo, create a new Github repository called ms-deploy. Once it’s ready, create a local clone of the repository in your local environment. We’ve done this a few times already, so we won’t go through all the details again. If you can’t remember how to do this, take a look at section [Link to Come].
Tip
A finished version of the deployment repository for the flight information and reservations services is available at https://github.com/implementing-microservices/ms-deploy
You should now have an empty Git repository ready to be populated with Helm packages. The easiest way to start working with Helm files is to use the Helm CLI. If you don’t have it already you’ll need to install it.
Helm’s CLI application allows you to create, install and inspect Helm charts by using the Kubernetes API. In our examples, we’ll be using Helm version 3.2.4 which you can find at https://github.com/helm/helm/releases/tag/v3.2.4
When you have Helm downloaded and installed, you’ll be ready to create the ms-flights chart.
Create a Helm Chart
One of the nice things about the Helm CLI is that it provides a handy function for bootstrapping a new chart really quickly. To create our skeleton chart, make sure you are in the root directory of your ms-deploy repository and run the following command:
ms-deploy $ helm create ms-flights
When it’s done, Helm will have created a basic packages that contains a Chart.yaml file which describes our chart, a values.yaml file we can use to customize chart values and a templates directory that contains a whole set of Kubernetes YAML templates for a basic deployment.
The great thing about using Helm is that most of the boilerplate code that we’d need to write for a basic Microserivces Kubernetes deployment has been handled for us. We’ll only need to make a few small changes to the templates that Helm has generated for us to have a working, deployable package.
In particular, we’ll need to update the templates/deployment.yaml file just a little bit to make it more specific to the container that we want to deploy.
Update the Flights Deployment Template
The /ms-flights/templates/deployment.yaml file is a Kubernetes object description file that declares the target deployment state for a Pod. We’ve already mentioned that Kubernetes objects can get pretty complicated. The good news is that the file that Helm generated for us includes a lot of placeholder values that we can leave as is. But, we’ll need to make a few small changes for this deployment to work for our flights microservice.
Let’s start by getting a basic understanding of some key YAML properties in the deployment object:
apiVersion-
Every Kubernetes YAML file specifies the version of a named Kubernetes API that this file uses.
kind-
Identifies the type of Kubernetes object. In this case, the object is “Deployment”.
spec-
The specification for the Kubernetes object - this is the heart of the description.
spec.replicas-
Specifies the number of replicas we want for this deployment. Kubernetes will create ReplicaSets for us based on this value.
spec.template-
The
templateproperty of the Deployment spec is the template for the Pod that we are planning to deploy. Kubernetes uses this template to provision the pods we are deploying. spec.template.containers-
The
containersproperty of a Pod template identifies the container image and environment values that Kubernetes should use when it creates a replica of a Pod.
For our simple deployment, we’re going to use the default values that Helm has generated for most of the Deployment object’s properties. But, we’ll need to update spec.template.containers so that it works for the ms-flights container that we’ve built.
Update the containers YAML so that it contains the env, ports, livenessProbe and readinessProbe values shown in Example 11-5.
Example 11-5. ms-flights Template Specification
spec:[...]template:[...]spec:[...]containers:-name:{{.Chart.Name}}[...]imagePullPolicy:{{.Values.image.pullPolicy}}env:-name:MYSQL_HOSTvalue:{{.Values.MYSQL_HOST | quote}}-name:MYSQL_USERvalue:{{.Values.MYSQL_USER | quote}}-name:MYSQL_PASSWORDvalueFrom:secretKeyRef:name:{{.Values.MYSQLSecretName}}key:{{.Values.MYSQLSecretKey}}-name:MYSQL_DATABASEvalue:{{.Values.MYSQL_DATABASE | quote}}ports:-name:httpcontainerPort:5501protocol:TCPlivenessProbe:httpGet:path:/pingport:httpreadinessProbe:httpGet:path:/pingport:http[...]
Note
A completed example of both the ms-flights and ms-reservations helm charts is available at https://github.com/implementing-microservices/ms-deploy.
The updates we’ve done to the containers section declares the following:
-
A templated set of environment variables for connecting to a MySQL Database. We’ll set the actual values later.
-
The TCP port that the flights microserivce binds to and our container exposes.
-
Liveness and readiness endpoints that Kubernetes will use to check if the Pod is still alive. It will uses these checks to determine if a new Pod needs to be instantiated to meet the replica state.
That’s all we need to customize to make the generated Helm templates work for our flight information service deployment. All that’s left is to define the values for the template when we want deploy the service into our staging environment.
Set Package Values
One of the nice things about using a Helm package for deployment is that we can re-use the same template for lots of different deployment by changing just a few values. One way to set those values is through the Helm client at the time of installation. This is what we did earlier in the book when we’ve installed Helm packages for ArgoCD and NginX.
Another option is to create a file that serializes all of the values you want to use in a single place. This is the approach we’ll take for our deployment package, because it gives us the advantage of managing these values along with our code. In practice, when you have lots of different environments you can maintain multiple values files. But, for the sake of simplicity, we’ll just edit the default values file that Helm has created for us and add some values that are specific to the staging environment.
When we’re done will have values that identify MySQL connection parameters, the location of our flights container image and the ingress rules for routing messages to it. One of the values we’ll need to define is network address of the MySQL database. Run the following AWS CLI command to get those details:
aws rds describe-db-instances
    --db-instance-identifier microservices-mysql | grep "Address"
Tip
If you don’t get a result from this command, remove the | grep "Address" part and run it again to see what you are getting back from AWS.
You should get a result that looks something like Example 11-6. Make a note of the address value so we can use it for our MySQL connection values.
Example 11-6. Example of an RDS Address
"Address": "microservices-mysql.cvwyhqlgawf0.eu-west-2.rds.amazonaws.com",
With that address in hand, we’re ready to edit our flights package’s value file. Open the values.yaml file that Helm created for you in the root directory of the package in your favourite text editor. We’ll leave most of the values in this file as is, but we’ll need to make a few changes for our service to work.
The first thing we’ll need to update are the details for the Docker image. Find the image key at the beginning of the YAML file and update it with the details of your flights microservice container. For example, Example 11-7 refers to the reference image we created for the book.
Example 11-7. Image example
replicaCount: 1

image:
  repository: "msupandrunning/flights"
  pullPolicy: IfNotPresent
  tag: "v1.0"
Note
Make sure that the repository and tag values match the details for the container you deployed into DockerHub if you want to use your own container.
Next, we’ll add the MYSQL connection values that we defined in the environment section of our template. Add the following YAML after the image key in your values file, replacing the MYSQL_HOST value with the address you retrieved earlier:
MYSQL_HOST: YOUR_HOST_VALUE
MYSQL_USER: microservices
MYSQL_DATABASE: microservices_db
MYSQLSecretName: mysql
Finally, find the ingress key near the end of the YAML file and update it with the following text:
ingress:
  enabled: true
  annotations: {}
    # kubernetes.io/ingress.class: nginx
    # kubernetes.io/tls-acme: "true"
  hosts:
    - host: flightsvc.com
      paths: ["/flights"]
This definition lets our Nginx ingress service know that it should route any messages sent to the host flightsvc.com with a URI of /flights to the flight information microservice. We won’t need to actually host the service at the flightsvc.com domain, we’ll just need to make sure that HTTP requests have those values if we want them to reach our service.
For a production environment, we’d probably have more values and template changes we’d want to make. But to get up and running, this is more than enough.
Test and Commit the Package
The last thing we’ll need to do is a quick “dry-run” test to ensure that we haven’t made any syntax errors. Run the following command to make sure that Helm will be able to build a package:
ms-flights$ helm install --debug --dry-run flight-info .
If it works, helm will return a lot of YAML that shows the objects that it would generate. It should end with something that looks like this:
[... lots of YAML...]
  backend:
              serviceName: flight-info-ms-flights
              servicePort: 80
NOTES:
1. Get the application URL by running these commands:
  http://flightsvc.com/flights
Tip
If you’re having trouble getting your Helm package to work, you can refer to a reference example of the flight service package at https://github.com/implementing-microservices/ms-deploy/tree/master/ms-flights
If everything looks good, commit the finished Helm files to the GitHub repository:
ms-flights$ git add .
ms-flights$ git commit -m "initial commit"
ms-flights$ git push origin
Now that the package files are available in the deployment mono-repo, we’re ready to use them with the ArgoCD deployment tool.
ArgoCD for GitOps Deployment
So far, we’ve created a Helm chart that gives us a more consumable way of deploying microservices into the Kubernetes cluster. Helm comes with the capability of performing deployments into Kubernetes clusters, so we’ve already done enough to be able to deploy the flight information service into the staging environment.
But with what we have now, this would be a very manual operation and we’d need to use the Helm CLI for every deployment. We’d also need to somehow keep track of the current state and version of deployed services so that we’d know if a new deployment is necessary when our deployment repository is updated.
Instead, we can do something better. Earlier in Chapter 5, we introduced ArgoCD as our continuous deployment tool. Now is our opportunity to use it and improve the way we deploy services into our environments.
ArgoCD is a “GitOps” deployment tool, which means its designed to use a Git repo as the source for the desired deployment state for our workloads and services. When it checks a repo that we’ve specified it determines whether the target state we’ve defined matches the running state in the environment. If it doesn’t, ArgoCD can “synchronize” the deployment to match what we’ve declared in our Helm charts.
This declarative approach fits in will with our principles and the other tools that we’ve adopted like Terraform. To make all this magic happen, we just need to login to the ArgoCD instance that we’ve installed in staging, point to our ms-deploy repository and setup a synchronized deployment.
Log in to ArgoCD
Before we can log in to ArgoCD, we’ll need to get the password for the Argo administrative user. Argo CD does something clever and makes the default password the same as the name of the Kubernetes object that it runs on. Run the following kubectl command to find the Argo CD pod
$ kubectl get pods -n "argocd" | grep argocd-server
NAME                                                 READY     STATUS    RESTARTS   AGE
msur-argocd-server-c6d4ffcf-9z4c2                    1/1       Running   0          51s
Copy the name of the pod somewhere as that will be the password we’ll use to login. For example, in the result above, the password would be msur-argocd-server-c6d4ffcf-9z4c2. In order to access the login screen and use our credentials, we’ll need to setup a port forwarding rule. That’s because we haven’t properly defined a way to access our Kubernetes cluster from the Internet. But, thankfully kubectl provides a handy in-built tool for forwarding requests from your local machine into the cluster. Use the following command to get it running:
$ kubectl port-forward svc/msur-argocd-server 8443:443 -n "argocd"
Forwarding from 127.0.0.1:8443 -> 8080
Forwarding from [::1]:8443 -> 8080
Now, you should be able to navigate to localhost:8443 in your browser. You’ll almost definitely get a warning indicating that the site can’t be trusted. That’s OK and is expected at this point. Let your browser know that it is ok to proceed and you should see a login screen that looks something like this:
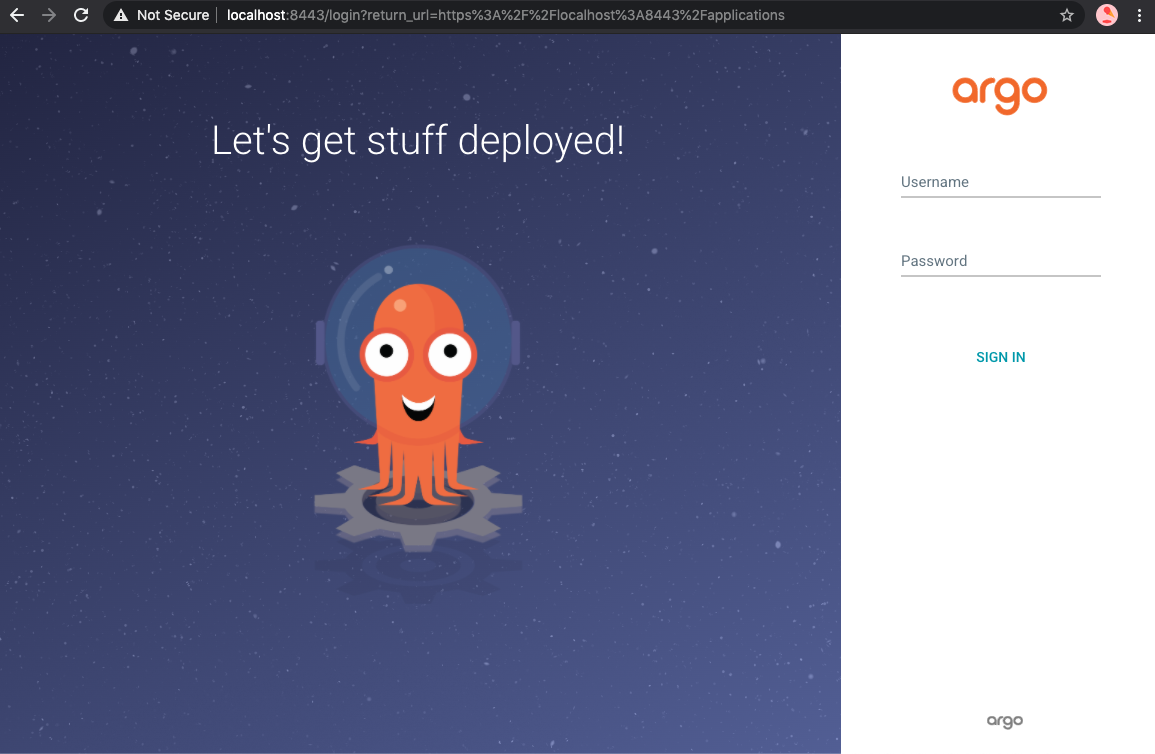
Figure 11-5. ArgoCD Login Screen
Enter admin as your user ID and use the password you noted down earlier and login. If you are able to login successfully, you’ll see a dashboard screen. Now we can move on to creating a reference to our flight information service deployment.
Sync and Deploy a Microservice
In ArgoCD, a microservice or workload that needs to be deployed is called an application. To deploy the flight information microservice we’ll need to create a new “application” and configure it with values that reference the Helm package in the git repository that we created earlier.
Start by clicking the CREATE APPLICATION or NEW APP button on the dashboard screen. When you click on it a web form will slide in from the right of the screen that you’ll need to populate. This is where you define the metadata for the application and the location of the Helm package. In our case, we’ll want ArgoCD to pull that form the deployments monorepo and the ms-flights directory within it.
Use the values in Table 11-5 to setup your flight-info microservice deployment. Make sure you change the value of the Repository URL to point to the deployment monorepo that we created earlier.
| Section | Key | Value |
|---|---|---|
GENERAL |
Application Name |
flight-info |
GENERAL |
Project |
default |
GENERAL |
SYNC POLICY |
manual |
SOURCE |
Repository URL |
URL_OF_YOUR_DEPLOYMENTS_MONOREPO |
SOURCE |
Path |
ms-flights |
DESTINATION |
Cluster |
in-cluster (https://kubernetes.default.svc) |
DESTINATION |
Namespace |
microservices |
When you are done filling in the form click the CREATE button.
Tip
If you run into trouble, consult the ArgoCD documentation for setting up an application at https://argoproj.github.io/argo-cd/getting_started/#creating-apps-via-ui
If you’ve created the application succesfully, ArgoCD will list the flight-info application in the dashboard as shown in Figure 11-6.
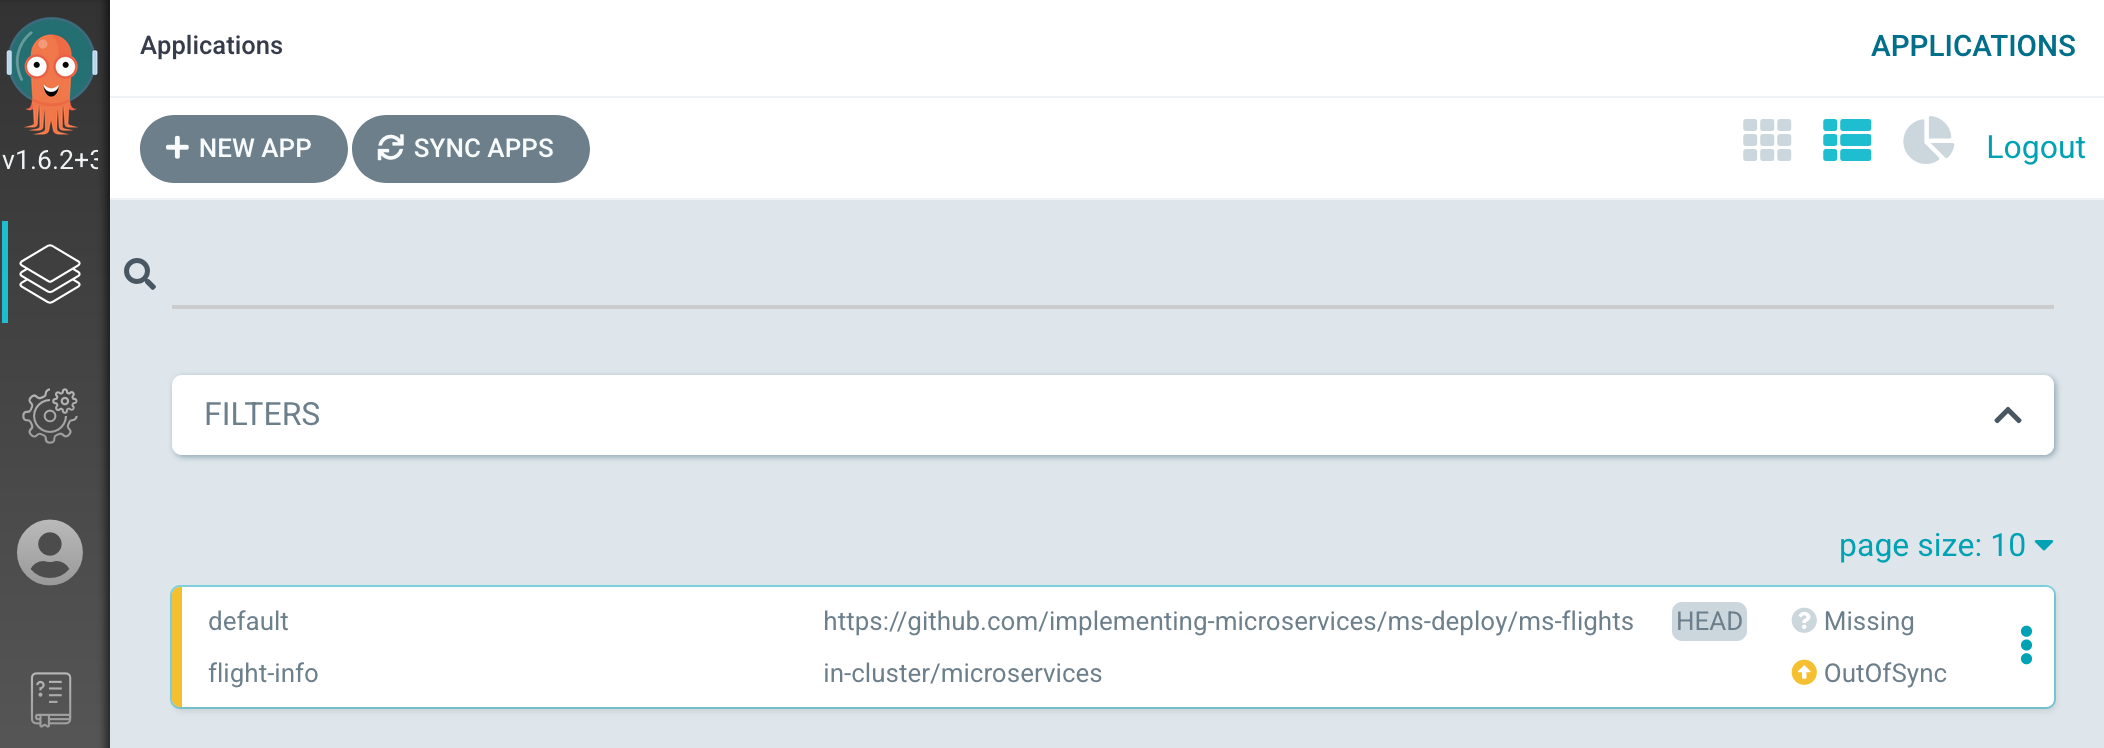
Figure 11-6. Flight Service Application Created
However, while the application has been created, it’s not yet synchronized with the deployment declaration. That means that the flight-info application in our cluster doesn’t match the description in our package. That’s because ArgoCD hasn’t actually done the Deployment yet. To make that happen, click on the flight-info application that we’ve just created, push the SYNC button and then push the SYNCHRONIZE button in the window that slides in as shown in Figure 11-7.
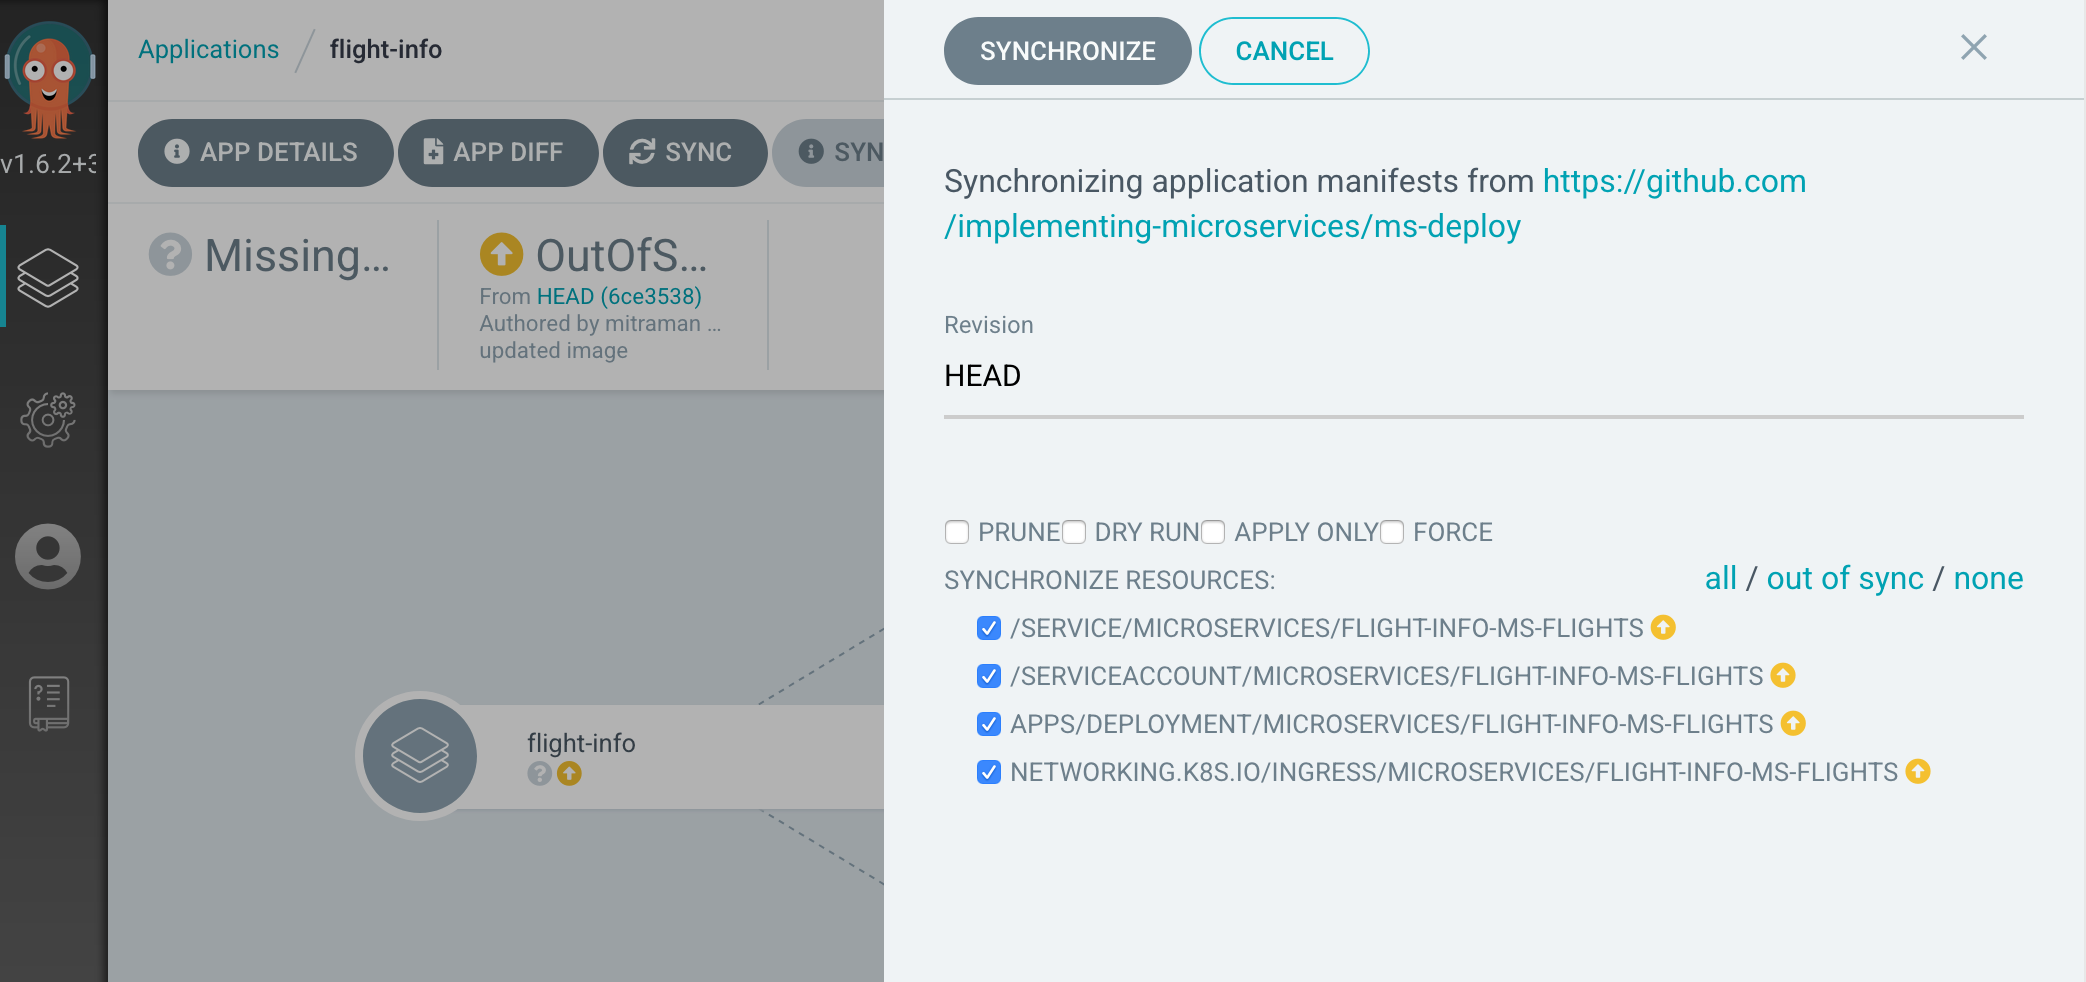
Figure 11-7. Synchronize the Flight Info Application
When you hit SYNCHRONIZE, argoCD will do whatever work it needs to do to make your application match the state you’ve described in the Helm package. If everything goes smoothly, you’ll have a health, sycnhronized and deployed microservice as shown in Figure 11-8.

Figure 11-8. Deployed Flight Service
This means that our container has been deployed in the Kubernetes cluster, its healthchecks and liveness checks have passed and its ready to receive requests. This is a big milestone! But, before we can try the service out and send it a message we’ll add an API gateway at the edge of our architecture.
Configuring the AWS API Gateway
An API gateway isn’t a requirement in a Microservices architecture. An alternative option is to host the APIs of individual Microservices out to client applications. This is an easier way to get started, but has the drawback of requiring clients to understand how to use a lot of different APIs to accomplish a job. This can be alleviated by using a composition pattern, where a single Microservice exposes a composite interface and does the work of calling the other microservices in the system to do the work.
The composition pattern helps, but, in our experience it’s a good idea to take it one step further and fully abstract system level composition into it’s own architectural component - the API gateway. Doing this allows us to separate the work of designing, securing and implementing the interface into the Microservices system from the Microservice teams. This fits well with the operating model we introduced in [Link to Come], we designated a specialist API team who would be responsible for the hosted API.
When we built services in the local development environment in Chapter 10, we used the Traeffik gateway to perform this role. In our AWS cloud environment, we’ll use the API Gateway managed service product and integrate it with the EKS cluster that hosts our Microservices. Architecturally, the AWS API Gateway fulfils a similar functional role to Traeffik in that it hosts APIs securely, controls access to APIs, routes messages to backend services and performs message and data translation as needed.
The AWS API Gateway is a managed service. That means it will reside in its own network, managed by the AWS team. Unlike with EKS, we won’t need to configure any virtual networks or subnets to make it run. To call the Microservices that we’ve deployed we’ll need to configure the Gateway to call the Nginx ingress service we provisioned earlier. When we’re done setting it up, the final version of our messaging architecture will look like Figure 11-9.

Figure 11-9. AWS API Gateway
We’ll setup the gateway using the same pattern we’ve used throughout this book for our other infrastructure components: A Github code repository, Terraform infrastructure code and a Github Action pipeline. Since we’ve gone through this pattern a few times already, we won’t spend a lot of time going through the specific steps again. Instead, we’ll cover the high level steps that are needed and we’ll leave it to you to execute them.
We’ve already established that in our operating model a special API team owns this bit of infrastructure and configuration. So, before we get going with the steps to configure the gateway, we’ll need to create a new AWS operator account for the team with the right level of permissions.
Setting up the API User
We’ve already created and used an AWS user account called ops-account to provision the infrastructure. While we could use the same account to configure the gateway, we’ll use this as an opportunity to practice some good behaviour. Since we want to separate the responsibilities for the microservices platform from the API, we’ll use two different AWS users so that our infrastructure team can’t inadvertently change the APIs that our API team manages.
We’ll use the AWS command line interface to create a new API team group, API user and attach a set of policies that will let us work with AWS API Gateway resources.
Note
You’ll need to have your local environment setup with AWS credentials for the following command line actions to work. You should be able to continue to use the ops-account credentials and environment settings you’ve been using for previous Terraform and AWS activities in the book.
The first step is to create the group. Use the following CLI command to create the API-operators group:
$ aws iam create-group --group-name API-operators
Next, create a new user called API-operator:
$ aws iam create-user --user-name API-operator
Now, we can add the newly created user to our group with this command:
$ aws iam add-user-to-group --group-name API-operators --user-name API-operator
We now have a new user and group, but at the moment our API-operator user doesn’t have any permissions to work with AWS resources. To fix that, we’ll need to create and attach a new policy for working with API Gateway resources. To save time, we’ve created a policy for you.
Download the policy from https://raw.githubusercontent.com/implementing-microservices/module-aws-apigw/master/policies/aws-apigw-policy.json and save the file as aws-apigw-policy.json in your working directory.
Use the following command to create a new policy based on the downloaded file:
$ aws iam create-policy --policy-name FullAcccessAPIGW --policy-document file://aws-apigw-policy.json
You should see a response that looks something like this:
{
    "Policy": {
        "PolicyName": "FullAcccessAPIGW",
        "PolicyId": "ANPA4IGBHKZTKNKNIVPU6",
        "Arn": "arn:aws:iam::842218821222:policy/FullAcccessAPIGW",
        [... a lot more JSON ...]
     }
}
Make note of the value of the "Arn" property which will be unique to your AWS instance. We’ve managed to create a policy for API Gateway work, but we still need to attach it to the group we’ve created. Use the Arn value with the following command to do that:
$ aws iam attach-group-policy --group-name API-operators --policy-arn ARN_OF_YOUR_POLICY
For example, in the example above we’d replace ARN_OF_YOUR_POLICY with the string arn:aws:iam::842218821222:policy/FullAcccessAPIGW
The API user is now ready to use. All that’s left is to get a set of access keys so that our pipeline can use them. Use the following command to retrieve the keys:
$ aws iam create-access-key --user-name API-operator
{
    "AccessKey": {
        "UserName": "API-operator",
        "AccessKeyId": "AKXC4ICATOQTRUE72WIP",
        "Status": "Active",
        "SecretAccessKey": "InueJZ0h02hDOdwpB/EOipXsUVrA1y2zONg3J1LL",
        "CreateDate": "2020-08-08T14:28:04+00:00"
    }
}
Make sure you save the result somewhere safe so you can use the AccessKeyId and SecretAccessKey in the next step when you setup the GitHub repository.
Fork the API Gateway Repository
We’ve done most of the work for the gateway infrastructure repository already, but you’ll need your own copy so that you can configure it to fit your environment and use your credentials. The first thing to do is fork our AWS API Gateway infrastructure repository located at https://github.com/implementing-microservices/module-aws-apigw into your own GitHub Account.
Once you’ve forked it, update the repository so that the Github Actions pipeline is active and your API-operator user credentials are stored as GitHub secrets. The secret names should be configured as follows:
| Key | Value |
|---|---|
AWS_ACCESS_KEY_ID |
The access key ID for your AWS |
AWS_SECRET_ACCESS_KEY |
The secret key for your |
Tip
If you don’t remember how to activate a forked GitHub Actions instance and configure secrets, refer to [Link to Come] for more details.
The pipeline is now configured and ready to be activated, but we’ll need to make a few changes to the Terraform file before running the provisioning step. We’ll be editing the main.tf file, so it might be a good idea to create local clone of the repository for the next step.
Customise the API Gateway Terraform File
The Terraform file that we’ve written for you has a lot of detail, but it describes three main things:
-
An AWS object definition for a VPC Link that connects the gateway to the AWS Load Balancer that our ingress service has created.
-
A large set of AWS API Gateway resources that describe the API that the gateway will host and the message routing it needs to do for our Nginx ingress service to fulfill API requests.
-
An API Gateway deployment environment called “staging” that we’ll use for our staging environment.
Our goal in this chapter is just to get you up and running with an end to end deployed Microservice, so we won’t get into the nuances an AWS API Gateway configuration. In fact, we can use all of the API definition and environment configuration “as-is”, but we’ll need to make a few changes to the VPC Link object for this Terraform code to work in the staging environment.
That’s because, the Nginx ingress object we provisioned earlier created a new, unique AWS load balancer resource when it started running. We need our API gateway to route messages to that load balancer, so we’ll need to get the name of it and plug that name into the Terraform file.
To get the name of the load balancer, use the following AWS CLI command (with your usual ops-account credentials):
$ aws elbv2 describe-load-balancers
This command displays all “version 2” AWS load balancers. But, if you’ve been following the directions to build the staging environment, there should only be a single load balancer in the result. Make a note of the value of the "LoadBalancerName" property in the JSON that the command returns:
{
    "LoadBalancers": [
        {
            "LoadBalancerArn": "arn:aws:elasticloadbalancing:eu-west-2:842218821222:loadbalancer/net/a2b4c7e2996a74ddbb9076515b19d039/fcf28133e914030e",
            "DNSName": "a2b4c7e2996a74ddbb9076515b19d039-fcf28133e914030e.elb.eu-west-2.amazonaws.com",
            "CanonicalHostedZoneId": "ZD4D7Y8KGAS4G",
            "CreatedTime": "2020-08-08T09:09:49.642000+00:00",
            "LoadBalancerName": "a2b4c7e2996a74ddbb9076515b19d039",
            "Scheme": "internet-facing"
            [... more JSON ...]
        }
     ]
]
Now, edit the main.tf Terraform file and update the AWS provider with the region you’re using and populate the local variable LoadBalancerName with the value you’ve just retreived. For example, using the result from above, we’d populate the values as shown in Example 11-8
Example 11-8.
provider "aws" {
  region = "eu-west-2"
}


locals {
  load_balancer_name = "a2b4c7e2996a74ddbb9076515b19d039"
}
The rest of the configuration is fine the way it is, so all that’s left to do is push the changes and trigger the provisioning pipeline. Use the following git commands to push a v1 label to GitHub and kick start the provisioning process:
api-gw $ git tag -a v1.0 -m "Initial release"
api-gw $ git push origin v1.0
You can validate that everything went as expected by logging into the GitHub Actions console. Bear in mind that it will take a few minutes to create the VPC Link resource, so don’t get worried if the job takes a little while. When it’s complete you’ll have a complete end to end Microservice deployment.
Testing the API
The API we designed for you brings the operations from the individual flight information and reservations microservices into a single, unified API.
In order to test it, we’ll need to get the unique hostname that the AWS API Gateway has created for our staging deployment. To make it easier for you to retrieve the URL of your API, our Terraform code creates a special file called test-urls.txt. You can retrieve that file from the list of downloadable artifacts in the Github Action job you’ve just run.
Inside test-urls.txt, you should find a single line that identifies the URL that calls the flight information endpoint of our Travel API. It should look something like Example 11-9
Example 11-9. Example of a test-urls.txt
Get Flight Info: https://07be1uiyhg.execute-api.eu-west-2.amazonaws.com/staging/flights/a228
You can now call this URL in your browser (as a GET) or using an HTTP testing tool like curl. You should get the details of a flight in JSON format as a response.
Tip
If you are using an API testing tool like Postman or SoapUI that understands the Open API Specification, you can export a complete staging API description directly from the AWS API Gateway. Refer to the export instructions in the AWS documentation at https://docs.aws.amazon.com/apigateway/latest/developerguide/api-gateway-export-api.html
The HTTP request that calls the Travel API on the API gateway is routed to the Nginx ingress service, which in turn routes the message to the Flights microservice based on the ingress rule we defined earlier in this chapter. The flights microservices retrieves data from the database service we provisioned and returns a result. With that request, we’ve been able to bring together all the parts of our architecture deploy and test an end to end Microservice architecture!
All that’s left is to clean up so we don’t end up paying for EKS resources that we aren’t using.
Warning
AWS bills you for EKS resources even when they aren’t handling traffic, so make sure you tear down your infrastructure if you aren’t using it.
Clean Up
As we’ve done before, we’ll use a local Terraform client to bring down the infrastructure. We’ll also need to delete the Istio resources that Terraform doesn’t know about. Make sure your using the Kubeconfig that points to your staging environment and run the following commands:
$ kubectl delete namespace istio-system
followed by:
$ kubectl create namespace istio-system
With those objects delete, you can navigate to the staging-infrastructure repository and run terraform destroy:
infra-staging-env $ terraform destroy
When it’s successfully completed, our Kubernetes based staging environment will be destroyed. You should verify that the objects are gone by using the AWS console to avoid any unexpected charges. You can also use Terraform to destroy the API gateway service, although it doesn’t incur any charges unless you send traffic through it.
Summary
At the beginning of this chapter we warned you that we’d be doing a lot of work. All that work paid off as we ended up with an end to end deployment of the Microservice architecture that we’ve been builiding throughout this book. We also got to reuse some of the tools and practices we established earlier to get more done in less time.
In this chapter we updated our infrastructure template to support the dependencies from our Microservces teams. We implemented a build and integration pipeline in our Microservice code repositories and we built a new deployment repository and tool based process to get services deployed. Finally, we provisioned an API gateway that encapsulated the entire system.
Hopefully, you’ve been able to see how the decisions we’ve made at deployment time have been heavily influenced by the earlier decisions we made on principles, operating models, infrastructure and design. They’ve all come together to form an end state that allowed us to build a running implementation.
But, the real test of a Microserivce system is in how it handles change. That’s what we’ll cover in our next chapter.
| ID | Decision | Alternatives Considered |
|---|---|---|
DEPLOY-x |
AWS RDS, AWS Redis |
Host database in k8s |
DEPLOY-x |
DockerHub is our container registry |
Host our own, Cloud vendor (e.g AWS ECR) |
DEPLOY-x |
Helm for packaging deployments |
Kubernetes only |
DEPLOY-x |
ArgoCD for continuous delivery of services |
Github Actions, Terraform, Spinnaker |
DEPLOY-x |
AWS API Gateway for ingress |
Istio, 3rd party gateway |