Chapter 10. Developing Microservices
Let’s put some of the techniques we’ve been discussing to work, and implement a sample multi-microservices project. The implementation of the microservices, in this sample project, will be greatly simplified. We will show just enough code to suffice for the demonstration purposes, but the steps and approaches we’ll discuss can be directly applied on much larger, real projects.
We will start by identifying fitting candidates for microservices, based on a bounded contexts analysis, using Event Storming, similar to the process described in Chapter 7. Next we will go through the 7 steps of the SEED(s) design methodology that we discussed in Chapter 6: Designing Microservices, culminating in writing the code for both of the sample microservices. In the implementation of these services we will employ the data-modelling guidance from Chapter 8. And last, but not least we will show how a user-friendly development environment for the microservices is properly set up and configured, applying many of the recommendations from Chapter 9, including the setup of creating an umbrella project - a way to execute multiple microservices together, in a developer workspace.
Designing Microservice Endpoints
Let’s assume that an Event Storming session that you conducted for a flights management software identified two major bounded contexts:
-
Flights Management, and
-
Reservations Management.
As we’ve discussed in Chapter 7, Rightsizing Your
Microservices, in the initial stages it pays off to design microservices
coarse-grained. Specifically, we often align them with bounded contexts i.e. our
first two microservices can be: ms-flights and ms-reservations!
Now that we have the target microservices identified, we need to use the SEED(S) design process, introduced in Chapter 6, for them. In step one, of the SEED(s) methodology, we need to identify various actors. For our purposes, we’ll assume following actors:
-
Customer trying to book the flight
-
Airline’s consumer application - the App (web, mobile, etc.)
-
Web APIs that the app interacts with. In Chapter 6 we mentioned some people may call these “Backends For Front-ends or BFF APIs”.
-
Flights Management Microservice: ms-flights
-
Reservations Management Microservice: ms-reservations
Let’s look at some sample Jobs To Be Done (JTBDs) that our product team may have collected from customer interviews and business analysis research.
-
When a customer is interacting with the user-interface, app needs to render a seating chart with occupied and available seats, so customer can choose a seat from the available ones.
-
When a customer is finalizing a booking, web app needs to reserve a seat for the customer, so the app can avoid accidental seat reservation conflicts.
Remember from Chapter 6 that we have recommended BFF APIs to be a very thin layer with no business logic implementation. They mostly just orchestrate microservices. So there are usually jobs that a BFF API needs microservices to get done. Following is a list of such jobs, the more technical JTBDs describing needs between the BFF APIs and microservices:
-
When API is asked to provide seating chart, API needs
ms-flightsto provide a seating setup of the flight, so the API can retrieve availabilities and render the final result. -
When API needs to render seating chart, API needs
ms-reservationsto provide a list of already reserved seats so the API can add that data to the seating setup and return the seating chart. -
When API is asked to reserve a seat, API needs
ms-reservationsto fulfill the reservation, so the API can reserve the seat.
Please note that we do not let ms-flights call ms-reservations directly to
assemble the seating chart. Rather we have BFF API orchestrate the interaction.
This approach goes back to the recommendation in Chapter 6
to avoid direct microservice-to-microservice calls.
Following the SEED(s) methodology, next we describe the interactions represented by various jobs, using UML Sequence Diagrams in PlantUML format:
@startuml

actor Customer as cust
participant "Web App" as app
participant "BFF API" as api
participant "ms-flights" as msf
participant "ms-reservations" as msr

cust -[#blue]-> app ++: "Flight Seats Page"
app -[#blue]-> api ++ : flight.getSeatingSituation()
api -[#blue]-> api: auth
api -> msf ++ : getFlightId()
msf --> api: flight_id
api -> msf: getFlightSeating()
return []flightSeating
api -> msr ++ : getReservedSeats()
return []reservedSeats
return []SeatingSituation
return "Seats Selection Page"
|||
cust -[#blue]->app ++: "Choose a seat & checkout"
app-[#blue]->app: "checkout workflow"
app-[#blue]->api ++: "book the seat"
api -[#blue]->api: auth
api->msr ++: "reserveSeat()"
return "success"
return "success"
return "Success Page"
@enduml
which can be rendered (e.g. using liveuml.com) into the UML diagram shown on Figure 10-1:
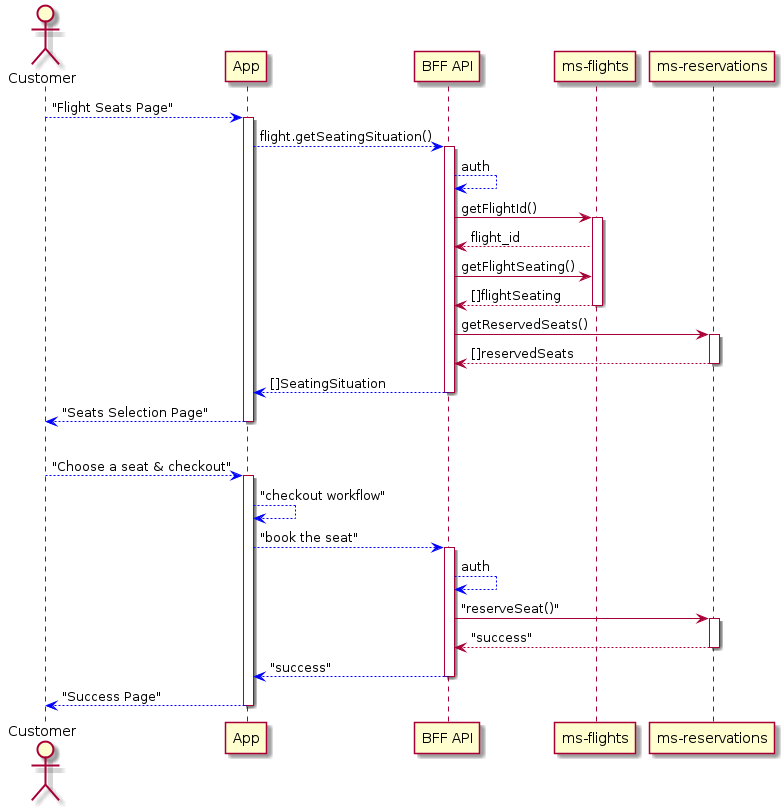
Figure 10-1. Sequence Diagram Represengting Interactions Of Various Jobs To Be Done
As you can clearly visualize on this diagram, the first job to be done is to
present a customer with a “seats on the flight” page. To fulfill this job, an
app (or a website) will need to call a frontend (BFF) API that returns seating
“situation”: list of seats with indicators for which ones are occupied or
vacant. The API will first authenticate the call to ensure the app is authorized
to ask such questions. If the auth passes, it will first try to get a flightId
from the ms-flights microservice. This is necessary because customers usually
just enter the non-unique Flight Number (identifying a route more than a specific
flight on a specific date) and flight date. With the unique flight_id returned
the API will then get the list of seats off of ms-flights. To make sure we
can show occupied seats, it will separately query ms-reservations for
existing reservations on the flight.
Please note how we are practicing the principle described in the
Chapter 6 regarding microservices not calling each other
directly and being orchestrated by a thin API layer, instead. This is entirely
why ms-flights is not querying the list of reserved seats off of
ms-reservations directly. Once the API collects all of the required
information it can return the rich data to the app/website so the latter can
render the desired screen for the customer.
In the second part of the interaction diagram, we describe the second job to be
done for the customer: once they see the current seating situation, they want to
pick a specific (available) seat and reserve it. To fulfill this task, API will
again need to auth and then call a microservice: ms-reservations, returning
the status, success or failure to the app, based on the result of the booking
attempt. This allows the app to let the customer know whether their request
could be completed or not.
Once we have the Jobs To Be Done, and understand the interactions, we can
translate them into queries and actions. We will do this for both ms-flights
and ms-reservations. In Chapter 6 we explained that you
should also design actions and queries for the BFF API, not just microservices,
but we will leave that task as an exercise to the reader.
Flights Microservice
- Get flight details
-
-
Input: flight_no, departure_local_date_time (ISO8601 format, and in local time zone)
-
Response: unique flight_id identifying a specific flight on a specific date. In practice, this endpoint will very likely return other flight-related fields, but those are irrelevant for our context, so we are skipping over them.
-
- Get flight seating: a diagram of seats on a flight
-
-
Input: flight_id
-
Response: SeatMap object in JSON format 1
-
Reservations Microservice
- Query Already reserved Seats on a Flight
-
-
Input: flight_id
-
Response: list of already-taken seat numbers, each seat number is in format like “2A”
-
- Reserve a seat on a flight
-
-
Input: flight_id, customer_id, seat_num
-
Expected Outcome: seat is reserved and unavailable to others, or an error fired if the seat was unavailable
-
Response: Success (200 Success) or Failure (403 Forbidden)
-
As discussed in Chapter 6, the beauty of writing-out actions and queries is that they bring us much closer to being able to create technical specs of the services than when jobs are presented in their business-oriented, jobs (JTBD) format.
Now that we have the actions and queries for our microservices, we can proceed with describing the microservices we intend to build in a standard format. In our case we build RESTful microservices and describe them with an Open API Spec. Let’s see, in the next section, what this spec for our two microservices could look like.
Designing Open API Spec
Based on the query and commands spec we just designed, translating it into an Open API spec is not a big deal and it would probably look something like the following for the flights microservice endpoints:
openapi:3.0.0info:title:Flights Management Microservice APIdescription:|API Spec for Fight Management Systemversion:1.0.1servers:-url:http://api.example.com/v1description:Production Serverpaths:/flights:get:summary:Look Up Flight Details with Flight No and Departure Datedescription:|Lookup flight details, such as: the unique flight_id used by therest of the Flights management endpoints, flight departure andarrival airports.Example request:```GET http://api.example.com/v1/flights?flight_no=AA2532&departure_date_time=2020-05-17T13:20```parameters:-name:flight_noin:queryrequired:truedescription:Flight Number.schema:type:stringexample:AA2532-name:departure_date_timein:queryrequired:truedescription:Date and time (in ISO8601)schema:type:stringexample:2020-05-17T13:20responses:'200':# success responsedescription:Successful Responsecontent:application/json:schema:type:arrayitems:type:objectproperties:flight_id:type:stringexample:"edcc03a4-7f4e-40d1-898d-bf84a266f1b9"origin_code:type:stringexample:"LAX"destination_code:type:stringexample:"DCA"example:flight_id:"edcc03a4-7f4e-40d1-898d-bf84a266f1b9"origin_code:"LAX"destination_code:"DCA"/flights/{flight_no}/seat_map:get:summary:Get a seat map for a flightdescription:|Example request:```GET http://api.example.com/v1/flights/AA2532/datetime/2020-05-17T13:20/seats/12C```parameters:-name:flight_noin:pathrequired:truedescription:Unique Flight Identifierschema:type:stringexample:"edcc03a4-7f4e-40d1-898d-bf84a266f1b9"responses:'200':# success responsedescription:Successful Responsecontent:application/json:schema:type:objectproperties:Cabin:type:arrayitems:type:objectproperties:firstRow:type:numberexample:8lastRow:type:numberexample:23Wing:type:objectproperties:firstRow:type:numberexample:14lastRow:type:numberexample:22CabinClass:type:objectproperties:CabinType:type:stringexample:EconomyColumn:type:arrayitems:type:objectproperties:Column:type:stringexample:ACharacteristics:type:arrayexample:-Windowitems:type:stringRow:type:arrayitems:type:objectproperties:RowNumber:type:numberexample:8Seat:type:arrayitems:type:objectproperties:premiumInd:type:booleanexample:falseexitRowInd:type:booleanexample:falserestrictedReclineInd:type:booleanexample:falsenoInfantInd:type:booleanexample:falseNumber:type:stringexample:AFacilities:type:arrayitems:type:objectproperties:Detail:type:objectproperties:content:type:stringexample:LegSpaceSeat
You can render the Open API Spec with a number of editors, for instance Swagger Editor-rendering of the above spec looks like Figure 10-2

Figure 10-2. Open API Spec for ms-flights rendered with Swagger Editor
Please note that for demonstration purposes, here we are using SeatMap object structure that mimics the one in Sabre’s SeatMap API – the gold standard of the industry. If you were really building a commercial API, you would design your own implementation or acquire a permission for reuse from the original author of the design.
Similarly to the Open API Spec of the flights microservice, the designs for the endpoints of the reservation system would be something along the lines of:
openapi:3.0.0info:title:Seat Reservation System APIdescription:|API Spec for Fight Management Systemversion:1.0.1servers:-url:http://api.example.com/v1description:Production Serverpaths:/reservations:get:summary:Get Reservations for a flightdescription:|Get all reservations for a specific flightparameters:-name:flight_idin:queryrequired:trueschema:type:stringresponses:'200':# success responsedescription:Successful Responsecontent:application/json:schema:type:arrayitems:type:objectproperties:seat_no:type:stringexample:"18F"example:-{seat_no:"18F"}-{seat_no:"18D"}-{seat_no:"15A"}-{seat_no:"15B"}-{seat_no:"7A"}put:summary:Reserve or cancel a seatdescription:|Reserves a seat or removes a seat reservationrequestBody:required:truecontent:application/json:schema:type:objectproperties:flight_id:description:Flight's Unique Identifier.type:stringexample:"edcc03a4-7f4e-40d1-898d-bf84a266f1b9"customer_id:description:Registered Customer's Unique Identifiertype:stringexample:"2e850e2f-f81d-44fd-bef8-3bb5e90791ff"seat_num:description:seat numbertype:stringexample:flight_id:"edcc03a4-7f4e-40d1-898d-bf84a266f1b9"customer_id:"2e850e2f-f81d-44fd-bef8-3bb5e90791ff"seat_num:"8D"responses:'200':description:|Success.content:application/json:schema:type:objectproperties:status:type:stringenum:["success","error"]example:"success"'403':description:seat(s) unavailable. Booking failed.content:application/json:schema:type:objectproperties:error:type:stringdescription:type:stringexample:error:"Couldnotcompletereservation"description:"Seatalreadyreserved.Cannotdouble-book"
Now that we have our service designs and the corresponding Open API specs, it is time to proceed to the last step in the SEED(S) process: writing the code for the microservices.
As we implement the Flights and Reservations microservices, we will practice the principles discussed earlier in this book. Specifically: we will use different tech stacks for these services, so we can demonstrate our ability of supporting heterogeneous implementation. Reservations microservice will be implemented in Python and Flask, while Flights microservice will be implemented in Node/Express.js.
Implementing the Data For a Microservice
To emphasize the need for data independence, that we discussed at length in Chapter 8, not only will we ensure the two microservices do not share any data space, but we will intentionally implement them using entirely different back-end data systems: Redis for the Reservations and MySQL for Flights. We will also explain how each of these microservices benefits from their choice of the data storage mechanism. Let’s start with the data for the reservations system microservice.
Redis For the Reservations Data Model
In the reservations system, we need to be able to capture a set of seat reservations for a flight, and reserve a seat if it is not already reserved. Redis has a perfect, simple data-structure that fits very well the use-case: Hashes. We can have a hash for each flight_id (specific flight) where keys of the hash are the seat numbers on the flight and the value is the customer_id that seat is already reserved for. Redis has commands to set a new value in a hash, get all set values (for when we need to know all reserved seats), and very conveniently: a command that allows us to set value only if the value for the same key (seat) is not already set. That’s perfect for us since we typically do not want to allow double-booking a seat on a flight.
Let’s see an example of reserving several
seats on a flight uniquely identified with the flight id:
40d1-898d-bf84a266f1b9:
> HSETNX flight:40d1-898d-bf84a266f1b9 12B b4cdf96e-a24a-a09a-87fb1c47567c
(integer) 1
> HSETNX flight:40d1-898d-bf84a266f1b9 12C e0392920-a24a-b6e3-8b4ebcbe7d5c
(integer) 1
> HSETNX flight:40d1-898d-bf84a266f1b9 11A f4892d9e-a24a-8ed1-2397df0ddba7
(integer) 1
> HSETNX flight:40d1-898d-bf84a266f1b9 3A 017d40c6-a24b-b6d7-4bb15d04a10b
(integer) 1
> HSETNX flight:40d1-898d-bf84a266f1b9 3B 0c27f7c8-a24b-9556-fb37c840de89
(integer) 1
> HSETNX flight:40d1-898d-bf84a266f1b9 22A 0c27f7c8-a24b-9556-fb37c840de89
(integer) 1
> HSETNX flight:40d1-898d-bf84a266f1b9 22B 24ae6f02-a24b-a149-53d7a72f10c0
(integer) 1
Let’s see how we would get all of the occupied seats:
> HKEYS flight:40d1-898d-bf84a266f1b9
1) "12B"
2) "12C"
3) "11A"
4) "3A"
5) "3B"
6) "22A"
7) "22B"
If we wanted to get both keys and values, we can also do that:
> HGETALL flight:40d1-898d-bf84a266f1b9
 1) "12B"
 2) "b4cdf96e-a24a-a09a-87fb1c47567c"
 3) "12C"
 4) "e0392920-a24a-b6e3-8b4ebcbe7d5c"
 5) "11A"
 6) "f4892d9e-a24a-8ed1-2397df0ddba7"
 7) "3A"
 8) "017d40c6-a24b-b6d7-4bb15d04a10b"
 9) "3B"
10) "0c27f7c8-a24b-9556-fb37c840de89"
11) "22A"
12) "0c27f7c8-a24b-9556-fb37c840de89"
13) "22B"
14) "24ae6f02-a24b-a149-53d7a72f10c0"
Let’s now see what happens if we try to double-book an already reserved seat, such as 12C:
> HSETNX flight:40d1-898d-bf84a266f1b9 12C 083a6fc2-a24d-889b-6fc480858a38
(integer) 0
Please notice how the response to this command is (integer) 0 instead of the
(integer) 1 we had gotten for earlier HSETNX commands. This indicates that
zero fields were actually updated and that is because 12C had already been
reserved.
As you can see, choosing Redis as the data store for ms-reservations has
made the implementation easy and natural. We were able to use well-fitting
data structures, such as HSET, that meet our needs effortlessly and elegantly.
The HSETNX command allowed us to avoid accidental double-bookings in a way
that is reliable and straightforward.
Redis is a fantastic key/value store and it can be used in a wide variety of use-cases. Which is why it has a huge fan base among programmers, however it is not going to be the perfect database for every single use-case we run into. Sometimes we may have data needs that are better met by other, popular databases.
To demonstrate this, in the next section, we will implement the data for the
ms-flights microservice using a traditional, SQL database.
MySQL Data Model for the Flights Microservice
The first data-model we need here should contain seat maps. As we saw in the OpenAPI spec for the Flights microservice, the seat map is a complex JSON object. MySQL can be a better storage for such data than standard Redis. As of MySQL 5.7.8, MySQL has a robust, native support for JSON data types. This support has expanded and improved in the latest, 8.x version of MySQL. It now also supports in-place, atomic updates of JSON values and JSON Merge Patch syntax. In comparison, Redis only supports JSON with a RedisJSON module that doesn’t come pre-built with the standard Redis distribution.
A well-implemented JSON data type provides tangible advantages compared to storing JSON data in a string column: validation of JSON documents during inserts, internally-optimized binary storage, ability to look up sub-objects and nested values directly by a key, etc.
Additionally, in the lookup endpoint we need to query data by two fields: flight_no and datetime. A relational database is more natural structure for such queries. In Redis, we would probably need to create a compound field to achieve the same. All-in-all, while technically we could implement this service with Redis as well, there are reasons to choose MySQL over it and it also helps us demonstrate usage of different databases for different services. Real-life situations will obviously be more complex, with more aspects to consider.
Let’s look at the seat_maps table:
CREATETABLE`seat_maps`(`flight_no`varchar(10)NULL,`seat_map`jsonNULL,`origin_code`varchar(10)NULL,`destination_code`varchar(10)NULL,PRIMARYKEY(`flight_no`));
Another table we need is the mapping of flight_ids with flight_no’s and datetimes. Creation script for this table may look something like the following:
CREATETABLE`flights`(`flight_id`varchar(36)NOTNULL,`flight_no`varchar(10)NULL,`flight_date`datetime(0)NULL,PRIMARYKEY(`flight_id`),INDEX`idx_flight_date`(`flight_no`,`flight_date`)FOREIGNKEY(flight_no)REFERENCESseat_maps(flight_no));
Let’s insert our first sample seat map:
INSERTINTO`seat_maps`(`flight_no`,`seat_map`,`origin_code`,`destination_code`)VALUES('AA2532','{"Cabin": [{"Row": [{"Seat": [{"Number": "A", "Facilities": [{"Detail": {"content": "LegSpaceSeat"}}], "exitRowInd": false, "premiumInd": false, "noInfantInd": false, "restrictedReclineInd": false}], "RowNumber": 8}], "Wing": {"lastRow": 22, "firstRow": 14}, "Column": [{"Column": "A", "Characteristics": ["Window"]}], "lastRow": 23, "firstRow": 8, "CabinClass": {"CabinType": "Economy"}}]}','LAX','DCA');
Once we have the proper JSON value in the database, we can easily, select specific values in it or filter by specific values. For instance:
selectseat_map->>"$.Cabin[0].firstRow"fromseat_maps
Now that we have a working data model for both of our microservices, we can dive deeper into the implementation of the code for them.
Implementing Code for a Microservice
We are going to follow the second goal that is the foundation of the “10 Workspace Guidelines for a Superior Developer Experience”, and start new microservices quickly, using well-tested templates for each relevant tech stack. For the Node.js-implemented Flights microservice we are using a popular bootstrapper Node Bootstrap, and for the Python-based Reservation microservice we are going to use a Github template repository that contains most of the boilerplate code that we are going to need: https://github.com/inadarei/ms-python-flask-template
Based on the 10 guidelines, using any templates assumes that you have a working Docker installation and the GNU Make, since we make use of both of them. There are no other expectations, however.
The Code Behind the Flights Microservice
To use Nodebootstrap for jump-starting a Node/Express microservice, you can
either install its bootstraper with node install -g nodebootstrap, if you
already have Node available on your system, or just clone the provided Github
template repository at: https://github.com/inadarei/nodebootstrap-microservice
While the former may be somewhat easier, we will do the latter since we do not want to assume that you had to set up Node on your system. Go ahead and click on “Use Template” at the nodebootstrap-microservice’s main repo page:

Once you have created a new repo for ms-flights microservice, at the destination of your choosing, let’s check it out on your developer machine and start modifying things, writing code.
One of the nice things about the Nodebootstrap template is that it comes with
full support for an Open API Spec of the microservices. Let’s take the
spec we designed earlier and put it into docs/api.yml file, replacing the
sample spec we already find there. Make sure you are in the docs sub-folder
and run make start:
→ make start docker run -d --rm --name ms-nb-docs -p 3939:80 -vms-flights/docs/api.yml:/usr/share/nginx/html/swagger.yaml-eSPEC_URL=swagger.yaml redocly/redoc:v2.0.0-rc.8-1 49e0986e318288c8bf6934e3d50ba93537ddf3711453ba6333ced1425576ecdf server started at: http://0.0.0.0:3939
which will render the spec to a beautiful HTML template and
make it available at http://0.0.0.0:3939. The rendering will probably
look like something at the following screenshot:

Nodebootstrap microservice comes with a sample “users” module. It’s located
under lib/users folder. Since we don’t need a user management module and
need a flights management one, let’s rename that folder to “flights” and
delete another default module: lib/homedoc as we are not going to need
that one, as well. When you remove the lib/homedoc folder you need to
also remove its plug from the appConfig.js in the root folder,
around line 24 that reads something like:
app.use('/',require('homedoc'));// attach to root route
Likewise, change the hookup for flights module, in the same file so that line .. reads like:
app.use('/flights',require('flights'));// attach to sub-route
Once you are done making these modifications, edit the
lib/flights/controllers/mappings.js file so it reads like the following:
const{spieler,check,matchedData,sanitize}=require('spieler')();constrouter=require('express').Router({mergeParams:true});constactions=require('./actions');constlog=require("metalogger")();constflightNoValidation=check('flight_no','flight_no must be at least 3 chars long and contain letters and numbers').exists().isLength({min:3}).matches(/[a-zA-Z]{1,4}d+/)constdateTimeValidation=check('departure_date_time','departure_date_time must be in YYYY-MM-ddThh:mm format').exists().matches(/d{4}-d{2}-d{2}Td{2}:d{2}/)constflightsValidator=spieler([flightNoValidation,dateTimeValidation]);constseatmapsValidator=spieler([flightNoValidation]);router.get('/',flightsValidator,actions.getFlightInfo);router.get('/:flight_no/seat_map',seatmapsValidator,actions.getSeatMap);module.exports=router;
As you can see, in this file we are setting up routes for our two main endpoints and validators that ensure that our input parameters are present, as well as properly formatted. When they are not, Nodebootstrap also has standard error messaging to let the client know.
Let’s now implement some logic. First we need to create MySQL tables and some sample data. As you may guess Nodebootstrap provides an easy solution for this as well, in the form of database migrations - scripts that codify database modifications and allows you to apply them in any environment, later.
We can create several database migrations with some make commands, as follows:
→ make migration-createname=seat-maps docker-compose -p msupandrunning up -d ms-flights-db is up-to-date Starting ms-flights ...donedocker-compose -p msupandrunningexecms-flights ./node_modules/db-migrate/bin/db-migrate create seat-maps --sql-file[INFO]Created migration at /opt/app/migrations/20200602055112-seat-maps.js[INFO]Created migration up sql file at /opt/app/migrations/sqls/20200602055112-seat-maps-up.sql[INFO]Created migration down sql file at /opt/app/migrations/sqls/20200602055112-seat-maps-down.sql sudo chown -R$USER./migrations/sqls/[sudo]passwordforirakli: → make migration-createname=flights docker-compose -p msupandrunning up -d ms-flights-db is up-to-date ms-flights is up-to-date docker-compose -p msupandrunningexecms-flights ./node_modules/db-migrate/bin/db-migrate create flights --sql-file[INFO]Created migration at /opt/app/migrations/20200602055121-flights.js[INFO]Created migration up sql file at /opt/app/migrations/sqls/20200602055121-flights-up.sql[INFO]Created migration down sql file at /opt/app/migrations/sqls/20200602055121-flights-down.sql sudo chown -R$USER./migrations/sqls/ → make migration-createname=sample-data docker-compose -p msupandrunning up -d ms-flights-db is up-to-date ms-flights is up-to-date docker-compose -p msupandrunningexecms-flights ./node_modules/db-migrate/bin/db-migrate create sample-data --sql-file[INFO]Created migration at /opt/app/migrations/20200602055127-sample-data.js[INFO]Created migration up sql file at /opt/app/migrations/sqls/20200602055127-sample-data-up.sql[INFO]Created migration down sql file at /opt/app/migrations/sqls/20200602055127-sample-data-down.sql sudo chown -R$USER./migrations/sqls/
After which we should open the the corresponding sql files and insert following content into each one of them:
CREATETABLE`seat_maps`(`flight_no`varchar(10)NOTNULL,`seat_map`jsonNOTNULL,`origin_code`varchar(10)NOTNULL,`destination_code`varchar(10)NOTNULL,PRIMARYKEY(`flight_no`))ENGINE=InnoDBDEFAULTCHARSET=utf8;
CREATETABLE`flights`(`flight_id`varchar(36)NOTNULL,`flight_no`varchar(10)NOTNULL,`flight_date`datetime(0)NULL,PRIMARYKEY(`flight_id`),FOREIGNKEY(`flight_no`)REFERENCESseat_maps(`flight_no`))ENGINE=InnoDBDEFAULTCHARSET=utf8;
INSERTINTO`seat_maps`VALUES('AA2532','{"Cabin": [{"Row": [{"Seat": [{"Number": "A","Facilities": [{"Detail": {"content": "LegSpaceSeat"}}],"exitRowInd": false, "premiumInd": false, "noInfantInd": false,"restrictedReclineInd": false}], "RowNumber": 8}],"Wing": {"lastRow": 22, "firstRow": 14},"Column": [{"Column": "A", "Characteristics": ["Window"]}],"lastRow": 23, "firstRow": 8,"CabinClass": {"CabinType": "Economy"}}]}','LAX','DCA');
Once you have these files, you can either just restart the project with
make restart and the migrations will be automatically applied (the new ones
get applied at every project start to keep various installation consistent),
or you can explicitly run a task to apply migrations with: make migrate
For the rest of the modifications, you will want to:
-
Change
ms-nodebootstrap-examplewithms-flightsin a variety of files, if you didn’t install the project with the nodebootstrap utility and just cloned the repo (former approach does renaming for you) -
Modify the rest of the source code to implement the flights and seat_maps endpoints and hook them up with the database.
You can also see a working version of the sample ms-flights at: https://github.com/implementing-microservices/ms-flights
When everything is working you should be able to access your /flights endpoint locally at a URL like:
http://0.0.0.0:5501/flights?flight_no=AA34&departure_date_time=2020-05-17T13:20
and the seat_maps endpoint at a URL like:
http://0.0.0.0:5501/flights/AA2532/seat_map
Please check-out all of the makefile targets, such as testing one to get
a sense of the user experience provided by the template project and what
kind of facilities you should strive to provide to your developers
with your templates. For the make test to work there’re additional
modifications required, related to us deleting functionality from the sample
project. We aren’t covering those changes, in detail, here, so it’s the
best to just check out the
https://github.com/implementing-microservices/ms-flights repo, which has every
modification required. Feel free to submit bug requests, if you run into any
problems.
Healthchecks
To manage the lifecycle of the containers that the app will be deployed into, most container-management solutions (e.g. Kubernetes, which we will use later in this book) need a service to expose a health endpoint. In case of Kubernetes, you should generally provide liveness and readiness endpoints.
To implement a health-check endpoint, we are going use the draft RFC authored by Irakli, and a Node.js implementation of it: https://github.com/inadarei/maikai The Node Bootstrap template already has a sample implementation for it, we just need to modify it for ms-flights codebase.
Let’s start by replacing lines 13-17 in appConfig.js, with code that looks like the following:
// For Liveness Probe, defaults may be all you need.constlivenessCheck=healthcheck({"path":"/ping"});app.use(livenessCheck.express());// For readiness check, let's also test the DBconstcheck=healthcheck();constAdvancedHealthcheckers=require('healthchecks-advanced');constadvCheckers=newAdvancedHealthcheckers();// Database health check is cached for 10000ms = 10 seconds!check.addCheck('db','dbQuery',advCheckers.dbCheck,{minCacheMs:10000});app.use(check.express());
This will create a simple “am I live?” check at /ping (known as “liveness
probe” in Kubernetes) and a more advanced “is database also ready? Can I
actually do useful things” check (known as “readiness probe” in Kubernetes) at
/health. Using two probes for overall health is very convenient since a
microservice being up doesn’t always mean that it is fully functional. If its
dependency, such as a database, is not up yet or is down - it won’t be actually
ready for useful work.
Please note the fourth argument {minCacheMs: 10000} in the .addCheck() call. It sets minimal cache duration server-side, indicated in milliseconds. Meaning: you can tell the health check middleware (the module we use) to only run an expensive, database-querying health-check probe against MySQL every 10 seconds (10,000 milliseconds), at most!
Even if your health probing infrastructure (e.g. Kubernetes) calls your health check endpoint very frequently, the middleware will only trigger the calls you deemed light enough. For more heavy calls (e.g. DB calls like the one to MySQL), the middleware (Maikai module) will serve cached values, avoiding stress on downstream systems like the database.
To complete the setup, you should also edit
libs/healthchecks-advanced/index.js file and rename the function to dbCheck
update the SQL query, so that lines 7 through 11 now read:
asyncdbCheck(){conststart=newDate();constconn=awaitdb.conn();constquery='select count(1) from seat_maps';}
If you now run curl http://0.0.0.0:5501/health
and if everything was done correctly, and the microservice is up and running
healthily, you should get a health endpoint output that looks like the
following:
{"details":{"db:dbQuery":{"status":"pass","metricValue":15,"metricUnit":"ms","time":"2020-06-28T22:32:46.167Z"}},"status":"pass"}
If you run curl http://0.0.0.0:5501/ping instead, you should get a simpler
output:
{"status":"pass"}
You can see the full implementation of the microservice at
https://github.com/implementing-microservices/ms-flights if you run into any
issues, while modifying code yourself.
Now that we have a fully-functioning ms-flights microservice, implemented
with Node.js and MySQL, let us switch to the code behind the ms-reservations
microservice.
Introducing a Second Microservice to the Project
We are going to implement the second, ms-reservations microservice in Python
and Flask using Redis data store. Once again following the second goal from
“10 Workspace Guidelines for a Superior Developer Experience”, we are going to use a
template Github repository for a Python/Flask stack available at:
https://github.com/inadarei/ms-python-flask-template
As you can see, this template has a lot of the same characteristics as the
Nodebootstrap one we just used for ms-flights: it only requires working
Docker and Make, has all of the Make targets to support smooth development
experience, just like Nodebootstrap, and has working setup for common tasks such
as testing, linting etc. One thing it is missing, however, is the support for
database migrations. Unlike MySQL, Redis doesn’t really use database schemas so
there’s no burning need to codify various data definitions for “table”
creations. You could still use migrations to create test data in various
environments, but we will leave that task to the reader, to figure out and have
fun with. It is one way this template is different from the ones you would see
that do use SQL databases.
Just like in case of ms-flights, let’s start our code modifications by placing
the proper Open API Spec we developed earlier in this chapter into docs/api.yml
of the new ms-reservations repo. After running make start in the docs folder
(please note: this is a separate Makefile from the main one!), you should see
the API spec for reservations rendered at http://0.0.0.0:3939:

We will start modifying our template microservice by implementing the reservation creation endpoint.
Open service.py and replace the mapping for the update_user POST /users
endpoint with the one for PUT /reservations that like this:
@app.route('/reservations',methods=['PUT'])defreserve():"""Endpoint that reserves a seat for a customer"""json_body=request.get_json(force=True)resp=handlers.reserve(json_body)if(resp.get("status")=="success"):returnjsonify(resp)else:returnResponse(json.dumps(resp),status=403,mimetype='application/json')
As you can see, based on the result of the reservation, we output a success or an error and provide corresponding HTTP error code.
To fully implement this endpoint we also need to create a handler for the
mapping (usually tasked with error validation, but for brevity we will skip it)
in src/handlers.py by replacing the save_user user creation handler with the
following:
defreserve(json_body):"""Save reservation callback"""returnmodel.save_reservation(json_body)
and, most importantly, we need to implement the actual save to the database in
src/models.py, by replacing the save_user function there with something like
the following:
defsave_reservation(reservation):"""Saves reservation into Redis database"""seat_num=reservation['seat_num']try:result=this.redis_conn.hsetnx(this.tblprefix+reservation['flight_id'],seat_num,reservation['customer_id'])exceptredis.RedisError:response={"error":f"Unexpected error reserving {seat_num}"}log.error(f"Unexpected error reserving {seat_num}",exc_info=True)else:ifresult==1:response={"status":"success",}else:response={"error":f"Could not complete reservation for {seat_num}","description":"Seat already reserved. Cannot double-book"}returnresponse
Please note that we are calling Redis’s hsetnx method, which only sets the
value if one is not already set. This is how we reliably avoid accidental
double-booking. When hsetnx is rejected due to already set key, it returns “0”
(as in: “0 records modified”), otherwise it returns “1”, letting us know if
a conflict occurred or not.
You should also declare the table-level prefix for reservations in the module
scope by adding the following code around line 19th of src/models.py, right
after the this = sys.modules[__name__] declaration:
this=sys.modules[__name__]# Existing linethis.tblprefix="flights:"# New line
Since the template microservice already contained all of the code required to connect to a Redis database and to grab database credentials from the environment, in the 12 Factor App-fashion (which we described in Chapter 2) – we don’t have to write or debug any of that code. This again demonstrates the significant benefits of maintaining templates for microservices.
Once you make all the required changes, the endpoint should work. You should be
able to run make from the top level of the source code, which will build and
run the project at 0.0.0.0:7701.
If you encounter any issues at any point or would like to check-out the
application logs for some reason, you can do this using the logs-app make
target:
→ make logs-app docker-compose -p ms-workspace-demo logs -f ms-template-microservice Attaching to ms-template-microservice ms-template-microservice|[INFO]Starting gunicorn 20.0.4 ms-template-microservice|[INFO]Listening at: http://0.0.0.0:5000(1)ms-template-microservice|[INFO]Using worker: sync ms-template-microservice|[INFO]Booting worker with pid: 15
Please note that the logs say service is running on port 5000, but that is true
inside the Docker container. We map the standard Flask port 5000 to 7701 on
the host machine (your machine). You can also see combined app and db logs
by running make logs or just the database logs by running make logs-db.
Now let’s run several CURL commands to insert couple of reservations:
curl --header "Content-Type: application/json"--request PUT--data '{"seat_num":"12B","flight_id":"werty", "customer_id": "dfgh"}'http://0.0.0.0:7701/reservationscurl --header "Content-Type: application/json"--request PUT--data '{"seat_num":"12C","flight_id":"werty", "customer_id": "jkfl"}'http://0.0.0.0:7701/reservations
We can also test that our protection against the accidental double-bookings works. Let’s verify it by attempting to reserve an already reserved seat (e.g. 12C):
curl -v --header "Content-Type: application/json"--request PUT--data '{"seat_num":"12C","flight_id":"werty", "customer_id": "another"}'http://0.0.0.0:7701/reservations
It will respond with HTTP 403 and an error message:
→ curl -v --header "Content-Type: application/json"
>   --request PUT
>   --data '{"seat_num":"12C","flight_id":"werty", "customer_id": "another"}'
>   http://0.0.0.0:7701/reservations
*   Trying 0.0.0.0:7701...
* TCP_NODELAY set
* Connected to 0.0.0.0 (127.0.0.1) port 7701 (#0)
> PUT /reservations HTTP/1.1
> Host: 0.0.0.0:7701
> User-Agent: curl/7.68.0
> Accept: */*
> Content-Type: application/json
> Content-Length: 64
>
< HTTP/1.1 403 FORBIDDEN
< Server: gunicorn/20.0.4
< Connection: close
< Content-Type: application/json
< Content-Length: 111
<
* Closing connection 0
{"error": "Could not complete reservation for 12C",
"description": "Seat already reserved. Cannot double-book"}
Perfect!
Since we now have some data in the Redis store, we can proceed to implementing
the reservation retrieval endpoint, as well. Again, we will start with the
mapping definition in service.py, replacing the default /hello/<name> greeter
endpoint with the following:
@app.route('/reservations',methods=['GET'])defreservations():""" Get Reservations Endpoint"""flight_id=request.args.get('flight_id')resp=handlers.get_reservations(flight_id)returnjsonify(resp)
The implementation of the handler in src/handlers.py will again be simple
since we are skipping input validation, for he sake of brevity:
defget_reservations(flight_id):"""Get reservations callback"""returnmodel.get_reservations(flight_id)
and the model code will look like the following:
defget_reservations(flight_id):"""List of reservations for a flight, from Redis database"""try:key=this.tblprefix+flight_idreservations=this.redis_conn.hgetall(key)exceptredis.RedisError:response={"error":"Cannot retrieve reservations"}log.error("Error retrieving reservations from Redis",exc_info=True)else:response=reservationsreturnresponse
To test this endpoint we can issue a curl command and verify that we receive the expected JSON response:
→curl-vhttp://0.0.0.0:7701/reservations?flight_id=werty*Trying0.0.0.0:7701...*TCP_NODELAYset>GET/reservations?flight_id=wertyHTTP/1.1>Host:0.0.0.0:7701>Accept:*/*><HTTP/1.1200OK<Server:gunicorn/20.0.4<Connection:close<Content-Type:application/json<Content-Length:90<{"12B":"dfgh","12C":"jkfl",}*Closingconnection0
The full source code of this microservice is available at:
https://github.com/implementing-microservices/ms-reservations
Please take a look and try to use various make targets available in the repository to get a better feeling of what is all that you get from the template this code was bootstrapped from.
You should also use this opportunity to take a break and pat yourself on the back - you just created and executed two perfectly-sized and impeccably implemented, beautifully separate-stack microservices! Hooray!
Now what we need to do is figure-out a way of executing these two microservices (and any additional future components you may create) as a single unit. For this, we will introduce a notion of an “umbrella project” and explain how to develop one.
Hooking Services Up With an Umbrella Project
Developing individual microservices is what teams should be spending most of their time on. It’s essential for providing team autonomy, that leads to the ever-important coordination minimizations, and most of our system design work in the microservices style should be indeed targeted at minimizing coordination needs. That said, at some point we do need to try the entire project – all microservices working together. Even if this need is relatively rare, it is very important to make doing so easy. Which is why principle 4 of the “10 Workspace Guidelines for a Superior Developer Experience” states: “Running a single microservice and/or a subsystem of several ones should be equally easy”.
We need an easy to use “umbrella project” - the one that can launch all of our microservice-specific sub-projects in one simple command and make them all work together nicely, until such time as we decided to shut the umbrella project with all of its components down. Which obviously should also be very easy to do. Everything we want our developers to do without mistakes, should be easy!
To deploy an easy-to-use “umbrella project”, we are going to use the
microservices workspace template available at:
https://github.com/inadarei/microservices-workspace and start a workspace for
us at https://github.com/implementing-microservices/microservices-workspace
instead.
We will start by indicating the two repos we have just created as the components of the new workspace, by editing the fgs.json file and making it look something like the following:
{"ms-flights":{"url":"https://github.com/implementing-microservices/ms-flights"},"ms-reservations":{"url":"https://github.com/implementing-microservices/ms-reservations"}}
This configuration is using an open-source project known as Faux Git Submodules. The idea is to allow placing nested sub-repos under the umbrella workspace, such that you could descend into a subfolder of your workspace repo, containing a microservice and treat it as a fully-functioning repo, which you could update, commit code in and push. So, basically like the intent behind the regular git submodules, except anybody who has used them knows that the actual ones can behave in unpredictable ways and be major pain in the neck. Faux ones, in our opinion are much simpler and work more predictably. But we digress.
In the configuration above we indicated ms-flights and ms-reservations using the read-only “http://” protocol. This is so that you can follow the example. In real projects you would want to pull your repos with rear/write `git:// protocol so you can modify them, not just try.
Now that we have configured the repos.json, let’s pull the ms-flights and ms-reservations microservices into the workspace:
→ make update git clone -b masterhttps://github.com/implementing-microservices/ms-flights ms-flights Cloning into'ms-flights'... git clone -b masterhttps://github.com/implementing-microservices/ms-reservations ms-reservations Cloning into'ms-reservations'...
This operation also helpfully adds the checked-out repost to .gitignore of the
parent folder to prevent the parent repo trying to double-commit them into the
wrong place.
We do, however need to edit bin/start.sh and bin/stop.sh scripts to make the changes from the default:
#!/usr/bin/env bashexportCOMPOSE_PROJECT_NAME=msupandrunningexportwkdr=$PWDcd$wkdr/ms-flights&&make startcd$wkdr/ms-reservations&&make startcd$wkdrmake proxystartunsetwkdr
#!/usr/bin/env bashexportCOMPOSE_PROJECT_NAME=msupandrunningexportwkdr=$PWDcd$wkdr/ms-flights&&make stopcd$wkdr/ms-reservations&&make stopcd$wkdrmake proxystopunsetwkdr
To keep things simple, yet powerfully automated, our workspace setup is using the Traefik edge router for seamless routing to the microservices. Please note that we had to add Traefik-related labels to the docker-compose of both microservices, to ensure proper routing of those services:
services:ms-flights:container_name:ms-flightslabels:-"traefik.enable=true"-"traefik.http.routers.ms-flights.rule=PathPrefix(`/reservations`)"
services:ms-reservations:container_name:ms-reservationslabels:-"traefik.enable=true"-"traefik.http.routers.ms-reservations.rule=PathPrefix(`/reservations`)"
We also need to update the umbrella project’s name (which serves as the
namespace and network name for all services) in the workspace’s Makefile, so
that instead of project:=ms-workspace-demo it says:
project:=msupandrunning
Once you bring-up the workspace, by running make start at the workspace level,
you will be able to access both microservices in their attached-to-workspace form.
We mounted Traefik to local port 9080, making http://0.0.0.0:9080/ our base
URI. Therefore, the below two commands are querying reservations and ms-flights
systems
> curl http://0.0.0.0:9080/reservations?flight_id=qwerty
> curl
  http://0.0.0.0:9080/flights?flight_no=AA34&departure_date_time=2020-05-17T13:20
You can see the full source of the umbrella project at:
https://github.com/implementing-microservices/microservices-workspace
Summary
In this chapter we brought together a lot of system design and code implementation guidance that we had been teasing-out, to provide an end-to-end implementation of couple of powerful microservices, together with an umbrella workspace that allows us to work on these services either individually, or as a unified project. We saw through a step-by-step implementation of the powerful SEED(s) methodology, the design of individual data-models, and learned how to quickly jump-start code implementations off of robust template projects.
These skills, ability to put together well-modularized components quickly and efficiently can make a material difference in your ability to execute microservice projects successfully. The difference between what you were able to achieve, in this chapter, and somebody spending weeks figuring-out the basic boilerplate, or going down the rabbithole of wrong decisions can be tremendous. The difference can be that of a success or a failure of the entire initiative.
1 For demonstration purposes we are using the seatmap object structure from Sabre’s SeatMap Restful API - a gold standard of the industry: https://developer.sabre.com/docs/rest_apis/air/book/seat_map/reference-documentation#/default/seatMap