
Chapter 14. Report Navigation
• Hyperlink (Jump to URL) Navigation
• BookmarkLink (Jump to Bookmark) Navigation
• Document Map
• Drillthrough (Jump to Report) Navigation
• Hiding Items and Toggle Items
• Practical Application of Action Items
One of the main uses for navigation functionality is to simplify navigation of large reports and hierarchies of reports. Report developers can add hyperlink actions (or simply actions) to a report.
Reporting Services supports three types of actions:
▪ Drillthrough (Jump to report)—Jump to other reports. This action also provides an opportunity to provide parameters for the target report as well as the ability to jump to the same report with different parameters. This action is denoted with the <Drillthrough> element in a report’s RDL.
▪ BookmarkLink (Jump to bookmark)—Jump to other areas (bookmarked) within the report. This action is denoted with the <BookmarkLink> element in a report’s RDL.
▪ Hyperlink (Jump to URL)—Jump to web pages and other HREF constructs, such as mail and news. This action is denoted with the <Hyperlink> element in a report’s RDL.
Expressions can be used as a value for any action. Developers can add an action from either the Properties dialog box (right-click on a report item, select Properties from the shortcut menu, and click the Navigation tab) or from the Action property (click the ellipses in the Action property of the control). See Figure 14.1 for more details.
Figure 14.1. Two methods of adding actions to a report.

Actions can be added to a Textbox or an Image item, which, in turn, provides actionable items for List, Table, and Matrix. Any Reporting Services item can have a single action and either one or both of the Bookmark and Document Map labels associated with it. Multiple actions can point to a single bookmark link. This is similar to a reference to a particular topic in a book, in that multiple pages can point to a single topic.
Tip
Highlight an actionable item so it is intuitive to a user that the item can be clicked. Blue in color and underlined text items, usually, provide good highlights.
Hyperlink (Jump to URL) Navigation
When a report developer adds Hyperlink action, SSRS generates HREFto create a navigatable HTML link. For example, when a developer enters http://www.microsoft.com into a Textbox’s Jump to URL action field and sets the value of Textbox.Value equal to “Visit Microsoft,” the following is the link generated by SSRS when it renders the report to HTML format:
<a href= "http://www.microsoft.com/" style="text-decoration:none;color:Black" TARGET="_top">Visit Micorosft </a>
Reporting Services allows navigation using other constructs valid for the HREFtag. For example, javascript:history.back() allows you to emulate a browser’s Back button. This particular construct relies on Java support by browser (Netscape 2 or higher and MSIE 3 or higher) and enabled JavaScript. Another valid construct is mailto:[email protected], which allows creating a link that launches an email editor and places [email protected] on the To line. Other valid constructs include the following: ftp://www.microsoft.com to launch a FTP download or news:www.microsoft.com to get to a newsreader.
Note
Not all HREF constructs function in Preview mode. For example, javascript:history.back() will not deliver the action in Preview mode; also this construct will function after the report is deployed to a Report Server.
To create a Hyperlink (Jump To URL) action, enter a valid (such as http://www.microsoft.com or other described previously) HREF construct in the Jump To URL action field. Figure 14.1 shows two dialogs that allow you to input Jump To URL action field for a Textbox or Image report item. Action has the following corresponding RDL.
<Action>
<Hyperlink>http://www.microsoft.com</Hyperlink>
</Action>
or
<Action>
<Hyperlink>={Expression}</Hyperlink>
</Action>
In the preceding code fragment, an {Expression} is any expression that evaluates to a valid HREF construct as described previously, such as http://www.microsoft.com.
BookmarkLink (Jump to Bookmark) Navigation
BookmarkLink (Jump to bookmark) simplifies navigation for large reports. This action allows navigation to a bookmarked line or page of the report.
To create a BookmarkLink navigation, the first step is to set a bookmark. A bookmark can be set for any report item using the following:
▪Properties window—The Properties window is normally docked in the lower-right corner of Report Designer. If you do not see this window, press F4 or use the View, Properties Window menu.
▪Navigation tab of an item’s Properties dialog box—The Properties dialog box can by accessed by right-clicking on a report item and selecting Properties from the short-cut menu. The Navigation tab of an item’s Properties dialog box is shown in Figure 14.1.
An example of a bookmark is included in the Actions -- Bookmark-Toggle-Document Map -- Products.rdl sample for this book. After Bookmark is set, Report Designer adds the following RDL:
<Bookmark>
={Expression}
</Bookmark>
The next step is to create a BookmarkLink action, which performs the navigation to the bookmark set in the previous step. The BookmarkLink action can be created only for Textbox and Image report items. To create a BookmarkLink action, enter the Jump to bookmark expression on either of the following:
▪Action dialog box—The Action dialog box can be accessed by clicking the ellipses “(...)” next to the Action property in the Properties window.
▪Navigation tab of an item’s Properties dialog box—The previous step describes how to access the Navigation tab.
After the BookmarkLink action is set, Report Designer adds the following RDL:
<Action>
<BookmarkLink>
={Expression}
</BookmarkLink>
</Action>
Document Map
Much like bookmarks, the document map is designed to simplify navigation for large reports. A document map is intended for interactive (HTML rendering) report viewing and is displayed as a side panel on a report.
PDF and Excel rendering extensions have a different way of articulating a document map. Excel rendering extensions create a separate worksheet with the name “Document map,” which provides links to a worksheet with the report’s data. PDF displays the document map in the Bookmarks Navigation tab.
Document map labels are set similarly to bookmarks as they relate to report items. To create a document map label for a report, you just fill the Document Map Label entry on the Navigation tab of an item’s Properties dialog box, or enter the Label property in the Properties window.
After the document map labels are created, Reporting Services automatically generates a document map and renders a treelike structure containing navigational items. SSRS builds a document map entry when it sees the following RDL:
<Label>={Expression}</Label>
Document map labels defined for report items are displayed on the same level (next after the root level) and ordered in the order of the report item’s appearance on a report. Order is based first on the position of the top side (vertical ordering) and second on the position of left side (horizontal ordering) of the item.
The document map also supports a hierarchical display of labels. SSRS creates a hierarchical view on a document map when you set Document Map Label and Parent Group expressions using the Grouping and Sorting Properties dialog box. The Grouping and Sorting Properties dialog box was discussed in Chapter 12, “Grouping, Sorting, and Aggregating Data, Working with Scope.” The hierarchical view is not supported in PDF. Instead, PDF shows labels of a document map as a single level in the Bookmarks Navigation tab.
The document map has the same name as the name of the report. This name is used for the root node of a document map. There are no options that allow changing the name of a document map. Only one document map is allowed for a report.
Note
An example of a document map is included in the Actions -- Bookmark-Toggle-Document Map -- Products.rdl sample for this book.
Drillthrough (Jump to Report) Navigation
This type of action is usually employed when there is a need to design master (parent) and detail (child) reports. An action, which takes users to a detail report, is created on the master report.
To create a Drillthrough navigation (action) you need to set Jump to report expression on either the Action dialog box or on the Navigation tab of the item’s Properties dialog box. The Jump to report expression needs to evaluate to a name of a report.
You can also specify parameters to pass to a report by clicking the Parameters button next to the Jump to report expression. The Parameters dialog box allows you to enter a constant name of a parameter and an expression that will assign a value to the parameter.
The following is an example of RDL for the Drillthrough action:
<Action>
<Drillthrough>
<ReportName>Product Detail</ReportName>
<Parameters>
<Parameter Name= "ProductNumber ">
<Value>=Fields!Name.Value</Value>
</Parameter>
</Parameters>
</Drillthrough>
</Action>
Note
The Back to Parent Report button on the Report Viewer’s toolbar provides a convenient way to navigate back to a parent report. This button is especially handy in Preview mode.
An example of a Drillthrough is included as a sample for this book and consists of master (Actions -- Drillthrough.PlusInteractiveSort -- Sales Order.rdl) and detail (Actions -- Hyperlink -- Product Detail.rdl) reports.
Hiding Items and Toggle Items
Hiding and toggling items handles interactive visibility for sections of a report and allows you to dynamically expand portions of a report that you want to see. This is yet another option to simplify navigation. Hide and toggle functionality can be used, for example, to implement master/detail functionality, category/subcategory functionality, or to simply shorten a large report.
To implement this functionality, set an InitialToggleState property. The InitialToggleState property indicates an image that is displayed for a toggle item: Collapsed, Expanded, or Expression. Normally, toggle control is a picture of a plus or minus sign, which indicates an expanded or collapsed state, respectively. InitialToggleState property just defines a picture of a state image, but does not change the visibility of an item. If not specified, the default toggle state is collapsed. If a developer clears an initial state property, it reverts back to collapsed.
Note
Note that the toggle state is not available for groups. It is only available for individual items.
Reporting Services adds the following RDL (if the item is visible, the <Hidden>tag is not included):
<Visibility>
<ToggleItem>{ToggleItem}</ToggleItem>
<Hidden>={Expression}or {true}</Hidden>
</Visibility>
Note
An example of a toggling and hiding items is included as a sample report: Actions -- Bookmark.Toggle.Document Map. -- Products.rdl.
Practical Application of Action Items
Adventure Works Internet sales department wants to create an interactive product catalog. The initial screen of a report should not be larger than a single page. A report must provide effective navigation through products. A user must be able to navigate through the product category and subcategory hierarchies.
Implementation
A finished implementation is included as a sample for this book, as shown in Actions -- Bookmark.Toggle.Document Map. -- Products.rdl.
First, create a data set (you can name the data set “ProductCategories” as in the sample) with the following query using AdventureWorks data source.
SELECT Production.ProductCategory.Name AS CategoryName,
Production.ProductSubcategory.Name AS SubCategoryName,
Production.Product.Name AS ProductName,
Production.ProductPhoto.ThumbNailPhoto,
Production.Product.ProductNumber
FROM
Production.ProductCategory
INNER JOIN
Production.ProductSubcategory ON Production.ProductCategory.ProductCategoryID = Production.ProductSubcategory.ProductCategoryID
INNER JOIN Production.Product ON Production.ProductSubcategory.ProductSubcategoryID = Production.Product.ProductSubcategoryID
INNER JOIN
Production.ProductProductPhoto ON Production.Product.ProductID =Production.ProductProductPhoto.ProductID
INNER JOIN
Production.ProductPhoto ON Production.ProductProductPhoto.ProductPhotoID = Production.ProductPhoto.ProductPhotoID
Create a report layout outline, as shown in Figure 14.2. This report uses Matrix to provide category navigation.
Figure 14.2. Navigation Report Layout view.

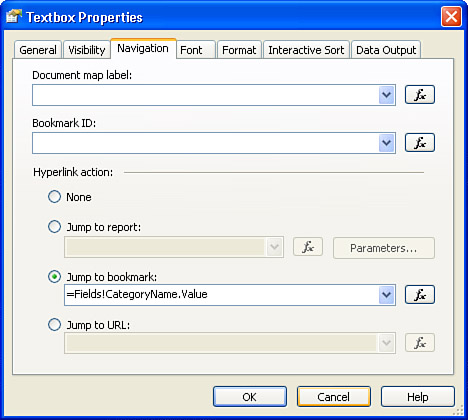
Right-click Matrix’s column group and view the Properties dialog box. On the Navigation tab (see Figure 14.3), add the following expression to the BookmarkLink (Jump to bookmark)action:
=Fields!CategoryName.Value
Figure 14.3. Jump to bookmark.
This allows users to access an appropriate category name on a report. Apply formatting so a user can tell that this is a clickable item.
Right-click the text box and view the Properties dialog box. On the Navigation tab, enter the following expression to the Jump to URL action (see Figure 14.4):
mailto:[email protected]
Figure 14.4. Jump to URL navigation.

This action starts the user’s email application and places [email protected]in the To... line.
Edit the table Subcategory group (inner group) and enter the following expression in the Document Map Label:
=Fields!SubCategoryName.Value
and the following expression in the Parent Group:
=Fields!CategoryName.Value
Note that this is a grouping expression and a document map for the outer (parent) group (see Figure 14.5). Thus, a hierarchy is formed for a document map.
Figure 14.5. Document map and its hierarchy.

Click the Visibility tab. Set Initial Visibility to Hidden. Check the Visibility Can Be Toggled By Another Report Item check box, and enter CategoryName. Visibility information should look similar to Figure 14.6.
Figure 14.6. Setting item visibility.

In addition, set the Visibility/Hidden property to True for all detail cells and set the Visibility Can Be Toggled By Another Report Item to SubCategoryName for detail cells in the Product Name and Photo columns.
Edit the parent group to enter =Fields!CategoryName.Value as a grouping expression and a document map.
Access the properties of an image and add navigation to the Actions -- Hyperlink -- Product Detail report by filling the Jump to report action. Additional formatting and retrieving a picture of a product from the database should be easy. See Figure 14.7 for the final product.
Figure 14.7. Sample report with navigation.

An actual sample produces slightly different output and has some remarks pointing to the implemented futures.
Note
Note how the Actions -- Hyperlink -- Product Detail report make use of the HideCost parameter. This is a hidden parameter that prevents the casual user fromviewing cost information. However, when this report is accessed from Actions -- Drillthrough.PlusInteractiveSort -- Sales Order, a Drillthrough action on this report sets the HideCost parameter to False and thus reveals cost information.
Summary
Actions, document maps, and bookmarks simplify navigation of complex reports, report hierarchies, and more. SSRS supports three types of actions: Drillthrough (or Jump to report), BookmarkLink (or Jump to bookmarked areas of a report), and Hyperlink (or Jump to URL—general web navigation).
Image and Text report items support the most complex navigation capabilities. Image and Text can contain a Document map label and Bookmark ID. Document map label and Bookmark ID mark navigation destinations on a report. Image and Text also support Jump to ... actions. Other SSRS items can serve as Document map label and Bookmark ID but do not by themselves support actions.
After a developer has defined document map labels, SSRS automatically renders a document map. Document map is supported by HTML, Excel, and PDF rendering extensions.
The next chapter reviews how SSRS works with multidimensional data sources and integrates with Analysis Services and Data Mining features of SQL Server 2005.