Chapter 19. Consolidating Projects and Resources

In this chapter, you will learn how to: | |
✓ | Create a resource pool to share resources across multiple projects. |
✓ | Look at resource allocation across multiple projects. |
✓ | Change resource assignments in a sharer plan, and see the effects in the resource pool. |
✓ | Change a resource’s working time in the resource pool, and see the effects in the sharer plan. |
✓ | Make a specific date nonworking time in the resource pool, and see the effects in the sharer plan. |
✓ | Create a project plan, and make it a sharer plan for the resource pool. |
✓ | Manually update the resource pool from a sharer plan. |
✓ | Insert project plans to create a consolidated project. |
✓ | Link tasks between two project plans. |
Tip
Do you need only a quick refresher on the topics in this chapter? See the Quick Reference entries in Consolidating Projects and Resources.
Important
This chapter describes various ways of sharing resources and managing multiple projects. This process is more generally called portfolio management or enterprise project management. Project Professional, when used with Project Server, offers much more sophisticated ways of managing a portfolio of projects and resources across an enterprise. To learn more about the portfolio management tools available with Project Server, see Part 4.
Most project managers must juggle more than one project at a time. These projects often share resources and are worked on simultaneously. Microsoft Office Project 2007 has several features to make it easier to work with multiple projects. In this chapter, you share resource information between multiple project plans and pull together separate project plans as a single consolidated plan.
Important
Before you can use the practice files provided for this chapter, you need to install them from the book’s companion CD to their default locations. See "Using the Book’s CD" for more information.
Creating a Resource Pool
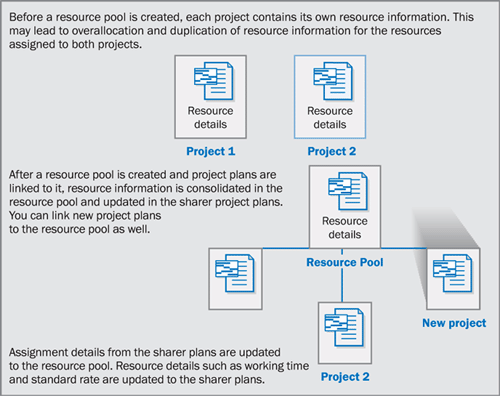
When managing multiple projects, it is common for work resources (people and equipment) to be assigned to more than one project at a time. It might become difficult to coordinate the work resources’ time among the multiple projects, especially if those projects are managed by different people. For example, a sound engineer in a film studio might have task assignments for a TV commercial, a promotional program, and a documentary film—three projects proceeding simultaneously. In each project, the engineer might be fully allocated or even underallocated. However, if you add together all of her tasks from these projects, you might discover that she has been overallocated, or assigned to work on more tasks than she can handle at one time. When working with cost resources in multiple projects, you might want to see not only the cost per project associated with a cost resource, but the cumulative costs across projects as well. Likewise, when working with material resources in multiple projects, you’d see cumulative consumed material resources in whatever unit of consumption you’ve used.
A resource pool can help you see how resources are utilized across multiple projects. The resource pool is a project plan from which other project plans draw their resource information. It contains information about all resources’ task assignments from all project plans linked to the resource pool. You can change resource information—such as maximum units, cost rates, and nonworking time—in the resource pool, and all linked project plans will use the updated information.
The project plans that are linked to the resource pool are called sharer plans. The following is one way of visualizing a resource pool and sharer plans.
If you manage just one project with resources that are not used in other projects, a resource pool provides you no benefit. However, if your organization plans to manage multiple projects, setting up a resource pool enables you to do the following:
Enter resource information once, but use it in multiple project plans.
View resources’ assignment details from multiple projects in a single location.
View assignment costs per resource across multiple projects.
View cost resources cumulative costs across multiple projects.
View material resources cumulative consumption values across multiple projects.
Find resources who are overallocated across multiple projects, even if those resources are underallocated in individual projects.
Enter resource information, such as nonworking time, in any of the sharer plans or in the resource pool so that it is available in other sharer plans.
A resource pool is especially beneficial when working with other Project users across a network. In those cases, the resource pool is stored in a central location, such as a network server, and the individual owners of the sharer plans (which might be stored locally or on a network server) share the common resource pool.
In this exercise, you arrange the windows of two project plans that will become sharer plans; this helps you see the effects of creating a resource pool. You then create a project plan that will become a resource pool and link the two sharer plans to it.
Important
If you are running Project Professional, you may need to make a one-time adjustment to use the Computer account and to work offline. This ensures that the practice files you work with in this chapter do not affect your Project Server data. For more information, see "Starting Project Professional“.
Note
OPEN Wingtip Toys Commercial 19a from the DocumentsMicrosoft PressProject 2007 SBSChapter 19 Consolidating folder. You can also access the practice files for this book by clicking Start, All Programs, Microsoft Press, Project 2007 Step by Step and then selecting the chapter folder of the file you want to open.
On the File menu, click Save As.
The Save As dialog box appears.
In the File name box, type Wingtip Toys Commercial 19, and then click Save.
On the Standard toolbar, click the Open button.
The Open dialog box appears.
Double-click the Parnell Aerospace Promo 19b file.
On the File menu, click Save As.
The Save As dialog box appears.
In the File name box, type Parnell Aerospace Promo 19, and then click Save.
These two project plans were previously created, and both contain resource information. Next, you will create a new project plan that will become a resource pool.
On the Standard toolbar, click the New button.
Project creates a new project plan, with the Gantt Chart view displayed.
On the View menu, click Resource Sheet.
The Resource Sheet view replaces the Gantt Chart view.
On the File menu, click Save As.
Navigate to the DocumentsMicrosoft PressProject 2007 SBSChapter 19 Consolidating folder.
In the File name box, type Resource Pool 19, and then click Save.
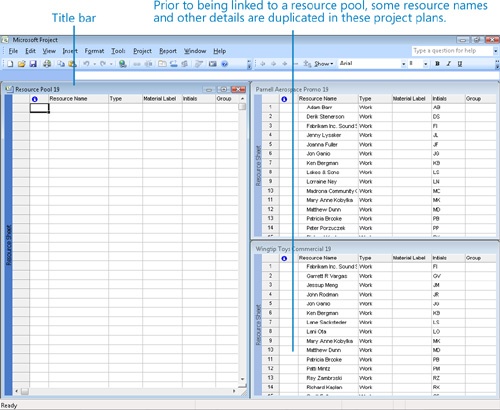
On the Window menu, click Arrange All.
Project arranges the three project plan windows within the Project window.
Tip
You do not need to arrange the project windows in this way to create a resource pool, but it is helpful to see the results as they occur in this chapter.
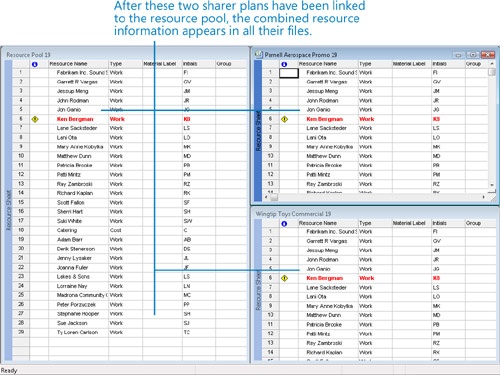
Looking at the resource names in the two project plans (Parnell Aerospace Promo 19 and Wingtip Toys Commercial 19), you can see that several of the same resources appear in both project plans. These include Fabrikam Inc. Sound Studio, Jon Ganio, Ken Bergman, Catering (a cost resource), and others. None of these resources are overallocated in either project.
Click the title bar of the Wingtip Toys Commercial 19 window.
On the Tools menu, point to Resource Sharing, and click Share Resources.
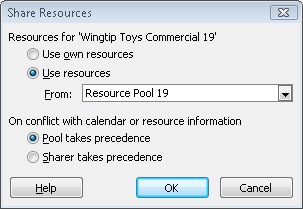
The Share Resources dialog box appears.
Under Resources for ‘Wingtip Toys Commercial 19’, select the Use resources option.
The Use Resources From list contains the open project plans that can be used as a resource pool.
On the From list, make sure that Resource Pool 19 is selected in the drop-down list.
Click OK to close the Share Resources dialog box.
You see the resource information from the Wingtip Toys Commercial 19 project plan appear in the Resource Pool 19 plan. Next, you will set up the Parnell Aerospace Promo 19 project plan as a sharer plan with the same resource pool.
Click the title bar of the Parnell Aerospace Promo 19 window.
On the Tools menu, point to Resource Sharing, and then click Share Resources.
Under Resources for ‘Parnell Aerospace Promo 19’, click the Use resources option.
On the From list, make sure that Resource Pool 19 is selected.
Resource Pool 19 is selected by default. The Wingtip Toys Commercial 19 project plan is already a sharer plan, and Project won’t allow a sharer plan to be a resource pool for another project plan.
Under On conflict with calendar or resource information, make sure that the Pool takes precedence option is selected.
Selecting this option causes Project to use resource information (such as cost rates) in the resource pool rather than in the sharer plan should it find any differences between the two project plans.
Click OK to close the Share Resources dialog box.
You see the resource information from the Wingtip Toys Commercial 19 project plan appear in the resource pool.
The resource pool contains the resource information from both sharer plans. Project will consolidate resource information from the sharer plans based on the name of the resource. Jon Ganio, for example, is listed only once in the resource pool, no matter how many sharer plans list him as a resource.
Important
Project cannot match variations of a resource’s name—for example, Jon Ganio from one sharer plan and J. Ganio from another. For this reason, it is a good idea to develop a convention for naming resources in your organization, and then stick with it.
Again, you do not have to arrange the project windows as you did in this exercise to link the sharer plans to the resource pool. However, it is helpful in this chapter to see the results as they occur.
Viewing Assignment Details in a Resource Pool
One of the most important benefits of using a resource pool is that it allows you to see how resources are allocated across projects. For example, you can identify resources that are overallocated across the multiple projects to which they are assigned.
Let’s look at a specific example. As you might have noticed in the previous section, the resource Ken Bergman, who was not overallocated in either of the individual project plans, did appear overallocated after Project accounted for all of his assignments across the two project plans. When Ken’s assignments from the two sharer plans were combined, they exceeded his capacity to work on at least one day. Although Ken most likely was aware of this problem, the project manager may not have known about it without setting up a resource pool (or hearing about the problem directly from Ken).
In this exercise, you look at the information in the resource pool.
Double-click the title bar of the Resource Pool 19 window.
The resource pool window is maximized to fill the Project window. In the resource pool, you can see all of the resources from the two sharer plans. To get a better view of resource usage, you will change views.
On the View menu, click Resource Usage.
The Resource Usage view appears.
In the Resource Name column, click the name of resource 6, Ken Bergman, and then scroll the Resource Usage view to display all of Ken’s assignments below his name.
On the Standard toolbar, click the Scroll To Task button.
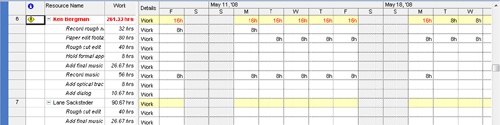
The timescale details on the right side of the Project window scroll horizontally to show Ken Bergman’s earliest task assignments. The red numbers (for example, 16 hours on Friday through Monday, May 9 through 19) indicate days on which Ken is overallocated. Next, you will display the Resource Form to get more detail about Ken’s assignments.
On the Window menu, click Split.
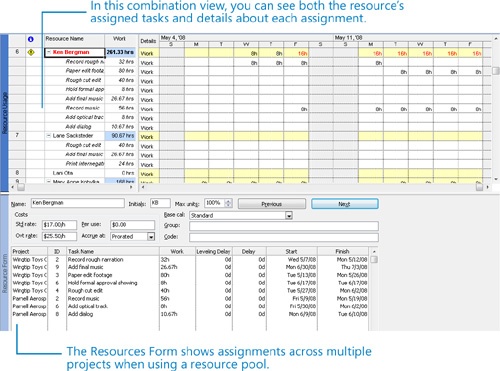
In this combination view, you can see all resources in the resource pool and their assignments (in the upper pane), as well as the selected resource’s details (in the lower pane) from all sharer plans. You can see, for example, that the Record rough narration task to which Ken is assigned is from the Wingtip Toys Commercial 19 project, and the Record music task is from the Parnell Aerospace Promo 19 project. Ken was not overallocated in either project, but he is overallocated when you see his assignments across projects in this way.
If you want, click different resource names in the Resource Usage view to see their assignment details in the Resource Form.
On the Window menu, click Remove Split.
Updating Assignments in a Sharer Plan
You might recall that an assignment is the matching of a resource to a task. Because a resource’s assignment details originate in sharer plans, Project updates the resource pool with assignment details as you make them in the sharer plan.
In this exercise, you change resource assignments in a sharer plan, and you see the changes posted to the resource pool.
On the Edit menu, click Go To.
In the ID field, enter 21, and then click OK.
Project displays the information for Jenny Lysaker. You can see that Jenny has no task assignments in either sharer plan. (The value of her Work field is zero.) Next, you will assign Jenny to a task in one of the sharer plans, and you will see the result in the resource pool as well as in the project.
On the Window menu, click Parnell Aerospace Promo 19.
On the View menu, click Gantt Chart.
On the Standard toolbar, click the Assign Resources button.
In the Task Name column, click the name of task 5, Add effects.
In the Resource Name column in the Assign Resources dialog box, click Jenny Lysaker, and click the Assign button.
Click Close to close the Assign Resources dialog box.
On the Window menu, click Resource Pool 19 to switch back to the resource pool.
Make sure that resource 21, Jenny Lysaker, is selected, and then on the Standard toolbar, click Scroll to Task.
As expected, Jenny Lysaker’s new task assignment appears in the resource pool.

When the resource pool is open in Project, any changes you make to resource assignments or other resource information in any sharer plans immediately show up in all other open sharer plans and the resource pool. You don’t need to switch between sharer plans and the resource pool, as you did in this chapter, to verify the updated resource assignments.
Updating a Resource’s Information in a Resource Pool
Another important benefit of using a resource pool is that it gives you a central location in which to enter resource details, such as cost rates and working time. When a resource’s information is updated in the resource pool, the new information is available in all of the sharer plans. This can be especially useful in organizations with a large number of resources working on multiple projects. In larger organizations, people such as line managers, resource managers, or staff in a program office are often responsible for keeping general resource information up to date.
Ken Bergman has told you that he will be unavailable to work on May 12 and 13. In this exercise, you update a resource’s working time in the resource pool, and you see changes in the sharer plans.
On the Edit menu, click Go To.
In the ID field, enter 6, and in the Date field, type or select 5/12/2008 and then click OK.
Project displays Ken’s assignments during the week of May 11 and later.
On the Tools menu, click Change Working Time.
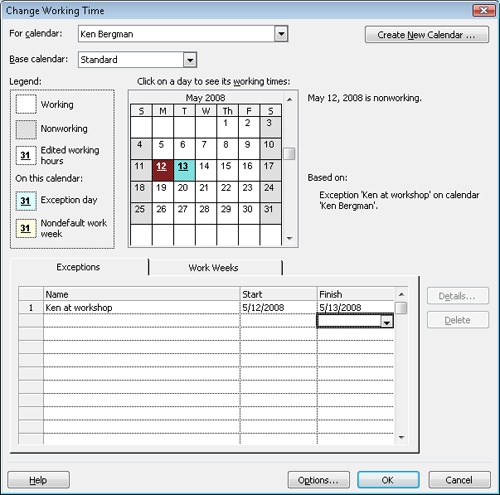
In the For calendar box, make sure that Ken Bergman is selected.
Ken Bergman’s resource calendar appears in the Change Working Time dialog box. Ken has told you that he will not be available to work on Monday and Tuesday, May 12 and 13, because he plans to attend a workshop.
On the Exceptions tab in the Change Working Time dialog box, click in the first row under Name and type Ken at workshop.
The description for the calendar exception is a handy reminder for you and others who may view the project plan later.
Click in the Start field and type or select 5/12/2008.
Click in the Finish field and type or select 5/13/2008, and then press
 .
.Click OK to close the Change Working Time dialog box.
Tip
When making such changes in the resource pool, you should have it open as read-write (as you do now). Whenever you open a resource pool, Project asks whether you want to open it as read-only (the default) or read-write.
Now Ken has no work scheduled (as he did previously).
To verify that Ken’s nonworking time setting was updated in the sharer plans, you will look at his working time in one of those project plans.
On the Window menu, click Parnell Aerospace Promo 19.
On the Tools menu, click Change Working Time.
The Change Working Time dialog box appears.
In the For calendar box, click Ken Bergman. His name appears toward the top of the list.
On the Exceptions tab, you can see that May 12 and 13 are flagged as nonworking days for Ken; the change to this resource’s working time in the resource pool has been updated in the sharer plans.
Click Cancel to close the Change Working Time dialog box.


Updating All Plans’ Working Times in a Resource Pool
In the previous exercise, you changed an individual resource’s working time in the resource pool, and you saw the change posted to the sharer plans. Another powerful capability of a resource pool enables you to change working times for a base calendar and see the changes updated to all sharer plans that use that calendar. For example, if you specify that certain days (such as holidays) are to be nonworking days in the resource pool, that change is posted to all sharer plans.
Important
By default, all sharer plans share the same base calendars, and any changes you make to a base calendar in one sharer plan are reflected in all other sharer plans through the resource pool. If you have a specific sharer plan for which you want to use different base calendar working times, change the base calendar that sharer plan uses.
In this exercise, you set nonworking time in a base calendar in the resource pool, and you see this change in all sharer plans.
On the Window menu, click Resource Pool 19.
The entire company will be attending a local film festival on May 12, and you want this to be a nonworking day for all sharer plans.
On the Tools menu, click Change Working Time.
The Change Working Time dialog box appears.
In the For calendar box, select Standard (Project Calendar) on the drop-down list.
Changes in working time to the Standard base calendar in the resource pool affect all project plans that are sharer plans of the resource pool.
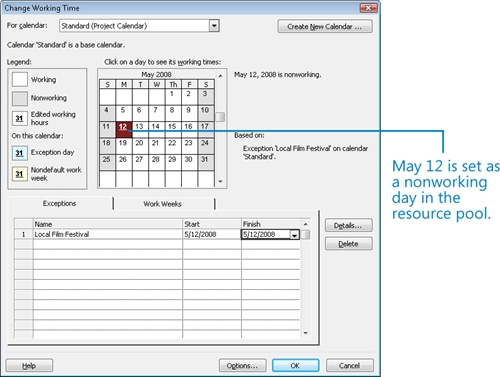
On the Exceptions tab in the Change Working Time dialog box, click in the first row under Name and type Local Film Festival.
Click in the Start field and type or select 5/12/2008, and then click the Finish field.
Project fills in the same value in the Finish Date field.
Click OK to close the Change Working Time dialog box.
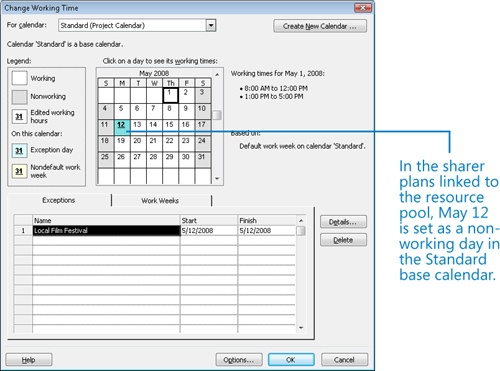
To verify that this change to the Standard base calendar in the resource pool was updated in the sharer plans, you will look at working time in one of the sharer plans.
On the Window menu, click Wingtip Toys Commercial 19.
On the Tools menu, click Change Working Time.
The Change Working Time dialog box appears.
In the For calendar box, click Standard (Project Calendar) on the drop-down list.
Tip
Base calendars, such as 24 Hours, Night Shift, and Standard, appear at the top of the list in the For Calendar box. Resource names appear below the base calendars.
Note the Local Film Festival exception on May 12. All project plans that are sharer plans of the same resource pool will see this change in this base calendar.
Click Cancel to close the Change Working Time dialog box.
If you want, you can switch to the Parnell Aerospace Promo 19 project plan and verify that May 12 is also a nonworking day for that project.
Close and save changes to all open project plans, including the resource pool.
Important
When working with sharer plans and a resource pool, it is important to understand that when you open a sharer plan, you must also open the resource pool if you want the sharer plan to be updated with the most recent changes to the resource pool. For example, assume that you change the project calendar’s working time in the resource pool, save it, and close it, If you later open a sharer plan but do not also open the resource pool, that sharer plan will not reflect the updated project calendar’s working time.
Linking New Project Plans to a Resource Pool
You can make a project plan a sharer plan for a resource pool at any time: when initially entering the project plan’s tasks, after you have assigned resources to tasks, or even after work has begun. After you have set up a resource pool, you might find it helpful to make sharer plans of all new projects along with the sharer plans of projects already created. In that way, you get used to relying on the resource pool for resource information.
Tip
A definite timesaving advantage of creating new project plans as sharer plans of a resource pool is that your resource information is instantly available. You do not have to reenter any resource data.
In this exercise, you create a project plan and make it a sharer plan for the resource pool.
On the Standard toolbar, click Open.
The Open dialog box appears.
Navigate to the Chapter 19 Consolidating folder, and double-click Resource Pool 19.
Project prompts you to select how you want to open the resource pool.
Important
The default option is to open the resource pool as read-only. You might want to choose this option if you and other Project users are sharing a resource pool across a network. If you store the resource pool locally, however, you should open it as read-write. To read more about how to open a resource pool, click the Help button in the Open Resource Pool dialog box.
Click the second option to open the project plan as read-write, and then click OK.
On the View menu, click Resource Sheet.
The Resource Sheet view appears.
On the Standard toolbar, click New.
On the File menu, click Save As.
The Save As dialog box appears.
Navigate to the DocumentsMicrosoft PressProject 2007 SBSChapter 19 Consolidating folder.
In the File name box, type Hanson Brothers Project 19, and then click Save.
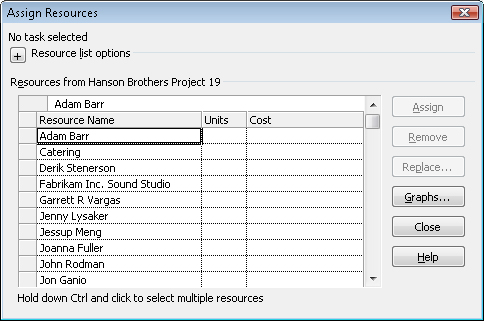
On the Standard toolbar, click Assign Resources.
The Assign Resources dialog box is initially empty because you have not yet entered any resource information in this project plan.
On the Tools menu, point to Resource Sharing, and then click Share Resources.
The Share Resources dialog box appears.
Under Resources for ‘Hanson Brothers Project 19’, select the Use resources option.
On the From list, make sure that Resource Pool 19 is selected on the drop-down list, and then click OK to close the Share Resources dialog box.
In the Assign Resources dialog box, you see all of the resources from the resource pool appear.
Now these resources are ready for assignments to tasks in this project.
Click Close to close the Assign Resources dialog box.
On the File menu, click Close. When prompted, click the Yes button to save your changes.
The Hanson Brothers Project 19 project plan closes, and the Resource Pool 19 plan remains open.
On the File menu, click Close. When prompted, click Yes to save your changes to Resource Pool 19.

Important
You save changes to the resource pool because it records the names and locations of its sharer plans.
Troubleshooting
If a sharer plan is deleted, assignment information from that sharer plan is still stored in the resource pool. To clear this assignment information from the resource pool, you must break the link to the sharer plan. Open the resource pool as read-write. On the Tools menu, click Resource Sharing, and then click Share Resources. In the Share Resources dialog box, click the name of the now-deleted sharer plan, and click the Break Link button.
Opening a Sharer Plan and Updating a Resource Pool
If you are sharing a resource pool with other Project users across a network, whoever has the resource pool open as read-write prevents others from updating resource information, such as standard cost rates, or making other project plans sharers of that resource pool. For this reason, it is a good idea to open the resource pool as read-only and use the Update Resource Pool command only when you need to update the resource pool with assignment information. You can click the Update Resource Pool command from the Resource Sharing submenu of the Tools menu. This command updates the resource pool with new assignment information; once that is done, anyone else who opens the resource pool will see the latest assignment information.
In this chapter, you are working with the resource pool and sharer plans locally. If you are going to use a resource pool over a network, it is a good idea to understand the updating process. This exercise introduces you to that process.
In this exercise, you change assignments in a sharer plan and then manually send updated assignment information to the resource pool.
On the Standard toolbar, click Open.
Navigate to the Chapter 19 Consolidating folder, and double-click the Parnell Aerospace Promo 19 file.
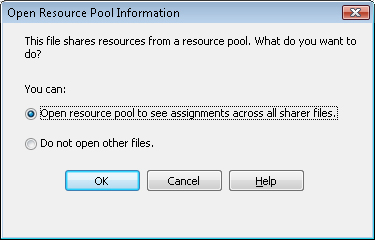
Because this project plan is a sharer plan linked to a resource pool, Project gives you the following options.
Click the Open resource pool to see assignments across all sharer files option, and then click OK.
Choosing the second option, Do Not Open Other Files, allows you to see assignments only in the single sharer project plan.
The resource pool opens as read-only in the background. (If you want to verify this, look at the items on the Window menu.) Next, you will change some assignments in the sharer plan.
On the Standard toolbar, click Assign Resources.
The Assign Resources dialog box appears. First, you will assign a resource to a task.
In the Task Name column, click the name of task 6, Add optical track.
In the Resource Name column in the Assign Resources dialog box, click Stephanie Hooper, and click Assign.
Next, you will remove a resource from a task.
In the Task Name column, click the name of task 8, Add dialog.
In the Resource Name column in the Assign Resources dialog box, click Sue Jackson (located at the top of the Resource Name column), and then click the Remove button.
You have made two assignment changes in the sharer plan. Because the resource pool is open as read-only, those changes have not been permanently saved in the resource pool. Next, you will update the resource pool.
On the Tools menu, point to Resource Sharing, and then click Update Resource Pool.
Project updates the assignment information in the resource pool with the new details from the sharer plan. Anyone else who opens or refreshes the resource pool now will see the updated assignment information.
Important
Only assignment information is saved to the resource pool from the sharer plan. Any changes you make to resource details, such as maximum units, in the sharer plan are not saved in the resource pool when you update. When you want to change the resource details, open the resource pool as read-write. After it is open as read-write, you can change resource details in either the resource pool or the sharer plan, and the other project plans will be updated.
Next, you will change an assignment in the sharer plan, close the project plan, and then update the resource pool.
In the Task Name column, click the name of task 3, Sync sound.
In the Resource Name column in the Assign Resources dialog box, click Lane Sacksteder, and then click Assign.
Click Close to close the Assign Resources dialog box.
On the File menu, click Close.
When prompted to save changes, click Yes.
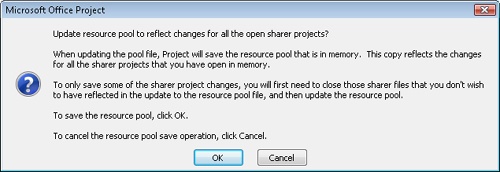
Project determines that, because the resource pool was open as read-only, the latest assignment changes from the sharer plans have not been updated in the resource pool. You are offered the choices shown in the following illustration.
Click OK.
Project updates the assignment information with the new details from the sharer plan. The resource pool remains open as read-only.
On the File menu, click Close.
Because the resource pool was opened as read-only, Project closes it without prompting you to save changes.
Consolidating Project Plans
Most projects often involve several people working on tasks at different times, sometimes in different locations, and frequently for different supervisors. Although a resource pool can help you manage resource details across projects, it might not give you the level of control that you want over tasks and relationships between projects.
A good way to pull together far-flung project information is to use a consolidated project. This is a project plan that contains other project plans, called inserted projects. The inserted projects do not reside within the consolidated project plan, but are linked to it in such a way that they can be viewed and edited from it. If a project plan is edited outside of the consolidated project, the updated information appears in the consolidated project plan the next time it is opened.
Tip
Consolidated project plans are also known as master projects, and inserted project plans are also known as subprojects; however, this chapter uses the terms consolidated and inserted. To learn more about consolidated project plans, type Insert a project into a master project into the Search box in the upper right corner of the Project window. The Search box initially contains the text Type a question for help.
Using consolidated project plans enables you to do the following:
See all tasks from your organization’s project plans in a single view.
“Roll up” project information to higher levels of management. For example, you might insert a team’s project plan into the larger department’s consolidated project plan and then insert that plan into the larger organization’s consolidated project plan.
Divide your project data into different project plans to match the nature of your project such as by phase, component, or location. Then you can pull the information back together in a consolidated project plan for a comprehensive look at the whole.
See all of your projects’ information in one location so that you can filter, sort, and group the data.
Consolidated project plans use Project’s outlining features. An inserted project plan appears as a summary task in the consolidated project plan, except that its summary Gantt bar is gray and an inserted project icon appears in the Indicators column. When you save a consolidated project plan, you are also prompted to save any changes you have made to inserted project plans as well.
Tip
If you normally work on a set of project plans, but you don’t want to combine them into one consolidated project plan, consider saving them as part of a workspace instead. A workspace simply records the names and window sizes of the open project plans into one file that you can later open. On the File menu, click Save Workspace.
In this exercise, you create a new consolidated project plan and insert two project plans.
On the Standard toolbar, click New.
Project creates a new project plan.
On the Insert menu, click Project.
Navigate to the Chapter 19 Consolidating folder, and while holding down the
 key, select Wingtip
Toys Commercial 19 and Parnell
Aerospace Promo 19.
key, select Wingtip
Toys Commercial 19 and Parnell
Aerospace Promo 19.Click Insert.
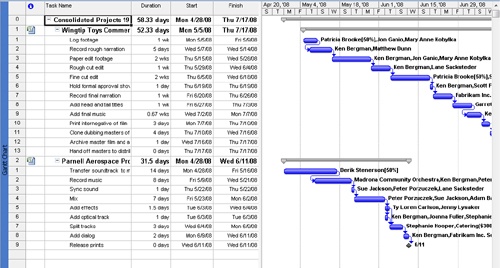
Project inserts the two projects into the consolidated project as collapsed summary tasks.
On the File menu, click Save As.
Navigate to the DocumentsMicrosoft PressProject 2007 SBSChapter 19 Consolidating folder.
In the File name box, type Consolidated Projects 19, and then click Save.
Next, you will display the details of the two inserted projects.
Select the names of the summary tasks 1 and 2, the Wingtip and Parnell projects.
On the Project menu, point to Outline, and then click Show Subtasks.
Project asks whether you want to open the resource pool. Project hasn’t actually loaded the content of the inserted project plans yet, and showing the subtasks in the consolidated project is akin to opening them.
Make sure that Open resource pool to see assignment across all sharer files is selected, and then click OK.
Project expands the Wingtip and Parnell project details. If any duration or date values are not fully visible, double-click the right edge of the column heading.
On the Standard toolbar, click the Scroll To Task button.
Note that the task IDs within both inserted projects start at 1, and the summary tasks representing the inserted projects are numbered 1 and 2. Next, you’ll take a look at the details of the inserted projects.
On the View menu, click Zoom.
In the Zoom dialog box, click the Entire Project option, and then click OK.
Project adjusts the timescale in the Gantt chart so that the full duration of the two inserted projects is visible.
To conclude this exercise, you will display the project summary task of the consolidated project plan.
On the Tools menu, click Options.
In the Options dialog box, click the View tab.
Under Outline options for ‘Consolidated Projects 19’, select the Show project summary task box, and then click OK.
Project displays the Consolidated Projects 19 summary task.
The values of this summary task, such as duration and work, represent the rolled-up values of both inserted projects. As Southridge Video takes on more projects, inserting them into the consolidated project plan in this way gives you a single location in which to view all activities of the organization.
Close and save changes to all open files.


Creating Dependencies Between Projects
Most projects do not exist in a vacuum. Tasks or phases in one project might depend on tasks in other projects. You can show such dependencies by linking tasks between projects.
Reasons that you might need to create dependencies between projects include the following:
The completion of one task in a project might enable the start of a task in another project. For example, another project manager might need to complete an environmental impact statement before you can start to construct a building. Even if these two tasks are managed in separate project plans (perhaps because separate departments of a development company are completing them), one project has a logical dependency on the other.
A person or a piece of equipment might be assigned to a task in one project, and you need to delay the start of a task in another project until that resource completes the first task. The two tasks might have nothing in common other than needing that resource.
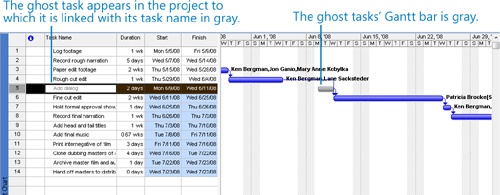
Task relationships between project plans look similar to links between tasks within a project plan, except that external predecessor and successor tasks have gray task names and Gantt bars. Such tasks are sometimes referred to as ghost tasks because they are not linked to tasks within the project plan, only to tasks in other project plans.
In this exercise, you link tasks in two project plans, and you see the results in the two project plans as well as in a consolidated project plan.
On the Standard toolbar, click Open.
The Open dialog box appears.
Navigate to the Chapter 19 Consolidating folder, and double-click the Wingtip Toys Commercial 19 file.
Click Open resource pool to see assignment across all sharer files, and then click OK.
On the Standard toolbar, click Open.
Navigate to the Chapter 19 Consolidating folder, and double-click the Parnell Aerospace Promo 19 file.
In the Task Name column, click the name of task 8, Add dialog.
On the Standard toolbar, click Scroll to Task.
To the right of the task’s Gantt bar, one of the resources assigned to this task is named Fabrikam Inc. Sound Studio. You want to use this studio for work on the Wingtip Toys project after this task is completed. Next, you will link task 8 to a task in the Wingtip Toys Commercial 19 project plan.
On the Window menu, click Wingtip Toys Commercial 19.
On the View menu, click Gantt Chart.
Click the name of task 5, Fine cut edit.
On the Standard toolbar, click Scroll to Task.
Project scrolls the Gantt Chart view to display task 5.
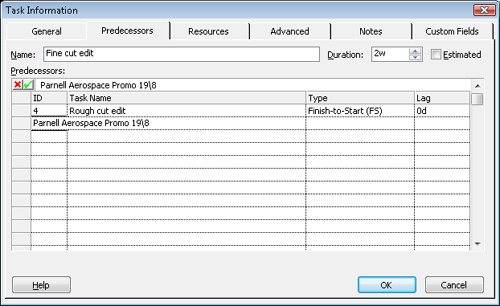
On the Standard toolbar, click the Task Information button.
The Task Information dialog box appears. In the next two steps, you will enter the file name and task ID of the predecessor task in this format: File NameTask ID.
Click the Predecessors tab.
In the ID column, click the next empty cell below task 4 and type Parnell Aerospace Promo 19.
Press the
key, and then click OK to close the Task Information dialog
box.Project inserts the ghost task named Add dialog in the project. The ghost task represents task 8 from the Parnell project.
Tip
If you point to the ghost task’s Gantt bar, Project displays a ScreenTip that contains details about the ghost task, including the full path to the external project plan where the external predecessor task (the ghost task) resides.
Next, you’ll look at the ghost task in the Parnell project.
On the Window menu, click Parnell Aerospace Promo 19.
Here you can see that ghost task 9, Fine cut edit, is a successor for task 8, Add dialog. Because task 9 is a successor task with no other links to this project, it has no effect on other tasks here.
The link between these two project plans will remain until you break it. Deleting a task in the source plan or the ghost task in the destination plan deletes the corresponding task or ghost task in the other plan.
Close and save changes to all open files.
To conclude this exercise, you will display the link between these two projects in the consolidated project plan.
On the Standard toolbar, click Open.
Navigate to the Chapter 19 Consolidating folder, and double-click the Consolidated Projects 19 file.
Click Open resource pool to see assignment across all sharer files, and then click OK.
In the Parnell project, click the name of task 8, Add dialog.
On the Standard toolbar, click Scroll to Task.
You can see the link line between the task Add dialog in one inserted project and the task Fine cut edit in the other inserted project.
Because you are looking at a consolidated project plan that shows the tasks from both project plans, the cross-project link does not appear as a ghost task.

The following are a few additional tips and suggestions for working with consolidated projects and cross-project links:
If you do not want to see cross-project links, on the Tools menu, click Options. On the View tab, clear the Show External Successors or Show External Predecessors check box.
When viewing a consolidated project, you can quickly create cross-project links by clicking the Link Tasks button on the Standard toolbar. Dragging the mouse between two task bars will do the same thing.
Each time you open a project plan with cross-project links, Project will prompt you to update the cross-project links. You can suppress this prompt if you would rather not be reminded, or you can tell Project to automatically accept updated data from the linked project plan. On the Tools menu, click Options, and then click the View tab. Under Cross Project Linking Options For <File Name>, select the options you want.
Key Points
If you have resource information duplicated in more than one project plan, a resource pool is an excellent way to collect resource information across project plans and spot problems, such as resource overallocation.
Besides indicating individual resources’ nonworking time in a resource pool, you can edit the project calendar in a resource pool (for example, marking holidays as nonworking time) and that information will be propagated to all sharer plans of the resource pool file.
Resource assignment details from all sharer plans are available for viewing (but not editing) in the resource pool file.
Consolidating project plans into a single plan is useful when you want to see all of the aggregate details in one place (the consolidated project plan), yet continue to work with the individual project plans.
When a task in one project plan has a logical dependency on a task in another project plan, you can link the two with a cross-project link. This produces what is sometimes called a ghost task (the predecessor or successor task) in both project plans.