Chapter 3. Getting started with an Azure SQL Database
In this chapter, I will discuss the Azure resources you will configure for your SQL Database logical server and databases. I also will discuss the Azure SQL Database connectivity requirements. I will finish the chapter with a guided walk-through of the creation of a SQL Database logical server and database that will conclude by connecting to the logical server and database using SQL Server Management Studio.
Overview of SQL Database
SQL Database is an Azure V12 SQL database running within the SQL Server platform service and associated with a logical server. An Azure V12 SQL database is similar in most respects to a SQL Server 2016 database, but there are a few differences. The SQL Server platform service provides the functionality to create and manage your database solution, freeing you up to focus on the solution rather than the underlying network, storage, and compute resources in addition to the SQL Server instance.
When creating your SQL database, you specify the amount of resources available to your new SQL database and associate it with either a new or an existing SQL Database logical server. The features and resource limits available to your new SQL database are determined by the service tier and performance level you select for the SQL database. The SQL Database service manages the resources available to each SQL database using a resource governance mechanism and hard resource limits (both of which are discussed below). A SQL database is portable and can be moved between logical servers.
To secure your SQL Database logical server and database instances, a SQL Database firewall limits connectivity to either Azure services or specific IP addresses. The SQL Database firewall operates at both the logical server and the database level.
Note
Integration of SQL Database with Azure Active Directory is out of scope of this chapter. It will be discussed in conjunction with security in Chapter 5, “Authentication, authorization, and data resiliency.”
Service tiers
There are three service tiers: Basic, Standard, and Premium. The capabilities and maximum performance levels of a database within a tier vary depending upon the tier selected.
Service tiers and performance levels
SQL Database service tiers differ based on performance levels. Within each service tier, performance levels are designed to have a database operate as if it is running in its own machine, isolated from other databases and services. SQL Database accomplishes this by using a resource governor for certain resources and hard resource limits for other resources.
Each database can have its own service tier with its own limits, independent of any other database. This option is best for databases with a consistent load. You also can place multiple databases in an elastic pool where resources can be shared among databases and minimum and maximum resource thresholds can be set for each database in the pool.
The resource governor enforces a maximum amount of resources for either a single database or an elastic pool of databases. If the aggregated resource utilization reaches the maximum available CPU, memory, log I/O, and data I/O resources assigned to the database, the resource governor will queue queries in execution and assign resources to the queued queries as resources become available.
To assist you in choosing the amount of resources you need for your database, Microsoft developed a unit of measure called a Database Transaction Unit (DTU). To develop this benchmark, Microsoft took a set of operations that are typical for an online transaction processing (OLTP) request and then measured how many transactions could be completed per second under fully loaded conditions within each performance level.
If you are migrating an existing SQL Server database, you can use a third-party tool, the Azure SQL Database DTU Calculator, to get an estimate of the performance level and service tier your database might require in SQL Database.
Figure 3-1 shows the service tiers and their capabilities and performance limits for a single database.

Figure 3-2 shows the service tiers and their capabilities and performance limits for an elastic pool of databases.

DTU resource limits
Single database: A single database can have between 5 and 1,750 DTUs. A Basic database has 5 DTUs, which means it can complete 5 “typical” transactions per second, while a Premium P11 database supports 1,750 DTUs. See Figure 3-3.

Elastic pool database: A database can be a member of an elastic pool with between 100 and 1,500 DTUs. All databases within a pool share a common set of resources. See Figure 3-4.

Other resource limits
SQL Database enforces limits on other resources by denying all new requests when limits are reached. These limits include the following:
• Maximum database size: Between 5 GB and 1 terabyte (TB)
• Max in-memory OLTP storage: Between not available and 10 GB
• Max concurrent requests: Between 30 and 2,400
• Max concurrent logins: Between 30 and 2,400
• Max sessions: Between 300 and 32,000
• Max databases using automated export: 10
Service tiers and capabilities
SQL Database service tiers also differ based on capabilities related to business continuity and in-memory features.
Business continuity services
All service tiers provide mechanisms to enable a business to continue operating in the face of disruption to its computing infrastructure. The types of potential disruption scenarios from which these mechanisms protect you are:
• Local hardware and software failures, such as disk failure
• Data corruption and deletion, such as application bugs and user errors
• Data center outage, such as a natural disaster
• Upgrade or maintenance errors, such as unanticipated issues during an application upgrade requiring a rollback to a previous state
The next two sections discuss these business continuity mechanisms and how they differ across service tiers.
Automatic database backup and self-service geo-restore services
To protect your data and enable point-in-time restore services, SQL Database automatically takes full database backups every week, multiple differential backups every day, and log backups every five minutes. Backup files are stored in a geo-redundant storage account with read access (RA-GRS) to ensure backups’ availability for disaster recovery purposes in case of catastrophic disaster at any single data center. The first full backup is scheduled immediately after a database is created. After the first full backup, all further backups are scheduled automatically and managed silently in the background. The exact timing of full and differential backups is determined by the system to balance overall load. Figure 3-5 illustrates both local redundancy within a data center and storage geo-replication of these backup files to protect you from both user error and catastrophic failures.

SQL Database provides this service for all databases regardless of server tier, but they have different retention periods for the database backups as follows:
• Basic: Any restore point within the past 7 days
• Standard: Any restore point within the past 14 days
• Premium: Any restore point within the past 35 days
SQL Database provides both database copy and point-in-time restore services on top of this automated backup system, which enable you to restore an existing or deleted database to a new database as of a specified point in time, including the current point in time, within the retention period supported by the service tier. This capability is offered within the current data center.
Note
You cannot choose to overwrite an existing database, only to create a new database from the automated backups.
Storage geo-replication provides the ability to restore a database to another data center from the last geo-redundant backup to create a new database in any geographic region. This capability is called geo-restore. The geo-replication of the backup blobs from the automated backups guarantees that daily backups are available even after an outage or massive failure in the primary region.
Active geo-replication
In addition to automated backups and storage geo-replication, SQL Database offers active geo-replication for all databases regardless of service tier. Active geo-replication provides a mechanism to create and maintain asynchronous secondary replicas in up to four regions. These secondary replicas can be either offline or online and readable, and they can be in the same or different data centers.
A readable secondary is priced at 1X price of the selected performance level. A non-readable secondary is charged at a discounted rate of 3/4X price of the selected performance level. To ensure that transactions being applied to the secondary do not bottleneck the primary, the secondary must be at the same or higher performance level than the primary.
Figure 3-6 illustrates a single non-readable offline secondary, and Figure 3-7 illustrates multiple readable secondaries.


Non-readable secondaries are available for failover if needed due to any of the disaster scenarios discussed above. Readable online secondary replicas can be used for load balancing and/or low-latency read access to different geographic regions. When performing an application upgrade or maintenance operation, the continuous replication can be frozen immediately prior to the upgrade or maintenance operation so that you can easily fall back. In case of a data center outage, you can manually fail over to one of the secondary replicas. You also can design and deploy a small worker role application that monitors your primary database and triggers a failover if necessary. For a discussion of active replication topologies using a combination of readable and non-readable secondaries for both disaster recovery scenarios and application load-balancing scenarios, see Design an application for cloud disaster recovery using geo-replication in SQL Database.
In-memory services
In-memory services are available only in the Premium service tier, with different size limits for memory storage based on the performance level within the Premium tier. In-memory services encompass two features: in-memory OLTP and Operational Analytics.
• In-memory OLTP is a feature that can greatly improve OLTP performance by storing selected OLTP tables in memory (5X–20X improvement) and by using compiled stored procedures (100X improvement). In-memory OLTP has been available in SQL Server beginning with SQL Server 2014 and has been enhanced significantly in SQL Server 2016. These enhancements also are available in SQL Database.
• Operational Analytics provides the ability to run both analytics and OLTP workloads in the same database at the same time without a significant degradation in performance. Besides running analytics in real time, you can eliminate the need for loading data into a data warehouse. Operational Analytics is a feature introduced in SQL Server 2016, with the same feature available in SQL Database.
A two-minute video about the benefits of using the in-memory OLTP feature is available at Azure SQL Database - In-Memory Technologies.
SQL Database logical server
A SQL Database server is a logical construct into which you can organize one or more SQL databases. Although much of the focus when working with SQL Database is at the database level, you do create some objects at the server level (for example, see the SQL Database firewall discussion below and see the discussion of logins in Chapter 5).
In addition, each server has a DTU quota per logical server of 45,000 DTUs and 5,000 databases per logical server. This quota represents the DTUs a logical server can host, based on the sum of the DTUs of the performance level of each database on the server. For example, a logical server with five Basic databases (5 X 5 DTUs maximum), two Standard S1 databases (2 X 20 DTUs maximum), and three Premium P1 databases (3 X 100 DTUs maximum) has consumed 365 DTUs of its 45,000 DTU quota. When you exceed the DTUs for a server, you will need to move a SQL database to another server.
Firewall rules
To protect your data in a SQL database hosted by the SQL Database service, the SQL Database firewall prevents all access to your SQL Database logical server until you open the firewall. You can create a firewall rule that opens the firewall to specific IP addresses and/or opens the firewall to all Azure services. SQL Database firewall rules can be established at the server level and at the database level.
• A firewall rule grants access based on the originating IP address of each request. You can permit individual addresses or a range of IP addresses. Use this option for connections from the Internet and for Azure connections using static IP addresses.
• Allowing access to Azure services opens the firewall to all Azure connections, which still must authenticate. Use this option for Azure connections using dynamic IP addresses.
Connection attempts from the Internet and Azure must pass through the firewall before they can reach your logical server or database. See Figure 3-8.

Server-level firewall rules
Server-level firewall rules enable users to access the entire SQL Database logical server through the SQL Database firewall, including all databases on the logical server based either on permitted IP address ranges or for Azure services. Actually, access is based on permissions in the individual databases. Server-level firewall rules are stored in the master database. Use server-level firewall rules for administrative access to enable management of all databases on a server by server-level principals.
Note
As of this writing, only server-level firewall rules can be created in the portal. Server-level firewall rules also can be created programmatically using PowerShell and the REST API. After the first server-level firewall rule has been created in the Azure portal, additional server-level firewall rules can be created using Transact-SQL.
Database-level firewall rules
Database-level firewall rules enable permitted IP address ranges or Azure services to access a specific database. Database-level firewall rules are stored in the individual databases. Use database-level firewall rules for database portability and to restrict database access within a logical server. After you have configured the first server-level firewall rule, you may want to restrict access to certain databases. If you specify an IP address range in the database-level firewall rule that is outside the range specified in the server-level firewall rule, only clients that have IP addresses in the database-level range can access the database. You can have a maximum of 128 database-level firewall rules for a database.
Note
As of this writing, database-level firewall rules for master and user databases can be created and managed using Transact-SQL, the REST API, PowerShell, or through the classic portal.
Walk-through: Getting started with an Azure SQL Database
In this walk-through, we will provision an Azure SQL Database logical server and a sample database using the Azure portal and then connect to this logical server and database using SQL Server Management Studio.
Provisioning a SQL Database logical server and database using the Azure portal
Let’s start by provisioning a SQL Database containing a sample database. For simplicity, we will create a logical server at the same time that we create a SQL Database. If you have an existing logical server, feel free to use that logical server instead.
1. If you are not still connected to the Azure portal, connect to the Azure portal now.
2. To create a SQL Database in the Azure portal, click SQL Databases on the default blade to open the SQL Databases blade.
Initially, there are no databases displayed. As you create SQL databases, you will be able to see and manage your SQL databases on this blade. To manage your logical SQL Database servers, click SQL Servers on the default blade (which will appear only after you have at least one SQL Database logical server defined). See Figure 3-9.

3. Click Add. See Figure 3-10.
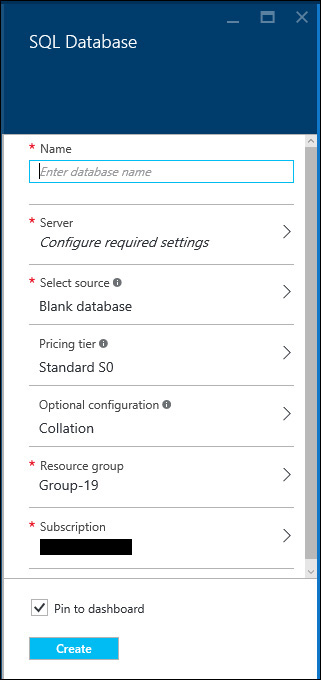
4. Provide a database name of your choice. I will call mine carlpaasdb.
5. To configure your logical server, click the Server node to open the Server blade. See Figure 3-11.
Notice that you are prompted to Configure Required Settings. This value will change to display your selected server name and location after configuration. This is a required value.
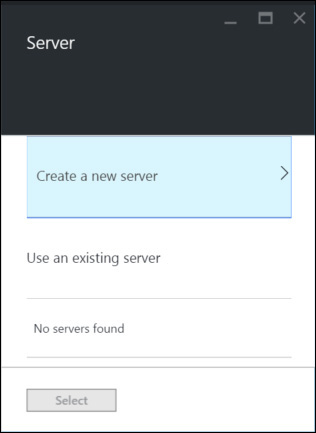
6. Because we have no existing servers from which to choose, click Create a New Server to open the New Server blade. See Figure 3-12.

7. Provide a name for your logical server. I will call mine carlpaassrv. See Figure 3-13.

Notice that the logical server has a fully qualified server name. In my case, it will be carlpaassrv.database.windows.net.
8. Provide a server admin login and password.
9. Choose an Azure region as the location. I will choose South Central US.
10. Verify that Yes is the default for Create a V12 Server (Latest Update).
11. Verify that the check box to Allow Azure Services to Access Server is selected. See Figure 3-14.

12. Click Select to return to the SQL Database blade to continue configuring the SQL Database.
13. To select a database for your new SQL Database, click the Select Source node to open the Select Source blade.
Notice that Blank Database is the default, which you are not required to change.
14. On the Select Source blade, review your options for a database source. See Figure 3-15.

15. If you select Sample, your database source will be the AdventureWorksLT (V12 database). See Figure 3-16.

16. If you select Backup, you will have the option to restore an existing SQL database or a deleted SQL database to a point in time from its server blade. See Figure 3-17.

17. Because I have no backups and I want to have a sample database to start with, I will select Sample.
18. On the Pricing Tier node, notice that the default service tier and performance level is Standard S0. Changing this is optional.
19. Click the Pricing Tier node to open the Choose Your Pricing Tier blade.
This blade displays all of the pricing tiers that are available to you, along with their DTU ratings, service features, and estimated cost per month. See Figure 3-18.

20. Click Recommended and review the recommended pricing tiers that are available to you to get started. See Figure 3-19.

21. Because we can change service tier and performance level dynamically, I will start with S0.
22. Although we can change the collation settings, a discussion of collations is well beyond the scope of this walk-through.
23. Next, we need to define a resource group into which to place this SQL Database logical server and database. See Figure 3-20.

Notice the default resource group name. I am going to change this to carlrgpaas.
24. We are almost ready to create a SQL Database. Notice that by default, the new SQL Database will be pinned to the dashboard. With lots of databases and other resources, you probably will not want all of them on the dashboard. But in our walk-through, let’s pin it to the dashboard.
25. Click Create.
26. On the dashboard, notice that your SQL Database is being created. See Figure 3-21.

Viewing and configuring your SQL Database in the portal
1. After the provisioning of your SQL Database is complete, a number of panes appear on the carlpaas SQL Database pane. See Figure 3-22.

2. Review the Essentials and Monitoring panes and the information on the Settings blade. Notice there are additional panes for Operations and Geo-Replication. Geo-Replication is out of scope for this ebook.
3. In the Essentials pane, click the link for your Server Name to open the carlpaassrv SQL Server blade. See Figure 3-23.
4. On the carlpaassrv SQL Server blade, review the Essentials and Databases panes and the Settings blade. Notice also the Elastic Database Pools pane at the bottom of this pane. See Figure 3-24.

5. In the Essentials pane, click Show Firewall Settings. See Figure 3-25.
6. On the Firewall Settings blade, notice that you have two firewall options: to allow access to Azure services and to allow access to specific IPs. Notice also that your client’s IP address is listed. See Figure 3-26.

7. Enter a rule name, a starting IP address, and an ending IP address. See Figure 3-27.

8. Click Save to update the firewall rules and then click OK.
9. Close the Firewall Settings blade and the carlpaasserv SQL Server blade.
10. In the Essentials pane, click Show Database Connection Strings. See Figure 3-28.
11. Review these connection strings on the Database Connection Strings pane. Notice that complete connection strings are provided for ADO.NET, ODBC, PHP, and JDBC. See Figure 3-29.

Connecting to your SQL Database using SQL Server Management Studio
1. On your own computer, if you have not already done so, get the newest version of SQL Server Management Studio (SSMS) from https://msdn.microsoft.com/en-us/library/mt238290.aspx.
The newest release of SQL Server Management Studio supports SQL Server 2005 through SQL Server 2016 versions of SQL Server, and this tool now is updated on a monthly basis.
2. Open SQL Server Management Studio.
3. In the Connect to Server dialog box:
a. Enter the fully qualified server name for your SQL Database logical server in the Server Name text box.
b. In the Authentication drop-down box, click SQL Server Authentication.
c. Enter your credentials.
See Figure 3-30.

4. Click Connect to connect to your Azure SQL Database in Object Explorer. See Figure 3-31.

Conclusion
In this chapter, we discussed the components of an Azure SQL Database logical server and database and how to configure connectivity. We then walked through the relatively simple process of creating an Azure SQL database, creating a firewall rule, and connecting to the Azure SQL Database logical server and database using SQL Server Management Studio from another computer.
In the next chapters, we will discuss importing data into an Azure virtual machine running SQL Server and into an Azure SQL Database.