Although the default installation of WSS and MOSS are acceptable for general-purpose usage, you will undoubtedly want to customize the appearance and behavior of sites to match your organization's branding and expectations. SharePoint supports customizing sites in several different ways. You can make many changes to the look and feel of a site directly through the site administration pages, or using the SharePoint Designer for more extensive control. Additionally, MOSS supports a publishing feature that enables professional content management capabilities for managing page creation, approval, and deployment. In this chapter, I cover all of the various ways to change the appearance, behavior, and content of sites.
Developing content in SharePoint begins by creating a site collection geared toward your needs. As you saw in Chapter 2, when you create a site collection, you must choose a template upon which to base the new site collection. The templates that appear on the Create Site Collection page are different depending on whether you are using MOSS or WSS. Generally, you'll find that WSS ships with collaboration templates designed to support teams. MOSS, on the other hand, ships with templates for use in a wide variety of applications within an organization. The MOSS templates include not only team collaboration templates, but also enterprise templates for creating document management systems, records management systems, and Internet sites. Table 5-1 lists all of the available templates in both WSS and MOSS.
Table 5.1. Site Collection Templates
Name | Category | MOSS/WSS | Description |
|---|---|---|---|
Blank Site | Collaboration | MOSS/WSS | A blank site with a single page |
Blog | Collaboration | MOSS/WSS | A site for creating a web log that allows posts and comments |
Document Workspace | Collaboration | MOSS/WSS | A site for creating a document with input from multiple people |
Team Site | Collaboration | MOSS/WSS | A general collaboration site for multiple people to work on a project |
Wiki Site | Collaboration | MOSS/WSS | A site that allows users to share knowledge by editing web pages directly |
Basic Meeting Workspace | Meetings | MOSS/WSS | A site with the fundamental tools required to plan, organize, and execute a meeting |
Blank Meeting Workspace | Meetings | MOSS/WSS | A blank meeting site that can be customized |
Decision Meeting Workspace | Meetings | MOSS/WSS | A site for supporting and tracking decisions made during a meeting |
Multipage Meeting Workspace | Meetings | MOSS/WSS | A site with multiple pages for organizing more complex meetings |
Social Meeting Workspace | Meetings | MOSS/WSS | A site to support the planning and execution of social events |
Document Center | Enterprise | MOSS only | A site that functions like a centralized document management system |
Records Center | Enterprise | MOSS only | A site that can be used as a records management repository |
Report Center | Enterprise | MOSS only | A site for creating and delivering dashboards, scorecards, and reports |
Search Center | Enterprise | MOSS only | A site for creating an enterprise search capability |
Search Center with Tabs | Enterprise | MOSS only | A site for creating an enterprise search capability that can be customized to add new sources |
Enterprise | MOSS only | A site that can be used to list and categorize key sites | |
My Site Host | Enterprise | MOSS only | A template for hosting all of the personal sites in an organization |
Publishing | MOSS only | A site for creating a corporate intranet | |
Publishing Portal | Publishing | MOSS only | A template for creating an Internet site or a corporate portal with complete content management facilities |
In this chapter, I cover content development for both WSS and MOSS sites. Therefore, you'll need to create a new web application where you can work on content. Later, you'll create a more complex Internet site, but for now you'll start with a plain blank site.
Follow these steps to create a blank site:
Log in to VSMOSS or VSWSS as a SharePoint administrator.
Select Start

On the Application Management tab, under the SharePoint Web Application Management section, click the link titled Create or Extend a Web Application.
On the Create or Extend a Web Application page, click the link titled Create a New Web Application.
On the Create a New Web Application page, select the option to Create a New IIS Web Site.
In the Description field, type Content.
In the Application Pool section, select Create a New Application Pool.
Enter Content_Pool as the pool name.
Select the Configurable option for the application pool security account.
In the User Name field, enter DOMAINSPContentPool.
In the Password field, enter the account password.
In the Reset Internet Information Services section, select the option to Restart IIS Automatically.
Click the OK button.
On the Application Created page, click the link titled Create Site Collection.
On the Create Site Collection page, enter Blank Site in the Title field.
Under the Primary Site Collection Administrator section, enter DOMAINAdministrator in the User Name field.
Under the Template Selection section, click the Collaboration tab, and then select the Blank Site.
Click the OK button to create the new site collection. When the site collection is created, open it in a separate copy of the browser.
After you create a new site in WSS or MOSS, you will undoubtedly want to start adding pages and content to the site. While some of the MOSS templates have sophisticated publishing tools that I cover in the section titled "Using the Publishing Feature," the basic templates, such as Team Site and Blank Site, use the Create page to add new pages. You can reach the Create page by selecting Create from the Site Actions menu.
On the Create page, you have links that allow you to create either a Basic Page or a Web Part Page. A Basic Page is a page that contains text and graphics, while a Web Part Page contains special placeholders, called web part zones, where you can add web parts. Regardless of which type of page you create, SharePoint will ask you to select a document library where the page will be stored. In most cases, you will not have a suitable document library available, so I recommend that you create two of them before adding new pages.
Follow these steps to create libraries:
From the home page of the blank site you created earlier, select Create from the Site Actions menu.
On the Create page, click the Document Library link.
On the New page, enter Basic Pages in the Name field.
Under the option Display This Document Library on the Quick Launch Bar, select No.
Select Basic Page from the Document Template list.
Click the Create button.
When the new library is complete, select Create from the Site Actions menu.
On the Create page, click the Document Library link.
On the New page, enter Web Part Pages in the Name field.
Under the option Display This Document Library on the Quick Launch Bar, select No.
Select Web Part Page from the Document Template list.
Click the Create button.
Once the new document libraries are created, you can choose to add new pages to your site by either using the Create page or by going directly to the document library and selecting New. Adding content to the Basic Page is done through a rich-text editing interface that allows you to add text, images, and tables to the page. This is a pretty simple interface that can be used by any nontechnical content owner to quickly create or edit a page. Figure 5-1 shows the editor with shameless content from my web site.

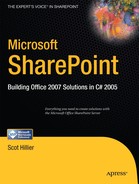
When you create a Web Part Page, you can select from various layouts with zones for web parts. Adding content to the Web Part Page is done by clicking the Add a Web Part link that appears at the top of each zone. When you click this link, SharePoint displays a dialog that allows you to select one or more web parts for the zone. Adding multiple web parts to a zone simply stacks them vertically within the zone. You can also drag the web parts between zones once they're on the page. Figure 5-2 shows the Add Web Parts dialog.
If you click the link at the bottom of the Add Web Parts dialog, you will open the Web Parts Gallery pane, which allows access to all available web parts on the farm. There are three different galleries, which are essentially catalogs of web parts from which you can choose. The available galleries are Closed Web Parts, [site name] Gallery, and Server Gallery.
The Closed Web Parts Gallery contains all of the web parts that are available specifically to the web page that is being modified. Closed web parts still execute as part of the page, but their output is not rendered. If you close a web part, the web part disappears from the page and becomes available in the Closed Web Parts Gallery. Once it is in the gallery, it may be moved back to the page by dragging it from the gallery and onto the page.
The [site name] Gallery is named after the site where the current page is located. If your site is named Board of Directors, the [site name] Gallery will be named Board of Directors Gallery. This gallery contains the bulk of the general-purpose web parts that may be used throughout the current site. In Chapter 10, you will add your own custom web parts to this gallery.
The Server Gallery is a gallery intended for enterprise deployments of SharePoint. In these cases, the Server Gallery acts as an enterprise-level repository for web parts. Using this gallery entails a special deployment model for web parts called a web-part solution file that I also cover in Chapter 10.
Regardless of where you get the web part, placing it on the page is always accomplished in the same manner. To move a web part onto the page, you click and drag the web part from the selected gallery into an available zone. Figure 5-3 shows the available galleries in SharePoint.

If you created the blank site described in this chapter, you will currently see only ten web parts in the [site name] Gallery. This is because the Blank Site template only enables some of the basic web parts. Don't be fooled by this short list; there are many web parts available to you in SharePoint, and this book will cover several of them in the chapters where they are most useful. Table 5-2 lists the web parts found in the Blank Site template and explains their functions.
Table 5.2. Blank Template Web Parts
Web Part | Description |
|---|---|
Basic Pages and Web Part Pages | These are the document libraries for holding web pages. All document libraries that you create will appear in the [site name] Gallery. |
Content Editor | This web part allows you to add rich text, HTML, or script to a site. |
Form | This web part is used to create an HTML form that can use script to communicate with other web parts. |
Image | This web part is used to place images on a page. |
Page Viewer | This web part provides an IFRAME viewer to other web content. |
Relevant Documents | This web part is used to display documents from the site that are important to the current user. |
Site Users | This web part displays a list of the site members and their status. |
User Tasks | This web part shows all of the tasks assigned to the current user. |
XML | This web part is used to add XML data and transform it with XSL. |
Although web parts are useful for displaying information, links, and lists, so far we have only seen them acting as islands of information. The content presented by multiple web parts on a page may be related, but the web parts are unaware of the related information. With connected web parts, however, you can relate multiple web parts.
Connecting web parts is done when a Web Part Page is in edit mode. You enter edit mode by selecting Edit Page from the Site Actions menu. Once in edit mode, you may use the drop-down menu associated with the web part. If the web part supports connecting with another web part on the page, you will see a Connections menu item. You may then select the web part with which to connect.
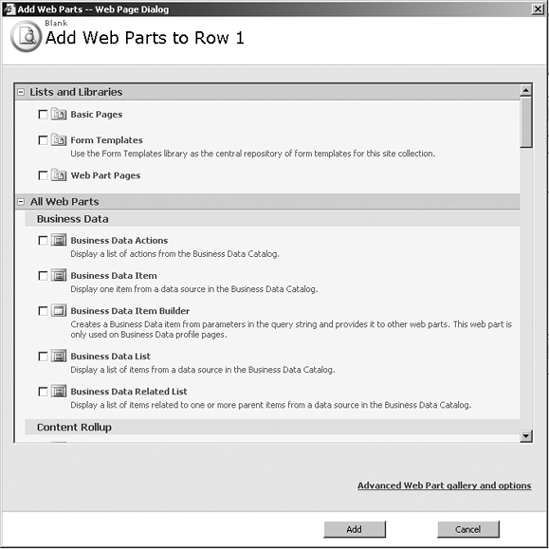
When a connection is established, SharePoint will prompt you to select the data column on which to base the connection. This is like performing a crude outer join in a SQL statement; the web parts must share a common piece of data that allows a connection. As an example, I created a connection between two Contacts List web parts. The first list shows a view of available technology experts and their area of expertise. This web part is then connected to a second list that shows the contact information for the selected expert. I cover how to create your own connectable web parts in Chapter 10. Figure 5-4 shows the resulting master-detail relationship between the web parts.
Once you add some pages and content to a new site, you will want to change the appearance and navigation of the site. Although I discuss several ways to alter the look and feel of a site throughout this chapter, the easiest way to get started is with the built-in options found inside SharePoint itself. You can change many navigation and appearance elements within a site simply by making configuration choices in the site administration pages. You can also change colors and styles with built-in options or by modifying some existing files.
By default, both WSS and MOSS have a simple navigation system that uses tabs across the top to access sites along with a Quick Launch area on the left-hand side to access content elements within a site. Using the built-in configuration settings of WSS and MOSS, you can make some changes to the way this information is presented in the site collection. Although these changes are not radical, they can be helpful in many applications.
During the site creation process, you can specify whether a subsite in the collection should appear as a tab in the parent site. You can also choose whether the tabs appear as navigation elements on the child site. After the subsite is created, you can subsequently click the Top Link Bar hyperlink under the Look and Feel section of the Site Settings to modify the tabs.
You can use the Tree View link under the Look and Feel section of the Site Settings to enable a tree view navigation system as well as hide the Quick Launch navigation area. Additionally, you can click the Quick Launch link under the Look and Feel section of the Site Settings to change what information appears in the Quick Launch area and how it is ordered. Again, none of these changes are extreme, but they are simple to implement.
Clicking the link titled Title, Description, and Icon will allow you to change these elements for a site. When using a new logo, you will typically create a new image library to store the logo and then reference that image when making the change. This is a simple way to provide some consistent branding to your sites.
You can achieve some additional customization by selecting a new theme for the site collection. This is done by clicking the Site Theme link in the Look and Feel section. SharePoint offers several themes that you can select with various color palettes. Ideally, you would want to be able to select a theme that closely matches your organization's color scheme. Although, a complete match is unlikely, you can usually find something passable for internal sites. Later in this chapter, I discuss how you can create your own themes.
If you don't use one of the available themes to customize your site, SharePoint still makes use of some thematic elements simply to create the default look. In particular, SharePoint makes use of style sheets to control the layouts, fonts, and colors you see in a site. The main style sheet, CORE.CSS, controls the appearance of many elements in a site. Therefore, customizing CORE.CSS will have an immediate and global impact on the look and feel of all sites in the farm.
Customizing CORE.CSS can be challenging, however, because there are a huge number of classes defined in this style sheet and no good reference to help you determine what elements to modify. Over the last couple of years, some tools have emerged to help developers identify the classes associated with elements in a web page, but the best one is the Internet Explorer Developer toolbar, which you can download from Microsoft. This tool loads into Internet Explorer and exposes a tremendous amount of information about the page being rendered in the browser. You can use this tool to identify the style classes associated with an element and modify that element in the style sheet.
Keep in mind that modifying CORE.CSS will make changes to every site in your farm. So be certain that you intend to make global changes before proceeding. A better approach, however, is to leave the CORE.CSS file alone and override styles instead. SharePoint provides a mechanism for specifying alternate style sheets that will override the core styles. I discuss alternate style sheets in the section titled "Using an Alternate Style Sheet" later in the chapter.
In cases where these changes do not provide enough control, you may want to make your own theme. You can do this from scratch or by customizing an existing theme. Then you can save the theme and make it available to all sites. SharePoint keeps all of the predefined themes in the folder Program FilesCommon FilesMicrosoft Sharedweb server extensions12TEMPLATETHEMES. Once created, the new theme is made available to SharePoint sites by making a new entry in the SPTHEME.XML file located in Program FilesCommon FilesMicrosoft Sharedweb server extensions12TEMPLATELAYOUTS1033.
Although Basic Pages and Web Part Pages offer you a quick way to get content into your site, you will likely find them too limiting. In my experience, organizations want much more control over the look and feel of the site. This is where the SharePoint Designer comes into play. The SharePoint Designer gives you a complete editing environment where you can significantly customize your pages.
You can open a SharePoint site directly in the SharePoint Designer by selecting File
From the folder list, you can right-click a file and select Open from the context menu. When the page opens, you will see that many of the elements are exposed for editing. You'll see, for example, that you could easily type directly into a Basic Page to edit its content. However, not everything you see is available for editing. What you are allowed to edit is a combination of SharePoint Designer settings and SharePoint page structure that I will unravel throughout this chapter.
As soon as you start to edit content in the SharePoint Designer, you'll have to deal with Contributor Mode. Contributor Mode is a limited-function mode that allows administrators to control which editing commands are available based on the author's membership in a Contributor Group. Contributor Mode is enabled by default for SharePoint sites and only administrators can change the settings.
Contributor Mode is closely linked with SharePoint permission levels. For the SharePoint Permission levels Full Control, Design, and Contribute, the SharePoint Designer defines the groups Site Manager, Web Designers, and Content Authors, respectively. When you first open a site in the SharePoint Designer, your ability to edit pages will likely be restricted by the Contributor Settings for your group. If you select Task Panes

If you are a site administrator for the site that is opened in the SharePoint Designer, you can make changes to the Contributor Settings. This is accomplished by selecting Site
If you disable Contributor Mode, anyone who is able to open a site in the SharePoint Designer will have the ability to make changes to any part of a page. This may be fine if you have a limited number of people making site customizations. Contributor Mode is really designed for teams of people who are all responsible for providing various content elements. In this situation, you may not want someone to have full access to the editing functions because they could accidentally change content that they should otherwise not have access to.
If you choose to use Contributor Mode, you do not necessarily have to do anything in the SharePoint Designer. Because Contributor groups are linked with SharePoint permission levels, you would simply add new users to the SharePoint site and assign them an appropriate permission level. This level would dictate their editing capabilities in the SharePoint Designer as I indicated previously. If, however, someone opens a site and he does not have any permission levels that map to a Contributor Group, he is automatically given the restrictions associated with the Content Authors group. This is because the Content Authors group has the least functionality in the SharePoint Designer. This often results in the interesting situation in which you could be a SharePoint farm administrator with little ability to edit a site because you were never specifically assigned a permission level.
As you'll see in the section "Using the Publishing Feature," much of the content that appears in a SharePoint page is contained in a content placeholder. Placeholders define text, image, and layout areas where content can reside on a page. When Contributor Mode is enabled, authors are restricted to editing the content in these placeholders only. This is how you can keep them from accidentally changing the underlying structure of a site. While it's tempting to simply turn Contributor Mode off, it will save you a lot of headaches when others are editing content. I've seen many pages destroyed by business users who were editing content in the previous version of SharePoint using Microsoft FrontPage with no restrictions.
When a site is open in the SharePoint Designer, you can add different elements including HTML, Active Server Pages, style sheets, lists, libraries, XML files, and many others. You can also customize existing elements that you made from the Create page in SharePoint. As a best practice, I generally prefer to add elements from within SharePoint and then customize them within the SharePoint Designer. This practice helps to ensure that the fundamental relationships between content elements are retained. However, there are times when adding content directly from the SharePoint Designer makes sense, such as when a large team of people is working on Internet-facing pages. It all depends on exactly what you are trying to accomplish.
Adding a page to an existing web site is a simple matter of selecting File
Once the new page is added, you may start designing it. Before you start creating sites that integrate directly with SharePoint Services, I'll start by reviewing some of the Basic Page-creation tools in the SharePoint Designer. These tools will be useful later when you are working with more complicated pages.
When starting a new page, many web designers will create a prototype page using a graphics program such as Adobe Photoshop. Then they cut the image apart to create the graphics for the new page. This is especially helpful if you have an existing web site and are trying to make the new page match that look and feel. You can get help with this effort by making use of a tracing image in the SharePoint Designer.
Tracing images allow you to take a JPEG, GIF, PNG, or BMP file and use it like tracing paper to help with the layout and design of a page. In order to set a tracing image, you must have the page in design view, which is controlled by a set of buttons underneath the page. Once in design view, the tracing image is set by selecting View

Once you have a tracing image in place, you will want to construct the layout of the page to define the areas where content will be placed. The SharePoint Designer allows you to set up multiple complex regions for content using layout tables. Layout tables are similar to any HTML table, but they are specifically intended to help lay out content regions on the page. Inserting a layout table into a page is done by using the layout table task pane, which can be opened by selecting Table
Within the task pane, you can choose to create your own layout tables or use the predefined layouts in the pane. Generally, the predefined layouts are sufficient because several different kinds are available. Even if these are not exactly what you want, you can modify the layouts once they are applied to the page.
To utilize layout tables and cells, take these steps:
Select Start
From the main menu, select File
In the Open Site dialog, type the address of the blank site you created earlier (e.g.,
http://vsmoss:[port])and click Open.When the site opens, make sure the folder list is visible by selecting Task Panes
Using the folder list, examine the sites, lists, and libraries defined in the site.
Add a new ASPX page to the site by selecting New
Open the Layout Tables and Cells task pane by selecting Table
In the Layout Tables and Cells task pane, click a new layout from the Table Layout section with a top title row that spans the entire page and a navigation column that spans the left side of the page.
Click your mouse inside the top row.
In the Layout Tables and Cells task pane, click the Insert Layout Cell link.
In the Insert Layout Cell dialog, accept the default values and click OK to insert the new cell.
When the new cell appears, right-click it and select Cell Properties from the context menu.
In the Cell Properties dialog, change the Background Color drop-down list to Blue and click the OK button.
Click the sizing handle and make the cell fill the entire available area within the layout table.
Place additional cells in the layout so that the page has a blue title area and a blue navigation area.
Once the initial layout is complete, adding text is a simple matter of typing directly into the cells. You can format the font style directly from the editor using the same approach as you would in Microsoft Word. For images, you may either place the image directly in a cell or make use of layers to position images. Layers are floating frames that can be positioned anywhere on the page. You can add a new layer from the Format menu. Once added, you can drag the layer around the page and position it exactly where you want it. Using the layouts and layers, you can rapidly put a page together over a tracing image.
Once you have an idea of how to use the basic layout tools, you will want to be able to add content more interesting than just text and graphics. The SharePoint Designer in conjunction with WSS supports the ability to create XML data sources that you can use in your web pages. This capability allows you to connect directly with SQL databases, XML files, SharePoint lists, and other sources to display dynamic data sets of information in tabular formats. Using the SharePoint Designer, you can display this data without ever writing code.
The key to using dynamic data sets in your web pages is to make use of the Data Source Library and the Data View web part. The Data Source Library acts as an agent for mapping access to any number of data sources that can provide XML data sets. The Data View web part is the component that displays those data sets on the page.
When the Data View web part is displaying an XML data set, it has the ability to format the data set based on the eXtensible Stylesheet Language Transform (XSLT). This means that you can use the SharePoint Designer editor to format columns, colors, and styles for a data set. You can also use a conditional format to change the style of a data cell when it reaches certain parameters. In this way, you can call attention to outlying data in the set.
Using XML data sets begins with the Data Source Library. You can access the Data Source Library by selecting Data View

When using the Data Source Library, you are not limited to the lists and libraries associated with the site that is currently open. You can either create new lists and libraries directly or utilize lists and libraries from other sites within the portal structure. If you click either the Create New SharePoint List or the Create New Document Library link, you will open a dialog that allows you to add a new list, library, or survey to the Data Source Library. If you instead want to add an element from another site, you can click the Connect to Another Library link to add a new source. From this link, you can add a reference to another SharePoint site, which will import all of the data sources defined for that site.
If the data source you want to use is not a SharePoint element already, you will have to spend some time setting up the source before it can be used. Most of the data sources are set up in a similar fashion that begins by clicking the link just below the data source type you want to use.
To add a database connection, follow these steps:
Place your cursor in the main body of the page you created earlier.
From the SharePoint Designer main menu, select Data View
In the Data Source Library, expand the Database Connections node.
Click the Connect to a Database link just beneath the node to open the Data Source Properties dialog.
Click the General tab, and name the connection Site Map.
On the Source tab, click the Configure Database Connection button.
In the Configure Database Connection dialog, check the box labeled Use Custom Connection String and click the Edit button.
In the Connection String dialog, enter Integrated Security=SSPI ;Persist Security Info=False;Data Source=VSSQL;.
Click the OK button.
Click Next.
On the next step, select a database and table from the list (I used the Names database from the Business Data Catalog examples in Chapter 4).
Click Finish.
On the Source tab, click Fields.
In the Displayed Fields dialog, remove any fields you do not want displayed and click OK.
On the Source tab, click Sort.
In the Sort dialog, select Sort the Fields By and click OK.
In the Data Source Properties dialog, click OK to complete the definition of the new data source.
When using a database connection as a data source, it is generally not a good idea to save the credentials directly in the database connection. Instead you can use Windows authentication to verify access credentials at the time the data is accessed in the web site. However, if you go down this path, you will have to set up credentials in the database for each user. A better mechanism for authentication is to use the Microsoft Single Sign-On (SSO) service. This service allows you to set up a master set of credentials just for accessing such data sources. I cover the setup and usage of SSO in Chapter 11.
Once the data source is defined, adding it to the page is a simple matter of dragging the source from the catalog to the page. Once you drop the data source onto the page, the SharePoint Designer adds the server-side code necessary to access the data source and display the data. Because the page now contains server-side code, you may be prompted to rename the page to contain an ASPX extension. The ASPX extension is required for the page to be recognized as containing server-side code.
Once the data set is visible on the page, you can make changes to the presentation directly in the page. Changing font styles, font sizes, and column header names can be done using the same techniques as in a word processor. A drop-down menu also becomes available in the upper right corner of the table. This drop-down menu gives you the ability to sort and filter the data as well as change the presentation style. From this menu, you can also apply conditional formatting to call out values in the data set that need attention.
Although data views can stand alone on a page like a report, they also have the ability to interact with other data sources. For example, you can have one data view that displays names and another data view that displays contact information. Selecting a name from the first data view causes the contact information to show in the second data view. This is the same concept of connecting web parts that you saw when you modified pages directly in SharePoint.
You can connect two data views by selecting Web Part Connections from the drop-down menu associated with either of the views. The SharePoint Designer responds by running a wizard that helps you make the connection. The wizard walks you through the process of selecting the fields to connect and the behavior for each part. The wizard also allows you to select a connection with a web part that is on a different page.
The templates that you can select from when creating a new site collection all come from site definitions. A site definition is a collection of pages and content specified using an XML markup language called the Collaborative Application Markup Language (CAML). I discuss CAML in some detail in Chapter 11, but for now I focus on the relationship between site definitions and pages in SharePoint. SharePoint uses site definitions to efficiently manage pages by saving the site definition once and then using it many times. For example, all of the sites you create that use the standard Team Site template share a single set of page definitions. These page definitions are loaded into memory when the site is accessed and subsequently used to render the site content. The pages that are created in memory based on the template are referred to as uncustomized pages.
Whenever a page is customized in the SharePoint Designer, it is saved to the SharePoint content database as a new unique page. Customized pages are separate from the site definition initially used to create them. This means that the customized site pages are no longer generated in memory from the initial template. While the SharePoint Designer makes it easy to customize pages, customizations can cause problems because they may not be properly updated whenever a service pack or security update is applied to the original site definition in SharePoint.
For many developers, the only acceptable way to modify a SharePoint site is to modify the site definition itself. While this is always a valid technical approach, it is much more difficult to modify pages using XML markup than with the SharePoint Designer. Additionally, you cannot take advantage of features such as Contributor Mode to ensure that customizations are done correctly. In my opinion, you should create site definitions only when you truly need a new template that does not exist in SharePoint already or are planning on using the definition to create many sites. Content changes are best done either directly in the SharePoint Designer or by making use of the publishing features discussed in the section "Using the Publishing Feature."
Note
For those familiar with previous versions of SharePoint, you may have heard customized pages referred to as unghosted pages. Rather than refer to pages as ghosted or unghosted, Microsoft now prefers customized and uncustomized. Furthermore, you may have also been aware that unghosted pages could cause performance problems in SharePoint sites. Microsoft now assures us that customizing pages in the SharePoint Designer will have no significant performance impact, because customized pages are now efficiently parsed.
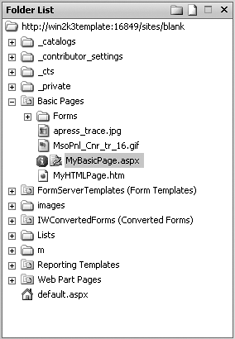
Whenever you perform an operation in the SharePoint Designer that will customize a page and separate it from its site definition, you will receive a warning dialog. Additionally, the SharePoint Designer will mark the page with an information icon in the Folder List indicating that the page has been customized. Figure 5-8 shows the Folder List in the SharePoint Designer with a customized page highlighted. If you want, you can also discard the customizations and revert the page back to its original definition by right-clicking the page and selecting Revert to Page Template from the context menu. You can even discard the customizations for an entire site by clicking the link titled Rest to Site Definition located on the Site Settings page in SharePoint.
Along with icons in the Folder List, the SharePoint Designer also provides a set of reports you can use to identify special pages. For example, you can select Site
Whenever you create a new site, SharePoint uses predefined templates to simplify the creation of the new elements for the site. You have already seen the list of templates in use several times. Although WSS and MOSS come with several templates already defined, you can create your own templates and then make them available to others for use. These new templates can be created directly in the browser and saved through the WSS or MOSS interface.
SharePoint defines a site collection as the top-level site and all of the sites beneath it in the hierarchy. You have already seen that permissions granted at the top of a site collection are inherited by sites lower in the collection. Using the same organizational structure, SharePoint maintains a Site Template Gallery for each site collection. A new site template can be created and added to the gallery by administrators.
Site templates may be created outside of SharePoint using an authoring tool such as the SharePoint Designer, but the simplest way to create a template is to use an existing site within the portal framework. Creating a template from an existing site is done through the Site Settings page for the site you want to save. Simply select the link titled Save Site as Template from the Look and Feel section on the Site Settings page. Generally, you will save only the structure of a site as a template; however, SharePoint does allow you the option of saving content along with the structure. Site templates are always saved as files with an STP extension.
Note
It's important to realize that site templates saved as STP files are always considered customized sites. They are never related to any site definition within SharePoint. This is essentially the same situation as if you had created every page in the template by hand in the SharePoint Designer; however, it's much easier to create a template as an STP file than to customize an entire site.
Once you have created saved templates for a site collection, you can go back and manage the templates. Accessing the set of templates for a site collection is done through the Site Settings page associated with the top-level site. The Site Templates Gallery is a library of all the available templates for the site collection. You will not see any site definitions in this library, only template files with an STP extension.
Once you have several templates available for the site collection, you can control their availability to subsites in the collection. Clicking the Site Templates link on the Site Settings page allows you to configure which templates are available to subsites in the collection.
Just as you can create site templates from existing sites, SharePoint allows you to create list templates from existing lists. A list template consists of the site columns that you define for the list and any views you define. Just like site templates, you also have the option of saving the list content as part of the template. Saving a list as a template is done from the List Settings page, which can be accessed by selecting Settings
While previous versions of SharePoint can be used as public Internet sites, they were never really designed with that purpose in mind. Chief among the limitations of previous versions is a complete lack of content management capabilities. Specifically, previous versions have no way to create page templates for different content, do not significantly separate content development from content publishing, and have only a simple mechanism for approving content.
The reason that previous versions of SharePoint have weak content management capabilities is probably because Microsoft Content Management Server (MCMS) already provides a structure for templating, authoring, and publishing web content; Microsoft saw SharePoint as primarily an intranet solution. That's all changed now because the web content management (WCM) features included with MOSS are a direct replacement for MCMS. Microsoft has already announced that there will be no new versions of MCMS, which means that organizations with MCMS infrastructures must eventually migrate to MOSS.
WCM consists of features that provide content publishing, page templates, document conversion from print to web, and multilanguage support. In this section, I focus specifically on the capabilities of the Office SharePoint Server Publishing Feature, which allows you to create and publish web content. I should point out before beginning a detailed discussion of WCM that content management is not limited to Internet sites. WCM is simply a set of features that provide the capability to implement content management within a site. You certainly could use it for an intranet or even a simple collaboration site. It is important to note, however, that WCM is strictly a MOSS feature. You will not find it in the list of available features for WSS.
While many content management capabilities are certainly useful in team sites, the most likely scenario for content management involves the enterprise. Therefore, I will assume for the rest of the chapter that you are using MOSS. To support the discussion, I'll use an Internet web site created on the VSMOSS server.
Follow these steps to create an Internet site:
Log in to VSMOSS as a SharePoint administrator.
Select Start
On the Application Management tab, under the SharePoint Web Application Management section, click the link titled Create or Extend a Web Application.
On the Create or Extend a Web Application page, click the link titled Create a New Web Application.
On the Create a New Web Application page, select the option to Create a New IIS Web Site.
In the Description field, type Internet.
In the Application Pool section, select Create a New Application Pool.
Enter Internet_Pool as the pool name.
Select the Configurable option for the application pool security account.
In the User Name field, enter DOMAINSPContentPool.
In the Password field, enter the account password.
In the Reset Internet Information Services section, select the option to Restart IIS Automatically.
Click the OK button.
On the Application Created page, click the link titled Create a New Site Collection.
On the Create Site Collection page, enter APress in the Title field.
Under the Template Selection section, click the Publishing tab, and then select the Publishing Portal template.
Under the Primary Site Collection Administrator section, enter DOMAINAdministrator in the User Name field.
Click the OK button to create the new site collection. When the site collection is created, open it in a separate copy of the browser.
When creating a public Internet site, you may want to set it up so that you can author content on it from inside the firewall. One way to do this is to configure it so that it is accessible from two different zones. Typically the Default zone is accessible through Windows authentication while the Internet zone is accessible anonymously. With this configuration, you can use the Default zone for managing content and the Internet zone for presenting it. This is not the only possible authoring configuration; I discuss a more formal content deployment scenario in the section titled "Using Content Deployment."
Follow these steps to extend the web application into the Internet zone:
In the Central Administration site, click the Application Management tab.
Under the SharePoint Web Application Management section, click the link titled Create or Extend Web Application.
On the Create or Extend Web Application page, click the link titled Extend an Existing Web Application.
On the Extend Web Application to Another IIS Web Site page, drop down the Web Application selection list and click Change Web Application.
In the Select Web Application page, click the link for the Internet Web Application that you created.
Under the IIS Web Site section, choose to Create a New IIS Web Site.
In the Description field type Public Internet, but leave the port number in parentheses as part of the name.
Under the Load Balanced URL section, select Internet from the Zone drop-down list.
Make note of the URL for the extended web application so you can access it later.
Click the OK button.
Once the web application is extended, you will want to enable anonymous access to the new site collection. Enabling anonymous access requires that you first allow it for the site collection using Central Administration and then designate what portions of the Internet site will support anonymous access. In this way, you can create an Internet site that has both public and private areas.
Follow these steps to enable anonymous access:
Click the Application Management tab in the Central Administration web site.
Under the Application Security section, click the Authentication Providers link.
On the Authentication Providers page, make sure that your new web application is shown in the drop-down. If not, use the drop-down to change the selection.
Click the Windows link for the Internet zone of your web application.
On the Edit Authentication page, check the box labeled Enable Anonymous Access and click the Save button.
Click the Application Management tab in the Central Administration web site.
Under the Application Security section, click the link titled Policy for Web Application.
On the Policy for Web Application page, make sure that your new web application is shown in the drop-down. If not, use the drop-down to change the selection.
Click the Add Users link.
On the Add Users page, make sure All Zones is selected and click the Next button.
Enter DOMAINAdministrator in the Users box and check the Full Control permission to grant the administrator access to both the Default and Internet zones.
Click the Finish button.
Now open the home page of the public Internet site you extended on the Internet zone and click the link titled Enable Anonymous Access.
Warning
Be sure that you open the Internet site using the URL for the extended application. Remember, you want anonymous access to the Internet zone and Windows access to the Default zone. I find it useful to save a link in the Favorites list named for the zone (e.g., Apress Default Zone and Apress Internet Zone).
On the Change Anonymous Access Settings page, select the option labeled Entire Web Site and click the OK button.
Once you have completed the previous steps you will be able to author content on the Default zone and access it anonymously on the Internet zone. While these steps are good for investigating MOSS, you will probably want to ensure the Internet zone is on port 80 in a production environment. Usually, I create the Default zone on a different port (e.g., 8080) and then extend the web application into port 80 as the Internet zone.
Another real-world consideration is the fact that Internet sites are often isolated in the DMZ and may not be accessible from the Windows domain. In this case, I make use of the content deployment capabilities of MOSS to push content from a staging server to production. I discuss content deployment in the section titled "Using Content Deployment" later in the chapter.
Once you have a site created, you may begin adding content to it. Typically, you begin the process by adding new pages to the site. Adding a page requires the Manage Web Site right and is accomplished by selecting Create Page from the Site Actions menu. When you select to create a new page for an Internet site, MOSS displays a list of page layouts for the site. Page layouts are templates that define content structure for a page and are always associated with a content type. As I discussed in Chapter 3, a content type contains a document template, data columns, workflows, and other information that completely defines a document. The publishing feature of MOSS uses a single root content type for publishing called Page. All of the page layouts inherit from this base. Figure 5-9 shows the list of available page layouts for the Internet site.

You can get a better understanding of the content types behind the page layouts by viewing their definitions in MOSS. Content types can be accessed from the Site Settings page by clicking the link titled Site Content Types. This link displays the Site Content Type Gallery, which lists all of the available content types for web pages, documents, and lists. The page layouts for the Internet site are located under the Page Layout Content Types section of the gallery. These content types define the document template and columns for the page layouts. This information determines how the page appears in MOSS and makes it available in the page layouts list. Figure 5-10 shows part of the content type definition for the Article Page layout.

When you create a new page, it is initially displayed in edit mode. In the body of the page, SharePoint displays field controls, which are used to add content to the page. Field controls hold values for columns associated with the content type. If you create a new Article Page, for example, it has field controls for Title, Rollup Image, Page Image, Article Date, Byline, Image Caption, and Page Content. If you examine the complete content type definition for an Article Page, you'll see that it has columns defined with the same names. Figure 5-11 shows an Article Page in edit mode.
Each of the field controls in a page layout can support different types of content, including images, text, groups, audiences, links, HTML, and more. When the page is in edit mode, each field control offers a different interface to help you properly configure the content. For example, field controls tied to images present an interface that allows you to select an image, provide alternate text, and specify hyperlinking behavior. To complete a page, simply work inside each field control to provide the needed content.
When working with a page in edit mode, SharePoint displays the page editing toolbar at the top. Once you've finished editing the page, you can use the page editing toolbar to allow other editors to view your work, save the page, or submit the page for approval. Figure 5-12 shows the page editing toolbar.


Clicking the button labeled Check In to Share Draft checks the new page in and allows other editors who have permission to review it. When a page is checked in, another editor may check out and alter the page by clicking the Edit Page button. MOSS automatically increments the minor version number of the page and displays it with a Draft status as each subsequent checkout, edit, check-in cycle is performed. When saved, the new page is stored in a document library named Pages that is fully accessible from within MOSS.
Most of the pages you create for a site will have other content elements such as images. In MOSS, individual content elements must be approved before they can appear in a published page. Content such as images is typically approved separately within the library where it resides and then used within pages.
Follow these steps to upload and approve an image:
Go to the home page of the Internet site you created earlier using the Default zone.
Select View All Site Content from the Site Actions menu.
On the All Site Content page, click the Images library.
In the Images Library, click Upload on the toolbar.
On the Upload Document: Images page, click the Browse button.
Using the Choose File dialog, locate an image to upload and then click the Open button.
On the Upload Document: Images page, click the OK button.
On the Edit Item page, give your image a title and click the Check In button.
On the Document Library page, note that the image now appears with an Approval Status of Draft.
Using the drop-down menu associated with the file name, select Publish a Major Version.
On the Publish a Major Version page, click the OK button.
On the Document Library page, note that the image now appears with an Approval Status of Pending.
Using the drop-down menu associated with the file name, select Approve/Reject.
On the Approve/Reject page, select Approved and click the OK button.
On the Document Library page, note that the image now appears with an Approval Status of Approved.
Once the page editing process is complete, you can click the Submit for Approval button. Submitting the page for approval starts a simple serial workflow process that allows you to route the page to a list of people one at a time. While the page is being routed for approval, you can also run a check of the content to make sure there aren't any unapproved content items used on the page.
Earlier in the chapter, I described how you could edit existing style sheets such as CORE.CSS to make changes to the appearance of sites. The drawback with this approach, of course, is that the changes made at this level are global. If you have the publishing feature installed, however, you can utilize an alternate style sheet that will override the styles found in CORE.CSS. Furthermore, each site collection can have its own alternate style sheet, which means that your changes do not have to be global. You can specify an alternate style sheet by clicking the Master Page link on the Site Settings page, which will take you to a page where you can enter a URL to the alternate style sheet.
Master pages and page layouts are the two main components used by SharePoint to control the navigation, branding, and content of a site. The purpose of a master page is to provide a consistent navigation and page layout structure that is independent of the content on the page. The purpose of a page layout is to provide the content that appears within the page. Together, master pages and page layouts dictate the look and feel of a SharePoint site.
Whenever you create a new site in SharePoint, a master page named default.master is created for the site and stored in the Master Page Gallery. This master page defines many of the navigational and branding elements that appear around a page. These elements are sometimes referred to as the chrome of the page, and changing them in the master page has a wide-ranging impact on a site.
Follow these steps to edit the master page:
Go to the home page of the Internet site you created earlier using the Default zone (e.g.,
http://vsmoss:[port]).Select Site Settings
On the Site Settings page, click the Master Page and Page Layout Gallery link under the Galleries section.
In the Master Page Gallery, select Check Out from the drop-down menu associated with the
default.masterfile.Select Edit in Microsoft SharePoint Designer from the drop-down menu associated with the
default.masterfile.When the master page opens, right-click the image near the site name and select Properties from the context menu.
In the tag Properties window, change the
ImageURLproperty to point to the approved image you uploaded earlier (e.g.,/sites/apress/PublishingImages/Apress_Small.jpg).Note
If you have an image taller than 25 pixels, it will likely be too large for a nice appearance. Therefore, you might want to edit an image and publish it again before using it. For this example, I created a small Apress logo from images on the web site.
Select File
When you receive the notice that you are customizing a page in the site template, click the Yes button.
Close the SharePoint Designer.
Return to the Master Page Gallery and select Check In from the drop-down menu associated with the
default.masterfile.On the Check In page, click the OK button.
Select Publish a Major Version from the drop-down menu associated with the
default.masterfile.On the Publish Major Version page, click the OK button.
Select Approve/Reject from the drop-down menu associated with the
default.masterfile.On the Approve/Reject page, select Approved and click the OK button.
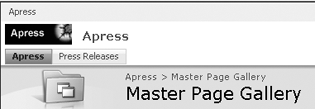
The Master Gallery page should now have the new image similar to Figure 5-13.
While changing the default.master page has resulted in a new image appearing, if you navigate to other pages you might notice that the new image is not present. For example, simply select View All Site Content from the Site Actions menu and you will see that the old image is still in use. This is because not all of the pages in the site use the default.master page to generate their chrome. Many of the pages use what is called the application master page instead.
The application master page is a global master page that is used across all site collections. It is located at Program FilesCommon FilesMicrosoft Sharedweb server extensions12TEMPLATELAYOUTS. If you want, you can edit this page in Visual Studio or Notepad by opening it directly from the file system. The problem, however, is that these changes will affect every site collection in SharePoint. This means that you are left with a terrible choice when it comes to site branding. If you don't edit the application master, some pages will not appear with a consistent look and feel. If you do edit the application master, every site will get the change and may cause inconsistencies as well.
The problem is even worse than you might expect because SharePoint actually has several master pages that it uses beyond the default and application master. A search of the LAYOUTS directory for master pages on VSMOSS reveals more than 20 master pages. Some of these pages are associated with particular templates, while others are used for administration pages. In any case, you can see that SharePoint's use of master pages is less than optimal.
One way to solve the problems with multiple master files is to create a new LAYOUTS directory for each web application. To do this, you simply create a new directory under the TEMPLATE directory, for example LAYOUTS2, and then change the Local Path property in the Internet Information Server console for the virtual LAYOUTS directory to point to the new folder. Copy all of the contents from the original LAYOUTS directory to the new one and then you'll have a separate application master file just for that web application.
Warning
When editing any file located in the LAYOUTS directory, do not use the SharePoint Designer. The SharePoint Designer is not intended to edit the pages and will corrupt files opened directly from the LAYOUTS directory. For best results, I edit these files in Visual Studio or Notepad instead. In any case, be sure to save a backup copy of the file before making any changes.
In the section "Using the Publishing Feature," I discuss creating new pages for a site and show the list of available page layouts. It is unlikely, however, that the available page layouts will work in most situations. Therefore, you'll have to create your own page layouts for use on the site. Creating a page layout is accomplished in five steps: define site columns, define a content type, create a page layout, edit the page layout, and publish the page layout.
As I mentioned already, page layout field controls are directly related to site columns. Therefore, you'll have to create new site columns for each of the separate content elements you want in a page layout. If, for example, you are creating a product page, you might define site columns such as Product Name or Product Description. These columns can then be used later to hold specific product information.
Creating new site columns is done from the Site Columns Gallery, which is accessible from the Site Settings page. From the Site Columns Gallery, you can click the Create button and define a new column. When you define a new site column you can select from any of the data types shown in Table 5-3.
Table 5.3. Site Column Types
Data Type | MOSS/WSS | Description |
|---|---|---|
Single Line of Text | MOSS/WSS | A single line of text |
Multiple Lines of Text | MOSS/WSS | Many lines of text |
Choice | MOSS/WSS | A predefined list of choices |
Number | MOSS/WSS | A specified minimum, maximum, and number of decimal places |
Currency | MOSS/WSS | Money in a specified currency format |
Date/Time | MOSS/WSS | A date or date/time formatted value |
Lookup | MOSS/WSS | A value obtained from a list on the site |
Boolean | MOSS/WSS | A yes or no value appearing as a check box |
People | MOSS/WSS | A person or group based on SharePoint membership |
URL | MOSS/WSS | A hyperlink or an image link |
Calculated | MOSS/WSS | A computed value based on other fields |
HTML | MOSS only | HTML content specifically for content management |
Image | MOSS only | A picture specifically for content management |
Hyperlink | MOSS only | A link specifically for content management |
Summary | MOSS only | A column providing summary links |
Business Data | MOSS only | A column for use with the Business Data Catalog |
Audience | MOSS only | A column that targets specific audiences |
After defining the site columns, you must then define a new content type that uses these columns. Defining a new content type is done from the Site Content Type Gallery, which is accessible from the Site Settings page. From the Site Content Type Gallery, you can click the Create button and define a new content type. The key to making a content type that works correctly with the WCM feature is to inherit from the existing page content type. After that, simply add the site columns you created to the new content type.
Once the content type is created, you can go on to create the new page layout. Creating a new page layout is done from the Master Page and Page Layout Gallery, which is accessible from the Site Settings page. From the Master Page and Page Layout Gallery, you can select New
After the new page layout is created, you must specifically add field controls to the page so that content editors can use them to create new pages. Field controls are added using the SharePoint Designer, and you can open the page layout for editing in the SharePoint Designer by using the drop-down menu associated with the file. Alternately, you can open the entire site in the SharePoint Designer and locate the page layout in the Master Page Gallery located at catalogsmasterpage.
Depending upon your exact role on the site, you may need to make changes to the Contributor Settings. In order to change the settings, select Site
If you have appropriate permissions, you can double-click the new page layout and it will open for editing. By selecting Task Panes

Once the new page layout is completed, you must make it available to content editors. This is done by checking in the page layout, publishing it, and approving it. This process is largely the same as for any item in SharePoint. Once approved, the new page layout will be available on the site when a user selects Create Page from the Site Actions menu. If you are interested in a detailed examination of creating new page layouts, the Exercise at the end of the chapter will walk you through the entire process.
In addition to the default and application master pages, you may also associate page layouts with custom master pages. For example, many of the pages in the Publishing Portal template use the TopNavFlyouts master page. This master page was designed to be the foundation for all of the public content pages that appear on the site. Creating a custom master page gives you the most control over the look and feel of a site. If you are using SharePoint to create a public Internet site, you will definitely want to create a set of custom master pages. This is really the only way to achieve the level of design control needed for most Internet projects.
Unfortunately, there is no way in SharePoint to start with a blank slate and design your site. This is because both SharePoint and the WCM feature assume a certain infrastructure is in place when processing master pages and page layouts. Furthermore, there is no "Blank WCM Site" template that gives you everything you need for your own custom master page. This is a terrible shortcoming in my opinion, but we can compensate by developing our own blank master page that meets just the minimum requirements of the SharePoint infrastructure. Listing 5-1 shows a complete master page, available in the MOSS SDK, that you can use as the basis for your own custom look and feel.
Example 5.1. A Minimal Master Page
<%@ Master language="C#" %> <!DOCTYPE html PUBLIC "-//W3C//DTD HTML 4.01 Transitional//EN" "http://www.w3.org/TR/html4/loose.dtd"> <%@ Import Namespace="Microsoft.SharePoint" %> <%@ Register Tagprefix="SPSWC" Namespace="Microsoft.SharePoint.Portal.WebControls" Assembly="Microsoft.SharePoint.Portal,Version=12.0.0.0,Culture=neutral,PublicKeyToken=71e9bce111e9429c" %> <%@ Register Tagprefix="SharePoint" Namespace="Microsoft.SharePoint.WebControls" Assembly="Microsoft.SharePoint,Version=12.0.0.0,Culture=neutral,PublicKeyToken=71e9bce111e9429c" %> <%@ Register Tagprefix="WebPartPages" Namespace="Microsoft.SharePoint.WebPartPages" Assembly="Microsoft.SharePoint,Version=12.0.0.0,Culture=neutral,PublicKeyToken=71e9bce111e9429c" %> <%@ Register Tagprefix="PublishingWebControls" Namespace="Microsoft.SharePoint.Publishing.WebControls" Assembly="Microsoft.SharePoint.Publishing,Version=12.0.0.0,Culture=neutral,PublicKeyToken=71e9bce111e9429c" %>
<%@ Register Tagprefix="PublishingNavigation" Namespace="Microsoft.SharePoint.Publishing.Navigation",Assembly="Microsoft.SharePoint.Publishing,Version=12.0.0.0,Culture=neutral,PublicKeyToken=71e9bce111e9429c" %> <%@ Register TagPrefix="wssuc" TagName="Welcome" src="~/_controltemplates/Welcome.ascx" %> <%@ Register TagPrefix="wssuc" TagName="DesignModeConsole" src="~/_controltemplates/DesignModeConsole.ascx" %> <%@ Register TagPrefix="PublishingVariations", TagName="VariationsLabelMenu" src="~/_controltemplates/VariationsLabelMenu.ascx" %> <%@ Register Tagprefix="PublishingConsole" TagName="Console" src="~/_controltemplates/PublishingConsole.ascx" %> <%@ Register TagPrefix="PublishingSiteAction" TagName="SiteActionMenu" src="~/_controltemplates/PublishingActionMenu.ascx" %> <html> <WebPartPages:SPWebPartManager runat="server"/> <SharePoint:RobotsMetaTag runat="server"/> <head runat="server"> <asp:ContentPlaceHolder runat="server" id="head"> <title> <asp:ContentPlaceHolder id="PlaceHolderPageTitle" runat="server" /> </title> </asp:ContentPlaceHolder> <Sharepoint:CssLink runat="server"/> <asp:ContentPlaceHolder id="PlaceHolderAdditionalPageHead" runat="server" /> </head> <body onload="javascript:_spBodyOnLoadWrapper();"> <form runat="server" onsubmit="return _spFormOnSubmitWrapper();"> <wssuc:Welcome id="explitLogout" runat="server"/> <PublishingSiteAction:SiteActionMenu runat="server"/> <PublishingWebControls:AuthoringContainer id="authoringcontrols" runat="server"> <PublishingConsole:Console runat="server" /> </PublishingWebControls:AuthoringContainer> <asp:ContentPlaceHolder id="PlaceHolderMain" runat="server" />
<asp:Panel visible="false" runat="server">
    <asp:ContentPlaceHolder id="PlaceHolderSearchArea"
     runat="server"/>
    <asp:ContentPlaceHolder id="PlaceHolderTitleBreadcrumb"
     runat="server"/>
    <asp:ContentPlaceHolder id="PlaceHolderPageTitleInTitleArea"
     runat="server"/>
    <asp:ContentPlaceHolder id="PlaceHolderLeftNavBar"
     runat="server"/>
    <asp:ContentPlaceHolder ID="PlaceHolderPageImage" runat="server"/>
    <asp:ContentPlaceHolder ID="PlaceHolderBodyLeftBorder"
     runat="server"/>
    <asp:ContentPlaceHolder ID="PlaceHolderNavSpacer" runat="server"/>
    <asp:ContentPlaceHolder ID="PlaceHolderTitleLeftBorder"
     runat="server"/>
    <asp:ContentPlaceHolder ID="PlaceHolderTitleAreaSeparator"
     runat="server"/>
    <asp:ContentPlaceHolder ID="PlaceHolderMiniConsole"
     runat="server"/>
    <asp:ContentPlaceHolder id="PlaceHolderCalendarNavigator"
     runat ="server" />
    <asp:ContentPlaceHolder id="PlaceHolderLeftActions"
     runat ="server"/>
    <asp:ContentPlaceHolder id="PlaceHolderPageDescription"
     runat ="server"/>
    <asp:ContentPlaceHolder id="PlaceHolderBodyAreaClass"
     runat ="server"/>
    <asp:ContentPlaceHolder id="PlaceHolderTitleAreaClass"
     runat ="server"/>
  </asp:Panel>

</form>
</body>
</html>
The minimal master page consists of Imports and Register statements for referencing SharePoint assemblies that are required by the WSS or WCM infrastructure. The body of the master page contains server-side controls that interact with the WSS or WCM infrastructure. Each of these controls is responsible for generating part of the page within a SharePoint site. The following sections describe key tags in the master page in the order they appear.
WebPartPages:SPWebPartManager is the server control that implements the web part infrastructure. You'll find this control on every page in a SharePoint site. Without this control, web parts cannot be used on the page.
The server control asp:ContentPlaceHolder generates content for the page. In a typical page, there are several of these controls that are used to hold everything from text to user controls. Earlier when you created a page layout, you used the PlaceHolderMain placeholder to render the body of the page.
It's important to note that a master page must support all of the content holders referenced by a page layout. If a page layout has content holders defined in it that are not available in the master page, you will see errors on the page when it renders. The master page defined in Listing 5-1 is designed to be a starting point that contains the minimally required tags, but you will likely have to add additional content placeholders if you wish to replace an existing master page in a SharePoint site. Table 5-4 shows the placeholders from Listing 5-1 and describes their purpose.
Table 5.4. Content Placeholders
Placeholder | Purpose |
|---|---|
| Defines the search box |
| Defines the main breadcrumb on the page |
| Defines the title at the top of the page |
| Defines the area on the far left of the page |
| Defines the page icon in the upper left corner |
| Defines the left border of the main page |
| Defines the width of the left navigation area |
| Defines the left border of the title area |
| Defines shadows for the title area |
| Defines an area for page-level commands such as exiting edit mode |
| Defines a date picker for a calendar view |
| Defines the bottom of the left navigation area |
| Defines the page description area |
| Defines additional body styles |
| Defines additional title styles |
While content placeholders are most obviously used for text and graphics, they can also be used to render controls. The best example of this capability is the SharePoint:DelegateControl. This control is often used in conjunction with placeholders to display user controls on a page. In fact, SharePoint uses this capability extensively to render things such as the search box. The following code from the default.master page shows how the search box is displayed using a combination of the PlaceHolderSearchArea placeholder and the DelegateControl:
<asp:ContentPlaceHolder id="PlaceHolderSearchArea" runat="server">
<SharePoint:DelegateControl runat="server" ControlId="SmallSearchInputBox" />
</asp:ContentPlaceHolder>
The DelegateControl has a ControlId attribute that references the class name of a user control located in C:Program FilesCommon FilesMicrosoft Sharedweb server extensions12TEMPLATECONTROL TEMPLATES. If you examine the contents of this directory, you will see that there are many user controls available. Unfortunately at this writing, there is very little documentation on these controls. The best way to learn about them is to examine the default.master page, review the control file itself, and experiment with test code.
The server control SharePoint:CssLink is responsible for generating the links between the page and the required style sheets. This link is created by using a link tag in the page. The following code shows an example of the output generated by the SharePoint:CssLink control:
<link rel="stylesheet" type="text/css" href="/_layouts/1033/styles/core.css"/>
PublishingWebControls:AuthoringContainer
The server control PublishingWebControls:AuthoringContainer is a container for the controls PublishingSiteAction:SiteActionMenu and PublishingConsole:Console. The PublishingSiteAction:SiteActionMenu server control is an enhanced Site Actions menu that is enabled by the WCM feature. The PublishingConsole:Console is used to generate the toolbar for the publishing process. All of these controls are required by the WCM feature.
If you are creating content that must be presented in different languages, you'll want to enable site variations. Site variations allow you to centralize the management of multilingual content and then propagate it to other sites. Site variations essentially set up parallel site collections that are synchronized with a master collection. When a change is made to the master collection, the content is copied to all the variations. Setting up site variations is relatively straightforward for a publishing site.
Follow these steps to set up site variations:
Go to the home page of the Internet site you created earlier using the Default zone.
Select Site Settings
On the Site Settings page, click the Variations link under the Site Collection Administration section.
On the Variation Settings page, type a forward slash into the Location field.
Click the OK button.
On the Site Settings page, click the Variation Labels link under the Site Collection Administration section.
On the Variation Labels page, click the New Label button.
On the Create Variation Label page, enter English (en-us) in the Label Name field.
Enter English in the Display Name field.
Select English (United States) from the Locale drop-down list.
Select the option labeled Publishing Site and All Pages.
Check the box labeled Set This Variation to Be the Source Variation.
Select Publishing Site from the drop-down list labeled Select the Publishing Site Template You Want to Use.
Click the OK button.
On the Variation Labels page, click the New Label button.
On the Create Variation Label page, enter Italian (it-IT) in the Label Name field.
Enter Italian in the Display Name field.
Select Italian (Italy) from the Local drop-down list.
Select the option labeled Publishing Site and All Pages.
Click the OK button.
On the Variation Labels page, click the Create Hierarchies button.
Once the hierarchy creation is complete, you will have a subsite created for each of the labels you defined. These subsite structures allow you to have identical structures with localized content. Now when you make changes to the source label, they'll be propagated to the other labels you defined.
Content deployment is a capability used to move content from one SharePoint site collection to another. Using content deployment, you can move content between site collections in the same farm or across farms. This capability allows you to create staging servers where you can develop and test solutions before deploying them into production.
Configuring content deployment is done through the Central Administration site. A content deployment section is located on the Operations tab and contains all of the functionality you need to set up paths and jobs. Paths form relationships between site collections so that one can act as a source and the other as a destination. Jobs define the actual content that will be deployed from the source to the destination.
Before creating paths and jobs, however, you must enable content deployment on the farm. This is done by clicking the Content Deployment Settings link on the Operations tab of the Central Administration site. On the Content Deployment Settings page, you must select the option to accept incoming content deployment jobs. You can also specify the servers to handle the incoming and outgoing jobs as well as whether connections must be made using the HTTPS protocol.
Once the farm is configured to allow content deployment, you can set up paths between site collections. This is accomplished by clicking the Content Deployment Paths and Jobs link. Here you can create a new path that defines a source and destination site collection.
Once the path is created, you can set up a job to move the content. The job can be set up to deploy an entire site collection or just selected sites. You can also set up the job to run on a schedule or to execute manually later. Lastly, you can configure the job to send an e-mail each time it runs.
In this exercise, you will create a new site that uses WCM to create a custom look and publish custom pages. The site will be an IT training site with custom page layouts to describe training courses offered internally to employees. I'll keep this site very simple to emphasize the process you should follow to create a custom look and feel that can differ radically from the standard SharePoint appearance. You'll then be able to use this same technique to create specific sites and page layouts for your own purposes.
When creating your own custom sites, you can either choose to modify the master pages and page layouts that are provided out of the box in templates, or create your own from scratch. In this exercise, you'll use a blank site and create new content that is not tied to an existing layout. The process of creating a new web application and site collection should be familiar to you by now.
Follow these steps to create a new site:
Log in to VSMOSS as a SharePoint administrator.
Select Start
On the Application Management tab, under the SharePoint Web Application Management section, click the link titled Create or Extend a Web Application.
On the Create or Extend a Web Application page, click the link titled Create a New Web Application.
On the Create a New Web Application page, select the option to Create a New IIS Web Site.
In the Description field, type Departmental and make note of the port number that the new web application will use.
In the Application Pool section, select Create a New Application Pool.
Enter Departmental_Pool as the pool name.
Select the Configurable option for the application pool security account.
In the User Name field, enter DOMAINSPContentPool.
In the Password field, enter the account password.
In the Reset Internet Information Services section, select the option to Restart IIS Automatically.
Click the OK button.
On the Application Created page, click the link titled Create a New Site Collection.
On the Create Site Collection page, enter IT Training in the Title field.
Under the Primary Site Collection Administrator section, enter DOMAINAdministrator in the User Name field.
Under the Template Selection section, click the Collaboration tab, and then select the Blank Site.
Click the OK button to create the new site collection. When the site collection is created, open it in a separate copy of the browser. You might also want to add a Favorites link in the browser so that you can get back to the site easily.
Although the Blank Site template is available in both WSS and MOSS, I want to use the publishing feature of MOSS to enable the management of web content. Therefore, you will enable the Office SharePoint Server Publishing Feature on the blank site. Once enabled, you will be able to create custom page layouts for the site.
Follow these steps to activate the publishing feature:
From the home page of the IT training site, select Site Settings from the Site Actions menu.
On the Site Settings page, click the Site Collection Features list under the Site Collection Administration section.
On the Site Collection Features page, click the Activate button associated with the Office SharePoint Server Publishing Infrastructure Feature.
Return to the Site Settings page.
On the Site Settings page, click the Site Features link under the Site Administration section.
On the Site Features page, click the Activate button associated with the Office SharePoint Server Publishing Feature.
Save the code from Listing 5-2 as a file named
training.master.Example 5.2. training.master
<%@ Master language="C#" %>
<!DOCTYPE html PUBLIC "-//W3C//DTD HTML 4.01 Transitional//EN"
 "http://www.w3.org/TR/html4/loose.dtd">
<%@ Import Namespace="Microsoft.SharePoint" %>
<%@ Register Tagprefix="SPSWC"
Namespace="Microsoft.SharePoint.Portal.WebControls"
Assembly="Microsoft.SharePoint.Portal,
Version=12.0.0.0, Culture=neutral,PublicKeyToken=71e9bce111e9429c" %> <%@ Register Tagprefix="SharePoint" Namespace="Microsoft.SharePoint.WebControls" Assembly="Microsoft.SharePoint,Version=12.0.0.0,Culture=neutral,PublicKeyToken=71e9bce111e9429c" %> <%@ Register Tagprefix="WebPartPages" Namespace="Microsoft.SharePoint.WebPartPages"Assembly="Microsoft.SharePoint,Version=12.0.0.0,Culture=neutral,PublicKeyToken=71e9bce111e9429c" %> <%@ Register Tagprefix="PublishingWebControls" Namespace="Microsoft.SharePoint.Publishing.WebControls" Assembly="Microsoft.SharePoint.Publishing,Version=12.0.0.0,Culture=neutral,PublicKeyToken=71e9bce111e9429c" %> <%@ Register Tagprefix="PublishingNavigation" Namespace="Microsoft.SharePoint.Publishing.Navigation" Assembly="Microsoft.SharePoint.Publishing,Version=12.0.0.0,Culture=neutral,PublicKeyToken=71e9bce111e9429c" %> <%@ Register TagPrefix="wssuc" TagName="Welcome" src="~/_controltemplates/Welcome.ascx" %> <%@ Register TagPrefix="wssuc" TagName="DesignModeConsole" src="~/_controltemplates/DesignModeConsole.ascx" %> <%@ Register TagPrefix="PublishingVariations" TagName="VariationsLabelMenu" src="~/_controltemplates/VariationsLabelMenu.ascx" %> <%@ Register Tagprefix="PublishingConsole" TagName="Console" src="~/_controltemplates/PublishingConsole.ascx" %> <%@ Register TagPrefix="PublishingSiteAction" TagName="SiteActionMenu" src="~/_controltemplates/PublishingActionMenu.ascx" %> <html> <WebPartPages:SPWebPartManager runat="server"/> <SharePoint:RobotsMetaTag runat="server"/>
<head runat="server">
<asp:ContentPlaceHolder runat="server" id="head">
<title>
<asp:ContentPlaceHolder id="PlaceHolderPageTitle" runat="server" />
</title>
</asp:ContentPlaceHolder>
<Sharepoint:CssLink runat="server"/>
<asp:ContentPlaceHolder id="PlaceHolderAdditionalPageHead"
 runat="server" />
</head>


<body onload="javascript:_spBodyOnLoadWrapper();">

<form runat="server" onsubmit="return _spFormOnSubmitWrapper();">

  <table border="0">
    <tr>
      <td><asp:ContentPlaceHolder id="PlaceHolderPageTitleInTitleArea"
           runat="server"/></td>
      <td><wssuc:Welcome id="explitLogout" runat="server"/></td>
      <td><PublishingSiteAction:SiteActionMenu runat="server"/></td>
    </tr>
    <tr>
      <td colspan="3">
        <PublishingWebControls:AuthoringContainer
         id="authoringcontrols" runat="server">
          <PublishingConsole:Console runat="server" />
        </PublishingWebControls:AuthoringContainer>
      </td>
    </tr>
    <tr>
      <td colspan="3">
        <br/>
        <asp:ContentPlaceHolder id="PlaceHolderMain" runat="server" />
        <p><asp:ContentPlaceHolder id="PlaceHolderSearchArea"
            runat="server"/></p>
        <p><asp:ContentPlaceHolder id="PlaceHolderLeftNavBar"
            runat="server"/></p>
        <p><asp:ContentPlaceHolder ID="PlaceHolderPageImage"
            runat="server"/></p>
        <p><asp:ContentPlaceHolder ID="PlaceHolderBodyLeftBorder"
            runat="server"/></p>
        <p><asp:ContentPlaceHolder ID="PlaceHolderNavSpacer"
            runat="server"/></p>
<p><asp:ContentPlaceHolder ID="PlaceHolderTitleLeftBorder" runat="server"/></p> <p><asp:ContentPlaceHolder ID="PlaceHolderTitleAreaSeparator" runat="server"/></p> <p><asp:ContentPlaceHolder ID="PlaceHolderMiniConsole" runat="server"/></p> <p><asp:ContentPlaceHolder id="PlaceHolderCalendarNavigator" runat ="server" /></p> <p><asp:ContentPlaceHolder id="PlaceHolderLeftActions" runat ="server"/></p> <p><asp:ContentPlaceHolder id="PlaceHolderPageDescription" runat ="server"/></p> <p><asp:ContentPlaceHolder id="PlaceHolderBodyAreaClass" runat ="server"/></p> <p><asp:ContentPlaceHolder id="PlaceHolderTitleAreaClass" runat ="server"/></p> </td> </tr> </table> </form> </body> </html>In the IT training site, select Site Settings
Note
Take note that the Site Actions menu has changed now due to the activation of the publishing feature.
On the Site Settings page, click the link titled Master Page and Page Layout Gallery under the Galleries section.
In the Master Page Gallery, click the Upload button.
On the Upload Master Page page, click the Browse button to open the Choose File dialog.
In the Choose File dialog, locate the
training.masterfile and click the Open button.On the Upload Master Page page, click the OK button.
On the Master Page Gallery page, select Publishing Master Page from the Content Type drop-down list and click the Check In button.
In the Master Page Gallery, locate the
training.masterfile and select Publish a Major Version from the drop-down menu.On the Publish Major Version page, click the OK button.
In the Master Page Gallery, locate the
training.masterfile and select Approve/Reject from the drop-down menu.On the Approve/Reject page, select Approved and click the OK button.
Select Site Settings
On the Site Settings Page, click the Site Master Page Settings link under the Look and Feel section.
On the Site Master Page Settings page, select the
training.masterfile from the Site Master Page drop-down list and click the OK button.
Now that the WCM features are available, you can use them to create a new page. A page layout already exists for creating a welcome page for the site. In this section, you will use the existing page layout to create a new welcome page for the training site.
Follow these steps to create a new welcome page:
In the IT training site, select Create Page from the Site Actions menu.
On the Create Page, enter IT Training Home in the Title field.
Enter home in the URL Name field.
Select (Welcome Page) Welcome Page with Table of Contents from the Page Layout list.
Click the Create button.
When the new welcome page appears in edit mode, click the button labeled Check In to Save Draft.
Note
The page should be a fairly plain page indicating the influence of the training master page. You should also see that the Site Actions menu has changed position to the left side of the page.
From the new Welcome page, select Site Settings
On the Site Settings page, click the Welcome Page link under the Look and Feel section.
On the Site Welcome Page page, click the Browse button.
Locate the
home.aspxpage in the Pages library and click the OK button.On the Site Welcome Page page, click the OK button. The
home.aspxpage should now be the default page for the site.
Page layouts are a key facet of content management within MOSS and are used to create specific types of web pages that have placeholders for content. Once created, page layouts make it easy for content owners to create new pages for a site, publish them, and route them for approval. The individual content elements that appear in a page layout are derived from site columns. When you create a page layout, you can use any of the site columns already defined or define your own. In this exercise, you will define several custom site columns that are specific to the course description page layout you will make later.
Follow these steps to create the custom site columns:
Select Site Settings
On the Site Settings page, click the Site Columns link under the Galleries section.
On the Site Column Gallery page, click the Create button.
On the New Site Column page, enter Course Name in the Column Name field.
Under the Group section, select the New Group option and type Course Page Layout in the text field.
Click the OK button.
Repeat steps 3 through 6 to create columns as defined in Table 5-5.
Page layouts have a direct relationship to a content type defined within the site. The content type is a collection of site columns, a page template, workflows, and other information that determines the appearance and behavior of a page layout. In this exercise, you will create a new content type that derives from the existing Page content type. Inheriting the Page content type allows the new page layout to function correctly within the MOSS content management feature.
Follow these steps to create the new content type:
Select Site Settings
On the Site Settings page, click the Site Content Types link under the Galleries section.
On the Site Content Type Gallery page, click the Create button.
On the New Site Content Type page, enter Course Page in the Name field.
Select Publishing Content Types from the list labeled Select Parent Content Type From.
Select Page from the list labeled Parent Content Type.
Select Custom Content Types from the list labeled Existing Group.
Click the OK button.
On the Site Content Type page, click the link titled Add from Existing Site Columns.
On the Add Columns to Site Content Type page, select Course Page Layout from the list labeled Select Columns From.
Move all of the columns from the Available Columns list to the Columns to Add list.
Click the OK button.
Page layouts are stored in the Master Page and Page Layout Gallery. From this gallery, you can create a new page layout and associate it with a content type. This process makes the site columns that are defined for the content type available to the page layout as field controls that you can place on the page with the SharePoint Designer.
Follow these steps to create the new page layout:
Select Site Settings
On the Site Settings page, click the Master Page and Page Layout Gallery link under the Galleries section.
In the Master Page Gallery, select New
On the New Page Layout page, select Custom Content Types from the list labeled Content Type Group.
Select Course Page from the list labeled Content Type Name.
Type CoursePage in the URL Name field.
Type Course Page in the Title field.
Give the page layout a description.
Click the OK button.
Once you have created the new page layout, you must open it in the SharePoint Designer so that you can add the desired field controls. The site columns you define as part of the content type become available in the SharePoint Designer as field controls that you can place on the page layout. In this exercise, you'll place field controls for the columns that define a course description page.
Follow these steps to edit the page layout:
Open the SharePoint Designer by selecting Start
In the SharePoint Designer, select File
In the Open Site dialog, type the training site (e.g.,
http://VSMOSS:20716/sites/itt).Select Site
In the Contributor Settings dialog, click the Advanced button.
Click the Disable Contributor Settings button.
Click the OK button.
In the Folder list, expand the _catalogs folder. Then expand the master page folder.
Note
If the Folder List pane is not visible, select Task Panes
If the
CoursePage.aspxpage is not already checked out, right-click theCoursePage.aspxfile and select Check Out from the context menu.Double-click the
CoursePage.aspxfile to open it for editing in the SharePoint Designer.In the toolbox, expand the SharePoint Controls section.
Note
If the Toolbox is not visible, select Task Panes
In the SharePoint Controls section, expand the Content Fields node. You should now see the custom columns you added earlier.
Right-click the Course Name field in the Toolbox and select Insert from the context menu.
Repeat the step to insert all of the fields into the Page Layout.
After the fields are added, click File
Exit the SharePoint Designer.
Tip
You can use just about any element available in the SharePoint Designer to create your page layout including layout tables, web part zones, and data views. Don't be shy about experimenting with the content; you can always undo your changes.
Once the page layout is created, you must publish and approve it so that it becomes available for content authors. This process is essentially the same as publishing any item in MOSS. First the document is checked in, then it is published, and finally it is approved.
Follow these steps to make the new page layout available for use:
Go to the home page of the training site.
Select Manage Content and Structure from the Site Actions menu.
On the Site Content and Structure page, select Open Link in New Window from the drop-down menu associated with the Master Page Gallery.
In the Master Page Gallery, select Check In from the drop-down menu associated with the
CoursePage.aspxfile.On the Check In page, click the OK button.
In the Master Page Gallery, select Publish a Major Version from the drop-down menu associated with the
CoursePage.aspxfile.On the Publish Major Version page, click the OK button.
In the Master Page Gallery, select Approve/Reject from the drop-down menu associated with the
CoursePage.aspxfile.On the Approve/Reject page, select Approved and click the OK button.
Once the page layout is published and approved, content authors may use it to create new pages. This is done in the normal way by selecting the Create Page item from the Site Actions menu. After the page is created, the field controls may be edited.
Follow these steps to create a new page:
Go to the home page of the training site.
Select Create Page from the Site Actions menu.
On the Create Page page, enter SharePoint Development in the Title field.
Select Course Page from the list of page layouts.
Click the Create button.
When the page opens in edit mode, enter information into the fields of the page layout to create a new course description. Figure 5-15 shows how the new page should look.