
27. Using ASP.NET Master Pages and User Controls
The Need for a Common Layout
Think for a moment about your Internet viewing habits. When you are clicking links on a site, how do you determine whether the information you are viewing is on the same site as the previous page? Most of you will probably agree that the most prevalent indicator is the style and layout of the site. In other words, if I’m viewing an article on the CNET site and I click a link, if the new page has the same layout and appearance as the previous page, my assumption is that it’s the same site. That is exactly why a common layout is vital to the success of your site.
Web developers use many techniques to facilitate a common layout. One of the most common is the use of templates, such as Expression Web’s Dynamic Web Templates. However, if you’re using ASP.NET in your site, you might want to consider Master Pages instead because they are designed specifically for ASP.NET sites.
![]() For more information on Dynamic Web Templates, see Chapter 19, “Using Dynamic Web Templates.”
For more information on Dynamic Web Templates, see Chapter 19, “Using Dynamic Web Templates.”
The Master Page
A Master Page is a special kind of ASP.NET page that contains graphics, HTML code, ASP.NET controls, and code that is shared between pages.
ASP.NET Master Pages are similar to Dynamic Web Templates in that they facilitate the development of a common user interface and a common look and feel. However, they also represent a substantial step up from Dynamic Web Templates because they fully support the ASP.NET code model and allow you to share not only user interface elements, but also code between pages.
Just like a Dynamic Web Template, you define areas where page-specific content will exist. When you create a page and attach it to a Master Page, you can add content on that page only in the areas that have been designated in the Master Page.
In a Dynamic Web Template, the areas where page-specific content can exist are called editable regions. In a Master Page, two ASP.NET controls are used instead: the Content control and ContentPlaceHolder control.
Note
![]()
A Master Page has a file extension of .master. A Content Page, just like any other ASP.NET Web Form, has a file extension of .aspx. You cannot apply a Master Page to a page unless that page is an ASP.NET Web Form.
The ContentPlaceHolder control exists on the Master Page. Each ContentPlaceHolder control is mapped to a Content control on a page that is attached to the Master Page. That page is called the Content Page. A Master Page is not required to have ContentPlaceHolder controls on it, but without them, there is no way to add content to a page that uses that Master Page.
You can define all content in the Master Page if you want. The Content Page can then provide its own content or simply use the content that the Master Page provides. Expression Web fully supports all aspects of Master Pages, so you don’t need to write any code to take advantage of this powerful feature.
To write server-side ASP.NET code for your Master Pages, you should use a tool made for that purpose, such as Microsoft Visual Web Developer Express Edition. Because of Expression Web’s excellent support for ASP.NET, it’s convenient to use both Expression Web and an ASP.NET application development tool in combination to build full-featured ASP.NET applications. However, Microsoft’s inclusion of many of Expression Web’s features in Visual Web Developer make it an easy transition for those who use Expression Web.
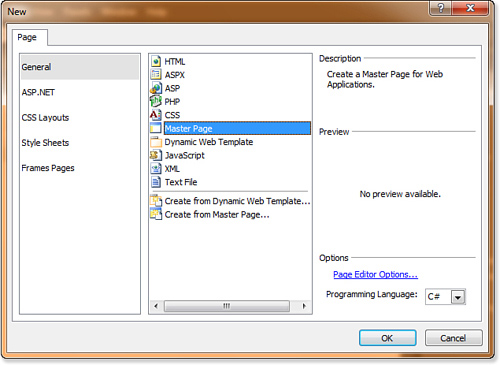
To create a new Master Page, select File, New, Page and select Master Page from the list of page templates, as shown in Figure 27.1.
Figure 27.1. The New dialog contains a page template for a Master Page. When you select it, Expression Web creates a new Master Page with one ContentPlaceHolder control on it.
Tip
![]()
You can select either General or ASP.NET from the list of page types in the New dialog. The option to create a new Master Page exists from either one of these choices and there is no difference in the two. It’s purely your choice.
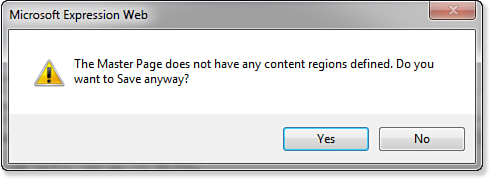
After you’ve created a new Master Page, you should save it with a .master file extension. As I stated earlier, your Master Page doesn’t have to contain a ContentPlaceHolder control, but if you save a Master Page that doesn’t contain a ContentPlaceHolder control, Expression Web prompts you with a warning dialog, as shown in Figure 27.2.
Figure 27.2. Expression Web enables you to save a Master Page that contains no ContentPlaceHolder controls, but it asks you just to be sure.
Tip
![]()
I think the message in Figure 27.2is poorly worded. By calling a ContentPlaceHolder a “content region,” Microsoft is making it easy to confuse ContentPlaceHolder controls with Content controls. Don’t fall into that trap. Content controls exist on Content Pages. When Expression Web says “content region,” what it really means is the ContentPlaceHolder control.
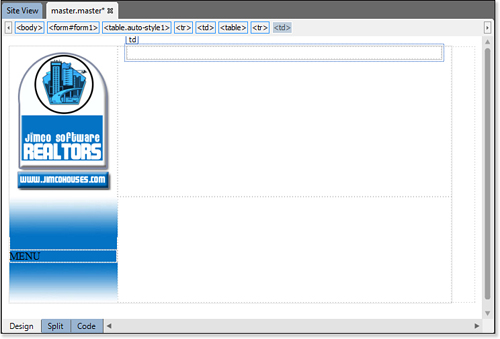
Let’s have a quick look at the <body> of a Master Page:
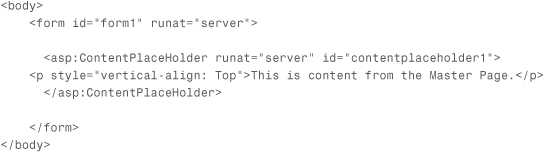
This Master Page contains one ContentPlaceHolder control named contentplaceholder1. I’ve added some text to that ContentPlaceHolder control. The text I’ve added will also appear on any Content Pages, but because the content is inside a ContentPlaceHolder control, I can use my own content for that section in my Content Page. To understand what I mean by that, let’s have a quick look at a Content Page.
The Content Page
A Content Page is a special kind of page. It cannot have any content in it unless that content is inside a Content control. When you first look at the HTML code of a Content Page, it will seem odd to see it completely empty except for the standard ASP.NET directives.
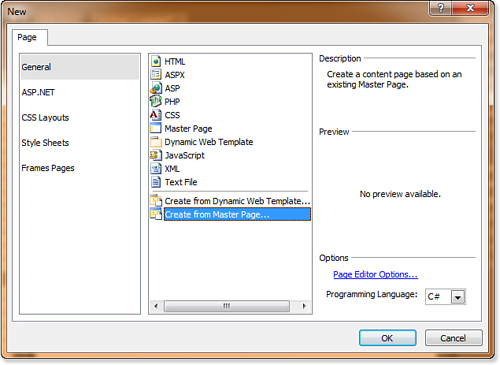
To create a new Content Page, select File, New, Page, and then select Create from Master Page in the New dialog, as shown in Figure 27.3.
Figure 27.3. You can hook up a new ASP.NET Web Form to a Master Page by selecting the option to create a new page from an existing Master Page.
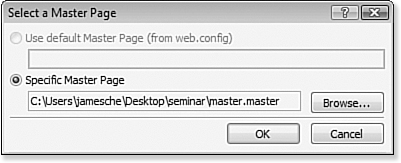
After you click OK, you are prompted to select the Master Page, as shown in Figure 27.4.
Figure 27.4. You must click Browse and select a Master Page. Expression Web won’t let you just type the path.
After you select the Master Page and click OK, you see the new Content Page along with all the content it has pulled from the Master Page (see Figure 27.5).
Figure 27.5. The new Content Page contains all the content from the Master Page. Any content in a Content control can be customized in the Content Page.
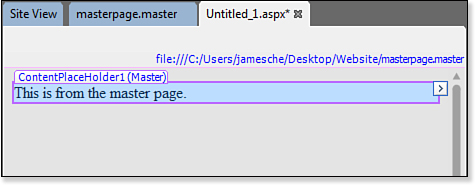
Notice that the text that was in the ContentPlaceHolder control in the Master Page is now located in a shaded area on the Content Page. That shaded area is the Content control. At the upper-left corner of the Content control is the ID of the ContentPlaceHolder control on the Master Page that is feeding the Content control.
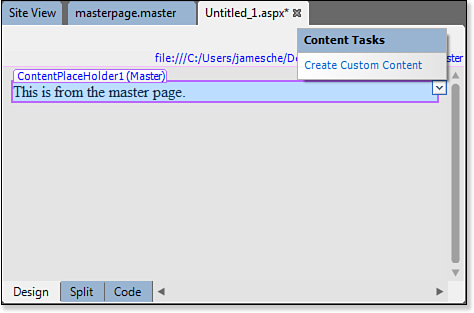
Note that Expression Web displays “(Master)” next to the ID, indicating that the Content control is currently configured to display content from the Master Page. To override that setting so you can change the content in the Content control, click the button at the upper right of the Content control and select Create Custom Content from the Content Tasks menu, as shown in Figure 27.6.
Figure 27.6. Click the button to display the Content Tasks pop-up. You can then choose to define your own content for the Content control.
When you click the Create Custom Content link, “(Master)” changes to “(Custom)” and you can click inside it and add your own content.
If you decide that you’d like the Content control to revert back to the content from the Master Page, you can simply click the button on the control to display the Content Tasks pop-up again, and then click the Default to Master’s Content link. When you do, Expression Web asks you to confirm your choice.
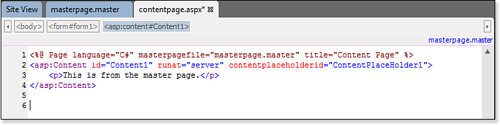
Figure 27.7shows the Content Page from Figure 27.5in Code View. Notice that the only code that exists in the Content Page is code that ASP.NET uses to identify properties of this particular page. No other HTML code appears in the page. Also notice that the name of the Master Page to which this page is attached appears at the upper-right corner of the page.
Figure 27.7. A Content Page contains nothing other than Content controls and the standard ASP.NET code at the top of the page. In this case, the page is getting all content from the Master Page, so no Content controls are present.

Tip
![]()
Content controls always take up the entire width of a page unless they are inside a table or other container. They are also not resizable in Expression Web. They automatically resize themselves when a page is browsed.
If you want to manipulate the size of a Content control, insert it into a table cell. You can then resize the table cell to control the size of the Content control within it.
After custom content is defined for the page, Expression Web adds a Content control to the page and the HTML for the custom content is added inside the Content control, as shown in Figure 27.8.
Figure 27.8. Expression Web adds a Content control to the page when custom content is created. Notice the absence of standard HTML tags such as <head>, <html>, and <body>.

Caution
![]()
If you change the content in a Content control and then later choose to revert to the content from the Master Page, all the custom content for the Content control will be lost. Even if you then switch back to display the custom content, the previously entered content will be gone.
Make absolutely sure that you want to revert to the Master Page’s content before you confirm that choice. When in doubt, save the content to a temporary page first so you can recover it later if you change your mind.
Developing a Master Page Site
Now that you have a good overview of how Master Pages work, let’s create a simple site using Master Pages.
Note
![]()
For this exercise, you will use the files downloadable from the website that accompanies this book at informit.com. You'll also find the completed Master Page site at that location.
Creating the Master Page
The Master Page will contain a table that controls the layout of the site. To create the Master Page, follow these steps:
- Create a new Master Page by selecting File, New, Page and selecting Master Page from the list of available page types.
- Click OK to create the Master Page.
- Click the
ContentPlaceHoldercontrol to select it; then delete it from the page. If you don’t see theContentPlaceHoldercontrol, select View, Visual Aids, Show to turn on Visual Aids. - Click Table, Insert Table.
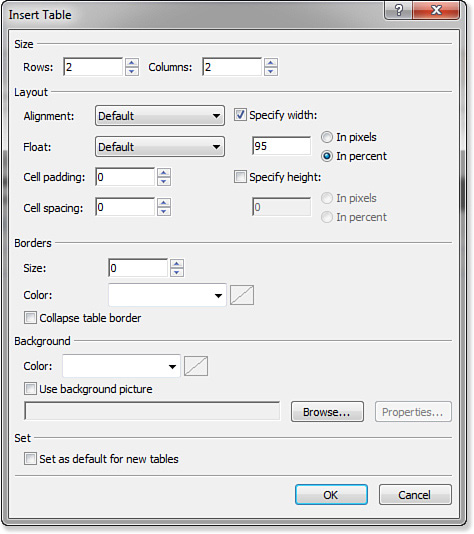
- In the Insert Table dialog, configure the table as follows:
• Set both the Rows and Columns to
2.• Set the Width to
95and select the In Percent radio button.• Set both
cellspacingandcellpaddingto0.• Set the border size to
0.The Insert Table dialog should now look like Figure 27.9. Click OK to insert the table.
Figure 27.9. The table you are configuring here will define the layout for the Master Page.
Tip
![]()
The default ContentPlaceHolder control is deleted from the page at this point because anything that exists within a ContentPlaceHolder control can be customized by the Content Page. When you are creating a Master Page, it’s often preferable to delete the default ContentPlaceHolder control and then insert new ContentPlaceHolder controls after you have defined where you want custom content to exist. That’s the method we’ll use in this chapter.
![]() For more information on inserting and configuring tables, see Chapter 5, “Using Tables.”
For more information on inserting and configuring tables, see Chapter 5, “Using Tables.”
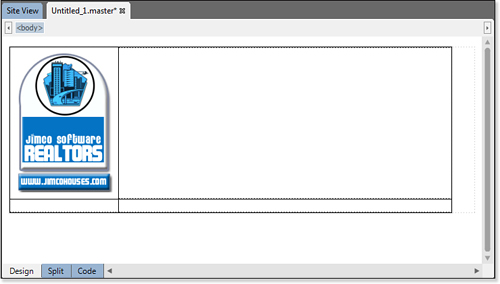
The table you just inserted will hold the common user interface elements for the site. We need to add a logo and change the width of the left column.
Copy the file logo.jpg from this book’s website to your hard drive and insert it into the upper-left cell. Drag the right border of the column containing the logo so that the column is 160px wide.
Your table should now look like Figure 27.10. Note that I’ve formatted the table in Figure 27.10 with a black border so that you can more easily see the table cells. Your table will not have a border.
Figure 27.10. This table will be used to lay out your site’s structure.
Note
![]()
CSS is actually preferred over tables for controlling layout. However, since we’re more interested in learning to use Master Pages in this chapter, I’ve used a table in the example to make it more simple.
![]() For more information on working with images in Expression Web, see Chapter 9, “Using Graphics and Multimedia.”
For more information on working with images in Expression Web, see Chapter 9, “Using Graphics and Multimedia.”
At this point, save the page as master.master. When you do, Expression Web warns you that no content regions exist. Click Yes to save the page anyway. We’ll add a content region shortly.
We have a couple of other areas to configure for the Master Page. Next, we’ll add a menu down the left edge of the page and an ASP.NET AdRotator control in the top area. Do the following:
- Place the insertion point in the cell below the logo.
- Insert the image
menu_top.jpginto the cell. - Press Shift+Enter on your keyboard to insert a new line break after the image.
- Insert a new table with a width of
100%,1column and1row, a border of0, andcellpaddingandcellspacingvalues of0. - Type MENU into the new table.
- Insert the image
menu_bottom.jpgunder the table you just created. - Right-click in the cell with the menu images and select Cell Properties from the menu.
- Click the drop-down next to Background Color and select More Colors from the menu.
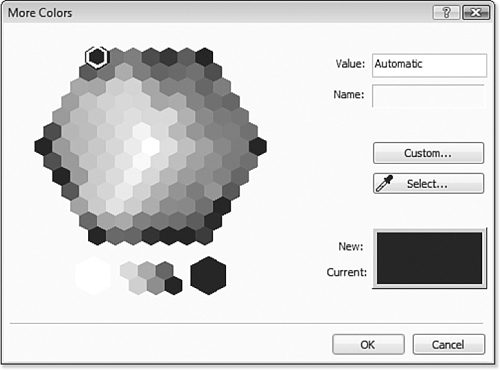
- Click the Select button in the More Colors dialog, as shown in Figure 27.11.
Figure 27.11. The More Colors dialog provides additional tools for selecting colors. In this case, the eye dropper is used by clicking the Select button.
- Place the color dropper over the blue color on the logo and click to select that color.
- Click OK in the More Colors dialog to finish selecting the color.
- Click OK in the Cell Properties dialog to apply the new color.
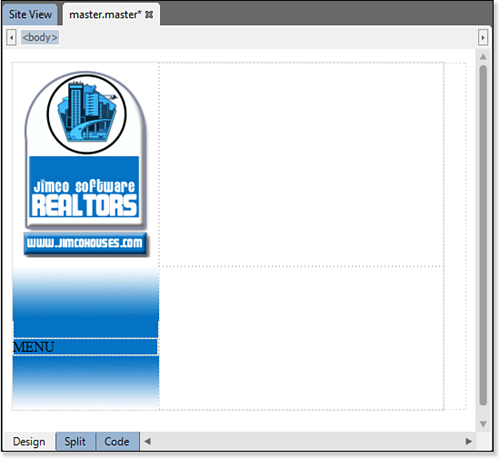
Your page should now look like Figure 27.12.
Figure 27.12. The column for the menu has been formatted with some images and a background color for an attractive look.
Note
![]()
The table you inserted into the menu cell prevents any menu text or control from extending beyond the width of the cell. Without the table in the cell, a menu could cause the cell to automatically widen. Because we’ve set a background color for the cell, having it extend beyond the width of the graphics would cause an unprofessional appearance.
We’re now ready to configure the top row of the table. Remember that we want to add an ASP.NET AdRotator control to this page. We’ll use the standard banner size of 468 pixels wide by 60 pixels high. Let’s add a new table now to contain the AdRotator control. Follow these steps:
- Right-click inside the upper-right cell in the table and select Cell Properties.
- Change the Vertical Alignment to Top and click OK.
- Select Table, Insert Table.
- Change Rows and Columns to
1, change the width to468, and select the In Pixels radio button. - Change both Cell Spacing and Cell Padding to
0and set the Alignment to Center. - Click OK to insert the table.
Your page should now look like the one shown in Figure 27.13.
Figure 27.13. The page now contains a table suitable for inserting an AdRotator control to show an ad banner.
![]() For more information on using the ASP.NET
For more information on using the ASP.NET AdRotator control, see Chapter 25, “Using Standard ASP.NET Controls.”
We now need to define the areas of the Master Page that we will allow to be customized by the content in the Content Page. In this set of steps, we create two areas of customizable content: the main content area and an area along the right edge of the page:
- Right-click in the cell just to the right of the menu cell and select Cell Properties from the menu.
- Change the vertical alignment of the cell to
Topand click OK. - From the Standard ASP.NET controls section of the Toolbox, add a new
ContentPlaceHoldercontrol to the cell. - If the Tag Properties panel is not visible, select Task Panes, Tag Properties to activate it.
Tip

We won’t add any default content to the
ContentPlaceHoldercontrols on the Master Page. However, in a real application, you might want to add content (perhaps something like advertisements) to the right edge of the Master Page. That way, page developers using your Master Page can decide to leave your default content in place or define their own content.
- If the
ContentPlaceHoldercontrol is not selected, click it to select it. - In the Tag Properties panel, change the ID of the
ContentPlaceHoldercontrol toMainContent. - Right-click the cell containing the
MainContent ContentPlaceHoldercontrol and select Insert, Column to the Right. - Right-click inside the bottom cell of the newly created column and select Cell Properties.
- Change the vertical alignment of the cell to
Top. - Change the horizontal alignment of the cell to
Right. - Change the width of the cell to
100px. - Click OK.
- Add a new
ContentPlaceHoldercontrol to the cell. - In the Tag Properties panel, change the ID of the
ContentPlaceHoldercontrol toRightEdge.
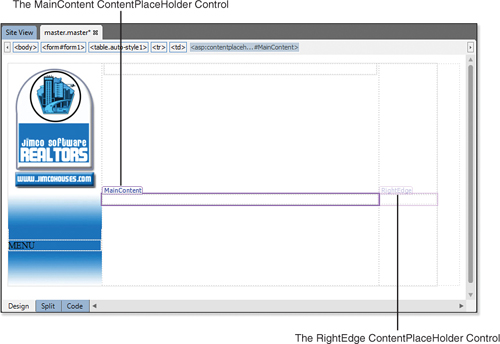
Your Master Page should now look like Figure 27.14. Save the Master Page.
Figure 27.14. The Master Page is now complete with two Content PlaceHolder controls for custom content.
Note
![]()
Even though Expression Web labels this area as MainContent, you are not actually editing the MainContent ContentPlaceHolder control. Instead, you are adding content into a Content control that is mapped to the MainContent ContentPlaceHolder control on the master.master page.
Creating the Content Page
We’re now ready to create a Content Page that uses the Master Page we just created. Here’s how:
- Select File, New, Create from Master Page.
- Click Browse and select the
master.masterpage you just finished creating. - Click Open to select the master page and click OK to create the new Content Page.
Save the new Content Page now as default.aspx.
If you look at the Code View for the new Content Page, you’ll see that there is almost no code in it. At this point, the Master Page is defining all the content for this page. The only things that actually exist on the Content Page are the two Content controls that map to the ContentPlaceHolder controls on the Master Page.
Using the following steps, we define some custom content for the new Content Page:
- Click inside the
MainContentarea to select it. - Click the button at the upper right of the control and select Create Custom Content from the Content Tasks pop-up.
- Enter some text inside the
MainContentarea. As shown in Figure 27.15, theContentcontrol resizes accordingly as you enter content.
Figure 27.15. The Content control changes size and shape depending on the content added to it.
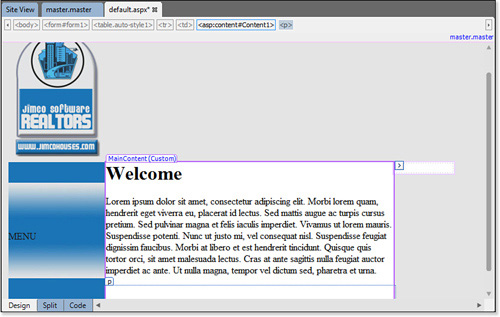
Notice that you are unable to edit any portion of the Content Page that falls outside a Content control. Master Pages are a powerful method of enforcing a common user interface while still allowing developers the flexibility to design content the way they want.
Save the Content Page and browse it using the Microsoft Expression Development Server. Notice that the content you entered into the Content control is displayed along with the interface elements from the Master Page.
If you open the Master Page and make any changes to the layout or content, those changes take effect immediately in all Content Pages that use that Master Page. Unlike Dynamic Web Templates, Master Pages do not require an explicit update of attached pages.
Gaining an understanding of Master Pages is valuable because it positions you to not only design your own sites using Master Pages, but also to contribute to a site development team that uses Master Pages. As previously mentioned, one of the primary reasons to use Master Pages is so that programmers can work independently from designers. With a firm knowledge of how Master Pages work, you can efficiently use Expression Web to take advantage of this powerful feature.
Extend Reusability with ASP.NET User Controls
Master Pages are a convenient way to provide consistent content across multiple pages. However, in some cases, you might want to reuse only a portion of a page. For example, in this chapter, you created a space at the top of the Master Page for an AdRotator control. Instead of using one AdRotator control for all of your pages, you might want to have several different AdRotator controls configured for a specific type of ad. In such a scenario, creating a few ASP.NET user controls with AdRotator controls on them makes it easy.
An ASP.NET user control is created in the same way that you create an ASP.NET Web Form. Once you’ve created a user control, you can add it to a page by simply dropping it on the page from the Expression Web Folder List.
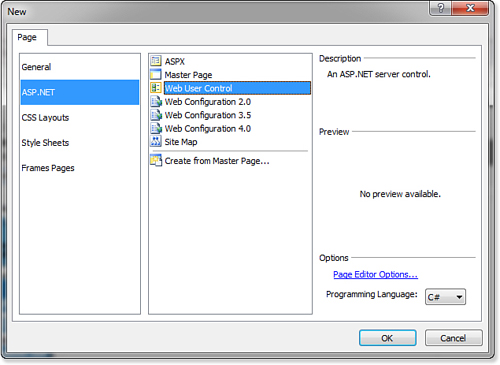
To create a user control, select File, New Page and select the ASP.NET section in the New dialog. Select Web User Control as shown in Figure 27.16 and click OK.
Figure 27.16. Expression Web makes it easy to create a new ASP.NET user control.
You can now add content to your user control just as you would an ASP.NET Web Form. Once you’ve completed adding your content, save the user control. Expression Web saves the user control with a .ascx file extension.
User controls are not intended to be browsed directly. In fact, if you try to browse directly to a user control, ASP.NET generates an error message. For that reason, Expression Web does not let you preview a user control in the browser. To view your user control, you must first add it to a page.
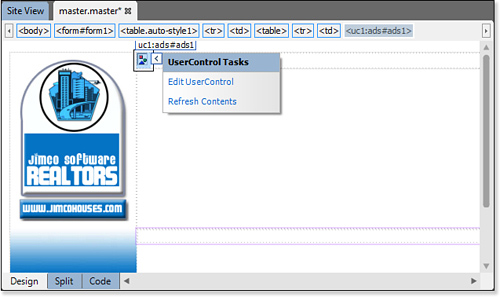
To add a user control to a page, drag the .ascx file from the Folder List to the point in your page where you want the user control to appear. You can then edit the user control by selecting Edit UserControl from the UserControl Tasks pop-up that appears as shown in Figure 27.17.
Figure 27.17. After you’ve inserted a user control, you can edit it by selecting Edit UserControl from the UserControl Tasks pop-up.
After you’ve created a user control, you can reuse it on any page by simply dropping it on the page. This capability makes user controls another powerful tool for reusing page content.