
Appendix A
The science of bouncing
Bouncing is the process of recording the mix or a submix (i.e., a stem). This lets us free up the resources used for the bounced mix. For example, after mixing eight tracks of drums in an analog studio, we can bounce the drum mix onto a stereo track, then play the stereo track instead of the original raw tracks, and use any compressors, equalizers, reverbs, or other tools that were used for the drum mix.
With a console-based setup (Figure A.1), this can be done to free up channels on the desk; for example, in a situation where a digital multitrack recorder is used and there are more tracks available on the recorder than channels on the desk. Sometimes we want more than one track to be processed using the same piece of outboard gear. For example, we might want to compress both the kick and the snare using the same mono compressor; bouncing the compressed kick frees up the compressor so that it can be used for the snare. Console-bouncing usually involves routing the bounced tracks to a group, which is then sent to the associated track on the multitrack recorder. Whenever bouncing is done on a desk, it is worth remembering to fill in a recall sheet or save the mix using a recall system, so that it can be recalled later if alterations are required.

Figure A.1 Before (a) and after (b) bouncing on a console-based setup.

Figure A.2 Pro Tools’ bounce window.
Software bouncing is usually done in order to free up CPU power so that additional plugins can be used. This is done using a dedicated command that brings up an options window (Figure A.2). In most situations, what we have to select is playback range, and solo the tracks we would like to bounce (or mute those we do not want to bounce).
The various applications provide different options in their bounce windows. Here are some options worth considering:
- File type—WAV files are usually the best option as these are widely supported on both PC and Mac platforms. WAV files can be timestamped (in which case they are referred to as BWFs—broadcast wave files), which can be useful when transferring projects between different applications.
- Bit rate—most applications’ internal architecture uses 32-bit float, which is roughly equivalent in quality to 24-bit integer (more on this in Chapter 10). Therefore, both 32-bit float and 24-bit integer are recommended. If a choice exists between the two, the native option of 32-bit float is recommended, although it will result in a bigger file. Also, 32-bit float files might not be supported at some mastering suites. Selecting 16-bit integer might be useful when disk space is an issue, but is very likely to result in the addition of digital distortion or the dithering noise that rectifies it.
- Sample rate—this should always be identical to the project’s sample rate.
- File format—the two important options are either multiple-mono or stereo-interleaved. Multiple-mono means that a stereo file is stored as two mono files with an extension of .L or .R (e.g., Drumix.L.wav and Drumix.R.wav). Stereo-interleaved means that a stereo file is stored as a single stereo file (e.g., Drumix.wav). Internally, every application separates a stereo-interleaved file into its discrete left and right channels, which results in a tiny processing overhead, but makes any additional processing much faster and more manageable. Pro Tools, for instance, instead of doing this conversion in real time every time a stereo-interleaved file is played back, does it once (offline) when the files are imported into the session; this saves the tiny real-time processing overhead, but results in file redundancy that doubles up disk space. It might seem logical to bounce using the multiple-mono format, but doing so involves two issues. First, it results in more file clutter; second, not all applications (some audio editors, for example) support this format. The general recommendation here is to use the stereo-interleaved format, unless it results in redundancy, as in the case of Pro Tools.
- Real-time (online)/offline—with real-time bouncing, the submix is saved to disk while being played. If we bounce a 6-minute selection, the bouncing process will take 6 minutes. While being the longer option of the two, there are a few advantages in real-time bouncing. First, it is usually less prone to timing errors that might occur when we bounce offline. The fact that we listen to what we bounce provides a form of quality control—it can reveal, for instance, clicks that were not audible before the bounced tracks were soloed. It also assures us that we are bouncing exactly the material we want (perhaps we forgot to mute a reverb return that only appears late in the song). None of this is the case with offline bouncing, where we cannot hear the result until the process is completed. As offline bouncing allocates all available processing resources to the bouncing process, this option is faster than real-time bouncing, which only uses the processing power needed for smooth playback. As a rule, in audio engineering we listen to what we commit. Therefore, real-time bouncing is recommended.
One exception to these recommendations involves the bouncing of the final mix. In this case, we usually bounce using the destination format. For example, if the file is going to be burnt onto an audio CD, it would normally be bounced using 16-bit, 44.1 kHz, stereo interleaved. But if the final mix is to be mastered, it is always better to leave any bit or sample rate conversions to the mastering stage, since mastering engineers have better tools for such conversions. A 24-bit, 88.2 kHz project is better bounced using the same bit and sample rates, and the standard stereo-interleaved format.
Bouncing issues
Bouncing is not as straightforward as it may seem. One very common mistake when bouncing that results in quality penalty is bouncing without checking the levels first. In other words—using the existing mix levels rather than optimum levels. For example, if we bounce a specific pad track that on a pre-fader meter hits –5 dB and has its fader set to –15 dB, we end up with a bounced version that has its peak at –20 dB. These 20 dB of unused dynamic range result in both the analog and digital domains in smaller signal-to-noise ratio (SNR), which impairs the quality of the signal. Another issue in these circumstances is that the bounced-track fader should be at 0 dB in order for the pad to match the original mixing levels. This means that the fader can only go up by its inherent extra gain (say, 10 dB), whereas before it could go up by 25 dB (15 + 10 dB extra gain). You might think that in the digital domain we can normalize the bounced track, but, as explained in Chapter 10, normalization is a downgrading process in which the SNR remains the same, but either distortion or dither noise are introduced. An opposite possible scenario involves bounced signal that is too high in level, in which case clipping distortion could be introduced. As a rule of thumb, we always want our recorded material to be at optimum levels— bounced tracks are no different.
Bouncing should be carried out at optimum levels, not mix levels.
It should be clear by this point that, prior to bouncing, we must observe the level of the bounced material and, if required, adjust it accordingly. As normally the bounced signal is that on the master bus, the master bus meters are what we look at. This helps us in determining the required gain change that will bring about the optimum level. The optimum level is the highest level possible without clipping or distorting. In the analog domain, signals can be pushed beyond the 0 VU; therefore, the definition of optimum level is not strict— but is usually accepted as being the level above which undesirable effects become apparent. In the digital domain, the optimum level is strictly 0 dBFS, although we often allow a safety margin of 3 dB (i.e., peak at –3 dBFS). The peak-hold feature, which is available on most digital meters, is extremely handy in these situations. It enables us to determine the exact amount of gain change straight after the first listen. When peak-hold is not available, we might have to listen to the material a few times while adjusting the level to optimum.
It does not end here. There are different ways to alter the level of the to-be-bounced material, and some are better than others. Here are the possible ways on an analog desk:
- VCA group—when available, this provides the quickest way to alter the levels of the original channels. Since VCA grouping does not involve an additional signal path, correct gain structure is maintained.
- Channel faders—a correct gain structure will also be maintained if all the channel faders of the original tracks are brought up. If the faders are motorized, there is usually a grouping or linking function that enables simultaneous movement of all the faders by the same number of decibels. If faders are not motorized, they should be adjusted one at a time, by the same number of decibels—a slow and imprecise method.
- Group level—since all the channels are sent to a group bus anyway, it is possible to bring down (and on many consoles up) the overall group level. While doing so is quick and easy, it does not comply with the correct gain structure concept, and usually results in additional noise (although sometimes this is unnoticeable).
In the realm of software mixers, the bouncing process is far more forgiving, as digital audio does not involve noisy components. The ways to alter the bounced material level are:
- Master fader—since most master faders in today’s software mixers are scaling faders, they provide the quickest and the easiest way to alter the gain of the bounced signal. There is no quality penalty in using them.
- Subgroup level—routing all the original tracks to a bus and then altering the bus level. This is a longer method of achieving the same result, but valid just the same.
- Fader grouping—this involves grouping a set of track faders so they all move simultaneously. Here as well, there are no gain structure issues.
There is even more to consider. When we alter the level of the original tracks (as in the case of VCA grouping, channel faders, or fader grouping), we should take into account post-fader aux sends. If a snare is sent to a reverb emulator post-fader, there is no need to bring down the level of the reverb since it will drop down with respect to the snare fader. This is not the case when the send is pre-fader, where bringing down the snare level will not alter the reverb level, and so the reverb fader should be brought down as well. To summarize: setting the bounced material level should be done using the master fader on a software mixer, whereas, on a console, with a bounced mix that uses post-fader sends, it might be worth trading the addition of noise for simplicity and time, and using group levels.
Using the same principal of bouncing at mix levels, when individual stereo tracks are bounced they often suffer from limited or shifted stereo width, as they are bounced with the pan pots positioned anywhere but the extremes. In the case of bounced synthesizer tracks, the same limited stereo width can be the result of a pan-spread control not set to full (like a unison pan-spread set to 50%). Stereo tracks that are not bounced panned to the extremes limit the mixing engineer’s ability to control stereo aspects.
Setting the time range prior to bouncing often also requires some attention. It is worth remembering that most time-based effects will require additional time to fade away—if bouncing is limited to the original material’s time range, reverbs and delays might cut abruptly. In addition, plugin delay compensation issues can lead to a bounced track that is out of sync with the original material. Figure A.3 shows an original snare hit (top) that was bounced with a reverb (bottom). There are three problems with the bounced version: it is lower in level than the original track, it is out of sync, and the reverb cuts at the end.

Figure A.3 Three problems caused by bouncing.
Once bouncing is complete, it is difficult to alter aspects of the original raw tracks in the bounced track; for example, the level balance between the kick and the snare. Yet, in most cases, the original tracks can be retrieved, mixed, and bounced again. Nearly every time we bounce, there is some quality penalty—noise in the analog domain, digital distortion, dither noise, or dynamic range reduction (due to safety margins) can all be introduced during the process. While these unwanted additions might not be audible after the first instance of bouncing, they accumulate and become more profound when material is bounced time and again. Ideally, bouncing should not take place at all.
To summarize this section, Figure A.4 illustrates the recommended steps in the process of bouncing.
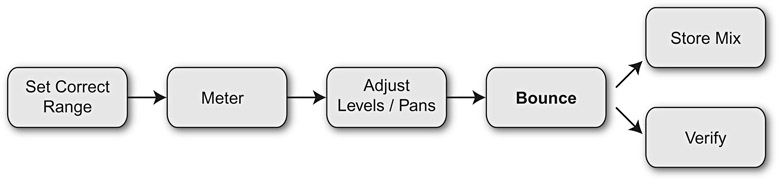
Figure A.4 Recommended steps in the process of bouncing.