
Chapter 8
Playback Mode: Viewing Your Photos
IN THIS CHAPTER
![]() Exploring picture playback functions
Exploring picture playback functions
![]() Taking advantage of Thumbnail and Calendar views
Taking advantage of Thumbnail and Calendar views
![]() Magnifying photos to check details
Magnifying photos to check details
![]() Deciphering the picture information displays
Deciphering the picture information displays
One of my favorite things about digital photography is being able to view my pictures the instant after I shoot them. No more guessing whether I got the picture or need to try again, as in the film days; no more wasting money on developing pictures that stink.
Seeing your pictures is just the start of your camera’s playback features, though. You also can review settings you used to take the picture, display graphics that alert you to exposure problems, and magnify a photo to check details. This chapter introduces you to these playback features and more.
Picture Playback 101
To start viewing your photos or movies, take these steps:
 Press the Playback button.
Figure 8-1 shows you where to find the button. By default, the playback screen for a photograph shows the information shown in the figure. For a video, the data is different and a big playback arrow appears in the center of the screen.
Although the figure shows the playback screen in the monitor, you also can view images and movies in the viewfinder.
 If you see multiple thumbnails or a calendar display, press the Zoom In button as many times as needed to get to the single image (or single video) display.
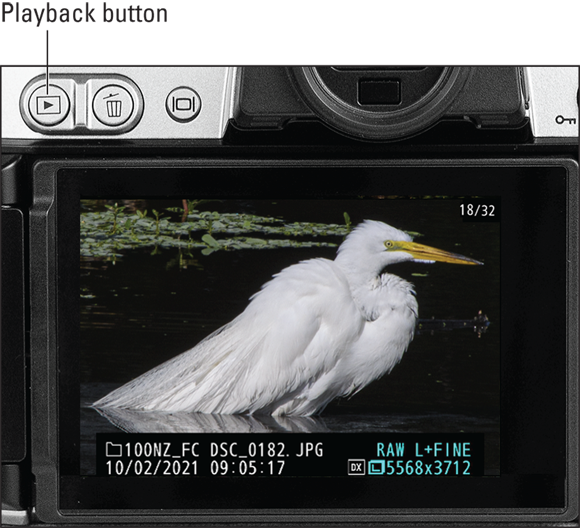
FIGURE 8-1: Press the Playback button to view your photos and movies.
To scroll through your files, swipe a finger horizontally across the monitor or press the Multi Selector right or left.
Normally, swiping from right to left advances to the next picture; swiping from left to right takes you back one file. You can reverse this setup by opening the Setup menu, choosing Touch Controls, and setting Full-frame Playback Flicks to the option that bears the left-pointing arrow.
 For faster scrolling, hold a finger on the bottom of the display until a gray bar appears. Drag right or left on the bar to scroll forward or backward. Lift your finger to return to the normal playback screen.
To start playing a video, tap the playback arrow or press the OK button.
See the last few sections of Chapter 7 for more details about video playback.
- To exit the playback screen and return to shooting, press the Playback button again or press the shutter button halfway and then release it.
Don’t see a picture or video that you know is on the memory card? The problem may lie with the Playback Folder option, discussed next.
Choosing Which Images to View
Your camera organizes pictures automatically into folders that are assigned generic names: 100NZ_FC, 101NZ_FC, and so on. You can also create custom folders by using the process outlined in Chapter 10.
If your card contains multiple folders, tell the camera which folder or folders you want to view via the Playback Folder option on the Playback menu, shown in Figure 8-2.

FIGURE 8-2: Specify which folder or folders you want to view.
You see the following Playback Folder options:
- NZ_FC (or custom folder name): The name displayed for this option depends on whether you create custom folders, a feature I explain in Chapter 10. If you don’t, the option reads NZ_FC, as shown on the right in Figure 8-2, and selecting the setting limits the camera to displaying only files in folders that have the NZ_FC tag. When you create a custom folder, you can assign a different five-character tag. As soon as you create the folder, that five-character name replaces NZ_FC as the first Playback Folder option. The menu option always reflects the name of the most recently created folder.
- All: This setting, which is the default, displays pictures in all folders.
- Current: Choose this setting to view files in the folder the camera is using to store new images. To see the name of that folder, open the Photo Shooting menu and choose Storage Folder.
![]() During playback, you also can select a single folder by pressing the i button to display the playback version of the i menu. Select Choose Folder from the menu and then tap the folder you want to view or highlight it and press the OK button.
During playback, you also can select a single folder by pressing the i button to display the playback version of the i menu. Select Choose Folder from the menu and then tap the folder you want to view or highlight it and press the OK button.
If your memory card contains pictures you took with another camera, you may be able to view them if you use the All setting and the photos are in a format the Z fc recognizes. You can usually see JPEG images and photos taken in the Nikon Raw format, for example, but not Raw files from other brands of cameras. However, the camera’s retouching tools may not work on files captured with other cameras, Nikon or not.
Adjusting Playback Timing
You can specify how long the camera displays each photo and whether you want the camera to automatically display an image for a few seconds after you shoot it. Here are the details:
- Adjust playback display time: By default, the monitor turns off after ten seconds of inactivity during playback. To adjust playback shutoff timing, open the Custom Setting menu, choose Timers/AE Lock, and then choose Power Off Delay, as shown on the left in Figure 8-3. The second screen in the figure appears. Select Playback to choose a shutoff time, keeping in mind that the longer the monitor remains on, the more battery juice the camera consumes.
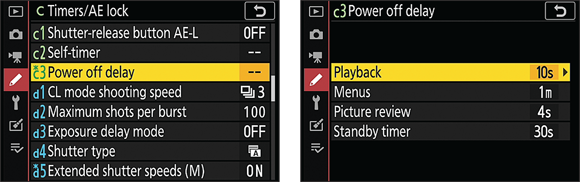
FIGURE 8-3: This setting determines how long pictures are displayed before the monitor shuts down to save battery power.
Turn on and customize automatic picture review: If you want the camera to automatically display a photo or movie file immediately after you shoot it, choose Picture Review from the Playback menu, shown in Figure 8-4. By default, the feature is off. Choose On to display the image in both the monitor and viewfinder; select On (Monitor Only) to have the image appear only in the monitor.
The drawback to enabling Image Review is that you can’t take another picture during the review period without pressing the shutter button halfway and releasing it, which tells the camera that you’re ready to start shooting. By default, the review period lasts 4 seconds. You can adjust that timing by way of the Power Off Delay setting featured in Figure 8-3; just choose Picture Review instead of Playback from the screen shown on the right in the figure.
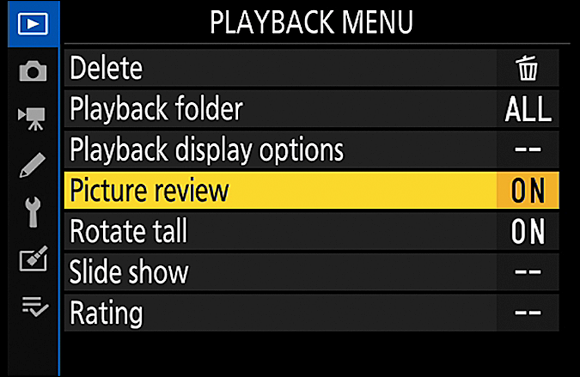
FIGURE 8-4: Enable Picture Review to display a photo for a few seconds immediately after you capture it.
Disabling Automatic Picture Rotation
Picture files store information about camera orientation — that is, whether you held the camera in the horizontal or vertical position when taking the picture. During playback, the camera reads the orientation data and rotates vertically oriented images so that they appear in the upright position, as shown on the left in Figure 8-5. The picture is also automatically rotated when you view it in photo programs that can read the data.
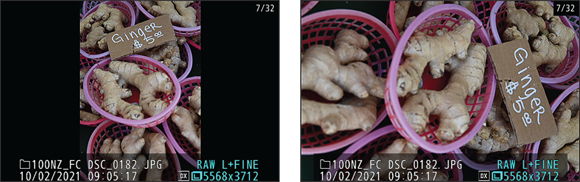
FIGURE 8-5: You can display vertically oriented pictures in their upright position (left) or sideways (right).
If you don’t want the rotation to happen, open the Playback menu and set the Rotate Tall option to Off. Vertically oriented pictures then appear horizontally in the displays, as shown on the right in Figure 8-5.
Regardless of the settings you choose, no rotation occurs during the Image Review period or when you’re viewing a movie. Also be aware that shooting with the lens pointing directly up or down sometimes confuses the camera, causing it to record the wrong orientation data.
One other tip: In either orientation, the data that appears by default obscures some of the image. See the section “Enabling display modes,” later in this chapter, to find out how to switch to a display that hides all data.
Shifting to Thumbnail Display
Rather than display each photo or movie one at a time, you can display 4 or 9 thumbnails, as shown in Figure 8-6, or even a whopping 72 thumbnails.
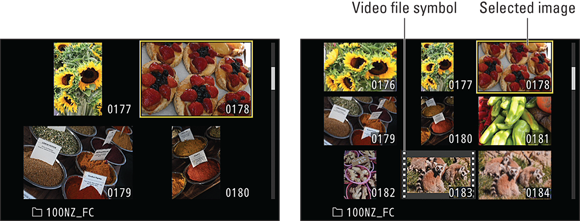
FIGURE 8-6: You can view multiple image thumbnails at a time.
Here’s how Thumbnail display works:
 Display thumbnails. If the touchscreen is enabled, pinch inward: Put your thumb and forefinger on opposite corners of the monitor and drag both toward the center of the screen. You also can press the Zoom Out button. Either way, your first pinch or button press cycles from the view that displays a single file to the one that displays 4 thumbnails. Keep pinching or pressing to shift to 9-thumbnail view and then to 72-thumbnail view. One more pinch or button press takes you to Calendar view, a nifty feature explained in the next section.
- Select an image or video file. To perform certain playback functions in Thumbnail view, you first need to select the file. A yellow box surrounds the selected file (refer to Figure 8-6). To select a different file, tap its thumbnail or use the Multi Selector to move the highlight box over the thumbnail.
- Display fewer thumbnails. For touchscreen operation, pinch outward (drag your thumb and forefinger from the center of the screen toward the outer edge). Or just press the Zoom In button. Each pinch or press takes you one step closer to displaying a single photo or video. To quickly exit Thumbnail view, tap a thumbnail twice. The first tap selects the photo or video file; the second tap displays the file all by its lonesome.
- Scroll to the next screen of thumbnails. Drag your finger up or down the screen or press the Multi Selector up and down.
- Locate video files: Video files appear inside the dotted frame, shown in Figure 8-6. The frame design is a nod to the sprocket holes that border frames of analog movie film.
The 4- and 9-thumbnail displays include the name of the folder that holds the images as well as the frame number of each file. In Figure 8-6, for example, the folder name is 100NZ_FC, and the selected frame number is 0178. The frame number isn’t the same thing as the filename; it just tells you which file you’re viewing in a series of files. In 72-thumbnail view, the folder number and frame number of the selected file appear at the bottom of the screen.
Displaying Photos in Calendar View
Calendar display mode, shown in Figure 8-7, makes it easy to locate pictures according to the date you shot them. Try it out:
- Press the Zoom Out button or pinch inward on the touchscreen as needed to bring up the Calendar display.
If you’re viewing each file in full-screen view, for example, you need to press the button or pinch inward four times to cycle through the thumbnail displays and then to Calendar view.
Select the date on which you shot the images you want to see.
A yellow box highlights the selected date. To select a different date, tap it on the calendar or move the highlight box over it by using the Multi Selector. After you select a date, the right side of the screen displays thumbnails of pictures taken on that date.
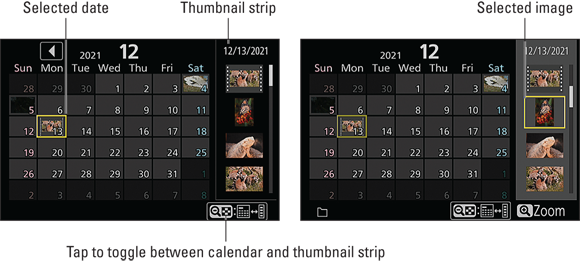
FIGURE 8-7: Calendar view makes it easy to view all photos shot on a particular day.
The year and number of the month appear at the top of the screen (2021 and 12, in the figure). If the memory card contains pictures you shot during the previous month, you see a left-pointing arrow next to the year, as shown on the left in Figure 8-7. Tap the arrow to navigate backward to another month. A right-pointing arrow means that the card contains pictures taken after the month that’s now in view. Tap the right-pointing arrow to scroll forward one month. You also can use the Multi Selector to scroll backwards or forwards through all the days in a month until you reach the previous or next month.- To access images from the selected date, press the Zoom Out button.
Alternatively, you can tap the symbol at the bottom of the screen, highlighted on the left in Figure 8-7. The thumbnail strip becomes active (refer to the right side in Figure 8-7), and you can scroll through the thumbnails by dragging up or down on the touchscreen or pressing the Multi Selector up or down. The selected image is surrounded by a yellow box.
- To temporarily display a larger view of a selected image in the thumbnail strip, hold down the Zoom In button.
Release the button to exit the magnified preview.
- To jump from the thumbnail strip back to the calendar so that you can select a different date, press the Zoom Out button again.
Or tap the symbol labeled on the left in Figure 8-7.
- To exit Calendar display, highlight a date on the calendar and then press the Zoom In button.
You return to the 72-thumbnail view. Continue pressing the Zoom In button until you return to the view you want to use. To quickly display an image or video in full-screen view, tap its thumbnail twice.
Magnifying Photos During Playback
When an image is displayed in full-screen view, as shown on the left in Figure 8-8, you can magnify it to inspect details, as shown on the right.
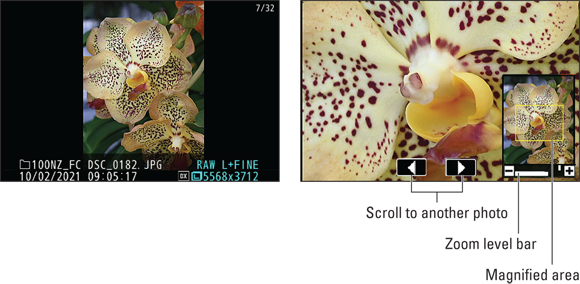
FIGURE 8-8: Press the Zoom In button or pinch out on the touchscreen to magnify an image.
Here’s how:
- Magnify the image. Pinch outward on the touchscreen or press the Zoom In button. A bar appears temporarily at the bottom of the navigation window to indicate the magnification level, as shown on the right in Figure 8-8. Keep pinching or pressing the Zoom In button to increase the magnification level. The bar turns green when you reach 100 percent magnification. Here’s a nifty time-saver: At the camera’s default settings, you can press the OK button to quickly jump to 100 percent magnification. This trick works in the Thumbnail and Calendar displays, too: Just select the image you want to inspect and then press OK. If you prefer to use the OK button for another purpose during playback, see Chapter 10 to find out how to make that change.
- Reduce magnification. Pinch inward or press the Zoom Out button. When you zoom out enough that the picture is no longer magnified, the camera returns you to full-screen view.
View another part of the magnified picture. When an image is magnified, a thumbnail showing the entire image appears briefly in the lower right corner of the display (refer to the right side of Figure 8-8). The yellow outline in the thumbnail indicates the area that’s consuming the rest of the display. To scroll the display, use the Multi Selector or drag your finger across the monitor.
 After a few seconds, the navigation thumbnail and other zoom indicators disappear; tap the screen or press the Multi Selector in any direction to redisplay them.
- Inspect faces. When you magnify portraits, the picture-in-picture thumbnail displays a white border around each face. Rotate the Sub-command dial or tap a face in the thumbnail to scroll the display to show another face. Unfortunately, the camera sometimes fails to detect faces, especially if the subject isn't looking directly at the camera. When it works correctly, though, this is a great tool for checking for closed eyes, red-eye, and, of course, spinach in the teeth.
- View more images at the same magnification. While the display is zoomed, tap the scroll arrows at the bottom of the screen (labeled on the right in Figure 8-8) or rotate the Main command dial to display the same area of the next photo at the same magnification.
 Crop the photo to the currently displayed area. This feature creates a new image that contains just the area visible in the magnified view. To try it out, press the i button and then choose Quick Crop from the i menu, as shown on the left in Figure 8-9. The camera creates your cropped copy, assigns it the next available filename, and displays it on the monitor, as shown on the right in the figure. The Retouched symbol, labeled in the figure, appears in order to remind you that you’re not looking at an original image. The lower right corner of the display also shows a scissors symbol, indicating that the photo was cropped. The resolution of the cropped copy appears as well.
Although handy, this feature limits you to cropping to the photo’s original aspect ratio. For other options, check out the Trim function on the Retouch menu, which I detail in Chapter 11.
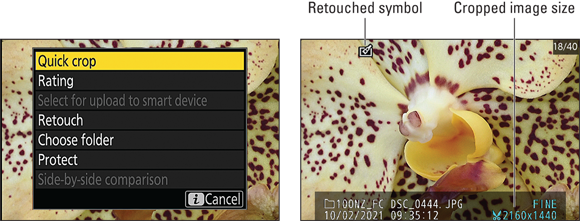
FIGURE 8-9: While a photo is magnified, choose Quick Crop from the i menu (left) to create a new image that contains only the area visible in the zoomed view (right).
Viewing Picture Data
At the camera’s default playback settings, photos appear in File Information display mode, which includes the data shown on the left in Figure 8-10. If you don’t want to see any data, as shown on the right, you can switch to None (Picture Only) display mode. The camera also offers five other display modes, all shown in Figure 8-11.
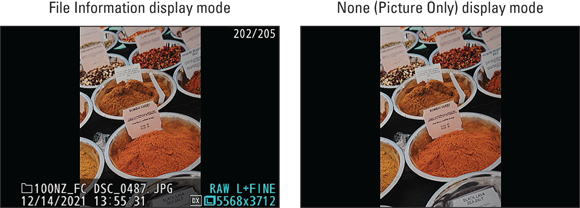
FIGURE 8-10: The normal Playback mode is File Information display (left); hide data by switching to None (Picture Only).
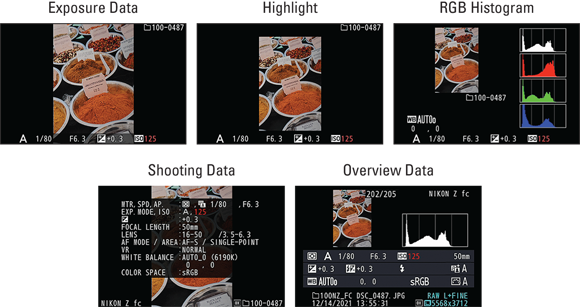
FIGURE 8-11: You also can enable these additional display modes.
Before you can use any mode except File Information, you must enable it via the Playback Display Options item on the Playback menu, as explained in the next section. After taking that step, shift from one display to the next by pressing the DISP button or by pressing the Multi Selector up or down.
I detail in later sections the data shown in all display modes except None (Picture Only). But first, I want to alert you to some symbols you may see in addition to the data that’s specific to whatever display mode you’re using.
In two display modes, File Information and Exposure Data, you can ask the camera to show you where it established focus for the shot. The focus position is indicated by a single red box, as shown on the left in Figure 8-12, or by a cluster of boxes. You enable the focus point display along with the individual display modes; again, the next section details that process. The other symbols labeled on the left in the figure indicate that you used after-the-shot tools to protect the file from accidental erasure or to assign a rating from 1 to 5 stars. I detail both features in Chapter 9.
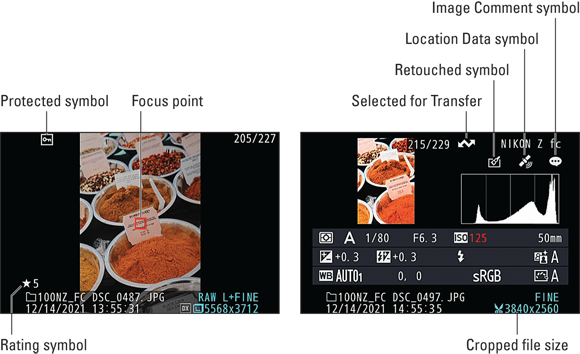
FIGURE 8-12: These symbols represent the focus point and after-the-shot features you used.
In Overview mode, you may see the Location Data and Image Comment symbols, as shown on the right in the figure. These symbols appear only if you enabled features that add location data or a hidden image comment to the file before shooting. To actually read the comment or location data, you have to switch to Shooting Information mode. Chapter 12 explains the Image Comment option; the appendix explains how to add location data.
Additionally, if you use the editing tools on the Retouch menu, covered in Chapter 11, you see the Retouched symbol shown on the right in Figure 8-12. In this case, I used the Trim tool to crop the photo, so the camera displays the size of the cropped photo along with a scissors symbol in the lower-right corner of the screen. If you tag the photo for wireless transfer to a smartphone or another device, you see the Selected for Transfer symbol, also labeled on the right in Figure 8-12. Retouch-related data and the Selected for Transfer symbol appear in any display mode except None (Picture Only), as do all symbols except the Location Data and Image Comment symbols. Again, those two appear only in Overview mode.
Note: Although you can view the first frame of a video in any display mode, after you start playback, data specific to video appears. See the playback section of Chapter 7 for help decoding video data.
Enabling display modes
To use any display mode but File Information or to turn on the focus point shown on the left in Figure 8-12, open the Playback menu and choose Playback Display Options, as shown in Figure 8-13.
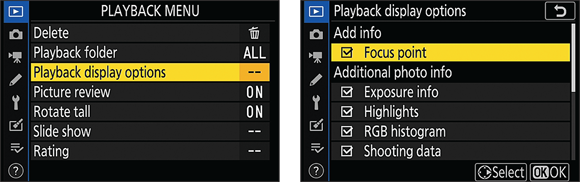
FIGURE 8-13: Enable the display options you want to use via this Playback menu setting.
A check mark in the box next to an option means that the feature is turned on. To toggle the check mark on and off, highlight the option and then press the Multi Selector right or tap the Select symbol at the bottom of the screen. The menu has two pages; scroll to Page 2 to access the Overview and None (Picture Only) modes. After turning on the options you want to use, press OK or tap the OK symbol.
During playback, press the DISP button or press the Multi Selector up or down to cycle from one display mode to the next.
File Information mode
In File Information mode, you see the following data, labeled in Figure 8-14.
- Frame Number/Total Files: The first value indicates the frame number of the photo or movie file; the second tells you the total number of files on the memory card.
- Folder name: Folders are named automatically by the camera unless you create custom folders, a trick you can explore in Chapter 10.
Filename: The camera automatically names your files. Filenames end with a three-letter code that represents the file format, which is either JPG (for JPEG) or NEF (for Raw) for still photos. Chapter 2 discusses these formats. If you record a movie, the file extension is MOV or MP4, depending on which movie format you selected.
 The first four characters of filenames can also vary as follows:
 - DSC_: You captured the photo using the default Color Space setting: sRGB. This setting is the best choice for most people, for reasons you can explore in Chapter 5.
- _DSC: If you change the Color Space setting to Adobe RGB, the underscore character comes first. (You can't use this color space when recording movies.)
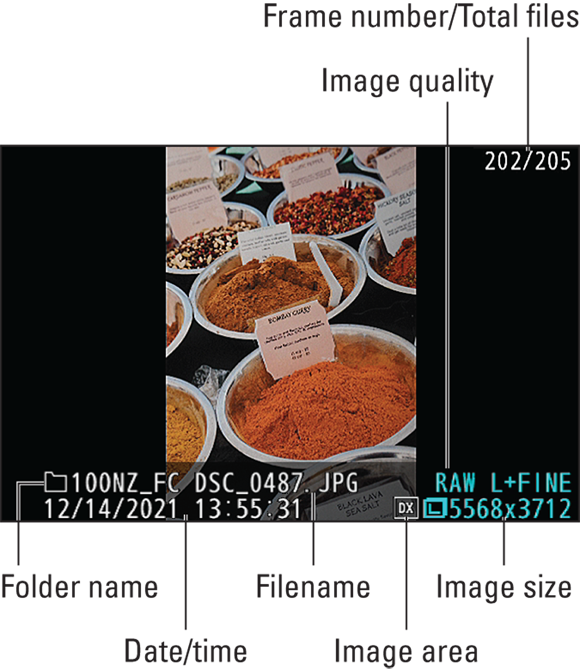
FIGURE 8-14: In File Information mode, you can view these bits of data.
Each image is also assigned a four-digit file number, starting with 0001. When you reach image 9999, the file numbering restarts at 0001 and new images are stored in a new folder to prevent any possibility of overwriting the existing files. See Chapter 10 if you want to customize filenames or folder names.
- Date/time: This value tells you when you recorded the photo or movie, using the current information showing for the Time Zone and Date option on the Setup menu.
- Image Area: This symbol relates to the Choose Image Area option on the Photo Shooting menu, detailed in Chapter 2. DX stands for the default setting, which uses the entire image sensor to capture an image with a 3:2 aspect ratio. The other options are 1:1 and 16:9.
- Image Size: This value tells you the image resolution, or pixel count. See Chapter 2 to find out about the Image Size setting.
- Image Quality: Chapter 2 also details this setting, which determines file type. During playback, the labels Fine, Normal, and Basic represent JPEG settings. Raw represents the Nikon Camera Raw format, NEF. Note that the filename ends with either JPG or NEF, not the label used in the Image Quality area of the playback display.
If you captured the photo in both Raw and JPEG, you see only one picture preview or thumbnail, but the Image Quality data reflects both file types (refer to Figure 8-14). For the JPEG version, you see a letter representing the Image Size setting for that file — L for Large, in the figure. (Raw files are always captured at the Large size.).

FIGURE 8-15: Use Exposure Data mode to see critical exposure settings.
File Information mode also displays the focus point used for the shot, assuming that you enable that option as explained in the preceding section. The left screen in Figure 8-12 offers a look at the focus point.
Exposure Data mode
Press DISP or press the Multi Selector down to shift from File Information mode to Exposure Data mode, which shows the exposure settings labeled in Figure 8-15.
Let me make two points about this display: First, if the ISO setting appears red, as in the figure, Auto ISO Sensitivity was enabled and the camera overrode your selected ISO to produce a good exposure. The red value shows the ISO that the camera selected. Second, if the Exposure Compensation value was set to EV 0.0 (no exposure adjustment), you see a dimmed plus/minus symbol, the universal icon representing that setting. You can read about both features and other exposure options in Chapter 3.
The upper right corner of this display includes the folder number and the last four digits of the filename. If you enable the Focus Point option from the Playback Display Options setting on the Playback menu, you also see the focus point (not shown in figure 8-15).
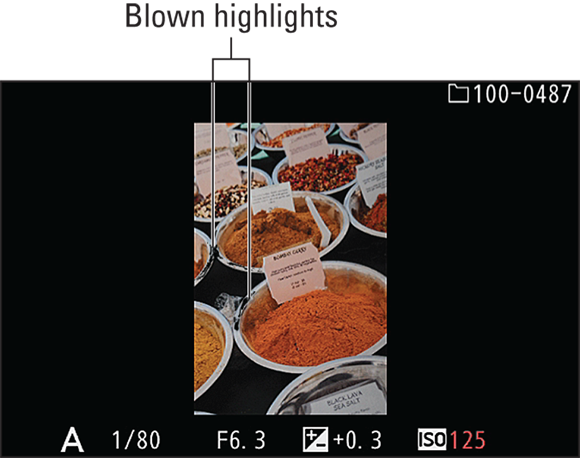
FIGURE 8-16: In Highlight mode, blinking areas indicate blown highlights.
Highlight display mode (“blinkies” mode)
One of the most difficult photo problems to correct in a photo-editing program is known as blown highlights in some circles and clipped highlights in others. Both terms mean that the brightest areas of the image are so overexposed that areas that should include a variety of light shades are instead totally white, resulting in a loss of picture detail.
In Highlight display mode, pixels that the camera thinks are blown highlights blink, which is why some people refer to this mode as “the blinkies.” In Figure 8-16, I captured the screen as the highlights blinked “off” — affected pixels appear black when off. I labeled a few of these spots in the figure.
As this image proves, just because you see a few blinking pixels doesn’t mean that you should adjust exposure. The decision depends on where the alerts occur and how the rest of the image is exposed. In Figure 8-16, the areas showing up as blown highlights are very small and not critical to the scene, for example. Had I reduced exposure to eliminate the few blown highlights, the spices and other darker parts of the scene would have been underexposed.
Highlight display mode includes the same exposure and folder/filename information as Exposure Data mode, so it’s easy to confuse the two unless your photo contains areas that trigger the blinkies. Notice that the image preview in Highlight mode is smaller than in Exposure Data mode (refer to Figure 8-15), enabling you to see the bottom of the image without exposure data covering it. Another distinguishing feature is that if you enable the focus-point display, it doesn’t appear in Highlight mode as it does in Exposure Data mode.
RGB Histogram mode
To understand RGB Histogram mode, you first need to know that digital images are created by mixing red, green, and blue light (thus r, g, b). In this light-based world, color values are measured in terms of brightness levels, ranging from 0 (no light) to 255 (maximum brightness). When you mix maximum brightness red, green, and blue light, you get white; when the brightness of all three colors is 0, the result is black.
For each pixel in a photo, the camera measures the brightness of the red, green, and blue light and then stores the individual brightness values in data containers known as color channels. The RBG Histogram display enables you to see the distribution of brightness values for the red, green, and blue channels separately. RGB Histogram mode also offers the same Brightness histogram you can bring up during shooting, as detailed in Chapter 3. The Brightness histogram shows you the combined brightness values for all three color channels. I labeled both histograms in Figure 8-17.

FIGURE 8-17: RGB Histogram display offers a Brightness histogram and an RGB histogram.
You’re welcome to explore the science of RGB color theory on your own, and knowing that stuff is helpful if you use advanced photo-editing programs, which often enable you to manipulate the individual color channels to alter certain other aspects of your photo. But, for the purpose of evaluating photos during playback, just keep the following points in mind:
- Reading the Brightness histogram: This histogram plots out the combined brightness values of the red, green, and blue brightness values for the image. The left end of the histogram represents 0 (black); the right end, 255 (white). The vertical axis of the graph tells you how many pixels appear at each brightness level. So if you see a tall, thick spike at the 255 end of the histogram, your image may be overexposed. A tall cluster near the left end of the histogram may mean underexposure.
Reading the RGB histogram: When you look at a single channel’s brightness data, you can assess color saturation, or purity of color. At a brightness value of 255, the color is fully saturated. If you see a tall, thick column at the far right end of the histogram, that color may be oversaturated, which can mean loss of detail. For example, a rose petal that should contain a subtle mix of dark pinks to fully saturated red are all full-on red, creating a swatch of solid color instead of the subtle variations that create a lifelike image. Similarly, if two channels — say, blue and green — show the same right-side overpopulation of pixels, both colors may be oversaturated.
However, if all three color channels show thick spikes at the far right or far left end of their histograms, you may be dealing with an exposure problem. Again, when you mix maximum brightness red, green, and blue light, you get white; when the brightness of all three colors is 0, the result is black. In this scenario, the Brightness histogram will pretty much mirror the RGB histograms, at least on the left and right ends of the brightness scale.
- Photographers schooled in the science of RGB can spot color balance issues by looking at the RGB histograms, too. But frankly, color balance problems — is there too much green and not enough amber, for example — are easy to spot by looking at the image in the camera displays. And using the RGB histograms for this purpose requires a deeper dive into RGB color theory than I have room to present (and more patience than either of us has).
Other data in the RGB Histogram includes the White Balance (WB) setting, which affects how colors are rendered. The first WB value shows the main setting (Auto0, in the figure). The numbers to the right indicate whether you fine-tuned the setting along the amber-to-blue axis (first value) or green-to-magenta axis (second value). Zeros, as in the figure, indicate no fine-tuning. Additionally, the display includes the folder number and the last four digits of the filename (100 and 0487, in the figure). The bottom of the screen shows the same exposure settings you see in Exposure Data mode.
If your assessment of the RGB Histogram display leads you to believe there’s a problem, explore the exposure tools covered in Chapter 3 and the White Balance and other color settings described in Chapter 5. However, don’t panic if you see a thin spike at either end of the histograms — it’s not unusual for a perfectly exposed photo to have some white and black pixels. You may want to check the image in Highlight mode, though, to make sure that the blinkies don’t indicate blown highlights in an important part of the scene. Sorry, there’s no mode to help you locate clipped shadows (areas that are black, with no shadow detail).
Shooting Data mode
In Shooting Data mode, you can view as many as six screens of information, which you scroll through by pressing the Multi Selector up and down, pressing the DISP button, or dragging your finger up and down on the touchscreen. Figure 8-18 shows the first screen of data.

FIGURE 8-18: Here you see the first Shooting Data screen.
If you’re new to advanced photography settings, some of the data may not make sense until you explore Chapters 3, 4, and 5, which explain, respectively, exposure, focus, and color. But I want to call your attention to a few data points presented in this display mode:
- The current folder and the last four digits of the filename appear in the lower right corner of the display, as does the Image Area setting (DX, 1:1, or 16:9).
- The Comment item, which is the final item on the fourth screen, contains a value if you use the Image Comment feature on the Setup menu. I cover image commenting in Chapter 12.
- The fifth screen appears if you include copyright data with your picture, another feature you can explore in Chapter 12. The sixth screen, dedicated to location data, appears if the camera was set to include the location data from your smartphone or another device. Look for information on that topic in the appendix.
- As with other screens that include the ISO setting, the value appears in red if Auto ISO sensitivity was enabled and the camera overrode the specific ISO setting you selected. Explore this feature in Chapter 3.
Overview mode
In this mode, the screen contains a small thumbnail, scads of shooting data, and a Brightness histogram. Figure 8-19 offers a look. The earlier section “RGB Histogram mode” tells you how to interpret the histogram.
The Frame Number/Total Pictures data appears near the upper right corner of the image thumbnail (202/205, in the figure). To sort out other information presented in Overview mode, the following list breaks things down into the rows that appear underneath the thumbnail and histogram. If any items do not appear on your screen, the relevant feature wasn’t enabled when you captured the shot. For the figure, I enabled every possible feature, just for the purpose of illustration; these aren’t the actual settings I used to photograph the image shown in the figure.
- Rows 1 and 2: You see the exposure-related settings labeled in Figure 8-20 as well as the Shooting mode and the focal length of the lens you used. The ISO value appears in red if you had Auto ISO override enabled and the camera adjusted ISO. See Chapter 3 for help understanding exposure; Chapter 2 for an introduction to Shooting modes; and Chapter 1 to learn about lens focal length.
- Row 3: Items in this row, shown in Figure 8-21, pertain to color options you can explore in Chapter 5.
- Rows 4 and 5: The final two rows in Figure 8-19 show the same information you see in File Information mode, explained earlier in this chapter.
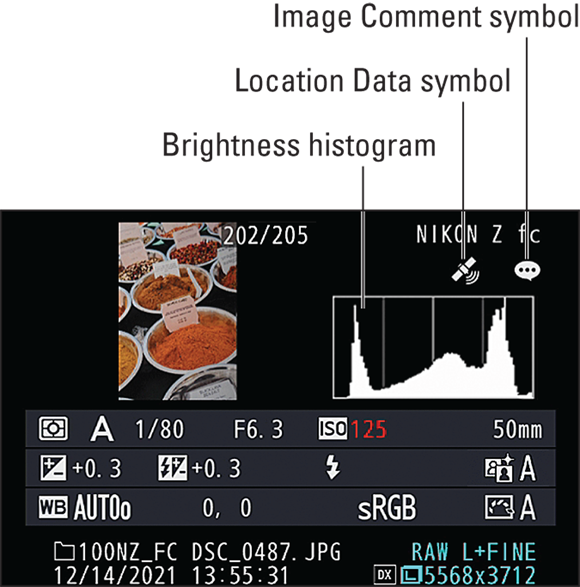
FIGURE 8-19: Overview mode shows a Brightness histogram and the major settings you used to take the picture.
If you enabled location data or added an image comment, Overview display mode also includes symbols to remind you of it. I labeled the symbols in Figure 8-19. To read the location data or comment, switch to Shooting Data mode. Appendix A explains how to enable location data using the camera’s wireless features; Chapter 12 details the Image Comment feature.

FIGURE 8-20: These rows show exposure data plus the lens focal length.

FIGURE 8-21: Look at this row for details about color settings.