
Chapter 9
Working with Picture and Video Files
IN THIS CHAPTER
![]() Rating photos and videos
Rating photos and videos
![]() Protecting files from being edited or erased
Protecting files from being edited or erased
![]() Deleting files
Deleting files
![]() Downloading files to your computer
Downloading files to your computer
![]() Processing Raw files
Processing Raw files
![]() Shrinking files for online use
Shrinking files for online use
Every creative pursuit involves its share of cleanup and organizational tasks. Painters have to wash brushes, embroiderers have to separate strands of floss, and woodcrafters have to haul out the wet/dry vac to suck up sawdust. Digital photography is no different: At some point, you have to stop shooting so that you can download and process your files.
This chapter explains these after-the-shot tasks. First up is a review of three in-camera operations: rating files, protecting your best work from accidental erasure, and deleting unwanted files. Following that, you can get help with transferring files to your computer, processing files that you shot in the Raw (NEF) format, and preparing photos for online sharing.
Rating Photos and Videos
While a picture or movie file is still on the memory card in your camera, you can assign it a rating: five stars for your best efforts, four stars for shots you may be able to improve in a photo editor, and so on. You can even assign a trash rating to files that you may decide to delete later.
 Rating files has a couple of benefits. First, assigning the trash tag makes it easy to spot the rotten apples when you need to delete files in order to fit more shots on your memory card. Additionally, some photo programs can read the rating and then sort files according to rating. That feature makes it easier to gather your best work for printing and sharing after downloading.
![]() Before showing you how to rate files, I need to share one rule: If you previously used the Protect feature described in the next section to lock a file, you can’t rate it. To unlock the file, display it and press the Protect button.
Before showing you how to rate files, I need to share one rule: If you previously used the Protect feature described in the next section to lock a file, you can’t rate it. To unlock the file, display it and press the Protect button.
You can access the Rating feature in two ways:
 i menu: During playback, display the photo or video you want to rate, press the i button, and then choose Rating from the i menu, as shown on the left in Figure 9-1. On the next screen, notice the rating bar, labeled on the right in the figure. Press the Multi Selector right or left to set the number of stars. You also can tap on the bar or rotate the Main command dial to add or remove stars.
To remove a rating, press the Multi Selector left until all the stars disappear from the rating bar and you reach the dot labeled No Rating in the figure. To assign the trash rating, press left once more; a trash can replaces the No Rating dot. When you’re done assigning a rating, tap OK Done or press the OK button.

FIGURE 9-1: During playback, press the i button and select Rating to access the rating screen.
Playback menu: You can use this option during shooting or playback. Open the Playback menu and choose Rating, as shown on the left in Figure 9-2. You then see thumbnails of your images, as shown on the right side of the figure. Select the photo or video you want to rate by tapping it or by pressing the Multi Selector left or right to move the yellow selection box over the file’s thumbnail.

FIGURE 9-2: You also can rate photos by choosing Rating from the Playback menu.
To assign a rating, press the Multi Selector up. Each press raises the rating by one star. The current rating appears with the thumbnail, as labeled in the figure. To lower the rating or assign the trash rating, press the Multi Selector down.
You also tap the Set symbol at the bottom of the screen to assign a star rating. Each tap raises the rating. But you can’t lower the rating or remove it by tapping. You also can't get to the trash rating. So take a hint from Nikon’s exclusion of this method from the user manual: Just stick with using the Multi Selector to set the rating.
Remember these additional points about rating photos by way of the Playback menu:
 To see a photo in full-screen view, move the highlight box over its thumbnail and then hold down the Zoom In button or tap the Zoom box at the bottom of the screen. After inspecting the photo, release the button or tap the return arrow in the upper right corner of the screen.
- You can rate as many files as you want while the rating screen is open. Unfortunately, you have to select and rate each file individually; there’s no way to select a batch of files and award them all the same rating.
- When you finish rating files, press the OK button or tap the OK symbol. Don’t forget this step: If you do, the rating doesn’t stick.
The rating you assign appears with the image in any playback display mode except None (Picture Only). Figure 9-3 shows the rating as it appears in the default playback display mode; for more about display modes, see Chapter 8.

FIGURE 9-3: The rating appears here in File Information playback mode.
Protecting Files
You can safeguard files from being accidentally erased by using the camera’s Protect feature, which locks the file.
 However, this step prevents you from erasing the file only when you use the camera’s Delete functions, explained later in this chapter. Formatting the memory card does erase protected pictures. Chapter 1 provides details about card formatting.
Giving a file protected status also prevents you from altering it by using the camera’s built-in editing tools, found on the Retouch menu. Nor can you assign a rating. So do any of that work before locking the file.
![]() To protect a picture, display it in full-screen view and then press the Protect button, (also known as the AE-L/AF-L button), highlighted in Figure 9-4. The same key symbol that you see next to the button appears on the photo, as shown in the figure. Press the button again to unlock the photo. In Thumbnail view or Calendar view, select the picture as explained in Chapter 8 and then press the Protect button.
To protect a picture, display it in full-screen view and then press the Protect button, (also known as the AE-L/AF-L button), highlighted in Figure 9-4. The same key symbol that you see next to the button appears on the photo, as shown in the figure. Press the button again to unlock the photo. In Thumbnail view or Calendar view, select the picture as explained in Chapter 8 and then press the Protect button.
Although using the Protect/AE-L/AF-L button is the fastest route to locking and unlocking a single file, you can also press the i button and choose Protect from the playback version of the i menu, as shown in Figure 9-5.

FIGURE 9-4: Press the Protect/AE-L/AF-L button to prevent accidental deletion of the selected image.
![]() To unlock all protected files in the folder being viewed — which is determined by the Playback Folder setting on the Playback menu — choose Unprotect All from the playback version of the i menu, shown in Figure 9-5. When you see a message asking whether you want to remove protection from all files, press the Delete button or tap Yes on the screen.
To unlock all protected files in the folder being viewed — which is determined by the Playback Folder setting on the Playback menu — choose Unprotect All from the playback version of the i menu, shown in Figure 9-5. When you see a message asking whether you want to remove protection from all files, press the Delete button or tap Yes on the screen.
One last bit of protection info: When you protect a file, it may show up as a read-only file when you transfer it to your computer, depending on whether the software you use can read the protection tag. Files that have the read-only status can’t be altered until you unlock them. To take that step in Nikon NX Studio, which is the photo software introduced later in this chapter, open the Image menu, choose Protection, and then select Unprotect.

FIGURE 9-5: During playback, you also can access the Protect feature from the i menu.
Deleting Files
Your camera’s Delete function makes it easy to erase files from a memory card when it’s in your camera. The next few sections give you the lowdown on various ways to use the feature.
 Whichever method you use, though, the Delete function doesn’t erase protected files. See the preceding section to find out how to remove protection. The only way to erase protected files is to format the memory card, which erases all data on the card, as outlined in Chapter 1.
Deleting files one at a time
![]() During picture playback, you can press the Delete button to erase individual photos and videos. But the process varies depending on the display mode:
During picture playback, you can press the Delete button to erase individual photos and videos. But the process varies depending on the display mode:
- In full-screen view (only one photo or video is displayed), press Delete to erase the current file.
- In Thumbnail view, select the photo you want to erase by using the Multi Selector to move the yellow highlight box over it. You can also select the photo by tapping it. Then press Delete.
 In Calendar view, select the date that contains the image. Then press the Zoom Out button or tap the Zoom Out symbol at the bottom of the screen to activate the thumbnail list. A yellow box surrounds the selected photo. To select a different photo, tap its thumbnail or use the Multi Selector to move the yellow box over it. Then press Delete.
After you press Delete, you’re asked to confirm that you want to erase the file. If you do, press Delete again. To cancel, press the Playback button.
Deleting all files in a folder
You can quickly delete all files in a selected folder or folders from the Playback menu. To select the folder(s) whose files you want to dump, use the Playback Folder option on the Playback menu. Chapter 8 explains this option in detail, but in short, if the option is set to All, all files in all folders are included. You can also select a specific folder by name or set the camera to display just the folder being used to store new files. That folder name appears with the Storage Folder option on the Photo Shooting menu.
After making your folder selection, choose Delete from the Playback menu and then choose All Pictures, as shown in Figure 9-6. A confirmation screen appears; select Yes and press OK.
This method, like the other Delete functions, doesn’t erase files you locked by applying the Protect feature. Also, even though the option name is All Pictures, any video files in the folder(s) are also trashed.

FIGURE 9-6: This menu option deletes all files stored in the folder you're viewing, except for those you protected.
Deleting a batch of selected files
To get rid of multiple files but not all files, don’t waste time erasing each file one at a time. Instead, you can tag each file for erasure and then delete them all at once.
If any files you want to erase are protected, remove that status as outlined in the earlier section “Protecting files.” Then select Delete from the Playback menu and choose one of these options:
- Selected Pictures: Choose this option, as shown on the left in Figure 9-7, to delete files taken on different days or to delete only a few pictures taken on a specific day. After you choose Selected Pictures, you see a screen of thumbnails, as shown on the right in the figure. Select the first photo you want to delete by tapping it or by using the Multi Selector to move the yellow box over it. Then tap Select or press the Zoom Out button. A trash can appears in the upper right corner of the thumbnail; in the figure, I labeled the symbol Delete tag.

FIGURE 9-7: This Delete option offers a quick way to erase a batch of files.
If you change your mind, tap Select or press the Zoom Out button again to remove the Delete tag. To remove the tag from all photos and exit the screen without dumping any of them, press the Playback button or tap the exit arrow in the upper right corner of the screen.
For a closer look at the currently selected image, tap the Zoom symbol onscreen or press and hold the Zoom In button. To exit magnified view, tap the exit arrow or release the Zoom In button. Images you tag with the trash rating, explained in the first section of this chapter, are not officially marked for erasure. The right screen in Figure 9-7 shows symbols representing both the trash rating and the Delete tag. The trash rating symbol includes a star, which you see with all rating symbols; the Delete tag looks like the symbol on the Delete button. It’s the Delete tag that triggers the camera to dump the file. The trash symbol is just there to help you find files that you earlier decided you might want to erase. Pictures Shot on Selected Dates: Select this option to quickly delete all files recorded on specific days. After you choose the option, as shown on the left in Figure 9-8, you see a list of dates, as shown on the right. To erase all files from a date, put a check mark in the box to its left. The easiest way to do that is to tap the box. But you also can press the Multi Selector up or down to highlight the date and then tap Select or press the Multi Selector right to toggle the check mark on and off.
To see which files were shot on a selected date, use these techniques:
- To view thumbnails of files recorded on the selected date, tap the Confirm symbol on the screen or press the Zoom Out button.
- When thumbnails are displayed, you can magnify the selected image by holding down the Zoom In button or tapping Zoom on the screen. Exit magnified view by releasing the button or tapping the exit arrow.
- To return to the date list, tap the Back symbol or press the Zoom Out button again.
After tagging individual files for deletion or specifying a date to delete, tap OK or press the OK button. Select Yes when the camera asks for confirmation that you want to erase the files.
You have one other way to quickly erase all files shot on a specific date: In Calendar display mode, highlight the date and then press the Delete button. You see a confirmation screen; press Delete again to wrap up. Visit Chapter 8 for the scoop on Calendar display mode.
Another timesaving option is to use the Protect feature to keep a handful of pictures in the current folder(s) but delete the rest. Rather than select all the pictures you want to erase, protect the handful you want to preserve. Then choose All Pictures from the Delete screen shown on the left in Figure 9-8. The camera dumps all files but the protected ones. See the earlier section “Deleting all files in a folder” for more on the All Pictures option.

FIGURE 9-8: With the Select Date option, you can quickly erase all photos and videos shot on a specific date.
Introducing Nikon's Free Photo Software
If you have no favorite computer program for downloading, viewing, and retouching images, Nikon offers a nice free solution, Nikon NX Studio, which you can download from the Nikon website. In fact, even if you already have a photo program, it’s worth checking out NX Studio because it offers some camera-related features not available in non-Nikon software.
Figure 9-9 shows the NX Studio program window. Your window may look a little different when you first install the program; I customized certain aspects of the display to the arrangement shown in the figure. You can create your own, custom layout by choosing options from the View and Window menus.
I especially appreciate the following NX Studio features:
- An easy-to-use tool for viewing and downloading pictures from your memory card to a computer: Called Nikon Transfer 2, this tool is built into NX Studio. I show you the steps for using it in the next section.
Focus point display: As you can do during playback on the camera, you can display any focus point that was used to set focus when you took the picture. I labeled the focus point in Figure 9-9, for example. To turn on this feature, click open the View menu, choose Image Viewer Options, and choose Show Focus Point. Or just click the symbol I labeled “Show/hide focus point” in the figure. As far as I know, only Nikon programs can display the focus point from Nikon cameras.
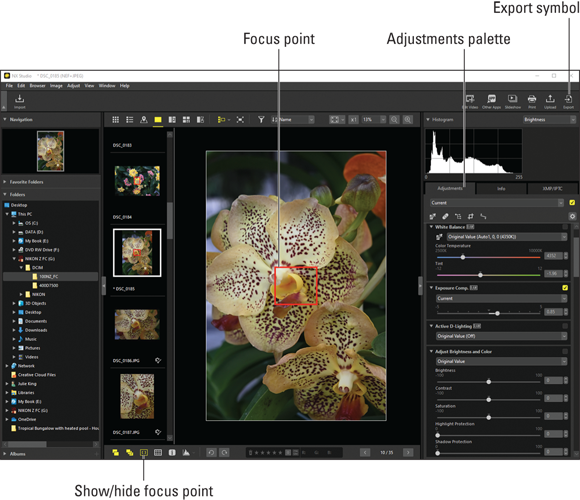
FIGURE 9-9: NX Studio enables you to display the focus point used to shoot a picture.
Being able to see the focus point(s) is helpful for troubleshooting focus problems. If the focus point is over your subject, any blurring of the subject is caused by camera shake or subject movement during the exposure, a common problem when you use a slow shutter speed. (Chapter 3 explains shutter speed and how it relates to blurred photos.)Nikon-oriented tools for processing Raw files: If you shoot in the Raw format, you need to convert the file to a common format, such as JPEG, in order to share it online or have it printed at retail photo-printing outlets. Many advanced photo programs have Raw processing tools, but NX Studio offers tools similar to some that you find on your Z fc. For example, you can apply the equivalent of Active D-Lighting and assign a Picture Control, something you can’t do in non-Nikon programs.
You can see some of the Raw processing tools in Figure 9-9. They’re located on the Adjustments palette, labeled in the figure. (If you don’t see the palette, open the Window menu and choose Show Adjustments/Info Palette).
After you tweak the image, click the Export symbol, also labeled in the figure, or choose Export from the File menu. You can then save the file in the JPEG format, the best for online sharing, or in the TIFF format, preferred in the professional print world because it delivers better image quality than JPEG, and top quality is critical for fine-art printing and printing at large sizes. As outlined in Chapter 3, JPEG applies a type of file compression that can create visual defects; TIFF does not use that type of compression and so does not reduce image quality. The downside of TIFF is that it creates larger files than JPEG because it doesn’t use JPEG file compression.
- Detailed shooting data display: If you open the Adjustments/Info palette and click the Info tab, you can see the settings you used when shooting the picture, as shown in Figure 9-10. The settings are stored as metadata (hidden text data) in each picture's file. Again, many photo viewers can display some metadata, but often can’t display the entire cache of Nikon-specific settings data that you see in NX Studio.

FIGURE 9-10: Click the Info tab to view shooting data.
For help using these and other program tools, you can download a copy of the user manual or simply check the online Help pages for answers. To find these resources, open a web browser, connect to the Internet, and then open Nikon NX Studio. In NX Studio, open the Help menu and choose NX Studio Help. Your browser displays a window that offers two options: Go to Help Site takes you to the program’s pages at the Nikon website; Get PDF Manual opens the user manual, which you can download or read online.
Downloading Pictures to Your Computer
Using your camera’s wireless features, you can transfer files to a smartphone or tablet that can run the Nikon SnapBridge app. The appendix of this book provides details. Unfortunately, the app doesn’t work for transferring files to a regular computer.
You can connect wirelessly to a computer by installing Nikon’s Wireless Transmitter Utility software on the computer. Grab the program for free from Nikon’s online software download center. Unfortunately, this file-transfer option involves computer network issues that I don’t have room to explain in this book. If you’re interested in the feature, the camera’s instruction manual provides fairly detailed information on how to use it. (You may want to ask your favorite networking guru to lend a hand.)
For a less complicated way to download files to a computer, try these transfer options:
- Connect the camera to the computer via a USB cable. You need a cable that has a USB-C connection at one end — that end connects to the camera. The other end of the cable needs whatever type of USB connector fits your computer; some machines use the standard USB connector, whereas newer models tend to have USB-C. After making sure that the camera battery is fully charged (you don't want it to run out of power during the file transfer), turn off the camera. Connect the USB-C plug on the cable to the camera’s USB-C port, labeled in Figure 9-11, and connect the other end of the cable to your computer. Then turn the camera back on.
Use a memory card reader. A card reader, if you’re unfamiliar, is a small device that attaches to your computer (or, in some cases, is built into the computer). When you put a camera memory card into the reader, your computer recognizes the card as another drive on the system, and you can then access the files on the card.
Not all card readers work with the newest or highest-capacity SD cards. If you're shopping for a reader, make sure it's compatible with your memory cards.

FIGURE 9-11: The camera’s USB-C port serves as one gateway to your computer.
After you connect your camera or put a card in the card reader, you can use whatever photo software you prefer to transfer photos to your computer. If you don't yet have a program for handling this task, give Nikon NX Studio a try. (It's free, after all.) The program has a built-in utility, Nikon Transfer 2, that makes the download process easy. Follow these steps:
- Open Nikon NX Studio.
In the program, click the File menu and then click Transfer Pictures.
Or click the Import button in the upper left corner of the window. Either way, you see the Nikon Transfer 2 window, shown in Figure 9-12.

FIGURE 9-12: Nikon Transfer 2 is a file transfer tool built into Nikon NX Studio.
Display the Source tab, labeled in Figure 9-12, to view your pictures.
Don’t see the Source tab — or any of the neighboring tabs? Click the Options triangle (refer to Figure 9-12) to display them.
When the Source tab is displayed, the icon representing your camera or card should be selected. In the figure, Removable Disk G is the name my computer assigned to my card reader.
Thumbnails of images and videos on the card appear in the bottom half of the dialog box. If you don’t see them, click the Thumbnails triangle (again, refer to Figure 9-12) to open the thumbnails area.
Select the files you want to download.
Click a thumbnail to highlight it and then click the box underneath to mark the file for downloading. These tricks speed up the process:
- Select protected files only. If you used the in-camera function to protect pictures, select just those images by clicking the Select Protected symbol, labeled in Figure 9-12.
- Select all files. Click the Select All symbol, also labeled in the figure.
Click the Primary Destination tab to display options for handling the file transfer, as shown in Figure 9-13.
The most important setting is Primary Destination Folder, highlighted in the figure. Open the drop-down list and choose the folder where you want to store the pictures. Other options on this tab enable you to specify how pictures should be organized inside the primary destination folder and to rename files during the transfer.

FIGURE 9-13: You can specify a primary download destination as well as automatically copy the files to a second storage location.
Click the Backup Destination tab (highlighted in Figure 9-13) to transfer copies of the files to a second location.
This feature enables you to download one copy of each file to your primary destination folder and a second copy to a backup drive in one step — a great archival timesaver. On the Backup Destination tab, select Backup Files and specify where you want the backup files to go.Click the Preferences tab to set other transfer options.
Pay special attention to these settings:
- Transfer New Files Only: Choose this option to avoid downloading images that you already transferred.
- Delete Original Files after Transfer: Turn off this option. Otherwise, your pictures are erased from your memory card when the transfer is complete. Always make sure the pictures made it to the computer before you delete them from your memory card.
- Open Destination Folder with the Following Application after Transfer: You can tell the program to immediately open your photo program after the transfer is complete. Choose NX Studio to view and organize your photos using that program. To choose another program, open the drop-down list, choose Browse, and select the program from the dialog box that appears. Click OK after doing so.
Click the Start Transfer button in the lower right corner of the window.
After you click the button, the Process bar in the lower left corner of the program window indicates how the transfer is progressing. What happens when the transfer completes depends on the choices you made in Step 7. If you selected Nikon NX Studio as the photo program, it opens and displays the folder that contains your just-downloaded images.
Processing Raw (NEF) Files
Chapter 2 introduces you to the Raw file format. The advantage of capturing Raw files — NEF files on Nikon cameras — is that you make the decisions about how to translate the original picture data into an actual photograph. You take this step by using a software tool known as a Raw processor.
Nikon NX Studio, introduced earlier in this chapter, provides a good (and free) Raw processing tool. Other popular programs for taking this step are Adobe Photoshop and Adobe Lightroom (you may need to update the programs so that they can read Z fc Raw files.)
However, you also have a non-software option: the Z fc’s built-in Raw processing tool. It doesn’t offer nearly the range of adjustments as NX Studio or Photoshop and Lightroom, and you can save your file only in the JPEG format, but it’s handy when you need a JPEG copy of a Raw image quickly.
Follow these steps to use the in-camera tool:
 Press the Playback button to start viewing photos.
Display the picture you want to process.
If the camera is set to display one photo at a time, move on to Step 3. If you’re using Thumbnail or Calendar view, you first must select the image. Chapter 8 explains how to select images. (To skip that bit of business, just press the Zoom In button as many times as needed to return to single-image view.)
- Press the i button to display the playback version of the i menu.
Choose Retouch and then select RAW Processing.
You see a screen similar to the one on the left in Figure 9-14, which is the first of two pages of options you can select for processing your file. Use the Multi Selector to scroll to the second page, shown on the right in the figure, or just drag your finger down the screen.

FIGURE 9-14: You get two pages of options for processing a Raw file.
Set the conversion options.
Along the right side of the screen, you see symbols representing adjustments you can make to the Raw file. The following list identifies each one, starting with the first option on the left screen in Figure 9-14 and continuing through the final setting on the second screen. Note that the currently selected option is highlighted, and its name appears atop the image thumbnail — Image Quality is selected in the first screen in the figure, for example; Active D-Lighting is selected in the second screen. Here are details about each option:
- EXE: Although this option tops the list of settings, it’s actually the last one to choose. It stands for execute and tells the camera to create the JPEG copy of your Raw file according to the adjustments you dialed in through the other settings.
- Image Quality: This option sets the JPEG quality. Choose Fine for maximum picture quality. See Chapter 2 for JPEG details.
- Image Size: Chapter 2 explains this one, too. Choose Large to retain the original image resolution (pixel count).
- White Balance: Detailed in Chapter 5, this option adjusts how colors are rendered. Experiment to see which setting you like best.
- Exposure Compensation: Use this option, covered in Chapter 3, to adjust image brightness. Raise the value for a brighter image; lower it for a darker shot. For Raw processing, you’re limited to an adjustment range of EV +2.0 to –2.0.
- Set Picture Control: This option, explained at the end of Chapter 5, affects color saturation, contrast, and image sharpness.
High ISO NR (Noise Reduction): If your picture looks noisy — that is, marred by a speckled look — enabling this feature may improve the picture. See Chapter 3 for an explanation of ISO and noise.
For this setting, as well as the Vignette Control and the Diffraction Compensation settings described later in this list, the setting that’s accompanied by a camera icon indicates the setting that was in force when you took the picture. You also see a label with the name of that setting under the image preview.- Color Space: This setting determines whether the camera uses the default color space, sRGB, or the larger Adobe RGB color space when converting the photo. Stick with sRGB until you digest the Chapter 5 section that details this option.
- Vignette Control: Does your picture appear unnaturally dark in the corners? This flaw, called vignetting, can sometimes be eliminated or diminished by applying the Vignette Control feature. Chapter 3 has more information.
- Active D-Lighting: To brighten the darkest part of a picture without also brightening the lightest areas, try adjusting this setting. See Chapter 3 to understand more about how this feature works. To darken shadows, try the Off setting.
- Diffraction Compensation: Like its counterpart on the Photo Shooting menu, this tool tries to compensate for a slight reduction in image sharpness that can occur with certain lenses when you shoot at high f-stop settings. It’s on by default; if you routinely experience this issue with a lens, experiment by processing one Raw file with the feature turned on and another with it turned off.
At any time, you can magnify the image by holding down the Zoom In button or by tapping the Zoom icon at the bottom of the screen. Release the button or tap the icon again to return to the normal display.Select EXE on the first Raw Processing menu screen.
The camera executes your command and creates the processed file in the JPEG format, assigning the next available file number to the image. In Playback mode, you see the Retouched symbol (the box with a paintbrush) just as you do when applying any Retouch menu feature.
You can also access the Raw processing tool via the normal menu system. Press the Menu button, open the Retouch menu, and then choose RAW Processing. On the next screen, choose Select Picture(s) to select one or more photos; choose Select Date to process all photos taken on a specific date; choose Select Folder to process all photos contained in a single folder. I don’t recommend this route for two reasons. First, to process a single photo, it’s just more time-consuming than using the i menu. Second, although it’s nice to think that you can process a batch of photos in a single pass by using this method, you’re forced to use the same processing settings for all files, and rarely does every shot need the same adjustments. So I suggest that you stick with the i menu and do Raw processing one file at a time.
Preparing Pictures for Online Sharing
Have you ever received an email containing a photo so large that you can’t view the whole thing without scrolling the email window or opening the picture in a separate photo program? This occurs because computer monitors, tablets, and smartphone screens can display only a limited number of pixels. The exact number depends on the screen, but suffice it to say, the number is much lower than the resolution of the photos your camera produces, even if you use the smallest Image Size setting (2784 x 1856 pixels).
Thankfully, most email programs now automatically shrink the photo display to a viewable size. That doesn’t change the fact that a large photo file means longer downloading times, though — and if recipients choose to hold on to the picture, a big storage hit on their hard drives. Additionally, some email providers limit the size of files the mailbox owner can receive.
Sending a high-resolution photo is the thing to do if you want the recipient to be able to generate a good print. For simple onscreen viewing, however, I suggest limiting your photos to fewer than 1,000 pixels on the longest side of the image so that people who use older email programs can see the entire picture (or nearly all of it) without scrolling the display. The same sizing usually works well for Facebook and other social media sites, but check the site's image guidelines before you post. If the picture is for use on your company’s business website, ask the web administrator what size image to supply.
In addition to reducing the file size, you need to make sure that the file is in the JPEG format, which is the most common online format. If the image was captured in the Raw format or saved after Raw processing in the TIFF format, you need to create a JPEG copy for online use.
You have two free ways to tackle both bits of prep. For pictures already downloaded to your computer, use Nikon NX Studio, introduced earlier in this chapter. Just click the image you want to prepare, open the File menu, and choose Export. In the resulting settings box, select JPEG as the file type, specify the new file size, and then give the copy a new name to avoid overwriting the full-resolution original.
For pictures still on the memory card in the camera, you can use the built-in resizing tool. It also lets you create a low-resolution JPEG copy of a Raw or JPEG original. Take one of these two paths:
- Resize a single photo: During picture playback, display the photo in single-image view (or select it in Thumbnail view or Calendar view), and press the i button. On the screen that appears, select Retouch to display the Retouch menu atop your photo.
Select Resize, as shown on the left in Figure 9-15, to display possible image sizes, as shown on the right in the figure. The first value shown for each size option reflects the pixel dimensions; the second, the total number of pixels, measured in megapixels. (This isn’t the same thing as the file size, which is measured in megabytes, or MB.) Available sizes depend on the size of the original and whether you captured the photo using the DX (whole sensor) Image Area setting, the 1:1 setting, or the 16:9 setting.
After you select a size, press the OK button or tap OK Save.

FIGURE 9-15: Use the Resize option to create a lower-resolution version of the picture.
Resize a batch of photos: Press the Menu button to access the regular menu system. Display the Retouch menu and choose Resize, as shown on the left in Figure 9-16. On the next screen, shown on the right in the figure, select Choose Size. You then see a screen where you can select the pixel count of the small images. After taking that step, press the OK button or tap the exit arrow to return to the main Resize menu. Then choose Select Picture(s), as shown on the left in Figure 9-17, to display thumbnails of your photos, as shown on the right.
Select the image you want to resize by tapping its thumbnail or using the Multi Selector to move the yellow highlight box over the thumbnail. Then tap Select (at the bottom of the screen) or press the Zoom Out button to tag the file with the Resize symbol, labeled in Figure 9-17. Select the next photo, and then rinse and repeat. After tagging all photos you want to resize, tap OK or press the OK button to display the go-ahead screen. Select Yes to create your small copies.

FIGURE 9-16: To resize multiple photos at once, select Resize from the regular Retouch menu.

FIGURE 9-17: Tag the selected photo for resizing by pressing the Zoom Out button or by tapping the Select symbol.
In both cases, the camera duplicates the original images and then downsamples (eliminates pixels from) the copies to achieve the size you specified. The copies are saved in the JPEG file format, using the same Image Quality setting (Fine, Normal, or Basic) as the original. Raw originals are saved as JPEG Fine images.
Small-size copies appear during playback marked by the Resized symbol next to the file size, as shown in Figure 9-18. Next to the symbol, you see the resolution (pixel count) of the resized image. You also see the standard Retouched symbol, which appears anytime you alter a photo via a Retouch menu option. The camera assigns the next available filename to the file.

FIGURE 9-18: The Resized symbol indicates a small-size copy.