 Compiling and running your first OpenGL application in Windows
by William C. Y. Lo, Raymond C. H. Lo, David Wolff, Muhammad Mobeen Movania
OpenGL – Build high performance graphics
Compiling and running your first OpenGL application in Windows
by William C. Y. Lo, Raymond C. H. Lo, David Wolff, Muhammad Mobeen Movania
OpenGL – Build high performance graphics
- OpenGL – Build high performance graphics
- Table of Contents
- OpenGL – Build high performance graphics
- OpenGL – Build high performance graphics
- Credits
- Preface
- 1. Module 1
- 1. Introduction to Modern OpenGL
- Introduction
- Setting up the OpenGL v3.3 core profile on Visual Studio 2010 using the GLEW and freeglut libraries
- Designing a GLSL shader class
- Rendering a simple colored triangle using shaders
- Doing a ripple mesh deformer using the vertex shader
- Dynamically subdividing a plane using the geometry shader
- Dynamically subdividing a plane using the geometry shader with instanced rendering
- Drawing a 2D image in a window using the fragment shader and the SOIL image loading library
- 2. 3D Viewing and Object Picking
- Introduction
- Implementing a vector-based camera with FPS style input support
- Implementing the free camera
- Implementing the target camera
- Implementing view frustum culling
- Implementing object picking using the depth buffer
- Implementing object picking using color
- Implementing object picking using scene intersection queries
- 3. Offscreen Rendering and Environment Mapping
- Introduction
- Implementing the twirl filter using the fragment shader
- Rendering a skybox using static cube mapping
- Implementing a mirror with render-to-texture using FBO
- Rendering a reflective object using dynamic cube mapping
- Implementing area filtering (sharpening/blurring/embossing) on an image using convolution
- Implementing the glow effect
- 4. Lights and Shadows
- Introduction
- Implementing per-vertex and per-fragment point lighting
- Implementing per-fragment directional light
- Implementing per-fragment point light with attenuation
- Implementing per-fragment spot light
- Implementing shadow mapping with FBO
- Implemeting shadow mapping with percentage closer filtering (PCF)
- Implementing variance shadow mapping
- 5. Mesh Model Formats and Particle Systems
- 6. GPU-based Alpha Blending and Global Illumination
- Introduction
- Implementing order-independent transparency using front-to-back peeling
- Implementing order-independent transparency using dual depth peeling
- Implementing screen space ambient occlusion (SSAO)
- Implementing global illumination using spherical harmonics lighting
- Implementing GPU-based ray tracing
- Implementing GPU-based path tracing
- 7. GPU-based Volume Rendering Techniques
- Introduction
- Implementing volume rendering using 3D texture slicing
- Implementing volume rendering using single-pass GPU ray casting
- Implementing pseudo-isosurface rendering in single-pass GPU ray casting
- Implementing volume rendering using splatting
- Implementing transfer function for volume classification
- Implementing polygonal isosurface extraction using the Marching Tetrahedra algorithm
- Implementing volumetric lighting using the half-angle slicing
- 8. Skeletal and Physically-based Simulation on the GPU
- Introduction
- Implementing skeletal animation using matrix palette skinning
- Implementing skeletal animation using dual quaternion skinning
- Modeling cloth using transform feedback
- Implementing collision detection and response on a transform feedback-based cloth model
- Implementing a particle system using transform feedback
- 1. Introduction to Modern OpenGL
- 2. Module 2
- 1. Getting Started with GLSL
- Introduction
- Using a function loader to access the latest OpenGL functionality
- Using GLM for mathematics
- Determining the GLSL and OpenGL version
- Compiling a shader
- Linking a shader program
- Sending data to a shader using vertex attributes and vertex buffer objects
- Getting a list of active vertex input attributes and locations
- Sending data to a shader using uniform variables
- Getting a list of active uniform variables
- Using uniform blocks and uniform buffer objects
- Getting debug messages
- Building a C++ shader program class
- 2. The Basics of GLSL Shaders
- Introduction
- Implementing diffuse, per-vertex shading with a single point light source
- Implementing per-vertex ambient, diffuse, and specular (ADS) shading
- Using functions in shaders
- Implementing two-sided shading
- Implementing flat shading
- Using subroutines to select shader functionality
- Discarding fragments to create a perforated look
- 3. Lighting, Shading, and Optimization
- 4. Using Textures
- 5. Image Processing and Screen Space Techniques
- 6. Using Geometry and Tessellation Shaders
- 7. Shadows
- 8. Using Noise in Shaders
- 9. Particle Systems and Animation
- 10. Using Compute Shaders
- 1. Getting Started with GLSL
- 3. Module 3
- 1. Getting Started with OpenGL
- Introduction
- Setting up a Windows-based development platform
- Setting up a Mac-based development platform
- Setting up a Linux-based development platform
- Installing the GLFW library in Windows
- Installing the GLFW library in Mac OS X and Linux
- Creating your first OpenGL application with GLFW
- Compiling and running your first OpenGL application in Windows
- Compiling and running your first OpenGL application in Mac OS X or Linux
- 2. OpenGL Primitives and 2D Data Visualization
- 3. Interactive 3D Data Visualization
- 4. Rendering 2D Images and Videos with Texture Mapping
- Introduction
- Getting started with modern OpenGL (3.2 or higher)
- Setting up the GLEW, GLM, SOIL, and OpenCV libraries in Windows
- Setting up the GLEW, GLM, SOIL, and OpenCV libraries in Mac OS X/Linux
- Creating your first vertex and fragment shader using GLSL
- Rendering 2D images with texture mapping
- Real-time video rendering with filters
- 5. Rendering of Point Cloud Data for 3D Range-sensing Cameras
- 6. Rendering Stereoscopic 3D Models using OpenGL
- 7. An Introduction to Real-time Graphics Rendering on a Mobile Platform using OpenGL ES 3.0
- 8. Interactive Real-time Data Visualization on Mobile Devices
- 9. Augmented Reality-based Visualization on Mobile or Wearable Platforms
- A. Bibliography
- 1. Getting Started with OpenGL
- Index
There are several ways to set up an OpenGL project. Here, we create a sample project using Visual Studio 2013 or higher and provide a complete walkthrough for the first-time configuration of the OpenGL and GLFW libraries. These same steps can be incorporated into your own projects in the future.
Assuming that you have both Visual Studio 2013 and GLFW (version 3.0.4) installed successfully on your environment, we will start our project from scratch.
In Visual Studio 2013, use the following steps to create a new project and compile the source code:
- Open Visual Studio 2013 (VS Express 2013 for desktop).
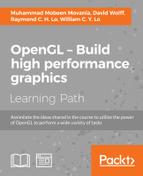
- Create a new Win32 Console Application and name it as
Tutorial1.
- Check the Empty project option, and click on Finish.

- Right-click on Source Files, and add a new C++ source file (Add | New Item) called main.cpp.

- Copy and paste the source code from the previous section into the main.cpp and save it.
- Open Project Properties (Alt + F7).
- Add the
includepath of the GLFW library, C:Program Files (x86)glfw-3.0.4include, by navigating to Configuration Properties | C/C++ | General | Additional Include Directories.
Tip
Downloading the example code
You can download the example code files from your account at http://www.packtpub.com for all the Packt Publishing books you have purchased. If you purchased this book elsewhere, you can visit http://www.packtpub.com/support and register to have the files e-mailed directly to you.
- Add the GLFW library path, C:Program Files (x86)glfw-3.0.4lib, by navigating to Configuration Properties | Linker | General | Additional Library Directories.

- Add the GLFW and OpenGL libraries (
glu32.lib,glfw3.libandopengl32.lib) by navigating to Configuration Properties | Linker | Input | Additional Dependencies.
- Build Solution (press F7).
- Run the program (press F5).
Here is your first OpenGL application showing a rotating triangle that is running natively on your graphics hardware. Although we have only defined the color of the vertices to be red, green, and blue, the graphics engine interpolates the intermediate results and all calculations are performed using the graphics hardware. The screenshot is shown as follows:

-
No Comment