
Chapter 7: Exploiting Owner and Privileged Azure AD Role Permissions
In the first chapter of this book, we made a distinction between the Azure AD roles and the Azure RBAC roles. We mentioned that Azure AD roles are used to manage access to Azure AD resources and operations, such as user accounts or group creation, and password resets, while Azure RBAC roles are used to manage access to Azure resources such as subscriptions, storage accounts, and SQL databases. For the most part, both services have separate scope boundaries. In general, an Azure AD role assignment does not grant access to manage Azure resources and an Azure RBAC role assignment does not grant access to manage Azure AD resources.
Bridging the gap from subscription Owner up to the root management group, or an Azure AD administrative role, or to on-premises targets, can be a difficult task. Likewise, moving laterally from Azure AD to Azure subscription resources could be tricky. In this chapter, we will focus on different techniques that can be used to move laterally beyond the scope of a user's existing permissions assignment within an environment.
Here are the topics that we will cover:
- Escalating from Azure AD to Azure RBAC roles
- Escalating from subscription Owner to Azure AD roles
- Attacking on-premises systems to escalate in Azure
Technical requirements
In this chapter, we will be talking about how we can use the BloodHound tool to find paths in Azure tenants (and normal Active Directory) that can be abused to escalate privileges. While it is not absolutely needed to follow along, it's a great tool to have in the arsenal:
- BloodHound: https://github.com/BloodHoundAD/BloodHound
Escalating from Azure AD to Azure RBAC roles
As highlighted in Figure 7.1, an Azure AD role assignment does not grant access to manage Azure resources and an Azure RBAC role assignment does not grant access to manage Azure AD resources by default:

Figure 7.1 – Azure AD roles versus Azure RBAC roles
To prevent lateral movement, the best practice is to keep both planes (Azure AD and Azure resources) separate. This means that separate user accounts should be used to administer them. If this best practice is not followed, the compromise of an identity that has access to Azure AD can be leveraged to move laterally to Azure resources and vice versa.
With that being said, there are other options that an attacker could look to exploit even if user accounts are kept separate for Azure AD and Azure resources. We will look at some of those options in the next sections.
Path 1 – Exploiting group membership
An Azure AD account may not have default access to Azure resources, but if it has access to modify group memberships in Azure AD, we could exploit this to add our account to a group that has permission to Azure resources. Figure 7.2 shows how this attack would work:

Figure 7.2 – Azure AD and subscription relationship
Let's discuss the steps briefly:
- User3 starts out with no access to Azure resources but has permissions to modify group membership in Azure AD.
- The cloud-architects group is assigned the Owner role for Azure resources.
- User3 adds themself to the cloud-architects group in Azure AD, which happens to have permissions to Azure resources.
- User3 now has permissions to Azure resources by virtue of the new group membership.
Important note
Even though our discussion in this chapter centers on the Global Administrator role in Azure AD, there are other built-in roles in Azure AD that could be used to perform this attack. This includes the following roles: User Administrator, Groups Administrator, and Directory Writers. Additionally, any Azure AD custom role with the following permission could be exploited: microsoft.directory/groups/members/update.
This is a very simple attack and we exploited something similar in a hands-on exercise in Chapter 4, Exploiting Reader Permissions, but with a slight variation. If a user already has rights in a subscription, it would be easy to identify any privileged groups in the subscription, but what can we do if our Active Directory user doesn't have any subscription rights? One way is by reviewing the Azure AD sign-in log.
The Azure AD sign-in log automatically records both interactive and non-interactive sign-in activities. From an offensive perspective, the log contains a wealth of information that could give an attacker insight on which users have access to each Azure AD application, which user accounts or applications are easy targets, and information on how to evade defensive configurations!
In our case, we could either log in through the Portal or use Azure PowerShell to review the logs to see the users who have access to Azure resources. We could then correlate that information with the group membership of the users.
To use Azure PowerShell to review the sign-in logs, we first need to install the AzureAD preview PowerShell module. At the time of writing, this feature is only available in the preview version of the module. Some preview features never make it to the generally available release, so this might not be generally available in the future.
Note that this module cannot be installed side by side with the Generally Available (GA) version of the AzureAD module, so we may first need to remove the GA version if we have it installed. Assuming you have been following the examples, AzureADPreview should have been installed as part of setting up PowerZure.
If the module is not set up, you can use the following instructions to do this:
# Remove the GA version if it is installed
Uninstall-Module AzureAD
# Install the preview version of the AzureAD module. Close and re-open the PowerShell console afterwards
Install-Module AzureADPreview
# Verify that the GA version of the module is installed
Import-Module AzureADPreview
Get-Module AzureADPreview | select Name,Version
Name Version
---- -------
AzureADPreview 2.0.2.138
To review the sign-in logs for interesting events, we can use the Get-AzureADAuditSignInLogs cmdlet as shown in the following commands (this command requires a native work/school Azure AD user account and not a Microsoft account). The following commands will filter the sign-in logs for successful Azure Portal or Azure PowerShell sign-ins in the time range specified (the date can be modified to the date before your current date to get the results for the past 24 hours). The output of these commands provides great information that we can use to verify the users of Azure management tools, which usually means that they have some level of access to Azure resources:
# First connect to Azure AD
Connect-AzureAD
# Get successful Azure Portal sign-ins in the time range (greater than the specified date)
Get-AzureADAuditSignInLogs -Filter "appDisplayName eq RAzure Portal' and createdDateTime gt $((Get-Date).AddDays(-1).ToString('yyyy-MM-dd')) and status/errorCode eq 0"
# Get successful Azure PowerShell sign-ins in the time range (greater than the specified date)
Get-AzureADAuditSignInLogs -Filter "appDisplayName eq 'Microsoft Azure PowerShell' and createdDateTime gt $((Get-Date).AddDays(-1).ToString('yyyy-MM-dd')) and status/errorCode eq 0"
We can filter this further to get the properties that are useful to show us the security configurations of the user accounts. This information can be useful if we need to look to bypass defenses:
# Get interesting authentication properties for successful Azure Portal sign-ins
Get-AzureADAuditSignInLogs -Filter "appDisplayName eq 'Azure Portal' and createdDateTime gt $((Get-Date).AddDays(-1).ToString('yyyy-MM-dd')) and status/errorCode eq 0" | Select-Object UserPrincipalName, MfaDetail, AppliedConditionalAccessPolicies
Here is a sample output of this command:

Figure 7.3 – PowerShell command results for sign-in auditing
The following Azure AD built-in roles have the permissions needed to read this information: Security Administrator, Security Reader, and Report Reader. Additionally, any custom Azure AD role that has the following permissions could also be used:
- microsoft.directory/groups/allProperties/allTasks – Grants permission to read and update group properties in Azure AD
- microsoft.directory/signInReports/allProperties/read – Grants permission to read sign-in reports
It is also worth noting that there are opportunities to move laterally from Azure AD to other cloud applications that may be using Azure AD as their identity provider if your pentest scope covers that. You can discover other applications that have a trust relationship with Azure AD by reviewing the Enterprise Applications in Azure AD. You can use this section to find out the users authorized for the applications and the groups that they belong to. If the access is granted via groups, you can add yourself to the groups to gain permissions to those cloud applications.
Path 2 – Resetting user passwords
Another path that could be exploited to move laterally to another Azure subscription is to reset the password of a user who has permissions to another Azure subscription and logging in as that user. This path is less preferred as it impacts the existing access of a user and is more intrusive. It easily raises an alarm if a user is suddenly not able to log in to their account with the password that they have always used, and the audit logs reflect the recent password change event.
Apart from the Global Administrator role, the following Azure AD roles have permissions to reset user passwords: Password Administrator, Helpdesk Administrator, Authentication Administrator, User Administrator, and Privileged Authentication Administrator. The Privileged Authentication Administrator role has unrestricted permissions to reset passwords, but the other listed roles have limited permissions to reset passwords only for users who have fewer privileges than the roles have themselves. Microsoft has detailed all of the Azure AD roles with password reset permissions, and which users they can reset passwords for, at https://docs.microsoft.com/en-us/azure/active-directory/roles/permissions-reference#password-reset-permissions.
Another point to consider for this path are additional security protections that may have been configured for an account. For example, you might want to review the sign-in logs to identify whether the user account was required to use MFA, or if other sign-in conditions were applied on previous sign-in events.
Path 3 – Exploiting service principal secrets
Another path that could be used to move laterally from Azure AD to Azure resources is by exploiting an existing service principal that has Azure resource permissions. It is a common scenario in organizations to have service principals that have privileged role assignments, such as Contributor, at the subscription level. As a matter of fact, this is the default role assignment granted to service principals created automatically in Azure DevOps! We exploited this same scenario in Chapter 4, Exploiting Reader Permissions, to escalate privilege from a Reader role. Figure 7.4 shows how this attack would work:
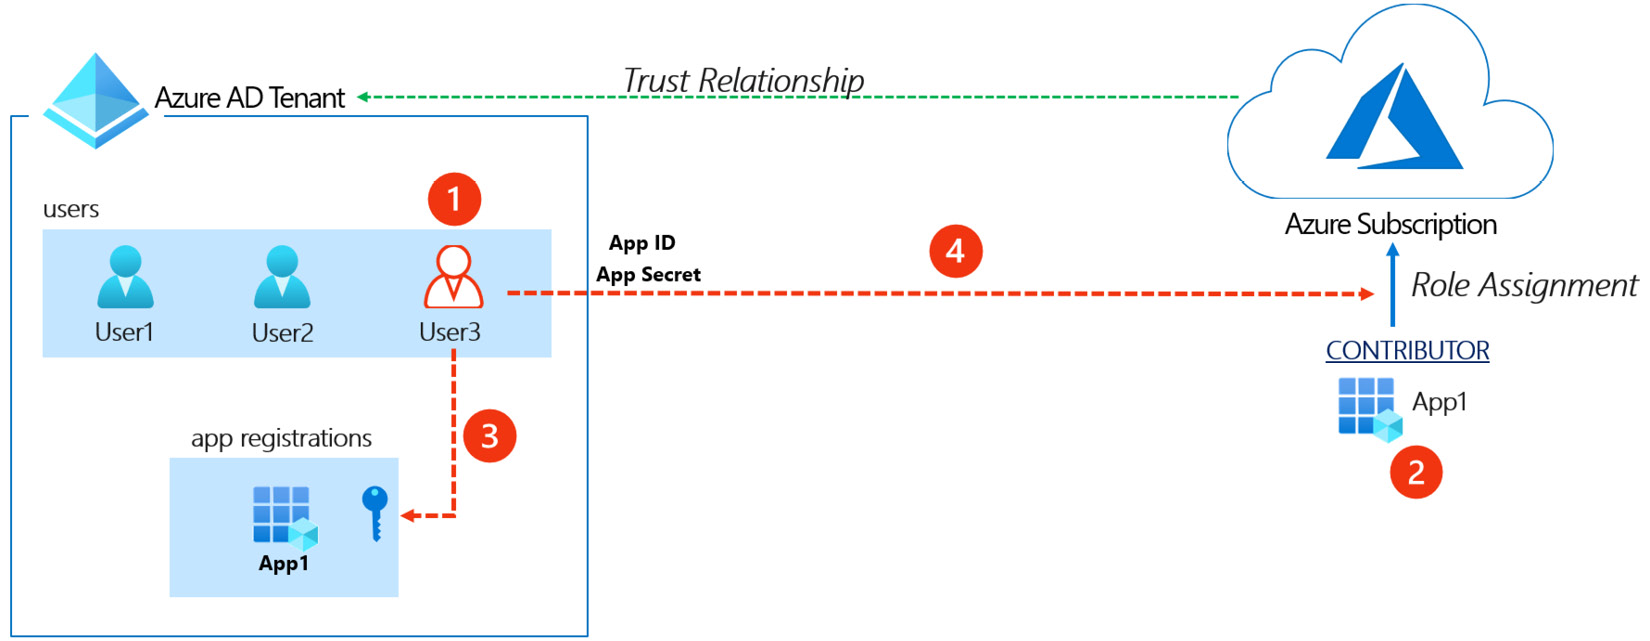
Figure 7.4 – Azure AD service principal to subscription relationship
It gives us the following information:
- User3 starts out with no access to Azure resources but has permissions to update service principals' credentials.
- The service principal for App-1 is assigned the Contributor role for Azure resources.
- User3 obtains the app ID for App-1 and exploits the permission to adds a new client secret to App-1.
- User3 uses the App ID and the newly added key to gain access to Azure resources.
Important note
Our discussion in this chapter centers on the Global Administrator role in Azure AD, but there are other built-in roles in Azure AD that could be used to perform this attack, including the following: Application Administrator, Cloud Application Administrator, Directory Synchronization Accounts, and Hybrid Identity Administrator. Additionally, any Azure AD custom role with the following permission could be exploited: microsoft.directory/servicePrincipals/credentials/update.
This path is preferred to the path of resetting a user's password as it is less intrusive. It does not impact any existing access for an application that is using the service principal, and it simply adds an additional access method for an attacker. To identify service principals that have access to Azure resources, we could review non-interactive sign-in activities in the sign-in log. Additionally, service principals can often be named after the applications and/or subscriptions that they are used in, so the name may be a good giveaway.
Path 4 – Elevating access to the root management group
Another lateral movement path from Azure AD to Azure resources is to elevate access to the root management group. This option exists to allow Global Administrators to regain access to subscriptions when Owners have lost access, but it can be exploited by an attacker.
The elevation implicitly grants the User Access Administrator role access to all subscriptions and management groups in the tenant, which allows unrestricted permissions to assign roles to Azure resources (Figure 7.5). An attacker that exploits this can view all resources and assign access in any subscription or management group in the tenant!

Figure 7.5 – User Access Administrator role definition
The elevation can be done in the properties section of Azure AD in the Azure portal (Figure 7.6):

Figure 7.6 – Modifying access to all subscriptions in the tenant
The elevation can also be done programmatically using the Azure CLI. The command to do this is as follows:
az rest --method post --url "/providers/Microsoft.Authorization/elevateAccess?api-version=2016-07-01"
Important note
Microsoft has great documentation on how this feature works within Azure AD. Please refer to the following URL for additional information: https://docs.microsoft.com/en-us/azure/role-based-access-control/elevate-access-global-admin#how-does-elevated-access-work.
Now that we have seen how we can escalate rights, let's go through a practical example.
Hands-on exercise – Preparing for the Global Administrator/Owner exploit scenarios
This hands-on exercise will prepare us for the rest of the exercises in this chapter. To follow along with the scenarios that we will cover in this chapter, you will need to set up a user with Global Administrator permissions in your Azure AD tenant and another user with the Owner permissions role in your Azure subscription. We have automated this using a PowerShell script that you can run from the Azure Cloud Shell. Here are the tasks that we will complete in this exercise:
- Open a web browser and browse to the Azure Portal (https://portal.azure.com). Sign in with the azureadmin credentials.
- In the Azure Portal, click on the Cloud Shell icon in the top-right corner of the Azure Portal. Select PowerShell:

Figure 7.7 – Click the icon to open Cloud Shell
- In the PowerShell session within the Cloud Shell pane, run the following command to download a script to create a user account with Owner permissions, a second user with Global Administrator permissions, and set up the required vulnerable workloads:
PS C:> Invoke-WebRequest https://bit.ly/owner-scenarios -O owner-scenarios.ps1
PS C:> Get-ChildItem
Here is a screenshot of what it looks like:

Figure 7.8 – Download the Owner scenario script
- Run the downloaded script to provision the objects and resources needed for the exercises in this chapter using the following command:
PS C:> ./owner-scenarios.ps1
When prompted to enter a password, enter myPassword123 and press Enter. Wait for the script deployment to complete. This may take about 8 minutes:

Figure 7.9 – Run the Owner scenario script
What does the script do?
The script creates a user account with Global Administrator permissions in Azure AD and another user with Owner permissions in the Azure subscription. See Figure 7.10 for a diagram:

Figure 7.10 – Global Administrator/Owner exploit scenario
- After the script has completed, the key information that you will need for the rest of this exercise will be displayed in the output section. Copy the information into a notepad document for later reference. There are four values that you will need from the output section:
Azure Global Admin User: This is the administrator username with Global Administrator permissions in Azure AD.
Azure Global Admin User Password: This is the password of the Global Administrator user.
Azure Owner User: This is the administrator username with Owner permissions to Azure resources.
Azure Owner User Password: This is the password of the Azure resource Owner user.
The information can be seen in the following screenshot:

Figure 7.11 – Obtaining the script output
You have now successfully created resources that we will be working with in later exercises in this chapter. In the next hands-on exercise, we will walk through how to exploit the elevate access option to move laterally from Azure AD to Azure resources.
Hands-on exercise – Elevating access
Here are the tasks that we will complete in this exercise:
- Task 1: Verify current user access.
- Task 2: Elevate access using the Azure CLI.
- Task 3: Verify access to Azure resources.
Let's go through the steps to complete the tasks:
- Open PowerShell on your Pentest VM.
- In the PowerShell console, type bash to switch to Windows Subsystem for Linux.
- Use the following command to switch to the root user. Enter the administrative password when prompted:
azureuser@PentestVM:~# sudo su -
- Authenticate to Azure using the Azure CLI command – az login:
root@PentestVM:~# az login
Here is a screenshot of this:

Figure 7.12 – az login results
- When prompted, enter the Azure Global Administrator credentials that you obtained from the script output in the first exercise in this chapter:

Figure 7.13 – Azure password prompt
You will receive an output message about not having access to a subscription. This is because the account only has access to Azure AD, and no access to any Azure subscriptions:

Figure 7.14 – Results of the AZ CLI login
- Run the following command to get tenant-level access. Authenticate as the same Global Administrator user that you used earlier, when prompted:
az login --allow-no-subscriptions
You will receive a message about a successful sign-in this time. Here is a screenshot of the output:

Figure 7.15 – Successful login as a Global Administrator
- Run the following command to exploit the Global Administrator role to modify privileges to Azure resources:
az rest --method post --url "/providers/Microsoft.Authorization/elevateAccess?api-version=2016-07-01"
If you did not receive any output, this means that the command completed successfully.
- Sign out and then sign in again with the Global Administrator credentials to confirm that you now have permissions on Azure subscription resources:
az logout
az login
Here is a screenshot of this:

Figure 7.16 – AZ CLI login with subscription access
- Assign the subscription Owner role to the Global Administrator account using the following commands:
userPrincipalName=$(az ad signed-in-user show --query userPrincipalName -o tsv)
az role assignment create --role "Owner" --assignee $userPrincipalName
The commands will be successful, proving that you have used your elevated Global Administrator role to modify permissions for Azure resources! Here is the output of the command:

Figure 7.17 – Owner role assignment
We have now modified our privileges to an Azure subscription from Azure AD. Let's examine the reverse scenario and techniques that can be employed to achieve this.
Escalating from subscription Owner to Azure AD roles
As part of a pentest, you could also be interested in pivoting from an Azure subscription to Azure AD. This objective could be part of an attack chain that has a goal of opening backdoors in Azure AD for persistence. We will cover the topic of persistence in Chapter 8, Persisting in Azure Environments. Here are some techniques that could be leveraged to achieve this.
Path 1 – Exploiting privileged service principals
Similar to user accounts, service principals and managed identities can also be assigned to Azure AD roles. Many attackers consider service principals and managed identities to be easier targets as they are usually excluded from security policies such as conditional access and MFA.
An attacker could exploit the privileges of an Azure AD account with rights to service principals or managed identities to gain access to the security privileged principals. This is a possible path, but it may be rare for you to run into, especially if an organization strictly follows the principle of keeping role assignments separate for the scopes.
Path 2 – Exploiting service principals' API permissions
The Microsoft identity platform supports two types of permissions for service principals: delegated permissions and application permissions. Delegated permissions are used for interactive authentication flows, where a signed-in user is present. For this scenario, the user will need to consent to the permission at the time of access (or an administrator can consent on behalf of users).
Application permissions are used by apps that run without any user interaction, which means no user is signed in to them. An administrator only needs to consent to the granted permissions once for the app. It is not uncommon for service principals to be granted permissions to perform sensitive operations on APIs such as the Microsoft Graph. These permissions can be exploited by an attacker to access the APIs that the app has been granted access to.

Figure 7.18 – Service principal app permission
For example, an app may not have any role assignments in Azure AD, but if it has app permissions to perform sensitive operations in Microsoft Graph, this could be used as an indirect way to access Azure AD. This style of attack is also becoming a popular phishing technique for attackers. By using an Azure AD consent grant URL (Figure 7.19), an attacker can use a legitimate Azure URL to send to a phishing victim. This URL uses the built-in Azure AD permissions approval flow to allow users to approve external applications.

Figure 7.19 – OAuth phishing attack example
Moving on from Owner-related Azure AD escalation scenarios, we will now focus on escalation techniques that utilize on-premises networks.
Attacking on-premises systems to escalate in Azure
While this may seem like a diversion from attacking Azure services, many tenants have direct connections to the Active Directory environments that they are synced with. By using the connections to attack on-premises systems, an attacker may be able to escalate their privileges for the primary Active Directory environment. Escalating up to domain administrator rights will allow the attacker to access the accounts of privileged users in the domain, including those with Azure AD rights.
Since there are many potential ways to escalate in an internal environment, we will focus on some general concepts that we will use to pivot from Azure down to on-premises systems.
Identifying connections to on-premises networks
First, we will look at how we can identify network connections that bridge the cloud to an on-premises network. These connections can allow us to pivot to other networks that may allow for escalation in the general Active Directory environment.
Important note
Since a lab for this scenario would require you to set up a connection to another network, we will not be covering this in a hands-on exercise. But we will provide the instruction on how to find these connections.
From the Azure Portal, finding on-premises connections is an easy task. Just navigate to the Connections blade and a list of available connections will appear. These connections can be Site-to-site VPN or Express Route connections.
Site-to-site (IPsec) connections
Site-to-site connections rely on traditional network hardware (VPN concentrators, routers, and so on) to create a VPN tunnel from Azure to another network. Many organizations choose this option, as it allows them to integrate with existing technologies that they have in place. One of the primary differences with site-to-site is that the traffic flows over the public internet, versus a private backbone connection.
Express Route connections
For those who want a more dedicated (and private) connection to Azure from their network, Express Route connections are the preferred option. These connections are typically created for organizations through a service provider that has a relationship with Microsoft.
While it is good to understand the basics of how these connections work, what we really care about is how we can use these connections to attack other networks. Since a Virtual Gateway will be used to create these connections, we will need to review the settings for the gateway to determine which networks have access to the remote connection.
In general, if we have the Contributor (or Owner) role on a subscription, we should be able to access virtual machine resources in the virtual network with access to the connection. Worst-case scenario, we could always create a new VM in the appropriate virtual network or attach a network interface to an existing VM.
With access to an on-premises network, and some domain credentials, we will want to find any available options for escalating our privileges in the domain. We will cover some common options and tools in the following sections.
Identifying domain escalation paths
Since we are assuming that we have escalated to an Owner role, or to an account with access to multiple subscriptions, we will assume that some domain credentials were gathered at some point along the way. If not, we would recommend revisiting previous chapters to review ways that we can extract domain credentials from virtual machines and PaaS services.
Using these acquired domain credentials, we will want to use tools to identify resources in the Active Directory domain that can be used to escalate our privileges. In many environments, multiple hops between systems will be required to gain access to domain administrator rights.
As an example, here is a common domain escalation path for an Active Directory domain (ACME.local) that is integrated with Azure resources:
- An attacker gathers domain credentials (Password Guessing, Network Protocol Attacks, and so on) from Active Directory or an Azure VM.
- The attacker uses the credentials to get a Kerberos ticket in a crackable format as part of a Kerberoasting attack.
- The ticket is cracked, revealing the cleartext credentials for the associated service account (ACMESQLUser1).
- The service account has local administrator rights on the AD servers computer group.
- A server in the group (FileServer01) has an active logon session for the ACMEkfosaaen-DA account, a Domain Administrator.
- The attacker uses the SQLUser1 service account credentials to log in to the FileServer01 server as a local administrator, and dumps the Domain Administrator credentials from the LSASS process with Mimikatz.
At the time of writing, this is a common escalation path that can be used in an Active Directory domain. This is a path that can be manually identified by gathering some basic domain information (service principals, domain groups, and so on), but there are tools available to help automate the identification of these paths. We will cover some of these tools in the next sections, along with additional tools that help with pivoting between systems.
Automating the identification of escalation paths
The BloodHound tool was created to help simplify the identification of Active Directory escalation paths. The tool allows a domain user to gather critical information about the active hosts and user sessions in the domain to help chain together privileges into a graph. This graph can then be parsed to find the most direct path to the desired privileges:

Figure 7.20 – Example BloodHound graph
Using our previous example, an attacker could collect the domain data and easily find a path from the Kerberoasting attack through domain administrator privileges by using BloodHound.
BloodHound information
Creators: Andrew Robbins (Twitter: @_wald0), Rohan Vazarkar (Twitter: @CptJesus), and Will Schroeder (Twitter: @harmj0y)
Open Source or Commercial: Open source project; commercial option available
GitHub Repository: https://github.com/BloodHoundAD/BloodHound
Language: PowerShell, JavaScript
Thanks to recent updates to the tool, BloodHound also supports finding many of the Azure attack paths mentioned in this chapter. The ability to graph the Azure roles and resources relationships can be extremely helpful in identifying ways to move laterally and escalate in Azure. While we won't cover the full usage of this tool, it's one of the most powerful tools for attacking Active Directory and highly recommended for Active Directory testing.
Important note
Since building up a lab for collecting the Azure data for BloodHound would require some specialized resource assignments in the subscription, we have opted to leave out the lab for this tool. If you want to see some of the data that it collects, feel free to run any of the build scripts from previous chapters, run the AzureHound collection tool, and then import the data into BloodHound.
While it is beyond the scope of this book, there are plenty of tools available to individually gather similar pieces of the information to those gathered by BloodHound. If done carefully, this piecemeal gathering of domain information may be less obvious than the BloodHound collection methods during a penetration test, but it will require more manual interpretation of the data (and specific knowledge of attack paths) to identify those same paths found by BloodHound.
Tools for pivoting along escalation paths
With a clear path in mind for pivoting through the on-premises environment, we will need some tooling to help us automate some of this process to make our job easier. Thankfully, many common escalations can be completed from non-domain joined systems, without the need for custom tools. However, one of the best ways to maintain a low profile during an assessment is by living off the LAN by using native system management tools (RDP, PS Remoting, and so on).
Since native Windows tools don't have intrinsic support for things such as credential gathering and process migration, additional tools may be needed to complete our objectives. Since these tools could each have their own dedicated book, we will just highlight a few of them here and leave it up to the reader to learn these tools:
- Metasploit
- CrackMapExec
- Cobalt Strike
- Empire
- Red Team Toolkit
- Covenant
These tools can all be used as part of lateral movement and escalation in a domain. While the tools are not always needed, they can help simplify some of the efforts.
While this will always be influenced by the available paths in the environment, we will generally use the following methodology to pivot between systems in a domain environment during escalation:
- Obtain access to domain or local credentials.
- Use credentials or exploits to gain local administrator access to a system.
- Compromise available credentials on the system.
- Identify additional targets to pivot to.
- Move laterally to additional targets, and restart the cycle.
Once domain administrator credentials are gathered during the preceding process, we move into a new phase where we gather credentials for privileged Azure users and use those to pivot into the Azure tenant.
Next, we will cover what to do once we have escalated internally on the domain.
General tips for post domain escalation and lateral movement
Domain administrator rights should not be the end of the line for an internal network penetration test. By stopping at domain administrator, you are showing that you have full control of the domain, but you aren't showing the potential impact of those rights. On an internal penetration test, an attacker can use these privileges to access sensitive data stores and drive home the potential dangers of an attacker escalating privileges.
The same methodology applies with an Azure penetration test. Getting domain administrator rights should really just be a foothold in working our way back up into the Azure AD environment as a privileged user. Since the Azure AD environments are so closely tied to the main Active Directory environments, there are many options for gaining control over Active Directory accounts that can allow us to pivot into Azure.
The first step after gaining domain administrative rights should be gathering domain NTLM hashes from a domain controller. This will open up the following opportunities for us:
- Cracking gathered hashes to obtain plaintext credentials
- Using the password hashes for Pass-the-Hash (PtH) attacks
- Persisting in the domain with golden ticket attacks (using the domain krbtgt account hash)
Since dumping all of the domain hashes can be a bit noisy, you may want to target specific accounts (krbtgt, domain/global administrators, and so on) for hash dumping. Additionally, those responsible for your domain may not appreciate having to reset every domain password, so make reasonable choices when dumping domain hashes.
For demonstration's sake, let's assume that we've gathered all of the domain NTLM hashes for the Global Administrator accounts in the Azure tenant. If we are able to crack any of these hashes, we may be able to use the cleartext credentials to pivot into the Azure tenant with a privileged role.
You may be thinking that all of these privileged accounts would be protected by MFA and conditional access policies. This is not always the case. While it is becoming more common to enforce MFA for all accounts, the authors have run into frequent scenarios where users are provisioned a privileged Azure AD role, but they never configure MFA for the account. Your mileage may vary, but it may be worth a try.
Alternatively, we can use the gathered domain credentials (cleartext or hashes) for privileged users to use for accessing systems used by Azure administrators. As previously mentioned, Azure tokens can be stored on user workstations in the .Azure profile folders. By accessing the workstations with one of the compromised privileged accounts, we may be able to assume the token of the Azure admin user. We will cover this process in depth in the following chapter as a method for obtaining persistence in the environment.
Finally, with administrative rights, we may have control over the MFA systems that are in use for the Azure environment. If third-party (Okta, Duo, and so on) MFA systems are in use, a privileged domain user may have control over the tokens for other users. By cracking a Global Administrator's password and granting them a new MFA token (on your device), you may be able to take over their Azure account.
Now that we have reviewed our options for using on-premises resources for escalation, let's clean up the resources that were created for the scenarios in this chapter.
Hands-on exercise – Cleaning up the Owner exploit scenarios
In this final exercise, we will use a cleanup script to automate the removal of the resources that were set up for the scenarios in this chapter. Here are the tasks that we will complete in this exercise:
- Download the cleanup script from GitHub.
- Run the script to remove the objects and resources created for the scenarios.
Here are the steps to complete these tasks:
- Open a web browser and browse to the Azure Portal (https://portal.azure.com). Sign in with the azureadmin credentials.
- In the Azure Portal, click on the Cloud Shell icon in the top-right corner of the Azure Portal. Select PowerShell:

Figure 7.21 – Opening Cloud Shell
- In the PowerShell session within the Cloud Shell pane, run the following command to download a script to clean up the scenarios that were built out for this chapter. Verify the download also:
PS C:> Invoke-WebRequest https://bit.ly/owner-scenario-cleanup -O owner-scenario-cleanup.ps1
PS C:> Get-ChildItem
Here is a screenshot of what it looks like:

Figure 7.22 – Results of downloading the script
- Run the downloaded script to remove the objects and resources that were created for the exercises in this chapter using the following command:
PS C:> ./owner-scenario-cleanup.ps1
Wait for the script to complete. This may take about 8 minutes:

Figure 7.23 – Results of running the cleanup script
Congratulations! You have completed all the exercise scenarios in this chapter and successfully removed the resources that were set up from your subscription.
Summary
In this chapter, we have reviewed the many ways that an attacker may be able to pivot up to privileged Azure AD roles in a tenant from a subscription Owner role. We also reviewed the ways that an attacker can use Azure AD access to gain rights on subscriptions within the tenant. While it's not always necessary to do so in an Azure penetration test, moving between subscriptions and Azure AD can be one of the best ways to show the full impact of privilege escalation in an environment.
In our next (and final) chapter, we will show how you can use this access to create persistence opportunities for yourself at all levels of the Azure tenant. From virtual machines up through Azure AD, we will review the available options for persisting access in an Azure tenant.