
Chapter 17
Making Creations
IN THIS CHAPTER
![]() Understanding creations
Understanding creations
![]() Understanding common creation assembly
Understanding common creation assembly
![]() Creating Memories videos
Creating Memories videos
![]() Creating other projects, such as photo collages or photo calendars
Creating other projects, such as photo collages or photo calendars
Adobe Photoshop Elements offers you a number of creations that you can share onscreen or in print. From both the Create and Share panels in the Panel Bin in the Organizer and Photo Editor, you have a number of menu choices for making creations designed for sharing.
In this chapter, we talk about creations designed for print and sharing. It’s all here in Photoshop Elements, for both Windows and Mac users. If you’re looking for how to create files for screen and web viewing, flip back to Chapter 16.
Checking Out the Create Panel
To see the creations available on the Create panel, as shown in Figure 17-1, click the Create tab above the Panel Bin. Like the Share panel we introduce in Chapter 16, the Create panel is available from either the Organizer or the Photo Editor. The Photo Editor doesn’t support video creations; therefore, the Organizer offers you three additional items not available in the Photo Editor.
The Create panel offers identical options in Windows and the Mac. You find options for creating photo prints, photo books, greeting cards, photo calendars, photo collages, an assortment of choices for DVD labels and jackets, and two options for use with Adobe Premiere Elements (Instant Movie and Video Story). Keep in mind that you need to acquire the bundle of Photoshop Elements and Premiere Elements in order to use the video creation options.
The video collage creation offers you a means for creating a collage of video clips and still images to assemble your most memorable events. As with other video creations, you need to install Adobe Premiere Elements.
Note: When you open the Create panel in the Photo Editor, you won’t see the options for video creations.

FIGURE 17-1: The Create panel from the Organizer.
Grasping Creation-Assembly Basics
Creations such as photo books, greeting cards, photo calendars, and photo collages that you assemble from the Create panel (refer to Figure 17-1) are intended for output to either print or screen sharing.
Many creation options follow a similar set of steps to produce a file that is shared with other users or sent to an online printing service. In the Panel Bin, you can find all you need to make a new project by choosing layouts and producing a creation. Here are the common steps to follow when making a choice from the Create panel:
-
Select photos.
In the Organizer or in the Photo Bin in the Photo Editor, select the photos you want to use for your creation. Sort photos or use keyword tags (as we explain in Chapters 5 and 6) to simplify finding and selecting photos you want to use for a creation.
 If you want to use photos from different folders, or when the images are spread around your hard drive, create an album, as we explain in Chapter 5. If you want to use the photos once for a creation, you can delete the album. Or you can keep the album around and use the same photos with several different creations.
 -
Click the Create tab.
The Create panel opens in the Panel Bin. The minute you click a creation, you’re switched automatically to the Photo Editor.
-
Click an option for the type of creation you want.
You can click Photo Book, Photo Calendar, Greeting Card, Photo Collage, and so on.
After you select the kind of creation you want to make, a wizard opens, and you choose the options you want.
 When you create a calendar, select 13 images. One image is used for the calendar cover and the remaining 12 images are used for each month.
 -
Select a size for the output in the left column.
In Figure 17-2, we selected to make a photo book, and the sizes are displayed in the left column.

FIGURE 17-2: Select a theme for your creation.
-
Select a theme/layout.
Many of the creation options enable you to select a template. When you click a creation option on the Create panel, the panel changes to display choices for various themes, backgrounds, and borders. You make choices by clicking the theme or background. In Figure 17-2, you can see the Themes column for a photo book creation.
Most assets, such as themes, are not installed with your Photoshop Elements installation. When you select an asset such as a theme, it’s downloaded from Adobe’s website. A message window informs you that a download is in progress. Be patient and wait for the download to complete before moving on.Elements automatically creates the number of pages to accommodate the number of photos you selected in the Organizer or Photo Bin.
-
Select your options in the Create panel. Click OK.
The Create panel changes to a wizard and displays three icons at the bottom of the panel, as shown in Figure 17-3:
- Pages: Add or delete pages.
- Layouts: Choose a layout, as shown in Figure 17-4. You can click different layouts and view the results in the wizard.
- Graphics: Add artwork and text with the Graphics panel. Explore each item and choose options available for editing your creation.

FIGURE 17-3: The Pages panel.

FIGURE 17-4: The Layouts panel offers choices for many layouts.
When you make a creation, you can determine the number of pages at the time you first choose a creation. Often, you forget about creating enough pages, or you find that you need more pages than originally anticipated. It can be downright frustrating if you need more pages but don’t know how to add the number you need. If you look closely at the top of the Pages panel, you find a Page icon. Click this icon to add more pages. To insert a page between two existing pages, click the first page in the sequence. Click the Page icon in the Pages panel, and the new pages are inserted after the selected page. To delete a page, select the page and click the Trash icon at the top of the Pages panel. -
(Optional) Select options in the creation’s Advanced mode.
Up to this point, you couldn’t make any changes to your photos (other than sizing and rotating) because the wizard interface is separate from the Organizer and Photo Editor.
Click the Advanced Mode button in the upper-left corner of the wizard, and you have access to the Photo Editor Tools panel. You can now make edits on any photos in the creation, as shown in Figure 17-5.
When you click Advanced Mode, the button name changes to Basic Mode. Click the Basic Mode button to return to the Create panel.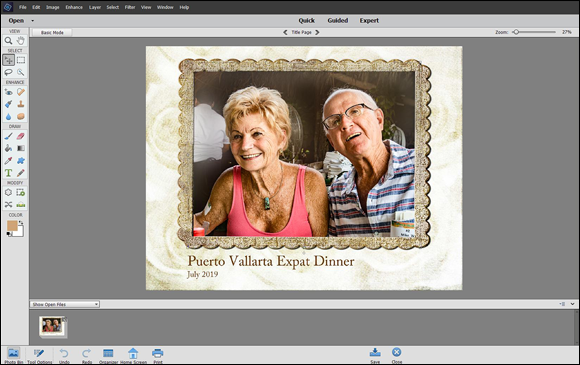
Photo: Ted Padova
FIGURE 17-5: Advanced mode provides you with the Photo Editor tools to edit photos in your creation before saving or printing.
- Click the output option at the bottom of the wizard:
- Save: Save the file as a Photoshop Elements Project. You can return to the project and edit it at a later time.
- Print: Before the output is generated, look over the preview of your creation. If you’re using Advanced mode, click the Basic button at the top of the window and scroll through the pages to preview the creation.
Whether you want to create a photo book, a calendar, or any one of the other first five options in the Create panel, you follow the same steps.
When you make a creation that will ultimately be shared with other users or sent to an online service for printing, you must first select the photos you want in your creation. For example, creating a photo book by clicking the Photo Book button on the Create panel first requires you to select photos.
The reason you must first select photos — in either the Organizer or Photo Bin — is because the creation process involves using a wizard to set the attributes for your creation. Elements must first know what photos you intend to use before it can open a wizard to walk you through the creation process.
Creating a Quote Graphic
 A new creation opportunity has been introduced in Elements 2021. It’s called Quote Graphic, and it deviates from the way we create Photo Collages, Photo Books, and Greeting Cards.
You begin with a photo open in the Photo Editor, select a photo in the Organizer, or start from scratch without selecting a photo. In the Create drop-down list that you open from either the Organizer or the Photo Editor, choose Quote Graphic.
The first panel opens, showing you the templates you can choose from. One option lets you start from scratch without using a template, as shown in Figure 17-6.
Click the template you want to use. The panel immediately changes to an assortment of fixed sizes and sharing destinations. For example, you can make an Instagram post, a Facebook Cover, a Twitter, or a Pinterest post. If you don’t want to post to a social media site, you can choose from a number of different fixed sizes that you can open in the Photo Editor, as shown in Figure 17-7.

FIGURE 17-6: The first panel for the Quote Graphic creation.

FIGURE 17-7: Choose from a variety of social media and common photo and document sizes.
Click an option in the second panel, and you arrive at the Background/Effects panel. The default is the Background panel, where you can choose from a number of different background designs and colors. Click the Effects panel, and you can choose from a huge assortment of different kinds of effects.
The default photo appears in the panel, as shown in Figure 17-8. To replace the photo, open the Photo Bin in the Photo Editor and drag a photo to the document. When finished, click the Save button that appears at the bottom of the Background/Effects panels.

FIGURE 17-8: The Background/Effects panel.

FIGURE 17-9: Final edited photo using the Quote Graphic creation.
In Figure 17-9, you can see our final image after using the Beautiful Moments template.
Creating a Memories Video
When you click the Slideshow button, you can create a video referred to as Memories. Select an album, photos in the Media Browser, or some Smart Picks and then click Slideshow in the Create panel or click the Slideshow button at the bottom of the Organizer window. The Memories Wizard opens. In this window, you find three buttons in the upper-left corner. Click the first button, and you see all the photos that will be included in the video. Click the plus (+) icon, and you can add more images. Click the Show Text check box, and you can add captions to the images.
The second button displays several different Themes you can use with a video, as shown in Figure 17-10. Click a Theme to use it with your video export.
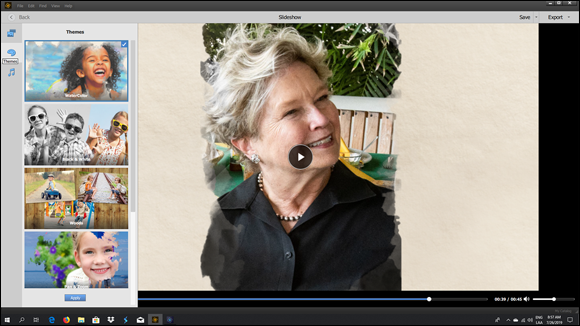
FIGURE 17-10: Click a Theme to apply to the video.
The last button enables you to choose an audio track. You can choose from audio files loaded in the Organizer or click the plus (+) icon to add an audio file from your hard drive.
When finished making the choices for your images, Theme, and audio track, click the Export button in the upper-right corner of the window. You can export directly to your Facebook account, export to Vimeo, export to YouTube, or save the video file to your hard drive.
To double-check your work, try to export the file to your hard drive and view it on your monitor before uploading the file to a social media site.
Creating a PDF Slideshow
In the Share panel, you have the PDF Slideshow option. When you select photos in the Organizer and choose this option, the Share panel opens and provides the same options as you find when using email (as described in Chapter 16). The only difference between this option and choosing to email your photos is that the selected images are saved as a PDF and then emailed to the recipients you select in the Share panel.
Making Additional Creations
Unfortunately, we don’t have room in this book to cover each creation. Fortunately, many of the other creation types are intuitive and easy to master. To create instant videos, you need Adobe Premiere Elements. Other readily available items include photo books, greeting cards, photo stamps, calendars, and CD/DVDs that you burn (Windows only). For each creation type, Elements provides you with many editing options. Explore each of the creations available to you and consult the online Help file for steps you can follow.