
8
SPI and I2C

This chapter introduces you to the Serial Peripheral Interface (SPI) and the Inter-Integrated Circuit (I2C), two common communication protocols in IoT devices that use microcontrollers and peripheral devices. As you learned in Chapter 7, sometimes simply connecting to interfaces, such as UART and JTAG, gives us direct access to a system shell, maybe one that the manufacturers left purposely. But what if the device’s JTAG or UART interfaces require authentication? Or worse, what if they’re not implemented? In those cases, you’ll still likely find older protocols like SPI and I2C built into the microcontrollers.
In this chapter, you’ll use SPI to extract data from EEPROM and other flash memory chips, which often contain firmware and other important secrets, such as API keys, private passphrases, and service endpoints. You’ll also build your own I2C architecture and then practice sniffing and manipulating its serial communications to force the peripherals to perform actions.
Hardware for Communicating with SPI and I2C
To communicate with SPI and I2C, you’ll need some specific hardware. You could use a breakout board or programmer for EEPROM/flash memory chips if you’re willing to desolder the chips (which should be your last resort). But if you prefer to not desolder anything from the circuit board, you can use either test hook clips or small outline integrated (SOIC) clips, which are cheap and handy.
For the SPI project in this chapter, you’ll need an eight-pin SOIC clip cable or hook clips to connect to the flash memory chips. SOIC clips (Figure 8-1) might be tricky to use, because you need to align the pads perfectly when connecting the clip to the chip. Hook clips might work better for some people.

Figure 8-1: An eight-pin SOIC cable
You’ll also need a USB-to-serial interface. Although you could use the adapter used in Chapter 7, we recommend the Bus Pirate (http://dangerousprototypes.com/docs/Bus_Pirate), a robust open source device that supports multiple protocols. It has built-in macros for IoT hacking, including scanning and sniffing capabilities for I2C and many other protocols. You could also try more expensive tools that can parse I2C messages in more formats, like the Beagle (https://www.totalphase.com/products/beagle-i2cspi/) or Aardvark (https://www.totalphase.com/products/aardvark-i2cspi/). In this chapter, you’ll learn how to use Bus Pirate’s built-in macros to perform common attacks.
Additionally, to run the I2C lab exercise later in this chapter, you’ll need an Arduino Uno (https://store.arduino.cc/usa/arduino-uno-rev3/), at least one BlinkM LED (https://www.sparkfun.com/products/8579/), a breadboard, and some jumper cables.
You might also use Helping Hands, devices that help you hold multiple hardware parts. They have a wide range of prices. Refer to “Tools for IoT Hacking” for a complete list of tools along with descriptions of some of their strengths and weaknesses.
SPI
SPI is a communication protocol that transmits data between peripherals and microcontrollers. Found in popular hardware like the Raspberry Pi and Arduino, it’s a synchronous communication protocol, which means it can transfer data faster than I2C and UART. Often, it’s used for short-distance communications in places where read and write speeds matter, such as in Ethernet peripherals, LCD displays, SD card readers, and the memory chips on almost any IoT device.
How SPI Works
SPI uses four wires to transmit data. In full duplex mode, when data transmissions happen simultaneously in both directions, it relies on a controller-peripheral architecture. In such an architecture, the device that serves as the controller generates and controls a clock that regulates the data transfer, and all devices that serve as peripherals listen and send messages. SPI uses the following four lines (not counting the ground):
- Controller In, Peripheral Out (CIPO) For messages sent by peripherals to the controller
- Controller Out, Peripheral In (COPI) For messages from the controller to peripherals
- Serial Clock (SCK) For an oscillating signal that indicates when devices should read lines of data
- Chip Select (CS) To select the peripheral that should receive a communication
Notice that, unlike UART, SPI uses separate lines for sending and receiving data (COPI and CIPO, respectively). Also note that the hardware required to implement SPI is cheaper and simpler than UART, and it can achieve higher data rates. For these reasons, many microcontrollers used in the IoT world support it. You can learn more about SPI implementations at https://learn.sparkfun.com/tutorials/serial-peripheral-interface-spi/all/.
Dumping EEPROM Flash Memory Chips with SPI
Flash memory chips often contain the device’s firmware and other important secrets, so extracting data from them can yield interesting security findings, such as backdoors, encryption keys, secret accounts, and so on. To locate the memory chips in an IoT device, open its external case and remove the PCB.
Identifying the Chip and Pins
Locate your device’s flash memory chip. Products that have been hardened for security will usually delete the chip labels on the device, but flash memory chips commonly have 8 or 16 pins. You can also find the chip by looking up the microcontroller’s datasheet online, as we did in Chapter 7. The datasheet should contain a diagram showing the pins’ configuration and descriptions. The datasheet will likely also contain information confirming whether the chip supports SPI. Other information, such as protocol version, speeds supported, and memory size, will also prove useful when configuring the tools for interacting with SPI.
Once you’ve identified the memory chip, find the small dot at one of the chip’s corners that labels pin #1 (Figure 8-2).
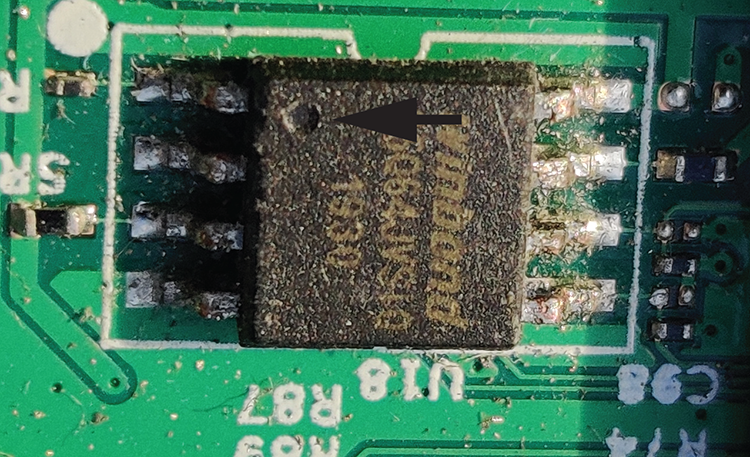
Figure 8-2: The flash memory chip
Now connect the first pin of an eight-pin SOIC cable to pin #1. The first pin of the SOIC clip often has a different color than the others, making it easier to find. Use the pin configuration pulled from the datasheet to align the rest of the SOIC pads correctly. Figure 8-3 shows a common alignment. For example, the WinBond 25Q64 memory chip uses this alignment.

Figure 8-3: A memory chip’s pin configuration diagram
When you’ve connected all parts of the SOIC clip to the memory flash chip, your setup should look like the one in Figure 8-4. Be careful connecting the SOIC clip because you can easily damage the pins.

Figure 8-4: SOIC clip connected to the flash memory chip
If you’re having trouble aligning the pads, test hook clips (Figure 8-5) work too; you might find them easier to connect.
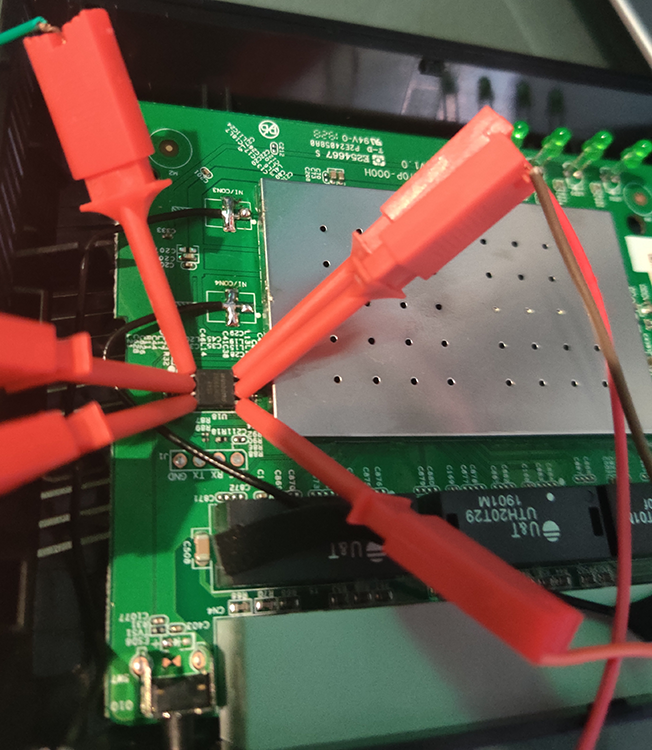
Figure 8-5: Hook clips connect to the SPI pins
Communicating with the SPI Chip
You’ll need a USB-to-serial adapter to read the memory chip’s contents. We’ll use the Bus Pirate in this example, but you could use any adapter, because most support read operations. If you use the Bus Pirate, make sure you upgrade its firmware to the latest stable release.
Make sure the device whose memory you’re extracting is powered off; then make the connections. Connect the Bus Pirate’s pins and the chip’s pins using the SOIC clip, as the datasheet indicates. For example, we’d connect the pins for the WinBond 25Q64 chip as shown in Table 8-1.
Table 8-1: Connecting the Pins
| Device/Bus Pirate |
| Pin #1 (CS) → CS |
| Pin #2 (DO) → CIPO (MISO) |
| Pin #4 (GND) → GND |
| Pin #5 (DI) → COPI (MOSI) |
| Pin #6 (CLK) → CLK |
| Pin #8 (VCC) → 3V3 |
When you’re done, your connections should look like those in Figure 8-6.

Figure 8-6: The Bus Pirate connected to the SPI chip with hook clips. We used Helping Hands to hold the different components.
Now, while the device whose memory you’ll read is powered off, connect the Bus Pirate’s USB cable to your computer. You can test your communication with the SPI chip using the flashrom Linux utility, which you can download from https://flashrom.org/Flashrom (or most package managers). The following command will identify the memory chipset:
# flashrom -p buspirate_spi:dev=/dev/ttyUSB0Make sure you replace ttyUSB0 with the device descriptor to which the USB-to-serial adapter has been assigned. It will usually be something like ttyUSB<number>, and you can issue the ls /dev/tty* command to see the descriptors on your system. The utility will either identify the SPI chip or return the message No EEPROM/flash device found.
Reading the Memory Chip Contents
Once you’ve established communication with the chip, you can perform a read operation to obtain its contents. Issue a read operation using the following flashrom command:
# flashrom -p buspirate_spi:dev=/dev/ttyUSB0 -r out.bin The -r flag issues a read operation that saves the contents in the specified file. The -p flag specifies the adapter’s name. The Bus Pirate’s name in this context is buspirate_spi, but you should change this name if you’re using another adapter. You should see output similar to the following:
Found Winbond flash chip “W25Q64.V” (8192 kB, SPI).
Block protection is disabled.
Reading flash…
Once the command is done running, the output file should match the chip storage size listed in the command output. For this chipset, it was 8MB.
Alternatively, you can get the chip’s contents using the popular spiflash.py script from libmpsse. Download the library, created by devttys0, from https://github.com/devttys0/libmpsse/, then compile and install it:
# cd libmpsse
# ./configure && make
# make install
If everything worked, you should be able to run spiflash.py. To make sure the tool detects the chip correctly and that all your pin connections are correct, execute spiflash.py and look for the chipset name in the output. To extract the memory stored in the chip, enter the following command:
# spiflash.py -r out.bin -s <size to read> For example, to read 8MB, run this command:
# spiflash.py -r out.bin -s $((0x800000))If you don’t know the size of the flash memory to extract, choose a random value large enough to hold the entire flash memory’s contents.
Now that you’ve extracted the flash memory, you could run the strings utility to begin looking at the information or perform further analysis with tools like binwalk. You can learn more about firmware security testing in Chapter 9.
I2C
Pronounced “I squared C,” I2C is a serial communication protocol for low-speed devices. Phillips Semiconductors developed I2C in the 1980s for communications between components on the same circuit board, but you can also use it between components connected via cable. In the IoT world, you’ll often find it in microcontrollers, I/O interfaces like keyboards and buttons, common household and enterprise devices, and sensors of all types. Crucially, even the sensors in many Industrial Control Systems (ICS) use I2C, making its exploitation high stakes.
The main advantage of this protocol is its simplicity. Instead of the four wires that SPI uses, I2C has a two-wire interface. In addition, the protocol allows hardware without built-in I2C support to use I2C through general purpose I/O pins. But its simplicity, and the fact that all data travels over the same bus, makes it an easy target if you want to sniff or inject your own data. The reason is that no authentication occurs between components in IoT devices sharing the same I2C bus.
How I2C Works
I2C’s simplicity allows hardware to exchange data with no strict speed requirements. The protocol uses three lines: the serial data line (SDA) for transmitting data, the serial clock line (SCL) to determine when the data gets read, and the ground line (GND). SDA and SCL lines are connected to the peripherals and they’re open drain drivers, meaning that both lines need to be connected to resistors. (You’ll need only one resistor for each line, not one for every peripheral.) Voltages vary from 1.8 V, 3.3 V, and 5.0 V, and transfers can occur at four different speeds: 100 kHz, or the initial speed according to I2C specifications; 400 kHz, which is the fast mode; 1 MHz, called high speed mode; and 3.2 MHz, called ultrafast mode.
Like SPI, I2C uses a controller-peripheral configuration. The components transfer data over the SDA line, bit by bit, in eight-bit sequences. The controller, or multiple controllers, manages the SCL line. An I2C architecture supports more than one controller and one or more peripherals, each with unique addresses used for communication. Table 8-2 shows the structure of a message sent from a controller to a peripheral.
Table 8-2: An I2C Message Sent to a Peripheral over SDA
| START | I2C address (7 or 10 bits) | Read/Write bit | ACK/NACK bit | Data (8 bits) | ACK/NACK bit | Data (8 bits) | STOP |
The controller begins each message with a START condition that signals the beginning of the message. Then it sends the peripheral’s address, which is usually 7 bits long but can be as long as 10 bits. This allows for up to 128 (if using 7-bit addresses) or 1024 peripherals (if using 10-bit addresses) on the same bus. The controller also appends a Read/Write bit that indicates the kind of operation to perform. An ACK/NACK bit indicates what the following data segment will be. SPI divides the actual data into eight-bit sequences, each of which ends in another ACK/NACK bit. The controller ends the message by sending the STOP condition. For more information about the protocol, visit https://www.i2c-bus.org/.
As mentioned previously, the I2C protocol supports multiple controllers on the same bus. This is important, because by connecting to the bus, we could act as another controller, and then read and send data to the peripherals. In the next section, we’ll set up our own I2C bus architecture so we can do exactly that.
Setting Up a Controller-Peripheral I2C Bus Architecture
To demonstrate how to sniff I2C communications and write data to peripherals on the bus, let’s set up a classic controller-peripheral architecture with some help from the following open source hardware:
- The Arduino Uno microcontroller (https://store.arduino.cc/usa/arduino-uno-rev3/) to act as the controller.
- One or more BlinkM I2C-controlled RGB LEDs (https://www.sparkfun.com/products/8579/) to act as peripherals. You can find the complete BlinkM documentation, including examples of other ways to program them, at https://thingm.com/products/blinkm/.
We chose to use the Arduino Uno because the analog pins it uses for SDA and SCL have built-in resistors, so we won’t need to add pull-up resistors to the circuit. Also, this lets us use Arduino’s official Wire library to manage the I2C bus as the controller and send commands to the I2C peripherals. Table 8-3 lists the Arduino Uno analog pins that support I2C.
Table 8-3: Arduino Uno Pins for I2C Communications
| Arduino analog pin | I2C pin |
| A2 | GND |
| A3 | PWR |
| A4 | SDA |
| A5 | SCL |
Identify pins A2, A3, A4, and A5 on the Arduino Uno and then connect male-to-male Dupont cables to them, as shown in Figure 8-7.

Figure 8-7: The analog pins are located in the bottom-right corner of the Arduino Uno.
Next, identify the GND (-), PWR (+), SDA (d), and SCL (c) pins on the BlinkM LED by checking the label at the top of each pin, as shown in Figure 8-8.
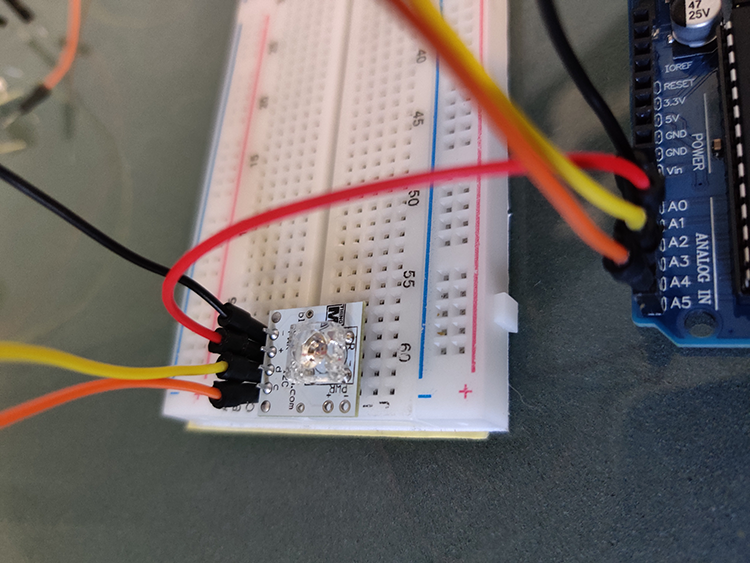
Figure 8-8: The BlinkM GND, PWR, data, and clock pins are clearly labeled.
Now, use a breadboard to connect the BlinkM LED and cables to the corresponding pins on the Arduino, as described in .
Table 8-4: Arduino/BlinkM Connections
| Arduino Uno/BlinkM RGB LED |
| Pin A2 (GND) → PWR - |
| Pin A3 (PWR) → PWR + |
| Pin A4 (SDA) → d (for data) |
| Pin A5 (SCL) → c (for clock) |
Figure 8-9 shows these connections.

Figure 8-9: We can connect SDA and SCL without resistors because the Arduino pins include built-in resistors.
If you have more than one I2C peripheral, connect them to the same SDA and SCL lines. Choose one line of the breadboard for SDA and another one for SCL; then connect the devices to those lines. For example, Figure 8-10 shows two connected BlinkMs. BlinkM LEDs of the same type all come with the same I2C address (0x09) by default, which is programmable, as indicated in the product datasheet available at https://www.infinite-electronic.kr/datasheet/e0-COM-09000.pdf. (This illustrates why you should always consult the datasheet, if it’s available; the information you find could save you reverse engineering efforts. In black box assessments, you might not be so lucky.)

Figure 8-10: An I2C bus supports up to 128 peripherals with 7-bit addresses.
Once you’ve connected the controller (Arduino) and peripheral (BlinkM LED), program the Arduino to join the bus and send some commands to the peripherals. We’ll use the Arduino IDE to write the program. See Chapter 7 for an introduction to the Arduino, as well as installation instructions. In the IDE, select the Arduino board you’re using by clicking Tools▶Board▶Arduino/Genuino UNO, and then upload the code in Listing 8-1.
#include <Wire.h>

void setup() {
  1 pinMode(13, OUTPUT); //Disables Arduino LED
  pinMode(A3, OUTPUT); //Sets pin A3 as OUTPUT
  pinMode(A2, OUTPUT); //Sets pin A2 as OUTPUT
  digitalWrite(A3, HIGH); //A3 is PWR
  digitalWrite(A2, LOW); //A2 is GND
  2 Wire.begin(); // Join I2C bus as the controller
}

byte x = 0;

void loop() {
  3 Wire.beginTransmission(0x09);4 Wire.write('c');
  Wire.write(0xff);
  Wire.write(0xc4);
  5 Wire.endTransmission();

  x++;
  delay(5000);
}
Listing 8-1: The I2C controller code that will administer the BlinkM RGB LED
The code configures the Arduino pins for I2C communication 1, joins the I2C bus as the controller 2, and, using a loop, periodically sends a message to the peripherals with the address 0x09 3. The message contains commands to light up the LEDs 4. You can find lengthier descriptions of these commands in the BlinkM’s datasheet. Finally, the code sends a STOP sequence to indicate the end of the message 5.
Now connect the Arduino Uno to the computer to power the circuit and upload your code. The BlinkM RGB LEDs should receive the commands and blink accordingly (Figure 8-11).
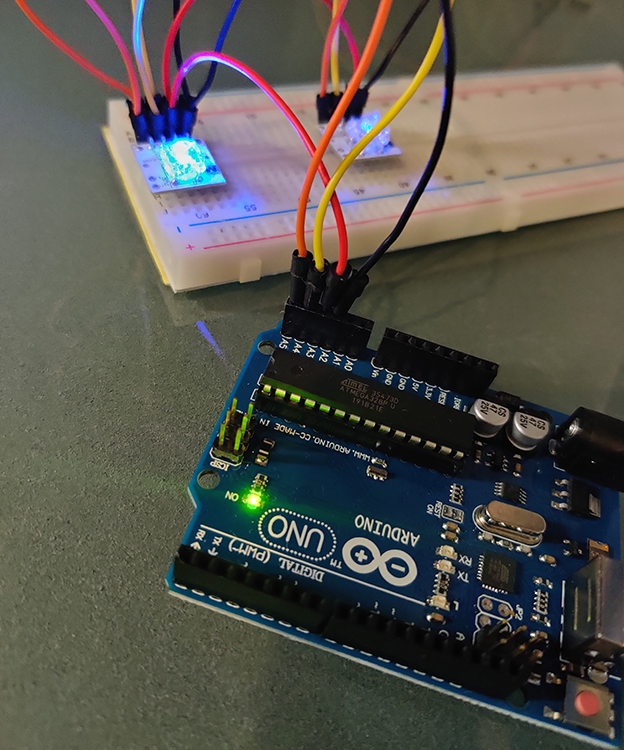
Figure 8-11: The BlinkM LEDs receiving signals via I2C from the Arduino Uno
Attacking I2C with the Bus Pirate
Let’s connect the Bus Pirate to our I2C bus and start sniffing communications. The Bus Pirate’s firmware has built-in support for I2C. It also has a couple of useful macros that we can use to analyze and attack I2C communications.
We’ll use the following pins on the Bus Pirate: COPI (MOSI), which corresponds to the I2C SDA pin; CLK, which corresponds to the SCL pin; and GND. Connect these three lines from the Bus Pirate to the I2C bus (Table 8-5) using jumper cables.
Table 8-5: Connections from the Bus Pirate to the I2C Bus
| Bus Pirate/Breadboard |
| COPI (MOSI) → SDA |
| CLK → SCL |
| GND → GND |
Once the pins are all connected, plug the Bus Pirate into your computer. To interact with it, you’ll need to connect it to the serial communication (COM) port using the default speed of 115,200 bauds. On Linux, do this using the screen or minicom utilities:
$ screen /dev/ttyUSB0 115200On Windows, open the Device Manager to see the COM port number. Then use PuTTY with the configuration shown in Figure 8-12.

Figure 8-12: Configuring PuTTY to connect to the Bus Pirate
Once you’ve set the configuration in PuTTY, click Open. You should now have an established connection.
Detecting I2C Devices
To enumerate all the I2C devices connected to the bus, use the Bus Pirate’s I2C library to search the entire address space. This yields all I2C chips connected, as well as undocumented access addresses. We begin by setting the Bus Pirate’s mode using the m command:
I2C>m
1. HiZ
2. 1-WIRE
3. UART
4. I2C
5. SPI
6. 2WIRE
7. 3WIRE
8. LCD
9. DIO
x. exit(without change)
Select 4 to choose the I2C mode, and then set the desired speed:
(1)>4
Set speed:
 1. ~5KHz
 2. ~50KHz
 3. ~100KHz
 4. ~400KHz

(1)>4
Ready
We set a speed of 4, which corresponds to approximately 400 kHz, or the I2C fast rate, because the controller, the Arduino Uno, operates on that speed.
The I2C library supports two macros. The first is the address search macro, which will automatically try every I2C address. Then it looks for a response to determine how many peripherals are connected and if you can use any other addresses, such as broadcast addresses. Execute the macro by entering the (1) macro command:
I2C>(1)
Searching I2C address space. Found devices at:
0x00(0x00 W) 0xFF(0x7F R)
This macro displays the addresses, followed by the 7-bit address with a bit indicating whether the address is for reading or writing. In this case, we see the addresses 0x00(W), the BlinkM broadcast address, and 0x7F, which belongs to the BlinkM LED.
Sniffing and Sending Messages
The second macro built into the Bus Pirate’s I2C library is the sniffer. This macro displays all START/STOP sequences, ACK/NACK bits, and data shared through the I2C bus. Once again, we need to put the Bus Pirate in I2C mode, select the speed, and then execute macro number two using the command (2):
I2C>(2)
Sniffer
Any key to exit
[0x12][0x12+0x63+]][0x12+0x63+0xFF+0xC4+][0x12+0x63+]][0x12+0x63+]][0x12+0x63+]][0x12+0x63+]][0x12+0x63+0xFF+0xC4+][0x12+0x63+0xFF+0xC4+][0x12+0xC6-0xFD-][0x12+0x63+0xFF+]]
The captured data appears on the screen using Bus Pirate’s message format for I2C, allowing us to copy and paste the message to replay it, if desired. Table 8-6 shows the syntax Bus Pirate uses to represent I2C characters.
Table 8-6: Bus Pirate Symbols Corresponding to I2C Message Components
| I2C characters | Bus Pirate symbols |
| START sequence | [ or { |
| STOP sequence | ] or } |
| ACK | + |
| NACK | - |
Corroborate that your sniffer is working correctly by matching the sniffer data with the data sent by the Arduino Uno.
Now, to send data to any of the peripherals on the bus, enter the message on Bus Pirate’s prompt directly or copy any message you want to replay. We can see the command structure for changing color in the traffic, and by looking at the datasheet, we can deduce its structure. Now we can test it by replaying the command:
I2C>[0x12+0x63+0xFF+0xC4+]
I2C START BIT
WRITE: 0x12 NACK
WRITE: 0x63 NACK
WRITE: 0xFF NACK
WRITE: 0xC4 NACK
I2C STOP BIT
The output shows the sequence bits and data you’ve written on the bus. Analyze the bus traffic on your own devices to identify patterns, then try sending your own commands. If you used the demo I2C bus shown in this chapter, you can find more valid commands on the BlinkM’s datasheet.
The stakes of replaying this command are fairly low; we’re only flashing lights in patterns. But in real-world attacks, you could use the same technique to write MAC addresses, flags, or factory settings, including serial numbers. Using the same approach as we used here, you should be able identify I2C buses on any IoT device and then analyze the communications between components to read and send your own data. In addition, due to this protocol’s simplicity, it’s very likely you’ll find it in all kinds of devices.
Conclusion
In this chapter, you learned about two of the most common protocols found in IoT devices at the hardware level: SPI and I2C. Fast peripherals are likely to implement SPI, whereas I2C can be implemented even in microcontrollers that don’t have it embedded by design, due its simplicity and cheap hardware requirements. The techniques and tools we discussed allow you to take apart devices and analyze them to understand their functionality for identifying security weaknesses. Throughout the chapter, we used the Bus Pirate, one of the many great tools available for interacting with SPI and I2C. This open source board has robust support for most communication protocols in IoT, including built-in macros for analyzing and attacking a wide variety of IoT devices.