
____________________________
In This Chapter
- Layered Security
- Management Roles
- Management Role Entries - Granular Permissions
- Management Role Groups
- Special Management Role Groups
- Default User Role
- Impersonation
- Management Scopes
- Auditing
- Admin Audit Logs
- Mailbox Audit Logs
____________________________
Ingrained in the coding of Exchange Online are layers of security that are used to prevent unauthorized access to various areas of Exchange like mailbox data, configuration and more. The ecosystem of security consists of multiple layers that enable a complex setup with administrators given access to all, some or none of Exchange. Typically the security layers concern more of the administration side of Exchange, however, some conditions can also be applied to user access as well.
Management Role Groups are a special type of Security Group that contains Universal Security Groups, other Role Groups and users which are also known as Role Group Members. Group members can be added and removed to fit the needs of an organization. Exchange Management Roles are assigned to the groups. Management Role Scopes are also assigned to control what rights a Role Group member can exercise within Exchange.
Management Role Entries are the individual rights that can be assigned or grouped into Management Roles. A Management Role Entry usually consists of a single PowerShell script or cmdlet and the relevant parameters that can be accessed by a Management Role.
Management Roles are groups of Management Role Entries and are grouped logically to help an administrator perform a certain task. These roles are assigned to Role Groups as part of this arrangement.
Impersonation is the act of a user or service account accessing another user's mailbox as if they were the owner of the mailbox. This right is typically assigned to an application that needs to process email in a user's mailbox or perform some specialized task like mailbox migrations.
Auditing is the process of keeping track of changes. In the case of Exchange we have auditing for Admin changes PowerShell or EAC as well as auditing for mailbox access. Auditing can be monitored and reports generated for compliance and security requirements for an organization. Admin Audit logging is on by default while mailbox access logging is not. Check your region privacy settings before enabling the mailbox features.
In this chapter we will cover these topics in-depth and as they relate to PowerShell.
Permissions for managing Exchange are broken down into a concept called Management Roles. Each of these roles can be assigned to a user in order to allow that person to configure those portions of Exchange. Role Groups are security groups within Exchange to which the Management Roles are assigned to so that a member of this Role Group has the rights granted to it. Role Groups in Exchange vary from a Read Only Admins all the way up to the Organization Management Group which has most of the Management Roles in Exchange. Let's explore these Management Roles and then Role Groups in order to get a better idea of how security is layered in Exchange 2016.
PowerShell
Let's explore what cmdlets are available for Management Role management in PowerShell:
Get-Command *ManagementRole*
This provides us with a short list of cmdlets:
Add-ManagementRoleEntry
Get-ManagementRole
Get-ManagementRoleAssignment
Get-ManagementRoleEntry
New-ManagementRole
New-ManagementRoleAssignment
Remove-ManagementRole
Remove-ManagementRoleAssignment
Remove-ManagementRoleEntry
Set-ManagementRoleAssignment
Set-ManagementRoleEntry
If we need to get a list of available Management Roles, we can use this simple cmdlet:
Get-ManagementRole
When run, a long list of management roles is provided:
Address Lists
ApplicationImpersonation
Audit Logs
Compliance Admin
Data Loss Prevention
Distribution Groups
E-Mail Address Policies
Federated Sharing
Information Rights Management
Journaling
Legal Hold
Mail Enabled Public Folders
Mail Recipient Creation
Mail Recipients
Mail Tips
Mailbox Import Export
Mailbox Search
Message Tracking
Migration
Move Mailboxes
My Custom Apps
My Marketplace Apps
My ReadWriteMailbox Apps
MyBaseOptions
MyContactInformation
MyAddressInformation
MyMobileInformation
MyPersonalInformation
MyDistributionGroupMembership
MyDistributionGroups
MyMailSubscriptions
MyMailboxDelegation
MyProfileInformation
MyDisplayName
MyName
MyRetentionPolicies
MyTeamMailboxes
MyTextMessaging
MyVoiceMail
O365SupportViewConfig
Org Custom Apps
Org Marketplace Apps
Organization Client Access
Organization Configuration
Organization Transport Settings
Public Folders
Recipient Policies
Remote and Accepted Domains
Reset Password
Retention Management
Role Management
Security Admin
Security Group Creation and Membership
Security Reader
Team Mailboxes
Transport Hygiene
Transport Rules
UM Mailboxes
UM Prompts
Unified Messaging
What can we determine about each of these Management Roles with just PowerShell? We know that it is possible to get a list of the roles with Get-ManagementRole, now we need to run that cmdlet against the role to determine important information about the Management Role. We can also limit the scope of the output to just RoleEntries:
(Get-ManagementRole 'Legal Hold').RoleEntries

Notice that there are a series of PowerShell cmdlets listed in the value of the ‘RoleEntries’ on the Management Role. After the PowerShell cmdlets are listed, a little more information about the cmdlet is revealed:

Can we get a better list from the ‘Role Entries’ property of the Management Role? With some work, yes we can. For an Exchange 2016 Server, which is what Exchange Online is currently based on, it takes one cmdlet to list these Role Entries. However, in Exchange Online it's a bit of a mess:

Notice that the information is in a bit of a jumble and we first get the PowerShell module - Microsoft.Exchange.Management.PowerShell.E2010, then the cmdlet - 'Write-AdminAuditLog' and then the switches.
This output cannot be formatted with Format-Table or Format-List. What can we do? Well, we can use '-Split' to separate out values. For this output, all of the items are separated by a space. This means we can parse out the line by splitting it by space. The name of the cmdlet is always in the second column and we can reference it as the [1] value in an array. Here is the PowerShell code to do so:
$ManagementRole = 'Legal Hold'
$RoleEntries = (Get-ManagementRole $ManagementRole).RoleEntries
Write-Host 'Cmdlet: ' -ForegroundColor White -NoNewline
Write-Host "$ManagementRole" -ForegroundColor Green
Write-Host ' '
Write-Host 'Role Name' -ForegroundColor Cyan
Write-Host '----------' -ForegroundColor Cyan
Write-Host ' '
Foreach ($Role in $RoleEntries) {
$Content = $Role -Split ' '
$RoleName = $Content[1]
$RoleName
}
This code does have some extra bits, but it produces output we can read and interpret:

We can manipulate the code above to check any cmdlet we want. For example, if we wanted cmdlets or 'Team Mailboxes' we would replace the Role in the first variable and re-run the script:
$ManagementRole = 'Team Mailboxes'

New Management Role
There are a lot of default Management Roles provided with Exchange Online. These existing roles may not be granular enough or encompassing enough depending on what the needs of the role are. For example we can create a new Management Role that is essentially a modified version of Help Desk Role Group. The original Role Group has three Management Roles assigned to it:

Let’s say we need a Role that can run all cmdlets having to deal with mailboxes. First, we need all of the cmdlets available:
Get-Command *Mailbox
Disable-Mailbox
Disable-UMMailbox
Enable-Mailbox
Enable-UMMailbox
Get-CASMailbox
Get-GroupMailbox
Get-Mailbox
Get-SiteMailbox
Get-UMMailbox
New-Mailbox
New-SchedulingMailbox
New-SiteMailbox
Remove-Mailbox
Set-CASMailbox
Set-GroupMailbox
Set-Mailbox
Set-SiteMailbox
Set-UMMailbox
Test-SiteMailbox
Undo-SoftDeletedMailbox
Update-PublicFolderMailbox
Update-SiteMailbox
We can call this new Management Role something like ‘Mailbox Management’. When providing just a name and the Role Entries, we receive an error about not providing a parent for the Management Role:
New-ManagementRole 'Mailbox Management'

The parent value is another Management Role that this new Management Role is based off of. In our case, we can speculate that these cmdlets are available in Recipient Management. So if we specify this as the parent, we can run the cmdlet successfully:
New-ManagementRole -Name 'Mailbox Management' -EnabledCmdlets Disable-Mailbox,Disable-UMMailbox,Enable-Mailbox,Enable-UMMailbox,Get-CASMailbox,Get-GroupMailbox,Get-Mailbox,Get-SiteMailbox,Get-UMMailbox,New-Mailbox,New-SchedulingMailbox,New-SiteMailbox,Remove-Mailbox,Set-CASMailbox,Set-GroupMailbox,Set-Mailbox,Set-SiteMailbox,Set-UMMailbox,Test-SiteMailbox,Undo-SoftDeletedMailbox,Update-PublicFolderMailbox,Update-SiteMailbox -parent 'Mail Recipients'
This would normally work right off the bat for an on-premises Exchange server. However, in the cloud, a tweak needs to be made because the above will generate an error message unless a customization has been made:

So what exactly is the Enable-OrganizationCustomization cmdlet and what does it do?

We can simply run this cmdlet without any switches if we want and it will allow us to add these roles:

** Note ** The reason this needs to be done is that the tenant is in a dehydrated state or tiny tenant mode. Microsoft does this for their own management reason. So when an admin runs into this issue in PowerShell, they can rehydrate their tenant with the Enable-OrganizationConfiguration cmdlet.
What we find out is that the list of cmdlets we assigned are not actually provided to the new Management Role:

To verify this worked, we use the script we wrote previously to check the built-in roles and we see that the new Management Role was created correctly:

Notice that the UMMailbox cmdlets are not listed, nor are the Update or Test cmdlets. This is because the ‘Mail Recipients’ Management Roles does not have these defined. In order to get the full set, we would need a Management Role with more cmdlets to choose from.
Remove Management Role
Creating Management Roles can help tailor the way Exchange is used in a particular environment. One thing that tends to get lost is cleanup of custom created items in Exchange. If for example a Management Role was created for a custom purpose, removing a role is easier than creating it. If we have the name of the role, we simply need to run the Remove-ManagementRole cmdlet to do so:
Remove-ManagementRole 'Mailbox Management'

Management Role Entries - Granular Permissions
Permissions required for Exchange Online PowerShell cmdlets can also be examined as granularly as the PowerShell cmdlets themselves. Each cmdlet has a set of roles or permissions that are allowed to run them. In 99% of cases where specific rights may need to be assigned, using the built in roles and other security features is the best method to do so. However, it may be unclear as to what PowerShell cmdlets are allowed to be run once a particular Management Role has been assigned. How can we figure out what cmdlets are allowed to be run per a particular Management Role?
PowerShell
How can we do this? Let's start by using your favorite search engine to find the information:
Search Terms: PowerShell cmdlet permissions:

Examining the page, we see that Microsoft has provides a cmdlets in order to find permissions for a cmdlet or even a parameter on a cmdlet:
Get-ManagementRoleEntry -Identity *<Cmdlet>
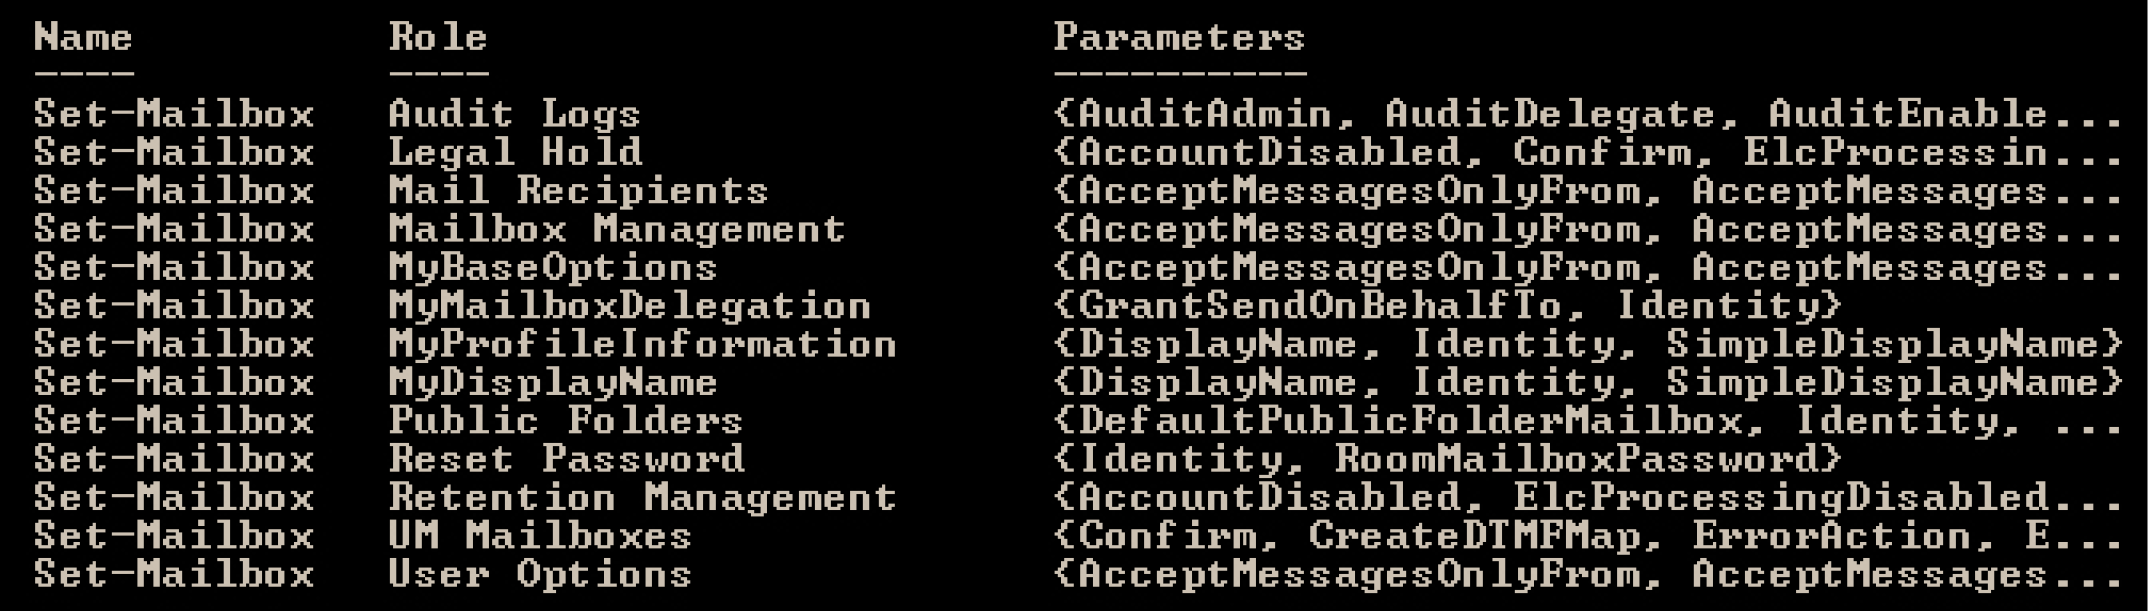
Let's use the code provided to see what permissions are required to run a few cmdlets. First, we will compare the Management Roles available for the Get-Mailbox and New-Mailbox PowerShell cmdlets. We see that the Roles that are allowed to run the Get-Mailbox cmdlet and there are quite a few (below is a partial list):
Get-ManagementRoleEntry -Identity *Set-Mailbox
Then if we review the entries for the New-Mailbox cmdlet:
Get-ManagementRoleEntry -Identity *New-Mailbox

In this last example, we can see that there is only one role for the New-MailboxImportRequest cmdlet:
Get-ManagementRoleEntry -Identity *New-MailboxImportRequest

Each of these roles can be assigned directly to a user or a user could be assigned a Management Role that includes this particular role. How to we find what Management Role has the role that allows access to these cmdlets? From the same link shown on page 267, we can use a set of cmdlets to display the Management Role that has the permission that had access to a cmdlet:
$Perms = Get-ManagementRole -Cmdlet <Cmdlet>
$Perms | Foreach {Get-ManagementRoleAssignment -Role $_.Name -Delegating $false | Format-Table -Auto Role,RoleAssigneeType,RoleAssigneeName}
$Perms
For a real world example we can use the New-Mailbox cmdlet :
$Perms = Get-ManagementRole -Cmdlet New-Mailbox
$Perms | Foreach {Get-ManagementRoleAssignment -Role $_.Name -Delegating $false | Format-Table -Auto Role,RoleAssigneeType,RoleAssigneeName}
$Perms

Parsing the results above by eliminating the duplicate entries above, we can refine this to five Management Roles which have permission to run the 'New-Mailbox' cmdlet:
Organization Management
Recipient Management
Public Folder Management
Compliance Management
Records Management
In order to help administrator Exchange Online, Microsoft has provided a set of standard Management Role Groups for us to use. These Role Groups include very limited rights groups all the way up to a full administrator Role Group. The array of groups allows for a range of Administrative Access to Exchange Online and allows us to follow a model of least permissions when granting access to users. We can limit what a user has access to with these generalized Role Groups. If the groups are not sufficient, they can also be modified as needed, duplicated or modified to fit a specific need.
PowerShell
How do we find these Management Role Groups in Exchange Online? Let’s see what cmdlets have the keywords ‘rolegroup’:
Get-Command *RoleGroup

We can use Get-RoleGroup to see what groups are available in Exchange:
Get-RoleGroup

What’s interesting about the list is that we can see the group names as well as the Management Roles (‘Assigned Roles’) assigned to those groups in the list. We see that Organization Management has the most roles assigned, while a Role Group like ‘Security Reader’ and ‘Security Administrator’ both only have one Management Role assigned to it. Let’s dig a little deeper into these Role Groups: how to create them, how to modify them and how to assign them to users.
Special Management Role Groups
Within the menagerie of Management Roles in Exchange Online there are a few that are more special than others. These roles allow the user assigned these roles to perform special tasks or be able to do almost anything in Exchange. These three roles were picked as they are some of the most commonly assigned roles. The roles mentioned are Import/Export PST, eDiscovery, and Organization Admin. We’ll explore what these roles are designated for and how to assign them to a user. While exploring the assignment, we can also examine what PowerShell cmdlets are available to the role.
Assigning Via PowerShell
All of these roles can be configured in the Exchange Admin Center (EAC), however, since this is a PowerShell book we will review how to do this in PowerShell. At the start of the chapter, we got a list of PowerShell cmdlets that handle Management Roles. One of cmdlets is called ‘New-ManagementRoleAssignment’ which will allow us to assign a Management Role to a mailbox. Let’s see what examples we can cull from Get-Help:

We can also assign the role directly to a mailbox using the ‘User’ parameter:
New-ManagementRoleAssignment -Role <Role to Assign> -User <user>
Now let’s walk through these three roles to see what they are and how to assign them to users.
Organization Admin
The Organizational Admin role is one of the most important, if not the most important, Management Role in Exchange. As an Organizational Admin, the user assigned this role is allowed to perform almost any task in Exchange – from adding mailboxes, configuring Transport Rules, adding Exchange Servers and many other maintenance tasks. In PowerShell, an Organizational Admin would be able to run about 99% of all the cmdlets available. Outside of these abilities, there are a few that a user assigned to this role are not assigned.
The role we need to assign is called ‘Organization Management’:
Add-RoleGroupMember "Organization Management" -Member 'Damian'
After we assign the role, how do we determine who has this role? We might need to remove extra names or even add additional users to help manage Exchange. We can do that with the example code below:
Get-RoleGroupMember 'Organization Management'
Import/Export PST
This is one Management Role that is not granted to the Organization Admin Management Role Group. This role grants the user permission to perform the following tasks:
Import PST files into a user’s mailbox
Export email from a mailbox to a PST file
For our examples, we will first assign the role to an Administrator:
New-ManagementRoleAssignment -Role “Mailbox Import Export” -User ‘JSmith’

In the second example we can also assign the role to a group of users who will manage the import process for a company:
New-ManagementRoleAssignment -Role “Mailbox Import Export” -SecurityGroup ‘PSTManagement’

Without the assignment of this role, the cmdlets available for import are not visible:

Once the role is assigned, we can see the cmdlets needed for PST import:

Discovery Management Role Group
In addition to the Import/Export Role, eDiscovery is also not a Management Role that is provided to the Organization Management Role Group. This means that if you have an eDiscovery administrator that handles these tasks or a legal department that handles the eDiscovery process, they will need this role assigned to them. Without this, there are cmdlets that cannot be run without it.
Reviewing the EAC, we see that the Discovery Management Role has two Assigned Roles. We also see that by default, the same role has no members assigned to it:

eDiscovery Management Roles
Legal Hold - This role allows a user to determine if emails should be retained for litigation purposes. These holds can be placed for a period or for an indefinite time as well.
Mailbox Search - Allows the holder of this role to search the contents of one of more mailboxes in the organization.
PowerShell
Discovery Management cmdlets are based off of the noun ‘MailboxSearch’ and using these keywords, we find that there are four cmdlets available to do searches:

We can verify that Discovery Management does have permission to use these cmdlets like so:

Custom Role Groups
In addition to the built in Management Role, we can also create custom roles to be used in Exchange Online. These roles can be simply modified versions of existing roles or brand new ones created for a special purpose. The first method is usually the easiest one to work with depending on the role requirements. For this section we’ll first examine the Help Desk Management Role which is one of the more commonly utilized or modified roles in Exchange.
Help Desk Management Role
In Exchange, Help Desk is considered a Role Group. So in order to find out what roles are assigned to this Role Group, we can start with the Get-RoleGroup cmdlet:

In addition to the administration/management security roles in Exchange, there is also a Default User Role assigned to users with mailboxes.
PowerShell
What PowerShell cmdlets are used to handle this assignment to the mailbox? First, let’s review what is in the EAC:
To find PowerShell cmdlets that can configure this policy, we can use keywords from within that red box above. Here is what we can try:
Get-Command *RoleAssignmentPolicy
Get-RoleAssignmentPolicy
New-RoleAssignmentPolicy
Remove-RoleAssignmentPolicy
Set-RoleAssignmentPolicy
We can check to see what is assigned to the role:
Get-RoleAssignmentPolicy

Taking a specific look at the assigned Roles and Role Assignments with these PowerShell cmdlets:
(Get-RoleAssignmentPolicy).AssignedRoles | FT Name

(Get-RoleAssignmentPolicy).RoleAssignments | Ft Name

We can also, by extension, also see what is assigned to user mailboxes by looking specifically for this property of the mailbox object in Exchange:
Get-Mailbox | Ft DisplayName,RoleAssignmentPolicy

What exactly can we do with this information? First, a quick look at the EAC and the User Roles tab:

If we edit the ‘Default Role Assignment Policy’ we can see that some items are checked, others are not:
We can see that the average user can modify their profile information, distribution groups, retention policy information and more however, the ability to manage some mailbox delegation is blocked. These values can be changed within the EAC or via PowerShell. Any Role Assignment Policies that exist in Exchange Online cannot be modified to change the existing Assigned Roles. In order to accomplish this, we will need to create a new policy and set it as default.
Let’s take the scenario where the users will be allowed to see their own Retention Tags. The default Role Assignment Policy does not allow for this. We will have to use the New-RoleAssignmentPolicy to handle this. Let’s see what our options are by looking at the examples:
Get-Help New-RoleAssignmentPolicy -Examples
The most relevant example is this one:

If we are looking to add to the default policy, then we need to grab the existing set, add the new right and then apply it to this cmdlet above:
New-RoleAssignmentPolicy –Name ‘Modified Default’ –Roles "MyTeamMailboxes", "MyDistributionGroupMembership", "My Custom Apps", "My Marketplace Apps", "My ReadWriteMailbox Apps", "MyBaseOptions", "MyContactInformation", "MyTextMessaging", "MyVoiceMail", "MyRetentionPolicies","MyMailboxDelegation"
The cmdlet successfully runs and produces this output:

We can change the policy to the fault with the Set-RoleAssignmentPolicy:
Get-RoleAssignmentPolicy 'Modified Default' | Set-RoleAssignmentPolicy -IsDefault
Which provides these results:

Impersonation is the security feature in Exchange that allows for a user or a service to impersonate the end user while accessing a particular mailbox. This permission can be granted to permit a user access to all mailboxes, but it can also be scoped to limit the access to certain mailboxes. Typical uses for Impersonation are:
- Migrations - Allowing a service or application full access to all mailboxes to move them to another location
- Line of Business Applications - Many of these applications typically requires the configuration of an account with impersonation rights
With the advent of Exchange 201x, Microsoft’s Role Based Access Control (RBAC) changed the way Impersonation is configured, Exchange Online includes this change as well. Impersonation is a Management Role that gets assigned. As we learned above, we can assign a Management Role with the New-ManagementRoleAssignment. For a sample configuration, we can use this cmdlet to assign the ApplicationImpersonation Role to a migration service account that an application server will use to move mailboxes to another Exchange Server in a different Active Directory Forest:
New-ManagementRoleAssignment -Name ‘MigrationService’ -Role ApplicationImpersonation -User MigrationService

Once assigned, the application now has full access to all the user mailboxes.
Removing Impersonation
The Management Role can be assigned as long as it is needed for the application to operate correctly. Once the need is no longer there, this same role assignment can be removed from the user account. We can use the Remove-ManagementRoleAssignment cmdlet to do that. If we combine the Get-ManagementRoleAssignment with the Remove cmdlet, we can remove the role assignment:
Get-ManagementRoleAssignment 'MigrationService' | Remove-ManagementRoleAssignment

Reporting Impersonation
We can use PowerShell to produce a report of who has been assigned that role. We can do this with the ‘Get-ManagementRoleAssignment’ cmdlet. We can use this to see who has been assigned the ‘ApplicationImpersonation’ Management Role:
Get-ManagementRoleAssignment | where {$_.Role -eq 'ApplicationImpersonation'}
The output for this cmdlet is a bit messy:

We can clean this up and just produce a table with the name of the role and who is assigned like so:
Get-ManagementRoleAssignment | where {$_.Role -eq 'ApplicationImpersonation'} | Ft Role,RoleAssigneeName

From this report we see there are only two roles assigned at the moment. If a user were assigned the right, the user would be listed in the results from that cmdlet. A non-owner mailbox access report would be able to determine if these rights were used.
While some application service accounts need full access, it is possible that an application would only need access to a small subset of the available mailboxes in Exchange. The limiting of this range is called a Management Scope. A Management Scope is a filter that creates the restriction of where to apply the Impersonation Role.
PowerShell
Let’s see what cmdlets are available by using Get-Command:
Get-Command *ManagementScope

As we can see, we can create, remove, modify and display any Management Scope in Exchange Online. By Default there are no defined Management Scopes that we can use. We will have to create a Management Scope and then assign this Management Scope to a Management Role, like ‘ApplicationImpersonation’. Let’s review the available options for the ‘New-ManagementScope’ cmdlet:
Get-Help New-ManagementScope -Examples

Scenario
A company called ABC, Corp has a subsidiary whose mailboxes are in the cloud with the parent companies mailboxes. ABC, Corp wants the subsidiary to only be able to manage their own mailboxes. The want to assign a role to someone on the subsidiaries Help Desk. The subsidiary has a different SMTP domain and this will be used for filtering
New-ManagementScope -Name 'Domain 1' -RecipientRestrictionFilter {PrimarySMTPAddress -Like '*@OnlineExchangeBook.onmicrosoft.com'}
We can then create a Management Role Assignment (taken from a previous example):
New-ManagementRoleAssignment -Name ‘HelpDesk-Subsidiary’ -Role MailboxManagement –User HelpDesk
Once we have the scope and the role, we can now use the Set-ManagementRoleAssignment to apply the scope to the role:
Set-ManagementRoleAssignment -Identity 'HelpDesk' -CustomRecipientWriteScope ‘Domain 1'
Now the Help Desk account is limited in its MailboxManagement rights to just the mailboxes with the Primary smtp addresses with '@OnlineExchangeBook.onmicrosoft.com' in them.
It seems like a lifetime ago, but there was once a time when there wasn’t an express need to audit the system administrator or email administrator. They were the trusted IT support people who handled the thankless job of maintaining the servers in corporate datacenters. With the advent of multiple compliance based standards, the auditing of the actions of an administrator have become important. Microsoft recognized this in Exchange 2010 with Admin Audit Logging.
Admin Audit Logging is in a way self-explanatory. Basically the actions of an Administrator in Exchange are being tracked in a way that can be audited and searched for possible misdeeds. This includes login attempts without permission or even a bad configuration. The log can be dumped for examination by a third party, examined in the Exchange Admin Center or even just simply displayed to the screen.
PowerShell
What PowerShell cmdlets are available for this part of Exchange's security mechanisms? Well, let's find out:
Get-Command *AdminAudit*
This provides a short list of cmdlets:

Let's start off with reviewing what the Admin Audit Log is configured for:
Get-AdminAuditLogConfig

Notice that the log age limit is 90 days, plenty of time to generate reports from and get history from as well. Two other parameters are important - AdminAuditLogCmdlets and AdminAuditLogParameters which refer to all cmdlets and all parameters. In most scenarios, the 'LogLevel' setting of 'None' is sufficient, however, the LogLevel can also be configured as 'Verbose'. The Verbose LogLevel setting also adds two additional bits of information:
ModifiedProperties (old and new)
ModifiedObjectResolvedName properties
What has changed with the Admin Audit Log over the past versions is the addition of the UnifiedAuditLog parameters. These two parameters link Exchange On-premises and Exchange Online. Only one can be configured. The UnifiedAuditLogIngestionEnabled parameter can be set to True or False. The default is False, which only audits and allows searches of Exchange On-Premises servers. If the setting is configured for True, the Admin Audit Logs for Office 365 are recorded in Office 365 and searches will be allowed after the fact. Other configurable parameters for the Admin Audit Log are:
AdminAuditLogCmdlets
AdminAuditLogParameters
AdminAuditLogExcludedCmdlets
The auditable cmdlets and parameters can be fine-tuned if that is desired, but to get a true sense of what an admin is doing the default configuration is the way to go. The third parameter 'AdminAuditLogExcludedCmdlets' allows for exclusions from the entirety of what is defined in the first two cmdlets. For example, if all cmdlets are chosen '*' to be audited, one could exclude certain cmdlets that may not be important like running Get-MessageTrackingLog or any Get cmdlets as well. This would allow for a more fine-tuned set of Admin Audit Logs.
Lastly, the amount of time included in the logs can also be adjusted from the default of 90 days. If the value is set for 0, all the logs are purged. Setting a number less than the default will truncate what is available in the Admin Audit Log as well.
Searching the Admin Audit Log
You will notice that there are two cmdlets for handling searches of the Admin Audit Log:
New-AdminAuditLogSearch
Search-AdminAuditLog
So which of these cmdlets are we supposed to use for searching the logs? Let's review some examples from these two cmdlets to compare the two:
Get-Help New-AdminAuditLogSearch -Full

Get-Help Search-AdminAuditLog -Full

Reviewing the two cmdlets, the help reveals a small different between the two cmdlets. The first one, New-AdminAuditLogSearch cmdlet examples both include the 'StatusMailRecipients' parameter and the parameter is required for the cmdlet. Thus the only way to get the results is via an email. This email is generated and delivered within a period of 15 minutes.
New-AdminAuditLogSearch
A sample run shows the status of the report and information to be gathered:

After the cmdlet is run, the results will be emailed to the Administrator’s mailbox:

The XML report will look something like this:

We can see the cmdlets, parameters, when it was run and by whom. If there are certain criteria that needs to be found, it can be pulled out via PowerShell or an XML editor depending on the need and volume of the reports. The cmdlet does have some limitations (https://technet.microsoft.com/en-us/library/ff459243(v=exchg.160).aspx):
'After the New-AdminAuditLogSearch cmdlet is run, the report is delivered to the mailboxes you specify within 15 minutes. The log is included as an XML attachment on the report email message. The maximum size of the log that can be generated is 10 megabytes (MB).'
Search-AdminAuditLog
Below is a sample run of the cmdlet and the output it can produce:

Like any other screen output, the results can be exported to an XML file for future examination like so:
Search-AdminAuditLog -StartDate <start date> -EndDate <end date> -resultsize 25000 | Export-Clixml <file name>
The more practical of the two for further analysis is the Search-AdminAuditLog as the file can be placed in a central location for analysis. A sample XML file looks like this:

Mailbox auditing logging is set on a per mailbox basis. The logging will capture the mailbox access by mailbox owners, delegates and administrators. The types of access that are logged can also be configured with PowerShell. Let’s explore how we can configure the logging and examine the logs with PowerShell.
PowerShell
What PowerShell cmdlets are available for this part of Exchange's security mechanisms? Well, let's find out:
Get-Command *MailboxAudit*

Mailbox Audits are not pre-configured, but are similar to how we ran the searches of the Admin Audit Logs in the previous section. First, we need to enable the auditing on the mailboxes we want to track. We can set this on a per mailbox basis or on a global basis to track all mailboxes in Exchange. The cmdlet we need for this is Set-Mailbox.
Mailbox Auditing Default Settings
What options are needed in order to configure this? First, we can start with:
Get-Help Set-Mailbox -Full
We can review the parameters with the ‘Audit’ keyword in it like these:
AuditAdmin - What is logged when an administrator accesses a mailbox
AuditDelegate - What delegate rights are audited when accessed
AuditEnabled - Whether or not mailbox auditing is enabled
AuditLog - Microsoft only parameter, do not set without support
AuditLogAgeLimit - The number of days the log is kept for with 90 days set as the default
AuditOwner - Rights that are audited for a mailbox owner
Let’s review the default settings on mailboxes to see values to change to allow accurate auditing of a mailbox:
Get-Mailbox | fl *audit*

Notice that auditing is not enabled for either mailbox. Also notice what actions are audited for Admins as well as what actions are auditing for mailbox delegates. An age limit of 90 days is configured for the audit logs. There also is no set owner for the mailbox auditing.
Configuring Mailbox Auditing
** Note ** Before we get too deep into mailbox auditing in Exchange Online make sure to review your local and/or regional privacy laws to make sure this will work for you without breaking the law.
Adding mailbox auditing involves using the Set-Mailbox cmdlet. First, the auditing needs to be enabled on the mailbox needs to be audited:

After auditing is enabled, we can adjust settings like the length the logs are kept, with the default being 90 days. For example we can adjust the length like 120 and 150 days:

Once done, we can verify the changes:
Get-Mailbox | FT Audit*
This provides these results:

Once the auditing is enabled, we can now generate searches of these logs.
Searching the Mailbox Audit Log
You will notice that there are two methods in order to search these generated logs:
Search-MailboxAuditLog
New-MailboxAuditLogSearch
So which of these cmdlets are we supposed to use for searching the logs? Let's review some examples from these two cmdlets to compare the two:
Search-MailboxAuditLog

New-MailboxAuditLogSearch

Reviewing the two cmdlets, the help reveals a small difference between the two cmdlets. The first one, the New-MailboxAuditLogSearch cmdlet, both examples include the 'StatusMailRecipients' parameter and the parameter is required for the cmdlet. Thus the only way to get the results is via an email. This email is generated and delivered within a period of 15 minutes.
Search-MailboxAuditLog
A sample run of this cmdlet shows how it displays the results to the PowerShell window:

No results? That’s because no mailboxes have had the Audit Logging setting enabled. This is an expected result. If we had enabled the logging on a mailbox and there was some sort of activity, we would see this instead:

We can also export this to an XML like so:
Search-MailboxAuditLog -Identity Damian -StartDate 11/23/17 -EndDate 12/13/17 | Export-Clixml c: emp est.xml

New-MailboxAuditLogSearch
A sample run shows the status of the report and information to be gathered:

Same as the previous cmdlet when no audit logging is enabled. Below is what would be expected if Audit Logging were enabled:

XML looks like this:

** Note ** It should be a good practice to audit Shared and Room mailboxes on a regular basis, while keeping regional privacy laws in consideration.
User Options
View-Only Audit Logs
View-Only Configuration
View-Only Recipients
ArchiveApplication
LegalHoldApplication
MailboxSearchApplication
MeetingGraphApplication
OfficeExtensionApplication
SendMailApplication
TeamMailboxLifecycleApplication
UserApplication

