
In the section “Specifying a View,” you learned how a controller specifies a view. But how does that view get created in the first place? You could certainly create a file by hand and add it to your Views directory, but the ASP.NET MVC tooling for Visual Studio makes it very easy to add a view using the Add View dialog.
Understanding the Add View Dialog Options
For this example, you'll add a new action method named Edit and then create a view for that action using the Add View dialog. To launch this dialog, right-click within an action method and select Add View (see Figure 3.2).

This brings up the Add View dialog shown in Figure 3.3. The following list describes each menu item in detail:

When launching this dialog from the context of an action method, the view name is prepopulated using the name of the action method. Naturally, the view name is required.
- View name: When launching this dialog from the context of an action method, the view name is prepopulated using the name of the action method. Naturally, the view name is required.
- View Engine: The second option in the dialog is the view engine. Starting in ASP.NET MVC 3, the Add View dialog supports multiple view engine options. We'll cover more about view engines later in this chapter. By default, there are two options in the dialog, Razor and ASPX. This drop down is extensible so that third party view engines can be listed in the drop down.
- Create a strongly-typed view: Selecting the checkbox labeled Create a Strongly-Typed View enables typing in or selecting a model class. The list of types in the drop-down is populated using reflection so make sure to compile the project at least once before specifying a model type.
- Scaffold template: Once you select a type, you can also choose a scaffold template. These are T4 templates that will generate a view based on the model type selected and are listed in Table 3.1.
Table 3.1: View Scaffold Types
| Scaffold | Description |
| Empty | Creates an empty view. Only the model type is specified using the @model syntax. |
| Create | Creates a view with a form for creating new instances of the model. Generates a label and editor for each property of the model type. |
| Delete | Creates a view with a form for deleting existing instances of the model. Displays a label and the current value for each property of the model. |
| Details | Creates a view that displays a label and the value for each property of the model type. |
| Edit | Creates a view with a form for editing existing instances of the model. Generates a label and editor for each property of the model type. |
| List | Creates a view with a table of model instances. Generates a column for each property of the model type. Make sure to pass an IEnumerable<YourModelType> to this view from your action method. The view also contains links to actions for performing the create/edit/delete operations. |
- Reference Script Libraries: This option is used to indicate whether the view you are creating should include references to a set of JavaScript files if it makes sense for the view. By default, the _Layout.cshtml file references the main jQuery library, but doesn't reference the jQuery Validation library nor the Unobtrusive jQuery Validation library.
When creating a view that will contain a data entry form, such as an Edit view or a Create view, checking this option ensures that the generated view does reference these libraries. These libraries are necessary for implementing client-side validation. In all other cases, this checkbox is completely ignored.
Note that for custom view scaffold templates and other view engines, the behavior of this checkbox may vary as it's entirely controlled by the particular view scaffold T4 template.
- Create as a Partial View: Selecting this option indicates that the view you will create is not a full view, thus the Layout option is disabled. For the Razor view engine, the resulting partial view looks much like a regular view, except there won't be the <html> tag nor <head> tag at the top of the view.
- Use a layout or Master Page: This option determines whether or not the view you are creating will reference a layout (or master page) or will be a fully self-contained view. For Razor view engines, specifying a Layout is not necessary if you choose to use the default layout because the layout is already specified in the _ViewStart.cshtml file. However, this option can be used to override the default Layout file.
Customizing the T4 View Templates
As mentioned earlier, when creating a strongly-typed view, you can select a view scaffold to quickly generate a particular type of view for the model.
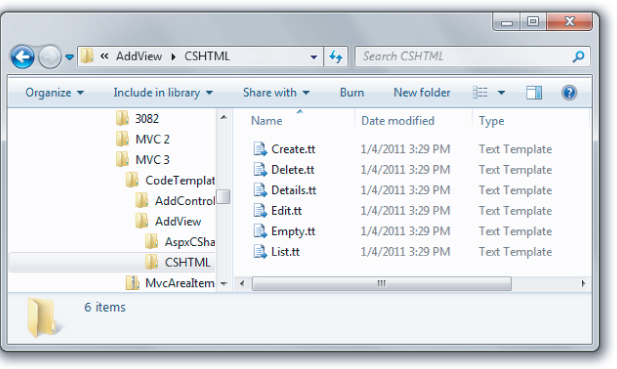
The list of scaffolds shown in Table 3.1 is populated by the set of T4 templates located in the following directory depending on your Visual Studio install directory and the language of the scaffold you care about:
[Visual Studio Install Directory]Common7IDEItemTemplates[CSharp | VisualBasic]WebMVC 3CodeTemplatesAddViewCSHTML
On my machine, this is located at:
C:Program Files (x86)Microsoft Visual Studio 10.0Common7IDEItemTemplatesCSharpWebMVC 3CodeTemplatesAddViewCSHTML
This directory contains a .tt file for each view scaffold as shown in Figure 3.4.
You can modify these T4 files to your heart's content. You can also create new ones and they'll show up in the view scaffold drop-down list.
In general though, you might not want to change these files because they affect every project on your machine. Instead you have the option to customize these files per project by copying them into your project.
The easiest way to do this is to take the CodeTemplates folder and copy it directly into the root of your ASP.NET MVC 3 project. You'll want to delete any templates you don't plan to override.
Visual Studio will complain with the following message:
Compiling transformation: The type or namespace name ‘MvcTextTemplateHost’ could not be found (are you missing a using directive or an assembly reference?)
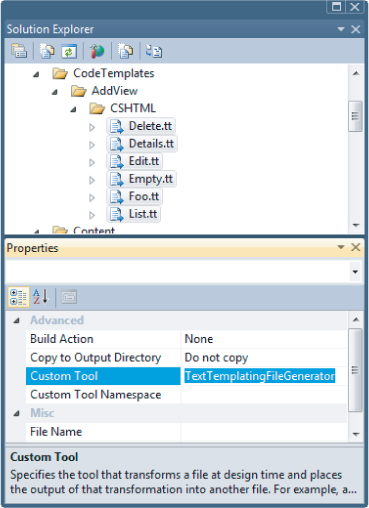
The reason for this is that when adding a T4 file to a project, Visual Studio sets the value of the Custom Tool property for each template to the value TextTemplatingFileGenerator. For a standalone T4 file, this is what you want. But in the case of your view scaffolds, this value is not correct. To fix this issue, select all of the T4 files and clear the Custom Tool property in the Properties window as shown in Figure 3.5.
The Add View dialog will now give preference to the view scaffold T4 templates in your project over the default ones of the same name. You can also give some templates a new name and you'll see the Add View dialog will show your new templates as options in the Scaffold Template drop-down list.