
The best way to learn a new framework is to build an application with it. This first chapter walks you through how to build a small, but complete, application using ASP.NET MVC 2 and introduces some of the core concepts behind it.
The application we are going to build is called NerdDinner. NerdDinner provides an easy way for people to find and organize dinners online (Figure 1-1).
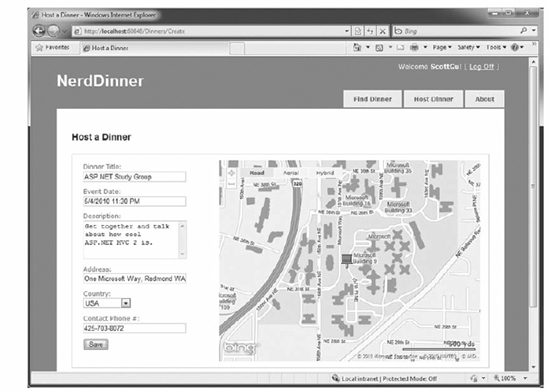
NerdDinner enables registered users to create, edit, and delete dinners. It enforces a consistent set of validation and business rules across the application (Figure 1-2).

Note
Chapter 1 is licensed under the terms of Creative Commons Attribution No Derivatives 3.0 license and may be redistributed according to those terms with the following attribution: "Chapter 1 "NerdDinner" from Professional ASP.NET MVC 1.0 written by Rob Conery, Scott Hanselman, Phil Haack, Scott Guthrie published by Wrox (ISBN: 978-0-470-38461-9) may be redistributed under the terms of Creative Commons Attribution No Derivatives 3.0 license. The original electronic copy is available at http://tinyurl.com/aspnetmvc. The complete book Professional ASP.NET MVC 2 is copyright 2010 by Wiley Publishing Inc and may not redistributed without permission."
Visitors to the site can search to find upcoming dinners being held near them (Figure 1-3).
Clicking a dinner will take them to a details page, where they can learn more about it (Figure 1-4).


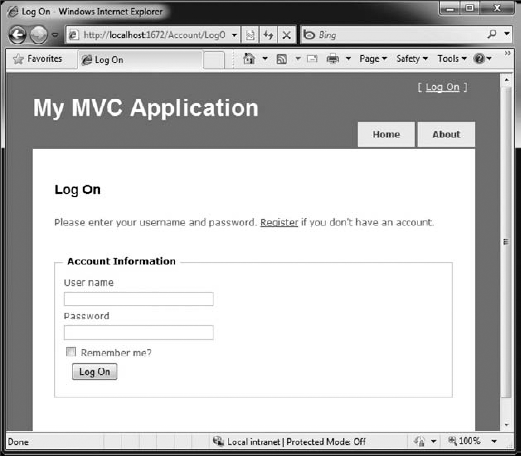
If they are interested in attending the dinner, they can log in or register on the site (Figure 1-5).
They can then easily RSVP to attend the event (Figures 1-6 and 1-7).


To implement the NerdDinner application, we'll start by using the File
You can build your own copy of NerdDinner from scratch by completing each step we walk through in this chapter. Alternatively, you can download a completed version of the source code here: http://tinyurl.com/aspnetmvc.
You can use either Visual Studio 2010 or the free Visual Web Developer 2010 Express to build the application. ASP.NET MVC 2 is included as part of these development environments. You can use either SQL Server or the free SQL Server Express to host the database.
You can install ASP.NET MVC 2, Visual Web Developer 2010, and SQL Server Express using the Microsoft Web Platform Installer available at www.microsoft.com/web/downloads.
Note
While this book focuses on using ASP.NET MVC 2 with Visual Studio 2010, most of what is shown in this book can also be done with Visual Studio 2008 by installing ASP.NET MVC 2 for Visual Studio 2008 via the Microsoft Web Platform Installer.
We'll begin our NerdDinner application by selecting the File
This brings up the "New Project" dialog. To create a new ASP.NET MVC 2 application, expand the Visual C# node, then select the Web node on the left side of the dialog and choose the "ASP.NET MVC 2 Web Application" project template on the right (Figure 1-8).
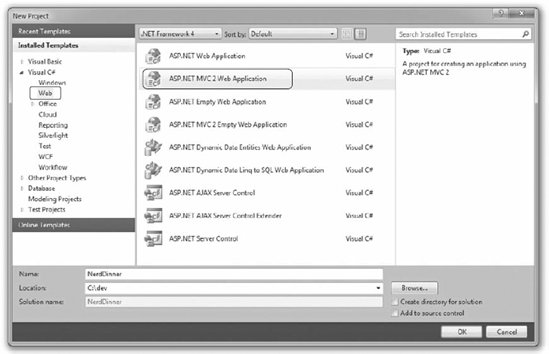
Name the new project NerdDinner and then click the OK button to create it.
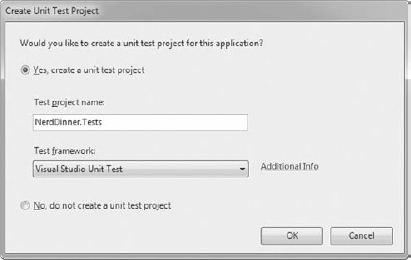
Clicking OK causes Visual Studio to bring up an additional dialog that prompts us to optionally create a unit test project for the new application as well (Figure 1-9). This unit test project enables us to create automated tests that verify the functionality and behavior of our application (something we'll cover later in this tutorial).
The Test framework dropdown in Figure 1-9 is populated with all available ASP.NET MVC 2 unit test project templates installed on the machine. Versions can be downloaded for NUnit, MbUnit, and XUnit. The built-in Visual Studio Unit Test Framework is also supported.
Note
The Visual Studio Unit Test Framework is only available with Visual Studio 2010 Professional and higher versions. If you are using VS 2010 Standard Edition or Visual Web Developer 2010 Express, you will need to download and install the NUnit, MbUnit, or XUnit extensions for ASP.NET MVC in order for this dialog to be shown. The dialog will not display if there aren't any test frameworks installed.
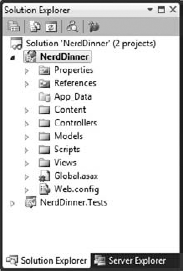
We'll use the default NerdDinner.Tests name for the test project we create, and use the "Visual Studio Unit Test Framework" option. When we click the OK button, Visual Studio will create a solution for us with two projects in it — one for our web application and one for our unit tests (Figure 1-10).
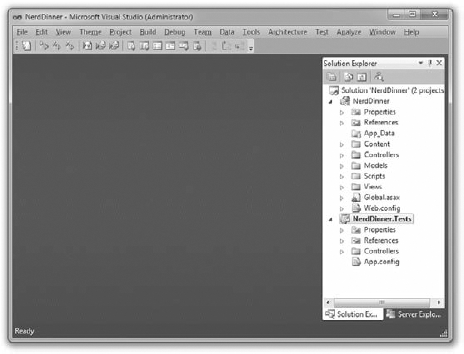
When you create a new ASP.NET MVC application with Visual Studio, it automatically adds several files and directories to the project, as shown in Figure 1-11.
ASP.NET MVC projects by default have six top-level directories, shown in Table 1-1.
Table 1.1. Default Top-Level Directories
DIRECTORY | PURPOSE |
|---|---|
| Where you put Controller classes that handle URL requests |
| Where you put classes that represent and manipulate data and business objects |
| Where you put UI template files that are responsible for rendering output, such as HTML |
| Where you put JavaScript library files and scripts (.js) |
| Where you put CSS and image files, and other non-dynamic/non-JavaScript content |
| Where you store data files you want to read/write |
ASP.NET MVC does not require this structure. In fact, developers working on large applications will typically partition the application up across multiple projects to make it more manageable (e.g., data model classes often go in a separate class library project from the web application). The default project structure, however, does provide a nice default directory convention that we can use to keep our application concerns clean.
When we expand the /Controllers directory, we'll find that Visual Studio added two Controller classes (Figure 1-12) — HomeController and AccountController — by default to the project:

When we expand the /Views directory, we'll find that three subdirectories — /Home, /Account, and /Shared — as well as several template files within them, were also added to the project by default (Figure 1-13).
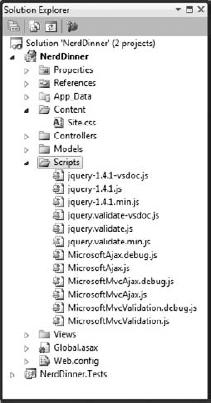
When we expand the /Content and /Scripts directories, we'll find a Site.css file that is used to style all HTML on the site, as well as JavaScript libraries that can enable ASP.NET AJAX and jQuery support within the application (Figure 1-14).
When we expand the NerdDinner.Tests project, we'll find two classes that contain unit tests for our Controller classes (see Figure 1-15).


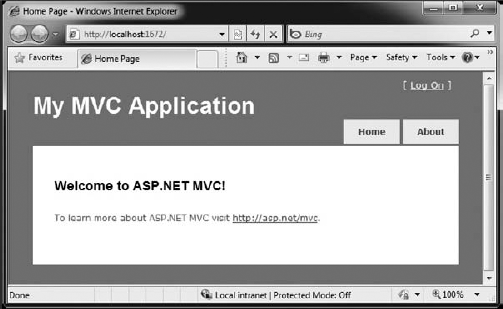
These default files, added by Visual Studio, provide us with a basic structure for a working application — complete with home page, about page, account login/logout/registration pages, and an unhandled error page (all wired-up and working out-of-the-box).
We can run the project by choosing either the Debug
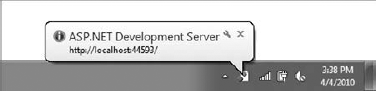
This will launch the built-in ASP.NET web server that comes with Visual Studio, and run our application (Figure 1-17).
Figure 1-18 is the home page for our new project (URL: /) when it runs.

Clicking the About tab displays an About page (URL: /Home/About, as shown in Figure 1-19).
Clicking the Log On link on the top right takes us to a Login page, as shown in Figure 1-20 (URL: /Account/LogOn).

If we don't have a login account, we can click the Register link (URL: /Account/Register) to create one (see Figure 1-21).

The code to implement the above home, about, and login/register functionality was added by default when we created our new project. We'll use it as the starting point of our application.


We'll be using a database to store all of the Dinner and RSVP data for our NerdDinner application.
The steps below show creating the database using the free SQL Server Express Edition. All of the code we'll write works with both SQL Server Express and the full SQL Server.
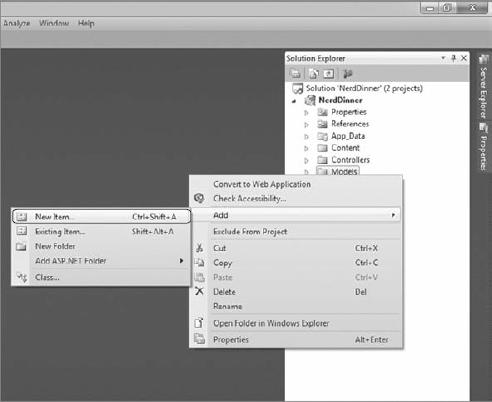
We'll begin by right-clicking on our web project, and then selecting the Add

This will bring up the Add New Item dialog (Figure 1-25). We'll filter by the Data category and select the SQL Server Database item template.
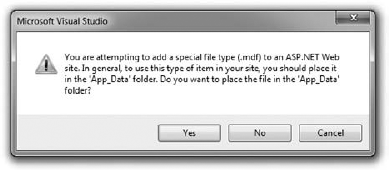
We'll name the SQL Server Express database we want to create NerdDinner.mdf and hit OK. Visual Studio will then ask us if we want to add this file to our App_Data directory (Figure 1-26), which is a directory already set up with both read and write security permissions.
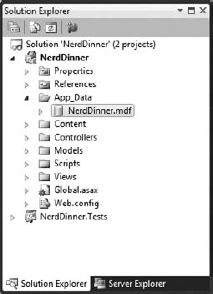
We'll click Yes, and our new database will be created and added to our Solution Explorer (Figure 1-27).

We now have a new empty database. Let's add some tables to it.
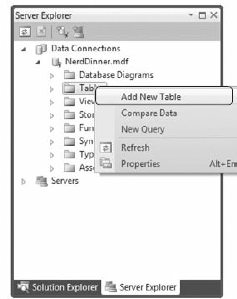
To do this, we'll navigate to the Server Explorer tab window within Visual Studio, which enables us to manage databases and servers. SQL Server Express databases stored in the App_Data folder of our application will automatically show up within the Server Explorer. We can optionally use the Connect to Database icon on the top of the Server Explorer window to add additional SQL Server databases (both local and remote) to the list as well (Figure 1-28).
We will add two tables to our NerdDinner database — one to store our Dinners and the other to track RSVP acceptances to them. We can create new tables by right-clicking on the Tables folder within our database and choosing the Add New Table menu command (Figure 1-29).

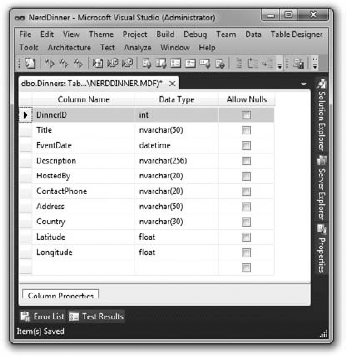
This will open up a Table Designer that allows us to configure the schema of our table. For our Dinners table, we will add 10 columns of data (Figure 1-30).
We want the DinnerID column to be a unique primary key for the table. We can configure this by right-clicking on the DinnerID column and choosing the Set Primary Key menu item (Figure 1-31).

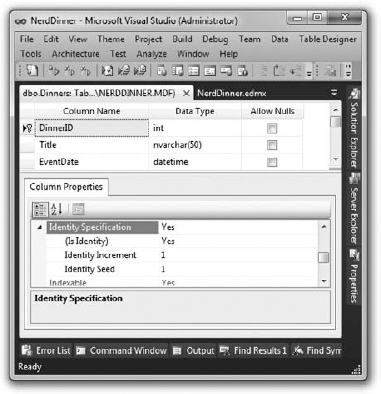
In addition to making DinnerID a primary key, we also want to configure it as an identity column whose value is automatically incremented as new rows of data are added to the table (meaning the first inserted Dinner row will have an automatic DinnerID of 1, the second inserted row will have a DinnerID of 2, etc.).
We can do this by selecting the DinnerID column and then using the Column Properties editor to set the "(Is Identity)" property on the column to Yes (Figure 1-32). We will use the standard identity defaults (start at 1 and increment 1 on each new Dinner row).
We'll then save our table by pressing Ctrl+S or by clicking the File
Our new Dinners table will then show up in our database in the Server Explorer.
Next, we'll repeat the above steps and create an RSVP table. This table will have three columns. We will set up the RsvpID column as the primary key, and also make it an identity column (Figure 1-34).
We'll save it and give it the name RSVP.

We now have two tables within our database. Our last schema design step will be to set up a "one-to-many" relationship between these two tables — so that we can associate each Dinner row with zero or more RSVP rows that apply to it. We will do this by configuring the RSVP table's DinnerID column to have a foreign-key relationship to the DinnerID column in the Dinners table.
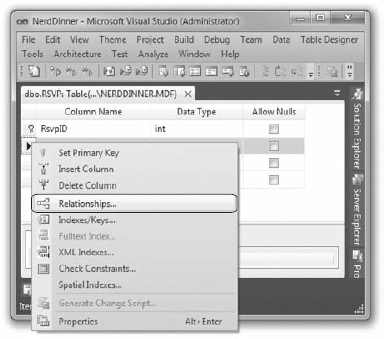
To do this, we'll open up the RSVP table within the table designer by double-clicking it in the Server Explorer. We'll then select the DinnerID column within it, right-click, and choose the Relationships context menu command (see Figure 1-35).
This will bring up a dialog that we can use to set up relationships between tables (Figure 1-36).

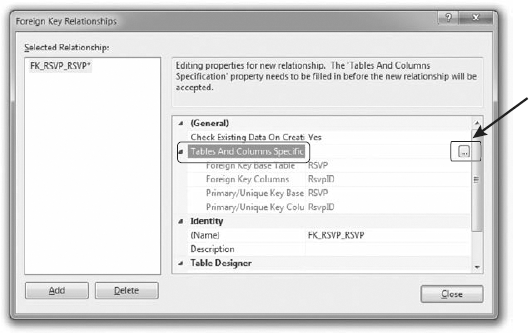
We'll click the Add button to add a new relationship to the dialog. Once a relationship has been added, we'll expand the Tables and Column Specification tree-view node within the property grid to the right of the dialog, and then click the "..." button to the right of it (Figure 1-37).
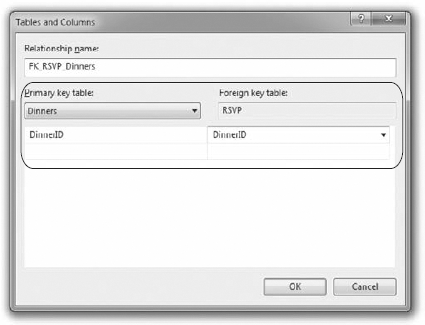
Clicking the "..." button will bring up another dialog that allows us to specify which tables and columns are involved in the relationship, as well as allow us to name the relationship.
We will change the Primary Key Table to be Dinners, and select the DinnerID column within the Dinners table as the primary key. Our RSVP table will be the foreign-key table, and the RSVP.DinnerID column will be associated as the foreign key (Figure 1-38).
Now each row in the RSVP table will be associated with a row in the Dinner table. SQL Server will maintain referential integrity for us — and prevent us from adding a new RSVP row if it does not point to a valid Dinner row. It will also prevent us from deleting a Dinner row if there are still RSVP rows referring to it.
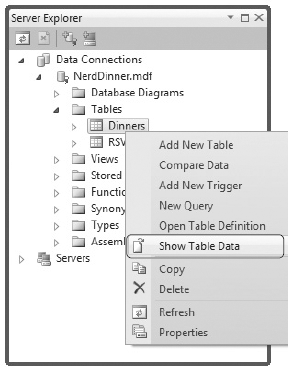
Let's finish by adding some sample data to our Dinners table. We can add data to a table by right-clicking it in the Server Explorer and choosing the Show Table Data command (see Figure 1-39).
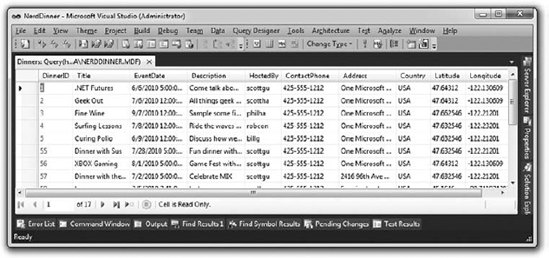
Let's add a few rows of Dinner data that we can use later as we start implementing the application (Figure 1-40).
In a Model-View-Controller framework, the term Model refers to the objects that represent the data of the application, as well as the corresponding domain logic that integrates validation and business rules with it. The Model is in many ways the heart of an MVC-based application, and as we'll see later, it fundamentally drives the behavior of the application.
The ASP.NET MVC Framework supports using any data access technology. Developers can choose from a variety of rich .NET data options to implement their models, including: Entity Framework, LINQ to SQL, NHibernate, LLBLGen Pro, SubSonic, WilsonORM, or just raw ADO.NET DataReaders or DataSets.
For our NerdDinner application, we are going to use Entity Framework to create a simple domain model that corresponds fairly closely to our database design, and add some custom validation logic and business rules. We will then implement a repository class that helps abstract away the data persistence implementation from the rest of the application, and enables us to easily unit test it.
Entity Framework is an ORM (object relational mapper) that ships as part of .NET 4.
Entity Framework provides an easy way to map database tables to .NET classes we can code against. For our NerdDinner application, we'll use it to map the Dinners and RSVP tables within our database to Dinner and RSVP model classes. The columns of the Dinners and RSVP tables will correspond to properties on the Dinner and RSVP classes. Each Dinner and RSVP object will represent a separate row within the Dinners or RSVP tables in the database.
Entity Framework allows us to avoid having to manually construct SQL statements to retrieve and update Dinner and RSVP objects with database data. Instead, we'll define the Dinner and RSVP classes, how they map to/from the database, and the relationships between them. Entity Framework will then take care of generating the appropriate SQL execution logic to use at run time when we interact and use them.
We can use the LINQ language support within VB and C# to write expressive queries that retrieve Dinner and RSVP objects. This minimizes the amount of data code we need to write and allows us to build really clean applications.
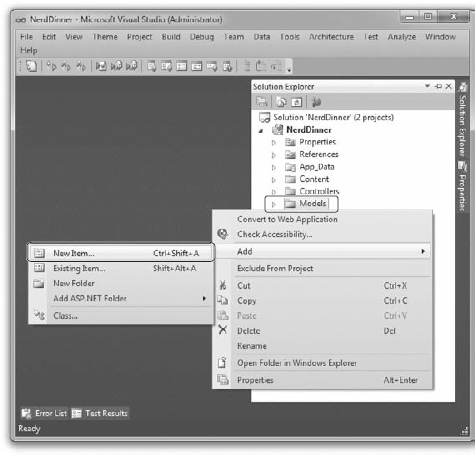
We'll begin by right-clicking the Models folder in our project and selecting the Add
This will bring up the "Add New Item" dialog (Figure 1-42). We'll filter by the Data category and select the ADO.NET Entity Data Model template within it.
We'll name the item NerdDinner.edmx and click the Add button. This takes us to the Entity Data Model Wizard (see Figure 1-43), which allows us to choose between two options. We can generate the model from the database, or we can choose an empty model.

Because we already have a database prepared, we'll choose "Generate from database" to generate our model classes based on our database tables. Clicking Next takes us to a screen that prompts us to choose connection information for connecting to our database (see Figure 1-44).


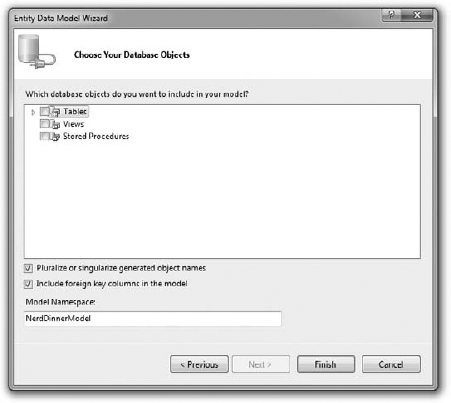
We can click Next here to choose the default, which takes us to a screen allowing us to choose which tables, views, and stored procedures we want to include in our model (see Figure 1-45).
Make sure to check Tables, Views, and Stored Procedures. Also, make sure that the options to "Pluralize or singularize generated object names" and "Include foreign key columns in the model" are also both checked (see Figure 1-46). We'll talk about what these do in the next section.

At that point, Visual Studio will add a NerdDinner.edmx file under our Models directory and then open the Entity Framework Object Relational Designer (Figure 1-47).

The Entity Data Model Wizard we just walked through enables us to quickly create data model classes from an existing database schema.
In the previous section, we checked the option to "Pluralize or singularize generated object names." By checking this, Entity Framework pluralizes table and column names when it creates classes based on a database schema. For example: the Dinners table in our example above resulted in a Dinner class. This class naming helps make our models consistent with .NET naming conventions, and having the Designer fix this up is convenient (especially when adding lots of tables).
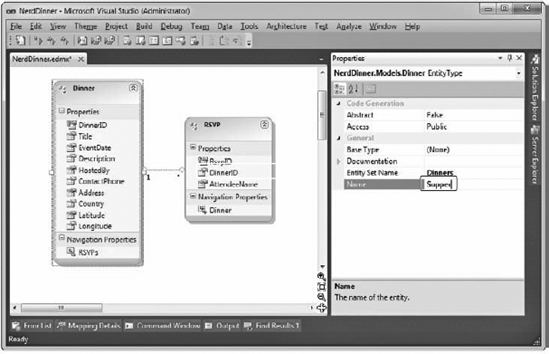
If you don't like the name of a class or property that the Designer generates, though, you can always override it and change it to any name you want. You can do this either by editing the entity/property name inline within the Designer or by modifying it via the property grid. Figure 1-48 shows an example of changing the entity name from Dinner to Supper.
We also checked the option "Include foreign key columns in the model." This causes the Entity Framework Wizard to inspect the primary key/foreign key relationships of the tables, and based on them automatically creates default relationship associations between the different model classes it creates. For example, when we selected the Dinners and RSVP tables in the Wizard by choosing all tables, a one-to-many relationship association between the two was inferred based on the fact that the RSVP table had a foreign key to the Dinners table (this is indicated by the circled area in the Designer in Figure 1-49).
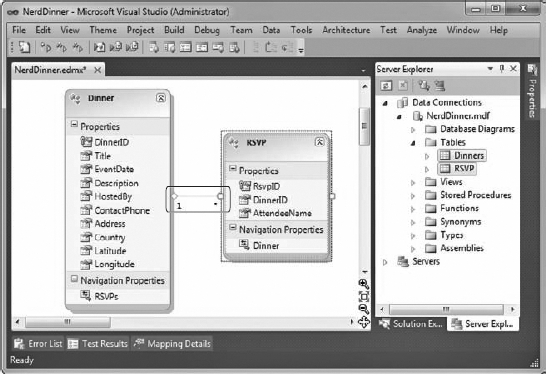
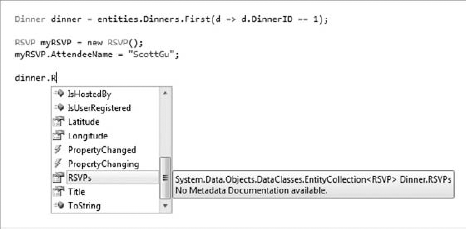
The association in Figure 1-49 will cause Entity Framework to add a strongly typed Dinner property to the RSVP class that developers can use to access the Dinner entity associated with a given RSVP. It will also cause the Dinner class to have a strongly typed RSVPs collection property that enables developers to retrieve and update RSVP objects associated with that Dinner.
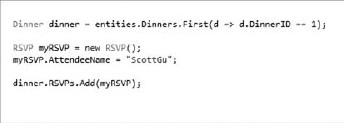
In Figure 1-50, you can see an example of IntelliSense within Visual Studio when we create a new RSVP object and add it to a Dinner's RSVPs collection.
Notice how Entity Framework created an "RSVPs" collection on the Dinner object. We can use this to associate a foreign-key relationship between a Dinner and an RSVP row in our database (see Figure 1-51).
If you don't like how the Designer has modeled or named a table association, you can override it. Just click on the association arrow within the designer and access its properties via the property grid to rename, delete, or modify it. For our NerdDinner application, though, the default association rules work well for the data model classes we are building, and we can just use the default behavior.
Visual Studio automatically generates .NET classes that represent the models and database relationships defined using the Entity Framework Designer. An ObjectContext class is also generated for each Entity Framework Designer file added to the solution. Because we named our Entity Framework class item NerdDinner, the ObjectContext class created will be called NerdDinnerEntities. This NerdDinnerEntities class is the primary way we will interact with the database.
Our NerdDinnerEntities class exposes two properties — Dinners and RSVP — that represent the two tables we modeled within the database. We can use C# to write LINQ queries against those properties to query and retrieve Dinner and RSVP objects from the database.
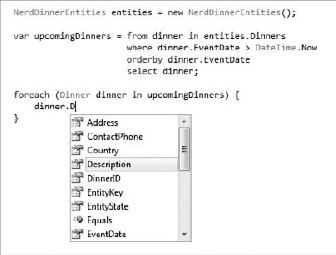
The following code (see Figure 1-52) demonstrates how to instantiate a NerdDinnerDataContext object and perform a LINQ query against it to obtain a sequence of Dinners that occur in the future.
A NerdDinnerEntities object tracks any changes made to Dinner and RSVP objects retrieved using it and enables us to easily save the changes back to the database. The code that follows demonstrates how we can use a LINQ query to retrieve a single Dinner object from the database, update two of its properties, and then save the changes back to the database:
NerdDinnerEntities entities = new NerdDinnerEntities();

// Retrieve Dinner object that reprents a row with DinnerID of 1
Dinner dinner = entities.Dinners.Single(d => d.DinnerID == 1);

// Update two properties on Dinner
dinner.Title = "Changed Title";
dinner.Description = "This dinner will be fun";

// Persist changes to database
db.SaveChanges();
Code snippet 1-1.txt
The NerdDinnerEntities object in the code automatically tracked the property changes made to the Dinner object we retrieved from it. When we called the SaveChanges method, it executed an appropriate SQL "UPDATE" statement to the database to persist the updated values back.
For small applications, it is sometimes fine to have Controllers work directly against an Entity Framework ObjectContext class and embed LINQ queries within the Controllers. As applications get larger, though, this approach becomes cumbersome to maintain and test. It can also lead to us duplicating the same LINQ queries in multiple places.
One approach that can make applications easier to maintain and test is to use a repository pattern. A repository class helps encapsulate data querying and persistence logic and abstracts away the implementation details of the data persistence from the application. In addition to making application code cleaner, using a repository pattern can make it easier to change data storage implementations in the future, and it can help facilitate unit testing an application without requiring a real database.
For our NerdDinner application, we'll define a DinnerRepository class with the following signature:
public class DinnerRepository {

    // Query Methods
public IQueryable<Dinner> FindAllDinners();
public IQueryable<Dinner> FindUpcomingDinners();
public Dinner GetDinner(int id);
// Insert/Delete
public void Add(Dinner dinner);
public void Delete(Dinner dinner);
// Persistence
public void Save();
}
Code snippet 1-2.txtNote
Later in this chapter, we'll extract an IDinnerRepository interface from this class and enable dependency injection with it on our Controllers. To begin with, though, we are going to start simple and just work directly with the DinnerRepository class.
To implement this class, we'll right-click our Models folder and choose the Add
We can then implement our DinnerRespository class using the code that follows:
public class DinnerRepository {

    private NerdDinnerEntities entities = new NerdDinnerEntities();

    //
    // Query Methods

    public IQueryable<Dinner> FindAllDinners() {
        return entities.Dinners;
    }

    public IQueryable<Dinner> FindUpcomingDinners() {
        return from dinner in entities.Dinners
               where dinner.EventDate > DateTime.Now
               orderby dinner.EventDate
               select dinner;
    }


    public Dinner GetDinner(int id) {
        return entities.Dinners.FirstOrDefault(d => d.DinnerID == id);
    }

    //
    // Insert/Delete Methods

    public void Add(Dinner dinner) {
        entities.Dinners.AddObject(dinner);
    }

    public void Delete(Dinner dinner) {
        foreach(var rsvp in dinner.RSVPs) {
            entities.RSVPs.DeleteObject(dinner.RSVPs);
        }
        entities.Dinners.DeleteObject(dinner);
    }

    //
    // Persistence

    public void Save() {
        entities.SaveChanges();
    }
}
Code snippet 1-3.txtNow that we've created our DinnerRepository class, let's look at a few code examples that demonstrate common tasks we can do with it.
The code that follows retrieves a single Dinner using the DinnerID value:
DinnerRepository dinnerRepository = new DinnerRepository();

// Retrieve specific dinner by its DinnerID
Dinner dinner = dinnerRepository.GetDinner(5);
Code snippet 1-4.txt
The code that follows retrieves all upcoming dinners and loops over them:
DinnerRepository dinnerRepository = new DinnerRepository();

// Retrieve all upcoming Dinners
var upcomingDinners = dinnerRepository.FindUpcomingDinners();

// Loop over each upcoming Dinner
foreach (Dinner dinner in upcomingDinners) {

}
Code snippet 1-5.txtThe code that follows demonstrates adding two new Dinners. Additions/modifications to the repository aren't committed to the database until the Save method is called upon it. Entity Framework automatically wraps all changes in a database transaction — so either all changes happen or none of them does when our repository saves:
DinnerRepository dinnerRepository = new DinnerRepository();

// Create First Dinner
Dinner newDinner1 = new Dinner();
newDinner1.Title = "Dinner with Scott";
newDinner1.HostedBy = "ScottGu";
newDinner1.ContactPhone = "425-703-8072";

// Create Second Dinner
Dinner newDinner2 = new Dinner();
newDinner2.Title = "Dinner with Bill";
newDinner2.HostedBy = "BillG";
newDinner2.ContactPhone = "425-555-5151";

// Add Dinners to Repository
dinnerRepository.Add(newDinner1);
dinnerRepository.Add(newDinner2);

// Persist Changes
dinnerRepository.Save();
Code snippet 1-6.txt
The code that follows retrieves an existing Dinner object and modifies two properties on it. The changes are committed back to the database when the Save method is called on our repository:
DinnerRepository dinnerRepository = new DinnerRepository();

// Retrieve specific dinner by its DinnerID
Dinner dinner = dinnerRepository.GetDinner(5);

// Update Dinner properties
dinner.Title = "Update Title";
dinner.HostedBy = "New Owner";

// Persist changes
dinnerRepository.Save();
Code snippet 1-7.txt
The code that follows retrieves a Dinner and then adds an RSVP to it. It does this using the RSVPs collection on the Dinner object that Entity Framework created for us (because there is a primary-key/foreign-key relationship between the two in the database). This change is persisted back to the database as a new RSVP table row when the Save method is called on the repository:
DinnerRepository dinnerRepository = new DinnerRepository();

// Retrieve specific dinner by its DinnerID
Dinner dinner = dinnerRepository.GetDinner(5);

// Create a new RSVP object
RSVP myRSVP = new RSVP();
myRSVP.AttendeeName = "ScottGu";

// Add RSVP to Dinner's RSVP Collection
dinner.RSVPs.Add(myRSVP);

// Persist changes
dinnerRepository.Save();
Code snippet 1-8.txtThe code that follows retrieves an existing Dinner object and then marks it to be deleted. When the Save method is called on the repository, it will commit the delete back to the database:
DinnerRepository dinnerRepository = new DinnerRepository();

// Retrieve specific dinner by its DinnerID
Dinner dinner = dinnerRepository.GetDinner(5);

// Mark dinner to be deleted
dinnerRepository.Delete(dinner);

// Persist changes
dinnerRepository.Save();
Code snippet 1-9.txt
Integrating validation and business rule logic is a key part of any application that works with data.
When Model classes are defined using the Entity Framework Designer, the data types of the properties in the data Model classes will correspond to the data types of the database table. For example: If the EventDate column in the Dinners table is a date/time, the data Model class created by Entity Framework will be of type DateTime (which is a built-in .NET data type). This means you will get compile errors if you attempt to assign an integer or Boolean to it from code, and it will raise an error automatically if you attempt to implicitly convert a non-valid string type to it at run time.
Entity Framework will also automatically handle escaping SQL values for you when you use strings — so you don't need to worry about SQL injection attacks when using it.
Data-type validation is useful as a first step but is rarely sufficient. Most real-world scenarios require the ability to specify richer validation logic that can span multiple properties, execute code, and often have awareness of a Model's state (e.g., is it being created/updated/deleted, or within a domain-specific state like archived).
ASP.NET MVC 2 introduces support for Data Annotations validation attributes. These are a set of attributes that live in the System.ComponentModel.DataAnnotations namespace and were introduced as part of the Dynamic Data feature of ASP.NET 3.5 Service Pack 1. To use these attributes, make sure to reference the System.ComponentModel.DataAnnotations.dll assembly from the .NET tab of the Add Reference dialog. Note that this assembly is referenced by default when creating new ASP.NET MVC 2 projects in Visual Studio.
The .NET Framework includes the four validation attributes presented in Table 1-2.
Table 1.2. DataAnnotations Validation Attributes
ATTRIBUTE | DESCRIPTION |
|---|---|
| Specifies the numeric range constraints for the value of a property. |
| Specifies that the property value must match the specified regular expression. |
| Specifies the maximum length of characters that are allowed in the property. |
| Specifies that a value for the property is required. |
We can apply these attributes directly to properties of our model for validation. For example, to indicate that the title of a dinner is required, we could apply the RequiredAttribute like so:
public class Dinner {
   [Required(ErrorMessage = "Title is required")]
    public string Title {
        get;
        set;
    }
}
Code snippet 1-10.txt
However, taking this approach can mean that you run into problems with classes maintained by a Visual Studio Designer (like the Dinner class generated by the Entity Framework Designer). When changes are made to the Designer, the Designer will use code generation to re-create the class that will overwrite the changes we've made. Fortunately, we can apply these attributes by specifying a buddy class that will hold the validation attributes instead of the main class.
To add this buddy class, we'll need to add a partial class to our project. Partial classes can be used to add methods/properties/events to classes maintained by a VS Designer (like the Dinner class generated by the Entity Framework Designer) to avoid having the tool mess with our code.
We can add a new partial class to our project by right-clicking the Models folder, and then selecting the "Add New Item" menu command. We can then choose the Class template within the "Add New Item" dialog (Figure 1-54) and name it Dinner.cs.
Clicking the Add button will add a Dinner.cs file to our project and open it within the IDE. We then apply the partial keyword to the class. Now we can add the MetadataTypeAttribute to the Dinner class by applying it to the partial class. This attribute is used to specify the buddy class, in this case Dinner_Validation:
[MetadataType(typeof(Dinner_Validation))]
public partial class Dinner {
  //...
}
public class Dinner_Validation
{
[Required(ErrorMessage = "Title is required")]
[StringLength(50, ErrorMessage = "Title may not be longer than 50 characters")]
public string Title { get; set; }
[Required(ErrorMessage = "Description is required")]
[StringLength(265, ErrorMessage =
"Description must be 256 characters or less")]
public string Description { get; set; }
[Required(ErrorMessage = "Address is required")]
public string Address { get; set; }
[Required(ErrorMessage = "Country is required")]
public string Country { get; set; }
[Required(ErrorMessage = "Phone# is required")]
public string ContactPhone { get; set; }
}
Code snippet 1-11.txt
A couple of notes about this code:
The
Dinnerclass is prefaced with apartialkeyword — which means the code contained within it will be combined with the class generated/maintained by the Entity Framework Designer and compiled into a single class.The property names of the
Dinner_Validateclass match the property names of theDinnerclass. Thus, when we validate a property of aDinner, we'll look at the attributes applied to the corresponding property ofDinner_Validation.
With these validation attributes in place, our model is validated any time we post it to an action method or call UpdateModel against it. Within an action method, we can check the ModelState.IsValid property to see if our model is valid as seen in the following Create method:
public class DinnerController : Controller {

    [HttpPost]
    public ActionResult Create(Dinner dinner) {
        if(ModelState.IsValid) {
            // Dinner is valid, save it.
        }
        else {
            return View();
        }
    }
Code snippet 1-12.txt
Notice that when the Model state is not valid, we simply show the create form again. When posting the Dinner to the action method, each of the validation attributes is run for each property. If an attribute fails, for example, if the Title field was left blank, an error is added to the ModelState dictionary with the key Title. This enables the helper methods used to build up the form to automatically display error messages and highlight fields that are in error.
Because our validation and business rules are implemented within our domain Model layer, and not within the UI layer, they will be applied and used across all scenarios within our application. We can later change or add business rules and have all code that works with our Dinner objects honor them. Having the flexibility to change business rules in one place, without having these changes ripple throughout the application and UI logic, is a sign of a well-written application, and a benefit that an MVC Framework helps encourage.
Note
In Chapter 13, we'll cover validation and data annotations in more depth.
With traditional web frameworks (classic ASP, PHP, ASP.NET Web Forms, etc.), incoming URLs are typically mapped to files on disk. For example: a request for a URL like /Products.aspx or /Products.php might be processed by a Products.aspx or Products.php file.
Web-based MVC Frameworks map URLs to server code in a slightly different way. Instead of mapping incoming URLs to files, they instead map URLs to methods on classes. These classes are called Controllers, and they are responsible for processing incoming HTTP requests, handling user input, retrieving and saving data, and determining the response to send back to the client (display HTML, download a file, redirect to a different URL, etc.).
Now that we have built up a basic model for our NerdDinner application, our next step will be to add a Controller to the application that takes advantage of it to provide users with a data listing/details navigation experience for Dinners on our site.
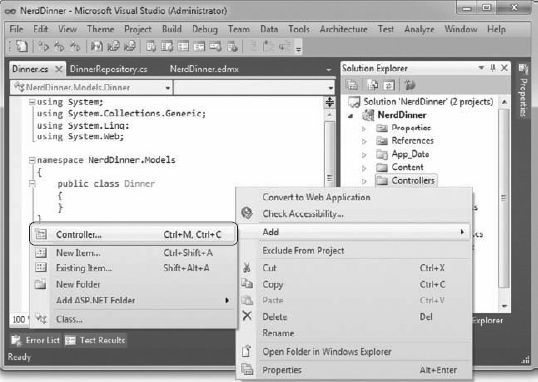
We'll begin by right-clicking the Controllers folder within our Web Project and then selecting the Add
Note
You can also execute this command by typing Ctrl+M, Ctrl+C.
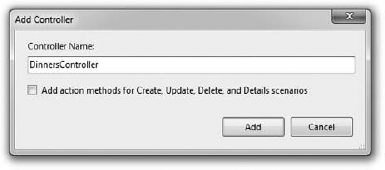
This will bring up the Add Controller dialog (Figure 1-56).
We'll name the new Controller DinnersController and click the Add button. Visual Studio will then add a DinnersController.cs file under our Controllers directory (Figure 1-57).
It will also open up the new DinnersController class within the code-editor.

We want to enable visitors using our application to browse the list of upcoming Dinners and enable them to click on any Dinner in the list to see specific details about it. We'll do this by publishing the URLs, presented in Table 1-3, from our application.
Table 1.3. Application URLs to Publish
URL | PURPOSE |
|---|---|
| Display an HTML list of upcoming Dinners. |
| Display details about a specific Dinner indicated by an |
We can publish initial implementations of these URLs by adding two public "action methods" to our DinnersController class:
public class DinnersController : Controller {

    //
    // GET: /Dinners/

    public void Index() {
Response.Write("<h1>Coming Soon: Dinners</h1>");
}
//
// GET: /Dinners/Details/2
public void Details(int id) {
Response.Write("<h1>Details DinnerID: " + id + "</h1>");
}
}
Code snippet 1-13.txtWe can then run the application and use our browser to invoke the action methods. Typing in the /Dinners/ URL will cause our Index method to run, and it will send back the response shown in Figure 1-58.
Typing in the /Dinners/Details/2 URL will cause our Details method to run, and send back the response shown in Figure 1-59.


You might be wondering — how did ASP.NET MVC know to create our DinnersController class and invoke those methods? To understand that, let's take a quick look at how routing works.
ASP.NET MVC includes a powerful URL routing engine that provides a lot of flexibility in controlling how URLs are mapped to Controller classes. It allows us to completely customize how ASP.NET MVC chooses which Controller class to create and which method to invoke on it, as well as configure different ways that variables can be automatically parsed from the URL/query string and passed to the method as parameter arguments. It delivers the flexibility to totally optimize a site for SEO (Search Engine Optimization) as well as publish any URL structure we want from an application.
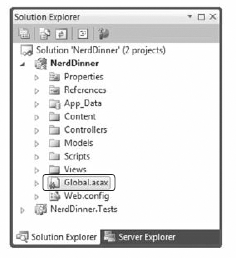
By default, new ASP.NET MVC projects come with a preconfigured set of URL routing rules already registered. This enables us to easily get started on an application without having to explicitly configure anything. The default routing rule registrations can be found within the Application class of our projects — which we can open by double-clicking the Global.asax file in the root of our project (Figure 1-60).
The default ASP.NET MVC routing rules are registered within the RegisterRoutes method of this class:
public void RegisterRoutes(RouteCollection routes)
{
    routes.IgnoreRoute("{resource}.axd/{*pathInfo}");

    routes.MapRoute(
        "Default",                                        // Route name
        "{controller}/{action}/{id}",                     // URL w/ params
        new { controller="Home", action="Index",
              id=UrlParameter.Optional }  // Param defaults
    );
}
Code snippet 1-14.txt
The routes.MapRoute method call in the previous code registers a default routing rule that maps incoming URLs to Controller classes using the URL format: /{controller}/{action}/{id}, where controller is the name of the Controller class to instantiate, action is the name of a public method to invoke on it, and id is an optional parameter embedded within the URL that can be passed as an argument to the method. The third parameter passed to the MapRoute method call is a set of default values to use for the controller/action/id values in the event that they are not present in the URL (controller = "Home", action="Index", id=UrlParameter.Optional).
Table 1-4 demonstrates how a variety of URLs are mapped using the default /{controllers}/{action}/{id} route rule.
Table 1.4. Example URLs Mapped to the Default Route
URL | CONTROLLER CLASS | ACTION METHOD | PARAMETERS PASSED |
|---|---|---|---|
|
|
|
|
|
|
|
|
|
|
| N/A |
|
|
| N/A |
|
|
| N/A |
|
|
| N/A |
The last three rows show the default values (Controller = Home, Action = Index, IdUrlParameter.Optional "") being used. Because the Index method is registered as the default action name if one isn't specified, the /Dinners and /Home URLs cause the Index action method to be invoked on their Controller classes. Because the Home controller is registered as the default controller if one isn't specified, the / URL causes the HomeController to be created, and the Index action method on it to be invoked.
If you don't like these default URL routing rules, the good news is that they are easy to change — just edit them within the RegisterRoutes method in the previous code. For our NerdDinner application, though, we aren't going to change any of the default URL routing rules — instead, we'll just use them as is.
Let's now replace the current implementation of our Index and Details action methods with implementations that use our Model.
We'll use the DinnerRepository class we built earlier to implement the behavior. We'll begin by adding a using statement that references the NerdDinner.Models namespace, and then declare an instance of our DinnerRepository as a field on our DinnerController class.
Later in this chapter, we'll introduce the concept of Dependency Injection and show another way for our Controllers to obtain a reference to a DinnerRepository that enables better unit testing — but for right now, we'll just create an instance of our DinnerRepository inline like the code that follows:
using System;
using System.Collections.Generic;
using System.Linq;
using System.Web;
using System.Web.Mvc;
using NerdDinner.Models;

namespace NerdDinner.Controllers {

    public class DinnersController : Controller {

        DinnerRepository dinnerRepository = new DinnerRepository();

        //
        // GET: /Dinners/

        public void Index() {
            var dinners = dinnerRepository.FindUpcomingDinners().ToList();
        }

        //
        // GET: /Dinners/Details/2

        public void Details(int id) {
            Dinner dinner = dinnerRepository.GetDinner(id);
        }
    }
}
Code snippet 1-15.txt
Now we are ready to generate an HTML response back using our retrieved data Model objects.
Although it is possible to write code within our action methods to assemble HTML and then use the Response.Write helper method to send it back to the client, that approach becomes fairly unwieldy quickly. A much better approach is for us to only perform application and data logic inside our DinnersController action methods, and to then pass the data needed to render an HTML response to a separate View template that is responsible for outputting the HTML representation of it. As we'll see in a moment, a View template is a text file that typically contains a combination of HTML markup and embedded rendering code.
Separating our Controller logic from our View rendering brings several big benefits. In particular, it helps enforce a clear separation of concerns between the application code and UI formatting/rendering code. This makes it much easier to unit test application logic in isolation from UI rendering logic. It makes it easier to later modify the UI rendering templates without having to make application code changes. And it can make it easier for developers and designers to collaborate together on projects.
We can update our DinnersController class to indicate that we want to use a View template to send back an HTML UI response by changing the method signatures of our two action methods from having a return type of void to instead have a return type of ActionResult. We can then call the View helper method on the Controller base class to return back a ViewResult object:
public class DinnersController : Controller {

    DinnerRepository dinnerRepository = new DinnerRepository();

    //
// GET: /Dinners/
public ActionResult Index() {
var dinners = dinnerRepository.FindUpcomingDinners().ToList();
return View("Index", dinners);
}
//
// GET: /Dinners/Details/2
public ActionResult Details(int id) {
Dinner dinner = dinnerRepository.GetDinner(id);
if (dinner == null)
return View("NotFound");
else
return View("Details", dinner);
}
}
Code snippet 1-16.txtThe signature of the View helper method we are using in the previous code looks like Figure 1-61.
The first parameter to the View helper method is the name of the View template file we want to use to render the HTML response. The second parameter is a Model object that contains the data that the View template needs in order to render the HTML response.
Within our Index action method, we are calling the View helper method and indicating that we want to render an HTML listing of dinners using an "Index" View template. We are passing the View template a sequence of Dinner objects to generate the list from:
//
    // GET: /Dinners/

    public ActionResult Index() {

        var dinners = dinnerRepository.FindUpcomingDinners().ToList();

        return View("Index", dinners);
    }
Code snippet 1-17.txt
Within our Details action method, we attempt to retrieve a Dinner object using the id provided within the URL. If a valid Dinner is found, we call the View helper method, indicating that we want to use a "Details" View template to render the retrieved Dinner object. If an invalid Dinner is requested, we render a helpful error message that indicates that the Dinner doesn't exist, using a "NotFound" View template (and an overloaded version of the View helper method that just takes the template name):
//
    // GET: /Dinners/Details/2

    public ActionResult Details(int id) {

        Dinner dinner = dinnerRepository.FindDinner(id);

        if (dinner == null)
            return View("NotFound");
        else
            return View("Details", dinner);
    }
Code snippet 1-18.txt
Let's now implement the "NotFound", "Details", and "Index" View templates.
We'll begin by implementing the "NotFound" View template — which displays a friendly error message indicating that the requested Dinner can't be found.
We'll create a new View template by positioning our text cursor within a Controller action method, and then by right-clicking and choosing the Add View menu command (see Figure 1-62; we can also execute this command by pressing Ctrl+M, Ctrl+V).

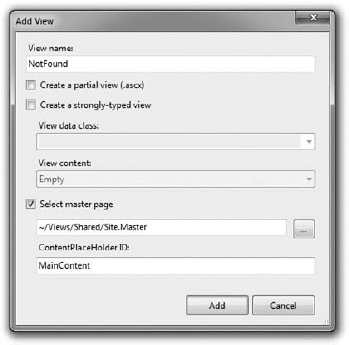
This will bring up the "Add View" dialog shown in Figure 1-63. By default, the dialog will pre-populate the name of the View to create to match the name of the action method the cursor was in when the dialog was launched (in this case, Details). Because we want to first implement the "NotFound" template, we'll override this View name and set it instead to be NotFound.
When we click the Add button, Visual Studio will create a new NotFound.aspx (see Figure 1-64) View template for us within the ViewsDinners directory (which it will also create if the directory doesn't already exist).
It will also open up our new NotFound.aspx View template within the code-editor (see Figure 1-65).


View templates by default have two content regions where we can add content and code. The first allows us to customize the title of the HTML page sent back. The second allows us to customize the main content of the HTML page sent back.
To implement our "NotFound" View template, we'll add some basic content:
<asp:Content ID="Title" ContentPlaceHolderID="TitleContent" runat="server">
    Dinner Not Found
</asp:Content>

<asp:Content ID="Main" ContentPlaceHolderID="MainContent" runat="server">

    <h2>Dinner Not Found</h2>

    <p>Sorry - but the dinner you requested doesn't exist or was deleted.</p>

</asp:Content>
Code snippet 1-19.txt
We can then try it out within the browser. To do this, let's request the /Dinners/Details/9999 URL. This will refer to a Dinner that doesn't currently exist in the database and will cause our DinnersController.Details action method to render our "NotFound" View template (see Figure 1-66).

One thing you'll notice in Figure 1-66 is that our basic View template has inherited a bunch of HTML that surrounds the main content on the screen. This is because our View template is using a Master Page template that enables us to apply a consistent layout across all views on the site. We'll discuss how Master Pages work more in a later part of this chapter.
Let's now implement the "Details" View template — which will generate HTML for a single Dinner model.
We'll do this by positioning our text cursor within the Details action method, and then right-clicking and choosing the Add View menu command (Figure 1-67) or pressing Ctrl+M, Ctrl+V.

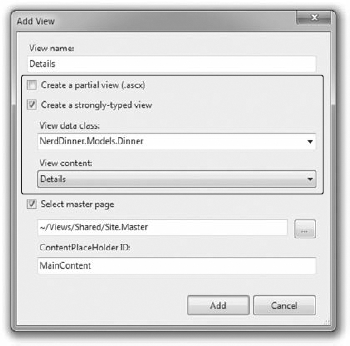
This will bring up the "Add View" dialog. We'll keep the default View name (Details). We'll also select the "Create a strongly-typed view" checkbox in the dialog and select (using the combobox dropdown) the name of the model type we are passing from the Controller to the View. For this View, we are passing a Dinner object (the fully qualified name for this type is: NerdDinner.Models.Dinner) as shown in Figure 1-68.
Unlike the previous template, where we chose to create an "Empty View," this time we will choose to automatically scaffold the view using a "Details" template. We can indicate this by changing the View content dropdown in the dialog above.
Scaffolding will generate an initial implementation of our Details View template based on the Dinner model we are passing to it. This provides an easy way for us to quickly get started on our View template implementation.
When we click the Add button, Visual Studio will create a new Details.aspx View template file for us within our ViewsDinners directory (see Figure 1-69).

It will also open up our new Details.aspx View template within the code-editor. It will contain an initial scaffold implementation of a Details View based on a Dinner model. The scaffolding engine uses .NET reflection to look at the public properties exposed on the class passed to it and will add appropriate content based on each type it finds:
<asp:Content ID="Title" ContentPlaceHolderID="TitleContent" runat="server">
    Details
</asp:Content>

<asp:Content ID="Main" ContentPlaceHolderID="MainContent" runat="server">

    <h2>Details</h2>

    <fieldset>
        <legend>Fields</legend>

        <div class="display-label">DinnerID</div>
        <div class="display-field"><%: Model.DinnerID %></div>

        <div class="display-label">Title</div>
        <div class="display-field"><%: Model.Title %></div>

        <div class="display-label">EventDate</div>
        <div class="display-field">
            <%: String.Format("{0:g}", Model.EventDate) %>
        </div>

        <div class="display-label">Description</div>
        <div class="display-field"><%: Model.Description %></div>

        <div class="display-label">HostedBy</div>
        <div class="display-field"><%: Model.HostedBy %></div>

        <div class="display-label">ContactPhone</div>
        <div class="display-field"><%: Model.ContactPhone %></div>

        <div class="display-label">Address</div>
        <div class="display-field"><%: Model.Address %></div>

        <div class="display-label">Country</div>
        <div class="display-field"><%: Model.Country %></div>

        <div class="display-label">Latitude</div>
        <div class="display-field">
            <%: String.Format("{0:F}", Model.Latitude) %>
        </div>

        <div class="display-label">Longitude</div>
        <div class="display-field">
            <%: String.Format("{0:F}", Model.Longitude) %>
        </div>

    </fieldset>
<p>
<%: Html.ActionLink("Edit", "Edit", new { id=Model.DinnerID }) %> |
<%: Html.ActionLink("Back to List", "Index") %>
</p>
</asp:Content>
Code snippet 1-20.txtWe can request the /Dinners/Details/1 URL to see what this "details" scaffold implementation looks like in the browser. Using this URL will display one of the Dinners we manually added to our database when we first created it (see Figure 1-70).
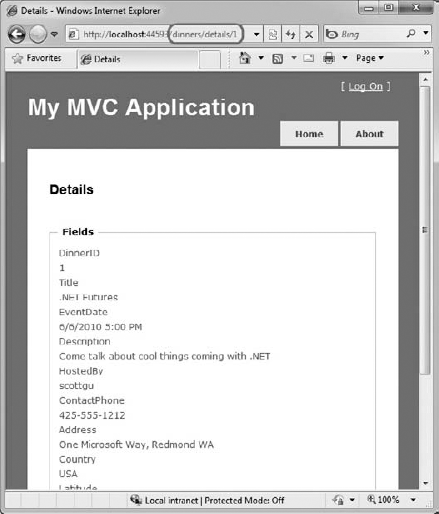
This gets us up and running quickly and provides us with an initial implementation of our Details .aspx View. We can then tweak it to customize the UI to our satisfaction.
When we look at the Details.aspx template more closely, we'll find that it contains static HTML as well as embedded rendering code. <% %> code nuggets execute code when the View template renders, and <%: %> code nuggets execute the code contained within them and then render the result to the output stream of the template.
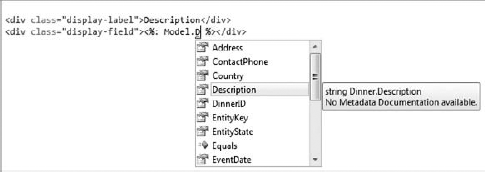
We can write code within our View that accesses the Dinner Model object that was passed from our Controller using a strongly typed Model property. Visual Studio provides us with full code-IntelliSense when accessing this Model property within the Editor (Figure 1-71).
Let's make some tweaks so that the source for our final Details View template looks like that below:
<asp:Content ID="Title" ContentPlaceHolderID="TitleContent" runat="server">
    Dinner: <%: Model.Title %>
</asp:Content>

<asp:Content ID="Main" ContentPlaceHolderID="MainContent" runat="server">

    <h2><%: Model.Title %></h2>
    <p>
        <strong>When:</strong>
        <%: Model.EventDate.ToShortDateString() %>

        <strong>@</strong>
        <%: Model.EventDate.ToShortTimeString() %>
    </p>
    <p>
        <strong>Where:</strong>
        <%: Model.Address %>,
        <%: Model.Country %>
    </p>
     <p>
        <strong>Description:</strong>
        <%: Model.Description %>
    </p>
    <p>
        <strong>Organizer:</strong>
        <%: Model.HostedBy %>
        (<%: Model.ContactPhone %>)
    </p>

    <%: Html.ActionLink("Edit Dinner", "Edit", new { id=Model.DinnerID })%> |
    <%: Html.ActionLink("Delete Dinner","Delete", new { id=Model.DinnerID})%>

</asp:Content>
Code snippet 1-21.txt
When we access the /Dinners/Details/1 URL again, it will render as shown in Figure 1-72.

Let's now implement the "Index" View template — which will generate a listing of upcoming Dinners. To do this, we'll position our text cursor within the Index action method and then right-click and choose the "Add View" menu command (or press Ctrl+M, Ctrl+V).
Within the "Add View" dialog (Figure 1-73), we'll keep the View template named Index and select the "Create a strongly-typed view" checkbox. This time we will choose to automatically generate a List View template and select NerdDinner.Models.Dinner as the Model type passed to the View (which, because we have indicated that we are creating a List scaffold, will cause the "Add View" dialog to assume that we are passing a sequence of Dinner objects from our Controller to the View).

When we click the Add button, Visual Studio will create a new Index.aspx View template file for us within our ViewsDinners directory. It will scaffold an initial implementation within it that provides an HTML table listing of the Dinners we pass to the View.
When we run the application and access the /Dinners/ URL, it will render our list of Dinners as shown in Figure 1-74.

The table solution in Figure 1-74 gives us a grid-like layout of our Dinner data — which isn't quitewhat we want for our consumer-facing Dinner listing. We can update the Index.aspx View template and modify it to list fewer columns of data, and use a <ul> element to render them instead of a tableusing the code that follows:
<asp:Content ID="Main" ContentPlaceHolderID="MainContent" runat="server">

    <h2>Upcoming Dinners</h2>

    <ul>

       <% foreach (var dinner in Model) { %>

           <li>
               <%: dinner.Title %>
               on
               <%: dinner.EventDate.ToShortDateString()%>
               @
               <%: dinner.EventDate.ToShortTimeString()%>
</li>
<% } %>
</ul>
</asp:Content>
Code snippet 1-22.txtWe are using the var keyword within the foreach statement as we loop over each Dinner in our Model. Those unfamiliar with C# 3.0 might think that using var means that the Dinner object is late-bound. It, instead, means that the compiler is using type-inference against the strongly typed Model property (which is of type IEnumerable<Dinner>) and compiling the local dinner variable as a Dinner type — which means that we get full IntelliSense and compile-time checking for it within code blocks (Figure 1-75).
When we press the Refresh button on the /Dinners URL in our browser, our updated View now looks like Figure 1-76.


This is looking better — but isn't entirely there yet. Our last step is to enable end users to click individual Dinners in the list and see details about them. We'll implement this by rendering HTML hyperlink elements that link to the Details action method on our DinnersController.
We can generate these hyperlinks within our Index view in one of two ways. The first is to manually create HTML <a> elements as shown in Figure 1-77, where we embed <% %> blocks within the <a> HTML element.

An alternative approach we can use is to take advantage of the built-in Html.ActionLink helper method within ASP.NET MVC that supports programmatically creating an HTML <a> element that links to another action method on a Controller:
<%: Html.ActionLink(dinner.Title, "Details", new { id=dinner.DinnerID }) %>The first parameter to the Html.ActionLink helper method is the link-text to display (in this case, the title of the Dinner); the second parameter is the Controller action name we want to generate the link to (in this case, the "Details" method); and the third parameter is a set of parameters to send to the action (implemented as an anonymous type with property name/values). In this case, we are specifying the id parameter of the Dinner we want to link to, and because the default URL routing rule in ASP.NET MVC is {Controller}/{Action}/{id}, the Html.ActionLink helper method will generate the following output:
<a href="/Dinners/Details/1">.NET Futures</a>
For our Index.aspx View, we'll use the Html.ActionLink helper method approach and have each dinner in the list link to the appropriate details URL:
<asp:Content ID="Title" ContentPlaceHolderID="TitleContent" runat="server">
       Upcoming Dinners
</asp:Content>

<asp:Content ID="Main" ContentPlaceHolderID="MainContent" runat="server">

 <h2>Upcoming Dinners</h2>

 <ul>
        <% foreach (var dinner in Model) { %>
            <li>
                <%: Html.ActionLink(dinner.Title, "Details",
                                       new { id=dinner.DinnerID }) %>
                on
                <%: dinner.EventDate.ToShortDateString()%>
                @
                <%: dinner.EventDate.ToShortTimeString()%>
            </li>
        <% } %>
    </ul>

</asp:Content>
Code snippet 1-23.txt
And now when we hit the /Dinners URL, our Dinner List looks like Figure 1-78.
When we click any of the Dinners in the list, we'll navigate to see details about it (Figure 1-79).


ASP.NET MVC applications, by default, use a convention-based directory-naming structure when resolving View templates. This allows developers to avoid having to fully qualify a location path when referencing Views from within a Controller class. By default, ASP.NET MVC will look for the View template file within the Views[ControllerName] directory underneath the application.
For example, we've been working on the DinnersController class — which explicitly references three View templates: "Index", "Details", and "NotFound". ASP.NET MVC will, by default, look for these Views within the ViewsDinners directory underneath our application root directory (see Figure 1-80).
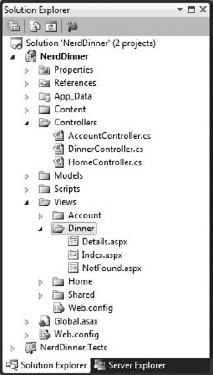
Notice in Figure 1-80 how there are currently three Controller classes within the project (DinnersController, HomeController, and AccountController — the last two were added by default when we created the project), and there are three subdirectories (one for each Controller) within the Views directory.
Views referenced from the Home and Accounts Controllers will automatically resolve their View templates from the respective ViewsHome and ViewsAccount directories. The ViewsShared subdirectory provides a way to store View templates that are reused across multiple Controllers within the application. When ASP.NET MVC attempts to resolve a View template, it will first check within the Views[Controller]-specific directory, and if it can't find the View template there, it will look within the ViewsShared directory.
When it comes to naming individual View templates, the recommended guidance is to have the View template share the same name as the action method that caused it to render. For example, our Index action method above is using the "Index" View to render the View result, and the Details action method is using the "Details" View to render its results. This makes it easy to quickly see which template is associated with each action.
Developers do not need to explicitly specify the View template name when the View template has the same name as the action method being invoked on the Controller. We can, instead, just pass the Model object to the View helper method (without specifying the View name), and ASP.NET MVC will automatically infer that we want to use the Views[ControllerName][ActionName] View template on disk to render it.
This allows us to clean up our Controller code a little, and avoid duplicating the name twice in our code:
public class DinnersController : Controller {
    DinnerRepository dinnerRepository = new DinnerRepository();

    //
    // GET: /Dinners/
public ActionResult Index() {
var dinners = dinnerRepository.FindUpcomingDinners().ToList();
return View(dinners);
}
//
// GET: /Dinners/Details/2
public ActionResult Details(int id) {
Dinner dinner = dinnerRepository.GetDinner(id);
if (dinner == null)
return View("NotFound");
else
return View(dinner);
}
}
Code snippet 1-24.txtThe previous code is all that is needed to implement a nice Dinner listing/details experience for the site.
We've introduced Controllers and Views, and covered how to use them to implement a listing/details experience for dinners on the site. Our next step will be to take our DinnersController class further and enable support for editing, creating, and deleting Dinners with it as well.
We previously added action methods to DinnersController that implemented support for two URLs (shown in Table 1-5): /Dinners and /Dinners/Details/[id].
Table 1.5. URLs Handled by DinnersController
URL | VERB | PURPOSE |
|---|---|---|
| GET | Displays an HTML list of upcoming Dinners. |
| GET | Displays details about a specific Dinner. |
We will now add action methods to implement three additional URLs: /Dinners/Edit/[id], /Dinners/Create and /Dinners/Delete/[id]. These URLs will enable support for editing existing Dinners, creating new Dinners, and deleting Dinners.
We will support both HTTP-GET and HTTP-POST verb interactions with these new URLs. HTTP GET requests to these URLs will display the initial HTML View of the data (a form populated with the Dinner data in the case of "edit," a blank form in the case of "create," and a delete confirmation screen in the case of "delete"). HTTP-POST requests to these URLs will save/update/delete the Dinner data in our DinnerRepository (and from there to the database), as shown in Table 1-6.
Table 1.6. URLs Combined with HTTP Verbs
URL | VERB | PURPOSE |
|---|---|---|
| GET | Displays an editable HTML form populated with Dinner data. |
POST | Saves the form changes for a particular Dinner to the database. | |
| GET | Displays an empty HTML form that allows users to define new Dinners. |
POST | Creates a new Dinner and saves it in the database. | |
| GET | Displays a confirmation screen that asks the user whether they want to delete the specified Dinner. |
POST | Deletes the specified Dinner from the database. |
Let's begin by implementing the "edit" scenario.
We'll start by implementing the HTTP GET behavior of our Edit action method. This method will be invoked when the /Dinners/Edit/[id] URL is requested. Our implementation will look like this:
//
// GET: /Dinners/Edit/2

public ActionResult Edit(int id) {

    Dinner dinner = dinnerRepository.GetDinner(id);

    return View(dinner);
}
Code snippet 1-25.txt
The code above uses the DinnerRepository to retrieve a Dinner object. It then renders a View template using the Dinner object. Because we haven't explicitly passed a template name to the View helper method, it will use the convention-based default path to resolve the View template: /Views/Dinners/Edit.aspx.
Let's now create this View template. We will do this by right-clicking within the Edit method and selecting the Add View context menu command (see Figure 1-81).
Within the Add View dialog, we'll indicate that we are passing a Dinner object to our View template as its model, and choose to auto-scaffold an Edit template (see Figure 1-82).
When we click the Add button, Visual Studio will add a new Edit.aspx View template file for us within the ViewsDinners directory. It will also open up the new Edit.aspx View template within the code-editor — populated with an initial "Edit" scaffold implementation like that shown in Figure 1-83.


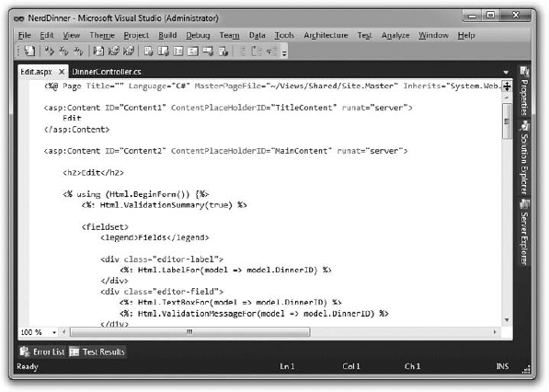
Let's make a few changes to the default "Edit" scaffold generated, and update the Edit View template to have the content below (which removes a few of the properties we don't want to expose):
<asp:Content ID="Title" ContentPlaceHolderID="TitleContent" runat="server">
    Edit: <%: Model.Title %>
</asp:Content>

<asp:Content ID="Main" ContentPlaceHolderID="MainContent" runat="server">

    <h2>Edit Dinner</h2>
    <% using (Html.BeginForm()) { %>
        <%: Html.ValidationSummary("Please correct the errors and try again.") %>
        <fieldset>
           <legend>Fields</legend>
            <div class="editor-label">
                <%: Html.LabelFor(m => m.Title) %>
            </div>
            <div class="editor-field">
                <%: Html.TextBoxFor(m => m.Title) %>
                <%: Html.ValidationMessageFor(m => m.Title, "*") %>
            </div>
            <div class="editor-label">
                <%: Html.LabelFor(m => m.EventDate) %>
            </div>
            <div class="editor-field">
                <%: Html.TextBoxFor(m => m.EventDate) %>
                <%: Html.ValidationMessageFor(m => m.EventDate, "*") %>
            </div>
            <div class="editor-label">
                <%: Html.LabelFor(m => m.Description) %>
            </div>
            <div class="editor-field">
                <%: Html.TextAreaFor(m => m.Description) %>
                <%: Html.ValidationMessageFor(m => m.Description, "*") %>
            </div>
            <div class="editor-label">
                <%: Html.LabelFor(m => m.Address) %>
            </div>
            <div class="editor-field">
                <%: Html.TextBoxFor(m => m.Address) %>
                <%: Html.ValidationMessageFor(m => m.Address, "*") %>
            </div>
            <div class="editor-label">
                <%: Html.LabelFor(m => m.Country) %>
            </div>
            <div class="editor-field">
                <%: Html.TextBoxFor(m => m.Country) %>
                <%: Html.ValidationMessageFor(m => m.Country, "*") %>
            </div>
            <div class="editor-label">
                <%: Html.LabelFor(m => m.ContactPhone) %>
            </div>
            <div class="editor-field">
                <%: Html.TextBoxFor(m => m.ContactPhone) %>
                <%: Html.ValidationMessageFor(m => m.ContactPhone, "*") %>
            </div>
            <div class="editor-label">
<%: Html.LabelFor(m => m.Latitude) %>
</div>
<div class="editor-field">
<%: Html.TextBoxFor(m => m.Latitude) %>
<%: Html.ValidationMessageFor(m => m.Latitude, "*") %>
</div>
<div class="editor-label">
<%: Html.LabelFor(m => m.Longitude) %>
</div>
<div class="editor-field">
<%: Html.TextBoxFor(m => m.Longitude) %>
<%: Html.ValidationMessageFor(m => m.Longitude, "*") %>
</div>
<p>
<input type="submit" value="Save" />
</p>
</fieldset>
<% } %>
</asp:Content>
Code snippet 1-26.txtWhen we run the application and request the /Dinners/Edit/1 URL, we will see the page shown in Figure 1-84.
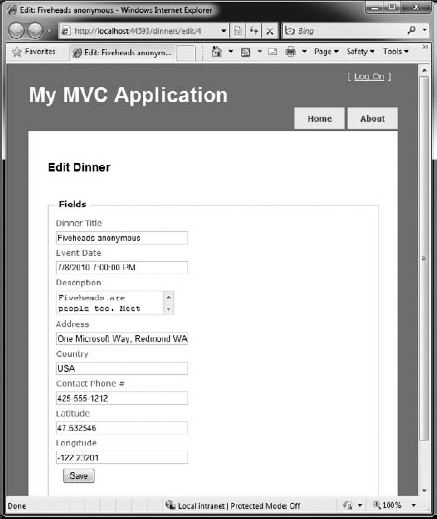
The HTML markup generated by our View looks like that below. It is standard HTML — with a <form> element that performs an HTTP POST to the /Dinners/Edit/1 URL when the Save <input type="submit"/> button is pushed. An HTML <input type="text"/> element has been output for each editable property (see Figure 1-85). One property is rendered as a <textarea /> element.

Our Edit.aspx View template is using several HTML Helper methods: Html.ValidationSummary, Html.BeginForm, Html.TextBoxFor, Html.TextAreaFor, and Html.ValidationMessageFor. In addition to generating HTML markup for us, these helper methods provide built-in support for displaying validation errors.
The Html.BeginForm helper method is what output the HTML <form> element in our markup. In our Edit.aspx View template, you'll notice that we are applying a C# using statement when using this method. The open curly brace indicates the beginning of the <form> content, and the closing curly brace is what indicates the end of the </form> element:
<% using (Html.BeginForm()) { %>

    <fieldset>

        <! -  Fields Omitted for Brevity  - >

        <p>
            <input type="submit" value="Save" />
       </p>
</fieldset>
<% } %>
Code snippet 1-27.txtAlternatively, if you find the using statement approach unnatural for a scenario like this, you can use a Html.BeginForm and Html.EndForm combination (which does the same thing):
<% Html.BeginForm();  %>

    <fieldset>
        <! -  Fields Omitted for Brevity  - >

        <p>
             <input type="submit" value="Save" />
        </p>
    </fieldset>

<% Html.EndForm(); %>
Code snippet 1-28.txt
Calling Html.BeginForm without any parameters will cause it to output a form element that does an HTTP-POST to the current request's URL. That is why our Edit View generates a <form action="/Dinners/Edit/1" method="post"> element. We could have alternatively passed explicit parameters to Html.BeginForm if we wanted to post to a different URL.
Our Edit.aspx View uses the Html.TextBoxFor helper method to output <input type="text"/> elements:
<%: Html.TextBoxFor(model => model.Title) %>
The Html.TextBoxFor method takes a single parameter — which is being used to specify both the ID/name attributes of the <input type="text"/> element to output, as well as the Model property to populate the textbox value from. For example, the Dinner object we passed to the Edit View had a "Title" property value of .NET Futures, and so our Html.TextBoxFor(model=> model.Title) method call output is <input id="title" name="Title" type="text" value=".NET Futures" />.
A second parameter to Html.TextBoxFor can optionally be used to output additional HTML attributes. The code snippet below demonstrates how to render an additional size="30" attribute and a class="myclass" attribute on the <input type="text"/> element. Note how we are escaping the name of the class attribute using a @ character because class is a reserved keyword in C#:
<%: Html.TextBoxFor(model => model.Title, new {size=30, @class="myclass"} )%>We now have the HTTP-GET version of our Edit action method implemented. When a user requests the /Dinners/Edit/1 URL, they receive an HTML page like the one shown in Figure 1-86.
Pressing the Save button causes a form post to the /Dinners/Edit/1 URL, and submits the HTML <input> form values using the HTTP-POST verb. Let's now implement the HTTP-POST behavior of our Edit action method — which will handle saving the Dinner.
We'll begin by adding an overloaded Edit action method to our DinnersController that has an HttpPost attribute on it that indicates it handles HTTP-POST scenarios:
//
// POST: /Dinners/Edit/2

[HttpPost]
public ActionResult Edit(int id, FormCollection formValues) {
   ...
}
Code snippet 1-29.txt
When the [HttpPost] attribute is applied to overloaded action methods, ASP.NET MVC automatically handles dispatching requests to the appropriate action method depending on the incoming HTTP verb. HTTP-POST requests to /Dinners/Edit/[id] URLs will go to the above Edit method, while all other HTTP verb requests to /Dinners/Edit/[id] URLs will go to the first Edit method we implemented (which did not have an [HttpPost] attribute).
There are a variety of ways we can access posted form parameters within our HTTP-POST Edit method. One simple approach is to just use the Request property on the Controller base class to access the form collection and retrieve the posted values directly:
//
// POST: /Dinners/Edit/2

[HttpPost]
public ActionResult Edit(int id, FormCollection formValues) {

    // Retrieve existing dinner
    Dinner dinner = dinnerRepository.GetDinner(id);

    // Update dinner with form posted values
dinner.Title = Request.Form["Title"];
dinner.Description = Request.Form["Description"];
dinner.EventDate = DateTime.Parse(Request.Form["EventDate"]);
dinner.Address = Request.Form["Address"];
dinner.Country = Request.Form["Country"];
dinner.ContactPhone = Request.Form["ContactPhone"];
// Persist changes back to database
dinnerRepository.Save();
// Perform HTTP redirect to details page for the saved Dinner
return RedirectToAction("Details", new { id = dinner.DinnerID });
}
Code snippet 1-30.txtThe approach in the previous code is a little verbose, though, especially once we add error handling logic.
A better approach for this scenario is to leverage the built-in UpdateModel helper method on the Controller base class. It supports updating the properties of an object we pass it using the incoming form parameters. It uses reflection to determine the property names on the object and then automatically converts and assigns values to them based on the input values submitted by the client.
We could use the UpdateModel method to implement our HTTP-POST Edit action using this code:
//
// POST: /Dinners/Edit/2
[HttpPost]
public ActionResult Edit(int id, FormCollection formValues) {
Dinner dinner = dinnerRepository.GetDinner(id);
UpdateModel(dinner);
dinnerRepository.Save();
return RedirectToAction("Details", new { id = dinner.DinnerID });
}
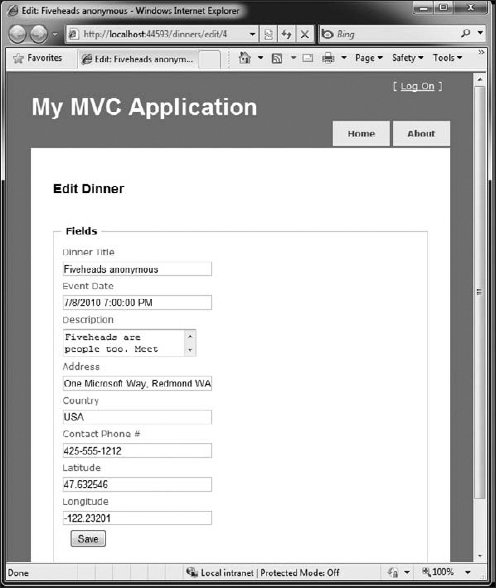
Code snippet 1-31.txtWe can now visit the /Dinners/Edit/1 URL and change the title of our Dinner (see Figure 1-87).

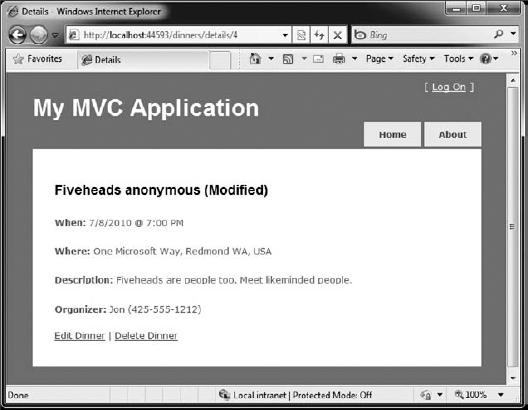
When we click the Save button, we'll perform a form post to our Edit action, and the updated values will be persisted in the database. We will then be redirected to the Details URL for the Dinner (which will display the newly saved values like those in Figure 1-88).
Our current HTTP-POST implementation works fine — except when there are errors.
When a user makes a mistake editing a form, we need to make sure that the form is redisplayed with an informative error message that guides them to fix it. This includes cases in which an end user posts incorrect input (e.g., a malformed date string), as well as cases in which the input format is valid, but there is a business rule violation. When errors occur, the form should preserve the input data the user originally entered so that they don't have to refill their changes manually. This process should repeat as many times as necessary until the form successfully completes.
ASP.NET MVC includes some nice built-in features that make error handling and form redisplay easy. To see these features in action, let's update our Edit action method with the following code:
//
// POST: /Dinners/Edit/2

[HttpPost]
public ActionResult Edit(int id, FormCollection formValues) {
    Dinner dinner = dinnerRepository.GetDinner(id);
    if(TryUpdateModel(dinner)) {
        dinnerRepository.Save();
        return RedirectToAction("Details", new { id=dinner.DinnerID });
    }
    return View(dinner);
}
Code snippet 1-32.txt
To see this working, let's re-run the application, edit a Dinner, and change it to have an empty Title and an Event Date of BOGUS. When we press the Save button, our HTTP-POST Edit method will not be able to save the Dinner (because there are errors) and will redisplay the form shown in Figure 1-89.

Our application has a decent error experience. The text elements with the invalid input are highlighted in red, and validation error messages are displayed to the end user about them. The form is also preserving the input data the user originally entered — so that they don't have to refill anything.
How, you might ask, did this occur? How did the Title and Event Date textboxes highlight themselves in red and know to output the originally entered user values? And how did error messages get displayed in the list at the top? The good news is that this didn't occur by magic — rather, it was because we used some of the built-in ASP.NET MVC features that make input validation and error handling scenarios easy.
Controller classes have a ModelState property collection that provides a way to indicate that errors exist with a Model object being passed to a View. Error entries within the ModelState collection identify the name of the Model property with the issue (e.g., Title, EventDate, or ContactPhone), and allow a human-friendly error message to be specified (e.g., "Title is required").
The TryUpdateModel helper method automatically populates the ModelState collection when it encounters errors while trying to assign form values to properties on the Model object. For example, our Dinner object's EventDate property is of type DateTime. When the UpdateModel method was unable to assign the string value BOGUS to it in the previous scenario, the UpdateModel method added an entry to the ModelState collection indicating that an assignment error had occurred with that property.
HTML helper methods (like Html.TextBoxFor) check the ModelState collection when rendering output. If an error for the item exists, they render the user-entered value and a CSS error class.
For example, in our "Edit" View, we are using the Html.TextBoxFor helper method to render the EventDate of our Dinner object:
<%: Html.TextBoxFor(model => model.EventDate) %>
When the View was rendered in the error scenario, the Html.TextBoxFor method checked the ModelState collection to see if there were any errors associated with the "EventDate" property of our Dinner object. When it determined that there was an error, it rendered the submitted user input ("BOGUS") as the value and added a CSS error class to the <input type="textbox"/> markup it generated:
<input class="input-validation-error" id="eventdate"
name="EventDate" type="text" value="BOGUS" />
You can customize the appearance of the CSS error class to look however you want. The default CSS error class — input-validation-error — is defined in the contentsite.css style sheet and looks like the code below:
.input-validation-error
{
    border: 1px solid #ff0000;
    background-color: #ffeeee;
}
Code snippet 1-33.txt
This CSS rule is what caused our invalid input elements to be highlighted, as in Figure 1-90.
The Html.ValidationMessageFor helper method can be used to output the ModelState error message associated with a particular model property:
<%: Html.ValidationMessageFor(model => model.EventDate) %>
The previous code outputs:
<span class="field-validation-error"> The value 'BOGUS' is invalid</span>
The Html.ValidationMessageFor helper method also supports a second parameter that allows developers to override the error text message that is displayed:
<%: Html.ValidationMessageFor(model => model.EventDate, "*") %>
The previous code outputs:
<span class="field-validation-error">*</span>
instead of the default error text when an error is present for the EventDate property.
The Html.ValidationSummary helper method can be used to render a summary error message, accompanied by a <ul><li/></ul> list of all detailed error messages in the ModelState collection as shown in Figure 1-91.

The Html.ValidationSummary helper method takes an optional string parameter — which defines a summary error message to display above the list of detailed errors:
<%: Html.ValidationSummary("Please correct the errors and try again.") %>You can optionally use CSS to override what the error list looks like.
The following code implements all of the Controller logic necessary for our Edit scenario:
//
// GET: /Dinners/Edit/2

public ActionResult Edit(int id) {

    Dinner dinner = dinnerRepository.GetDinner(id);
    return View(dinner);
}
//
// POST: /Dinners/Edit/2

[HttpPost]
public ActionResult Edit(int id, FormCollection formValues) {
    Dinner dinner = dinnerRepository.GetDinner(id);
    if(TryUpdateModel(dinner)) {
        dinnerRepository.Save();

        return RedirectToAction("Details", new { id=dinner.DinnerID });
    }
    return View(dinner);
}
Code snippet 1-34.txt
The nice thing about our Edit implementation is that neither our Controller class nor our View template has to know anything about the specific validation rules being enforced by our Dinner model. We can add additional rules to our model in the future and do not have to make any code changes to our Controller or View in order for them to be supported. This provides us with the flexibility to easily evolve our application requirements in the future with a minimum of code changes.
We've finished implementing the Edit behavior of our DinnersController class. Let's now move on to implement the Create support on it — which will enable users to add new Dinners.
We'll begin by implementing the HTTP-GET behavior of our Create action method. This method will be called when someone visits the /Dinners/Create URL. Our implementation looks like this:
//
// GET: /Dinners/Create

public ActionResult Create() {

    Dinner dinner = new Dinner() {
        EventDate = DateTime.Now.AddDays(7)
};
return View(dinner);
}
Code snippet 1-35.txtThe previous code creates a new Dinner object and assigns its EventDate property to be one week in the future. It then renders a View that is based on the new Dinner object. Because we haven't explicitly passed a name to the View helper method, it will use the convention-based default path to resolve the View template: /Views/Dinners/Create.aspx.
Let's now create this View template. We can do this by right-clicking within the Create action method and selecting the "Add View" context menu command. Within the "Add View" dialog we'll indicate that we are passing a Dinner object to the View template and choose to auto-scaffold a Create template (see Figure 1-92).
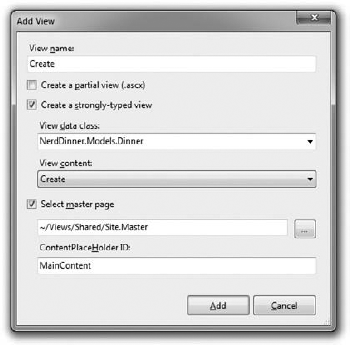
When we click the Add button, Visual Studio will save a new scaffold-based Create.aspx View to the ViewsDinners directory and open it up within the integrated development environment (IDE) (see Figure 1-93).

Let's make a few changes to the default "create" scaffold file that was generated for us, and modify it up to look like the code below:
<asp:Content ID="Title" ContentPlaceHolderID="TitleContent" runat="server">
    Host a Dinner
</asp:Content>

<asp:Content ID="Main" ContentPlaceHolderID="MainContent" runat="server">

    <h2>Host a Dinner</h2>

    <%: Html.ValidationSummary("Please correct the errors and try again.") %>

    <% using (Html.BeginForm()) {%>

        <fieldset>
            <p>
                <%: Html.LabelFor(m => m.Title) %>
                <%: Html.TextBoxFor(m => m.Title) %>
                <%: Html.ValidationMessageFor(m => m.Title, "*") %>
            </p>
            <p>
                <%: Html.LabelFor(m => m.EventDate) %>
                <%: Html.TextBoxFor(m => m.EventDate) %>
                <%: Html.ValidationMessageFor(m => m.EventDate, "*") %>
            </p>
            <p>
                <%: Html.LabelFor(m => m.Description) %>
                <%: Html.TextAreaFor(m => m.Description) %>
                <%: Html.ValidationMessageFor(m => m.Description, "*") %>
            </p>
            <p>
                <%: Html.LabelFor(m => m.Address) %>
                <%: Html.TextBoxFor(m => m.Address) %>
                <%: Html.ValidationMessageFor(m => m.Address, "*") %>
            </p>
            <p>
                <%: Html.LabelFor(m => m.Country) %>
                <%: Html.TextBoxFor(m => m.Country) %>
                <%: Html.ValidationMessageFor(m => m.Country, "*") %>
            </p>
            <p>
                <%: Html.LabelFor(m => m.ContactPhone) %>
                <%: Html.TextBoxFor(m => m.ContactPhone) %>
                <%: Html.ValidationMessageFor(m => m.ContactPhone, "*") %>
            </p>
            <p>
                <%: Html.LabelFor(m => m.Latitude) %>
                <%: Html.TextBoxFor(m => m.Latitude) %>
                <%: Html.ValidationMessageFor(m => m.Latitude, "*") %>
            </p>
            <p>
                <%: Html.LabelFor(m => m.Longitude) %>
                <%: Html.TextBoxFor(m => m.Longitude) %>
                <%: Html.ValidationMessageFor(m => m.Longitude, "*") %>
</p>
<p>
<input type="submit" value="Save" />
</p>
</fieldset>
<% } %>
</asp:Content>
Code snippet 1-36.txtAnd now when we run our application and access the /Dinners/Create URL within the browser, it will render the UI as in Figure 1-94 from our Create action implementation.
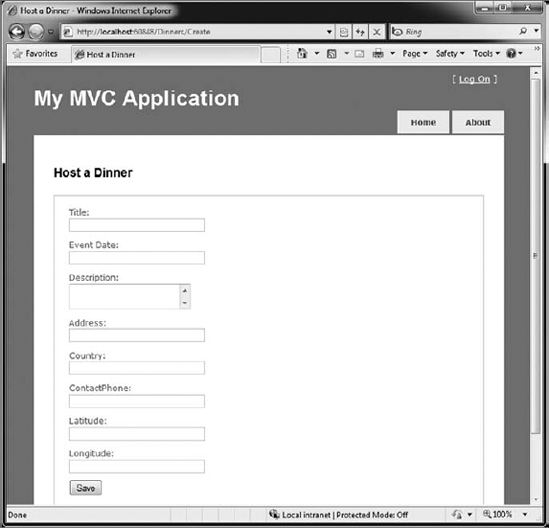
We have the HTTP-GET version of our Create action method implemented. When a user clicks the Save button, it performs a form post to the /Dinners/Create URL and submits the HTML <input> form values using the HTTP-POST verb.
Let's now implement the HTTP-POST behavior of our Create action method. We'll begin by adding an overloaded Create action method to our DinnersController that has an HttpPost attribute on it that indicates it handles HTTP-POST scenarios:
//
// POST: /Dinners/Create

[HttpPost]
public ActionResult Create(FormCollection formValues) {
    ...
}
Code snippet 1-37.txt
There are a variety of ways in which we can access the posted form parameters within our HTTP-POST-enabled Create method.
One approach is to create a new Dinner object and then use the UpdateModel helper method (as we did with the Edit action) to populate it with the posted form values. We can then add it to our DinnerRepository, persist it to the database, and redirect the user to our Details action to show the newly created Dinner, using the following code:
//
// POST: /Dinners/Create

[HttpPost]
public ActionResult Create(FormCollection formValues) {
    Dinner dinner = new Dinner();

    if(TryUpdateModel(dinner)) {
        dinnerRepository.Add(dinner);
        dinnerRepository.Save();

        return RedirectToAction("Details", new {id=dinner.DinnerID});
    }
    return View(dinner);
}
Code snippet 1-38.txt
Alternatively, we can use an approach in which we have our Create action method take a Dinner object as a method parameter. ASP.NET MVC will then automatically instantiate a new Dinner object for us, populate its properties using the form inputs, and pass it to our action method:
//
// POST: /Dinners/Create

[HttpPost]
public ActionResult Create(Dinner dinner) {
    if (ModelState.IsValid) {
        dinner.HostedBy = "SomeUser";

        dinnerRepository.Add(dinner);
        dinnerRepository.Save();

        return RedirectToAction("Details", new {id = dinner.DinnerID });
}
return View(dinner);
}
Code snippet 1-39.txtOur action method in the previous code verifies that the Dinner object has been successfully populated with the form post values by checking the ModelState.IsValid property. This will return false if there are input conversion issues (e.g., a string of "BOGUS" for the EventDate property), and if there are any issues, our action method redisplays the form.
If the input values are valid, then the action method attempts to add and save the new Dinner to the DinnerRepository.
To see this error handling behavior in action, we can request the /Dinners/Create URL and fill out details about a new Dinner. Incorrect input or values will cause the Create form to be redisplayed with the errors highlighted as in Figure 1-95.
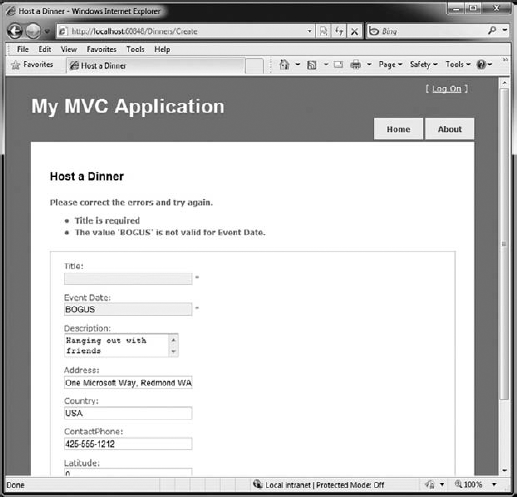
Notice how our Create form is honoring the exact same validation and business rules as our Edit form. This is because our validation and business rules were defined in the model and were not embedded within the UI or Controller of the application. This means we can later change/evolve our validation or business rules in a single place and have them apply throughout our application. We will not have to change any code within either our Edit or Create action method to automatically honor any new rules or modifications to existing ones.
When we fix the input values and click the Save button again, our addition to the DinnerRepository will succeed, and a new Dinner will be added to the database. We will then be redirected to the /Dinners/Details/[id] URL — where we will be presented with details about the newly created Dinner (see Figure 1-96).
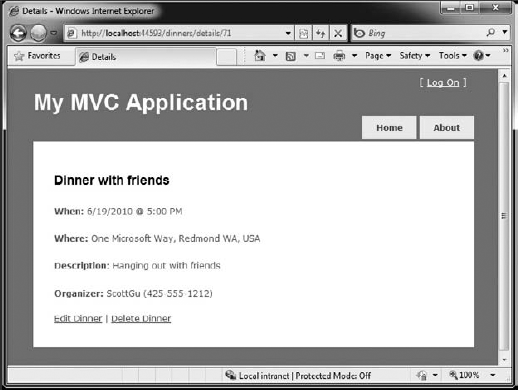
Let's now add "Delete" support to our DinnersController.
We'll begin by implementing the HTTP-GET behavior of our Delete action method. This method will get called when someone visits the /Dinners/Delete/[id] URL. Below is the implementation:
//
// HTTP GET: /Dinners/Delete/1

public ActionResult Delete(int id) {

    Dinner dinner = dinnerRepository.GetDinner(id);

    if (dinner == null)
        return View("NotFound");
    else
        return View(dinner);
}
Code snippet 1-40.txt
The action method attempts to retrieve the Dinner to be deleted. If the dinner exists, it renders a View based on the Dinner object. If the object doesn't exist (or has already been deleted), it returns a View that renders the "NotFound" View template we created earlier for our Details action method.
We can create the "Delete" View template by right-clicking within the Delete action method and selecting the "Add View" context menu command. Within the "Add View" dialog, we'll indicate that we are passing a Dinner object to our View template as its Model, and choose to create a delete template as shown in Figure 1-97.

When we click the Add button, Visual Studio will add a new Delete.aspx View template file for us within our ViewsDinners directory. We'll add some HTML and code to the template to implement a Delete Confirmation screen, as shown below:
<asp:Content ID="Title" ContentPlaceHolderID="TitleContent" runat="server">
    Delete Confirmation: <%: Model.Title %>
</asp:Content>

<asp:Content ID="Main" ContentPlaceHolderID="MainContent" runat="server">

    <h2>
        Delete Confirmation
    </h2>

    <div>
        <p>Please confirm you want to cancel the dinner titled:
        <i> <%: Model.Title %>? </i></p>
    </div>

    <% using (Html.BeginForm()) { %>

        <input name="confirmButton" type="submit" value="Delete" />

    <% } %>

</asp:Content>
Code snippet 1-41.txt
The code above displays the title of the Dinner to be deleted and outputs a <form> element that does a POST to the /Dinners/Delete/[id] URL if the end user clicks the Delete button within it.
When we run our application and access the /Dinners/Delete/[id] URL for a valid Dinner object, it renders the UI as shown in Figure 1-98.
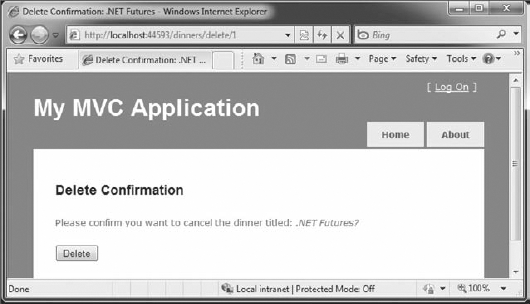
We now have the HTTP-GET version of our Delete action method implemented that displays a Delete Confirmation screen. When an end user clicks the Delete button, it will perform a form post to the /Dinners/Dinner/[id] URL.
Let's now implement the HTTP-POST behavior of the Delete action method using the code that follows:
//
// HTTP POST: /Dinners/Delete/1

[HttpPost]
public ActionResult Delete(int id, string confirmButton) {

    Dinner dinner = dinnerRepository.GetDinner(id);

    if (dinner == null)
        return View("NotFound");

    dinnerRepository.Delete(dinner);
    dinnerRepository.Save();

    return View("Deleted");
}
Code snippet 1-42.txt
The HTTP-POST version of our Delete action method attempts to retrieve the Dinner object to delete. If it can't find it (because it has already been deleted), it renders our "NotFound" template. If it finds the Dinner, it deletes it from the DinnerRepository. It then renders a "Deleted" template.
To implement the "Deleted" template, we'll right-click in the action method and choose the "Add View" context menu. We'll name our view Deleted and have it be an empty template (and not take a strongly typed Model object). We'll then add some HTML content to it:
<asp:Content ID="Title" ContentPlaceHolderID="TitleContent" runat="server">
      Dinner Deleted
</asp:Content>

<asp:Content ID="Main" ContentPlaceHolderID="MainContent" runat="server">
    <h2>Dinner Deleted</h2>

    <div>
        <p>Your dinner was successfully deleted.</p>
    </div>
    <div>
        <p><a href="/dinners">Click for Upcoming Dinners</a></p>
    </div>
</asp:Content>
Code snippet 1-43.txt
And now when we run our application and access the /Dinners/Delete/[id] URL for a valid Dinner object, it will render our Dinner Delete Confirmation screen as shown in Figure 1-99.
When we click the Delete button, it will perform an HTTP POST to the /Dinners/Delete/[id] URL, which will delete the Dinner from our database, and display our "Deleted" View template (see Figure 1-100).
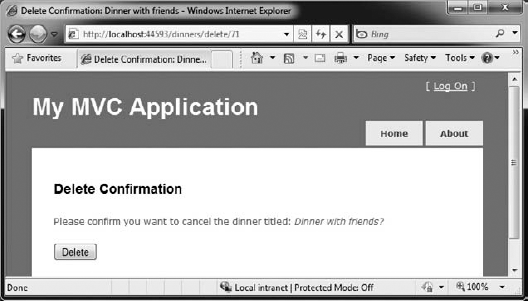
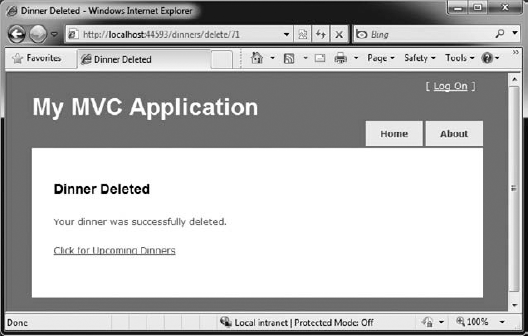
We've discussed two different ways to use the built-in model-binding features of ASP.NET MVC. The first using the UpdateModel method to update properties on an existing Model object, and the second using ASP.NET MVC's support for passing Model objects in as action method parameters. Both of these techniques are very powerful and extremely useful.
This power also brings with it responsibility. It is important to always be paranoid about security when accepting any user input, and this is also true when binding objects to form input. You should be careful to always HTML-encode any user-entered values to avoid HTML and JavaScript injection attacks, and be careful of SQL injection attacks.
Note
We are using Entity Framework for our application, which automatically encodes parameters to prevent SQL Injection attacks.
You should never rely on client-side validation alone, and always use server-side validation to guard against hackers attempting to send you bogus values.
One additional security item to make sure you think about when using the binding features of ASP.NET MVC is the scope of the objects you are binding. Specifically, you want to make sure you understand the security implications of the properties you are allowing to be bound, and make sure you only allow those properties that really should be updatable by an end user to be updated.
By default, the UpdateModel method will attempt to update all properties on the Model object that match incoming form parameter values. Likewise, objects passed as action method parameters also, by default, can have all of their properties set via form parameters.
You can lock down the binding policy on a per-usage basis by providing an explicit include list of properties that can be updated. This can be done by passing an extra string array parameter to the UpdateModel method like the following code:
string[] allowedProperties = new[]{"Title", "Description",
                                             "ContactPhone", "Address",
                                             "EventDate", "Latitude",
                                     "Longitude"};

UpdateModel(dinner, allowedProperties);
Code snippet 1-44.txt
Objects passed as action method parameters also support a [Bind] attribute that enables an include list of allowed properties to be specified like the code that follows:
//
// POST: /Dinners/Create

[HttpPost]
public ActionResult Create( [Bind(Include="Title,Address")] Dinner dinner ) {
    ...
}
Code snippet 1-45.txtYou can also lock down the binding rules on a per-type basis. This allows you to specify the binding rules once and then have them apply in all scenarios (including both UpdateModel and action method parameter scenarios) across all Controllers and action methods.
You can customize the per-type binding rules by adding a [Bind] attribute onto a type. You can then use the Bind attribute's Include and Exclude properties to control which properties are bindable for the particular class or interface.
We'll use this technique for the Dinner class in our NerdDinner application and add a [Bind] attribute to it that restricts the list of bindable properties to the following:
[Bind(Include="Title,Description,EventDate,Address,Country,ContactPhone,Latitude,
               Longitude")]
public partial class Dinner {
}
Code snippet 1-46.txt
Notice we are not allowing the RSVPs collection to be manipulated via binding, nor are we allowing the DinnerID or HostedBy properties to be set via binding. For security reasons, we'll instead only manipulate these particular properties using explicit code within our action methods.
ASP.NET MVC includes several built-in features that help with implementing form posting scenarios. We used a variety of these features to provide CRUD (Create Read Update Delete) UI support on top of our DinnerRepository.
We are using a Model-focused approach to implement our application. This means that all our validation and business rule logic is defined within our Model layer — and not within our Controllers or Views. Neither our Controller class nor our View templates know anything about the specific business rules being enforced by our Dinner Model class.
This will keep our application architecture clean and make it easier to test. We can add additional business rules to our Model layer in the future and not have to make any code changes to our Controller or View in order for them to be supported. This is going to provide us with a great deal of agility to evolve and change our application in the future.
Our DinnersController now enables Dinner listings/details, as well as create, edit, and delete support. The complete code for the class can be found below:
public class DinnersController : Controller {

    DinnerRepository dinnerRepository = new DinnerRepository();

    //
    // GET: /Dinners/

    public ActionResult Index() {
        var dinners = dinnerRepository.FindUpcomingDinners().ToList();
        return View(dinners);
    }

    //
    // GET: /Dinners/Details/2

    public ActionResult Details(int id) {
Dinner dinner = dinnerRepository.GetDinner(id);
if (dinner == null)
return View("NotFound");
else
return View(dinner);
}
//
// GET: /Dinners/Edit/2
public ActionResult Edit(int id) {
Dinner dinner = dinnerRepository.GetDinner(id);
return View(dinner);
}
//
// POST: /Dinners/Edit/2
[HttpPost]
public ActionResult Edit(int id, FormCollection formValues) {
Dinner dinner = dinnerRepository.GetDinner(id);
if (TryUpdateModel(dinner)){
dinnerRepository.Save();
return RedirectToAction("Details", new { id = dinner.DinnerID });
}
return View(dinner);
}
//
// GET: /Dinners/Create
public ActionResult Create() {
Dinner dinner = new Dinner() {
EventDate = DateTime.Now.AddDays(7)
};
return View(dinner);
}
//
// POST: /Dinners/Create
[HttpPost]
public ActionResult Create(Dinner dinner) {
if (ModelState.IsValid) {
dinner.HostedBy = "SomeUser";
dinnerRepository.Add(dinner);
dinnerRepository.Save();
return RedirectToAction("Details", new{id=dinner.DinnerID});
}return View(dinner);
}
//
// HTTP GET: /Dinners/Delete/1
public ActionResult Delete(int id) {
Dinner dinner = dinnerRepository.GetDinner(id);
if (dinner == null)
return View("NotFound");
else
return View(dinner);
}
//
// HTTP POST: /Dinners/Delete/1
[HttpPost]
public ActionResult Delete(int id, string confirmButton) {
Dinner dinner = dinnerRepository.GetDinner(id);
if (dinner == null)
return View("NotFound");
dinnerRepository.Delete(dinner);
dinnerRepository.Save();
return View("Deleted");
}
}
Code snippet 1-47.txtWe've covered several form post scenarios and discussed how to implement create, read, update, and delete (CRUD) support. We'll now take our DinnersController implementation further and enable support for richer form editing scenarios. While doing this, we'll discuss two approaches that can be used to pass data from Controllers to Views: ViewData and ViewModel.
One of the defining characteristics of the MVC pattern is the strict separation of concerns it helps enforce between the different components of an application. Models, Controllers, and Views each have well-defined roles and responsibilities, and they communicate with each other in well-defined ways. This helps promote testability and code reuse.
When a Controller class decides to render an HTML response back to a client, it is responsible for explicitly passing to the View template all of the data needed to render the response. View templates should never perform any data retrieval or application logic — and should instead limit themselves to only having rendering code that is driven off of the Model data passed to it by the Controller.
Right now the Model data being passed by our DinnersController class to our View templates is simple and straightforward — a list of Dinner objects in the case of Index, and a single Dinner object in the case of Details, Edit, Create, and Delete. As we add more UI capabilities to our application, we are often going to need to pass more than just this data to render HTML responses within our View templates. For example, we might want to change the Country field within our Edit and Create views from being an HTML textbox to being a dropdown list. Rather than hard-code the dropdown list of country names in the View template, we might want to generate it from a list of supported countries that we populate dynamically. We will need a way to pass both the Dinner object and the list of supported countries from our Controller to our View templates.
Let's look at two ways we can accomplish this.
The Controller base class exposes a ViewDataDictionary property that can be used to pass additional data items from Controllers to Views.
For example, to support the scenario in which we want to change the Country textbox within our Edit view from being an HTML textbox to a dropdown list, we can update our Edit action method to pass (in addition to a Dinner object) a SelectList object that can be used as the Model of a Countries dropdown list:
//
// GET: /Dinners/Edit/5

[Authorize]
public ActionResult Edit(int id) {

    Dinner dinner = dinnerRepository.GetDinner(id);
    var countries = new[] {
        "USA",
        "Afghanistan",
        "Akrotiri",
        "Albania",
        //... omitted for brevity
        "Zimbabwe"
    };


    ViewData["Countries"] = new SelectList(countries, dinner.Country);

    return View(dinner);
}
Code snippet 1-48.txt
Note
For now, we define the list of countries within this controller action. That's something we'll need to fix later as we'll need to reuse that list in other places.
The constructor of the SelectList from the previous code is accepting a list of countries to populate the dropdown list with, as well as the currently selected value.
We can then update our Edit.aspx View template to use the Html.DropDownListFor helper method instead of the Html.TextBoxFor helper method we used previously:
<%: Html.DropDownListFor(model => model.Country,
ViewData["Countries"] as SelectList) %>
The Html.DropDownListFor helper method in the previous line of code takes two parameters. The first is an expression that specifies the name of the HTML form element to output. The second is the SelectList model we passed via the ViewDataDictionary. We are using the C# as keyword to cast the type within the dictionary as a SelectList.
And now when we run our application and access the /Dinners/Edit/1 URL within our browser, we'll see that our Edit UI has been updated to display a dropdown list of countries instead of a textbox (Figure 1-101).

Because we also render the Edit View template from the HTTP-POST Edit method (in scenarios when errors occur), we'll want to make sure that we also update this method to add the SelectList to ViewData when the View template is rendered in error scenarios:
//
// POST: /Dinners/Edit/5

[HttpPost]
public ActionResult Edit(int id, FormCollection collection) {
    Dinner dinner = dinnerRepository.GetDinner(id);

    if(TryUpdateModel(dinner)) {
        dinnerRepository.Save();

        return RedirectToAction("Details", new { id=dinner.DinnerID });
    }

    var countries = new[] {
        "USA",
        "Afghanistan",
        "Akrotiri",
        "Albania",
        //... omitted for brevity
        "Zimbabwe"
    };

    ViewData["countries"] = new SelectList(countries, dinner.Country);
    return View(dinner)
}
Code snippet 1-49.txt
And now our DinnersController Edit scenario supports a dropdown list.
The ViewDataDictionary approach has the benefit of being fairly fast and easy to implement. Some developers don't like using string-based dictionaries, though, since typos can lead to errors that will not be caught at compile-time. The untyped ViewDataDictionary also requires using the as operator or casting when using a strongly typed language like C# in a View template.
An alternative approach that we could use is one often referred to as the ViewModel pattern. When using this pattern, we create strongly typed classes that are optimized for our specific View scenarios and that expose properties for the dynamic values/content needed by our View templates. Our Controller classes can then populate and pass these View-optimized classes to our View template to use. This enables type safety, compile-time checking, and editor IntelliSense within View templates.
For example, to enable Dinner form editing scenarios, we can create a DinnerFormViewModel class like the following code that exposes two strongly typed properties: a Dinner object and the SelectList model needed to populate the Countries dropdown list:
public class DinnerFormViewModel {

    private static string[] _countries = new[] {
        "USA",
        "Afghanistan",
        "Akrotiri",
        "Albania",
        //... omitted for brevity
        "Zimbabwe"
    };


    // Properties
    public Dinner     Dinner    { get; private set; }
    public SelectList Countries { get; private set; }

    // Constructor
    public DinnerFormViewModel(Dinner dinner) {
        Dinner = dinner;

        Countries = new SelectList(_countries, dinner.Country);
    }
}
Code snippet 1-50.txt
We can then update our Edit action method to create the DinnerFormViewModel using the Dinner object we retrieve from our repository, and then pass it to our View template:
//
// GET: /Dinners/Edit/5

[Authorize]
public ActionResult Edit(int id) {

    Dinner dinner = dinnerRepository.GetDinner(id);

    return View(new DinnerFormViewModel(dinner));
}
Code snippet 1-51.txt
We'll then update our View template so that it expects a DinnerFormViewModel instead of a Dinner object by changing the Inherits attribute at the top of the edit.aspx page like so:
Inherits="System.Web.Mvc.ViewPage<NerdDinner.Controllers.DinnerFormViewModel>
Once we do this, the IntelliSense of the Model property within our View template will be updated to reflect the object model of the DinnerFormViewModel type we are passing it (see Figure 1-102 and Figure 1-103).
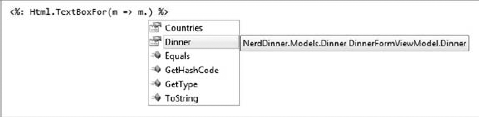

We can then update our View code to work off of it. Notice in the following code how we are not changing the names of the input elements we are creating (the form elements will still be named "Title", "Country") — but we are updating the HTML Helper methods to retrieve the values using the DinnerFormViewModel class:
<p>
    <%: Html.LabelFor(m => m.Title) %>
    <%: Html.TextBoxFor(m => m.Title) %>
    <%: Html.ValidationMessageFor(m => m.Title, "*") %>
</p>
<p>
    <%: Html.LabelFor(m => m.Country) %>
<%: Html.DropDownListFor(m => m.Country, Model.Countries) %>
<%: Html.ValidationMessageFor(m => m.Country, "*") %>
</p>
Code snippet 1-52.txtWe'll also update our Edit post method to use the DinnerFormViewModel class when rendering errors:
//
// POST: /Dinners/Edit/5

[HttpPost]
public ActionResult Edit(int id, FormCollection collection) {
    Dinner dinner = dinnerRepository.GetDinner(id);

    if(TryUpdateModel(dinner)) {
        dinnerRepository.Save();

        return RedirectToAction("Details", new { id=dinner.DinnerID });
    }

    return View(new DinnerFormViewModel(dinner));
}
Code snippet 1-53.txt
We can also update our Create action methods to reuse the exact same DinnerFormViewModel class to enable the Countries dropdown list within those as well. The following code is the HTTP-GET implementation:
//
// GET: /Dinners/Create

public ActionResult Create() {

    Dinner dinner = new Dinner() {
        EventDate = DateTime.Now.AddDays(7)
    };

    return View(new DinnerFormViewModel(dinner));
}
Code snippet 1-54.txt
The following code is the implementation of the HTTP-POST Create method:
//
// POST: /Dinners/Create

[HttpPost]
public ActionResult Create(Dinner dinner) {

    if (ModelState.IsValid) {
dinner.HostedBy = "SomeUser";
dinnerRepository.Add(dinner);
dinnerRepository.Save();
return RedirectToAction("Details", new { id=dinner.DinnerID });
}
return View(new DinnerFormViewModel(dinnerToCreate));
}
Code snippet 1-55.txtAnd now both our Edit and Create screens support dropdown lists for picking the country.
In the scenario above, our DinnerFormViewModel class directly exposes the Dinner model object as a property, along with a supporting SelectList model property. This approach works fine for scenarios in which the HTML UI we want to create within our View template corresponds relatively closely to our domain model objects.
For scenarios where this isn't the case, one option that you can use is to create a custom-shaped ViewModel class whose object model is more optimized for consumption by the View — and that might look completely different from the underlying domain model object. For example, it could potentially expose different property names and/or aggregate properties collected from multiple model objects.
Custom-shaped ViewModel classes can be used both to pass data from Controllers to Views to render and to help handle form data posted back to a Controller's action method. For this later scenario, you might have the action method update a ViewModel object with the form-posted data, and then use the ViewModel instance to map or retrieve an actual domain model object.
Custom-shaped ViewModel classes can provide a great deal of flexibility and are something to investigate any time you find the rendering code within your View templates or the form-posting code inside your action methods starting to get too complicated. This is often a sign that your domain models don't cleanly correspond to the UI you are generating and that an intermediate custom-shaped ViewModel class can help.
One of the design philosophies that ASP.NET MVC embraces is the Don't Repeat Yourself principle (commonly referred to as DRY). A DRY design helps eliminate the duplication of code and logic, which ultimately makes applications faster to build and easier to maintain.
We've already seen the DRY principle applied in several of our NerdDinner scenarios. A few examples: Our validation logic is implemented within our Model layer, which enables it to be enforced across both Edit and Create scenarios in our Controller; we are reusing the "NotFound" View template across the Edit, Details, and Delete action methods; we are using a convention-naming pattern with our View templates, which eliminates the need to explicitly specify the name when we call the View helper method; and we are reusing the DinnerFormViewModel class for both Edit and Create action scenarios.
Let's now look at ways we can apply the DRY principle within our View templates to eliminate code duplication there as well.
Currently we are using two different View templates — Edit.aspx and Create.aspx — to display our Dinner form UI. A quick visual comparison of them highlights how similar they are. Figure 1-104 shows what the Create form looks like.

And Figure 1-105 is what our "Edit" form looks like.
Not much of a difference, is there? Other than the title and header text, the form layout and input controls are identical.
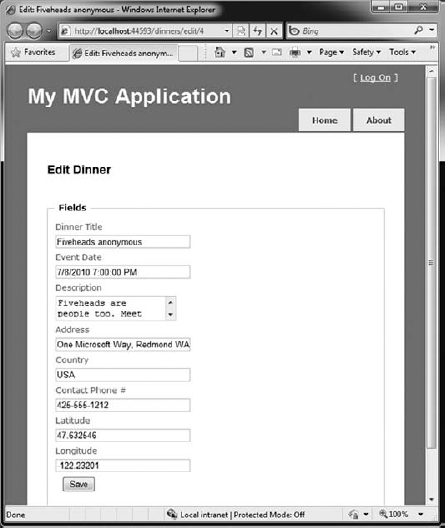
If we open up the Edit.aspx and Create.aspx View templates, we'll find that they contain identical form layout and input control code. This duplication means that we end up having to make changes twice whenever we introduce or change a new Dinner property — which is not good.
ASP.NET MVC supports the ability to define Partial View templates that can be used to encapsulate View rendering logic for a subportion of a page. Partials provide a useful way to define View rendering logic once and then reuse it in multiple places across an application.
To help "DRY-up" our Edit.aspx and Create.aspx View template duplication, we can create a Partial View template named DinnerForm.ascx that encapsulates the form layout and input elements common to both. We'll do this by right-clicking our ViewsDinners directory and choosing the Add
This will display the "Add View" dialog. We'll name the new View we want to create DinnerForm, select the "Create a partial view" checkbox on the dialog, and indicate that we will pass it a DinnerFormViewModel class (see Figure 1-107).
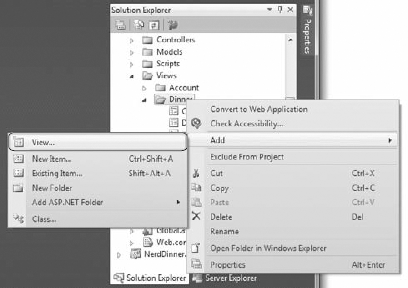
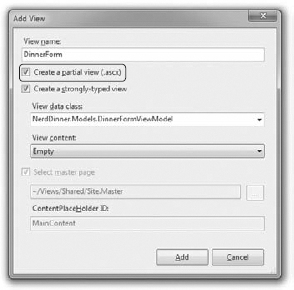
When we click the Add button, Visual Studio will create a new DinnerForm.ascx View template for us within the ViewsDinners directory.
We can then copy/paste the duplicate form layout/input control code from our Edit.aspx/ Create.aspx View templates into our new DinnerForm.ascx Partial View template:
<%: Html.ValidationSummary("Please correct the errors and try again.") %>

<% using (Html.BeginForm()) { %>

    <fieldset>

        <p>
            <%: Html.LabelFor(m => m.Title) %>
            <%: Html.TextBoxFor(m => m.Title) %>
            <%: Html.ValidationMessageFor(m => m.Title, "*") %>
        </p>
        <p>
            <%: Html.LabelFor(m => m.EventDate) %>
            <%: Html.TextBoxFor(m => m.EventDate) %>
            <%: Html.ValidationMessageFor(m => m.EventDate, "*") %>
        </p>
        <p>
            <%: Html.LabelFor(m => m.Description) %>
            <%: Html.TextAreaFor(m => m.Description) %>
            <%: Html.ValidationMessageFor(m => m.Description, "*")%>
        </p>
        <p>
            <%: Html.LabelFor(m => m.Address) %>
            <%: Html.TextBoxFor(m => m.Address) %>
<%: Html.ValidationMessageFor(model => model.Address, "*") %>
</p>
<p>
<%: Html.LabelFor(m => m.Country) %>
<%: Html.DropDownListFor(m => m.Country, Model.Countries) %>
<%: Html.ValidationMessageFor(m => m.Country, "*") %>
</p>
<p>
<%: Html.LabelFor(m => m.ContactPhone) %>
<%: Html.TextBoxFor(m => m.ContactPhone) %>
<%: Html.ValidationMessageFor(m => m.ContactPhone, "*") %>
</p>
<p>
<input type="submit" value="Save" />
</p>
</fieldset>
<% } %>
Code snippet 1-56.txtWe can then update our Edit and Create View templates to call the DinnerForm Partial template and eliminate the form duplication. We can do this by calling Html.RenderPartial("DinnerForm") within our View templates:
Create.aspx
<asp:Content ID="Title" ContentPlaceHolderID="TitleContent" runat="server">
    Host a Dinner
</asp:Content>

<asp:Content ID="Create" ContentPlaceHolderID="MainContent" runat="server">

    <h2>Host a Dinner</h2>

    <% Html.RenderPartial("DinnerForm"); %>

</asp:Content>
Edit.aspx
<asp:Content ID="Title" ContentPlaceHolderID="TitleContent" runat="server">
Edit: <%: Model.Dinner.Title %>
</asp:Content>
<asp:Content ID="Edit" ContentPlaceHolderID="MainContent" runat="server">
<h2>Edit Dinner</h2>
<% Html.RenderPartial("DinnerForm"); %>
</asp:Content>
Code snippet 1-57.txtYou can explicitly qualify the path of the Partial template you want when calling Html.RenderPartial (e.g., ~/Views/Dinners/DinnerForm.ascx). In our previous code, though, we were taking advantage of the convention-based naming pattern within ASP.NET MVC and just specifying DinnerForm as the name of the Partial to render. When we do this, ASP.NET MVC will look first in the convention-based views directory (for DinnersController this would be /Views/Dinners). If it doesn't find the Partial template there, it will then look for it in the /Views/Shared directory.
When Html.RenderPartial is called with just the name of the Partial View, ASP.NET MVC will pass to the Partial View the same Model and ViewData dictionary objects used by the calling View template. Alternatively, there are overloaded versions of Html.RenderPartial that enable you to pass an alternate Model object and/or ViewData dictionary for the partial view to use. This is useful for scenarios in which you only want to pass a subset of the full Model/ViewModel.
We created the DinnerForm Partial View template to avoid duplicating View rendering logic in multiple places. This is the most common reason to create Partial View templates.
Sometimes it still makes sense to create Partial Views even when they are only being called in a single place. Very complicated View templates can often become much easier to read when their View rendering logic is extracted and partitioned into one or more well-named Partial templates.
For example, consider the following code snippet from the e file in our project (which we will be looking at shortly). The code is relatively straightforward to read — partly because the logic to display a login/logout link at the top right of the screen is encapsulated within the LogOnUserControl Partial:
<div id="header">
    <div id="title">
        <h1>My MVC Application</h1>
    </div>

    <div id="logindisplay">
        <% Html.RenderPartial("LogOnUserControl"); %>
    </div>

    <div id="menucontainer">

        <ul id="menu">
            <li><%: Html.ActionLink("Home", "Index", "Home")%></li>
            <li><%: Html.ActionLink("About", "About", "Home")%></li>
        </ul>

    </div>
</div>
Code snippet 1-58.txt
Whenever you find yourself getting confused trying to understand the HTML/code markup within a View template, consider whether it wouldn't be clearer if some of it was extracted and refactored into well-named Partial Views.
In addition to supporting Partial Views, ASP.NET MVC also supports the ability to create Master Page templates that can be used to define the common layout and top-level HTML of a site. Content placeholder controls can then be added to the Master Page to identify replaceable regions that can be overridden or filled in by Views. This provides a very effective (and DRY) way to apply a common layout across an application.
By default, new ASP.NET MVC projects have a Master Page template automatically added to them. This Master Page is named Site.master and lives within the ViewsShared folder, as shown in Figure 1-108.

The default Site.master file looks like the following code. It defines the outer HTML of the site, along with a menu for navigation at the top. It contains two replaceable content placeholder controls — one for the title and the other for where the primary content of a Page should be replaced:
<%@ Master Language="C#" Inherits="System.Web.Mvc.ViewMasterPage" %>

<!DOCTYPE html PUBLIC "-//W3C//DTD XHTML 1.0 Strict//EN"
"http://www.w3.org/TR/xhtml1/DTD/xhtml1-strict.dtd">
<html xmlns="http://www.w3.org/1999/xhtml">

<head runat="server">
   <title><asp:ContentPlaceHolder ID="TitleContent" runat="server" /></title>
   <link href="../../Content/Site.css" rel="stylesheet" type="text/css" />
</head>

<body>
    <div class="page">

        <div id="header">
            <div id="title">
                <h1>My MVC Application</h1>
            </div>

            <div id="logindisplay">
                <% Html.RenderPartial("LogOnUserControl"); %>
            </div>

            <div id="menucontainer">

                <ul id="menu">
                    <li><%: Html.ActionLink("Home", "Index", "Home")%></li>
                    <li><%: Html.ActionLink("About", "About", "Home")%></li>
                </ul>

            </div>
        </div>

        <div id="main">
            <asp:ContentPlaceHolder ID="MainContent" runat="server" />
        </div>
    </div>
</body>
</html>
Code snippet 1-59.txt
All of the View templates we've created for our NerdDinner application ("List", "Details", "Edit", "Create", "NotFound", etc.) have been based on this Site.master template. This is indicated via the MasterPageFile attribute that was added by default to the top <% @ Page %> directive when we created our Views using the "Add View" dialog:
<%@ Page Language="C#"
Inherits="System.Web.Mvc.ViewPage<NerdDinner.Controllers
.DinnerViewModel>" MasterPageFile="~/Views/Shared/Site.Master" %>
Code snippet 1-60.txt
What this means is that we can change the Site.master content and have the changes automatically be applied and used when we render any of our View templates.
Let's update our Site.master's header section so that the header of our application is "NerdDinner" instead of "My MVC Application." Let's also update our navigation menu so that the first tab is "Find a Dinner" (handled by the HomeController's Index action method), and let's add a new tab called "Host a Dinner" (handled by the DinnersController's Create action method):
<div id="header">
    <div id="title">
        <h1>NerdDinner</h1>
    </div>

    <div id="logindisplay">
        <% Html.RenderPartial("LoginStatus"); %>
    </div>

    <div id="menucontainer">
        <ul id="menu">
           <li><%: Html.ActionLink("Find Dinner", "Index", "Home")%></li>
           <li><%: Html.ActionLink("Host Dinner", "Create", "Dinners")%></li>
           <li><%: Html.ActionLink("About", "About", "Home")%></li>
        </ul>
    </div>
</div>
Code snippet 1-61.txt
When we save the Site.master file and refresh our browser, we'll see our header changes show up across all Views within our application (e.g., see Figure 1-109) and with the /Dinners/Edit/[id] URL (see Figure 1-110).


Partials and Master Pages provide very flexible options that enable you to cleanly organize views. You'll find that they help you avoid duplicating View content/code, and make your View templates easier to read and maintain.
If our site is successful, it will have thousands of upcoming Dinners. We need to make sure that our UI scales to handle all of these Dinners and allows users to browse them. To enable this, we'll add paging support to our /Dinners URL so that instead of displaying thousands of Dinners at once, we'll only display 10 upcoming Dinners at a time — and allow end users to page back and forward through the entire list in an SEO-friendly way.
The Index action method within our DinnersController class currently looks like the following code:
//
// GET: /Dinners/

public ActionResult Index() {

    var dinners = dinnerRepository.FindUpcomingDinners().ToList();

    return View(dinners);
}
Code snippet 1-62.txt
When a request is made to the /Dinners URL, it retrieves a list of all upcoming Dinners and then renders a listing of all of them (see Figure 1-111).

IQueryable<T> is an interface that was introduced with LINQ in .NET 3.5. It enables powerful deferred execution scenarios that we can take advantage of to implement paging support.
In our DinnerRepository in the following code we are returning an IQueryable<Dinner> sequence from our FindUpcomingDinners method:
public class DinnerRepository {

    private NerdDinnerDataContext db = new NerdDinnerDataContext();

    //
    // Query Methods

    public IQueryable<Dinner> FindUpcomingDinners() {
        return from dinner in db.Dinners
               where dinner.EventDate > DateTime.Now
               orderby dinner.EventDate
               select dinner;
    }
Code snippet 1-63.txt
The IQueryable<Dinner> object returned by our FindUpcomingDinners method encapsulates a query to retrieve Dinner objects from our database using Entity Framework. Importantly, it won't execute the query against the database until we attempt to access/iterate over the data in the query, or until we call the ToList method on it. The code calling our FindUpcomingDinners method can optionally choose to add additional chained operations/filters to the IQueryable<Dinner> object before executing the query. Entity Framework is then smart enough to execute the combined query against the database when the data is requested.
To implement paging logic, we can update our Index action method so that it applies additional Skip and Take operators to the returned IQueryable<Dinner> sequence before calling ToList on it:
//
// GET: /Dinners/

public ActionResult Index() {

    var upcomingDinners = dinnerRepository.FindUpcomingDinners();
    var paginatedDinners = upcomingDinners.OrderBy(d => d.EventDate)
                                          .Skip(10)
                                          .Take(20).ToList();

    return View(paginatedDinners);
}
Code snippet 1-64.txt
The preceding code skips over the first 10 upcoming Dinners in the database and then returns 20 Dinners. Entity Framework is smart enough to construct an optimized SQL query that performs this skipping logic in the SQL database — and not in the web server. This means that even if we have millions of upcoming Dinners in the database, only the 10 we want will be retrieved as part of this request (making it efficient and scalable).
Also note that the code makes a call to OrderBy before calling Skip. The Skip method is only supported for sorted input.
Instead of hard-coding a specific page range, we'll want our URLs to include a page parameter that indicates which Dinner range a user is requesting.
The code that follows demonstrates how we can update our Index action method to support a query-string parameter and enable URLs like /Dinners?page=2:
//
// GET: /Dinners/
//      /Dinners?page=2

public ActionResult Index(int page = 0) {

    const int pageSize = 10;

    var upcomingDinners = dinnerRepository.FindUpcomingDinners();
    var paginatedDinners = upcomingDinners.OrderBy(d => d.EventDate)
                                          .Skip(page * pageSize)
                                          .Take(pageSize)
                                          .ToList();

    return View(paginatedDinners);
}
Code snippet 1-65.txt
The Index action method in the previous code has a parameter named page. The parameter is declared as an integer, but with a default value of 0. This means that the /Dinners?page=2 URL will cause a value of 2 to be passed as the parameter value. The /Dinners URL (without a query-string value) will cause the default value of 0 to be passed.
We are multiplying the page value by the page size (in this case, 10 rows) to determine how many Dinners to skip over.
An alternative to using a query-string value would be to embed the page parameter within the actual URL itself. For example: /Dinners/Page/2 or /Dinners/2. ASP.NET MVC includes a powerful URL routing engine that makes it easy to support scenarios like this.
We can register custom routing rules that map any incoming URL or URL format to any Controller class or action method we want. All we need to do is to open the Global.asax file within our project (see Figure 1-112)

and then register a new mapping rule using the MapRoute helper method as in the first call to routes.MapRoute that follows:
public void RegisterRoutes(RouteCollection routes) {

    routes.IgnoreRoute("{resource}.axd/{*pathInfo}");

    routes.MapRoute(
        "UpcomingDinners",
        "Dinners/Page/{page}",
        new { controller = "Dinners", action = "Index" }
    );

    routes.MapRoute(
        "Default",                                        // Route name
        "{controller}/{action}/{id}",                     // URL with params
        new { controller="Home", action="Index",
             id=UrlParameter.Optional }  // Param defaults
    );
}

void Application_Start() {
    RegisterRoutes(RouteTable.Routes);
}
Code snippet 1-66.txt
In the previous code, we were registering a new routing rule named UpcomingDinners. We indicate that it has the URL format Dinners/Page/{page} — where {page} is a parameter value embedded within the URL. The third parameter to the MapRoute method indicates that we should map URLs that match this format to the Index action method on the DinnersController class.
We can use the exact same Index code we had before with our Query-string scenario — except now our page parameter will come from the URL and not the query string:
//
// GET: /Dinners/
//      /Dinners/Page/2

public ActionResult Index(int page = 0) {

    const int pageSize = 10;

    var upcomingDinners = dinnerRepository.FindUpcomingDinners();
    var paginatedDinners = upcomingDinners.OrderBy(d => d.EventDate)
                                          .Skip(page * pageSize)
                                          .Take(pageSize)
                                          .ToList();

    return View(paginatedDinners);
}
Code snippet 1-67.txt
And now when we run the application and type in /Dinners, we'll see the first 10 upcoming Dinners, as shown in Figure 1-113.
And when we type in /Dinners/Page/1, we'll see the next page of Dinners (see Figure 1-114).

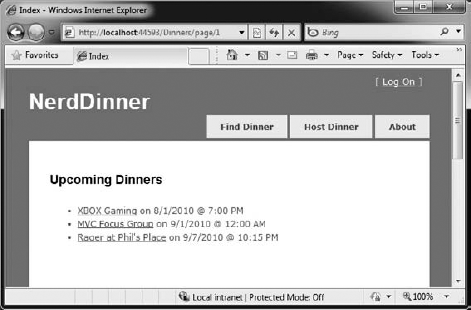
The last step to complete our paging scenario will be to implement the "Next" and "Previous" navigation UIs within our View template to enable users to easily skip over the Dinner data.
To implement this correctly, we'll need to know the total number of Dinners in the database, as well as how many pages of data this translates to. We'll then need to calculate whether the currently requested page value is at the beginning or end of the data, and show or hide the Previous and Next UIs accordingly. We could implement this logic within our Index action method. Alternatively, we can add a helper class to our project that encapsulates this logic in a more reusable way.
The following code is a simple PaginatedList helper class that derives from the List<T> collection class built into the .NET Framework. It implements a reusable collection class that can be used to paginate any sequence of IQueryable data. In our NerdDinner application we'll have it work over the IQueryable<Dinner> results, but it could just as easily be used against the IQueryable<Product> or IQueryable<Customer> results in other application scenarios:
public class PaginatedList<T> : List<T> {

    public int PageIndex  { get; private set; }
    public int PageSize   { get; private set; }
    public int TotalCount { get; private set; }
    public int TotalPages { get; private set; }

    public PaginatedList(IQueryable<T> source, int pageIndex, int pageSize) {
        PageIndex = pageIndex;
        PageSize = pageSize;
        TotalCount = source.Count();
        TotalPages = (int) Math.Ceiling(TotalCount / (double)PageSize);

        this.AddRange(source.Skip(PageIndex * PageSize).Take(PageSize));
    }

    public bool HasPreviousPage {
        get {
            return (PageIndex > 0);
        }
    }

    public bool HasNextPage {
        get {
            return (PageIndex+1 < TotalPages);
        }
    }
}
Code snippet 1-68.txt
Notice in the previous code how it calculates and then exposes properties like PageIndex, PageSize, TotalCount, and TotalPages. It also then exposes two helper properties — HasPreviousPage and HasNextPage — that indicate whether the page of data in the collection is at the beginning or end of the original sequence. The above code will cause two SQL queries to be run — the first to retrieve the count of the total number of Dinner objects (this doesn't return the objects; rather, it performs a SELECT COUNT statement that returns an integer), and the second to retrieve just the rows of data we need from our database for the current page of data.
We can then update our DinnersController.Index helper method to create a PaginatedList<Dinner> from our DinnerRepository.FindUpcomingDinners result and pass it to our View template:
//
// GET: /Dinners/
//      /Dinners/Page/2

public ActionResult Index(int page = 0) {

    const int pageSize = 10;

    var upcomingDinners = dinnerRepository.FindUpcomingDinners();
    var paginatedDinners = new PaginatedList<Dinner>(upcomingDinners,
                                                     page,
                                                     pageSize);

    return View(paginatedDinners);
}
Code snippet 1-69.txt
We can then update the ViewsDinnersIndex.aspx View template to inherit from ViewPage<NerdDinner.Helpers.PaginatedList<Dinner>> instead of ViewPage<IEnumerable<Dinner>>, and then add the following code to the bottom of our View template to show or hide the Next and Previous navigation UIs:
<% if (Model.HasPreviousPage) { %>

    <%: Html.RouteLink("<<<",
                       "UpcomingDinners",
                       new { page=(Model.PageIndex−1) }) %>

<% } %>

<% if (Model.HasNextPage) { %>

    <%: Html.RouteLink(">>>",
                       "UpcomingDinners",
                       new { page = (Model.PageIndex + 1) })%>

<% } %>
Code snippet 1-70.txt
Notice, in the previous code, how we are using the Html.RouteLink helper method to generate our hyperlinks. This method is similar to the Html.ActionLink helper method we've used previously. The difference is that we are generating the URL using the "UpcomingDinners" routing rule we set up within our Global.asax file. This ensures that we'll generate URLs to our Index action method that have the format: /Dinners/Page/{page}, where the {page} value is a variable we are providing above based on the current PageIndex.
And now when we run our application again, we'll see 10 Dinners at a time in our browser, as shown in Figure 1-115.
We also have <<< and >>> navigation UIs at the bottom of the page that allow us to skip forward and backward over our data using search-engine-accessible URLs (see Figure 1-116).
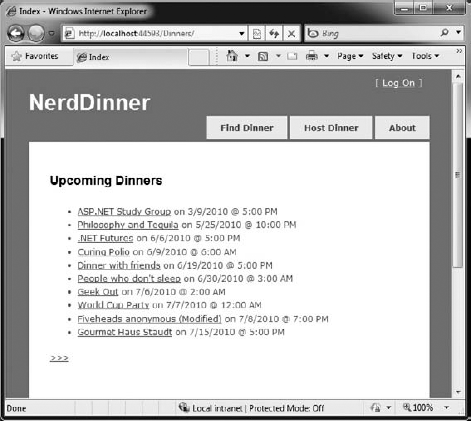

Right now our NerdDinner application grants anyone visiting the site the ability to create and edit the details of any Dinner. Let's change this so that users need to register and log in to the site to create new Dinners, and add a restriction so that only the user who is hosting a Dinner can edit it later.
To enable this, we'll use authentication and authorization to secure our application.
Authentication is the process of identifying and validating the identity of a client accessing an application. Put more simply, it is about identifying who the end user is when he or she visits a website.
ASP.NET supports multiple ways to authenticate browser users. For Internet web applications, the most common authentication approach used is called Forms Authentication. Forms Authentication enables a developer to author an HTML login form within his application and then validate the username/password an end user submits against a database or other password credential store. If the username/password combination is correct, the developer can then ask ASP.NET to issue an encrypted HTTP cookie to identify the user across future requests. We'll be using Forms Authentication with our NerdDinner application.
Authorization is the process of determining whether an authenticated user has permission to access a particular URL/resource or to perform some action. For example, within our NerdDinner application, we'll want to authorize only users who are logged in to access the /Dinners/Create URL and create new Dinners. We'll also want to add authorization logic so that only the user who is hosting a dinner can edit it — and deny edit access to all other users.
The default Visual Studio project template for ASP.NET MVC automatically enables Forms Authentication when new ASP.NET MVC applications are created. It also automatically adds a pre-built account login implementation to the project — which makes it really easy to integrate security within a site.
The default Site.master Master Page displays a [Log On] link (shown in Figure 1-117) at the top right of the site when the user accessing it is not authenticated.
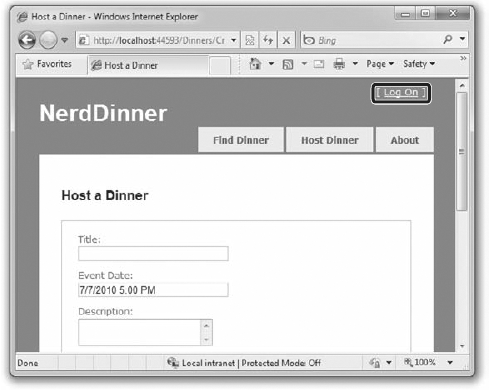
Clicking the [Log On] link takes a user to the /Account/LogOn URL (Figure 1-118).
Visitors who haven't registered can do so by clicking the Register link, which will take them to the /Account/Register URL and allow them to enter account details (see Figure 1-119).
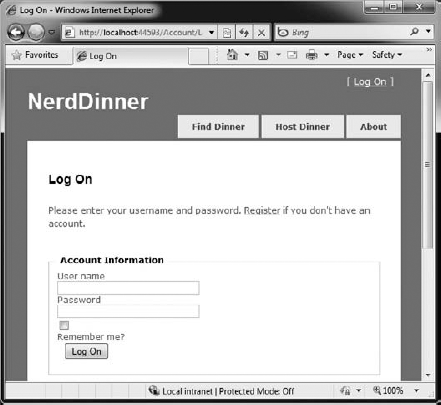

Clicking the Register button will create a new user within the ASP.NET Membership System and authenticate the user onto the site using Forms Authentication.
When a user is logged in, the Site.master changes the top right of the page to output a "Welcome [username]!" message and renders a [Log Off] link instead of a [Log On] one. Clicking the [Log Off] link logs out the user (see Figure 1-120).
The above login, logout, and registration functionality is implemented within the AccountController class that was added to our project by VS when it created it. The UI for the AccountController is implemented using View templates within the ViewsAccount directory (shown in Figure 1-121).


The AccountController class uses the ASP.NET Forms Authentication system to issue encrypted authentication cookies and the ASP.NET Membership API to store and validate usernames/passwords. The ASP.NET Membership API is extensible and enables any password credential store to be used. ASP.NET ships with built-in membership provider implementations that store usernames/passwords within a SQL database or within the Active Directory.
We can configure which membership provider our NerdDinner application should use by opening the web.config file at the root of the project and looking for the <membership> section within it. The default web.config, added when the project was created, registers the SQL membership provider and configures it to use a connection-string named ApplicationServices to specify the database location.
The default ApplicationServices connection string (which is specified within the <connectionStrings> section of the web.config file) is configured to use SQL Express. It points to a SQL Express database named ASPNETDB.MDF under the application's App_Data directory. If this database doesn't exist the first time the Membership API is used within the application, ASP.NET will automatically create the database and provision the appropriate membership database schema within it (Figure 1-122).
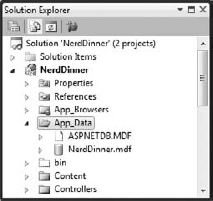
If, instead of using SQL Express, we wanted to use a full SQL Server instance (or connect to a remote database), all we'd need to do is to update the ApplicationServices connection string within the web.config file and make sure that the appropriate membership schema has been added to the database it points at. You can run the aspnet_regsql.exe utility within the WindowsMicrosoft.NETFrameworkv4.0.30319 directory to add the appropriate schema for membership and the other ASP.NET application services to a database.
We didn't have to write any code to enable a secure authentication and account management implementation for the NerdDinner application. Users can register new accounts with our application and log in/log out of the site. And now we can add authorization logic to the application, and use the authentication status and username of visitors to control what they can and can't do within the site.
Let's begin by adding authorization logic to the Create action methods of our DinnersController class. Specifically, we will require that users accessing the /Dinners/Create URL must be logged in. If they aren't logged in, we'll redirect them to the login page so that they can sign in.
Implementing this logic is pretty easy. All we need to do is to add an [Authorize] filter attribute to our Create action methods like so:
//
// GET: /Dinners/Create
[Authorize]
public ActionResult Create() {
   ...
}

//
// POST: /Dinners/Create

[HttpPost, Authorize]
public ActionResult Create(Dinner dinnerToCreate) {
   ...
}
Code snippet 1-71.txt
ASP.NET MVC supports the ability to create action filters that can be used to implement reusable logic that can be declaratively applied to action methods. The [Authorize] filter is one of the built-in action filters provided by ASP.NET MVC, and it enables a developer to declaratively apply authorization rules to action methods and Controller classes.
When applied without any parameters (as in the previous code), the [Authorize] filter enforces that the user making the action method request must be logged in — and it will automatically redirect the browser to the login URL if they aren't. When doing this redirect, the originally requested URL is passed as a query-string argument (e.g., /Account/LogOn?ReturnUrl=%2fDinners%2fCreate). The AccountController will then redirect the user back to the originally requested URL once they log in.
The [Authorize] filter optionally supports the ability to specify a Users or Roles property that can be used to require that the user is both logged in and within a list of allowed users or a member of an allowed security role. For example, the following code only allows two specific users, scottgu and billg, to access the /Dinners/Create URL:
[Authorize(Users="scottgu,billg")]
public ActionResult Create() {
    ...
}
Code snippet 1-72.txt
Embedding specific usernames within code tends to be pretty unmaintainable, however. A better approach is to define higher-level roles that the code checks against, and then to map users into the role using either a database or active directory system (enabling the actual User Mapping List to be stored externally from the code). ASP.NET includes a built-in Role Management API as well as a built-in set of role providers (including ones for SQL and Active Directory) that can help perform this user/role mapping. We could then update the code to only allow users within a specific "admin" role to access the /Dinners/Create URL:
[Authorize(Roles="admin")]
public ActionResult Create() {
   ...
}
Code snippet 1-73.txtWe can retrieve the username of the currently logged-in user of a request using the User.Identity.Name property exposed on the Controller base class.
Earlier, when we implemented the HTTP-POST version of our Create action method, we had hard-coded the HostedBy property of the dinner to a static string. We can now update this code to instead use the User.Identity.Name property, as well as automatically add an RSVP for the host creating the Dinner:
//
// POST: /Dinners/Create

[HttpPost, Authorize]
public ActionResult Create(Dinner dinner) {
    if (ModelState.IsValid) {
dinner.HostedBy = User.Identity.Name;
RSVP rsvp = new RSVP();
rsvp.AttendeeName = User.Identity.Name;
dinner.RSVPs.Add(rsvp);
dinnerRepository.Add(dinner);
dinnerRepository.Save();
return RedirectToAction("Details", new { id=dinner.DinnerID });
}
return View(new DinnerFormViewModel(dinner));
}
Code snippet 1-74.txtBecause we have added an [Authorize] attribute to the Create method, ASP.NET MVC ensures that the action method only executes if the user visiting the /Dinners/Create URL is logged in on the site. As such, the User.Identity.Name property value will always contain a valid username.
Let's now add some authorization logic that restricts users so that they can only edit the properties of Dinners they themselves are hosting.
To help with this, we'll first add an IsHostedBy(username) helper method to our Dinner object (within the Dinner.cs Partial class we built earlier). This helper method returns true or false, depending on whether a supplied username matches the Dinner HostedBy property, and encapsulates the logic necessary to perform a case-insensitive string comparison of them:
public partial class Dinner {

    public bool IsHostedBy(string userName) {

        return HostedBy.Equals(userName,
            StringComparison.OrdinalIgnoreCase);
    }
}
Code snippet 1-75.txt
We'll then add an [Authorize] attribute to the Edit action methods within our DinnersController class. This will ensure that users must be logged in to request a /Dinners/Edit/[id] URL.
We can then add code to our Edit methods that uses the Dinner.IsHostedBy(username) helper method to verify that the logged-in user matches the Dinner host. If the user is not the host, we'll display an "InvalidOwner" view and terminate the request. The code to do this looks like the following:
//
// GET: /Dinners/Edit/5

[Authorize]
public ActionResult Edit(int id) {

    Dinner dinner = dinnerRepository.GetDinner(id);

    if (!dinner.IsHostedBy(User.Identity.Name))
        return View("InvalidOwner");

    return View(new DinnerFormViewModel(dinner));
}

//
// POST: /Dinners/Edit/5

[HttpPost, Authorize]
public ActionResult Edit(int id, FormCollection collection) {

    Dinner dinner = dinnerRepository.GetDinner(id);

    if (!dinner.IsHostedBy(User.Identity.Name))
        return View("InvalidOwner");

    if(TryUpdateModel(dinner)) {
        dinnerRepository.Save();

        return RedirectToAction("Details", new {id = dinner.DinnerID});
    }
    return View(new DinnerFormViewModel(dinner));
}
Code snippet 1-76.txt
We can then right-click the ViewsDinners directory and choose the Add
<asp:Content ID="Title" ContentPlaceHolderID="TitleContent" runat="server">
      You Don't Own This Dinner
</asp:Content>

<asp:Content ID="Main" ContentPlaceHolderID="MainContent" runat="server">
    <h2>Error Accessing Dinner</h2>

    <p>Sorry - but only the host of a Dinner can edit or delete it.</p>
</asp:Content>
Code snippet 1-77.txt
And now when a user attempts to edit a Dinner she doesn't own, she'll get the error message shown in Figure 1-123.
We can repeat the same steps for the Delete action methods within our Controller to lock down permission to delete Dinners as well, and ensure that only the host of a Dinner can delete it.

We are linking to the Edit and Delete action methods of our DinnersController class from our /Details URL (see Figure 1-124).

Currently we are showing the Edit and Delete action links regardless of whether the visitor to the Details URL is the host of the Dinner. Let's change this so that the links are only displayed if the visiting user is the owner of the Dinner.
The Details action method within our DinnersController retrieves a Dinner object and then passes it as the Model object to our View template:
//
// GET: /Dinners/Details/5

public ActionResult Details(int id) {

    Dinner dinner = dinnerRepository.GetDinner(id);

    if (dinner == null)
        return View("NotFound");

    return View(dinner);
}
Code snippet 1-78.txt
We can update our View template to conditionally show/hide the Edit and Delete links by using the Dinner.IsHostedBy helper method as in the code that follows:
<% if (Model.IsHostedBy(Context.User.Identity.Name)) { %>

   <%: Html.ActionLink("Edit Dinner", "Edit", new { id=Model.DinnerID })%> |
   <%: Html.ActionLink("Delete Dinner", "Delete", new {id=Model.DinnerID})%>

<% } %>
Code snippet 1-79.txtLet's now add support for logged-in users to RSVP their interest in attending a Dinner. We'll implement this using an AJAX-based approach integrated within the Dinner Details page.
Users can visit the /Dinners/Details/[id] URL to see details about a particular Dinner (see Figure 1-125).
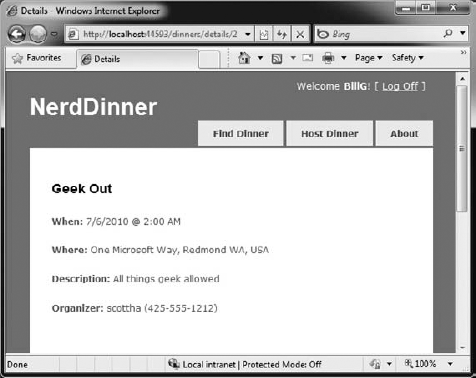
The Details action method is implemented like so:
//
// GET: /Dinners/Details/2

public ActionResult Details(int id) {

    Dinner dinner = dinnerRepository.GetDinner(id);

    if (dinner == null)
        return View("NotFound");
    else
        return View(dinner);
}
Code snippet 1-80.txt
Our first step to implement RSVP support will be to add an IsUserRegistered(username) helper method to our Dinner object (within the Dinner.cs Partial class we built earlier). This helper method returns true or false, depending on whether the user is currently RSVP'ed for the dinner:
public partial class Dinner {

    public bool IsUserRegistered(string userName) {

        return RSVPs.Any(r => r.AttendeeName.Equals(userName,
StringComparison.OrdinalIgnoreCase));
}
}
Code snippet 1-81.txtWe can then add the following code to our Details.aspx View template to display an appropriate message indicating whether the user is registered or not for the event:
<% if (Request.IsAuthenticated) { %>

    <% if (Model.IsUserRegistered(Context.User.Identity.Name)) { %>

        <p>You are registered for this event!</p>

    <% } else { %>

        <p>You are not registered for this event</p>

    <% } %>

<% } else { %>

    <a href="/Account/Logon">Logon</a> to RSVP for this event.

<% } %>
Code snippet 1-82.txt
And now when users visit a Dinner they are registered for, they'll see the message shown in Figure 1-126.

And when they visit a Dinner they are not registered for, they'll see the message shown in Figure 1-127.

Now let's add the functionality necessary to enable users to RSVP for a Dinner from the Details page.
To implement this, we'll create a new RSVPController class by right-clicking on the Controllers directory and choosing the Add
We'll implement a Register action method within the new RSVPController class that takes an ID for a Dinner as an argument, retrieves the appropriate Dinner object, checks to see if the logged-in user is currently in the list of users who have registered for it, and if not adds an RSVP object for them:
public class RSVPController : Controller {

    DinnerRepository dinnerRepository = new DinnerRepository();

    //
    // AJAX: /Dinners/Register/1

    [Authorize, HttpPost]
    public ActionResult Register(int id) {

        Dinner dinner = dinnerRepository.GetDinner(id);

        if (!dinner.IsUserRegistered(User.Identity.Name)) {
            RSVP rsvp = new RSVP();
rsvp.AttendeeName = User.Identity.Name;
dinner.RSVPs.Add(rsvp);
dinnerRepository.Save();
}
return Content("Thanks - we'll see you there!");
}
}
Code snippet 1-83.txtNotice, in the previous code, how we are returning a simple string as the output of the action method. We could have embedded this message within a View template — but since it is so small, we'll just use the Content helper method on the Controller base class and return a string message like the previous one.
We'll use AJAX to invoke the Register action method from our Details View. Implementing this is pretty easy. First, we'll add two script library references:
<script src="/Scripts/MicrosoftAjax.js" type="text/javascript"></script>
<script src="/Scripts/MicrosoftMvcAjax.js" type="text/javascript"></script>
Code snippet 1-84.txt
The first library references the core ASP.NET AJAX client-side script library. This file is approximately 24k in size (compressed) and contains core client-side AJAX functionality. The second library contains utility functions that integrate with ASP.NET MVC's built-in AJAX helper methods (which we'll use shortly).
We can then update the View template code we added earlier so that, instead of outputting a "You are not registered for this event" message, we render a link that when pushed performs an AJAX call that invokes our Register action method on our RSVP Controller and RSVPs the user:
<div id="rsvpmsg">

<% if (Request.IsAuthenticated) { %>

    <% if (Model.IsUserRegistered(Context.User.Identity.Name)) { %>

        <p>You are registered for this event!</p>

    <% } else { %>

        <%: Ajax.ActionLink( "RSVP for this event",
                             "Register", "RSVP",
                             new { id=Model.DinnerID },
                             new AjaxOptions { UpdateTargetId="rsvpmsg" }) %>
<% } %>
<% } else { %>
<a href="/Account/Logon">Logon</a> to RSVP for this event!
<% } %>
</div>
Code snippet 1-85.txtThe Ajax.ActionLink helper method in the previous code is built into ASP.NET MVC and is similar to the Html.ActionLink helper method except that instead of performing a standard navigation, it makes an AJAX call to the action method. Above we are calling the "Register" action method on the "RSVP" Controller and passing the DinnerID as the id parameter to it. The final AjaxOptions parameter we are passing indicates that we want to take the content returned from the action method and update the HTML <div> element on the page whose ID is "rsvpmsg".
And now when users browse to a Dinner they aren't registered for yet, they'll see a link to RSVP for it (see Figure 1-128).
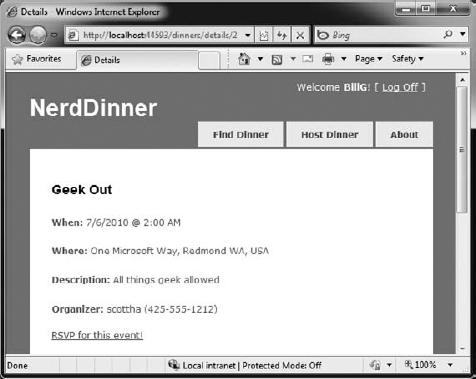
If they click the "RSVP for this event" link, they'll make an AJAX call to the Register action method on the RSVP Controller, and when it completes, they'll see an updated message like that shown in Figure 1-129.

The network bandwidth and traffic involved when making this AJAX call are really lightweight. When the user clicks on the "RSVP for this event" link, a small HTTP-POST network request is made to the /Dinners/Register/1 URL that looks like the following on the wire:
POST /Dinners/Register/49 HTTP/1.1
X-Requested-With: XMLHttpRequest
Content-Type: application/x-www-form-urlencoded; charset=utf-8
Referer: http://localhost:8080/Dinners/Details/49
Code snippet 1-86.txt
And the response from our Register action method is simply:
HTTP/1.1 200 OK
Content-Type: text/html; charset=utf-8
Content-Length: 29
Thanks - we'll see you there!
Code snippet 1-87.txt
This lightweight call is fast and will work even over a slow network.
The AJAX functionality we implemented works well and fast. Sometimes it can happen so fast, though, that a user might not notice that the RSVP link has been replaced with new text. To make the outcome a little more obvious, we can add a simple animation to draw attention to the updates message.
The default ASP.NET MVC project template includes jQuery — an excellent (and very popular) open source JavaScript library that is also supported by Microsoft. jQuery provides several features, including a nice HTML DOM selection and effects library.
To use jQuery, we'll first add a script reference to it. Because we are going to be using jQuery within a variety of places within our site, we'll add the script reference within our Site.master Master Page file so that all pages can use it.
<script src="/Scripts/jQuery-1.4.1.js" type="text/javascript"></script>
Note
If you are using ASP.NET MVC 2 with Visual Studio 2008, make sure you have installed the JavaScript IntelliSense hotfix for VS 2008 SP1 that enables richer IntelliSense support for JavaScript files (including jQuery). You can download it from: http://tinyurl.com/vs2008javascripthotfix.
For Visual Studio 2010 there is no hotfix needed.
Code written using jQuery often uses a global $() JavaScript method that retrieves one or more HTML elements using a CSS selector. For example, $("#rsvpmsg") selects any HTML element with the ID of rsvpmsg, while $(".something") would select all elements with the "something" CSS class name. You can also write more advanced queries like "return all of the checked radio buttons" using a selector query like $("input[@type=radio][@checked]").
Once you've selected elements, you can call methods on them to take action, such as hiding them: $("#rsvpmsg").hide();.
For our RSVP scenario, we'll define a simple JavaScript function named AnimateRSVPMessage that selects the "rsvpmsg" <div> and animates the size of its text content. The next code starts the text small and then causes it to increase over a 400-millisecond (400-ms) time frame:
<script type="text/javascript">

    function AnimateRSVPMessage() {
        $("#rsvpmsg").animate({fontSize: "1.5em"}, 400);
    }

</script>
Code snippet 1-88.txt
We can then wire up this JavaScript function to be called after our AJAX call successfully completes by passing its name to our Ajax.ActionLink helper method (via the AjaxOptions OnSuccess event property):
<%: Ajax.ActionLink( "RSVP for this event",
                     "Register", "RSVP",
                     new { id=Model.DinnerID },
                     new AjaxOptions { UpdateTargetId="rsvpmsg",
                                 OnSuccess="AnimateRSVPMessage" }) %>
Code snippet 1-89.txt
And now when the "RSVP for this event" link is clicked and our AJAX call completes successfully, the content message sent back will animate and grow larger (see Figure 1-130).
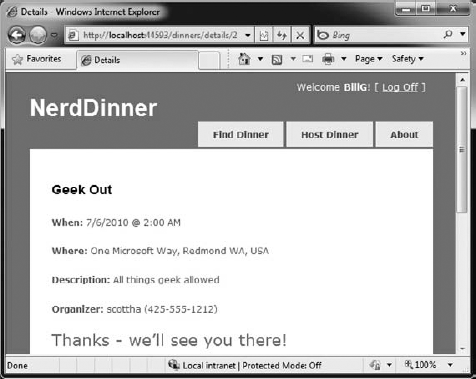
In addition to providing an OnSuccess event, the AjaxOptions object exposes OnBegin, OnFailure, and OnComplete events that you can handle (along with a variety of other properties and useful options).
Our Details View template is starting to get a little long, which over time will make it a little harder to understand. To help improve the code readability, let's finish up by creating a Partial View — RSVPStatus.ascx — that encapsulates all of the RSVP View code for our Details page.
We can do this by right-clicking the ViewsDinners folder and then choosing the Add
Once we've done that, let's also create another Partial View — EditAndDeleteLinks.ascx — that encapsulates our Edit and Delete link View code. We'll also have it take a Dinner object as its strongly typed ViewModel, and copy/paste the Edit and Delete logic from our Details.aspx View into it.
Our Details View template can then just include two Html.RenderPartial method calls at the bottom:
<% Html.RenderPartial("RSVPStatus"); %>
<% Html.RenderPartial("EditAndDeleteLinks"); %>We'll now make our application a little more visually exciting by integrating AJAX mapping support. This will enable users who are creating, editing, or viewing Dinners to see the location of the Dinner graphically.
We are going to use mapping functionality in several places within our application. To keep our code DRY, we'll encapsulate the common map functionality within a single Partial template that we can reuse across multiple Controller actions and Views. We'll name this Partial View map.ascx and create it within the ViewsDinners directory.
We can create the map.ascx Partial by right-clicking the ViewsDinners directory and choosing the Add
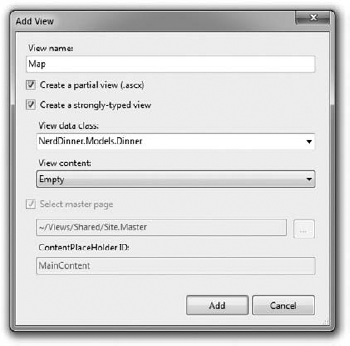
When we click the Add button, our Partial template will be created. We'll then update the Map.ascx file to have the following content:
<script src="http://dev.virtualearth.net/mapcontrol/mapcontrol.ashx?v=6.2"
 type="text/javascript"></script>

<script src="/Scripts/Map.js" type="text/javascript"></script>

<div id="themap">
</div>
<script type="text/javascript">

    $(document).ready(function() {
        var latitude = <%:Model.Latitude %>;
        var longitude = <%:Model.Longitude %>;

        if ((latitude == 0) || (longitude == 0))
            LoadMap();
        else
            LoadMap(latitude, longitude, mapLoaded);
});
function mapLoaded() {
var title = "<%: Model.Title %>";
var address = "<%: Model.Address %>";
LoadPin(center, title, address);
map.SetZoomLevel(14);
}
</script>
Code snippet 1-90.txtThe first <script> reference points to the Microsoft Virtual Earth 6.2 mapping library. The second <script> reference points to a map.js file that we will shortly create, which will encapsulate our common JavaScript mapping logic. The <div id="themap"> element is the HTML container that Virtual Earth will use to host the map.
We then have an embedded <script> block that contains two JavaScript functions specific to this View. The first function uses jQuery to wire up a function that executes when the page is ready to run client-side script. It calls a LoadMap helper function that we'll define within our Map.js script file to load the Virtual Earth map control. The second function is a callback event handler that adds a pin to the map that identifies a location.
Notice how we are using a server-side <%: %> block within the client-side script block to embed the latitude and longitude of the Dinner we want to map into the JavaScript. This is a useful technique to output dynamic values that can be used by client-side script (without requiring a separate AJAX call back to the server to retrieve the values — which makes it faster). The <%: %> blocks will execute when the View is rendering on the server — and so the output of the HTML will just end up with embedded JavaScript values (e.g., var latitude = 47.64312;).
Let's now create the Map.js file that we can use to encapsulate the JavaScript functionality for our map (and implement the preceding LoadMap and LoadPin methods). We can do this by right-clicking the Scripts directory within our project, and then choose the Add
We'll add the following JavaScript code to the Map.js file, which will interact with Virtual Earth to display our map and add location pins to it for our Dinners:
var map = null;
var points = [];
var shapes = [];
var center = null;

function LoadMap(latitude, longitude, onMapLoaded) {
    map = new VEMap('theMap'),
    options = new VEMapOptions();
options.EnableBirdseye = false;
// Makes the control bar less obtrusive.
map.SetDashboardSize(VEDashboardSize.Small);
if (onMapLoaded != null)
map.onLoadMap = onMapLoaded;
if (latitude != null && longitude != null) {
center = new VELatLong(latitude, longitude);
}
map.LoadMap(center, null, null, null, null, null, null, options);
}
function LoadPin(LL, name, description) {
var shape = new VEShape(VEShapeType.Pushpin, LL);
//Make a nice Pushpin shape with a title and description
shape.SetTitle("<span class="pinTitle"> " + escape(name) + "</span>");
if (description !== undefined) {
shape.SetDescription("<p class="pinDetails">" +
escape(description) + "</p>");
}
map.AddShape(shape);
points.push(LL);
shapes.push(shape);
}
function FindAddressOnMap(where) {
var numberOfResults = 20;
var setBestMapView = true;
var showResults = true;
map.Find("", where, null, null, null,
numberOfResults, showResults, true, true,
setBestMapView, callbackForLocation);
}
function callbackForLocation(layer, resultsArray, places,
hasMore, VEErrorMessage) {
clearMap();
if (places == null)
return;
//Make a pushpin for each place we find
$.each(places, function(i, item) {
var description = "";
if (item.Description !== undefined) {description = item.Description;
}
var LL = new VELatLong(item.LatLong.Latitude,
item.LatLong.Longitude);
LoadPin(LL, item.Name, description);
});
//Make sure all pushpins are visible
if (points.length > 1) {
map.SetMapView(points);
}
//If we've found exactly one place, that's our address.
if (points.length === 1) {
$("#Latitude").val(points[0].Latitude);
$("#Longitude").val(points[0].Longitude);
}
}
function clearMap() {
map.Clear();
points = [];
shapes = [];
}
Code snippet 1-91.txtWe'll now integrate the Map support with our existing Create and Edit scenarios. The good news is that this is pretty easy to do and doesn't require us to change any of our Controller code. Because our Create and Edit Views share a common DinnerForm Partial View used to implement the Dinner form UI, we can add the map in one place and have both our Create and Edit scenarios use it.
All we need to do is to open the ViewsDinnersDinnerForm.ascx Partial View and update it to include our new map Partial. Following is what the updated DinnerForm will look like once the map is added (the HTML form elements are omitted from the following code snippet for brevity):
<%: Html.ValidationSummary() %>

<% using (Html.BeginForm()) { %>

    <fieldset>

        <div id="dinnerdiv">
            <p>
                  [HTML Form Elements Removed for Brevity]
           </p>
            <p>
               <input type="submit" value="Save" />
</p>
</div>
<div id="mapDiv">
<% Html.RenderPartial("Map", Model.Dinner); %>
</div>
</fieldset>
<script type="text/javascript">
$(document).ready(function() {
$("#Address").blur(function(evt) {
$("#Latitude").val("");
$("#Longitude").val("");
var address = jQuery.trim($("#Address").val());
if (address.length < 1)
return;
FindAddressOnMap(address);
});
});
</script>
<% } %>
Code snippet 1-92.txtThe DinnerForm Partial above takes an object of type DinnerFormViewModel as its Model type (because it needs both a Dinner object and a SelectList to populate the dropdown list of countries). Our map Partial just needs an object of type Dinner as its Model type, and so when we render the map Partial, we are passing just the Dinner subproperty of DinnerFormViewModel to it:
<% Html.RenderPartial("Map", Model.Dinner); %>The JavaScript function we've added to the Partial uses jQuery to attach a blur event to the Address HTML textbox. You've probably heard of focus events that fire when a user clicks or tabs into a textbox. The opposite is a blur event that fires when a user exits a textbox. The event handler in the previous code clears the latitude and longitude textbox values when this happens, and then plots the new address location on our map. A callback event handler that we defined within the map.js file will then update the longitude and latitude textboxes on our form using values returned by Virtual Earth based on the address we gave it.
And now when we run our application again and click the Host Dinner tab, we'll see a default map displayed along with our standard Dinner form elements (Figure 1-132).
When we type in an address and then tab away, the map will dynamically update to display the location, and our event handler will populate the latitude/longitude textboxes with the location values (Figure 1-133).


If we save the new Dinner and then open it again for editing, we'll find that the map location is displayed when the page loads (Figure 1-134).

Every time the address field is changed, the map and the latitude/longitude coordinates will update.
Now that the map displays the Dinner location, we can also change the Latitude and Longitude form fields from being visible textboxes to instead be hidden elements (since the map is automatically updating them each time an address is entered). To do this, we'll switch from using the Html.TextBox HTML helper to using the Html.Hidden helper method:
<p>
    <%: Html.Hidden("Latitude", Model.Dinner.Latitude)%>
    <%: Html.Hidden("Longitude", Model.Dinner.Longitude)%>
</p>
Code snippet 1-93.txt
And now our forms are a little more user-friendly (Figure 1-135) and avoid displaying the raw latitude/longitude (while still storing them with each Dinner in the database).
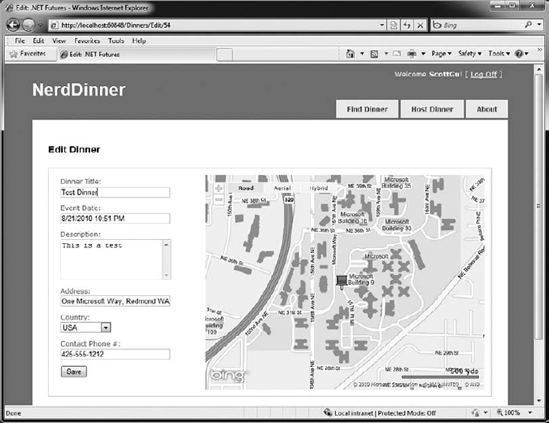
Now that we have the map integrated with our Create and Edit scenarios, let's also integrate it with our Details scenario. All we need to do is to call <% Html.RenderPartial("map"); %> within the Details View.
The following is what the source code to the complete Details View (with map integration) looks like:
<asp:Content ID="Title" ContentPlaceHolderID="TitleContent" runat="server">
    <%: Model.Title %>
</asp:Content>

<asp:Content ID="details" ContentPlaceHolderID="MainContent" runat="server">

    <div id="dinnerDiv">

        <h2><%: Model.Title %></h2>
<p>
<strong>When:</strong>
<%: Model.EventDate.ToShortDateString() %>
<strong>@</strong>
<%: Model.EventDate.ToShortTimeString() %>
</p>
<p>
<strong>Where:</strong>
<%: Model.Address %>,
<%: Model.Country %>
</p>
<p>
<strong>Description:</strong>
<%: Model.Description %>
</p>
<p>
<strong>Organizer:</strong>
<%: Model.HostedBy %>
(<%: Model.ContactPhone %>)
</p>
<% Html.RenderPartial("RSVPStatus"); %>
<% Html.RenderPartial("EditAndDeleteLinks"); %>
</div>
<div id="mapDiv">
<% Html.RenderPartial("map"); %>
</div>
</asp:Content>
Code snippet 1-94.txtNow when users navigate to a /Dinners/Details/[id] URL, they'll see details about the Dinner, the location of the Dinner on the map (complete with a pushpin that, when hovered over, displays the title and address of the Dinner), and have an AJAX link to RSVP for it (see Figure 1-136).
To finish off our AJAX implementation, let's add a map to the home page of the application that allows users to graphically search for Dinners near them (see Figure 1-137).
We'll begin by implementing support within our database and data repository layer to efficiently perform a location-based radius search for Dinners. We could use the geospatial features of SQL Server 2008 (www.microsoft.com/sqlserver/2008/en/us/spatial-data.aspx) to implement this, or alternatively we can use a SQL function approach that Gary Dryden discussed in the article at www.codeproject.com/KB/cs/distancebetweenlocations.aspx.
To implement this technique, we will open the Server Explorer within Visual Studio, select the NerdDinner database, and then right-click the Functions subnode under it and choose to create a new "Scalar-valued function" (Figure 1-138).


We'll then paste in the following DistanceBetween function:
CREATE FUNCTION [dbo].[DistanceBetween] (@Lat1 as real,
                @Long1 as real, @Lat2 as real, @Long2 as real)
RETURNS real
AS
BEGIN

DECLARE @dLat1InRad as float(53);
SET @dLat1InRad = @Lat1 * (PI()/180.0);
DECLARE @dLong1InRad as float(53);
SET @dLong1InRad = @Long1 * (PI()/180.0);
DECLARE @dLat2InRad as float(53);
SET @dLat2InRad = @Lat2 * (PI()/180.0);
DECLARE @dLong2InRad as float(53);
SET @dLong2InRad = @Long2 * (PI()/180.0);

DECLARE @dLongitude as float(53);
SET @dLongitude = @dLong2InRad - @dLong1InRad;
DECLARE @dLatitude as float(53);
SET @dLatitude = @dLat2InRad - @dLat1InRad;
/* Intermediate result a. */
DECLARE @a as float(53);
SET @a = SQUARE (SIN (@dLatitude / 2.0)) + COS (@dLat1InRad)
                 * COS (@dLat2InRad)
                 * SQUARE(SIN (@dLongitude / 2.0));
/* Intermediate result c (great circle distance in Radians). */
DECLARE @c as real;
SET @c = 2.0 * ATN2 (SQRT (@a), SQRT (1.0 - @a));
DECLARE @kEarthRadius as real;
/* SET kEarthRadius = 3956.0 miles */
SET @kEarthRadius = 6376.5;        /* kms */

DECLARE @dDistance as real;
SET @dDistance = @kEarthRadius * @c;
return (@dDistance);
END
Code snippet 1-95.txt
We'll then create a new "Table-valued Function" in SQL Server that we'll call NearestDinners (see Figure 1-139).
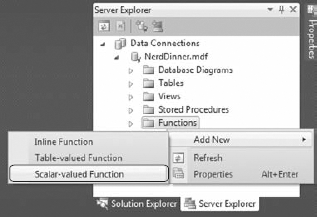

This NearestDinners table function uses the DistanceBetween helper function to return all Dinners within 100 miles of the latitude and longitude we supply it:
CREATE FUNCTION [dbo].[NearestDinners]
       (
       @lat real,
       @long real
       )
RETURNS  TABLE
AS
       RETURN
       SELECT Dinners.DinnerID
       FROM   Dinners
       WHERE  dbo.DistanceBetween(@lat, @long, Latitude, Longitude) <100
Code snippet 1-96.txt
Now that we've added this function to our database, we need to update the entity model from the database so that it knows about the new function.
Open the Entity Designer by double-clicking the NerdDinner.edmx file, as shown in Figure 1-140.
Right-click the design surface and select the Update Model from Database option, as shown in Figure 1-141.
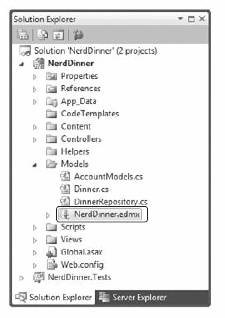

This brings up an Update Wizard. Our table-valued function shows up within the Stored Procedures node of the Add tab. Expand the Stored Procedures node, select the DistanceBetween option, and click Finish, as seen in Figure 1-142.
After clicking Finish, the entity framework Wizard updates the entity model (EDMX file) with the function. We'll need to tweak the EDMX file to translate SQL Server Real values to .NET floats. To do that, we'll need to open the EDMX file as XML. To do that, right-click the EDMX file and select the Open With option, as shown in Figure 1-143.
This brings up the Open With dialog. Select the XML option, as seen in Figure 1-144.


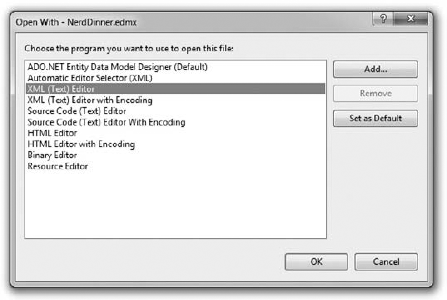
Search for the string DistanceBetween within the XML. You'll find some XML that looks like the following:
<Function Name="DistanceBetween" ReturnType="real" Aggregate="false"
BuiltIn="false" NiladicFunction="false" IsComposable="true"
ParameterTypeSemantics="AllowImplicitConversion" Schema="dbo">
  <Parameter Name="Lat1" Type="real" Mode="In" />
  <Parameter Name="Long1" Type="real" Mode="In" />
  <Parameter Name="Lat2" Type="real" Mode="In" />
  <Parameter Name="Long2" Type="real" Mode="In" />
</Function>
Code snippet 1-97.txt
Change the return type and the parameter types from "real" to "float". When you are done, the snippet of XML should look like this:
<Function Name="DistanceBetween" ReturnType="float" Aggregate="false"
BuiltIn="false" NiladicFunction="false"     IsComposable="true"
ParameterTypeSemantics="AllowImplicitConversion" Schema="dbo">
  <Parameter Name="Lat1" Type="float" Mode="In" />
  <Parameter Name="Long1" Type="float" Mode="In" />
  <Parameter Name="Lat2" Type="float" Mode="In" />
  <Parameter Name="Long2" Type="float" Mode="In" />
</Function>
Code snippet 1-98.txt
Now that we have this table-valued function as part of our database, how do we make use of it when building a LINQ query against our entities?
Entity Framework can't call a table-valued function directly so we need to add in a scalar stub function. That allows us to write a LINQ query in C# or VB that calls this stub function, but the function won't actually be executed in the client code. Instead, when the query is translated to a call in the database, the call to the stub function gets translated as a call to our table-valued function in the database.
To set this up, the first thing we'll do is add a new function to DinnerRepository.
[EdmFunction("NerdDinnerModel.Store", "DistanceBetween")]
public static double DistanceBetween(double lat1, double long1,
  double lat2, double long2)
{
  throw new NotImplementedException("Only call through LINQ expression");
}
Code snippet 1-99.txt
Note
This function has the EdmFunctionAttribute applied. You'll need to add the following using statement to the top of this class.
using System.Data.Objects.DataClasses;
We can then expose a FindByLocation query method on our DinnerRepository class that uses the NearestDinner function to return upcoming dinners that are within 100 miles of the specified location:
public IQueryable<Dinner> FindByLocation(float latitude, float longitude) {

   var dinners = from dinner in FindUpcomingDinners()
                 join i in NearestDinners(latitude, longitude)
                 on dinner.DinnerID equals i.DinnerID
                 select dinner;

    return dinners;
}We'll now implement a Controller action method that takes advantage of the new FindByLocation repository method to return a list of Dinner data that can be used to populate a map. We'll have this action method return the Dinner data in a JSON (JavaScript Object Notation) format so that it can be easily manipulated using JavaScript on the client.
To implement this, we'll create a new SearchController class by right-clicking the Controllers directory and choosing the Add
public class JsonDinner {
    public int      DinnerID    { get; set; }
    public string   Title       { get; set; }
    public double   Latitude    { get; set; }
    public double   Longitude   { get; set; }
    public string   Description { get; set; }
    public int      RSVPCount   { get; set; }
}

public class SearchController : Controller {

    DinnerRepository dinnerRepository = new DinnerRepository();

    //
    // AJAX: /Search/SearchByLocation

    [HttpPost]
    public ActionResult SearchByLocation(float longitude, float latitude) {

        var dinners = dinnerRepository.FindByLocation(latitude, longitude);

        var jsonDinners = from dinner in dinners
                          select new JsonDinner {
                              DinnerID = dinner.DinnerID,
                              Latitude = dinner.Latitude,
Longitude = dinner.Longitude,
Title = dinner.Title,
Description = dinner.Description,
RSVPCount = dinner.RSVPs.Count
};
return Json(jsonDinners.ToList());
}
}
Code snippet 1-100.txtThe SearchController's SearchByLocation action method internally calls the FindByLocation method on DinnerRespository to get a list of nearby Dinners. Rather than return the Dinner objects directly to the client, though, it instead returns JsonDinner objects. The JsonDinner class exposes a subset of Dinner properties (e.g., for security reasons it doesn't disclose the names of the people who have RSVP'ed for a Dinner). It also includes an RSVPCount property that doesn't exist in Dinner — and that is dynamically calculated by counting the number of RSVP objects associated with a particular Dinner.
We are then using the Json helper method on the Controller base class to return the sequence of Dinners using a JSON-based wire format. JSON is a standard text format for representing simple data structures. The following is an example of what a JSON-formatted list of two JsonDinner objects look like when returned from our action method:
[{"DinnerID":53,"Title":"Dinner with the Family","Latitude":47.64312,
"Longitude":-122.130609, "Description":"Fun dinner","RSVPCount":2},
{"DinnerID":54, "Title":"Another Dinner","Latitude":47.632546,
"Longitude":-122.21201,"Description":"Dinner with Friends",
"RSVPCount":3}]
Code snippet 1-101.txtWe are now ready to update the home page of the NerdDinner application to use the SearchController's SearchByLocation action method. To do this, we'll open the /Views/Home/Index.aspx View template and update it to have a textbox, search button, our map, and a <div> element named dinnerList:
<h2>Find a Dinner</h2>

<div id="mapDivLeft">

    <div id="searchBox">
        Enter your location: <%: Html.TextBox("Location") %>
        <input id="search" type="submit" value="Search" />
    </div>

    <div id="theMap">
</div>
</div>
<div id="mapDivRight">
<div id="dinnerList"></div>
</div>
Code snippet 1-102.txtWe can then add two JavaScript functions to the page:
<script type="text/javascript">

    $(document).ready(function() {
        LoadMap();
    });

    $("#search").click(function(evt) {
        var where = jQuery.trim($("#Location").val());
        if (where.length < 1)
            return;

        FindDinnersGivenLocation(where);
    });

</script>
The first JavaScript function loads the map when the page first loads. The second JavaScript function wires up a JavaScript click event handler on the Search button. When the button is pressed, it calls the FindDinnersGivenLocation JavaScript function, which we'll add to our Map.js file:
function FindDinnersGivenLocation(where) {
    map.Find("", where, null, null, null, null, null, false,
       null, null, callbackUpdateMapDinners);
}
Code snippet 1-103.txt
This FindDinnersGivenLocation function calls map.Find on the Virtual Earth Control to center it on the entered location. When the Virtual Earth map service returns, the map.Find method invokes the callbackUpdateMapDinners callback method we passed it as the final argument.
The callbackUpdateMapDinners method is where the real work is done. It uses jQuery's $.post helper method to perform an AJAX call to our SearchController's SearchByLocation action method — passing it the latitude and longitude of the newly centered map. It defines an inline function that will be called when the $.post helper method completes, and the JSON-formatted Dinner results returned from the SearchByLocation action method will be passed it using a variable called dinners. It then does a foreach over each returned dinner, and uses the Dinner's latitude and longitude and other properties to add a new pin on the map. It also adds a Dinner entry to the HTML list of Dinners to the right of the map. It then wires up a hover event for both the pushpins and the HTML list so that details about the Dinner are displayed when a user hovers over them:
function callbackUpdateMapDinners(layer, resultsArray,
    places, hasMore, VEErrorMessage) {

    $("#dinnerList").empty();
    clearMap();
    var center = map.GetCenter();

    $.post("/Search/SearchByLocation", { latitude: center.Latitude,
                                         longitude: center.Longitude },
    function(dinners) {
        $.each(dinners, function(i, dinner) {

            var LL = new VELatLong(dinner.Latitude,
                                   dinner.Longitude, 0, null);

            var RsvpMessage = "";

            if (dinner.RSVPCount == 1)
                RsvpMessage = "" + dinner.RSVPCount + " RSVP";
            else
                RsvpMessage = "" + dinner.RSVPCount + " RSVPs";

            // Add Pin to Map
            LoadPin(LL, '<a href="/Dinners/Details/' + dinner.DinnerID + '">'
                        + dinner.Title + '</a>',
                        "<p>" + dinner.Description + "</p>" + RsvpMessage);

            //Add a dinner to the <ul> dinnerList on the right
            $('#dinnerList').append($('<li/>')
                            .attr("class", "dinnerItem")
                            .append($('<a/>').attr("href",
                                      "/Dinners/Details/" + dinner.DinnerID)
                            .html(dinner.Title))
                            .append(" ("+RsvpMessage+")"));
        });

        // Adjust zoom to display all the pins we just added.

            if (points.length > 1) {
                     map.SetMapView(points);
            }

        // Display the event's pin-bubble on hover.
        $(".dinnerItem").each(function(i, dinner) {
            $(dinner).hover(
                function() { map.ShowInfoBox(shapes[i]); },
                function() { map.HideInfoBox(shapes[i]); }
            );
        });
    }, "json");
Code snippet 1-104.txt
Now when we run the application and visit the home page, we'll be presented with a map. When we enter the name of a city, the map will display the upcoming Dinners near it (see Figure 1-145).
Hovering over a Dinner will display details about it (Figure 1-146).

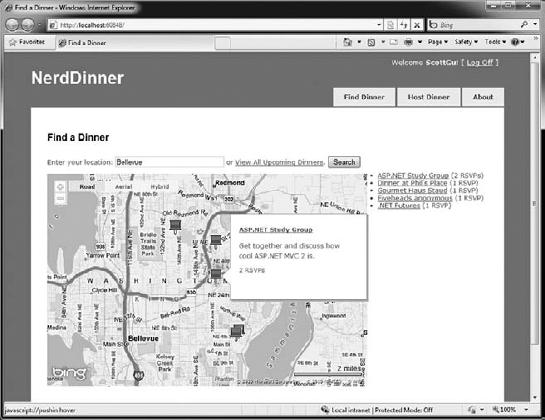
Clicking the Dinner title either in the bubble or on the right-hand side in the HTML list will navigate us to the Dinner — which we can then optionally RSVP for (Figure 1-147).

Let's develop a suite of automated unit tests that verify our NerdDinner functionality and that will give us the confidence to make changes and improvements to the application in the future.
On the drive into work one morning you have a sudden flash of inspiration about an application you are working on. You realize there is a change you can implement that will make the application dramatically better. It might be a refactoring that cleans up the code, adds a new feature, or fixes a bug.
The question that confronts you when you arrive at your computer is, "How safe is it to make this improvement?" What if making the change has side effects or breaks something? The change might be simple and only take a few minutes to implement, but what if it takes hours to manually test out all of the application scenarios? What if you forget to cover a scenario and a broken application goes into production? Is making this improvement really worth all the effort?
Automated unit tests can provide a safety net that enables you to continually enhance your applications and avoid being afraid of the code you are working on. Having automated tests that quickly verify functionality enables you to code with confidence and empowers you to make improvements you might otherwise not have felt comfortable doing. They also help create solutions that are more maintainable and have a longer lifetime — which leads to a much higher return on investment.
The ASP.NET MVC Framework makes it easy and natural to unit test application functionality. It also enables a Test Driven Development (TDD) workflow that enables test-first-based development.
When we created our NerdDinner application at the beginning of this tutorial, we were prompted with a dialog asking whether we wanted to create a unit test project to go along with the application project (Figure 1-148).
We kept the "Yes, create a unit test project" radio button selected, which resulted in a NerdDinner.Tests project being added to our solution (Figure 1-149).

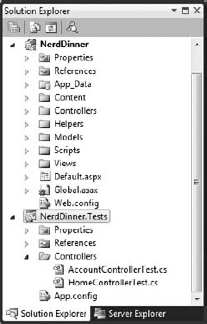
The NerdDinner.Tests project references the NerdDinner application project assembly and enables us to easily add automated tests to it that verify the application.
Let's add some tests to our NerdDinner.Tests project that verify the Dinner class we created when we built our Model layer.
We'll start by creating a new folder within our test project called Models, where we'll place our Model-related tests. We'll then right-click the folder and choose the Add
We'll choose to create a unit test and name it DinnerTest.cs (see Figure 1-150).
When we click the OK button, Visual Studio will add (and open) a DinnerTest.cs file to the project (Figure 1-151).
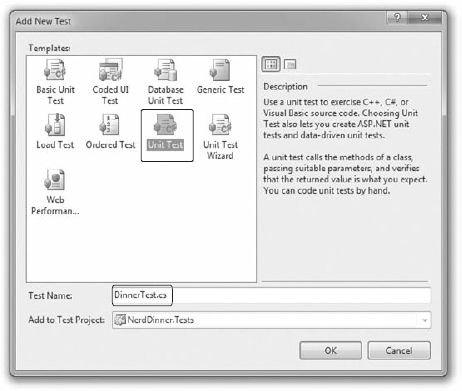

The default Visual Studio Unit Test template has a bunch of boilerplate code within it that I find a little messy. Let's clean it up to just contain the code that follows:
using System;
using System.Collections.Generic;
using System.Linq;
using Microsoft.VisualStudio.TestTools.UnitTesting;
using NerdDinner.Models;

namespace NerdDinner.Tests.Models {

    [TestClass]
    public class DinnerTest {

    }
}
Code snippet 1-105.txt
The [TestClass] attribute on the preceding DinnerTest class identifies it as a class that will contain tests, as well as optional test initialization and teardown code. We can define tests within it by adding public methods that have a [TestMethod] attribute on them.
To get warmed up, we'll start with a couple of simple tests that exercise our Dinner class. The first test verifies that the IsHostedBy method of our Dinner returns true if the value of the HostedBy property matches the supplied username. The second test verifies that the IsRegistered method of the Dinner class checks its list of RSVPs:
[TestClass]
public class DinnerTest {
    [TestMethod]
    public void IsHostedBy_Should_Return_True_When_Dinner_HostedBy_User()
    {
        // Arrange
        Dinner dinner = new Dinner
        {
            HostedBy = "ScottGu"
        };

        // Act
        bool isHostedByScott = dinner.IsHostedBy("ScottGu");

        // Assert
        Assert.IsTrue(isHostedByScott);
    }

    [TestMethod]
    public void IsUserRegistered_Should_Return_True_When_User_RSVPs() {
        // Arrange
        Dinner dinner = new Dinner();
        dinner.RSVPs.Add(new RSVP { AttendeeName = "Haacked" });

        // Act
bool haackedIsRegistered = dinner.IsUserRegistered("Haacked");
// Assert
Assert.IsTrue(haackedIsRegistered);
}
}
Code snippet 1-106.txtYou'll notice that our test names are very explicit (and somewhat verbose). We are doing this because we might end up creating hundreds or thousands of small tests, and we want to make it easy to quickly determine the intent and behavior of each of them (especially when we are looking through a list of failures in a test runner). The test names should always be named after the functionality they are testing. In the preceding code, we are using a Noun_Should_Verb naming pattern.
We are structuring the tests using the AAA testing pattern, which stands for Arrange,Act,Assert:
Arrange: Set up the unit being tested.
Act: Exercise the unit under test and capture the results.
Assert: Verify the behavior.
When we write tests, we want to avoid having the individual tests do too much. Instead, each test should verify only a single concept (which will make it much easier to pinpoint the cause of failures). A good guideline is to try to only have a single Assert statement for each test. If you have more than one Assert statement in a test method, make sure that they are all being used to test the same concept. When in doubt, make another test.
Visual Studio 2008 Professional (and higher editions) includes a built-in test runner that can be used to run Visual Studio Unit Test projects within the IDE. We can select the Test
Let's position our cursor within the DinnerTest class and press Ctrl+R, T to run the two tests we just defined. When we do this, a Test Results window will appear within Visual Studio and we'll see the results of our test run listed within it (see Figure 1-152).

Note
The VS Test Results window does not show the Class Name column by default. You can add this by right-clicking within the Test Results window and using the Add/Remove Columns menu command.
Our two tests took only a fraction of a second to run — and as you can see, they both passed. We can now go on and augment them by creating additional tests such as those that validate the negative cases where we make sure that these methods don't return true for cases that they shouldn't.
Having all these tests in place for the Dinner class will make it much easier and safer to add new business rules in the future. We can add our new rule logic to Dinner, and then within seconds verify that it hasn't broken any of our previous logic functionality.
Notice how using a descriptive test name makes it easy to quickly understand what each test is verifying. I recommend using the Tools
Let's now create some unit tests that verify our DinnersController functionality. We'll start by right-clicking the Controllers folder within our Test project and then choose the Add
We'll create two test methods that verify the Details action method on the DinnersController. The first will verify that a View is returned when an existing Dinner is requested. The second will verify that a "NotFound" View is returned when a nonexistent dinner is requested:
[TestClass]
public class DinnersControllerTest {

    [TestMethod]
    public void DetailsAction_Should_Return_View_For_ExistingDinner() {

        // Arrange
        var controller = new DinnersController();

        // Act
        var result = controller.Details(1) as ViewResult;

        // Assert
        Assert.IsNotNull(result, "Expected View");
    }

    [TestMethod]
    public void DetailsAction_Should_Return_NotFoundView_For_BogusDinner() {

        // Arrange
var controller = new DinnersController();
// Act
var result = controller.Details(999) as ViewResult;
// Assert
Assert.AreEqual("NotFound", result.ViewName);
}
}
Code snippet 1-107.txtThe previous code compiles cleanly. When we run the tests, though, they both fail, as shown in Figure 1-153.
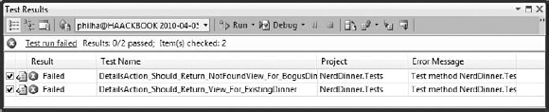
If we look at the Error Messages, we see that the reason the tests failed was because our DinnersRepository class was unable to connect to a database. Our NerdDinner application is using a connection string to a local SQL Server Express file that lives under the App_Data directory of the NerdDinner application project. Because our NerdDinner.Tests project compiles and runs in a different directory from the application project, the relative path location of our connection string is incorrect.
We could fix this by copying the SQL Express database file to our test project, and then add an appropriate test connection string to it in the App.config of our test project. This would get the preceding tests unblocked and running.
Unit testing code using a real database, though, brings with it a number of challenges. Specifically:
It significantly slows down the execution time of unit tests. The longer it takes to run tests, the less likely you are to execute them frequently. Ideally, you want your unit tests to be able to be run in seconds — and have it be something you do as naturally as compiling the project.
It complicates the setup and cleanup logic within tests. You want each unit test to be isolated and independent of others (with no side effects or dependencies). When working against a real database, you have to be mindful of state and reset it between tests.
Let's look at a design pattern called dependency injection that can help us work around these issues and avoid the need to use a real database with our tests.
Right now DinnersController is tightly coupled to the DinnerRepository class. Coupling refers to a situation in which a class explicitly relies on another class in order to work:
public class DinnersController : Controller {

    DinnerRepository dinnerRepository = new DinnerRepository();

    //
    // GET: /Dinners/Details/5

    public ActionResult Details(int id) {

        Dinner dinner = dinnerRepository.FindDinner(id);

        if (dinner == null)
            return View("NotFound");

        return View(dinner);
    }
Code snippet 1-108.txt
Because the DinnerRepository class requires access to a database, the tightly coupled dependency the DinnersController class has on the DinnerRepository ends up requiring us to have a database in order for the DinnersController action methods to be tested.
We can get around this by using a design pattern called dependency injection — which is an approach in which dependencies (like repository classes that provide data access) are no longer created within classes that use them. Instead, dependencies can be passed to the class that uses them, using constructor arguments. If the dependencies are defined using interfaces, we then have the flexibility to pass in fake dependency implementations for unit test scenarios. This enables us to create test-specific dependency implementations that do not actually require access to a database.
To see this in action, let's implement dependency injection with our DinnersController.
Our first step will be to create a new IDinnerRepository interface that encapsulates the repository contract our Controllers require to retrieve and update dinners.
We can define this interface contract manually by right-clicking the Models folder and then choosing the Add
Alternatively, we can use the refactoring tools built into Visual Studio Professional (and higher editions) to automatically extract and create an interface for us from our existing DinnerRepository class. To extract this interface using VS, simply position the cursor in the text editor on the DinnerRepository class, and then right-click and choose the Refactor

This will launch the "Extract Interface" dialog and prompt us for the name of the interface to create. It will default to IDinnerRepository and automatically select all public members on the existing DinnerRepository class to add to the interface (Figure 1-155).

When we click the OK button, Visual Studio will add a new IDinnerRepository interface to our application:
public interface IDinnerRepository {

    IQueryable<Dinner> FindAllDinners();
    IQueryable<Dinner> FindByLocation(float latitude, float longitude);
IQueryable<Dinner> FindUpcomingDinners();
Dinner GetDinner(int id);
void Add(Dinner dinner);
void Delete(Dinner dinner);
void Save();
}
Code snippet 1-109.txtAnd our existing DinnerRepository class will be updated so that it implements the interface:
public class DinnerRepository : IDinnerRepository {
   ...
}
Code snippet 1-110.txtWe'll now update the DinnersController class to use the new interface.
Currently DinnersController is hard-coded such that its dinnerRepository field is always a DinnerRepository instance:
public class DinnersController : Controller {

    DinnerRepository dinnerRepository = new DinnerRepository();

    ...
}
Code snippet 1-111.txt
We'll change it so that the dinnerRepository field is of type IDinnerRepository instead of DinnerRepository. We'll then add two public DinnersController constructors. One of the constructors allows an IDinnerRepository to be passed as an argument. The other is a default constructor that uses our existing DinnerRepository implementation:
public class DinnersController : Controller {

    IDinnerRepository dinnerRepository;

    public DinnersController()
        : this(new DinnerRepository()) {
    }

    public DinnersController(IDinnerRepository repository) {
        dinnerRepository = repository;
    }
    ...
}
Code snippet 1-112.txt
Because ASP.NET MVC, by default, creates Controller classes using default constructors, our DinnersController at run time will continue to use the DinnerRepository class to perform data access.
We can now update our unit tests, though, to pass in a fake dinner repository implementation using the parameter constructor. This fake dinner repository will not require access to a real database and, instead, will use in-memory sample data.
Let's create a FakeDinnerRepository class.
We'll begin by creating a Fakes directory within our NerdDinner.Tests project and then add a new FakeDinnerRepository class to it (right-click the folder and choose Add
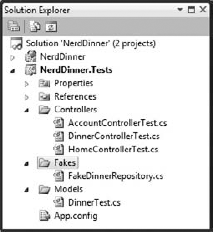
We'll update the code so that the FakeDinnerRepository class implements the IDinnerRepository interface. To do so, we can right-click on the interface and choose the Implement interface context menu command or we can place our mouse over the interface and implement the interface via the smart tag (see Figure 1-157).

This will cause Visual Studio to automatically add all of the IDinnerRepository interface members to our FakeDinnerRepository class with default stub out implementations:
public class FakeDinnerRepository : IDinnerRepository {

    public IQueryable<Dinner> FindAllDinners() {
        throw new NotImplementedException();
    }

    public IQueryable<Dinner> FindByLocation(float lat, float long){
throw new NotImplementedException();
}
public IQueryable<Dinner> FindUpcomingDinners() {
throw new NotImplementedException();
}
public Dinner GetDinner(int id) {
throw new NotImplementedException();
}
public void Add(Dinner dinner) {
throw new NotImplementedException();
}
public void Delete(Dinner dinner) {
throw new NotImplementedException();
}
public void Save() {
throw new NotImplementedException();
}
}
Code snippet 1-113.txtWe can then update the FakeDinnerRepository implementation to work off of an in-memory List<Dinner> collection passed to it as a constructor argument:
public class FakeDinnerRepository : IDinnerRepository {

    private List<Dinner> dinnerList;

    public FakeDinnerRepository(List<Dinner> dinners) {
        dinnerList = dinners;
    }

    public IQueryable<Dinner> FindAllDinners() {
        return dinnerList.AsQueryable();
    }

    public IQueryable<Dinner> FindUpcomingDinners() {
        return (from dinner in dinnerList
                where dinner.EventDate > DateTime.Now
                select dinner).AsQueryable();
    }

    public IQueryable<Dinner> FindByLocation(float latitude
      , float longitude) {
        return (from dinner in dinnerList
                where dinner.Latitude == lat && dinner.Longitude == lon
                select dinner).AsQueryable();
    }

    public Dinner GetDinner(int id) {
return dinnerList.SingleOrDefault(d => d.DinnerID == id);
}
public void Add(Dinner dinner) {
dinnerList.Add(dinner);
}
public void Delete(Dinner dinner) {
dinnerList.Remove(dinner);
}
public void Save() {
}
}
Code snippet 1-114.txtWe now have a fake IDinnerRepository implementation that does not require a database and can instead work off an in-memory list of Dinner objects.
Let's return to the DinnersController unit tests that failed earlier because the database wasn't available. We can update the test methods to use a FakeDinnerRepository populated with sample in-memory dinner data to the DinnersController using the code that follows:
[TestClass]
public class DinnersControllerTest {

    List<Dinner> CreateTestDinners() {

        List<Dinner> dinners = new List<Dinner>();

        for (int i = 0; i < 101; i++) {

            Dinner sampleDinner = new Dinner() {
                DinnerID = i,
                Title = "Sample Dinner",
                HostedBy = "SomeUser",
                Address = "Some Address",
                Country = "USA",
                ContactPhone = "425-555-1212",
                Description = "Some description",
                EventDate = DateTime.Now.AddDays(i),
                Latitude = 99,
                Longitude = −99
            };
            dinners.Add(sampleDinner);
        }
        return dinners;
}
DinnersController CreateDinnersController() {
var repository = new FakeDinnerRepository(CreateTestDinners());
return new DinnersController(repository);
}
[TestMethod]
public void DetailsAction_Should_Return_View_For_Dinner() {
// Arrange
var controller = CreateDinnersController();
// Act
var result = controller.Details(1);
// Assert
Assert.IsInstanceOfType(result, typeof(ViewResult));
}
[TestMethod]
public void DetailsAction_Should_Return_NotFoundView_For_BogusDinner() {
// Arrange
var controller = CreateDinnersController();
// Act
var result = controller.Details(999) as ViewResult;
// Assert
Assert.AreEqual("NotFound", result.ViewName);
}
}
Code snippet 1-115.txtNow when we run these tests, they both pass (see Figure 1-158).

Best of all, they take only a fraction of a second to run and do not require any complicated setup/cleanup logic. We can now unit test all of our DinnersController action method code (including listing, paging, details, create, update, and delete) without ever needing to connect to a real database.
Let's now create some unit tests that verify the Edit functionality of the DinnersController. We'll start by testing the HTTP-GET version of our Edit action:
//
// GET: /Dinners/Edit/5

[Authorize]
public ActionResult Edit(int id) {

    Dinner dinner = dinnerRepository.GetDinner(id);

    if (!dinner.IsHostedBy(User.Identity.Name))
        return View("InvalidOwner");

    return View(new DinnerFormViewModel(dinner));
}
Code snippet 1-116.txt
We'll create a test that verifies that a View backed by a DinnerFormViewModel object is rendered back when a valid dinner is requested:
[TestMethod]
public void EditAction_Should_Return_View_For_ValidDinner() {

    // Arrange
    var controller = CreateDinnersController();

    // Act
    var result = controller.Edit(1) as ViewResult;

    // Assert
    Assert.IsInstanceOfType(result.ViewData.Model,
                            typeof(DinnerFormViewModel));
}
Code snippet 1-117.txt
When we run the test, though, we'll find that it fails because a null reference exception is thrown when the Edit method accesses the User.Identity.Name property to perform the Dinner.IsHostedBy check.
The User object on the Controller base class encapsulates details about the logged-in user and is populated by ASP.NET MVC when it creates the Controller at run time. Because we are testing the DinnersController outside of a web-server environment, the User object isn't set (hence the null reference exception).
Mocking frameworks make testing easier by enabling us to dynamically create fake versions of dependent objects that support our tests. For example, we can use a mocking framework in our Edit action test to dynamically create a User object that our DinnersController can use to look up a simulated username. This will prevent a null reference from being thrown when we run our test.
There are many .NET mocking frameworks that can be used with ASP.NET MVC (you can see a list of them at www.mockframeworks.com/). For testing our NerdDinner application, we'll use an open source mocking framework called Moq, which can be downloaded for free from http://code.google.com/p/moq/. The samples in this book assume Moq version 4.0.423.5.
Once it is downloaded, we'll add a reference in our NerdDinner.Tests project to the Moq.dll assembly (see Figure 1-159).
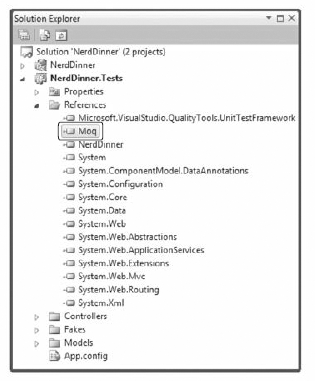
We'll then add an overloaded CreateDinnersControllerAs(username) helper method to the test class, which takes a username as a parameter and then mocks the User.Identity.Name property on the DinnersController instance:
DinnersController CreateDinnersControllerAs(string userName) {

    var mock = new Mock<ControllerContext>();
    mock.SetupGet(p => p.HttpContext.User.Identity.Name).Returns(userName);
    mock.SetupGet(p => p.HttpContext.Request.IsAuthenticated).Returns(true);

    var controller = CreateDinnersController();
    controller.ControllerContext = mock.Object;

    return controller;
}
Code snippet 1-118.txt
In this, we are using Moq to create a Mock object that fakes a ControllerContext object (which is what ASP.NET MVC passes to Controller classes to expose runtime objects like User, Request, Response, and Session). We are calling the SetupGet method on the Mock to indicate that the HttpContext.User.Identity.Name property on ControllerContext should return the username string we passed to the helper method.
We can mock any number of ControllerContext properties and methods. To illustrate this, I've also added a SetupGet call for the Request.IsAuthenticated property (which isn't actually needed for the tests below but helps illustrate how you can mock Request properties). When we are done, we assign an instance of the ControllerContext mock to the DinnersController our helper method returns.
We can now write unit tests that use this helper method to test Edit scenarios involving different users:
[TestMethod]
public void EditAction_Should_Return_EditView_When_ValidOwner() {

    // Arrange
    var controller = CreateDinnersControllerAs("SomeUser");

    // Act
    var result = controller.Edit(1) as ViewResult;

    // Assert
    Assert.IsInstanceOfType(result.ViewData.Model,
                            typeof(DinnerFormViewModel));
}

[TestMethod]
public void EditAction_Should_Return_InvalidOwnerView_When_InvalidOwner() {

    // Arrange
    var controller = CreateDinnersControllerAs("NotOwnerUser");

    // Act
var result = controller.Edit(1) as ViewResult;
// Assert
Assert.AreEqual(result.ViewName, "InvalidOwner");
}
Code snippet 1-119.txtNow when we run the tests, they pass (see Figure 1-160).

We've created tests that cover the HTTP-GET version of the Edit action. Let's now create some tests that verify the HTTP-POST version of the Edit action:
//
// POST: /Dinners/Edit/5

[HttpPost, Authorize]
public ActionResult Edit (int id, FormCollection collection) {
    Dinner dinner = dinnerRepository.GetDinner(id);

    if (!dinner.IsHostedBy(User.Identity.Name))
        return View("InvalidOwner");

    if(TryUpdateModel(dinner)) {
        dinnerRepository.Save();

        return RedirectToAction("Details", new { id=dinner.DinnerID });
    }
    return View(new DinnerFormViewModel(dinner));
}
Code snippet 1-120.txt
The interesting new testing scenario for us to support with this action method is its usage of the UpdateModel helper method on the Controller base class. We are using this helper method to bind form-post values to our Dinner object instance.
The following code has two tests that demonstrate how we can supply form-posted values for the UpdateModel helper method to use. We'll do this by creating and populating a FormCollection object, and then assign it to the ValueProvider property on the Controller.
The first test verifies that upon a successful save, the browser is redirected to the Details action. The second test verifies that when invalid input is posted, the action redisplays the Edit view again with an error message.
public void EditAction_Should_Redirect_When_Update_Successful() {

    // Arrange
    var controller = CreateDinnersControllerAs("SomeUser");

    var formValues = new FormCollection() {
        { "Title", "Another value" },
        { "Description", "Another description" }
    };

    controller.ValueProvider = formValues;

    // Act
    var result = controller.Edit(1, formValues) as RedirectToRouteResult;

    // Assert
    Assert.AreEqual("Details", result.RouteValues["Action"]);
}


[TestMethod]
public void EditAction_Should_Redisplay_With_Errors_When_Update_Fails() {

    // Arrange
    var controller = CreateDinnersControllerAs("SomeUser");

    var formValues = new FormCollection() {
        { "EventDate", "Bogus date value!!!"}
    };

    controller.ValueProvider = formValues;

    // Act
    var result = controller.Edit(1, formValues) as ViewResult;

    // Assert
    Assert.IsNotNull(result, "Expected redisplay of view");
    Assert.IsTrue(result.ViewData.ModelState.Count > 0, "Expected errors");
}
Code snippet 1-121.txtWe've covered the core concepts involved in unit testing Controller classes. We can use these techniques to easily create hundreds of simple tests that verify the behavior of our application.
Because our Controller and Model tests do not require a real database, they are extremely fast and easy to run. We'll be able to execute hundreds of automated tests in seconds, and immediately get feedback as to whether a change we made broke something. This will help provide us the confidence to continually improve, refactor, and refine our application.
We covered testing as the last topic in this chapter — but not because testing is something you should do at the end of a development process! On the contrary, you should write automated tests as early as possible in your development process. Doing so enables you to get immediate feedback as you develop, helps you think thoughtfully about your application's use case scenarios, and guides you to design your application with clean layering and coupling in mind.
A later chapter in this book will discuss Test Driven Development (TDD) and how to use it with ASP.NET MVC. TDD is an iterative coding practice wherein you first write the tests that your resulting code will satisfy. With TDD you begin each feature by creating a test that verifies the functionality you are about to implement. Writing the unit test first helps ensure that you clearly understand the feature and how it is supposed to work. Only after the test is written (and you have verified that it fails) do you then implement the actual functionality the test verifies. Because you've already spent time thinking about the use case of how the feature is supposed to work, you will have a better understanding of the requirements and how best to implement them. When you are done with the implementation, you can re-run the test and get immediate feedback as to whether the feature works correctly. We'll cover TDD more in Chapter 10.
Our initial version of our NerdDinner application is now complete and ready to deploy on the Web (Figure 1-161).
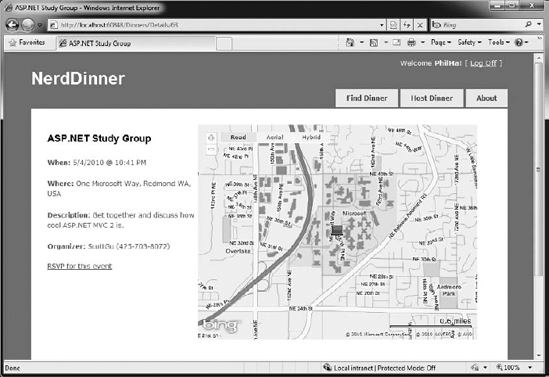
We used a broad set of ASP.NET MVC features to build NerdDinner. I hope that the process of developing it shed some light on how the core ASP.NET MVC features work and provided context on how these features integrate within an application.
The following chapters will go into more depth on ASP.NET MVC and discuss its features in detail.