
ASP.NET MVC 2 builds on ASP.NET MVC 1.0, introducing productivity-oriented enhancements and features throughout the Framework. Although we've touched on them throughout the book, this chapter will summarize them for those of you who have used ASP.NET MVC 1.0 and want a recap on what's changed.
There's a white paper on the ASP.NET website that overviews the changes (www.asp.net/learn/whitepapers/what-is-new-in-aspnet-mvc/). We're going to focus on some of the standout features you'll really want to know about.
ASP.NET MVC 2 has several enhancements which help you to write secure web applications. We've talked about them in Chapter 9, but look at two in a bit more detail here: HTML Encoding Code Blocks and JsonResult.
HTML Encoding Code Blocks are actually a feature of ASP.NET 4, but they're so useful in ASP.NET MVC 2 that it's worth calling them out. This syntax is shorthand for Html.Encode (well, actually the HttpUtility.Encode that powers Html.Encode).
Instead of this:
<%= Html.Encode(Model.PotentialEvil) %>
Code snippet 13-1.txt
You can now type this:
<%: Model.PotentialEvil %>
Code snippet 13-2.txt
We hope that we convinced you of the importance of always HTML-encoding any external data you display during the discussion on XSS in Chapter 9. With this new HTML Encoding Code Block syntax, there's just no excuse for writing out un-encoded content — it doesn't require a single additional character of code!
There are cases in which you want to output text that contains HTML or has already been encoded. In those cases, you don't want to encode the string again, which would result in double-encoding. In order to allow you to always use the <%:%> syntax, ASP.NET 4 introduces an IHtmlString, which the Framework will view as already encoded.
There are two concrete implementations of IHtmlString that you should be aware of. ASP.NET 4 includes HtmlString, which can be easily created via its public constructor:
<%: new HtmlString("<acronym title="Model View Controller">MVC</acronym>") %>
Code snippet 13-3.txt
Additionally, ASP.NET MVC 2 includes a concrete implementation, MvcHtmlString. This is used by HTML Helper methods and works with the <%:%> syntax under ASP.NET 4 but is backward-compatible under ASP.NET 3.5.You can use the static MvcHtmlString.Create method to create a new MvcHtmlString that should not be encoded:
<%: MvcHtmlString.Create("<h1>Hello!</h1>") %>So when should you use MvcHtmlString versus HtmlString? Well, if you're working on an ASP.NET MVC 2 site that only runs under ASP.NET 4, you can use either. If you are writing helpers or any kind of library code that may be used under ASP.NET 3.5, you should use MvcHtmlString because it is backward-compatible.
By default, JsonResult only responds to an HTTP-POST request to guard against a vulnerability. This can allow sensitive data sent via JSON to be exposed. This vulnerability requires that you are exposing a JSON service which:
In this case, an attacker can use malicious JavaScript to redefine the Object setter method before your service is called, which would allow them to call arbitrary JavaScript when the JSON data is rehydrated into JavaScript objects:
<html>
...
<body>
    <script type="text/javascript">
        Object.prototype.__defineSetter__('Id', function(obj){alert(obj);});
    </script>
    <script src="http://example.com/Home/AdminBalances"></script>
</body>
</html>
Code snippet 13-4.txt
Thus, if you never send sensitive data in JSON format or you only send JSON in response to a POST request, or the like, then your site is probably not vulnerable to this particular vulnerability (although there could be others).
While you could guard against this in ASP.NET MVC 1.0 using the [AcceptVerbs(HttpVerbs.Post)] to prevent GET access to your JSON services, it required action on your part. In ASP.NET MVC 2, this is taken care of for you — services that return a JsonResult will only respond to an HTTP-POST request.
If you need to support GET requests for JSON data that will not contain sensitive information, you can bypass this security measure using an overload for the Json() controller utility method, as shown below.
public ActionResult Index()
{
    var data = new {
        timestamp = DateTime.Now,
        message = "Hello!"
    };

    return Json(data, JsonRequestBehavior.AllowGet);
}
Code snippet 13-5.txtASP.NET MVC 2 has several new features that allow you to increase your productivity. Strongly typed HTML Helpers eliminate strings from your View code, allowing you to perform type checking, refactoring and to use IntelliSense. Templated Helpers give you the flexibility of defining HTML for both edit and display of a specific data type. The new Validation system in ASP.NET MVC 2 allows you avoid hand-written, imperative validation logic with simple, declarative attributes, implement client side validation, and organize your large projects with Areas.
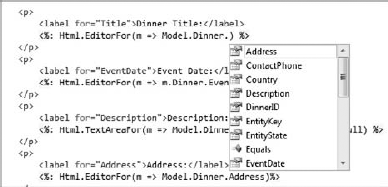
ASP.NET MVC 2 includes overrides for many HTML Helpers that allow you to specify bindings using expressions rather than strings. For example, you can replace <%: Html.TextBox("PropertyName") %> with <%: Html.TextBoxFor(m => m.PropertyName) %>. This gives you a lot of benefits, including type checking, IntelliSense, and easier refactoring. See Figure 13-1.
The templates that create a new view use these strongly typed HTML helpers, too. For example, here's an Edit form for our NerdDinner model using the Create template:
<% using (Html.BeginForm()) {%>
  <%: Html.ValidationSummary(true) %>

  <fieldset>
    <legend>Fields</legend>

    <div class="editor-label">
      <%: Html.LabelFor(model => model.Title) %>
    </div>
    <div class="editor-field">
      <%: Html.TextBoxFor(model => model.Title) %>
      <%: Html.ValidationMessageFor(model => model.Title) %>
    </div>

    <div class="editor-label">
      <%: Html.LabelFor(model => model.EventDate) %>
    </div>
    <div class="editor-field">
      <%: Html.TextBoxFor(model => model.EventDate) %>
      <%: Html.ValidationMessageFor(model => model.EventDate) %>
    </div>

    <div class="editor-label">
      <%: Html.LabelFor(model => model.Description) %>
</div>
<div class="editor-field">
<%: Html.TextBoxFor(model => model.Description) %>
<%: Html.ValidationMessageFor(model => model.Description) %>
</div>
<!- other fields removed for brevity ->
<p>
<input type="submit" value="Create" />
</p>
</fieldset>
<% } %>
Code snippet 13-6.txtFor more information on Strongly Typed HTML Helpers, see the "Using the HTML Helpers" section in Chapter 6.
Templated Helpers allow you to define the HTML that is shown for both edit and display of a specific data type. You can use them with both system data types (such as System.DateTime values) as well as your own data types (such as a User or Order class) that you've defined, which gives you a huge amount of flexibility.
Templated Helpers are displayed using the Html.DisplayFor and Html.EditorFor helper methods. ASP.NET MVC 2 includes default display and edit templates for many common data types, as shown in Table 13-1.
Table 13.1. ASP.NET MVC 2 Default Templates
DEFAULT DISPLAY TEMPLATES | DEFAULT EDIT TEMPLATES |
|---|---|
EmailAddress | HiddenInput |
HiddenInput | MultilineText |
Html | password |
String | String |
Url | Collection |
Collection | Boolean |
Boolean | Decimal |
Decimal | String |
String | Object |
Object |
ASP.NET MVC 2 uses a convention-driven system to allow you to substitute your own template files for any type, including the ones in Table 13-1. Here are the conventions you need to adhere to:
You can use either an ASPX or ASCX file with the same name as your data type. For example, a display template for the Enumeration type would either be named Enumeration.aspx or Enumeration.ascx.
Display templates must be inside a folder named DisplayTemplates, and Editor templates must be inside a folder named EditorTemplates.
Your template folder needs to be in the standard search path for the Web Forms View Engine.
This is pretty simple given an example. Again assuming that you are overriding the Enumeration display template and you decide to use an ASPX extension, your file could use any of the following:
~/Areas/AreaName/Views/ControllerName/DisplayTemplates/Enumeration.aspx
~/Areas/AreaName/Views/Shared/DisplayTemplates/Enumeration.aspx
~/Views/ControllerName/DisplayTemplates/Enumeration.aspx
~/Views/Shared/DisplayTemplates/Enumeration.aspx
The astute reader may have noticed that the default templates include some "data types" that don't exist, such as EmailAddress, HiddenInput, and MultilineText. You can specify these using the DataType attribute, and you can map properties to a specific template by name using the UIHint attribute.
[DataType(DataType.EmailAddress)]
public string CustomerEmail { get; set; }

[UIHint("SpecialEmailAddressTemplate")]
public string SpecialEmail { get; set; }For this example, you'll create a custom editor template that will be shown for all DateTime edit fields in an application. You'll use the standard jQuery UI Datepicker plug-in, and you'll do it with as little code as possible. Follow these steps:
Note
We're just doing a Datepicker for this example to keep things simple, because there's a great jQueryUI plug-in for it. For a more complex sample that uses a DateTime picker, you can see the live NerdDinner source at http://nerddinner.codeplex.com.
Download the jQueryUI
Datepickercontrol. There are a variety of ways to reference this plug-in, such as using the Google CDN or building a custom jQueryUI download athttp://jqueryui.com/download. If you just want the scripts without the accompanying theme files, you can get them fromhttp://jquery-ui.googlecode.com/svn/trunk/ui/. You'll need the following dependencies:jquery.ui.datepicker.js
jquery.ui.core.js
A theme, available for download from
http://jqueryui.com/themeroller/
Copy these files into your ~/Scripts directory, as shown in Figure 13-2, and add a reference to them in your Site.Master.
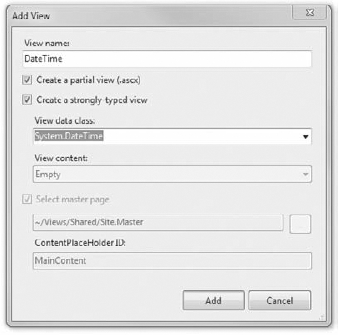
Create the ~/Views/Shared/ EditorTemplates directory if it doesn't exist.
Right-click the EditorTemplates directory and select "Add View." In the "Add View" dialog (Figure 13-3), add a partial view named DateTime that's strongly typed to
System.DateTime.The created view just has one line of code that declares the control. Add the following code:
<<%@ Control Language="C#"
    Inherits="System.Web.Mvc.ViewUserControl<System.DateTime>" %>
<%: Html.TextBox("",
    ViewData.TemplateInfo.FormattedModelValue,
    new { @class = "text-box single-line" }) %>
<script type="text/javascript">
    $(function () {
        $('#<%: ViewData.TemplateInfo.GetFullHtmlFieldId("") %>')
        .datepicker();
    });
</script>
Code snippet 13-7.txt

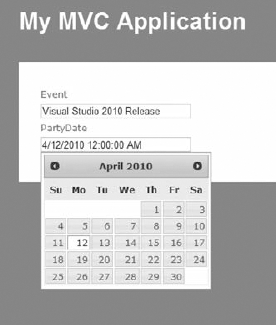
That's it! Now any DateTime edit fields in our site will show a calendar pop-up. To see this in action, you can create a Controller action that returns a model, which includes a System.DateTime property.
public ActionResult DateEntry()
{
    var party = new Party
    {
        Event = "Visual Studio 2010 Release",
        PartyDate = new DateTime(2010, 04, 12)
    };
    return View(party);
}
Code snippet 13-8.txt
Then you can create a strongly typed view of type System.DateTime and add a call to EditorForModel in the generated view.
<%@ Page Title="" Language="C#" MasterPageFile="~/Views/Shared/Site.Master"
    Inherits="System.Web.Mvc.ViewPage<Planners.Models.Party>" %>
<asp:Content ID="Content1" ContentPlaceHolderID="TitleContent" runat="server">
</asp:Content>

<asp:Content ID="Content2" ContentPlaceHolderID="MainContent" runat="server">
    <%: Html.EditorForModel()%>
</asp:Content>
Code snippet 13-9.txt
When this page is displayed and you click the textbox, you should see a Calendar pop-up. See Figure 13-4.
Model Validation is one of the biggest productivity boosters in ASP.NET MVC 2. It replaces tons of hand-written, imperative validation logic with simple, declarative attributes.
Model Validation takes advantage of DataAnnotations, from the System.ComponentModel namespace. You can take advantage of the DataAnnotation attributes in Table 13-2.
Table 13.2. DataAnnotation Attributes used in Model Validation
NAME | USE |
|---|---|
| Verifies that a property value is not null |
| Verifies that a string property's length is does not exceed the maximum length |
| Verifies that a property value for a numeric field is no less than the minimum value and no greater than the maximum value |
| Verifies that a property value matches the specified regular expression |
Let's look at how this simplifies validation for the NerdDinner Dinners model. In the ASP.NET MVC 1.0 version, you had custom code that was called from the model's IsValid method.
if (String.IsNullOrEmpty(Title))
    yield return new RuleViolation("Title required","Title");

if (String.IsNullOrEmpty(Description))
    yield return new RuleViolation("Description required","Description");

if (String.IsNullOrEmpty(HostedBy))
    yield return new RuleViolation("HostedBy required", "HostedBy");

//etc.
Code snippet 13-10.txt
This code is completely repetitive and serves no purpose other than to specify that certain fields are required and the error messages to display if they fail validation. You can replace all of that code by just putting the RequiredAttribute on those properties in our model.
[Required(ErrorMessage = "Title is required")]
public string Title { get; set; }

[Required(ErrorMessage = "Description is required")]
public string Description { get; set; }

[Required(ErrorMessage = "HostedBy required")]
public string HostedBy { get; set; }
Code snippet 13-11.txt
You've replaced six lines of custom validation logic with three attributes, without losing anything (and as you'll see later, you've gained some new functionality).
One of the great features of Model Validation is that it makes it incredibly easy to add client-side validation. How easy? One line of code. Add a call to Html.EnableClientValidation above your form, like this:
<%: Html.ValidationSummary() %>
<% Html.EnableClientValidation(); %>

<% using (Html.BeginForm()) { %>
Code snippet 13-12.txt
That's it. Now you get client-side validation that enforces whatever rules you've set on your Model via Data Annotations.
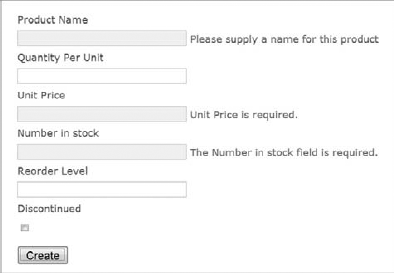
For example, let's create a simple model with some Data Annotations:
public class Product {
[Required(ErrorMessage = "Please supply a name")]
[RegularExpression(@"[A-za-zs]+", "Product name must be alphabetic")]
[DisplayName("Product Name")]
public string ProductName { get; set; }
[Required(ErrorMessage = "Please supply a name")]
[DisplayName("Unit Price")]
[Range(1.00, 1000.00)]
public decimal UnitPrice { get; set; }
[Required]
[DisplayName("Number in stock")]
[Range(0, int.MaxValue)]
public int UnitsInStock { get; set; }
public bool Discontinued { get; set; }
}
Code snippet 13-13.txtNow you'll create an Edit form, enable the client validation, run the application, and click submit. See Figure 13-5.
All the validation is sent to the client when the page is requested, so there are no additional calls back to the server to validate that the code meets the requirements set via Data Annotations.
The client-side validation is completely extensible. The content sent to the client includes all the validation rules. Here's what you'd see for a very simple Registration page:
</form><script type="text/javascript">
//<![CDATA[
if (!window.mvcClientValidationMetadata)
{ window.mvcClientValidationMetadata = []; }
window.mvcClientValidationMetadata.push(
{"Fields":[
{"FieldName":"username","ReplaceValidationMessageContents":true,
"ValidationMessageId":"username_validationMessage","ValidationRules":[]},
{"FieldName":"email","ReplaceValidationMessageContents":true,
"ValidationMessageId":"email_validationMessage","ValidationRules":[]},
{"FieldName":"password","ReplaceValidationMessageContents":true,
"ValidationMessageId":"password_validationMessage","ValidationRules":[]},
{"FieldName":"confirmPassword","ReplaceValidationMessageContents":true,
"ValidationMessageId":"confirmPassword_validationMessage",
"ValidationRules":[]}],
"FormId":"form0","ReplaceValidationSummary":false});
//]]>
</script>
Code snippet 13-14.txtThis means that you're free to replace the client-side validation code with whatever logic you'd like.
In addition to defining your Model Validation rules using Annotations, you can make use of some additional annotations to define how your model properties are displayed and edited. These Attributes are described in Table 13-3.
Table 13.3. Attributes use in Templates
ASP.NET MVC 2 introduces two powerful new HTML Helper methods, Action and RenderAction. These helpers are similar to Partial and RenderPartial, but are a lot more flexible. While Partial allows you some organization and reuse benefits, it's constraining since it only executes within the context of the parent View.
Action and RenderAction, on the other hand, execute a separate Controller action method and display the results inline. They have no dependency on the containing View for model data or other controller context, which opens up a lot of new scenarios that were previously impossible or impractical with Partial and RenderPartial.
See our discussion of Action and RenderAction in Chapter 6 for more information.
One cool new feature of VS10 is that snippets now work in the HTML editor. A list of snippets, with the code they generate for you, is shown in Table 13-4.
Table 13.4. Code Snippets in Views
NAME | SHORTCUT | GENERATED CODE |
|---|---|---|
|
| |
|
|
|
|
|
|
|
|
|
|
|
|
|
|
|
|
|
|
|
|
|
|
|
|
|
|
|
|
|
|
|
|
|
|
|
|
|
|
|
|
|
|
Areas let you organize a large project into multiple smaller sections in order to manage the complexity of a large web application. Each section (area) typically represents a separate section of a large website and is used to group related sets of Controllers and Views.
To create a new area, do the following:
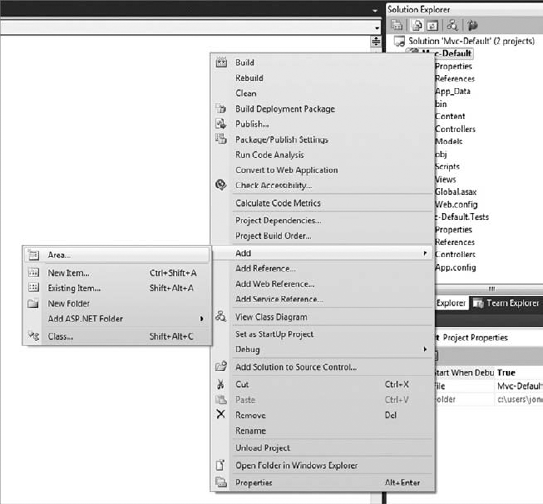
In Solution Explorer, right-click the project, click Add, and then click Area, as shown in Figure 13-6.
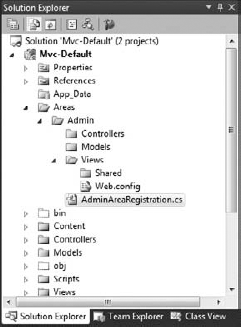
This displays a dialog box that prompts you for the area name. After you enter the area name, Visual Studio adds a new area to the project. Add a new area to our site called Admin. See Figure 13-7.
This includes a new file called AdminAreaRegistration.cs (since our area was named Admin).
using System.Web.Mvc;

namespace Mvc_Default.Areas.Admin
{
    public class AdminAreaRegistration : AreaRegistration
    {
        public override string AreaName
        {
            get
            {
                return "Admin";
            }
        }

        public override void RegisterArea(AreaRegistrationContext context)
        {
            context.MapRoute(
                "Admin_default",
                "Admin/{controller}/{action}/{id}",
                new { action = "Index", id = UrlParameter.Optional }
            );
        }
    }
}
Code snippet 13-15.txt
You can use the AreaRegistration class for your area to register any area-specific routes.
The new AsyncController class provides support for asynchronous action methods. Asynchronous action methods allow you to make long-running calls from within your Controller actions without tying up a thread. A common use case for asynchronous action methods is to make calls to a long-running, external web service.
For more information on using the AsyncController class, see our discussion in Chapter 5.
The following is a list of miscellaneous changes that are new in ASP.NET MVC 2:
Overriding the HTTP Method Verb: You can override the HTTP verb for form submissions by using the
HttpMethodOverrideHelper. This is covered in detail in Chapter 5 in the section "Simulating RESTful Verbs."Optional and Default Parameter Values: ASP.NET MVC 2 allows you to specify optional and default parameter values. See the discussion in Chapter 5 for more information.
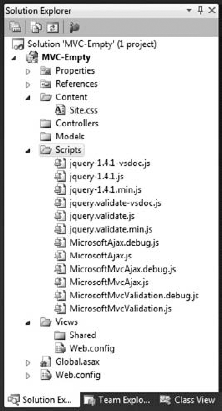
Empty Project Template: When you create a new ASP.NET MVC 2 application, you now have the option of creating an ASP.NET MVC 2 Empty Web Application. This project template creates a bare bones MVC 2 application, with just the folder structure, Global.asax, Scripts, and Site.css (see Figure 13-8). While the standard MVC 2 Application project template can help you get going on a new site, the Empty template is great when you know you're not going to be using features like the Account Controller, built in styles, etc.
New Visual Studio Code Snippets: ASP.NET MVC 2 includes 19 new code snippets, including the Code Snippets in Views we discussed earlier in this chapter. To view the list, in the Tools menu, select "Code Snippets Manager" (see Figure 13-9). For the language, select HTML, and for location, select ASP.NET MVC 2.

ASP.NET MVC 2 adds to the Framework established in ASP.NET MVC 1.0, adding the kind of productivity features that make it...well, just plain fun to use. ASP.NET MVC 1.0 was exciting and enjoyable, but just a bit more work than it needed to be, and ASP.NET MVC 2 more than addresses that. We hope that you'll agree that ASP.NET 2 is so easy to work with that it just might be more fun. Don't worry — we won't tell your boss.