
A user's first impression of your application starts with the View. While your Models may well be elegantly designed, and your Controllers may be well factored and streamlined, none of that is visible to the end users. Their entire interaction with your application starts with the View. The View is effectively your application's ambassador to the user — representing your application to the user and providing the basis on which the application is first judged.
Obviously, if the rest of your application is buggy, then no amount of spit and polish on the View will make up for the application's deficiencies. However, build an ugly and hard-to-use View, and many users will not give your application the time to prove just how feature-rich and bug-free it may well be.
In this chapter, we won't show you how to make a pretty View, as our own aesthetic skills may be called into question. Instead, we will demonstrate how Views work in ASP.NET MVC and what their responsibilities are, and provide you with the tools to build Views that your application will be proud to wear.
The View is responsible for providing the user interface (UI) to the user. It is given a reference to the Model, and it transforms that Model into a format ready to be presented to the user. In ASP.NET MVC, this consists of examining the ViewDataDictionary handed off to it by the Controller (accessed via the ViewData property) and transforming that to HTML.
In the strongly typed View case, which is covered in more depth later, the ViewDataDictionary has a strongly typed Model object that the View renders. This Model might represent the actual domain object, such as a Product instance, or it might be a presentation Model object specific to the View, such as a ProductEditViewData instance.
Let's take a quick look at an example of a View. The following code sample shows the Index View within the default ASP.NET MVC project template reformatted to fit the format of this book:
<%@ Page Language="C#" MasterPageFile="~/Views/Shared/Site.Master"
  Inherits="System.Web.Mvc.ViewPage" %>

<asp:Content ID="indexTitle" ContentPlaceHolderID="TitleContent" runat="server">
Home Page
</asp:Content>

<asp:Content ID="indexContent" ContentPlaceHolderID="MainContent" runat="server">
    <h2><%: ViewData["Message"] %></h2>
    <p>
          To learn more about ASP.NET MVC visit <a href="http://asp.net/mvc"
   title="ASP.NET MVC Website">http://asp.net/mvc</a>.
   </p>
</asp:Content>
Code snippet 6-1.txt
This is an extremely simple example of a View, but it's useful for pointing out some of the key details of Views in ASP.NET MVC. One of the first things you'll notice is that, on the surface, it looks just like a Web Form. ASP.NET MVC allows you to swap out different View engines, but the default View engine is a WebFormsViewEngine.
Technically, this is not a Web Form because it doesn't include the <form runat="server"> tag; it's really just an ASP.NET Page. Views in ASP.NET MVC derive from a common base class, System.Web.Mvc.ViewPage, which itself derives from System.Web.UI.Page. Strongly typed Views derive from the generic ViewPage<T>.
If you really wanted to, you could add the <form runat="server"> tag to the View and start dropping server controls into the View. In general, we recommend against this, as many server controls violate the MVC pattern because they encapsulate the Controller behavior and View in a single control — not to mention that MVC doesn't support View State and PostBacks. However, there are some "View-only" server controls that require the server form tag. Using these would be entirely appropriate.
Another thing to notice is that this View is able to take advantage of Master Pages, one of the benefits of building Views on top of the existing ASP.NET Page infrastructure.
The astute reader may have noticed the following line of code in the above View:
<%: ViewData["Message"] %>
Code snippet 6-2.txt
The use of code nuggets within the View, represented by <% %> blocks, is a departure from the declarative approach that many Web Forms developers are used to. With MVC, all the real work is done within the Model and Controllers, so by the time the View becomes involved, the only thing it really needs to do is output the result in the form of HTML markup.
To many, seeing the "angle percent" markup on a page is a visual nightmare, taking them back to last century and Classic ASP, and ultimately drawing comparisons to spaghetti code, wherein the business logic and View logic are all intertwined in one saucy noodle mess.
This comparison ignores the fact that it's possible to write spaghetti code with Web Forms. In fact, no language is completely immune from spaghetti code. The difference with ASP.NET MVC, compared to Classic ASP, is that the structure of the project encourages proper separation of concerns. When you put business logic in the Model and application logic in the Controllers, the View is much less prone to spaghetti code. Also, ASP.NET MVC provides a library of helper methods used to output properly encoded HTML, which provides a lot of help in creating Views.
In following with the principle of separation of concerns, Views should not contain application logic and business logic. In fact, they should contain as little code as possible. Although it's perfectly acceptable for a View to contain View logic, Views are generally the most difficult part of the application to test in an automated fashion, and they therefore benefit from having very little code.
So far, you've seen what a View does and what it doesn't do, but this chapter hasn't covered how to specify the View that should render the output for a specific action. It turns out that this is very easy when you follow the conventions implicit in the ASP.NET MVC Framework.
When you create a new project template, you'll notice that the project contains a Views directory structured in a very specific manner (see Figure 6-1).
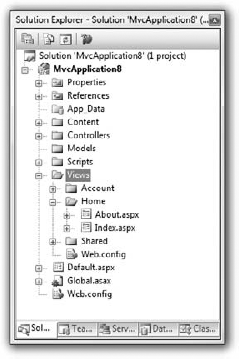
By convention, the Views directory contains a folder per Controller, with the same name as the Controller, sans the Controller suffix. Within each Controller folder, there's a View file for each action method, named the same as the action method. This provides the basis for how Views are associated to an action method.
For example, as discussed in Chapter 5, an action method can return a ViewResult via the View method like so:
public class HomeController : Controller
{
  public ActionResult Index()
  {
    ViewData["Message"] = "Welcome to ASP.NET MVC!";
    return View();
  }
}
Code snippet 6-3.txt
This method ought to look familiar; it's the Index action method of HomeController in the default project template. Because the View name was not specified, the ViewResult returned by this method looks for a View named the same as the action name in the /Views/ControllerName directory. The View selected in this case would be /Views/Home/Index.aspx.
As with most things in ASP.NET MVC, this convention can be overridden. Suppose that you want the Index action to render a different View. You could supply a different View name like so:
public ActionResult Index()
{
  ViewData["Message"] = "Welcome to ASP.NET MVC!";
  return View("NotIndex");
}
Code snippet 6-4.txt
In this case, it will still look in the /Views/Home directory, but choose NotIndex.aspx as the View. In some situations, you might even want to specify a View in a completely different directory structure. You can use the tilde syntax to provide the full path to the View like so:
public ActionResult Index()
{
  ViewData["Message"] = "Welcome to ASP.NET MVC!";
  return View("~/Some/Other/View.aspx");
}
Code snippet 6-5.txt
When using the tilde syntax, you must supply the file extension of the View because this bypasses the View engine's internal lookup mechanism for finding Views.
Suppose that you have a list of Product instances you wish to display in a View. One means of doing this is to simply add the products to the View Data dictionary and iterate them over the View.
For example, the code in your Controller action might look like this:
public ActionResult List()
{
  var products = new List<Product>();
  for(int i = 0; i < 10; i++)
  {
    products.Add(new Product {ProductName = "Product " + i});
  }
  ViewData["Products"] = products;
  return View();
}
Code snippet 6-6.txt
In your View, you can then iterate and display the products like so:
<ul>
<% foreach(Product p in (ViewData["Products"] as IEnumerable<Product>)) {%>
  <li><%: p.ProductName %></li>
<% } %>
</ul>
Code snippet 6-7.txt
Because the ViewData indexer returns an object, it was necessary to cast ViewData["Products"] to an IEnumerable<Product> before enumerating it. It would be cleaner if you could provide the View with the type for the Model being sent in. This is where strongly typed Views come in.
In the Controller method, you can specify the Model via an overload of the View method whereby you pass in the Model.
public ActionResult List()
{
  var products = new List<Product>();
  for(int i = 0; i < 10; i++)
  {
    products.Add(new Product {ProductName = "Product " + i});
  }
  return View(products);
}
Code snippet 6-8.txt
Behind the scenes, this sets the value of the ViewData.Model property to the value passed into the View method. The next step is to change the type of View inherited from ViewPage<T>. In early preview versions of ASP.NET MVC, Views had a code-behind file, and you would change the View's derived type like this:
public partial class Index : ViewPage
{
}
becomes...
public partial class Index : ViewPage<IEnumerable<Product>>
{
}
Code snippet 6-9.txt
However, the View really has no business having a code-behind file in the MVC Model. In fact, by default, there are no code-behind files for Views in ASP.NET MVC. If you want strongly typed Views, just add the type to derive from in the @Page directive as follows:
<%@ Page Language="C#" MasterPageFile="~/Views/Shared/Site.Master"
Inherits="System.Web.Mvc.ViewPage<IEnumerable<Product>>" %>
Code snippet 6-10.txt
This is the preferred way to have strongly typed Views. Now within the markup for the View, you can access the strongly typed ViewData.Model property, with full IntelliSense support.
<ul>
<% foreach(Product p in Model) {%>
  <li><%: p.ProductName %></li>
<% } %>
</ul>
Code snippet 6-11.txtOften a View needs to display a variety of data that doesn't map directly to a Model. Rather than just falling back to using ViewDataDictionaries, you can create a custom ViewModel class. You can think of a ViewModel as a Model that exists just to supply information for a View.
For example, if you had a shopping cart summary page that needed to display a list of products, the total cost for the cart, and a message to the user, you could create the ShoppingCartSummaryViewModel class, shown as follows:
public class ShoppingCartViewModel
{
    public List<Product> Products { get; set; }
    public decimal CartTotal { get; set; }
    public string Message { get; set; }
}
Code snippet 6-12.txt
Now you can strongly type a View to this Model, using the following @Page directive:
<%@ Page Language="C#" MasterPageFile="~/Views/Shared/Site.Master"
Inherits="System.Web.Mvc.ViewPage<ShoppingCartSummaryViewModel>" %>
Code snippet 6-13.txt
This gives you the benefits of a strongly typed View (including type checking, IntelliSense, and freedom from having to cast untyped View DataDictionary objects) without requiring any changes to the Model classes.
One of the traits of the ASP.NET MVC Framework that is often touted is that it puts you in full control of your application, including the HTML markup. Many announce this as a benefit of the Framework. After all, full control is good, right? But it's really a characteristic of the Framework that's only good or bad depending on the circumstances.
There are times when you don't want to be in control over the markup. You'd rather drop a control and have it figure out the markup because you don't care how it looks. Other times, you want to have absolute control over the markup. Being in control is great, but it also means more responsibility. You are now responsible for outputting markup that would have otherwise been handled by a Server Control in the Web Forms world.
HTML helpers provide a middle ground. These are methods included with the framework that help with rendering markup for very common cases. In most cases, they handle common mistakes such as forgetting to encode attribute values, and so on, and so on.
The ViewPage class has an HtmlHelper property named Html. When you look at the methods of HtmlHelper, you'll notice that it's pretty sparse. This property is really an anchor point for attaching extension methods. When you import the System.Web.Mvc.Html namespace (imported by default in the default template), the Html property suddenly lights up with a bunch of helper methods.
In the screenshot in Figure 6-2, the extension methods are denoted by the blue down arrow (gray in the dialog in Figure 6-2).
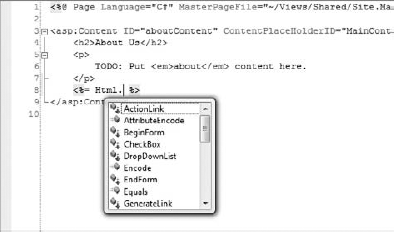
One benefit of this approach is that if you don't like the helper methods included with the Framework, you can remove this namespace and attach your own HTML helper extension methods. Likewise, it provides a convenient place to add your own helper methods by simply writing extension methods of the HtmlHelper class.
This section covers the HTML helper methods that ship with ASP.NET MVC. There are a few common patterns that all helpers share, which are worth calling out now:
All helpers HTML encode values they display, such as link text.
Helpers that accept a
RouteValueDictionaryhave a corresponding overload that allows you to specify an anonymous object as the dictionary, as covered in Chapter 4, which discussed anonymous object initializers.Likewise, helpers that accept an
IDictionary<string, object>, used to specify HTML attributes, have a corresponding overload that allows you to specify an anonymous object as the dictionary.RouteValueDictionaryimplementsIDictionary<string,object>, so it's typically what you'll pass when you seeIDictionary<string,object>as the parameter type.Helpers used to render form fields will automatically look up their current value in the ModelState dictionary. The name argument to the helper is used as the key to the dictionary.
If the
ModelStatecontains an error, the form helper associated with that error will render a CSS class ofinput-validation-errorin addition to any explicitly specified CSS classes. The default style sheet, style.css, included in the project template contains styling for this class.
ASP.NET MVC 2 includes support for strongly typed HTML helpers, which allow you to specify Model properties using a Lambda expression rather than as strings. For example, where you would have previously used <%: Html.TextBox("PropertyName") %> in ASP.NET MVC 1, you can now use <%: Html.TextBoxFor(m => m.PropertyName) %>. Replacing strings with expressions provides a number of benefits, including type checking, IntelliSense, and simpler refactoring. We'll point out which HTML helpers have added strongly typed overloads as applicable in this section.
Encode is not an extension method but a proper method of HtmlHelper. It's really a shorthand way of calling the HttpUtility.HtmlEncode method, but with the benefit that it contains a convenience overload that accepts an object, unlike HtmlEncode. When an object is supplied, it is converted to a string by using CultureInfo.CurrentCulture, before being encoded.
ASP.NET 4 includes an even simpler syntax for HTML Encoding content in a View, using the new <%: %> syntax.
The TextBox helper renders an input tag with the type attribute set to text. This is one of the form helpers most commonly used to accept free-form input from a user; for example:
<%: Html.TextBox("name") %>
Code snippet 6-14.txt
results in:
<input id="name" name="name" type="text" value="" />
Code snippet 6-15.txt
Like most form helpers, it looks in the ModelState and ViewData to obtain its current value. For example, here's one way to set the value of a product's name in a form:
public ActionResult Edit(int id) {
  var product = new Product {Name = "ASP.NET MVC"}

  ViewData["Name"] = product.Name;

  return View();
}
Code snippet 6-16.txt
and in the View you can use a textbox to display that value by giving the TextBox helper the same name as the value in the ViewData:
<%: Html.TextBox("Name") %>
Code snippet 6-17.txt
which results in:
<input id=" Name" name="Name" type="text" value="ASP.NET MVC" />
Code snippet 6-18.txt
A ViewData lookup can also look up properties of objects in the View Data. For example, going back to the previous example, let's change it to add the whole Product to ViewData:
public ActionResult Edit(int id) {
  var product = new Product {Name = "ASP.NET MVC"};

  ViewData["Product"] = product;

  return View();
}
Code snippet 6-19.txt
You can use the following code to display a textbox with the product's name as the current value:
<%: Html.TextBox("Product.Name") %>
Code snippet 6-20.txt
which results in:
<input id="Product_Name" name="Product.Name" type="text" value="ASP.NET MVC" />
Code snippet 6-21.txt
If there are now values matching "Product.Name" in the View data, then it attempts to look up a value for the portion of the name before the first dot, "Product", in which case it finds a Product instance. It then evaluates the remaining portion of the name "Name" against the product it found, yielding the value.
One other thing to note is that the id of the attribute replaced the dot in the name with an underscore. This behavior is controllable via the static HtmlHelper.IdAttributeDotReplacement property. This is necessary because dots aren't valid in an ID, and JavaScript libraries such as jQuery require valid ID's.
The TextBox helper also works well against strongly typed View data. For example, given the following Controller action:
public ActionResult Edit(int id) {
  var product = new Product {Name = "ASP.NET MVC"}

  return View(product);
}
Code snippet 6-22.txt
you can supply the TextBox helper with the name of a property in order to display that property:
<%: Html.TextBox("Name") %>
Code snippet 6-23.txt
which results in:
<input id="Name" name="Name" type="text" value="ASP.NET MVC" />
Code snippet 6-24.txt
The TextBox helper allows you to supply an explicit value and avoid View data lookup if you wish. For example:
<%: Html.TextBox("Name", "ASP.NET MVC") %>
Code snippet 6-25.txt
produces the same markup as the previous example.
If you wish to specify HTML attributes, you'll need to call an overload that also supplies an explicit value. If you want to use View data lookup in these cases, just pass in null to the TextBox helper. For example:
<%: Html.TextBoxFor(m => m.Name, null, new {@class="lotsofit"}) %>
Code snippet 6-26.txt
will result in:
<input class="lotsofit" id="Name" name="Name" type="text" value="ASP.NET MVC" />
Code snippet 6-27.txt
The strongly typed equivalent of Html.TextBox is Html.TextBoxFor. It supports the same overloads demonstrated above, so we could replace the above call with the following code:
<%: Html.TextBox(m => m.Name, null, new {@class="lotsofit"}) %>
Code snippet 6-28.txtThe ActionLink method renders a hyperlink (anchor tag) to another Controller action. This method uses the Routing API under the hood to generate the URL. For example, when linking to another action within the same Controller used to render the current View, you can simply specify the action name:
<%: Html.ActionLink("Link Text", "AnotherAction") %>
Code snippet 6-29.txt
This produces the following markup, assuming the default routes:
<a href="/Home/AnotherAction">LinkText</a>
Code snippet 6-30.txt
You can specify a Controller name as the third argument to link to an action of another Controller. For example, to link to the AccountController.Withdraw action, use:
<%: Html.ActionLink("Link Text", "Withdraw", "Account") %>
Code snippet 6-31.txt
Notice that you specify the Controller name without the Controller suffix. You never specify the Controller's type name.
In many cases, you have more route parameters than you need to supply in order to choose the correct URL to render for the action link. In that case, you can specify a RouteValueDictionary for the routeValues argument. The following example uses the overload that accepts the anonymous object overload for route values to specify the ID:
<%: Html.ActionLink("Link Text", "Withdraw", "Account", new {id=34231}, null) %>
Code snippet 6-32.txt
To specify HTML attributes, provide a value for the htmlAttributes argument. This accepts an IDictionary<string, object>, but for ease of use, you can call the overload that accepts an anonymous object:
<%: Html.ActionLink("LinkText", "About", "Account", null,
new {title="withdraw from account"}) %>
Code snippet 6-33.txt
The ActionLink methods have specific knowledge about ASP.NET MVC Controllers and actions. Hence, these methods provide convenient overloads that allow the specifying of a controllerName and actionName directly.
The RouteLink methods follow the same pattern as the ActionLink methods but also accept a route name and do not have arguments for Controller name and action name. For example, the first example ActionLink shown previously is equivalent to the following:
<%: Html.RouteLink("Link Text", new {action="AnotherAction"}) %>
Code snippet 6-34.txtThe BeginForm method follows a different pattern from the other helper methods. An HTML form generally starts with a <form> tag, contains a bunch of markup in the middle, and then ends with a closing tag.
It wouldn't be very useful to have to specify the markup that goes in between the form start and end tags to the form helper method. Instead, the method uses the disposing pattern to denote the scope of the form.
An example should clarify what we mean:
<% using(Html.BeginForm()) { %> <! --  <form ...> tag here // -- >

  <label for="firstName">
  <input type="text" name="FirstName" id="firstname" />
  <input type="submit" value="Save" />

<% } %> <! --  End </form> tag here // -- >
Code snippet 6-35.txt
In this code sample, you enclose the BeginForm method in a using block. This method returns an instance of MvcForm that implements the IDisposable interface. At the end of the using block, the Dispose method is called, which renders the closing form tag. This provides a convenient approach for implementing HTML blocks in which the closing tag needs to be rendered at the end of a block of arbitrary HTML.
It's an unusual use of a using block, for sure, but being completely biased, we find it quite elegant. For those who find it completely distasteful, you can also use the following approach, which provides a bit of symmetry:
<% Html.BeginForm(); %>

  <label for="firstName">
  <input type="text" name="FirstName" id="firstname" />
  <input type="submit" value="Save" />

<% Html.EndForm(); %>
Code snippet 6-36.txt
Future helper methods that follow this pattern should be named according to the Begin* pattern.
Html.Hidden
The Html.Hidden method is used to render a hidden input. For example, the following code:
<%: Html.Hidden("wizardStep", "1") %>
Code snippet 6-37.txt
results in:
<input id="wizardstep" name="wizardStep" type="hidden" value="1" />
Code snippet 6-38.txt
The strongly typed version of this helper is Html.HiddenFor. Assuming our Model had a WizardStep property, you would use it as follows:
<%: Html.HiddenFor(m => m.WizardStep) %>
Code snippet 6-39.txtBoth the DropDownList and ListBox helpers render a <select /> HTML element. The difference is that ListBox is used for multiple item selection. It sets the multiple attribute to True in the rendered markup, allowing for multiple selections.
Typically, a select element serves two purposes:
To show a list of possible options
To show the current value for a field
For example, if you have a Product class with a CategoryID property, you may use a select element to display the value of the CategoryID property of Product, as well as to show all possible categories.
Thus, there's a bit of setup work to do in the Controller when using these helpers in order to provide these two bits of information. Here's an example of the code in the Controller that prepares an enumeration of SelectListItem instances. SelectListItem serves as the presentation Model for the DropDownList and ListBox methods:
[HttpGet]
public ActionResult Edit(int id) {
  NorthwindDataContext context = new NorthwindDataContext();
  var product = context.Products.Single(p => p.ProductID == id);

  ViewData["CategoryId"] = from c in p.Categories
    select new SelectListItem {
      Text = c.CategoryName,
      Value = c.CategoryID,
      Selected = (c.CategoryID == p.CategoryID)
    };

  return View(product);
}
Code snippet 6-40.txt
Now, in the View, you can render the dropdown list simply by referring to the IEnumerable<ListItem> that you put in the View data:
<%: Html.DropDownList("CategoryID") %>There are other overloads that allow you to supply the enumeration directly. The SelectList class and the MultiSelectList class are helper classes used to transform an enumeration of any type into an IEnumerable<SelectListItem>. In the preceding example, a LINQ projection was used instead of these helper classes to transform an enumeration of Category instances into an enumeration of SelectListItem instances.
Although a bit more advanced than using the helper classes, using a LINQ projection lets you avoid using reflection to generate the enumeration.
Both Html.DropDownList and Html.ListBox have strongly typed counterparts, Html.DropDownListFor and Html.ListBoxFor, respectfully. The above DropDownList would be rendered using the strongly typed syntax shown below:
<%: Html.DropDownListFor(m => m.CategoryID) %>
Code snippet 6-41.txt
Html.Password is a simple helper used to render a password field. It's much like the TextBox helper, except that it does not retain the posted value, and it uses a password mask:
<%: Html.Password("UserPassword") %>
Code snippet 6-42.txt<input id="my-password" name="UserPassword" type="password" value="" />
Code snippet 6-43.txtThe strongly typed syntax for Html.Password, as you'd expect, is Html.PasswordFor. Here's how you'd use it to display the UserPassword property:
<%: Html.Password(m => m.UserPassword) %>
Code snippet 6-44.txtRadio buttons are generally grouped together to provide a range of possible options for a single value. For example, if you wanted the user to select a color from a specific list of colors, you might use multiple radio buttons to present the choices. To group the radio buttons, you give each button the same name. Only the selected radio button is posted back to the server when the form is submitted.
The Html.RadioButton helper renders a simple radio button:
<%: Html.RadioButton("color", "red") %>
<%: Html.RadioButton("color", "blue", true) %>
<%: Html.RadioButton("color", "green") %>
Code snippet 6-45.txt
and results in:
<input id="color" name="color" type="radio" value="red" />
<input checked="checked" id="color" name="color" type="radio" value="blue" />
<input id="color" name="color" type="radio" value="green" />
Code snippet 6-46.txt
Html.RadioButton has a strongly typed counterpart, Html.RadioButtonFor. Rather than a name and a value, the strongly typed version takes an expression that identifies the object that contains the properties to render, followed by a value to submit if this radio button item is selected.
Partial is used to render a partial View, as opposed to a full View. Typically, this is used to render out a snippet of markup that is meant to be a reusable piece of the View. In the default View engine, a partial View is implemented as a UserControl (aka an .ascx file, although it is possible to use a full .aspx page as a partial View), but other View engines may use other means for implementing a partial View.
There are four overloads for Partial:
public void Partial(string partialViewName);
public void Partial(string partialViewName, object model);
public void Partial(string partialViewName, ViewDataDictionary viewData);
public void Partial(string partialViewName, object model,
  ViewDataDictionary viewData);
Code snippet 6-47.txt
A partial View may be rendered using a different View engine from your main View. This is useful in cases in which you might be reusing some View component code, which assumes a different View engine from the one you're using. The lookup for the partial View follows the same logic as the normal View lookup.
Here's an example of calling a partial View:
<%: Html. Partial("MyUserControl"); %>
Code snippet 6-48.txt
There's another very similar override, RenderPartial, which differs from Render in that it writes directly to the Response output stream; it does not return a string. Hence, you use <% rather than <%:, and you need the semicolon at the end for C#. To illustrate, the following two lines of code will result in the same input being written to the screen:
<% Html.RenderPartial("MyUserControl"); %>
<%: Html. Partial("MyUserControl"); %>
Code snippet 6-49.txt
So, how do you decide which to use?
Html.Partial is more convenient, since you can use the same <%: %> HTML Encoding Code Block syntax you're using with your other HTML Helpers. Html.RenderPartial will result in higher performance since it writes directly to the Response output stream, although it would require a lot of use (either high site traffic or repeated calls in a loop) before the difference would be measurable.
ASP.NET MVC 2 introduces a new pair of helpers which are which are similar to Partial and RenderPartial: Action and RenderAction. Whereas Partial renders the parent view's Model data using View markup in a separate file, Action actually executes a separate Controller action and displays the results. Action provides a lot more flexibility and re-use, because the child view can include different Model data, make use of separate Controller context, etc.
As with Partial and RenderPartial, the only difference between Action and RenderAction is that RenderAction will render the result directly to the Response (which is more efficient if the action returns a large amount of HTML) whereas Action returns a string with the result. For the sake of brevity, I'll use the term RenderAction to refer to both of these methods. Here's a quick look at how you might use this method. Suppose you have the following controller.
public class MyController {
  public ActionResult Index() {
    return View();
  }

  [ChildActionOnly]
  public ActionResult Menu() {
    var menu = GetMenuFromSomewhere();
      return PartialView(menu);
  }
}
Code snippet 6-50.txt
The Menu action grabs the Menu model and returns a partial view with just the menu.
<%@ Control Inherits="System.Web.Mvc.ViewUserControl<Menu>" %>
<ul>
<% foreach(var item in Model.MenuItem) { %>
  <li><%= item %></li>
<% } %>
</ul>
Code snippet 6-51.txt
In your Index.aspx view, you can now call into the Menu action to display the menu:
<%@ Page %>
<html>
<head><title></title></head>
<body>
  <%= Html.Action("Menu") %>
  <h1>Welcome to the Index View</h1>
</body>
</html>
Code snippet 6-52.txt
Notice that the Menu action is marked with a ChildActionOnlyAttribute. This attribute indicates that this action should not be callable directly via the URL. It's not required for an action to be callable via RenderAction.
We also added a new property to ControllerContext named IsChildAction. This lets you know whether the action method is being called via a RenderAction call or via the URL. This is used by some of our action filters which should do not get called when applied to an action being called via RenderAction such as AuthorizeAttribute and OutputCacheAttribute.
Because these methods are being used to call action methods much like an ASP.NET Request does, it's possible to specify route values when calling RenderAction. What's really cool about this is you can pass in complex objects.
For example, suppose we want to supply the menu with some options. We can define a new class, MenuOptions like so.
public class MenuOptions {
    public int Width { get; set; }
    public int Height { get; set; }
}
Code snippet 6-53.txt
Next, we'll change the Menu action method to accept this as a parameter.
[ChildActionOnly]
public ActionResult Menu(MenuOptions options) {
    return PartialView(options);
}
Code snippet 6-54.txt
And now we can pass in menu options from our action call in the view:
<%= Html.Action("Menu",
  new { options = new MenuOptions { Width=400, Height=500} })%>
Code snippet 6-55.txtAnother thing to note is that RenderAction honors the ActionName attribute when calling an action name. Thus if you annotate the action like so.
[ChildActionOnly]
[ActionName("CoolMenu")]
public ActionResult Menu(MenuOptions options) {
    return PartialView(options);
}
Code snippet 6-56.txt
You'll need to make sure to use "CoolMenu" as the action name and not "Menu" when calling RenderAction.
The aptly named TextArea helper renders a <textarea> tag, which is commonly used for entering multi-line data in a form. It properly encodes the value of the text area and attributes. For example:
<%: Html.TextArea("text", "hello <br/> world") %>
Code snippet 6-57.txt
results in:
<textarea cols="20" id="text" name="text" rows="2">hello <br /> world
</textarea>
Code snippet 6-58.txt
There are overloads that allow you to explicitly specify the columns and rows; for example:
<%: Html.TextArea("text", "hello <br /> world", 10, 80, null) %>
Code snippet 6-59.txt
results in:
<textarea cols="80" id="text" name="text" rows="10">hello <br /> world
</textarea>
Code snippet 6-60.txt
The strongly typed equivalent of Html.TextArea is Html.TextAreaFor. To render a text area for a Model's Description property, you'd use the following code:
<%: Html.TextAreaFor(m => m.Description) %>
Code snippet 6-61.txtWhen there is an error for a particular field in the ModelState dictionary, you can use the ValidationMessage helper to display that message.
For example, in the following Controller action, we purposefully add an error to the Model state:
public ActionResult Index()
{
    var modelState = new ModelState();
    modelState.Errors.Add("Ouch");
    ModelState["Name"] = modelState;

    return View();
}
Code snippet 6-62.txt
Now in the View, you can display the error message for the "Name" field like so:
<%: Html.ValidationMessage("Name") %>
Code snippet 6-63.txt
which results in:
<span class="field-validation-error">Ooh!</span>
Code snippet 6-64.txt
This message is only shown if there is an error in the Model state for the key "Name". You can also call an override that allows you to override the error message from within the View:
<%: Html.ValidationMessage("Name", "Something is wrong with your name") %>
Code snippet 6-65.txt
which results in:
<span class="field-validation-error">Something wrong with your name  </span>
Code snippet 6-66.txt
Note
By convention, this helper renders the CSS class field-validation-error along with any specific CSS classes you provide. The default template includes some styling to display these items in red, which you can change in style.css.
Html.ValidationMessageFor is the strongly typed doppelganger of Html.ValidationMessage. The previous call could be rewritten as follows:
<%: Html.ValidationMessageFor(m => m.Name, "Something is wrong with your name") %>
Code snippet 6-67.txt
Html.ValidationSummary displays an unordered list of all validation errors in the ModelState dictionary. This summary can be styled using CSS. As an example, update the Controller action you used in the previous section to include another Model state error:
public ActionResult Index()
{
    var modelState = new ModelState();
    modelState.Errors.Add("Ouch");
    ModelState["Name"] = modelState;

    var modelState2 = new ModelState();
    modelState2.Errors.Add("Ooh!");
    ModelState["Age"] = modelState;

    return View();
}
Code snippet 6-68.txt
A call to:
<%: Html.ValidationSummary() %>
Code snippet 6-69.txt
results in:
<ul class="validation-summary-errors">
  <li>Ouch</li>
  <li>Ooh!</li>
</ul>
Code snippet 6-70.txt
This method also allows the specifying of a generic header message, which is displayed only if there is an error. For example:
<%: Html.ValidationSummary("An error occurred") %>
Code snippet 6-71.txt
results in:
<div class="validation-summary-errors">
  <span>An error occurred</span>
  <ul>
    <li>Ouch</li>
    <li>Ooh!</li>
  </ul>
</div>
Code snippet 6-72.txt
Note
Note that, by convention, this helper renders the CSS class validation-summary-errors along with any specific CSS classes you provide. The default template includes some styling to display these items in red, which you can change in style.css. See Chapter 9 for more information.
ASP.NET MVC 2 includes support for HTML template customization, which allows you to override both display and edit templates. You can create templates for your own models, as well as system types like System.DateTime. We'll look at this in detail in Chapter 13.
ScottHa likes to call the View engine "just an angle bracket generator." At the most general level, a View engine will take a representation of a View in any format you like and turn it into whatever other format you like. Usually, this means that you will create an ASPX file containing markup and script, and ASP.NET MVC's default View engine implementation, the WebFormViewEngine, will use some existing ASP.NET APIs to render your page as HTML.
View engines aren't limited to using ASPX pages, nor are they limited to rendering HTML. You'll see later how you can create alternate View engines that render output that isn't HTML, as well as unusual View engines that take a custom DSL (Domain Specific Language) as input.
To better understand what a View engine is, let's review the ASP.NET MVC life cycle (very simplified in Figure 6-3).
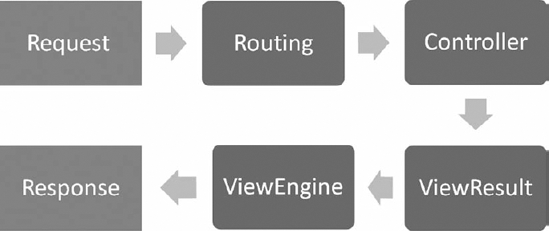
There are a lot more subsystems involved than Figure 6-3 shows; this figure just highlights where the View engine comes into play — which is right after the Controller action is executed and returns a ViewResult in response to a request.
It is very important to note here that the Controller itself does not render the View; it simply prepares the data (aka the Model) and decides which View to display by returning a ViewResult instance. As you saw earlier in this chapter, the Controller base class contains a simple convenience method, named View, used to return a ViewResult. Under the hood, the ViewResult calls into the current View engine to actually render the View.
As just mentioned, it's possible to have alternative View engines configured for an application. View engines are configured in Global.asax.cs. By default, there is no need to configure other View engines if you stick with just using WebFormViewEngine. However, if you want to replace this View engine with another, you could use the following code in you Application_Start method:
protected void Application_Start()
{
  ViewEngines.Engines.Clear();
  ViewEngines.Engines.Add(new MyViewEngine());
  RegisterRoutes(RouteTable.Routes);
}
Code snippet 6-73.txt
Engines is a static ViewEngineCollection used to contain all registered View engines. This is the entry point for registering View engines. You needed to call the Clear method first because WebFormViewEngine is included in that collection by default. Calling the Clear method is not necessary if you wish to add your custom View engine as another option in addition to the default one, rather than replace the default one. It's fine to have multiple View engines registered.
The IViewEngine interface is the key interface to implement when building a custom View engine:
public interface IViewEngine
{
    ViewEngineResult FindPartialView(ControllerContext controllerContext,
        string partialViewName, bool useCache);
    ViewEngineResult FindView(ControllerContext controllerContext, string viewName,
        string masterName, bool useCache);
    void ReleaseView(ControllerContext controllerContext, IView view);
}
Code snippet 6-74.txt
With the ViewEngineCollection, the implementation of FindView simply iterates through the registered View engines and calls FindView on each one, passing in the specified View name. This is the means by which the ViewEngineCollection can ask each View engine if it can render a particular View.
The FindView method returns an instance of ViewEngineResult, which encapsulates the answer to the question of whether the View engine can render the View (see Table 6-1).
Table 6.1. View Engine Properties
PROPERTY | DESCRIPTION |
|---|---|
| Returns the found |
| Returns an |
| Returns an |
If the IView returned is null, then the View engine was not able to locate a View corresponding to the View name. Whenever a View engine cannot locate a View, it will return the list of locations it checked. These are typically file paths for View engines that use a template file, but they could be something else entirely, such as database locations for View engines that store Views in the database.
Note that the FindPartialView method works in exactly the same way as FindView, except that it focuses on finding a partial View. It is quite common for View engines to intrinsically treat Views and partial Views differently. For example, some View engines automatically attach a master View (or layout) to the current View by convention. So it's important for that View engine to know whether it's being asked for a full View or a partial View. Otherwise, every partial View might have the master layout surrounding it.
The IView interface is the second interface one needs to implement when implementing a custom View engine. Fortunately, it is quite simple, containing a single method:
public interface IView
{
    // Methods
    void Render(ViewContext viewContext, TextWriter writer);
}
Code snippet 6-75.txt
Custom Views are supplied with a ViewContext instance, which provides the information that might be needed by a custom View engine, along with a TextWriter instance. The View will then call methods of the TextWriter instance to render the output.
The ViewContext contains the following properties, accessible by the View as shown in Table 6-2.
Table 6.2. ViewContext Properties
DESCRIPTION | |
|---|---|
| An instance of |
| An instance of |
| An instance of |
| An instance of |
| An instance of |
| An instance of |
| Boolean value, true if Client Validation has been enabled for the View |
| Contains information about the form, used in client-side validation |
| Allows you to override how forms are named ("form0"-style by default) |
| Boolean value, true if the action is being displayed as a result of a call to |
| When |
|
|
Not every View needs access to all these properties to render a View, but it's good to know they are there when needed.
When working with ASP.NET MVC for the first time, you're likely to use the View engine that comes preloaded with ASP.NET MVC: the WebFormViewEngine. There are many advantages to this:
Don't be fooled by the "Web Forms" part of WebFormViewEngine. It's not really a Web Form in that, by default, there is no <form runat="server"> tag in ViewPage. There are also no PostBacks or View State, as mentioned many times before.
The ViewPage class, which serves as the default View, does invoke the Page life cycle when rendering, but the various points of the life cycle end up being no-ops. It's possible to handle the various events in the page life cycle, but this approach is generally frowned upon. Ideally, developers should not treat the ViewPage as if it were a Web Forms page.
Stated succinctly, ASP.NET MVC includes the WebFormViewEngine for designer support and familiarity, but ASP.NET MVC uses it for angle bracket generation, nothing more.
There are times, however, when you might want to use a different View engine, for example, when you:
Desire to use a different language (like Ruby or Python).
Need more concise HTML coding with better standards support.
Render non-HTML output such as graphics, PDFs, RSS, and the like.
There are several different View engines available at the time of this writing — the next sections take a look at some of the really interesting ones. Currently there are others, and there will be even more — we predict — in the future, but each of these has something unique to offer.
Spark (http://sparkviewengine.com/) is the brainchild of Louis DeJardin and is being actively developed with support for both MonoRail and ASP.NET MVC. It is of note because it blurs the line between markup and code. Hamilton, the founder of the Castle Project, toyed with similar ideas when trying to create an IronPython View engine (http://hammett.castleproject.org/?p=94), and Spark seems to have come up with a similar idea but takes it to the next level with several choices for making your Views aesthetically pleasing and functional.
First, you can use standard <% %> syntax:
<%
int total = 0;
foreach(var item in items)
{
  total += item.Quantity;
}
%>
Code snippet 6-76.txt
or a hash syntax for code blocks:
#int total = 0;
#foreach(var item in items)
#{
#   total += item.Quantity;
#}
Code snippet 6-77.txt
It's nice to have a choice, but neither of these two examples is revolutionary. The real spark of Spark is code like this:
<viewdata model="IEnumerable[[Person]]"/>
<ul class="people">
<li each="var person in ViewData.Model">
${person.LastName}, ${person.FirstName}
</li>
</ul>
Code snippet 6-78.txt
ScottHa's eyes blurred when Rob saw this, but then he realized what was happening. The each attribute is specific to Spark and provides a means of data binding to the supplied code expression. Thus, the <li> element will be repeated once per person. Within the <li> tag, you can use the Spark templating syntax to output properties of the current person instance.
This makes for a very natural HTML-centric syntax such that the code almost disappears in the markup. Remember that a View is only supposed to contain control flow that is specific to its one concern — generating the View. The View isn't a place for business logic or complex code, and Spark enables an idiomatic coding style that cleans up many of the kinds of inline code that makes some Views look messy. Additionally, Spark is well-formed XML, which opens the door for the use of editors and other accelerators in the future.
Spark has continued to grow in popularity since it was first released in July, 2008, to the point that it has become generally regarded as the most popular alternative View engine for ASP.NET MVC. In addition to the innovative syntax, it includes a lot of other exciting features, for example:
Support for IronPython and IronRuby, for those who enjoy using a dynamic language in their Views
Simple output caching syntax
A Master Layouts system which allows for some scenarios which are outside the scope of ASP.NET Master Pages, including three-pass rendering and convention driven Master Layout selection
Spark is an exciting View engine to keep an eye on, and it is representative of the kind of exciting outside-the-box thinking that's happening around the "V" in MVC.
Another popular View engine is NHaml, created by Andrew Peters and released on his blog in December 2007. The project is a port of the popular Rails Haml View engine and is described on their blog as follows:
Haml is a markup language that's used to cleanly and simply describe the XHTML of any web document, without the use of inline code. Haml functions as a replacement for inline page templating systems such as PHP, ERB, and ASP. However, Haml avoids the need for explicitly coding XHTML into the template, because it is actually an abstract description of the XHTML, with some code to generate dynamic content.
The goal of NHaml is to reduce the verbosity of XHTML, doing away with the excess of angle brackets required for most HTML pages. Some have called it "markup haiku."
The core syntax of NHaml is not unfamiliar and uses many of the same concepts that you'd see on a Web Forms ViewPage. The one main difference, however, is that white space (lines, spaces, tabs) counts in how things are marked up.
In the example shown in Listing 6-1, taken from the Andrew's blog, you can contrast a View written with Web Forms-style markup with one ported to the NHaml View Engine:
Example 6.1. Listing 6-1.txt
Northwind Products List Using WebForms View
<%@ Page Language="C#" MasterPageFile="~/Views/Shared/Site.Master"
         AutoEventWireup="true"
         CodeBehind="List.aspx"
         Inherits="MvcApplication5.Views.Products.List" Title="Products" %>
<asp:Content ContentPlaceHolderID="MainContentPlaceHolder" runat="server">
  <h2><%: ViewData.CategoryName %></h2>
  <ul>
<% foreach (var product in ViewData.Products) { %>
<li>
<%: product.ProductName %>
<div class="editlink">
(<%: Html.ActionLink("Edit",
new { Action="Edit", ID=product.ProductID })%>)
</div>
</li>
<% } %>
</ul>
<%: Html.ActionLink("Add New Product", new { Action="New" }) %>
</asp:Content>Northwind Products List Using NHaml View
%h2= ViewData.CategoryName
%ul
  - foreach (var product in ViewData.Products)
    %li
      = product.ProductName
      .editlink
        = Html.ActionLink("Edit", new { Action="Edit", ID=product.ProductID })
= Html.ActionLink("Add New Product", new { Action="New" })
You can see from this example that NHaml does away with angle brackets quite nicely, and also uses white space to help in the formatting of the output.
NHaml also allows you to implement some core features of Ruby on Rails, namely, the use of Partials (akin to UserControls) and Layouts (akin to MasterPages).
The use of Partials in NHaml highlights the project's commitment to simplicity and less typing. To use a Partial in NHaml, you first need to create a bit of NHaml markup and save it in an .haml file. Their convention is to use an underscore as a prefix: "_Product.haml" to denote that the file is a Partial. To use this Partial, you just reference the name of the Partial without the extension, and it will be rendered inline (the Partial must be in the same physical directory as the file referencing it):
- foreach (var product in ViewData.Products)
  %li
    _ Product
Code snippet 6-79.txt
Layouts work in much the same way as Master Pages do with ASP.NET Web Forms, but with a few less features. With NHaml, the use of Layouts relies heavily on convention, in that a particular layout must be located in the Views/Shared folder and must use the same name as the Controller (you can override this behavior by passing in the MasterName argument to the View method from the Controller).
To create a Layout in NHaml, you create some NHaml markup and save it in the Views/Shared/[ControllerName] folder. The ProductController is used for the following example:
!!!
%html{xmlns="http://www.w3.org/1999/xhtml"}
  %head
    %title Rob's NHamlized MVC Application
%link{href="../../Content/Sites", rel="stylesheet", type="text/css"}
%body
#inner
#header
%h1 Welcome To My Store
#maincontent
_
#footer
Code snippet 6-80.txtThis is a pretty simple page, and the part that matters, once again, is the underscore. All of the Views for the ProductController (unless the Action tells it to use a different layout) will be injected into this Layout where the underscore is.
You can also use application-wide Layouts with NHaml by creating an Application.haml file in the Views/Shared directory.
NVelocity is an Open Source templating engine and a port of the Apache/Jakarta Velocity project, built for Java-based applications. The NVelocity project did quite well for a few years, until 2004, when check-ins stopped and the project slowed down.
The Castle Project (the guys responsible for MonoRail, an alternative to ASP.NET Web Forms) forked the NVelocity project at that time and added some much needed bug fixes and changes to an alternative templating engine. NVelocity remains an interpreted language, but it performs quite well regardless.
MonoRail's fork of NVelocity includes a number of really clever improvements to the original. The most striking is their "Fancy foreach loop" inspired by Joel Spolsky's CityDesk language. This loop is almost reason enough to take a good, hard look at using NVelocity. Here's a sample from the NVelocity documentation:
#foreach($person in $people)
#beforeall
       <table>
               <tr><th>Name</th><th>Age</th></tr>
#before
       <tr
#odd
          Style='color:gray'>
#even
          Style='color:white'>

#each
       <td>$person.Name</td><td>$person.Age</td>

#after
       </tr>

#between
       <tr><td colspan='2'>$person.bio</td></tr>
#afterall
</table>
#nodata
Sorry No Person Found
#end
Code snippet 6-81.txtThe addition of all the directives such as #before, #between, and many others allow you to make quick work of even the most complex table markup.
Brail is an interesting View engine because it uses the Boo Language for its syntax. Boo is an object-oriented statically typed language for the CLR, but it has a Python language style to it, has significant white space, and includes some interesting ideas. It's not IronPython, to be clear; it's a whole new language. It promotes a syntax that tries to avoid explicit type-casting and includes syntactic sugar for patterns like string formatting and regular expressions intended to be wrist-friendly to the developer.
Brail was originally created as a View engine for the MonoRail project that has been ported over to ASP.NET MVC's interface. Brail support for ASP.NET MVC currently lives in the MVCContrib project at www.mvccontrib.org. Brail's Views are compiled, which makes them potentially faster than interpreted Views like those in NVelocity.
Where ASP.NET Web Forms has Master Pages, Brail has Layouts. A primary layout in Brail might look like this:
<html>
 <head>
        <title>My site</title>
 </head>
 <body>
        <h1>My sample site</h1>
        <div>
               ${childOutput}
        </div>
 </body>
</html>
Code snippet 6-82.txt
Note that the ${childOutput} indicates where the rendered View's output should appear within the larger layout. A "Hello World" might look like this:
<% output "Hello, powerful person! The time is ${DateTime.Now}"
if user.IsAdministrator %>
Code snippet 6-71.txt
Of course, you can do for loops, call methods, and all the things you'd expect. However, note the Boo-ism where there's an if control statement at the end of the line. Boo's fluent, easy-to-read syntax was one of the aspects that got the MonoRail team excited about Brail, and now it's an option for ASP.NET MVC.
One question we are often asked is when should someone create a custom View engine as opposed to simply a new ActionResult type? For example, suppose that you want to return objects via a custom XML format; should you write a custom View engine or a new MyCustomXmlFormatActionResult?
The general rule of thumb for choosing between one and the other is whether or not it makes sense to have some sort of template file that guides how the markup is rendered. If there's only one way to convert an object to the output format, then writing a custom ActionResult type makes more sense.
For example, the ASP.NET MVC Framework includes a JsonResult, by default, which serializes an object to JSON syntax. In general, there's only one way to serialize an object to JSON. You wouldn't change the serialization of the same object to JSON according to which action method or View is being returned. Serialization is generally not controlled via templating.
But suppose that you wanted to use XSLT to transform XML into HTML. In this case, you may have multiple ways to transform the same XML into HTML depending on which action you're invoking. In this case, you would create an XsltViewEngine, which uses XSLT files as the View templates.
View engines have a very specific, constrained purpose. They exist to take data passed to them from the Controller, and they generate formatted output, usually HTML. Other than those simple responsibilities, or concerns, as the developer, you are empowered to achieve the goals of your View in any way that makes you happy.