
7
Decorator Pattern
WHAT’S IN THIS CHAPTER?
- How to implement the decorator pattern in plain code
- How the decorator pattern solved a real-life dilemma
- How to implement the decorator pattern using the @Decorator and @Delegate annotations
- How to make the decorator pattern pluggable via the deployment descriptors
- How to use qualifiers to gain fine-grain control over how decorators are used
WROX.COM CODE DOWNLOAD FOR THIS CHAPTER
The wrox.com code download for this chapter is found at www.wrox.com/go/projavaeedesignpatterns on the Download Code tab. The code is in the Chapter 7 download and individually named according to the names throughout the chapter.
The GoF1 book describes the decorator pattern as “Attach additional responsibilities to an object dynamically” and gives a Graphical User Interface Toolkit as an example. This is an excellent real-world example because adding new styles or behaviors to a user interface (UI) toolkit is the perfect job for the decorator pattern.
The Head First Design Patterns2 book gives a coffee shop as an example of different options such as whip cream being added to the product. The addition of each new condiment wraps the beverage object and adds new behavior to the description and price. This example has been the best-fit solution since the authors had a similar real-life experience. See the next War Story.
The decorator pattern relies on component and decorator objects, which implement the same interface. The decorator has an instance variable that implements the same interface so it can wrap either a component object or another decorator. Sharing the same interface allows decorators to decorate the base component or another decorator. With a proper implementation, it is simple to call all relevant function implementations in order from the last decorator to the inner target component object. In most cases, it should not be difficult to adapt an existing system to use the decorator pattern.
WHAT IS A DECORATOR?
The decorator pattern is one of the structural patterns described in the book of GoF. Its purpose is to wrap a target object so that you can dynamically add new responsibilities at run time. Each decorator can wrap another one, which allows for a theoretically unlimited number of decorating of target objects.
Although this runtime behavior is much more flexible than inheritance via subclassing, it introduces a level of complexity to concrete subclassing as it makes it more difficult to determine the types and behaviors of objects prior to executing the application.
Decorators are used in almost all languages and all platforms, from the UI to the back end. Most frameworks and run times use the decorator pattern to add flexibility and runtime–specific behavior.
In Java EE, you implement the decorator pattern without boilerplate code. However, unlike the majority of the patterns in this book, you often add XML configuration to the bean.xml.
Decorator Class Diagram
As is seen in the class diagram in Figure 7.1, the decorator pattern introduces some boilerplate code to an existing class hierarchy. The pattern introduces a shared interface between the target class and the decorator. The decorator must have a reference to an instance of this interface.
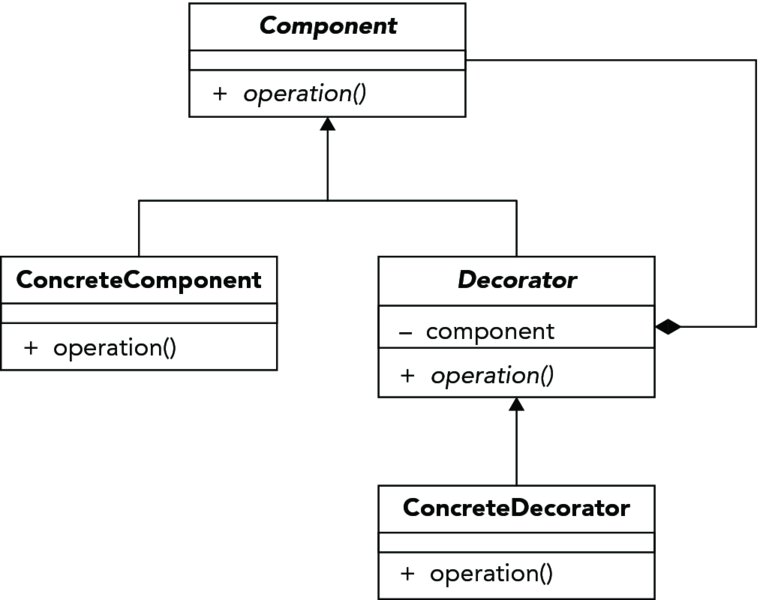
Figure 7.1 Class diagram of the decorator pattern
IMPLEMENTING THE DECORATOR PATTERN IN PLAIN CODE
If the classes are in the design stage, the addition of decorators shouldn’t be too much of an issue. However, if the decorator is to be implemented in an existing system, you might need to refactor some classes. For example, the target class should implement the same interface that the decorator implements.
This chapter demonstrates the use of the decorator pattern using a simplified POS system for a pizza restaurant. Each pizza can be “decorated” with extra toppings, such as double cheese and free chili.
First, you will create the Order interface, which is implemented by the Pizza class and by the decorator’s Extra abstract class. The Extra class is extended by the extra toppings classes: DoubleExtra, NoCostExtra, and RegularExtra.
You’ll start by creating the Order interface in Listing 7-1.
In Listing 7-2, you’ll create the class that represents a pizza (Four Seasons, Margarita, Hawaiian, and so on) on the menu. This is the target object to be decorated.
The following code creates a Four Seasons pizza.
Order fourSeasonsPizza = new Pizza("Four Seasons Pizza", 10);Next, you need to create the decorators that will decorate the pizza with extra toppings. Use an abstract class so that the concrete classes do not have to implement all the business methods of an interface. An abstract decorator will create a blueprint that other decorators can extend.
Perhaps you have different topping types (cheese, chili, pineapple, and so on). Imagine that the customer wants to order the meal a little spicier, and the restaurant will not charge for that extra topping. So you need a decorator that does not add to the price of the pizza but provides proper labeling (that extra chili has been requested). Also, the customer may ask for two extra portions of cheese, and if the system prints “cheese” twice, the chef may think it is a bug and add only one portion of cheese. So you need another concrete decorator to allow for proper labeling of double toppings. Listing 7-3 accomplishes your goals.
Now that you have the abstract decorator, you can add specific behaviors and create concrete decorators. You’ll start with the RegularExtra decorator, which adds a charge and a label to the target object (the pizza). Because the labeling function is already provided by the abstract decorator and inherited by all subclasses that extend it, you only need to implement the pricing functionality. Listing 7-4 takes care of that.
Next, you need to create the NoCostDecorator, which modifies the label string but does not add to the cost of the pizza. See Listing 7-5.
Finally, in Listing 7-6, you implement the DoubleExtra decorator to avoid printing the topping twice on the label. The decorator doubles the price and adds the keyword double in front of the target label.
Now that the decorator pattern has been implemented to add extra toppings to your pizza, you can test your implementation.
Order fourSeasonsPizza = new Pizza("Four Seasons Pizza", 10);
fourSeasonsPizza = new RegularExtra("Pepperoni", 4, fourSeasonsPizza );
fourSeasonsPizza = new DoubleExtra("Mozzarella", 2, fourSeasonsPizza );
fourSeasonsPizza = new NoCostExtra("Chili", 2, fourSeasonsPizza );

System.out.println(fourSeasonsPizza.getPrice());
System.out.println(fourSeasonsPizza.getLabel());
The output in the console will be as follows:
18.0
Pizza, Pepperoni, Double Mozzarella, Chili
But wait! There is a potential bug! Chili is not free if you order it as a side dish, but the chef is happy to offer it free on a pizza. You need to make sure the system accounts for those differences. Just imagine that these values and labels come from a database. What would you do to create different behaviors for chili? One option might be to create two chili objects: one labeled as “with pizza.” Clearly, this would be a hack, leaving a backdoor open for any waiter to order free chili for his friends. Another option would be to create an additional constructor method in the abstract class that does not take a price parameter. Any decorator that does not charge for extras could implement this.
IMPLEMENTING THE DECORATOR PATTERN IN JAVA EE
Unlike most other patterns described in this book, you implement the decorator pattern by declaring the decorator classes in the bean.xml deployment descriptor (except when annotated with @Priority; see the following section“Decorators Without XML Configuration”). Luckily, this configuration is simple and gives you the advantage of pluggability and control over the order in which the decorators are invoked.
The decorator implementation in Java EE introduces two new annotations: @Decorator and
@Delegate. @Decorator annotates the decorator class, and @Delegate annotates the delegate injection point where the class to be decorated is injected.
You will use the example of a shop that wants to discount some of its products. It will use a decorator to apply this discount to the regular retail price. In Listing 7-7, you start by creating the interface that you will use to connect the decorator with the object you want to decorate.
The interface introduces the generateLabel method, which the decorator implements to add its discounting behavior. In Listing 7-8, you create the Table class. It is the product that you want to be decorated; therefore, it implements the Product interface.
You create the PriceDiscountDecorator decorator by implementing the Product interface. This class implements the generateLabel method and adds its discounting behavior. The decorator reduces the price of a product by 50 percent and adds the text “(Discounted)” to the product’s label.
To enable the container to identify this class as a decorator, you must annotate it with @Decorator. The delegate injection point (the instance that will be decorated) is annotated with @Delegate and must be an injected field, an initializer method parameter, or a bean constructor method parameter. The delegate type must be the interface implemented by the classes that you want to be decorated—in this case, Product. The CDI container injects any available instance of the Product interface into the product member variable as shown in Listing 7-9.
Finally, you must declare the decorator in bean.xml. Although most of the configuration has already been done via annotations, you still need to add some XML configuration to make the decorator work. The configuration might seem disappointing because you have already annotated your decorator; nevertheless, the configuration is simple and necessary so that you can define the order of execution of the decorators (if more than one). Add the following lines to beans.xml:
<decorators>
    <class>com.devchronicles.decorator.PriceDiscountDecorator</class>
</decorators>
Your work is done. You can now use your decorator.
@Any
@Inject
Product product;

public void createPriceList(){
    System.out.println("Label: " + product.generateLabel());
}
An instance of Table is injected into the Product member variable, and the generateLabel method is called. The output to the console will be as follows:
Label: 12.5, Dining Table (Discounted)When a call is made to the generateLabel method of any Product instance, the container intercepts it. The call is delegated to the appropriate method of the PriceDiscountDecorator decorator, where it discounts the product’s price and passes the call onto the original destination by calling the generateLabel method of the Table object.
A call chain is set up that includes all the decorators that are declared to decorate classes that implement the Product interface. The order in which the decorators are called is determined by the order in which they are declared in the bean.xml deployment descriptor.
You are going to see this in action in Listing 7-10, where you define another decorator. You create the BlackFridayDiscountDecorator decorator, implement the Product interface, and add the @Decorator and @Delegate annotations.
You must add the decorators to the bean.xml archive in the order that you want them to be invoked. Here, you declare that the PriceDiscountDecorator decorator should be invoked before the BlackFridayDiscountDecorator decorator.
<decorators>
     <class>com.devchronicles.decorator.PriceDiscountDecorator</class>
     <class>com.devchronicles.decorator.BlackFridayDiscountDecorator</class>
</decorators>
When the generateLabel method is invoked, a call chain is set up that includes the two decorators. The call to generateLabel is intercepted and delegated to the generateLabel method of the PriceDiscountDecorator. It calls getPrice, which will be intercepted and delegated to the getPrice method of BlackFridayDiscountDecorator, which in turn calls the getPrice method of its injected Product object. (This is the same instance that you injected into the PriceDiscountDecorator decorator.) This invocation is not intercepted because there are no more decorators declared for this interface, and it calls the getPrice method in the Table object. Once this call has finished, it returns down the call stack to the first getPrice method. This is called returning the price of the Table. The decorator reduces the price by 50 percent and calls the setPrice method. This call is delegated up the call chain until it reaches the Table object, where the new price is set. Then the call returns down the call chain.
The getLabel method is called and creates a call chain similar to that of the getPrice method.
Finally, the generateLabel method is invoked and intercepted by the BlackFridayDiscountDecorator decorator. The price is discounted by a further 25 percent, and a call chain similar to that set up by the PriceDiscountDecorator decorator is initiated.
The output to the console follows:
Label: 6.25, Dining Table (Discounted)For the chain to continue unbroken, the generateLabel method must delegate to the generateLabel method of the delegate injected instance; otherwise, the chain is broken and only the first decorator is invoked.
All classes that implement the same interface as the one implemented by the delegate injection point are decorated, but only if those decorators are declared in bean.xml. This has two major implications:
- Decorators can be enabled and disabled at deployment time by editing the
bean.xmlfile. This gives great flexibility over when and which decorators are invoked. For example, you can implement a price discount decorator only for the duration of the sales period and disable it when the period comes to an end. The flexibility of the deployment descriptor declaration means that this decorator can be easily enabled again if debugging information is later required. - A decorator is automatically applied to classes that implement the same interface. This is efficient at the time of adding new classes because they are decorated with no additional coding. However, this could prove inconvenient if there is a requirement that not all classes of the same type are decorated. Luckily, there is a solution to this situation that involves using qualifiers to annotate only those classes that should be decorated.
To not decorate all classes of the same type, you need to create a custom qualifier and annotate the delegate injection point and the classes that you want decorated. You’ll create a Plate product that implements the Product interface. Only this product must be discounted. To implement this requirement, you annotate it with a custom qualifier, thus excluding the other product from being decorated.
You create a custom qualifier and call it @ClearanceSale.
@Qualifier
@Retention(RUNTIME)
@Target({FIELD, PARAMETER, TYPE})
public @interface ClearanceSale {}
In Listing 7-11, you create the new implementation of the Product interface and annotate it with your custom qualifier.
Finally, you annotate the delegate injection point in the decorator that you want to invoke. In this case, choose the PriceDiscountDecorator decorator.
@ClearanceSale
@Any
@Inject
@Delegate
private Product product;
Only classes that are annotated with @ClearanceSale and implement the Product interface are injected into the delegate injection point of the PriceDiscountDecorator decorator; therefore, only your Plate class will be decorated. A delegate injection point can have as many qualifiers as is required, and it will only be bound to beans with the same qualifier.
Decorators Without XML Configuration
At deployment time, the CDI container scans all the JAR and WAR files in the application looking for bean.xml deployment descriptors. For those that it finds, it processes each one in turn, making the appropriate configurations. When it meets the <decorator/> descriptor, it enables the decorators for the archive in which the bean.xml file was found. It does not enable them for the whole application. This is a problem for developers who want the decorators to apply to all classes that implement the same interface regardless of where they are in the application. Since CDI 1.1,4 it has been possible to enable decorators for the entire application by annotating the decorator class with @Priority and an Interceptor.Priority value. Here is an example of how to enable your two decorators for the whole application.
@Priority(Interceptor.Priority.APPLICATION)
@Decorator
public class PriceDiscountDecorator extends AbstractDiscountDecorator

@Priority(Interceptor.Priority.APPLICATION+10)
@Decorator
public class BlackFridayDiscountDecorator extends AbstractDiscountDecorator
Decorators annotated with a lower value priority are called first. In the preceding example, PriceDiscountDecorator is invoked before BlackFridayDiscountDecorator.
Decorators annotated with @Priority are called before decorators in the deployment descriptor. If a decorator is enabled in both, it is called twice. This may lead to undesirable results, so you need to ensure that decorators are enabled in only one way.
WHERE AND WHEN TO USE THE DECORATOR PATTERN
The decorator pattern dynamically adds behavior to an object at run time or when it is not possible or advisable to use subclassing (perhaps because it would create multiple subclasses). The pizza restaurant example shows how to add behavior to a pizza object at run time based on choices the customer made.
The functionality of an application programming interface (API) can be extended and
improved by wrapping it in a decorator. Data streams are often decorated in this way. java
.io.BufferedInputStream is a good example of a decorator wrapping a lower-level API and adding functionality to buffer an input stream.
In Java EE, decorators are implemented via Context Dependency Injection (CDI). You can use decorators to add new business behavior or any other functionality that can be wrapped around the original object. However, this design should be well documented and clearly implemented to allow for better maintainability.
The pluggability of decorators declared in the deployment descriptor makes it easy to enable and disable decorators without recompiling and redeploying. In a hot deployment environment, the server does not need to be restarted for the changes to the bean.xml to take effect. This makes it extremely easy to change the behavior of an application in a production environment with no interruption to service.
Qualifier use provides a finer grain of control over the execution of decorators than enabling/disabling them in the bean.xml deployment descriptor. You can use qualifiers to exclude certain implementations of an interface from being decorated or to apply different decorators to implementations of the same interface.
A decorator intercepts calls only to certain Java types. It is aware of all the semantics of that interface and can implement business logic. This makes it perfect for modeling business concerns that are identifiable for a certain interface type.
Decorators are often contrasted with interceptors. Interceptors intercept invocations of any Java type, but they are not semantically aware and therefore are not a suitable tool for modeling business concerns. Interceptors are used to implement cross-cutting concerns such as logging, security, and auditing that are not related to business logic.
The heavy use of decorators may introduce runtime bugs, a harder-to-understand code base, and a loss to the advantage of strongly typed static polymorphism. It may also introduce additional test cases. However, decorators can provide almost unlimited extensibility and a great interface for future implementations without breaking old code.
SUMMARY
In this chapter, you have seen how the implementation of the decorator pattern in Java EE is almost unrecognizable from its pre-Java EE ancestor. The object to be decorated is instantiated and injected by the container, and the decorators to be applied are determined by declarations made in the bean.xml deployment descriptor or via the strategic use of custom qualifiers.
The use of annotations and dependency injection has reduced the number of lines of code you must produce to implement a decorator solution and made it easier to introduce additional new classes, which are automatically decorated by virtue of the interface they implement.
You have seen how the decorator pattern has evolved into what is effectively a pluggable pattern that can be enabled and disabled while the application is in production with no loss to service. However, it maintains its original design principle of adding behavior or responsibilities to the objects it decorates.
EXERCISES
-
Extend the shop example given earlier by adding more discount decorators and introducing more qualifiers to gain finer control over which decorators are invoked for which concrete implementations.
-
Implement the decorator pattern on an existing API to add new functionality. For example:
java.io.FileInputStream. -
Create a decorator that adds behavior to a bank account system such that when the client withdraws more than a certain amount of cash, an SMS text message is sent to the client advising of the withdrawal.