
Chapter 4: Installing and Configuring SharePoint 2010
What’s In This Chapter?
- Running prerequisiteinstaller.exe and setup.exe
- Avoiding standalone installation
- Running the Config Wizard
- Running the Central Administration Wizard
- Handling post-setup configuration
- Installing SharePoint 2010
Please read this chapter! It has become commonplace for IT professionals and consultants to just “wing” the installation and configuration of software, figuring if there are any issues along the way a quick trip to Bing will get them squared away. While this may be true, it is hardly considered best practice.
This chapter walks you through all of the steps necessary to get your users a SharePoint site they can access. Starting with installing the software and then working through running the two configuration wizards, you will be on your way. Once you are done with the wizards, you will make some additional changes to Central Administration. With all of the knobs turned and the buttons pressed, you will then create a web application and site collection. At that point you are ready to turn over SharePoint to the users. Then there is nothing to do except cross your fingers and hope for the very best. Or if you are the proactive type you can check out Chapter 15 where monitoring is covered.
It is interesting to look back over the past five years and see that SharePoint911's most popular service has been performing server audits—essentially, walking through the install and configuration steps performed to build out a server farm and discovering and correcting the errors found with the initial installation. Can you hazard a guess as to how many of those farms were configured 100% correctly? The answer is zero. While it is true that some of them only had minor issues, the vast majority of them had major issues. How were these servers deployed? By the “Next, Next, Bing it” method. It just doesn’t work.
So read this chapter before attempting to install and configure your server. That way, if it is ever audited, you can get the highly coveted “Your server is perfect!” feedback.
SharePoint installation has followed the lead of a lot of the other Microsoft server software, and now includes its own tool, the Products Preparation Tool, to install all of those pesky little programs that are required to make your farm run. Figure 4-1 shows the list of these programs.

By default, when you run the tool it first configures IIS for you with the necessary settings. Then it checks for each of the listed programs and if they are not installed, or if the wrong version is found, the tool will access the Microsoft Download Center and download and install them for you automatically. Depending on changes made to your server and other updates you may have previously installed, you may have to reboot at this point. SharePoint will prompt you if this is necessary. Also, if a reboot is required to continue running the prerequisite installer you will be prompted to click Finish to perform the reboot. Then when you log back into the server the prereq installer will automatically pick up where it left off.
For some administrators, the process of having the tool automatically access the Internet to download all of these files is either not possible or not preferable. If you find yourself in this situation, you can manually download the files from the Internet. The easiest way to ensure that you are getting the correct files is to use the link from Figure 4-1 labeled “Learn more about these prerequisites.” Clicking the link takes you to a TechNet page that contains links to all of the installers. With these installers in hand you have two options. The first option is to install each program individually to get everything your server needs; this would be ideal in one-off situations. The other option is to take advantage of the command-line switches available to the prerequisite installer by running the following command:
PrerequisiteInstaller.exe /?
Figure 4-2 shows the available installer command-line options.
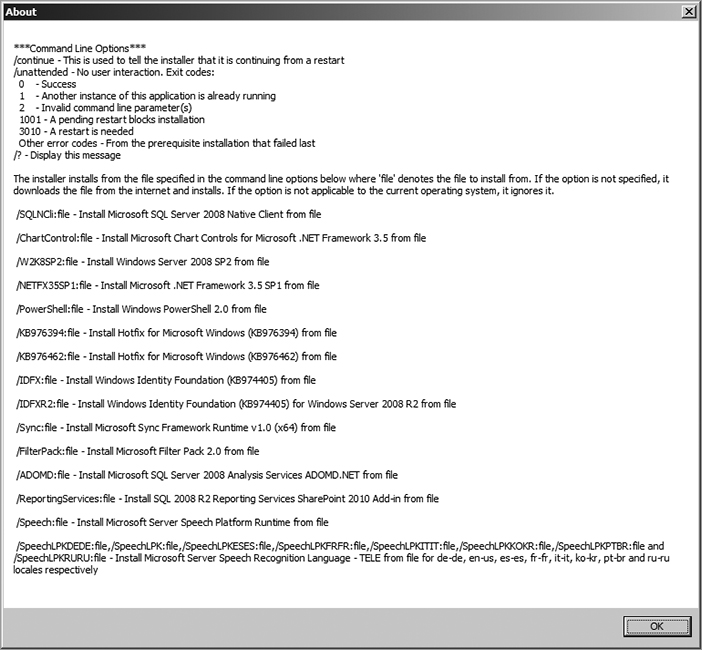
Armed with this information, it is now possible for you to create a command line that installs all of the prerequisites for you from the locations to which you downloaded them. As you can tell, this is a pretty long command line and would not be much fun to write, so it’s probably not something you would want to do for a one-time install. Conversely, if you are trying to streamline the process and make it repeatable across servers, this might just be the ticket.
Where Is PrerequisiteInstaller.exe?
Looking for PrerequisiteInstaller.exe? If you have a CD/DVD with SharePoint 2010 on it from Microsoft there is a good chance on the root of that disc you will find the EXE in question. But, if you are like most people, you just have an OfficeServer.exe or SharePoint.exe you downloaded from Microsoft.com. In this case you cannot access the individual files by default. To access the files you will need to extract out the contents of the EXE you downloaded first. To do this, open a command prompt, navigate to where you downloaded OfficeServer.exe, and then run the following command:
OfficeServer.exe /extract:c:install
This will extract all of the SharePoint files and you can then find the preparation tool at c:installPrerequisiteInstaller.exe.
When the prerequisite installer finishes, you should be greeted with an Installation Complete message. If any part of the process failed, you will see an error message and a link to the log file. It is a fairly concise, easy to read log file, so if you are getting errors don’t be afraid to crack it open. In most cases it will make it clear what installation or upgrade failed and why.
Two common issues seen with the prerequisite installation to this point are not having connectivity to the Internet from your SharePoint server and having PowerShell 1.0 already installed. The Internet issue is pretty obvious, along with the work-arounds noted above for manually downloading them; but the PowerShell issue requires a bit more explanation. If you are running on Windows Server 2008, there is a decent chance that you have already activated the Windows PowerShell feature. Some products will even activate this automatically when they are installed; SQL Server is an example of an application that installs PowerShell when it is installed. This feature uses Windows PowerShell 1.0 but SharePoint requires Windows PowerShell 2.0. When the prerequisite installer runs, it sees that Windows PowerShell 2.0 is not installed so it tries to download and install it. However, because Windows PowerShell 1.0 is already installed, the 2.0 version fails to install, causing the prerequisite installer to fail. At this point, you need to access Windows Server Manager, deactivate the Windows PowerShell feature, and then run prerequisiteinstaller.exe again.
Now that the prerequisites are out of the way, running setup.exe is the next logical step. Fortunately, setup does a little checking of its own before it does too much. It will check your system and confirm that you have indeed installed all of the prerequisites and that no reboots are needed prior to running setup. Fortunately you have read the previous section and you have gotten all of the necessary supporting programs installed.
The need to reboot is a by-product of all the updates that were installed by the prerequisite installer. Unfortunately, that tool is sometimes too lazy to tell you to reboot, so setup has to step in and deliver the bad news. Take advantage of the time to go get a drink. If it is the middle of the day the vending machine would be a good place to look for one, but if it is the middle of the night the executive refrigerator/bar might be calling your name.
If setup should fail for any reason, the best place to look for details is the logs at c:program filescommon filesMicrosoft sharedweb server extensions14logs. Sometimes setup will give you a handy link, but often you need to find it on your own. Now you know where to look.
Choosing Your Installation Type
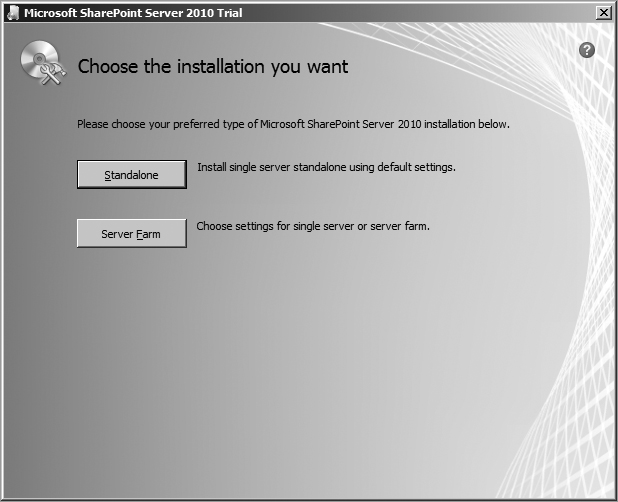
After you get through the checks and licensing, you will find yourself facing a crucial decision. Your choice on the screen shown in Figure 4-3 can make or break you; it is here that you must decide between a Standalone install or a Server Farm install.
The real question is do you want a SharePoint environment you can be proud of and show off to your dog or do you want something that will make your four-legged friend laugh at you?
Standalone Install
You may have heard standalone installs referred to as basic installs or single-click installs. They have been around since the early days of SharePoint and are not going away any time soon. They are meant, with good intentions, for the casual evaluation of SharePoint, the idea being that you click “Standalone install” and a few minutes later, with no effort on your part, there is a running SharePoint farm for you to evaluate. The install process will take care of all the details for you. These include installing a new instance of SQL Server 2008 Express, configuring SharePoint to store all databases on that instance, configuring all of the necessary service applications, and creating a web application and, finally, a site collection. You are ready to dive headfirst into evaluating SharePoint. Not so fast … . There are a lot of things you should take time to consider before jumping headfirst into this type of install. The remainder of the section reviews some of the common questions/issues you need to consider before choosing your installation type. Once you read through the rest this section, it should be clear why Standalone or Basic installs are not recommended. Remember, should you choose to proceed, you have been warned!
SharePoint, the Proof of Concept That Lasts Forever
It is very common for an organization to quickly stand SharePoint up for “a simple proof of concept (POC).” The goal of the POC, to try it for one project and see how well it meets the business needs. Experience has shown that during the POC a lot of permanent, business-critical information ends up stored within SharePoint. This leaves many unsuspecting administrators stuck supporting a server that they built as a POC that is now being used as a production server. Had they known this would happen, they would have never built the POC using temporary methods, knowing it was unsupportable. The best advice? Even if the business is calling this an evaluation or POC or some other silly word and even if they double pinky promise they will have no expectations of this server being permanent, do not believe them. Take the time to build the server as if it will be used for production data. Experience has shown that this is the only way to protect against the POC that becomes the production environment.
Do You Want SQL Server Express 2008?
That is right, folks. When you choose a standalone install, SQL Server Express 2008 is installed and configured for you free of charge. SharePoint will then use that SQL Server instance for storing all of your SharePoint databases. What if you already have SQL Server installed on the server? It doesn’t matter; SharePoint will still create and use the Express instance, ignoring the previously installed SQL Server.
The biggest drawback to SQL Server Express is that you cannot have databases larger than 4GB in size. It’s unlikely that you would buy this big book to support an application with less than 4GB of data.
SQL Server Express is provided for use with both SharePoint Foundation and SharePoint Server, unlike in the past. Way back in the good old days of Windows SharePoint Services (WSS) 3.0, if you did a Basic install it was configured to use the Windows Internal Database (WID) engine, which did not have size limits. Because SharePoint Foundation is not part of Windows, like WSS was, it cannot use WID. If you are upgrading from WSS 3.0, this change does have some ramifications, as discussed in Chapter 5.
SQL Express 2008 does not include any GUI based managed tools, such as SQL Server Management Studio, which is the GUI tool for managing SQL Server. You can use the command-line tool osql.exe to manage SQL Express. Or, a much better idea is to download the free tool Microsoft SQL Server 2008 Management Studio Express, available from http://www.microsoft.com/downloads/details.aspx?familyid=08E52AC2-1D62-45F6-9A4A-4B76A8564A2B&displaylang=en. This will give you the GUI tools you are used to, and a fighting chance to manage your SQL databases.
It is possible to upgrade the instance of SQL Express to a real version of SQL Server. Check out http://msdn.microsoft.com/en-us/library/ms143393.aspx for an article on how to upgrade SQL Server, as that topic is outside the scope of this book. Keep in mind, however, that this won’t negate the other pitfalls of a standalone install, including the fact that SharePoint will always know you chose standalone, which prevents you from adding additional servers to your installation and may limit your upgrade options down the road.
What Kind of Permissions Do You Want?
It is very easy to ignore what is happening behind the scenes when you do a standalone install. After all, isn’t that the point? If you were paying attention to the process you would have noticed you were never prompted for a username or password. Instead of prompting you for the accounts you want to configure SharePoint to run with, it will use the Network Service and Local System accounts. SharePoint uses these accounts to configure the authentication for services, database connections, and application pools. These two special accounts are used for everything in place of real credentials. For example, your SharePoint Timer service, which is the lifeblood of SharePoint, is configured to use Network Service.
While these accounts are great to get you going and to keep you from fretting about creating service accounts, they are at the mercy of the system. Whenever a new Windows or .NET hotfix comes out, you have to proceed with extreme caution and confirm that they haven’t reset some permission, thereby disabling SharePoint from running error free. It has happened with previous versions and it will most likely happen again. Your SharePoint accounts are so important that Chapter 8 spends a great many words discussing how and when to use them and what permissions they need. A basic install just bypasses all of that—not an ideal situation.
Forever Is a Long Time
When you choose a standalone install you are committing to it forever. That’s because SharePoint always knows you originally did a standalone install. This will constrain a lot of your options going forward. For example, you will lose the capability to add additional SharePoint servers later when you want to scale out your system. Chapter 3, which discusses the farm architecture and capacity, explains how simple it is to add capacity after the fact by just plugging in a new server to the farm. With a standalone install you cannot add additional servers. If adding another server is an absolute must, then you must back up your data, format the server and start over from scratch. That doesn’t seem like much fun.
Your upgrade options may also be limited. Basic installs of 2003 were not able to use all of the 2007 upgrade options. Fortunately, 2007 basic installs aren’t limited in this way when upgrading to 2010, but who knows what the story will be moving from 2010 to the next version? That is another risk of this install method.
Patching
Windows Update will only consider installing a SharePoint patch for you if you have done a standalone install. Patching SharePoint servers is a critical task that needs to be undertaken with thought and planning. The idea that Windows Update might decide to install one at 3:00 a.m. on Tuesday is a little scary.
The patching mechanisms in SharePoint 2010 have been drastically updated and are actually pretty cool. Wouldn’t you prefer to be at the helm playing with those new options, rather than be at the mercy of Windows Update? Check out Chapter 5 for all of the patching excitement.
Standalone Installation for Developers
There may be one small case where a Standalone install is a decent option. For SharePoint 2010, both Foundation and Server, Microsoft allows the installation of SharePoint on Windows 7 and Vista SP1 or SP2. (It does require a 64-bit operating system.) The idea is that developers can install SharePoint locally, avoiding the need to have a server to do their work. If you choose to go with this model, then a basic install is the only choice. It is also highly recommended that developers have access to SharePoint running on Windows Server to test their code, and that the development environment matches the configuration of production as closely as possible. For more details and a step-by-step guide to installing on a Windows client machine, check out http://msdn.microsoft.com/en-us/library/ee554869(office.14).aspx.
The Standalone Installation Process
If this list has not convinced you to avoid a standalone install, or if you need to do one for a specific reason, such as to create a single-server development environment installation on Windows 7 or Windows Vista, the process is simple.
When you click Standalone from the splash screen, the install begins immediately. The process will install all of the bits necessary for SharePoint. Once completed, it will then automatically run the Configuration Wizard for you. No input is required. If everything goes correctly, the next time you are prompted is from an Internet Explorer window. Here you choose what template you would like to use for the root site collection. The install automatically creates a web application at http://<YourServerName>. At the Choose your template screen, you can also upload a custom template to the gallery and use that template, which is a nice touch.
Hopefully, you have read this section and will heed its warnings. Standalone installs are very simple to get up and running, but they lock you into a limited set of options and present a lot of potential nightmares going forward. If you do find yourself running a standalone install, the best advice is to back up the databases and format the C: drive.
Server Farm Install
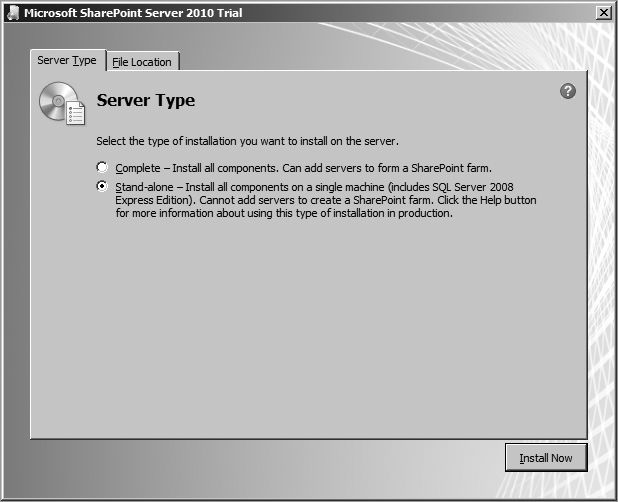
You finished reading the previous section and you get it—don’t do a standalone install—so you click Server Farm like a good SharePoint administrator and what is your reward? Take a gander at Figure 4-4 to see.
Eek! The default setting is Stand-alone. How is Stand-alone different from the Standalone install we just feverishly avoided? Other than their spellings, not a gosh darn thing. That’s right; Microsoft wants you to do a standalone install so badly they make you avoid it twice. Luckily, you are smart enough to know better, so select Complete before clicking Install Now.
A complete install will install all of the SharePoint bits on your server but will do nothing to configure them. Once the install is done, you run the configuration wizards to configure things as necessary. The key advantage of this approach is that you have complete control of all the service accounts you use, and what features are activated. In addition, you are free to reconfigure the server at a later time because all of the functionality is already installed. This flexibility may not seem important on day one, but as you work with SharePoint and need to scale in new business requirements, you will grow to appreciate it.
Web Front End Only Install
SharePoint Server 2007 had a third (advanced) install option called Web Front End (WFE). This option provided you with the flexibility of adding the server to a farm and using accounts as you wanted, but it lacked some of the components. The server only had the capability to act as a web front end, serving up SharePoint pages. You would sometimes see these servers used in large environments or for public-facing SharePoint sites. The benefit was that they had a smaller attack vector because there were fewer bits on the server to be exploited.
The major drawback was you couldn’t use a WFE-only server as a query or index server. You lost all deployment flexibility because you couldn’t move the server roles around. For example, if you wanted to rearrange your hardware before upgrading to this version, reallocating WFEs wouldn’t be possible. In order to go from a WFE-only install to a complete, you have to uninstall and reinstall, something to keep in mind when choosing between the two.
WFE-only was so infrequently used that Microsoft has removed it from the GUI installer completely in SharePoint 2010. If you are part of that small minority who still needs that functionality, it is available through a scripted install.
Choose a File Location
The File Location tab on the dialog in Figure 4-4 has two fields where you can specify locations for the SharePoint Server files and the search index files, respectively. From this tab you can change either from their default C: location without any issue. You can also change the locations later, so don’t agonize over the settings if you don’t know them now.
Notice there no setting for changing what is known as the SharePoint root or the “14 hive,” the files located at c:program filescommon filesMicrosoft Sharedweb server extensions14. This is intentional; those files should always be left on the C: drive. They generally take up around 1GB of space at maximum.
Scripted Install
For some administrators all of that clicking does nothing but wear out their little finger. They find themselves for one reason or another wanting to automate their install. Because of this, scripted installs have grown in popularity over the last couple of years. The idea is that working out all of your configurations ahead of time and packaging them into a nice script can greatly accelerate your recovery plans. This is because, instead of doing an install through the GUI and then reading through documentation to rebuild your farm, you can just run your initial scripts again and you are ready to start restoring data.
The first step is modifying a config.xml file with your settings. SharePoint has several files with default settings that you can use as a jumping-off point. If you are doing your install from the downloaded EXE file, then you have to work a little bit to get to them. First, extract the files from the EXE by running the following command:
Officeserver.exe /extract:C:install
If you aren’t familiar with how this works refer back to the sidebar “Where Is PrerequisiteInstaller.exe?” from earlier in this chapter.
After extracting all the files to c:install, look in c:installfiles, where you will see several folders. Each of those folders contains a different config.xml file. If you open one of the files with your favorite XML editor, such as Notepad, you will see that the file is pretty self-explanatory. The contents of c:installfilessetupconfig.xml are as follows:
<Configuration>
<Package Id="sts">
<Setting Id="LAUNCHEDFROMSETUPSTS" Value="Yes"/>
</Package>
<Package Id="spswfe">
<Setting Id="SETUPCALLED" Value="1"/>
</Package>
<Logging Type="verbose" Path="%temp%" Template="SharePoint Server
Setup(*).log"/>
<!--<PIDKEY Value=”Enter Product Key Here” />-->
<Setting Id="SERVERROLE" Value="SINGLESERVER"/>
<Setting Id="USINGUIINSTALLMODE" Value="1"/>
<Setting Id="SETUPTYPE" Value="CLEAN_INSTALL"/>
<Setting Id="SETUP_REBOOT" Value="Never"/>
</Configuration>
This is the configuration file that SharePoint uses for defaults when you run the normal GUI setup by running setup.exe. Let’s look at a couple of quick changes you can make.
Look at the line that reads:
<!--<PIDKEY Value="Enter Product Key Here" />-->
If you remove the <!-- from the beginning, and the --> from the end, you can add your product key and get a line like this:
<PIDKEY Value="11111-22222-33333-44444-55555" />
This might be a good idea if you are putting the files on a file share to be reused often. I also recommend changing SERVERROLE to APPLICATION in the next line so that the default is no longer Stand-Alone:
<Setting Id="SERVERROLE" Value="APPLICATION"/>
Those are little novelty tricks to save you some typing and clicking. The real power comes from customizing c:installfilessetupsilentconfig.xml. Modify this file with your desired SEVERROLE and PIDKEY and then pass a reference to the file. Now the install magic just happens. Use a line like the following at the command prompt:
C:installsetup.exe /config c:installfilessetupsilentconfig.xml
If all of your settings are acceptable, the install will just run for you. It may take a couple of attempts to get everything right, but once you do you are on the road to a scripted install.
One gotcha to watch out for is that the config.xml file is case sensitive.
While there is no SharePoint 2010 reference available yet, the settings are very close to, if not exactly the same as, those used with SharePoint 2007. You can find that reference at http://technet.microsoft.com/en-us/library/cc261668.aspx.
Using the SharePoint 2010 Wizards
SharePoint 2010 provides two wizards to help you get a new SharePoint farm up and running: the SharePoint Products and Technologies Configuration Wizard (Config Wizard) and the Initial Farm Configuration Wizard (Central Administration Wizard). The Config Wizard is used to create a new SharePoint farm or add your server to an existing farm. The Central Admin Wizard is used to help you provision service applications.
Configuration Wizard
After the install finishes you are brought to the configuration wizard (which could be called the grey wizard—more on that later). This tool is responsible for helping you create or join a SharePoint farm and then configuring all of the necessary databases and files for that farm to work.
Connecting to a Server Farm
A SharePoint server farm is one or many SharePoint servers that share the same configuration database, as explained in Chapter 2. The first important decision you need to make when running the configuration wizard is whether you want to “Connect to an existing server farm” or “Create a new server farm.” More simply put, do you want to attach to an existing configuration database or create a new configuration database?
If you choose to connect to an existing server farm, you are prompted to enter the SQL Server that hosts the database, after which you click Retrieve Database Names, and then you select the configuration database, as shown in Figure 4-5. After that you will need to enter the farm passphrase (covered a little later in this chapter) to join the farm. You will also have the opportunity to specify this server as the host for SharePoint Central Administration if you wish.

With this information, the wizard can then run. It will configure the files and registry on your server with the proper settings and permissions, and add your server to the SharePoint farm and register it with the appropriate databases. By default, this server will also host the web application role, so all web applications, except for Central Administration, will be created and available on this server.
What About Duplicate Database Names?
You shouldn’t encounter any database name conflicts. If you are using the same SQL Server to host multiple SharePoint farms, then you should have multiple instances of SQL Server configured. Avoid having two SharePoint farms using the same SQL instance; managing those databases can quickly become a nightmare, and security is very touchy.
Creating a New Farm
If you choose to create a new farm, the options are slightly different but similar. You will be taken to a screen to specify the Database Server and Name. It is recommended to use the default database name of SharePoint_Config. You will also need to enter the username and password for your server farm account.
Establishing the Farm Account
It is very important to assign the correct settings for the server farm account. This account needs to be part of the domain, but it only needs to be a regular user and not a domain admin. As part of the configuration wizard, SharePoint will elevate this account’s access as necessary. It will be given the SQL Roles of dbcreator and securityadmin. The account will also be added to the following local security groups:
- IIS_IUSRS
- Performance Log Users
- Performance Monitor Users
- WSS_ADMIN_WPG
- WSS_RESTRICTED_WPG
- WSS_WPG
The account is also given the following Local Security Policy - User Rights Assignments:
- Adjust memory quotas for a process
- Logon as a service
- Replace a process level token
The account will be used for the following Windows Services:
- Windows SharePoint Services Timer V4
- Windows SharePoint Services User Code Host V4
Finally, the account is used for the application pool for SharePoint Central Administration, the Topology Web Service, and the Security Token Service. With all of that it is very clear that this account should be considered carefully.
The Farm Passphrase
In the next dialog of the Config Wizard, SharePoint prompts for the farm passphrase. The passphrase is used to secure farm communications and will have to be provided by any additional servers joining the farm. You should choose a reasonably strong passphrase and document it in a safe place. Recovering a lost passphrase is very difficult if not impossible. Changing the passphrase is possible after the farm is online using the Windows PowerShell cmdlet Set-SPPassPhrase.
Central Administration Settings
In the next screen, the Central Administration settings enable you to configure a port number and authentication method for your Central Admin web application. It is recommended that you use a port number that is easy to remember for remote administration.
For authentication methods, the default is NTLM, which should be used unless you need the Central Administration web application to use Kerberos authentication; typically this is not necessary. Each web application has its own authentication settings, so using NTLM for Central Administration does not preclude you from using Kerberos on a different SharePoint web application.
Advanced Settings—SharePoint Foundation Only
The last screen of the Config Wizard enables you to confirm the settings you have chosen before committing to them. If you are doing anything other than a SharePoint Foundation install, you will see an Advanced Settings button that is grayed out. If you are doing a SharePoint Foundation install, this button is enabled. If you click the button, you are taken to the Enable Active Directory Account Creation Mode screen shown in Figure 4-6.
Active Directory Account Creation Mode (ADACM) is an interesting but mostly unused feature of SharePoint. It allows your SharePoint farm to be set up to automatically create Active Directory users when you add them to SharePoint. These new accounts are created in the organizational unit (OU) specified on the screen. You can even have SharePoint e-mail a notification to users when their account is created, along with the password. This is a truly automated scenario that works very well in hosted environments.
Of course, there is a down side. You cannot use existing Active Directory accounts to access SharePoint, only accounts created through this mode. So if you are deploying SharePoint in ADACM, you cannot use your existing AD account to access SharePoint. Users hate having one username and password; can you imagine telling them they need a second username and password to access SharePoint? Now you can see why this mode is not used very often. And remember, it is only available in Foundation, not Server.

Other Uses for the Configuration Wizard
After configuration, it is typical to forget about this powerful tool, but that would be a mistake. While its main focus in life is running after setup.exe to get things squared away, it comes into play throughout the life of the server. It can be used to change the server that hosts the Central Administration site, commit patches and upgrades to the farm, and cleanly remove a server from the farm before being decommissioned.
Error Handling for the Configuration Wizard
If the Config Wizard encounters any errors it will fail and give you the basics of the error along with a link to the log file. In the log file, which is located in 14logs, you will be able to trace through the full details of the error. The most common error seen at this point is related to connecting to the SQL Server, due to either network issues or security settings on the SQL Server.
Central Administration Wizard
SharePoint thought having the grey wizard was so cool that for 2010 it now has added a white wizard. After running the grey wizard (also known as the SharePoint Products and Technologies Configuration Wizard), Central Administration opens up the white wizard (also known as the Initial Farm Configuration Wizard). On the first page of this white wizard, you can either have SharePoint automatically provision service applications for you using default settings or choose to configure everything manually. Service applications are covered in great detail in Chapter 7.
What Do the White Wizard and Grey Wizard Have To Do With Anything?
In the grand scheme of things… nothing. SharePoint 2010 is packed full of wizards with very similar names that do similar tasks. So in order for the authors to keep track of them they have taken to referring to them by color. The SharePoint 2010 Products and Technologies Wizard, which is also called the configuration wizard by some, uses grey as the primary color for all of the screens while the Initial Farm Configuration Wizard is run on pages that have white as the primary color. So the names grey wizard and white wizard were born. Also, if you are fan of the Lord of the Rings books or movies you may also recall a very similar naming situation. At the end of the day what you call the wizards are not important; keeping track of which one does what is.
If you choose to have SharePoint help you configure your farm, you are taken to a screen where you can select an existing managed account or have the wizard create one for you, and then select which of the service applications you wish to have the wizard configure for you.
The wizard will also create a web application at http://servername and will prompt you for what template to use for the site collection. The account you are logged in with will be made the site collection administrator. If you are like most users, you probably won’t use this site collection so you can safely click Skip.
Managed Accounts
New to SharePoint 2010 is the concept of managed accounts. With a managed account, you register a domain account with SharePoint, which stores the account and its password for reuse. Then, any time you specify an account in SharePoint—whether it is for application pools, database connections, or services—you have to select one of your managed accounts. The major upside of this is that now you have one interface for managing password changes for all of your managed accounts, unlike previous versions where password changes were a complete nightmare. Also, if you choose, you can have SharePoint handle the management of this account’s password altogether.
For example; if you have a domain policy that passwords must be changed every 60 days, either you can configure SharePoint to notify you by e-mail so you can come into SharePoint and change the password manually or you can set SharePoint to automatically change the password in Active Directory. That way, you don’t need to remember who knows the service account passwords because only the SharePoint farm does. If you need to manually change the password for any reason, you can change it from within SharePoint using PowerShell. Working with managed accounts is covered in greater detail in Chapter 6.
Error Handling for the Central Administration Wizard
The Central Administration wizard also has some built-in error handling. If an individual service application fails, Central Administration will provide you with an error message listing the service app that failed, details of the failure, and a correlation ID along with a Next button. It will continue with the other service applications that remain to be configured. You can also look in the ULS log in 14logs for more details. In Chapter 15, you will learn about correlation IDs and how they make your life about a million times easier.
Central Administration Post-Setup Configuration
Although Chapter 6 covers SharePoint administration and how to poke around Central Admin, a couple of topics need to be covered here to get your farm off the ground successfully. This section provides insight into recommended configuration changes you should make before you let the users in and they make a mess.
Outgoing E-Mail
If you are familiar with SharePoint 2.0 or 3.0 outgoing e-mail settings, then this page should look very familiar, as it hasn’t changed in years. You will need to specify the outbound SMTP server along with the From and Reply To e-mail addresses.
The outbound SMTP server can be any e-mail server that allows anonymous relay from the SharePoint server. Because anonymous relay is typically frowned upon, you may need to have your e-mail server administrator enable anonymous relay for the IP address(es) of your SharePoint server(s).
Secure Store Service
The Secure Store Service is a service application that acts as a credential manager. For example, when you set up the PerformancePoint Services application’s unattended service account, the information is stored in the Secure Store Service database. While you are configuring these other service applications, it isn’t always apparent they are having issues because the Secure Store Service isn’t configured, so it is best to configure the service as part of the initial farm configuration.
Thankfully, there is very little to do with this configuration. Simply open the service application and generate a new key. When you generate the key you will need to specify a passphrase for the hash. Be certain to record this passphrase in a safe place. Once the key is generated, your work is done. Pretty simple, but it should save you some confusion later.
Configuring a Search Schedule
Another good idea is to configure a generic search schedule as part of your initial configuration. This way, while your users are “just testing,” they don’t get frustrated because the search feature doesn’t work. All of Chapter 14 is dedicated to search, and there is a lot of great stuff to learn in order to search correctly; but skipping ahead for now and just enabling an incremental crawl, even just once a day, will go a long way toward avoiding angry phone calls later. This crawl will populate the index with information so when your users use the search box to find items they can get results. Keep in mind that it is easy to overwhelm your server with a too aggressive schedule, so set it to every few hours at most or every day at best until you have learned more about search and understand your data.
Monitoring Drive Space
While you are wrapping up your server configuration it is a good time to think about drive space. By default, everything is going to be on the C: drive of your server. This may be okay if you have a 500GB C: drive, but insufficient space can pose a major problem. Some items you should consider are as follows:
- IIS logs
- Web application directories (C:inetpub*)
- SharePoint ULS logs
- SharePoint usage data collection
- SharePoint search index
Consider whether it makes sense to move some of these files to another drive.
Other Thinking Points
There are a few more things for you to consider. What is your backup strategy? Asking yourself when the server goes down or after an executive needs his or her vacation pictures restored is too late. Once the server is installed and you give users access, you are responsible for their data no matter what your agreement with them might have been, so you better be backing up that data before you let them in. Chapter 12 has plenty on the topic so enjoy the read.
Congratulations! The day you became a SharePoint administrator you also became a SQL administrator. Even if you have great DBAs watching over those SQL Servers, 99 percent of your data is stored there so their problems are your problems. You need to be very vocal in communicating with the DBAs about what they can and cannot do with your databases. And do you know where your performance bottlenecks are most likely to occur? That’s right—on the SQL Server.
Chapter 3 discussed the new HTTP throttling feature and how it enables the server to protect data being written to the server during heavy load periods. If you are doing a VM install of SharePoint on underperforming hardware, consider disabling HTTP throttling. It can cause you some headaches on your slow VM while trying to protect you.
You have learned a lot over the previous several pages about the various installation and configuration options you face while building a SharePoint farm, and the reasoning behind a lot of the recommendations that were made. This section now brings it all together with clear, step-by-step install instructions that will enable you to go from a simple Windows and SQL Server install to a running SharePoint farm.
The Environment
This walk-through uses two servers. One server will be the Active Directory domain controller, with SQL Server 2008 running on it. The second server will be configured only with a pre-RTM SharePoint Server 2010 Enterprise installation. Both machines are actually virtual machine guests.
ServerDC
The first server, named ServerDC, is running Windows Server 2008 R2 (64-bit) with all current Windows Updates installed. It has been preconfigured as an Active Directory domain controller for the Contoso domain. SQL Server 2008 has been installed and has had Service Pack 1 and Cumulative Update Package 2 (KB970315) applied.
ServerSP
The second server, named ServerSP, is also running Windows Server 2008 R2 (64-bit) with all current Windows Updates installed. It is a member of the Contoso domain.
Accounts
Three accounts have been created for this scenario. In most production scenarios you will have additional accounts. The accounts are ContosoSP_Admin, ContosoSP_Farm, and ContosoSP_ServiceApp. Each account has been configured only as a domain user. Additionally, SP_Admin has been given the following additional rights:
- Added as a local administrator on ServerSP only
- From SQL Management Studio running on ServerDC, the account has had a SQL login created with the roles of dbcreator, public, and securityadmin, as shown in Figure 4-7.

The Install
Enough messing around and getting things in order. Time to jump in and get this thing installed.
1. Log in to ServerSP as ContosoSP_admin.
2. Download OfficeServer.exe to your server desktop.
3. Open a command prompt and change directory to your desktop by running the following command:
CD Desktop
4. Run the following command to extract the contents of OfficeServer.exe, as shown in Figure 4-8:
OfficeServer.exe /extract:c:installSharePoint2010

5. Click OK at the “Files extracted successfully.” message.
6. Close the command prompt window and use Windows Explorer to navigate to c:installSharePoint2010.
7. Double-click on PrerequisiteInstaller.exe.
8. Click Next at the Welcome screen. Read and accept the license terms and click Next.
9. At the Installation Complete screen, click Finish. If you have any errors, click on the log and review the errors. Correct those errors and re-run the prerequisiteinstaller.exe.
10. From the c:installSharePoint2010 folder, double-click setup.exe.
11. Enter your product key and click Continue.
12. Read and accept the license terms and click Continue.
13. STOP! This is a very easy place to make a mistake by going too fast. The “Choose the installation you want” screen offers you the choice of a Stand-alone install or a Server Farm. As described earlier in this chapter, it is essential that you change from the default Standalone option to Server Farm before clicking. Figure 4-9 serves as a reminder.
14. STOP! Another easy mistake to be made. In the next screen, Stand-alone is again the default, but for goodness’ sake, click the button for Complete. After double-checking that you clicked Complete, you can click Install Now. The installation will run.
15. When the install completes, the Run Configuration Wizard screen will appear. Leave the check box selected and click Close.

If you are planning on installing the Office Web Applications (OWA), which are covered in Chapter 19, you need to deselect the check box to prevent the Configuration Wizard from running. You then need to run the OWASetup.exe and walk through that install as detailed in Chapter 19.
16. The Welcome Screen will display; click Next.
17. A warning will appear that IIS and SharePoint administrative and timer services will be stopped. Click Yes.
18. The Connect to a server farm screen will open. Select Create a new server farm and click Next.
19. At the Specify Configuration Database Settings screen, input your information as applicable. Figure 4-10 shows the settings used based on server names and accounts in the example scenario. After confirming your selections, click Next.

20. At the Specify Farm Security Settings screen, enter and confirm your passphrase. Be sure to document your passphrase for future reference.
21. At the Configure SharePoint Central Administration Web Application screen, it is recommended that you specify a port number. In the example, 5555 is used because it is easy to remember.
22. Keep the authentication provider for Central Admin at the default of NTLM and click Next to continue.
23. From the Completing the SharePoint Products Configuration Wizard screen, confirm your settings and click Next. This will start the configuration process, which takes a few minutes.
24. At the Configuration Successful screen, click Finish.
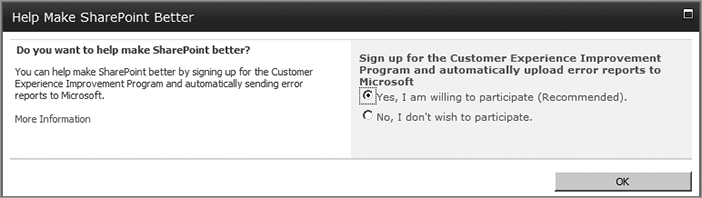
25. SharePoint Central Administration opens automatically. Depending on the configuration of your browser you may be prompted to log in. You should also confirm that the site is an Internet Explorer Trusted site or a Local intranet zone. If prompted, you can choose to participate in the Customer Experience Improvement program or not and then click OK, as shown in Figure 4-11.
26. Central Admin now takes you to a page asking “How do you want to configure your SharePoint farm?” Click Start the Wizard.
27. Enter the username and password of a new managed account. For this example, use ContosoSP_ServiceApp. Remember to add the domain in front of your username as shown in Figure 4-12.

28. By default, all of the service applications will be selected except for the Lotus Notes Connector. Make any necessary changes and then click Next.
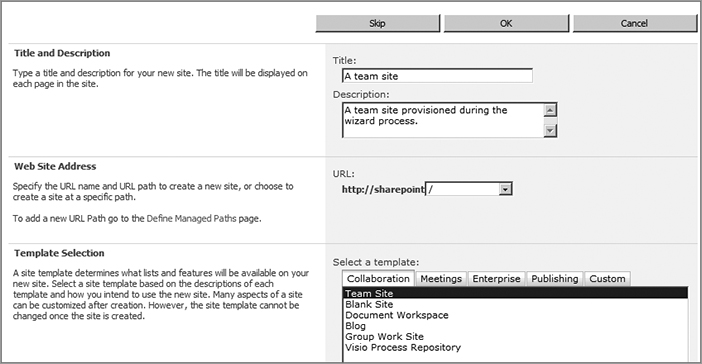
29. After a few minutes you will be brought to a page to create a site collection in the web application SharePoint automatically created for you. Enter a Title and Description and then select a template to use. Figure 4-13 shows an example.
30. When the wizard completes, SharePoint will return a page with a list of the service applications that were created. Click Finish.
31. Configure Outgoing e-mail:
a. From the home page of Central Admin, click System Settings.
b. On the System Settings page, click Configure outgoing e-mail settings from the E-mail and Text Messages (SMS) section.
c. Specify the Outbound SMTP server and the From and Reply to addresses, and then click OK.
32. Configure the Secure State Service:
a. From the left-hand navigation pane, click Application Management.
b. Click Manage service applications from the Service Applications section.
c. Scroll down the page and click Secure Store Service.
d. From the ribbon, click Generate New Key.
e. Enter and confirm a passphrase and click OK.
f. When finished, you should see the message “There are no Secure Store Target Applications in this Secure Store Service Application.” This is normal.
33. Set a simple search crawl schedule:
a. From the Central Admin home page, select Manage service applications.
b. Click the Search Service Application.
c. From the left-hand navigation pane, click Content Sources.
d. Hover over Local SharePoint sites and click the drop-down arrow.
e. Select Edit.
f. Scroll to the bottom of the page and click Create schedule.
g. Define a schedule and click OK.
With these settings done, your farm should be ready to rock and roll. Now would be a great time to put your backup strategy in place.
Creating Something Users Can Use
You have done it. SharePoint is now fully installed and configured—all that is left is creating something your users can use. Of course, the configuration wizard did create a web application at http://servername for you that you could give the users access to, but if you are like some geeks you prefer server names like BigScaryMonsterFromSpace or Server128323-City-State-Country-Company. While both of those names are great for IT, they kind of stink for Betty in accounting.
So instead, create a web application like http://portal.company.com or http://DepartmentName to get users started. Remember that whatever host header you choose you will need to create a DNS record that points that host header at your SharePoint server. For the following example we use portal.contoso.com. A DNS host (A) record was created to resolve portal.contoso.com to the IP address of ServerSP.
One side track before you create your web application. You should use a new unique account for the application pool. For the example use ContosoSP_PortalApp. This account needs to be a domain user. You also need to register this as a managed account before creating the web application.
The following sections walk you through the main steps: creating a managed account, a web application, and a site collection, and adding users.
Creating a New Managed Account
Follow these steps to create a new managed account:
1. From the home page of Central Admin, click Security.
2. Click Configure managed accounts from the General Security section.
3. Click the Register Managed Account link.
4. Enter the username and password. For this example use ContosoSP_PortalApp for the username.
5. Leave the other default settings and click OK.
Creating a Web Application
Follow these steps to create a web application:
1. From Central Admin, select Application Management.
2. Click Manage web applications from the Web Applications section.
3. From the Ribbon, click the New icon.
4. For Authentication, accept the default of Classic Mode Authentication. (For more information on the differences between Classic Mode and Claims Based, check out Chapter 9.)
5. In the IIS Web Site section, select Create a new IIS web site. (Remember that in SharePoint terminology this is called a web application.)
6. For the port enter 80.
7. For Host Header enter portal.contoso.com.
8. Confirm your web application settings to match those shown in Figure 4-14 and then scroll down the page.

9. For the fields Authentication provider, Allow Anonymous, Use Secure Sockets Layer (SSL), and Public URL, accept the defaults.
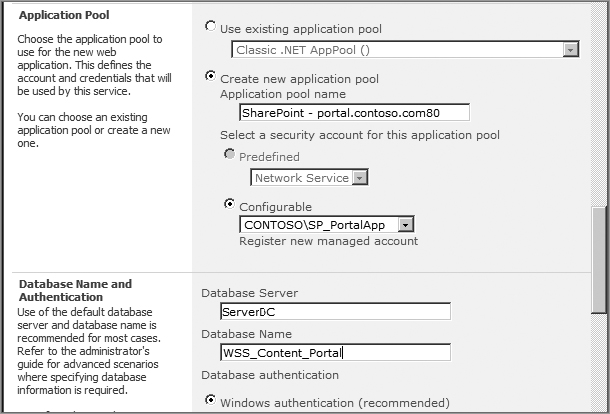
10. In the Application Pool section, select the Configurable drop-down and change it to your new managed account. For this example, select ContosoSP_PortalApp.
11. Change the Database Name from WSS_Content_<big GUID string> to WSS_Content_yourhostheader. For this example, the database name used was WSS_Content_Portal, as shown in Figure 4-15.
12. Scroll down the page and select Yes for the Enable Customer Experience Improvement Program. (This is optional but it is a good idea.)
13. Keep all other defaults and click OK.
14. Once the process is complete, click OK at the Application Created window.
Creating a Site Collection
Follow these instructions to create a site collection:
1. Click Application Management from the left-hand side of the page.
2. Click Create site collections from the Site Collections section.
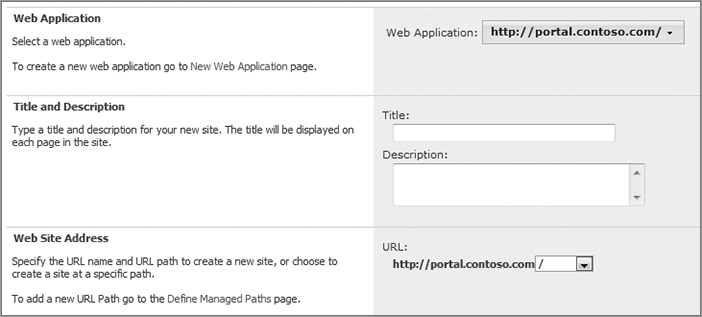
3. Change the web application to your new web application by clicking the drop-down next to http://Servername and selecting Change web application.
4. From the pop-up window, click your web application. For this example, it is SharePoint - portal.contoso.com80.
5. Enter a Title and Description.
6. The URL will be at the default of http://webapplication/. For this example, it is http://portal.contoso.com/, as shown in Figure 4-16.
7. Scroll down the page and choose a template. This will be the template used for the root web in the site collection. You may also elect to choose <select template later…> from the Custom tab. This allows site collection administrators to choose their own template.
8. Enter a Primary and Secondary Site Collection Administrator.
9. Choose No Quota.
10. Click OK. You will get a page with Top-Level Site Successfully Created message. Click OK.
Add Users
The last step is to quickly grant access to the necessary users. For example, if you want everyone to try out SharePoint, you can set up Domain Users to have contributor access.
1. Navigate to your new site collection. For the example, that’s http://portal.contoso.com.
2. Log in as the site collection administrator.
3. There will be a slight delay the first time the site is accessed. Once the page opens, click Site Actions Site Settings.
4. Click Site permissions from the Users and Permissions section.
5. Click the Grant Permissions button from the Ribbon.
6. Enter domain users and select the members group from the drop-down.
7. Click OK. SharePoint is now ready for use.
As you have seen from this chapter, while the install is not overly complicated, there are some opportunities for mistakes, but also many chances to make your life easier going forward. Take the time to proactively consider the installation process, and never fall for the line that “The server doesn’t matter, it is just a POC.” With the knowledge you gained from this chapter, you should be on your way to a great experience with SharePoint 2010. Finally, if you only take one idea from this chapter, remember that standalone installs are the devil.