
Chapter 17: Social Computing and SharePoint 2010
What’s In This Chapter?
- Managing, using, and synchronizing user profiles
- Setting up and customizing My Sites
- Creating and using wikis and blogs
- Applying ratings
- Using the Outlook 2010 Social Connector plug-in
- Searching for people in SharePoint using People Search
Social computing is one of the fastest evolving trends on the Internet. This dynamic trend has touched the corporate environment and most, if not all, companies are thinking about using social computing in some capacity, but we are yet to see broad-scale adoption like we have seen on the public Internet. Social computing is generally about establishing communities, and building and maintaining relationships. It is usually recognized as involving blogs, wikis, social networks like Facebook, and micro-blogging like Twitter. Social computing (usually referred to as Web 2.0 on the Internet and Enterprise 2.0 in the corporate setting), is representative of a collection of different technologies. But in its most general sense, social computing is people interacting and sharing information, which is the exact goal of SharePoint and collaboration. SharePoint’s social computing capability addresses the following areas:
- Capturing and sharing information
- Enabling people to find and engage experts
- Improving productivity
SharePoint 2010 social computing features include a new and better organized My Site, which provides dynamic news feeds so that people can stay up-to-date on colleague’s activities. Central to the social computing capability is the User Profile Service, another service application in SharePoint 2010 new service architecture. Content tagging is a new introduction and all types of content can be tagged, categorized and viewed in the person’s Tag Cloud Web Part, which is one of the built-in web parts. Tagged content can also be located more easily using search. Search and People Search have been improved and they provide excellent tools for finding information and experts. Blogs and wikis have been improved, and they now include the ability to host rich media such as audio and video. All of these topics are discussed in this chapter, which introduces you as an administrator to social computing and provides the information for installing and configuring the numerous options. The chapter begins with a discussion of the User Profile Service, which is at the heart of SharePoint’s social computing capability.
The User Profile Service Application
The User Profile Service Application is a managed application, and it is where the social computing setup begins in SharePoint 2010. This application stores information about all users, which can include profile properties from Active Directory, My Site configurations, and profile synchronization settings. This section describes the uses and configuration settings in the User Profile Service Application. Figure 17-1 displays the main screen of this managed application.

User Profiles and Properties
The People section of the User Profile Server Application contains information about all of the individuals in the organization, and the properties associated with their user profiles.
Manage User Properties
User properties are all of the fields associated with the database of users in the organization, referred to as a directory service. A long list of properties is included and already configured by default. These properties are also set up in visual groupings called sections, mostly for the purpose of organizing them. User properties can be set up in order to automatically pull or push data to the directory service, or configured to be editable by end users from within their SharePoint My Site. A user property is composed of the following:
- Property Settings — The property name is permanent and cannot contain any spaces, but the display name is what is shown to the end users. The type of property is a field type, such as a string, a date, or an integer. Fields of the type single or multi-value string also provide an option to configure a term set to be used for the property. (See Chapter 16 for more information on the concept of a term set and how to set one up.) Multi-value strings are properties that can contain more than one value, and properties can support multiple languages, using the Edit Languages button.
- Sub-Type of a Profile — Subtypes can be used to more granularly categorize the people, such as by a company’s major divisions. Each profile property can be selectively added or removed from these subtypes.
- Policy Settings — Use this section to configure settings such as whether fields are required and who should be able to see them. The privacy setting determines just that — how private is the information in this property? For example, a property such as Home Phone will most likely be set up with a default privacy setting of Only Me or My Manager. If the organization’s policy is that end users are allowed to modify the privacy setting, check the box next to User can override. When the default privacy setting is set to Everyone, the property may also be set as Replicable. This means that the property will be propagated down to each site’s user information list.
On any SharePoint site, click your user name drop-down button at the top-right corner of the site, and click My Settings. User properties that are set as Replicable will appear on this screen. Replicable properties also become available properties in the settings of the out-of-box Web Part called the Current User Filter.
- Edit Settings — Use this section to specify whether users should be allowed to edit the value of this property. For properties that are automatically populated from the directory service, it is a best practice to choose Do not allow users to edit values for this property, because the value will be overwritten during the next synchronization.
- Display Settings — If a property is set as visible to everyone in the policy settings, there will be an option to Show in the profile properties section of the user’s profile page. This means that when a user’s My Site profile is being viewed, this property will be displayed. When Show on the Edit Details page is enabled, it will be available as an editable property when a user clicks Edit my profile, which is a link located under the user photo on the My Site. If the Edit Settings section is set to not allow users to edit the property value, then selecting to Show on the Edit Details page will not have any effect. Enable the Track updates to the property in the User Profile change log option to display changes to this property as part of the newsfeed of activities in SharePoint 2010, which can be seen on the My Network page on any user’s My Site. Figure 17-2 shows the Policy, Edit, and Display settings sections.

- Search Settings — The Alias setting is used only for the unique fields associated with each user, such as Account name, Name, User name, and Work e-mail. When a property is configured as indexed, this allows the data to be searched when searches for people are performed in SharePoint.
- Mapped Data — Each property in the list can be mapped to a specific attribute in another line-of-business directory service, such as Active Directory. First, pick a Source Data Connection. (The upcoming “Synchronization” section covers how to create these data connections.) Then, from within that source, pick an attribute, which is a field in the user database. Lastly, choose whether to either import this attribute into SharePoint, or export it from SharePoint.
Active Directory Attribute Names
When mapping attributes from Active Directory to the profile properties in SharePoint, sometimes it is a little difficult to discern the correct attribute, simply because the names don’t necessarily match up. For example, when creating a new profile property called Zip to map to the Zip Code attribute in Active Directory, it took a while to figure out that Zip is actually called postalCode.
You can use ADSI Edit to take a look at the real attribute names. From a server with the Active Directory domain services role installed, click Administrative Tools in the Start menu and choose ADSI Edit. Click Action, click Connect to, and type your domain name. Then, navigate through the Active Directory structure to where the user objects are. Right-click on a user’s name and choose Properties. Scroll through the Attribute Editor tab to see the names of the attributes and the data in them.
Manage User Profiles
Once user profiles have been synchronized, they are available in the Manage User Profiles interface. Scroll through the list of users, or use the Find Profiles box to search for specific users by name. To modify a profile, click an account name and choose Edit. You can also use the New Profile button to create a new user profile. When the profiles are imported using a synchronization connection, it is not usually necessary to create new ones from here.
When editing an individual user profile, note that icons next to profile properties give a quick indication as to which ones are required, and which properties were imported through a data connection.
Profile Services Policies
The Profile Services policies settings are used to determine how to share personalized information, along with who can view this information about users. Use these policies to configure privacy settings and access for My Site personalization features and user profile properties. Administrators can configure policies for each specific feature or user profile property, allowing them to align to the organization’s existing privacy and sharing policies. Some of the types of policies that can be configured in this interface are as follows:
- SharePoint site and distribution list memberships
- Auto-population and recommendations of colleagues
- My Links on My Site
- Personalization site pinning
- User profile properties
Follow these steps to change the settings of a profile service policy in the User Profile Service Application:
1. In the People section, click Manage Policies.
2. Click the drop-down box on a policy and click Edit Policy.
3. The policy setting can be enabled or disabled. The default privacy setting configures who is allowed to see the information in this property. In addition there is an option that allows users to override the default policy setting.
4. Click OK after changes have been made.
Manage User Sub-types
From the User Profile Service Application you can easily access the Sub-types page by clicking the Manage User Sub-types link. As shown in Figure 17-3, you can create new user sub-types or remove existing ones from this page. Use sub-types for classification of user properties, which means that if desired, user properties can be associated with only specific sub-types. An example of the use of sub-types would be for a large company that has many user accounts for vendors with whom it does business. A user subtype called “Vendors” could be created, and a new property called “Vendor Company” could be created. This property could be set up to be associated only with the users that are categorized into the Vendors sub-type.

Manage User Permissions
Within the User Profile Service Application, administrators can configure permissions to control whether or not users can create their own My Sites, and if they can use personal features or social features. Figure 17-4 shows the default permission setting, which allows all authenticated users to use all personalization features.
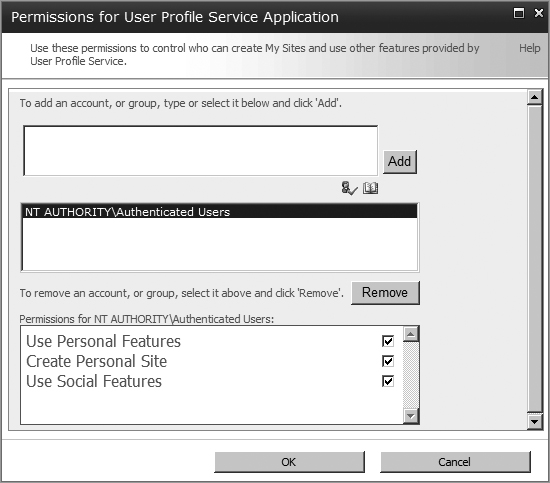
The top portion of the permissions screen allows you to add groups, which then appear in the list in the middle section. Select a group from the middle section, and assign it permissions using the checkboxes at the bottom.
Synchronization
Within the User Profile Service Application, synchronization is set up between SharePoint and other directory services applications, such as Active Directory, an LDAP directory, or other line of business (LOB) applications. User profile data is stored in a database inside of SQL Server.
Synchronization Connections
Synchronization connections are set up in order to either pull profile property data from directory services into SharePoint or export it back out.
Active Directory
Follow these steps to create each synchronization connection from within the User Profile Service Application:
1. In the Synchronization section, click Configure Synchronization Connections.
2. Click Create New Connection.
3. Type a descriptive name as the Connection Name.
4. The type of connection can be one of the following: Active Directory, Active Directory Logon Data, Active Directory Resource, Business Data Connectivity, ITDS, Novell eDirectory, or Sun Java System Directory Server.
5. Once a Type has been selected, the rest of the settings on the screen vary according to connection type.
Table 17-1 describes the settings for the most common connection type, Active Directory.
Table 17-1: Create Active Directory Synchronization Connection
| Setting | Description |
| Connection Name | A descriptive name of the connection. |
| Type | Active Directory. |
| Connection Settings | Type the name of the Active Directory forest, and either choose auto-discovery of a domain controller or type a specific one. |
| Authentication Provider Type | Choose from Windows Authentication, Forms Authentication, or Trusted Claims Provider Authentication. |
| Account Name and Password | Account credentials for Active Directory access. |
| Port | The default port is 389. |
| Containers | Click the Populate Containers button to see a hierarchical view of Active Directory. From this view, a specific Organizational Unit (OU) or other containers may be selected. |
Figure 17-5 displays the Add new synchronization connection screen:

Business Data Connectivity
When external content types have been created in SharePoint 2010, they can be used as synchronization connections. Learn more about external content types in Chapter 24. When an external data source is selected as a Business Data Connectivity entity, there are additional options to connect the user profile store to the business data connectivity entity as either a one-to-one mapping or a one-to-many mapping. Once the BDC connection has been created, this is treated as secondary to the Active Directory connection, and does not overwrite existing imported data.
Connection Filters
Connection filters enable users to filter the data that is imported into SharePoint. By default, all user accounts are imported, including disabled accounts. One way to use the connection filter is to selectively import only active user accounts from Active Directory. Follow these steps to create a filter that excludes disabled accounts from the import:
1. In the User Profile Service Application, click Configure Synchronization Connections.
2. Hover over the name of any connection that has been created, click the drop-down box, and choose Edit Connection Filters.
3. Under Exclusion Filters for user, click the Attribute drop-down box, and choose the userAccountControl.
4. Choose the operator “equals.”
5. In the Filter text box, type the number 0x10222. (After saving these settings, the next time you look, the number will be 66082)
6. Click the Add button, and then click OK. During the next import, those accounts will be excluded.
Synchronization Timer Job
Once synchronization connections have been set up, you will need to configure a schedule for when this synchronization is to take place. An import should be performed at a frequency that matches how often the data source content changes. In the User Profile Service Application, click Configure Synchronization Timer Job. Use this screen to set the timer job to run on a recurring schedule according to minutes, hours, days, weeks, or months. In addition, you can start the synchronization immediately by clicking the Run Now button.
Synchronization Settings
In the User Profile Service Application, click Configure Synchronization Settings. This page enables you to change more specific configuration settings regarding the data synchronization connections that have been created. Several options are available, such as whether to import only Users, or Users and Groups.
Organizations
The concept of organizations in the User Profile Service Application is similar to the user profiles, the difference being that user properties are related to individual people, and organization properties are related to entire organizations. Organization sub-types can be used to more granularly categorize multiple organizations, such as by a company’s major divisions or subsidiaries.
On the main User Profile Service Application screen, there is an area called Organizations that contains links to Manage Organization Properties, Manage Organization Profiles, or Manage Organization Sub-types.
A multinational company with different subsidiary companies is one example of how this feature might be used. The company could use these Organizations in order to specify different information about the subsidiary. Some users can actually have multiple profiles, one for each of different subsidiaries that they may work with.
Audiences
SharePoint audiences, which are used to target content to specific sets of users, can be quite powerful when used to their full extent. Audiences are defined here in the User Profile Service Application, and can be used in many ways in sites and lists to display information relevant to specific users. Audiences are not a security setting, but are simply used to display pertinent information to certain people.
Before creating audiences, it is important to plan audience use. Audiences cannot be used to their full advantage unless the user data is accurate in the user profiles and properties. Whether this information comes from Active Directory or another line of business directory services such as PeopleSoft, correct and consistent profile data is imperative. Once this profile data is accurate and useful, you should understand how to use audiences before going through the process of defining them.
The following is a list of places in SharePoint 2010 where audiences are applicable:
- List items displayed in a Content Query Web Part
- Personalization Site links and Publish links to Office client applications
- Web Parts
- Web Part pages
- Navigation links
Setting Up an Audience
Follow these steps in order to set up audiences in the User Profile Service Application:
1. In the People section, click Manage Audiences.
2. Click the New Audience button. The screen shown in Figure 17-6 will appear.

3. Give the audience a Name and Description.
4. Define the audience owner.
5. Multiple rules can be defined, so specify whether all or any of the rules need to be satisfied in order for a user to be included in the audience. Click OK.
6. Using the screen shown in Figure 17-7, set up a rule that defines the audience.
7. Create a rule based on either the User or Property Operand. Click OK.

Audience Targeting Rules and Logic
This section uses some examples to describe the rules for audience targeting and the logic behind them.
For the first example, suppose you want to make sure that new employees see Web Parts and content relevant to those new to the company, such as forms to fill out and orientation announcements to read. You could create an audience called “New Hires.” The rule that defines it can be as follows:
- Property of Hire Date >= 1/1/2010
This rule could be changed once per year to include everyone hired in the past year as new hires.
The second example uses an audience called Marketing, with three possible ways to define this group of people:
- Define an audience according to a group of people who report to the same manager. This option is useful as long as the Manager property is accurate in the user profiles. The downside to this option is handling employee attrition. Because this rule is based on an individual person, when that person leaves the company, this audience must be redefined to include the new marketing manager’s name. The rules for this example would be:
- Operand — User
- Operator — Reports under
- Value — Select the name of the manager of the marketing department.
- Define an audience based on group membership. Any security-based distribution list in Active Directory can be selected as the basis for an audience. In this example, we have already created a group called Marketing, which contains all of the members of the marketing department. The rules for this example would be:
- Operand — User
- Operator — Member of
- Value — The name of the group, in this case “Marketing”
- Define an audience based on information in user profile properties. In this example, the Department property contains the word “Marketing.” The rules for this example would be:
- Operand — Property
- Operator — Contains
- Value — Marketing
Given the different rules that might define the marketing department in the company, think about how restrictive the audience definition should be. In Figure 17-7, under the Audience settings, you could include users who satisfy all of the rules if each person must report to the specific marketing manager and have membership in the Marketing group in Active Directory and have “Marketing” as part of their department name. Alternately, you could choose to include users who satisfy any of the rules, if at least one of these criteria needs to be met. The second option allows for a broader audience, of course.
Audience Compilation
The list of audience members can be compiled on a schedule. This compilation entails a scan of changes in the user profiles, and changing the audience member list accordingly. For example, if a user was not in the marketing department during the last compilation, then the new compilation will recognize the changes to the user’s profile, and add them as a member of the audience automatically. All audiences are compiled on the same schedule. Follow these steps to set up an audience compilation schedule in the User Profile Service Application:
1. In the People section, click Schedule Audience Compilation.
2. Check the box to Enable Scheduling.
3. Configure settings for daily, weekly, or monthly compilation. Click OK.
At any point, a manual compilation of all audiences can be started by clicking Compile Audiences in the People section. Any individual audience can be manually compiled from that audience’s properties screen by clicking Compile audience.
Targeting Content to Audiences
We create audiences in SharePoint, so that some content can be targeted to be seen by certain people. It is a good idea to first determine where audiences will need to be used, before going through the process of creating them.
Several bullet points on this page note that audiences do not need to be created at the Central Administration level in order to target content. In some cases, the audience settings allow for the selection of already existing SharePoint or Active Directory Groups.
This section describes several targeting methods, along with instructions to carry them out.
- List Items displayed in a Content Query Web Part — In the settings for any list or library, click Audience targeting settings, and check the box to Enable audience targeting. There will be a new field in the list, called Target Audiences. Set target audiences on individual items in the list, from the Edit Properties page. The way that the audience targeting is made applicable is to display the list in a Content Query Web Part on a Web Part page on a site in the same site collection. In the Web Part’s tool pane settings, note two checkboxes: In the Query section, there is an Audience Targeting area. Once the setting to Apply audience filtering is selected, you can optionally choose to include items that are not targeted. Pick from audiences, distribution lists, or SharePoint groups for targeting. This means that if an audience for a Content Query Web Part simply needs to be an Active Directory or SharePoint group, then it is not necessary to define this audience in the User Profile Service Application.
- Personalization Site Links and Publish Links to Office Client Applications — In the My Site Settings section of the User Profile Service Application, the Personalization Site Links and the Publish Links to Office Client application options both allow for content to be audience targeted. Read more about these features in the “My Sites” section of this chapter.
- Web Parts — Any Web Part can be targeted to an audience. In the Web Part’s properties tool pane, expand the Advanced section, which contains a Target Audiences field at the bottom. Pick from audiences, distribution lists, or SharePoint groups for targeting. This means that if an audience for a Web Part simply needs to be an Active Directory or SharePoint group, then it is not necessary to define this audience in the User Profile Service Application.
- Web Part Pages — In SharePoint publishing sites, there is a library called Pages. Click to Edit Properties of any individual page in the library, to see the field called Target Audiences. Pages that have been targeted to audiences will be displayed only to that audience, within the site’s navigation. Pick from audiences, distribution lists, or SharePoint groups for targeting. This means that if an audience for a Web Part page simply needs to be an Active Directory or SharePoint group, then it is not necessary to define this audience in the User Profile Service Application.
- Navigation Links — Within the navigational structure of the site, individual links may be targeted to audiences. On a SharePoint Server 2010 site, click Site ActionsSite Settings. In the Look and Feel section, click Navigation. Click a link in the navigation, and then click the Edit button. (Some items are not editable because they are part of the built-in site structure.) This screen is displayed in Figure 17-8. Type an audience name and click OK. Pick from audiences, distribution lists, or SharePoint groups for targeting. This means that if an audience for a link simply needs to be an Active Directory or SharePoint group, it is not necessary to define this audience in the User Profile Service Application.

- Trusted My Site Hosted Locations — In larger SharePoint deployments with geographically distributed User Profile Service Applications, administrators manage a list of Trusted My Site host locations, which can be targeted to audiences. These different locations can exist as multiple web applications in a farm. This setting is found in the My Sites section of the application.
Remember that audiences are not a method of controlling security. Items that are not targeted to specific users are not inaccessible to those users. Navigation in SharePoint will automatically be security trimmed, which means that users who don’t have access to a list, library, or site, will not see that link in navigation. When it comes to navigation, audience targeting is most useful with links that have been manually added, such as links to external websites, or links to other site collections.
Interfaces for social interactivity and feedback on content are pervasive throughout SharePoint 2010. Users are encouraged to tag items everywhere in the environment, which makes their experience more interactive and collaborative. This section explains the tagging and notes interface, including steps for tagging and making notes.
First, take a look at the top-right corner of any site in SharePoint 2010 to see the I Like It and Tags & Notes buttons, shown in Figure 17-9.
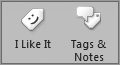
These icons will become very familiar, as they appear pretty much everywhere in SharePoint 2010.
Activity Feed Timer Job
By default, SharePoint does not automatically compile the activity feed, which is the list of user activities like tags and notes. There is a server timer job that needs to be enabled first. In Central Administration, click Monitoring in the quick launch. In the list of timer jobs, click the User Profile Service Application Activity Feed Job, and click the Enable button.
Tagging
In SharePoint Server 2010 discussions, you hear a lot about metadata and social tags. Tags are basically keywords, or data about data. To tag something is to assign keywords to it, separated by semicolons, and these keywords can be associated with anything. End users are able to “tag,” which not only adds a level of rich interactivity, but enables participation in the SharePoint community in the organization. The I Like It button, next to Tags & Notes, enables users to quickly identify content that they like. These tags can also be managed, and even structured, from within Central Administration and at other levels. Read Chapter 16 for a thorough understanding of this managed metadata. Here is a list of some objects that can be tagged in SharePoint 2010:
- Pages
- Libraries
- Lists
- List items
- Documents
- External websites
- My Sites
- Tag profiles
- Images
When tagging pages, libraries, lists, My Sites, and tag profiles, the experience is similar. Simply navigate to that location in SharePoint, and use the Tags & Notes button at the top-right corner of the page. Figure 17-10 shows an example of the Tags & Notes interface after some user activity.
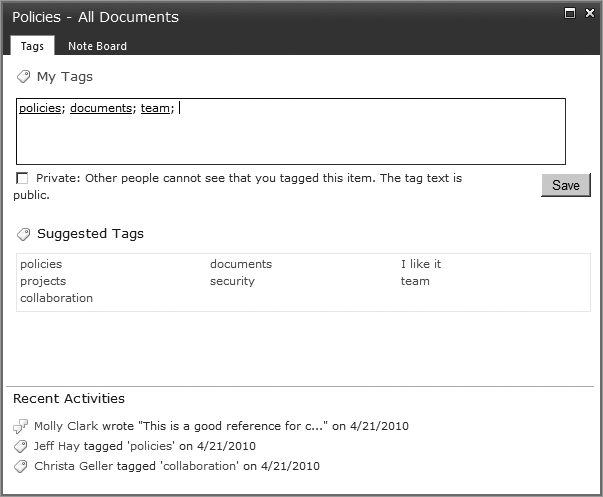
My Tags are tags that you have added, and the Suggested Tags section shows what others have added to the same object. As you start typing a new tag, SharePoint will automatically suggest similar tags that already exist as managed metadata.
In document libraries, the content tagging setting is not turned on by default. To enable it, in the library settings, click Enterprise Data and Keyword Settings. There are two check boxes on the Enterprise Metadata and Keywords Settings screen:
- Add Enterprise Keywords — Check this box in order to make use of any legacy keywords associated with the items in this list. In the Office applications, on the File Save As screen, there is a Tags field. The words entered here automatically populate a new Enterprise Keywords column in the document library. Once this check box is selected and OK is clicked, this option cannot be turned back off. The new column can then be added to any views in the library. When only this option is selected, tags added to the Enterprise Keywords column are not part of the Tags & Notes for the item.
- Metadata Publishing —When this option is selected, tags can be added to the item using the Tags & Notes button, and those tags are saved as social tags in the Managed Metadata.
When both of the above items are selected, the Enterprise Keywords for an item are the same as the Tags in the Tags & Notes screen. For example, when a document is created, tags can be added on the Save As screen in Word. These tags not only get passed to the Enterprise Keywords column in the library, but they show up when viewing the Tags & Notes screen for the item. Why participate in tagging? Tagging something helps to describe it, and enables it to be found again by browsing or searching. When you identify and classify items this way, it aids in information retrieval for not only the individual doing the tagging, but also for other people who visit SharePoint sites. The tags themselves each have their own page, or Tag Profile, and can be followed by other people in their My Site activity feeds.
Shown in Figure 17-11 is the out-of-the-box Web Part called the Tag Cloud Web Part, which can be found in the Social Collaboration category when adding the Web Part.

A tag cloud is a listing of recent tags related to the current page. Tags that have been used more often are displayed in a larger font, with the font size decreasing for tags that have been used less often. By default, this Web Part displays tags created by the current user only, but the Web Part’s properties can be changed to show tags by everyone. The Web Part can also be configured to display a maximum number of tags, or to display a number in parentheses next to each tag (Show Count), indicating the exact number of times it has been used. By default, the date range of tags is one month, but it can be changed to one year or all dates. A tag cloud is also displayed on the Tags & Notes tab of each user profile.
The Note Board
The Note Board is new in SharePoint 2010, and it is pervasive throughout all sites in the environment. Notes in SharePoint 2010 are literally free-form notes that users add to SharePoint objects, as a running commentary. Like the tags described in the preceding section, these notes exist within the same interface. Notes are an integral part of an activity feed in the social network of SharePoint 2010. Figure 17-12 displays the Note Board portion of the Tags & Notes interface.

The Note Board is also an out-of-the-box Web Part that can be added to any page in SharePoint, and can be found in the Social Collaboration category of Web Parts. Web Part settings include the capability to configure the number of recent notes that are displayed, and whether or not to include the new note entry text box. Even if the option to enable new note entry is unchecked, users may still add new notes by using the Tags & Notes button at the top-right corner of the page.
Tag Profiles
For every tag that has been added to content in SharePoint 2010, there is a special page called a Tag Profile, as shown in Figure 17-13.
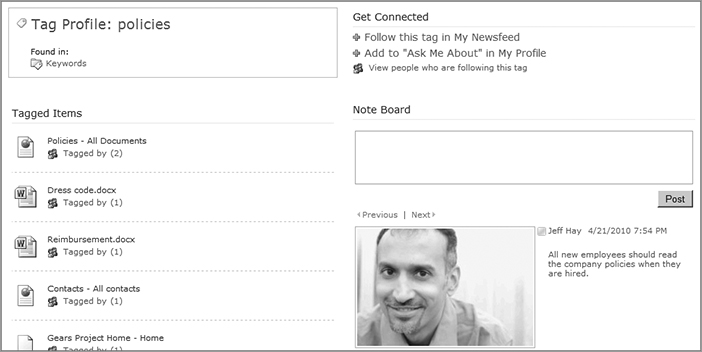
In this case, the tag profile is for the tag “policies.” It includes a list of recent items that have been tagged with the word, a Get Connected section, and, of course, a Note Board.
The Get Connected section is another way in which personal interactivity with SharePoint is enhanced, and it contains the following links:
- Follow this tag in My Newsfeed — When this link is clicked, the tag is added to the current logged-in user’s newsfeed, as a keyword that is “followed.” This newsfeed can be accessed by clicking My ProfileMy Network. After this link has been clicked, the tag is automatically added to the user’s profile, in a property called Interests. Profile editing is covered later in this chapter in the section “My Sites.”
- Add to “Ask Me About” in My Profile — When this link is clicked, the tag is added to the current logged-in user’s profile, in a property called Ask Me About.
- View people who are following this tag — Clicking this link will elicit a People search on the tag, for people with the word in their Ask Me About property or in the Interests property of their profile.
Also included for each tag profile is a link called See all results for this tag in Search. Clicking this link elicits a search on All Sites, for items that have been tagged with this keyword. The search syntax for a tag called “policies” is as follows: socialtag:“policies.”
In SharePoint, My Sites are personal sites that not only display information about each user in the organization, but also are used as a personal landing page and storage site for individuals. My Sites can be used to both enter information about yourself, such as demographics, current projects, and areas of expertise, and to view an activity feed of information about colleagues’ activities in SharePoint.
This section explains how to set up My Sites on the server, and then discusses their components and how they can be used.
Setting Up My Sites
Basically, each My Site is a site collection, and each user is the site collection owner of his or her My Site. Some planning should be done before jumping right into the setup. The following should be determined ahead of time:
- Storage requirements — Each My Site is a site collection in which each owner can create multiple libraries and lists, and subsequently upload many files to these libraries. Because of this, site sizes can easily get out of hand if storage and quotas are not considered at the time of creation. Consider setting up a relatively small site quota as a default, such as 50MB. Multiply this number by the number of users in the organization, for a potential total. Keep in mind that as more storage is needed, it can be handed out on a per-user basis, or the default quota can be changed. A lot of the size planning for My Sites is based on how many users will actually be using them and storing data in them, and only you know this about your own company.
- URL planning — What URL will be used for My Sites? It is a best practice to create a new web application for this purpose. Some commonly used URLs for the My Site web application are “my” or “mysite.” For example, if your company were called Contoso, and the main SharePoint site were http://intranet.contoso.com, then the My Sites web application would be http://my.contoso.com.
Here are the steps to take to set up My Sites in SharePoint Server 2010:
1. Create a new web application by following the instructions in Chapter 4. Use the naming convention that was determined in the URL planning phase. Here’s an example of what a few of the fields would contain if “my” was determined to be the DNS name of the web application:
My Sites New Web Application
| Field | Contents |
| IIS Web Site Name | My Sites |
| Port | 80 |
| Host Header | my.contoso.com |
| URL | http://my.contoso.com |
2. After the web application has been created, a confirmation pop-up window will appear. Click this link on this window called Create Site Collection.
3. Fill out the following fields on the Create Site Collection screen:
Create My Sites Site Collection
| Field | Content |
| Title | My Sites Home |
| Web Site Address (URL) | Leave this as the default of “/”, which is the root of the web application. |
| Template Selection | In the Enterprise tab, select My Site Host. |
| Site Collection Administrators | Designate primary and secondary site collection owners. |
| Quota Template | This is the quota discussed above in the storage requirements bullet point. There is a default quota template called Personal Site, with a storage limit of 100MB. Use this one, or go to Specify Quota Templates in Application Management to create a custom one. This can be changed at any time. |
4. In Central Administration, click Manage web applications in the Application Management section. Click to select the My Sites web application.
5. In the Ribbon at the top of the screen, click Managed Paths. Add two managed paths as shown in Figure 17-14. Note that “personal” is a wildcard, whereas “my” is explicit.

6. Now that the site collection has been created, the My Sites configuration is next. In Central Administration, click Manage Service Applications, in the Application Management section.
7. Click the User Profile Service Application and click Manage in the Ribbon. Alternately, click the hyperlink text on the name of the application to access it.
8. In the My Site Settings section, click Setup My Sites. Here are some settings to consider:
My Site Settings
| Field | Content |
| My Site Host Location |
This is the URL to the My Site web application, with /my at the end. This will be the beginning of the URL to each user’s public profile — for example:
http://my.contoso.com/my The profile page of a user with the login name of mollyc on the contoso domain will have a URL of http://my.contoso.com/my/Person.aspx?accountname=CONTOSO%5Cmollyc |
| Personal Site Location |
This is the beginning of the URL for each user’s content area, which is different from the user’s profile page URL. This is the personal site collection for each user, where they can store their data in lists and libraries. An example URL is
http://my.contoso.com/personal |
| Site Naming Format |
This is the suffix of the personal site location URL. For single-domain environments, the first option called “User Name” is a good choice. Inherently, because there are no duplicate usernames in a single domain, there will be no conflicts. In multiple-domain environments, pick one of the second two options. In a single-domain environment, a user with the login name of “mollyc” will have a personal site collection URL of
http://my.contoso.com/personal/mollyc . |
| Read Permission Level | By default, all authenticated users are given Read permissions to new personal sites as they are created, which is a best practice for My Sites. |
9. After all of these steps have been completed, try it out by clicking your name at the top-right corner of a SharePoint site. Click My Profile. This is your profile page. Click My Content at the top of the screen to generate your own personal site collection.
Trusted My Site Host Locations
In larger SharePoint deployments with geographically distributed farms and User Profile Service Applications, multiple My Site host locations can exist. In these scenarios, administrators manage a list of Trusted My Site host locations, and then target each location to the audiences of users who need to view those locations. Follow these steps to set up multiple My Site trusted locations in the User Profile Service Application:
1. In the My Site Settings section, click Configure Trusted Host Locations.
2. Click the New Link button.
3. The URL field should contain the link to the top level of the location in which the My Sites are located.
4. The Description field should contain the text that is displayed to the users, as a clickable link.
5. In the Target Audiences box, chose one or more audiences who will use that URL location as their My Site host.
Personalization Site Links
Personalization site links are links that are added to the top navigation within My Sites. Each link that is added can be targeted to a specific audience or to the default audience of All Site Users. This enables end users to quickly navigate from their My Site to other locations that are relevant to them.
The following example demonstrates how personalization site links can be used to target departmental home pages to users in each company department. The company, called Contoso, has five major departments, each with its own SharePoint departmental home page that is used for team collaboration. Five different audiences have been created, one for each department; and five personalization site links have been created, each one a link to the departmental home page, and targeted to users in the departmental audience. For example, when users in the marketing department navigate to their My Site, the appropriate link is displayed in the top navigation, as shown in Figure 17-15.
Follow these steps to set up personalization site links in the User Profile Service Application, per the preceding example:
1. In the My Site Settings section, click Configure Personalization Site.
2. Click the New Link button.
3. Fill in the URL to the departmental team site.
4. The Description will be the text that is displayed, such as “Marketing Site” in Figure 17-15.
5. The owner is a required field, and represents the person responsible for maintaining this link.
6. The Target Audience in this example is called “Marketing,” composed of all users in an Active Directory, security-based e-mail distribution list called “Marketing.”
7. Take a look at Figure 17-16, and click OK to save the new link. Follow the preceding steps for each company department.

Publish Links to Office Client Applications
The configuration to publish links to Microsoft Office client applications is conceptually similar to the personalization site links. This setting enables SharePoint links to be pushed out, so that they are available to end users within the Office applications, such as Word and Excel. When users have such quick and easy access to open and save files to common SharePoint locations, their daily work processes can be even more efficient.
In the My Sites section, click Publish Links to Office Client Applications. The steps to create a new link are identical to the personalization site link steps in the previous section, except that there is an additional drop-down box to select what type of item is being published, such as a document library or a team site.
Where does the end user see the published links? In any Office 2010 application, click the File tab at the top left, choose the Share tab, and click Save to SharePoint. This section lists the published links on the right side, which the file can then be saved in as long as the user has Contribute rights to the library selected.
Chapter 18 includes a section called “Managing Office 2010 and SharePoint through Group Policy” with information about using Active Directory Group Policy to control the SharePoint site links in Microsoft Office 2010 applications. This is simply another method of globally configuring the links that are published to Office clients.
Manage Social Tags and Notes
Within the My Site Settings section of the User Profile Service Application is a setting called Manage Social Tags and Notes. The concept of tags and notes was described earlier in this chapter.
As shown in Figure 17-17, SharePoint 2010 includes a management console for administrators that enables them to perform searches on existing tags and notes, as well as delete specific ones as needed.

To perform a search for either tags or notes, the username or URL must be specified. You can narrow down the search results by specifying a date range or keyword or both. Click the Find button to see the results of the query. When the list of results is displayed, the only action that can be taken on an item is to delete it. Only the person who created a note is allowed to edit it.
My Sites User Experience
This section covers My Sites from the user’s perspective. It explains the different parts of the user’s My Site and profile, along with how they are used.
Once My Sites have been set up in the SharePoint environment, users have access to their own My Site profile, and can navigate through other users’ profiles. At the top-right corner of any site, logged-in users can click their name to see a drop-down box. The My Profile option is selected in order to display the profile portion of My Site. Figure 17-18 displays the top portion of a user’s profile, as seen by the user.

The user’s status update appears in the dialog bubble by the user’s image. To update your own status, simply type inside this bubble. This brief status update is known in social computing as micro blogging. Some important properties are displayed under the user’s name, such as phone number and e-mail address. The fields that are displayed here are configured in the user property display settings in the User Profile Service Application. The descriptive text toward the right side of the user’s name in Figure 17-18 comes from the About Me property in the user’s profile. Each of the subheadings described next appear as tabs on the My Site profile.
A light-blue band across the top of the profile includes the option to View My Profile as seen by. This setting enables users to test how their profile will appear when viewed by others. For example, users may want to preview their information for privacy purposes. When editing their profile, users can specify that their home phone number should be visible only to their manager. To be absolutely certain that the home phone number is not shown publicly, users can view the profile as seen by everyone (for example) and ensure that the home phone field does not show.
Overview
The Overview tab displays some basic information about the person and their activity in SharePoint. Within each user’s profile, by default there is an editable field called Ask Me About. This is a place for users to type in keywords regarding their areas of expertise. On this overview tab, the Ask me about section contains that person’s expertise keywords as hyperlinks. When one of these links is clicked, text is automatically inserted into a new Note Board note. For example, if the user’s profile has an Ask Me About link called “marketing,” clicking this link will insert this text “Question on marketing:”, which enables My Site visitors to type in their own text before posting the note.
The Note Board on My Site can be likened to the “wall” on the Facebook social networking site. This is a place for colleagues to post public comments to each other.
Another prominent part of the Overview tab is a list of recent activities, as shown in Figure 17-19.

Recent Activities is a list of what the person has been doing in SharePoint, such as updating information about themselves, tagging items, and making notes on note boards.
When viewing user profiles other than your own, the In Common With You section displays a list of commonalities between the logged-in user and the user whose profile is being viewed. Above this section is a small organization chart with a link to view the Organization Browser, which is a link to the Organization tab.
Organization
The Organization tab contains the Organization Browser, an interactive Silverlight Web Part. (Microsoft’s Silverlight software must be installed on client machines in order for them to enjoy not only this Web Part, but also several other enhanced interfaces within SharePoint 2010.) The entire structure of this interface is based upon the accuracy of the Manager field in the user profiles. Click any name to see the profile page for that person. The Organization Browser Web Part is shown in Figure 17-20.

Note that non-Silverlight clients can view a simple HTML view via a link at the bottom-left corner of the Organization tab.
Content
The Content tab is where each user stores his or her own content, such as documents and spreadsheets in libraries, and personal SharePoint lists and subsites. Click the Content tab on any user’s My Site to see content that has been shared publicly, such as shared documents and blogs. Each of these personal sites is a site collection, and each user is the owner of his or her own site collection.
Tags and Notes
The Tags and Notes tab displays a running list of all tags and notes that the user creates in SharePoint. Figure 17-21 shows an example of the information in the Tags and Notes section. You can optionally refine the list on the right to show either tags or notes, and scroll between months. The tag cloud on the left shows the most frequent tags by this person. Users can go to their own Tags and Notes and either edit or delete them individually. When viewing your own Profile, there is also the option to filter the list to display only private or public items.

Colleagues
In SharePoint, all users keep their own list of favorite colleagues with whom they would like to keep current and share certain information. This tab enables users to manage and organize colleagues, such as by group. A person’s colleagues can be added as follows:
- Automatically — Some colleagues will be automatically added, such as direct reports and people who report to the same manager. As mentioned earlier, this data is drawn from the Manager property under User Properties, and is therefore only as accurate as the data entered in Active Directory.
- Suggestions — Some colleagues will be suggested by SharePoint, based on commonly sent Exchange e-mails, Office Communication Server contacts, and websites for which multiple individuals are included in the Members group.
- Manually — When viewing a person’s profile page, you can click the Add as a Colleague button, which is located below the person’s profile picture, to add them to your own list of colleagues.
There are a couple of different reasons to add people to your personal list of colleagues. First, the activity of colleagues will be displayed in your newsfeed, also known as the My Network page, which is covered later in this section. All of the colleagues’ social interactivity within SharePoint is displayed on this continuous feed. Second, when people are added as colleagues, it is possible to granularly share profile information with them. The Add Colleagues screen, shown in Figure 17-22, contains the following options:
- Add to My Team — Enable this option in order to use the privacy settings. This allows for granular sharing of certain information with the given colleague.
- Add to a Group — Colleague groups provide a simple organization method for handling a long list of colleagues.
- Show to — Use this option to specify which people are allowed to see that this person is in your list of colleagues.
“Colleagues” is also an out-of-the-box Web Part that users can add to their own My Content sites.
In SharePoint 2010 My Sites, a drop-down box called Show To appears in several places. This is a privacy setting, which allows control over what personal information is displayed, and to whom it is displayed. Five different levels are possible, listed in order from the most private to the most public: Only Me, My Manager, My Team, My Colleagues, and Everyone.

Memberships
This section displays SharePoint sites and distribution lists of which the person is a member. Each item in the list has a privacy setting that determines who is allowed to view that membership. Memberships is also a Web Part that users can add to their own My Content sites.
My Newsfeed
The next few sections regarding My Newsfeed, My Content, and My Profile refer to the top navigation items on My Sites. My network is the activity feed, and displays all of the activities of the current user’s colleagues, along with activity related to tags in which the user is interested. Figure 17-23 shows an example of an activity feed.

An out-of-the-box Web Part called What’s New can be used on My Site content pages to display the same information as this activity feed. The top of the My Network page displays the following three links:
- My Colleagues — Link directly to the Colleagues tab on the My Site.
- My Interests — Link directly to the current user’s profile page, and the Interests property.
- Newsfeed Settings — Link directly to the current user’s profile page, and the Activities I am following section.
My Content
With My Sites, each person has his or her own site collection for storing personal content, which can be accessed by clicking My Content at the top of the My Site. The first time a user clicks on My Content, the site collection is automatically created. Also, if the client computer has Microsoft Office installed, then the first time the content site is accessed the user will be prompted to allow Microsoft Office to remember the My Site location. After clicking Yes to this prompt, Microsoft Office applications will have the user’s My Site as a SharePoint location in which to save documents. For example, in Microsoft Office, click the File menu at the top, select the Share tab on the left, and then click Save to SharePoint. My Site will be listed under My SharePoint Locations.
My Profile
This link simply takes the current user to his or her My Site profile page. On this page, there is an Edit My Profile link under the user’s photo. Profile editing is covered shortly in the section “Edit My Profile.”
My Links
SharePoint users can save their favorite links to their own list called My Links. Although it is not apparent as a tab in the interface, there are two ways to add links and to manage a list of personal links:
- Document Libraries — Follow these steps to add to My Links from within document libraries:
1. In any document library, click the Library tab in the Ribbon at the top of the page.
2. In the Connect & Export section of the Ribbon, click the Connect to Office button, shown in Figure 17-24.

3. From this drop-down box, you can add or remove a link to this library, or manage your own personal list of links.
- My Content Site — Follow these steps to add to My Links from within the personal My Content site:
1. Click to edit the page and click to Add a Web Part.
2. In the Recommended Items category of Web Parts, add the My Links Web Part to the page. This Web Part contains the list of My Links, along with a button to Manage Links.
Edit My Profile
All SharePoint users have their own personal profile and can modify certain properties in it. The properties that can be edited are controlled from within the user profiles and properties in the User Profile Service Application, which was covered at the beginning of this chapter.
When viewing your own My Site profile, click the Edit My Profile button, located below your photo. Figure 17-25 displays an example of part of the edit screen of a user’s profile.
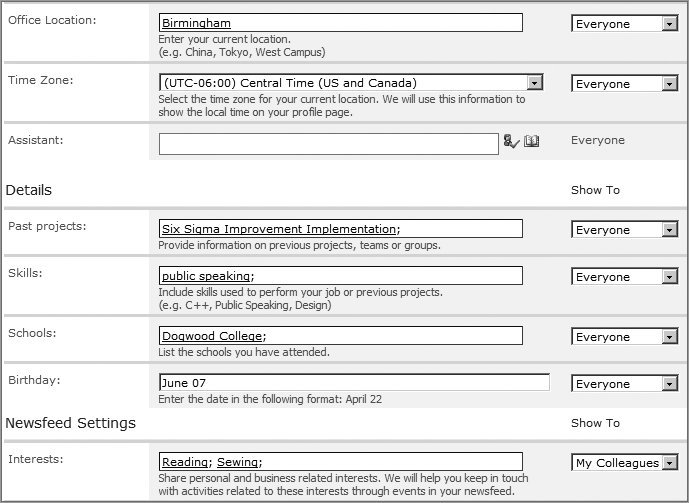
On the right side of each property is a Show To setting indicating who is able to see that particular piece of information. The Manage User Properties section earlier in this chapter describes how administrators can configure these settings globally. For some properties, end users can change the Show To setting using a drop-down box, whereas other settings are hard-coded to a default setting.
In some properties of the profile, such as Ask Me About, Skills, and Interests, tags are used. When tagging, you are not simply typing text in a text box. The keywords that are used in profiles become part of the farm’s metadata term set. The tags that are used in these fields are interactively tied to many other social aspects of SharePoint 2010. Read more about term sets in Chapter 16.
Another important part of the edit screen of the user’s profile is the Preferences section, shown in Figure 17-26.

Set your own e-mail notification preferences here, along with activities to follow. To follow an activity means to see that type of activity listed in your My Network page.
Wikis and blogs are considered part of social media on the web, and are both highly interactive types of web pages. Before delving into how to use them in SharePoint, we will quickly define each of these concepts.
A wiki is a web page that allows users to freely create and edit content through a web browser interface. This open editing concept is useful in the creation of collaborative websites, in obtaining community input, or for personal note taking. Wikis are exceptionally useful when it comes to maintaining knowledge management systems, such as a knowledge base for an information technology help desk.
A blog is a personal web log, and can be thought of as an individual’s journal on a particular topic. Blog posts can be written about either personal or business-related topics, and are usually created for consumption by the general public. Each new entry made in the blog is referred to as a blog post, and readers of the blog are usually allowed to comment on each of these posts.
Wikis
In SharePoint, a wiki can be created using a site template, or a wiki can simply be created as a library within an already existing site. This section covers both methods, along with concepts of working within a wiki.
To create a Wiki site:
1. Click Site ActionsNew Site.
2. Click Enterprise Wiki, and enter a name and URL for the new site.
3. Click the Create button.
To create a Wiki library in an existing site:
1. Click Site ActionsMore Options.
2. Click Wiki Page Library and type a name for it.
3. Click the Create button.
When a new wiki is created, by default there are two entries in the wiki library. To create a new entry in the library:
1. Click the Page tab in the Ribbon at the top of the screen.
2. Click the View All Pages button to see the list of all wiki pages in the library.
3. In the Ribbon at the top of the screen, click the Documents tab.
4. Click the New Document button.
A wiki site has quite a few more features than a wiki library. The following wiki site benefits aren’t included when simply creating a wiki library:
- Page ratings included on each wiki page
- Page categories (tagging) on each wiki page
- An Edit This Page button on each wiki page, for quick editing
- Three different wiki page templates
- The capability to insert multimedia into a wiki page
Blogs
Blogs are composed of a blog site, blog posts, and blog comments. When it comes to the social features that SharePoint 2010 offers, blogs play an integral part. In the corporate environment, blogs can be used to post current information on projects, highlight departmental achievements, or serve as a log of technical trials and tribulations. Each user’s My Site content site contains a “Recent blog posts” Web Part by default. When people create blog posts in SharePoint, they become part of the bigger picture of social activity.
Unlike wikis, which can be created as sites or just libraries, blogs can only be created as sites. Besides being included as part of My Sites, blogs can also be created anywhere in SharePoint. For example, suppose your IT department wants to publish an “IT Blog” by the CIO, which is a subsite of the public IT departmental site.
Follow these steps to create a new blog site:
1. Click Site ActionsNew Site.
2. Choose Blog, and type a name and URL for it. Click Create.
3. You are now the proud owner of a new blog site, as shown in Figure 17-27.

One of the first things to consider when creating a blog site is the blog categories. Notice that the Quick Launch bar on the left lists categories 1 through 3 by default. Obviously, there’s a button to Add New Category, but you’ll probably want to modify the existing ones first. Click All Site Content, and then go to the Categories list to edit each of the default categories.
In addition to creating your own set of categories, create an image and description for this new blog. The About this Blog Web Part is simply a Content Editor Web Part that can be modified.
Blog Tools
On the right side of the blog is a set of links called Blog Tools, which can be viewed only by users who have at least Contribute permissions on the blog posts. The following are options available in the Blog Tools:
- Create a Post — Create a new item in the list on the site called Posts. The most recent blog post is listed first, on the blog site.
- Manage Posts — Navigate to a list view of the Posts list on the site.
- Manage Comments — Navigate to a list view of all comments that have been made on blog posts. This is a list on the site called Comments.
- Launch blog program to post — Open Microsoft Word in order to create a blog post. Chapter 18 has detailed information on how to create blog posts in Word.
Allowing Comments
In a typical blog scenario, one or two people create blog posts in any given blog site, and then the general visitors to the site are able to make comments on those posts. By default, the Comments list is set up to inherit permissions from the site level, but in order to allow comments on a blog, some permissions need to be changed, as described in the following steps:
1. On the blog site, click Manage Comments on the right side of the page.
2. In the Ribbon at the top of the screen, click the List tab.
3. Click the List Permissions button.
4. Click the Stop Inheriting Permissions button.
5. According to your company’s requirements, give the appropriate group of people Contribute permissions on this screen, to allow them to add blog comments. Click the Grant Permissions button to add new groups or individuals, or click the check boxes next to existing ones to change their permissions. A good example is where the site visitors group may have Read access, change that group’s permission to Contribute.
Users can now add and edit comments on this blog site, but we don’t want them to be able to edit other people’s comments. This is a simple setting change in the Comments list, following these steps:
1. On the blog site, click Manage Comments on the right side of the page.
2. In the Ribbon at the top of the screen, click the List tab.
3. Click the List Settings button.
4. Click Advanced Settings.
5. Look at the Item-Level Permissions section. In the Create and Edit access option, select Create items and edit items that were created by the user. Click OK.
Another action that can be taken in order to have a bit of control over the comments that are posted is to turn on content approval. Follow these steps to turn on comment approval:
1. On the blog site, click Manage Comments on the right side of the page.
2. In the Ribbon at the top of the screen, click the List tab.
3. Click List Settings.
4. Click Versioning Settings.
5. In the Content Approval section, choose Yes. Click OK.
There’s one more step. How will you know when new comments are added to the blog? The comments have to be approved, so someone needs to know when to approve them. Set up an alert for yourself on the Comments list, to be notified when new items are added.
To approve or reject an item, go to the Comments list and click the drop-down box on the item. Choose Approve/Reject, and then pick whether you approve or reject the item, and add optional comments.
In SharePoint 2010, you can rate content on a scale from zero (the lowest rating) to five (the highest). In addition to tags and notes, this is yet another way that people are encouraged to participate by giving feedback in SharePoint. This section covers the rating setup steps, along with ways that this rating information can be utilized.
Turning on Ratings
In a list or library’s settings, click Rating Settings. Choose Yes to allow items in this list to be rated. Once this rating feature has been enabled, a new column called “Rating (0–5)” appears in the list. This field can be added to any views, and it is displayed on the View Properties and the Edit Properties form for each item in the list or library. Figure 17-28 shows an example of a document library view in which ratings have been enabled.
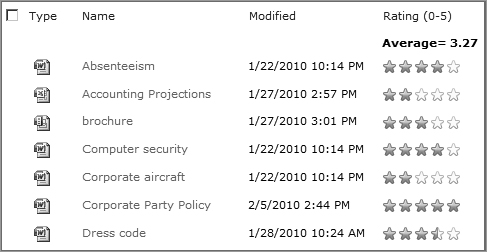
Hover over any individual item’s star rating to see text about your own rating of the item. Click to assign a rating is shown, along with My Rating, which reminds you, the logged-in user, of any rating that you have already assigned. As items are rated, they are listed in activity feeds.
The Ratings Timer Job
In order for current ratings to be displayed as the appropriate number of stars next to each rated item, there is a timer job on the server. The User Profile Service Application - Social Rating Synchronization Job runs hourly by default. This timer job aggregates all of the past hour’s ratings, and calculates totals and averages for each rated item.
A new Outlook plug-in called the Social Connector enables connections to social networks to be created within Outlook. These social connections become apparent when reading and writing e-mails, and in the Outlook contacts lists.
When you select an e-mail, the bottom of the screen displays icons of people, gray by default, each representing a person addressed in the e-mail. Clicking a small chevron button next to these icons expands what is called the People Pane.
To connect SharePoint 2010 to the Social Connector in Outlook 2010 on a client desktop, follow these steps:
1. In Outlook 2010, click the View tab.
2. Click the People Pane button.
3. Click Account Settings.
4. On the Social Network Accounts screen, click the checkbox next to My Site.
5. Type the URL to your personal My Site site collection, and your username and password.
6. Click the Connect button.
7. Click Finish.
8. A “Congratulations!” screen will let you know that you have successfully connected. Click Close.
Once SharePoint has been added to the list of social networks, the News Feed will appear in Outlook 2010, on the left side, in the list of folders. This is the continuous feed of all activities that are being followed on the user’s My Site in SharePoint. Profile settings on My Site enable each user to choose what types of activities to follow. This is the same list of activities that are displayed on the My Network page on the My Site.
Now that SharePoint 2010 has been added as a social network, you can add individuals to your own network in order to add individuals from the SharePoint network to your own contacts list in Outlook. In an e-mail, each person’s image has an Add button below it, as shown in Figure 17-29.

To add a person to your SharePoint 2010 social network in Outlook, click the green Add button and choose SharePoint. The person’s photo will be displayed after they’ve been added to your network. Also, a SharePoint icon will appear next to the Add button. After people have been added, they will appear in the Contacts list in Outlook, as a folder underneath the default Contacts list. This list will be called “SharePoint___,” with the name and URL of the SharePoint My Site at the end. Edit this contacts list to modify the people who have been added to your network. Tabs are listed next to each person’s image, to quickly view content related to that person, such as activities in the social network, e-mail, attachments, meetings, and status updates.
Other social networks are also available in the Social Connector, such as Facebook, MySpace, and LinkedIn, which are separately installed Outlook plug-ins. Each social network that is added includes its own separate contacts list in Outlook.
When searching for people in SharePoint 2010, the interface has advanced filtering capabilities, and interactivity with the search results. This capability brings into play the concept of knowledge mining, centered around the SharePoint tagging covered earlier in this chapter. There is a give-and-take with knowledge mining, centered around the following concepts:
- Everyone in the SharePoint community participates in tagging. This practice benefits yourself and others in the organization, and the searching of content.
- Using the Ask Me About property, individuals indicate their areas of expertise.
- Using the Interest property, users can indicate their interests. As opposed to a topic of expertise, an interest reflects something that the person would like to learn more about.
In addition to responsibilities and interests, any profile properties that have been set by the administrator as “indexed” are also searchable. Configuring properties as indexed in the Search Settings was covered in the “User Profiles and Properties” section at the beginning of this chapter.
In knowledge mining, the idea is that when metadata associated with a person is accurate, they can be found easily. Consider the need to pull together a team of people when starting a new project. Knowledge mining enables you to search for people in the organization based on areas of expertise related to the skill sets needed for the project. This can save valuable time when searching for, discovering, and using people’s proficiencies.
People Search Configuration
In Search Administration there is a scope called People, in addition to the default scope of All Sites. The definition of this scope is that a property called contentclass is equal to urn:content-class:SPSPeople. As long as the user profiles exist and a full crawl has been performed, people searches are possible whether or not My Sites are used in the environment. By default, this People scope is available in the search drop-down box in site collections. Take a look at Chapter 14 for more information about configuring search scopes.
Performing a People Search
When site users would like to search for people, using keywords, the People scope can be selected next to the search box at the top of the SharePoint site, as shown in Figure 17-30.

An advanced people search can also be performed. From the Search Center, click the People tab, and then the Search Options link, to see more options, as shown in Figure 17-31.
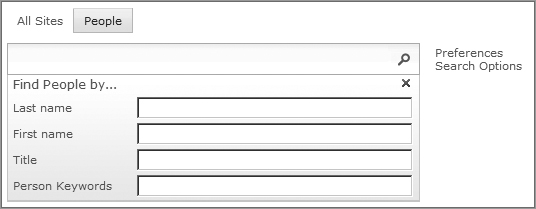
The search options enable specific properties to be searched. There is also another way to perform a search on a specific property. The syntax for a search on anyone who has the word “marketing” selected as one of their interests, for example, would be Interests:“marketing”.
The People Search Results Page
When searches for people are performed, the results page is highly integrated with the knowledge mining concept discussed in the last section. Figure 17-32 displays the People results page.

The left side of the screen contains a Web Part called the People Refinement Panel. Use this panel to further filter the results that are displayed. Some examples of properties that can be used to filter are Focus, Job Title, School, Past projects, and Office Location. The Sort by drop-down box at the top right enables the results to be sorted on the page, and there are additional links to set up a search alert, view an RSS feed, or click to search from Windows, which enables the Search Connector to be added to Windows.
Several actions can be taken on each of the people profiles that are displayed in the results. As you can see in Figure 17-32, pertinent information about each user is displayed, with the search term in bold letters.
- Click any person’s name to view their profile.
- The listed profiles of people who are not in the My Colleagues list of the currently logged-in user will contain a link to Add as colleague.
- The relationship of each person to the currently logged-in user will be listed under their photo, such as “My Colleague” or “My Colleague’s Colleague.”
- Click the Browse in organizational chart link for any person, to navigate to that person’s profile within the Organization tab.
- Click “By person’s name,” which elicits a JavaScript control to view that person’s recent content. By default, a tab is shown, About “keyword,” where the keyword is the search term that was used. There is also a tab under “By person’s name” called “More by person’s name,” where you can quickly view the most recent documents and pages that the person has worked on.
When the currently logged-in user’s profile is displayed among the search results, something special happens. Detailed information is provided regarding searches that were performed that lead to that person, as displayed in Figure 17-33.
Notice the section called Help People Find Me. You can see the number of times that searches led to your profile, and a list of the exact keywords that were used when people found you in search results and clicked on your name. There are also quick links to navigate to your own profile to modify it or add more keywords to it.

In this chapter, you learned about social computing concepts and how those concepts are now used in SharePoint 2010. Now you have the tools to be able to set up your own SharePoint implementation to take advantage of all of these new features, like tagging, notes, My Sites, and even rating content.