
Chapter 22. Persistent Storage
Your app can save data into files that persist on the device even when your app isn’t running or the device is powered down. This chapter is about how and where files are saved and retrieved. It also talks about some of the additional ways in which files can be manipulated: for example, apps can define document types in which they specialize and can hand such documents to one another, and can share documents into the cloud (iCloud), so that multiple copies of the same app can retrieve them on different devices. The chapter also explains how user preferences are maintained in UserDefaults, and describes some specialized file formats and ways of working with their data, such as XML, JSON, SQLite, Core Data, PDF, and images.
The Sandbox
The device’s contents as a whole are not open to your app’s view. Instead, a limited region of the device’s persistent storage is dedicated to your app alone: this is your app’s sandbox. The idea is that every app, seeing only its own sandbox, is hindered from spying or impinging on the files belonging to other apps, and in turn is protected from having its own files spied or impinged on by other apps. Your app’s sandbox is thus a safe place for you to store your data. Your sandbox, and hence your data, will be deleted if the user deletes your app; otherwise, it should reliably persist.
Standard Directories
The preferred way to refer to a file or directory is with a file URL, a URL instance. The other possible way is with a file path, or pathname, which is a string; if necessary, you can convert from a file URL to a file path by asking for the URL’s path, or from a pathname to a file URL with the URL initializer init(fileURLWithPath:). But on the whole, you should try to stick with URL objects.
The sandbox contains some standard directories, and there are built-in methods for referring to them. You can obtain a URL for a standard directory by starting with a FileManager instance, which will usually be FileManager.default, and calling url(for:in:appropriateFor:create:), like this:
do {
    let fm = FileManager.default
    let docsurl = try fm.url(for:.documentDirectory,
        in: .userDomainMask, appropriateFor: nil, create: false)
    // use docsurl here
} catch {
    // deal with error here
}
A question that will immediately occur to you is: where should I put files and folders that I want to save now and read later? The Documents directory can be a good place. But if your app supports file sharing (discussed later in this chapter), the user can see and modify your app’s Documents directory through iTunes, so you might not want to put things there that the user isn’t supposed to see and change. A good alternative is the Application Support directory. In iOS, each app gets a private Application Support directory in its own sandbox, so you can safely put files directly into it. This directory may not exist initially, but you can obtain it and create it at the same time:
do {
    let fm = FileManager.default
    let suppurl = try fm.url(for:.applicationSupportDirectory,
        in: .userDomainMask, appropriateFor: nil, create: true)
    // use suppurl here
} catch {
    // deal with error here
}
Temporary files whose loss you are willing to accept (because their contents can be recreated) can be written into the Caches directory (.cachesDirectory) or the Temporary directory (the FileManager’s temporaryDirectory). You can write temporary files into the Application Support folder, but by default this means they can be backed up by the user through iTunes or iCloud; to prevent that, exclude such a file from backup by way of its attributes:
var myFileURL = // file URL
var rv = URLResourceValues()
rv.isExcludedFromBackup = true
try myFileURL.setResourceValues(rv)
Inspecting the Sandbox
While developing your app, you might like to peek inside its sandbox for debugging purposes, to make sure your files are being saved there as you expect. The Simulator’s sandbox for your app is a folder on your Mac that you can, with some cunning, inspect visually. In your app’s code, print to the Xcode console the path of your app’s Documents directory. Copy that value from the console, switch to the Finder, choose Go → Go to Folder, paste the path into the dialog that appears, and click Go. Now you’re looking at your app’s Documents directory in the Finder; to see more of the sandbox, press Command-Up arrow.
Figure 22-1 displays my app’s sandbox. The Documents folder contains a folder and a couple of files that I’ve created programmatically (the code that created them will appear later in this chapter).

Figure 22-1. An app’s sandbox in the Simulator
You can also view the file structure of your app’s sandbox on a device. When the device is connected, choose Window → Devices and Simulators, and switch to the Devices tab. Select your device on the left; on the right, under Installed Apps, select your app. Click the Gear icon and choose Show Container to view your app’s sandbox hierarchy in a modal sheet (Figure 22-2). Alternatively, choose Download Container to copy your app’s sandbox to your computer; the sandbox arrives on your computer as an .xcappdata package, and you can open it in the Finder with Show Package Contents.

Figure 22-2. Summoning and displaying an app’s sandbox on a device
Basic File Operations
Let’s say we intend to create a folder MyFolder inside the Documents directory. We already know how to use a FileManager instance to get a URL pointing at the Documents directory; from this, we can generate a reference to the MyFolder folder. Using that reference, we can ask the FileManager to create the folder if it doesn’t exist already:
let foldername = "MyFolder"
let fm = FileManager.default
let docsurl = try fm.url(for:.documentDirectory,
    in: .userDomainMask, appropriateFor: nil, create: false)
let myfolder = docsurl.appendingPathComponent(foldername)
try fm.createDirectory(at:myfolder, withIntermediateDirectories: true)
To learn what files and folders exist within a directory, you can ask for an array of the directory’s contents:
let fm = FileManager.default
let docsurl = try fm.url(for:.documentDirectory,
    in: .userDomainMask, appropriateFor: nil, create: false)
let arr = try fm.contentsOfDirectory(at:docsurl,
    includingPropertiesForKeys: nil)
arr.forEach{ print($0.lastPathComponent) } // MyFolder
The array resulting from contentsOfDirectory lists full URLs of the directory’s immediate contents; it is shallow. For a deep traversal of a directory’s contents, you can enumerate it by means of a directory enumerator (FileManager.DirectoryEnumerator); this is efficient with regards to memory, because you are handed just one file reference at a time. In this example, MyFolder is in the Documents directory, and I am looking for two .txt files that I have saved into MyFolder (as explained in the next section); I find them by doing a deep traversal of the Documents directory:
let fm = FileManager.default
let docsurl = try fm.url(for:.documentDirectory,
    in: .userDomainMask, appropriateFor: nil, create: false)
let dir = fm.enumerator(at:docsurl, includingPropertiesForKeys: nil)!
for case let f as URL in dir where f.pathExtension == "txt" {
    print(f.lastPathComponent) // file1.txt, file2.txt
}
A directory enumerator also permits you to decline to dive into a particular subdirectory (skipDescendants), so you can make your traversal even more efficient.
Consult the FileManager class documentation for more about what you can do with files, and see also Apple’s File System Programming Guide in the documentation archive.
Saving and Reading Files
Four Cocoa classes provide an initializer that creates an instance from a file URL and a write instance method that saves the instance to a file URL. Thus you can effectively convert between a file and an instance of one of these classes:
- NSString and NSData
-
NSString and NSData objects map directly between their own contents and the contents of a file. Here, I’ll generate a text file in MyFolder directly from a string:
try "howdy".write(to: myfolder.appendingPathComponent("file1.txt"),
    atomically: true, encoding:.utf8)
- NSArray and NSDictionary
-
NSArray and NSDictionary files are actually property lists, and require all the contents of the array or dictionary to be property list types. Those types are:
-
NSString
-
NSData
-
NSDate
-
NSNumber
-
NSArray
-
NSDictionary
As long as you can reduce your data to an array or dictionary containing only those types, you can write it out directly to a file with
write(to:). Here, I create an array of strings and write it out as a property list file:let arr = ["Manny", "Moe", "Jack"] let temp = FileManager.default.temporaryDirectory let f = temp.appendingPathComponent("pep.plist") try (arr as NSArray).write(to: f) -
Thus, if you can couch your data as an instance of NSString, NSData, NSArray (with only property list type elements), or NSDictionary (with only property list type elements), writing your data out to a file or reading your data in from a file is trivial.
So how do you save an object of some other type to a file? The strategy is to serialize it to an NSData object (Swift Data). This, as we already know, can be saved directly to a file, or can be part of an array or dictionary to be saved to a file, and so the problem is solved.
Serializing means that we describe the object in terms of the values of its properties. There are two approaches to serializing an object as Data — the older Cocoa way (NSCoding) and the newer Swift way (Codable).
NSCoding
The NSCoding protocol is defined in Cocoa’s Foundation framework. If an object’s class adopts NSCoding, that object can be converted to NSData and back again, by way of the NSCoder subclasses NSKeyedArchiver and NSKeyedUnarchiver. This means that the class implements encode(with:) to archive the object and init(coder:) to unarchive the object.
Many built-in Cocoa classes adopt NSCoding — and you can make your own class adopt NSCoding as well. This can become somewhat involved, because an object can refer (through a property) to another object, which may also adopt the NSCoding protocol, and thus you can end up saving an entire graph of interconnected objects if you wish. However, I’ll confine myself to illustrating a simple case (and you can read Apple’s Archives and Serializations Programming Guide, in the documentation archive, for more information).
To illustrate, let’s say that we have a simple Person class with a firstName property and a lastName property. We’ll declare that it adopts the NSCoding protocol. New in iOS 12, Apple encourages us to step up our game to NSSecureCoding, a protocol that adopts NSCoding; to do so, we simply have to implement the static supportsSecureCoding property to return true:
class Person: NSObject, NSSecureCoding {
    static var supportsSecureCoding: Bool { return true }
    var firstName : String
    var lastName : String
    override var description : String {
        return self.firstName + " " + self.lastName
    }
    init(firstName:String, lastName:String) {
        self.firstName = firstName
        self.lastName = lastName
        super.init()
    }
    // ...
}
So far so good, but our code does not yet compile, because we do not yet conform to NSCoding (or to NSSecureCoding). We need to implement encode(with:) and init(coder:).
In encode(with:), we must first call super if the superclass adopts NSCoding — in this case, it doesn’t — and then call the encode method for each property we want preserved:
func encode(with coder: NSCoder) {
    // do not call super in this case
    coder.encode(self.lastName, forKey: "last")
    coder.encode(self.firstName, forKey: "first")
}
In init(coder:), we call a decode method for each property stored earlier, thus restoring the state of our object. We must also call super, using either init(coder:) if the superclass adopts NSCoding or the designated initializer if not:
required init(coder: NSCoder) {
    self.lastName = coder.decodeObject(
        of: NSString.self, forKey:"last")! as String
    self.firstName = coder.decodeObject(
        of: NSString.self, forKey:"first")! as String
    // do not call super init(coder:) in this case
    super.init()
}
We can test our code by creating, configuring, and saving a Person instance as a file:
let fm = FileManager.default
let docsurl = try fm.url(for:.documentDirectory,
    in: .userDomainMask, appropriateFor: nil, create: false)
let moi = Person(firstName: "Matt", lastName: "Neuburg")
let moidata = try NSKeyedArchiver.archivedData(
    withRootObject: moi, requiringSecureCoding: true)
let moifile = docsurl.appendingPathComponent("moi.txt")
try moidata.write(to: moifile, options: .atomic)
We can retrieve the saved Person at a later time:
let fm = FileManager.default
let docsurl = try fm.url(for:.documentDirectory,
    in: .userDomainMask, appropriateFor: nil, create: false)
let moifile = docsurl.appendingPathComponent("moi.txt")
let persondata = try Data(contentsOf: moifile)
let person = try NSKeyedUnarchiver.unarchivedObject(
    ofClass: Person.self, from: persondata)!
print(person) // "Matt Neuburg"
Archiving a single Person may seem like overkill; why didn’t we just make a text file consisting of the first and last names? But imagine that Person has a lot more properties, or that we have an array of hundreds of Persons, or an array of hundreds of dictionaries where one value in each dictionary is a Person; now the power of an archivable Person is evident.
Even though Person now adopts NSCoding, an NSArray containing a Person object still cannot be written to a file using NSArray’s write(to:), because Person is still not a property list type. But the array can be archived with NSKeyedArchiver and the resulting Data object can be written to a file, with write(to:options:). That’s because NSArray conforms to NSCoding and, if its elements are Person objects, all its elements conform to NSCoding as well.
Codable
The Codable protocol was introduced in Swift 4; it is a combination of two other protocols, Encodable and Decodable. An object can be serialized (archived) as long as it conforms to Encodable, and can be restored from serial form (unarchived) as long as it conforms to Decodable. Most commonly, an object will conform to both, and this will be expressed by having it adopt Codable. There are three modes of serialization:
- Property list
-
Use PropertyListEncoder
encode(_:)to encode and PropertyListDecoderdecode(_:from:)to decode. - JSON
-
Use JSONEncoder
encode(_:)to encode and JSONDecoderdecode(_:from:)to decode. - NSCoder
-
Use NSKeyedArchiver
encodeEncodable(_:forKey:)to encode and NSKeyedUnarchiverdecodeDecodable(_:forKey:)to decode.
You’ll probably prefer to use Swift Codable rather than Cocoa NSCoding wherever possible. Not only a class instance but also a struct instance can be encoded; you can even encode an enum instance, provided the enum is RawRepresentable (that is, it has a raw value). Most built-in Swift types are Codable right out of the box. Moreover, in the vast majority of cases, your object type will be Codable right out of the box! There are encode(to:) and init(from:) methods, similar to NSCoding encode(with:) and init(coder:), but you usually won’t need to implement them because the default methods, inherited through a protocol extension, will suffice.
To illustrate, I’ll rewrite my Person class to adopt Codable instead of NSCoding:
class Person: NSObject, Codable {
    var firstName : String
    var lastName : String
    override var description : String {
        return self.firstName + " " + self.lastName
    }
    init(firstName:String, lastName:String) {
        self.firstName = firstName
        self.lastName = lastName
        super.init()
    }
}
That’s all! Person conforms to Codable with no further effort on our part. The primary reason is that our properties are Strings, and String is itself Codable. To save a Person to a file, we just have to pick an encoding format. I recommend using a property list unless there is some reason not to; it is simplest, and is closest to what NSKeyedArchiver does under the hood:
let fm = FileManager.default
let docsurl = try fm.url(for:.documentDirectory,
    in: .userDomainMask, appropriateFor: nil, create: false)
let moi = Person(firstName: "Matt", lastName: "Neuburg")
let moidata = try PropertyListEncoder().encode(moi)
let moifile = docsurl.appendingPathComponent("moi.txt")
try moidata.write(to: moifile, options: .atomic)
And here’s how to retrieve our saved Person later:
let fm = FileManager.default
let docsurl = try fm.url(for:.documentDirectory,
    in: .userDomainMask, appropriateFor: nil, create: false)
let moifile = docsurl.appendingPathComponent("moi.txt")
let persondata = try Data(contentsOf: moifile)
let person = try PropertyListDecoder().decode(Person.self, from: persondata)
print(person) // "Matt Neuburg"
To save an array of Codable Person objects, do exactly the same thing. Array conforms to Codable, so use PropertyListEncoder to encode the array into a Data object and call write(to:options:), precisely as we did for a single Person object. To retrieve the array, read the data from the file as a Data object and use a PropertyListDecoder to call decode([Person].self, from:data).
When your goal is to serialize your own object type to a file, there usually won’t be any more to it than that. Your Codable implementation may be more elaborate, however, when the format of the encoded data is out of your hands, such as when you are communicating through a JSON API dictated by a server. I’ll illustrate later in this chapter.
The existence of Codable does not mean that you’ll never need to use NSCoding. Cocoa is written in Objective-C; its encodable object types adopt NSCoding, not Codable. And the vast majority of your objects will be Cocoa objects. For example, if you want to turn a UIColor into a Data object, you’ll use an NSKeyedArchiver, not a PropertyListEncoder; UIColor adopts NSCoding, not Codable.
You can, however, combine Swift Codable with Cocoa NSCoding, thanks to the NSCoder subclass methods encodeEncodable(_:forKey:) and decodeDecodable(_:forKey:). For example, suppose you have a view controller that is to participate in view controller state saving and restoration (Chapter 6). You implement encodeRestorableState(with:) to store your view controller’s property values in the coder:
class Pep: UIViewController {
    let boy : String
    // ...
    override func encodeRestorableState(with coder: NSCoder) {
        super.encodeRestorableState(with:coder)
        coder.encode(self.boy, forKey:"boy")
    }
}
That example works because self.boy is a String, String is bridged to NSString, and NSString adopts NSCoding. But now suppose that our view controller class, Pep, also has a property prop whose type is a struct MyStruct. Before Swift 4, you couldn’t have archived a struct directly into the coder; but now you can, because the struct can adopt Codable. coder is typed as an NSCoder, but in reality it is an NSKeyedArchiver; cast it down and call encodeEncodable(_:forKey:), like this:
class Pep: UIViewController {
    let boy : String
    let prop : MyStruct // adopts Codable
    // ...
    override func encodeRestorableState(with coder: NSCoder) {
        super.encodeRestorableState(with:coder)
        coder.encode(self.boy, forKey: "boy")
        let arch = coder as! NSKeyedArchiver
        try! arch.encodeEncodable(self.prop, forKey: "prop")
    }
}
The implementation of decodeRestorableState(with:) is parallel: cast the coder down to an NSKeyedUnarchiver and call decodeDecodable(_:forKey:) to extract the encoded struct.
User Defaults
The UserDefaults class functions as persistent storage of the user’s preferences. User defaults are little more, really, than a special case of an NSDictionary property list file. You talk to the UserDefaults standard object much as if it were a dictionary; it has keys and values, and you set and fetch values by their keys. The dictionary is saved for you automatically as a property list file — but you don’t know where or when, and you don’t care.
(Indeed, actual saving of the dictionary to disk might not take place until several seconds have elapsed after you make a change.)
Because user defaults is actually a property list file, the only legal values that can be stored in it are property list values. Therefore, everything I said in the preceding section about saving objects applies. If an object type is not a property list type, you’ll have to archive it to a Data object if you want to store it in user defaults. If the object type is a class that belongs to Cocoa and adopts NSCoding, you’ll archive it through an NSKeyedArchiver. If the object type belongs to you, you might prefer to make it adopt Codable and archive it through a PropertyListEncoder.
To provide the value for a key before the user has had a chance to do so — the default default, as it were — call register(defaults:). What you’re supplying here is a transient dictionary whose key–value pairs will be held in memory but not saved; a pair will be used only if there is no pair with the same key already stored in the user defaults dictionary. Here’s an example from one of my apps:
UserDefaults.standard.register(defaults: [
    Default.hazyStripy : HazyStripy.hazy.rawValue,
    Default.cardMatrixRows : 4,
    Default.cardMatrixColumns : 3,
    Default.color1 : try! NSKeyedArchiver.archivedData(
        withRootObject: UIColor.blue, requiringSecureCoding:true),
    Default.color2 : try! NSKeyedArchiver.archivedData(
        withRootObject: UIColor.red, requiringSecureCoding:true),
    Default.color3 : try! NSKeyedArchiver.archivedData(
        withRootObject: UIColor.green, requiringSecureCoding:true),
])
The idea is that we call register(defaults:) extremely early as the app launches. Either the app has run at some time previously and the user has set these preferences, in which case this call has no effect and does no harm, or not, in which case we now have initial values for these preferences with which to get started. In the game app from which that code comes, we start out with a hazy fill, a 4×3 game layout, and the three card colors blue, red, and green; but the user can change this at any time.
You will probably want to offer your user a way to interact explicitly with the defaults. One possibility is that your app provides some kind of interface. For example, the game app from which the previous code comes has a tab bar interface; in the second tab, the user explicitly sets the very preferences whose default values are configured in that code (Figure 22-3).
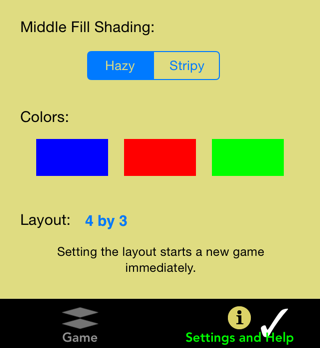
Figure 22-3. An app’s preferences interface
Alternatively, you can provide a settings bundle, consisting mostly of one or more property list files describing an interface and the corresponding user default keys and their initial values; the Settings app is then responsible for translating your instructions into an actual interface, and for presenting it to the user. Writing a settings bundle is described in Apple’s Preferences and Settings Programming Guide in the documentation archive.
Using a settings bundle means that the user has to leave your app to access preferences, and you don’t get the kind of control over the interface that you have within your own app. Also, the user can set your preferences while your app is backgrounded or not running; you’ll need to register for UserDefaults.didChangeNotification in order to hear about this.
Still, a settings bundle has some clear advantages. Keeping the preferences interface out of your app can make your app’s own interface cleaner and simpler. You don’t have to write any of the “glue” code that coordinates the preferences interface with the user default values. And it may be appropriate for the user to be able to set at least some preferences for your app when your app isn’t running.
Moreover, you can transport your user directly from your app to your app’s preferences in the Settings app (and a Back button then appears in the status bar, making it easy for the user to return from Settings to your app):
let url = URL(string:UIApplication.openSettingsURLString)!
UIApplication.shared.open(url)
It is common practice to misuse UserDefaults ever so slightly for various purposes. For example, every method in your app can access the UserDefaults standard object, so it often serves as a global “drop” where one instance can deposit a piece of information for another instance to pick up later, when those two instances might not have ready communication with one another or might not even exist simultaneously.
UserDefaults is also a lightweight alternative to the built-in view controller–based state saving and restoration mechanism discussed in Chapter 6. My Zotz! app (Figure 22-3) is a case in point. In addition to using the user defaults to store the user’s explicit preferences, it also records the state of the game board and the card deck into user defaults every time these change, so that if the app is terminated and then launched again later, we can restore the game as it was when the user left off. One might argue that the contents of the card deck are not a user preference, so I am misusing the user defaults to store state data. However, while purists may grumble, it’s a very small amount of data and I don’t think the distinction is terribly significant in this case.
Yet another use of UserDefaults is to communicate data between your app and an extension provided by your app. For example, let’s say you’ve written a today extension (Chapter 13) whose interface details depend upon some data belonging to your app. After configuring your extension and your app to constitute an app group, both the extension and the app can access the UserDefaults associated with the app group (call init(suiteName:) instead of standard). For more information, see the “Handling Common Scenarios” chapter of Apple’s App Extension Programming Guide.
Simple Sharing and Previewing of Files
iOS provides basic passageways by which a file can pass safely in and out of your sandbox. File sharing lets the user manipulate the contents of your app’s Documents directory. UIDocumentInteractionController allows the user to tell another app to hand a copy of a document to your app, or to tell your app to hand a copy of a document to another app; it also permits previewing a document, provided it is compatible with Quick Look.
File Sharing
File sharing means that an app’s Documents directory becomes accessible to the user through iTunes (Figure 22-4). The user can add files to your app’s Documents directory, and can save files and folders from your app’s Documents directory to the computer, as well as renaming and deleting files and folders. This could be appropriate, for example, if your app works with common types of file that the user might obtain elsewhere, such as PDFs or JPEGs.
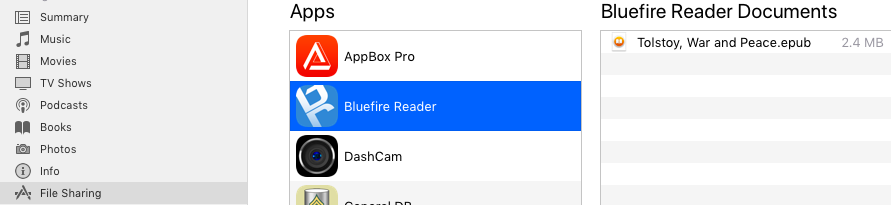
Figure 22-4. The iTunes file sharing interface
To support file sharing, set the Info.plist key “Application supports iTunes file sharing” (UIFileSharingEnabled) to YES.
Once your entire Documents directory is exposed to the user this way, you are unlikely to use the Documents directory to store private files. As I mentioned earlier, I like to use the Application Support directory instead.
Your app doesn’t get any automatic notification when the user has altered the contents of the Documents directory. Noticing that the situation has changed and responding appropriately is entirely up to you; Apple’s DocInteraction sample code demonstrates one approach using the kernel-level kqueue mechanism.
Document Types and Receiving a Document
Your app can declare itself willing to open documents of a certain type. In this way, if another app obtains a document of this type, it can propose to hand a copy of the document over to your app. For example, the user might download the document with Mobile Safari, or receive it in a mail message with the Mail app; now we need a way to get it from Safari or Mail to you.
To let the system know that your app is a candidate for receiving a certain kind of document, you will configure the “Document types” (CFBundleDocumentTypes) key in your Info.plist. This is an array, where each entry will be a dictionary specifying a document type by using keys such as “Document Content Type UTIs” (LSItemContentTypes), “Document Type Name” (CFBundleTypeName), CFBundleTypeIconFiles, and LSHandlerRank.
The simplest way to configure the Info.plist is through the interface available in the Info tab when you edit the target. For example, suppose I want to declare that my app opens PDFs and text files. In my target’s Info tab in Xcode, I would edit the Document Types section to look like Figure 22-5.

Figure 22-5. Creating a document type
(The values in the Types field in Figure 22-5 are UTIs — uniform type identifiers. PDFs and text files are common types, so they have standard UTIs. To find out the standard UTI for a common file type, look in Apple’s Uniform Type Identifiers Reference in the documentation archive.)
Now suppose the user receives a PDF in an email message. The Mail app can display this PDF, but the user can also bring up an activity view offering, among other things, to copy the file to some other app. The interface will resemble Figure 22-6; various apps that can deal with a PDF are listed here, and my app (MyCoolApp) is among them.

Figure 22-6. The Mail app offers to hand off a PDF
So far, so good. But what if the user actually taps the button that sends the PDF over to my app? Then my app delegate’s application(_:open:options:) is called. When that happens, my app has been brought to the front, either by launching it from scratch or by reviving it from background suspension; its job is now to handle the opening of the document whose URL has arrived as the second parameter. The system has already copied the document into an Inbox folder which it has created in my Documents directory for exactly this purpose.
Warning
If your app implements file sharing, the user can see the Inbox folder using iTunes; you may wish to delete the Inbox folder, therefore, when you’re done retrieving files from it.
In this simple example, my app has just one view controller, which has an outlet to a web view where we will display any PDFs that arrive in this fashion. So my app delegate contains this code:
func application(_ app: UIApplication, open url: URL,
    options: [UIApplication.OpenURLOptionsKey : Any]) -> Bool {
        let vc = self.window!.rootViewController as! ViewController
        vc.displayDoc(url: url)
        return true
}
And my view controller contains this code (self.wv is the web view):
func displayDoc (url:URL) {
    let req = URLRequest(url: url)
    self.wv.loadRequest(req)
}
In real life, things might be more complicated. Our implementation of application(_:open:options:) might check to see whether this really is a PDF, and return false if it isn’t. Also, our app might be in the middle of something else, possibly displaying a completely different view controller’s view; realizing that application(_:open:options:) can arrive at any time, we may have to be prepared to drop whatever we were doing and display the incoming document instead.
If our app is launched from scratch by the arrival of this URL, application(_:didFinishLaunchingWithOptions:) will be sent to our app delegate as usual. The options: dictionary will contain the .url key, and we can take into account, if we like, the fact that we are being launched specifically to open a document. If we return true as usual, application(_:open:options:) will arrive in good order after our interface has been set up; but if we have dealt completely with the URL in application(_:didFinishLaunchingWithOptions:), we can return false to prevent application(_:open:options:) from being called.
The example I’ve been discussing assumes that the UTI for the document type is standard and well-known. It is also possible that your app will operate on a new document type, that is, a type of document that the app itself defines. In that case, you’ll also want to add this UTI to your app’s list of Exported UTIs in the Info.plist. I’ll give an example later in this chapter.
Handing Over a Document
The converse of the situation discussed in the previous section is that your app has somehow acquired a document and wants to let the user hand over a copy of it to some other app to deal with it. This is done through the UIDocumentInteractionController class. This class operates asynchronously, so retaining an instance of it is up to you; typically, you’ll store it in a property, and there is no reason not to initialize this property directly:
let dic = UIDocumentInteractionController()
For example, assuming we have a file URL url pointing to a stored document file, presenting the interface for handing the document over to some other application could be as simple as this (sender is a button that the user has just tapped):
self.dic.url = url
let v = sender as! UIView
self.dic.presentOpenInMenu(from:v.bounds, in: v, animated: true)

Figure 22-7. The document Open In activity view
The interface is an activity view (Figure 22-7; see Chapter 13). There are actually two activity views available, each of which is summoned by either of two methods (the first method of each pair expects a CGRect and a UIView, while the second expects a UIBarButtonItem):
presentOpenInMenu(from:in:animated:)presentOpenInMenu(from:animated:)-
Presents an activity view listing apps to which the document can be copied.
presentOptionsMenu(from:in:animated:)presentOptionsMenu(from:animated:)-
Presents an activity view listing apps to which the document can be copied, along with other possible actions, such as Message, Mail, Copy, and Print.
Previewing a Document
A UIDocumentInteractionController can be used for an entirely different purpose: it can present a preview of the document, if the document is of a type for which preview is enabled, by calling presentPreview(animated:). You must give the UIDocumentInteractionController a delegate (UIDocumentInteractionControllerDelegate), and the delegate must implement documentInteractionControllerViewControllerForPreview(_:), returning an existing view controller that will contain the preview’s view controller. So, here we ask for the preview:
self.dic.url = url
self.dic.delegate = self
self.dic.presentPreview(animated:true)
In the delegate, we supply the view controller; it happens that, in my code, this delegate is a view controller, so it simply returns self:
func documentInteractionControllerViewControllerForPreview(
    _ controller: UIDocumentInteractionController) -> UIViewController {
        return self
}
If the view controller returned were a UINavigationController, the preview’s view controller would be pushed onto it; in this case it isn’t, so the preview’s view controller is a presented view controller with a Done button. The preview interface also contains a Share button that lets the user summon the Options activity view (Figure 22-8).

Figure 22-8. The preview interface
There is another way for the user to reach this interface. If you call presentOptionsMenu on your UIDocumentInteractionController, and if its delegate implements documentInteractionControllerViewControllerForPreview(_:), then the activity view will contain a Quick Look icon that the user can tap to summon the preview interface.
Additional delegate methods allow you to track what’s happening in the interface presented by the UIDocumentInteractionController. Probably most important are those that inform you that key stages of the interaction are ending:
-
documentInteractionControllerDidDismissOptionsMenu(_:) -
documentInteractionControllerDidDismissOpenInMenu(_:) -
documentInteractionControllerDidEndPreview(_:) -
documentInteractionController(_:didEndSendingToApplication:)
Quick Look Previews
Previews are actually provided through the Quick Look framework. You can skip the UIDocumentInteractionController and present the preview yourself through a QLPreviewController; you’ll need to import QuickLook. It’s a view controller, so to display the preview you show it as a presented view controller or push it onto a navigation controller’s stack, just as UIDocumentInteractionController would have done.
A nice feature of QLPreviewController is that you can give it more than one document to preview; the user can move between these, within the preview, by paging sideways or using a table of contents summoned by a button at the bottom of the interface. Apart from this, the interface looks like the interface presented by the UIDocumentInteractionController.
In this example, I may have somewhere in my Documents directory one or more PDF or text documents. I acquire a list of their URLs and present a preview for them (self.exts has been initialized to a set consisting of ["pdf", "txt"]):
self.docs = [URL]()
do {
    let fm = FileManager.default
    let docsurl = try fm.url(for:.documentDirectory,
        in: .userDomainMask, appropriateFor: nil, create: false)
    let dir = fm.enumerator(at: docsurl, includingPropertiesForKeys: nil)!
    for case let f as URL in dir {
        if self.exts.contains(f.pathExtension) {
            if QLPreviewController.canPreview(f as QLPreviewItem) {
                self.docs.append(f)
            }
        }
    }
    guard self.docs.count > 0 else { return }
    let preview = QLPreviewController()
    preview.dataSource = self
    preview.currentPreviewItemIndex = 0
    self.present(preview, animated: true)
} catch {
    print(error)
}
You’ll notice that I haven’t told the QLPreviewController what documents to preview. That is the job of QLPreviewController’s data source. In my code, I (self) am also the data source. I simply fetch the requested information from the list of URLs, which I previously saved into self.docs:
func numberOfPreviewItems(in controller: QLPreviewController) -> Int {
    return self.docs.count
}
func previewController(_ controller: QLPreviewController,
    previewItemAt index: Int) -> QLPreviewItem {
        return self.docs[index] as QLPreviewItem
}
The second data source method requires us to return an object that adopts the QLPreviewItem protocol. By a wildly improbable coincidence, URL does adopt this protocol, so the example works.
By giving your QLPreviewController a delegate (QLPreviewControllerDelegate), you can cause a presented QLPreviewController to appear by zooming from a view in your interface.
For document types that you own, you can supply your own Quick Look preview. I’ll discuss that later in this chapter.
Document Architecture
A document is a file of a specific type. If your app’s basic operation depends on opening, saving, and maintaining documents of a type particular to itself, you may want to take advantage of the document architecture. At its simplest, this architecture revolves around the UIDocument class. Think of a UIDocument instance as managing the relationship between your app’s internal model data and a document file storing that data.
Interacting with a stored document file involves a number of pesky issues. The good news is that UIDocument handles all of them seamlessly:
-
Reading or writing your data might take some time, so UIDocument does those things on a background thread.
-
Your document data needs to be synchronized to the document file. UIDocument provides autosaving behavior, so that your data is written out automatically whenever it changes.
-
A document owned by your app may be exposed to reading and writing by other apps, so your app must read and write to that document coherently without interference from other apps. The solution is to use an NSFileCoordinator. UIDocument does that for you.
-
Information about a document can become stale while the document is open. To prevent this, the NSFilePresenter protocol notifies editors that a document has changed. UIDocument participates in this system.
-
Your app might be able to open a document stored in another app’s sandbox. To do so, you need special permission, which you obtain by treating the document’s URL as a security scoped URL. UIDocument does that automatically.
-
With iCloud, your app’s documents on one of the user’s devices can automatically be mirrored onto another of the user’s devices. UIDocument can act as a gateway for allowing your documents to participate in iCloud.
Getting started with UIDocument is not difficult. You’ll declare a UIDocument subclass, and you’ll override two methods:
load(fromContents:ofType:)-
Called when it’s time to open a document from its file. You are expected to convert the
contentsvalue into a model object that your app can use, and to store that model object, probably in an instance property. contents(forType:)-
Called when it’s time to save a document to its file. You are expected to convert the app’s model object into a Data instance (or, if your document is a package, a FileWrapper) and return it.
To instantiate a UIDocument, call its designated initializer, init(fileURL:). This sets the UIDocument’s fileURL property, and associates the UIDocument with the file at this URL; typically, this association will remain constant for the rest of the UIDocument’s lifetime. You will then probably store the UIDocument instance in an instance property, and use it to create (if necessary), open, save, and close the document file:
- Make a new document
-
Having initialized the UIDocument with a
fileURL:pointing to a nonexistent file, send itsave(to:for:completionHandler:); the first argument will be the UIDocument’s ownfileURL, and the second argument (a UIDocument.SaveOperation) will be.forCreating.This, in turn, causes
contents(forType:)to be called, and the contents of an empty document will be saved out to a file. Your UIDocument subclass will need to supply some default value representing the model data when there is no data. - Open an existing document
-
Send the UIDocument instance
open(completionHandler:).This, in turn, causes
load(fromContents:ofType:)to be called. - Save an existing document
-
There are two approaches to saving an existing document:
- Autosave
-
Usually, you’ll simply mark the document as “dirty” by calling
updateChangeCount(_:). From time to time, the UIDocument will notice this situation and will save the document to its file for you, callingcontents(forType:)as it does so. - Manual save
-
On certain occasions, waiting for autosave won’t be appropriate. We’ve already seen one such occasion — when the document file needs to be created on the spot. Another case is that the app is going into the background; we will want to preserve our document there and then, in case the app is terminated. To force the document to be saved right now, call
save(to:for:completionHandler:); the second argument will be.forOverwriting.Alternatively, if you know you’re finished with the document (perhaps the interface displaying the document is about to be torn down), you can call
close(completionHandler:).
The open, save, and close methods take a completionHandler: function. This is UIDocument’s solution to the fact that reading and saving may take time. The file operations themselves take place on a background thread; your completion function is then called on the main thread.
A Basic Document Example
We now know enough for an example! I’ll reuse my Person class from earlier in this chapter. Imagine a document effectively consisting of multiple Person instances; I’ll call each such document a people group. Our app, People Groups, will list all people group documents in the user’s Documents folder; the user can then select any people group document and our app will open that document and display its contents, allowing the user to create a new Person and to edit any existing Person’s firstName or lastName (Figure 22-9).

Figure 22-9. The People Groups interface
My first step is to edit my project and use the Info tab (Figure 22-10) to configure my app’s Info.plist. I define (export) a custom UTI, associating a file type com.neuburg.pplgrp with a file extension "pplgrp". I give this UTI a place in the UTI hierarchy (it inherits from no existing type, so it conforms to public.content, the base type) and I declare that it is a simple flat file (public.data) as opposed to a package. I also define a corresponding document type, declaring that my app is the origin of this UTI (Owner) and that it is able to open and save documents (Editor).
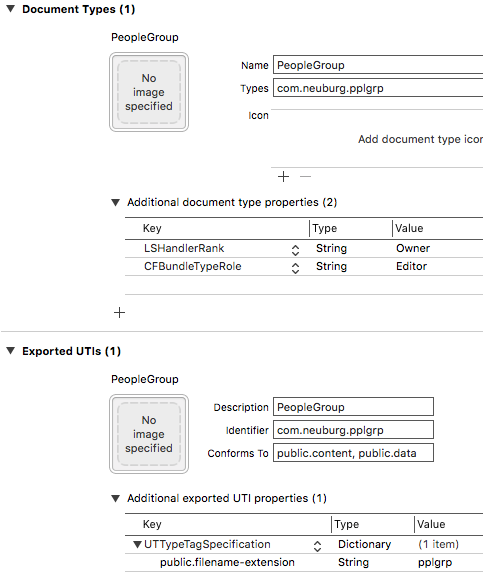
Figure 22-10. Defining a custom UTI
Now let’s write our UIDocument subclass, which I’ll call PeopleDocument. A document consists of multiple Persons, so a natural model implementation is a Person array. PeopleDocument has a public people property, initialized to an empty Person array; this will not only hold the model data when we have it, but will also give us something to save into a new empty document. Since Person implements Codable, a Person array can be archived directly into a Data object, and our implementation of the loading and saving methods is straightforward:
class PeopleDocument: UIDocument {
    var people = [Person]()
    override func load(fromContents contents: Any,
        ofType typeName: String?) throws {
            if let contents = contents as? Data {
                if let arr = try? PropertyListDecoder().decode(
                    [Person].self, from: contents) {
                        self.people = arr
                        return
                }
            }
            // if we get here, there was some kind of problem
            throw NSError(domain: "NoDataDomain", code: -1, userInfo: nil)
    }
    override func contents(forType typeName: String) throws -> Any {
        if let data = try? PropertyListEncoder().encode(self.people) {
            return data
        }
        // if we get here, there was some kind of problem
        throw NSError(domain: "NoDataDomain", code: -2, userInfo: nil)
    }
}
The first view controller, GroupLister, is a master table view (its view appears on the left in Figure 22-9). It merely looks in the Documents directory for people group documents and lists them by name; it also provides an interface for letting the user create a new people group. None of that is challenging, so I won’t discuss it further.
The second view controller, PeopleLister, is the detail view; it is also a table view (its view appears on the right in Figure 22-9). It displays the first and last names of the people in the currently open people group document. This is the only place where we actually work with PeopleDocument, so let’s focus our attention on that.
PeopleLister’s designated initializer demands a fileURL: parameter pointing to a people group document, and uses it to set its own fileURL property. From this, it instantiates a PeopleDocument, keeping a reference to it in its doc property. PeopleLister also has a people property, acting as the data model for its table view; this is nothing but a pointer to the PeopleDocument’s people property.
As PeopleLister comes into existence, the document file pointed to by self.fileURL need not yet exist. If it doesn’t, we create it; if it does, we open it. In both cases, our people data are now ready for display, so the completion function reloads the table view:
let fileURL : URL
var doc : PeopleDocument!
var people : [Person] { // point to the document's model object
    get { return self.doc.people }
    set { self.doc.people = newValue }
}
init(fileURL:URL) {
    self.fileURL = fileURL
    super.init(nibName: "PeopleLister", bundle: nil)
}
required init(coder: NSCoder) {
    fatalError("NSCoding not supported")
}
override func viewDidLoad() {
    super.viewDidLoad()
    self.title =
        (self.fileURL.lastPathComponent as NSString).deletingPathExtension
    // ... interface configuration goes here ...
    let fm = FileManager.default
    self.doc = PeopleDocument(fileURL:self.fileURL)
    func listPeople(_ success:Bool) {
        if success {
            self.tableView.reloadData()
        }
    }
    if let _ = try? self.fileURL.checkResourceIsReachable() {
        self.doc.open(completionHandler: listPeople)
    } else {
        self.doc.save(to:self.doc.fileURL,
            for: .forCreating, completionHandler: listPeople)
    }
}
Displaying people, creating a new person, and allowing the user to edit a person’s first and last names, are all trivial uses of a table view (Chapter 8). Let’s proceed to the only other aspect of PeopleLister that involves working with PeopleDocument, namely saving.
When the user performs a significant editing maneuver, such as creating a person or editing a person’s first or last name, PeopleLister updates the model (self.people) and the table view, and then tells its PeopleDocument that the document is dirty, allowing autosaving to take it from there:
self.doc.updateChangeCount(.done)
When the app is about to go into the background, or when PeopleLister’s own view is disappearing, PeopleLister forces PeopleDocument to save immediately:
func forceSave(_: Any?) {
    self.tableView.endEditing(true)
    self.doc.save(to:self.doc.fileURL, for:.forOverwriting)
}
That’s all it takes! Adding UIDocument support to your app is easy, because UIDocument is merely acting as a supplier and preserver of your app’s data model object. The UIDocument class documentation may give the impression that this is a large and complex class, but that’s chiefly because it is so heavily customizable both at high and low levels; for the most part, you won’t need any customization. You might work with your UIDocument’s undo manager to give it a more sophisticated understanding of what constitutes a significant change in your data; I’ll talk about undo managers in Chapter 25. For further details, see Apple’s Document-based App Programming Guide for iOS in the document archive.
If your app supports iTunes file sharing, and if the Info.plist key “Supports opening documents in place” (LSSupportsOpeningDocumentsInPlace) is also set to YES, files in your app’s Documents directory will be visible in the Files app, and the user can tap one to call your app delegate’s application(_:open:options:), as described earlier in this chapter. That’s safe only if your app accesses files by way of NSFilePresenter and NSFileCoordinator — and because you’re using UIDocument, it does.
iCloud
Once your app is operating through UIDocument, basic iCloud compatibility effectively falls right into your lap. You have just two steps to perform:
- Obtain iCloud entitlements
-
Edit the target and, in the Capabilities tab, set the iCloud switch to On. This causes a transaction to take place between Xcode and the Member Center; automatically, your app gets a ubiquity container, and an appropriately configured entitlements file is added to the project (Figure 22-11).
- Obtain an iCloud-compatible directory
-
Early in your app’s lifetime, call FileManager’s
url(forUbiquityContainerIdentifier:)(typically passingnilas the argument), on a background thread, to obtain the URL of the cloud-shared directory. Any documents your app puts here by way of your UIDocument subclass will be automatically shared into the cloud.

Figure 22-11. Turning on iCloud support
Thus, having thrown the switch in the Capabilities tab, I can make my People Groups app iCloud-compatible with just two code changes. In the app delegate, as my app launches, I step out to a background thread (Chapter 24), obtain the cloud-shared directory’s URL, and then step back to the main thread and retain the URL through a property, self.ubiq:
DispatchQueue.global(qos:.default).async {
    let fm = FileManager.default
    let ubiq = fm.url(forUbiquityContainerIdentifier:nil)
    DispatchQueue.main.async {
        self.ubiq = ubiq
    }
}
When I determine where to seek and save people groups, I specify ubiq — unless it is nil, implying that iCloud is not enabled, in which case I specify the user’s Documents folder:
var docsurl : URL {
    let del = UIApplication.shared.delegate
    if let ubiq = (del as! AppDelegate).ubiq {
        return ubiq
    } else {
        do {
            let fm = FileManager.default
            return try fm.url(for:.documentDirectory, in: .userDomainMask,
                appropriateFor: nil, create: false)
        } catch {
            print(error)
        }
    }
    return NSURL() as URL // shouldn't happen
}
To test, iCloud Drive must be turned on under iCloud in my device’s Settings. I run the app and create a people group with some people in it. I then switch to a different device and run the app there, and tap the Refresh button. This is a very crude implementation, purely for testing purposes; we look through the docsurl directory for pplgrp files and download any cloud-based files:
do {
    let fm = FileManager.default
    self.files = try fm.contentsOfDirectory(at: self.docsurl,
        includingPropertiesForKeys: nil).filter {
            if fm.isUbiquitousItem(at:$0) {
                try fm.startDownloadingUbiquitousItem(at:$0)
            }
            return $0.pathExtension == "pplgrp"
    }
    self.tableView.reloadData()
} catch {
    print(error)
}
Presto, the app on this device now displays my people group documents created on a different device! It’s quite thrilling.
My Refresh button approach, although it works (possibly after a couple of tries), is decidedly crude. My UIDocument works with iCloud, but my app is not a good iCloud citizen. The truth is that I should not be using FileManager like this; instead, I should be running an NSMetadataQuery. The usual strategy is:
-
Instantiate NSMetadataQuery and retain the instance.
-
Configure the search. This means giving the metadata query a search scope of
NSMetadataQueryUbiquitousDocumentsScope, and supplying a serial queue for it to run on (OperationQueue, see Chapter 24). -
Register for notifications such as
.NSMetadataQueryDidFinishGatheringand.NSMetadataQueryDidUpdate. -
Start the search by calling
start. The NSMetadataQuery instance then remains in place, with the search continuing to run more or less constantly, for the entire lifetime of the app. -
When a notification arrives, check the NSMetadataQuery’s
results. These will be NSMetadataItem objects, whosevalue(forAttribute:NSMetadataItemURLKey)is the document file URL.
Similarly, in my earlier code I called checkResourceIsReachable, but for a cloud item I should be calling checkPromisedItemIsReachable instead.
Another problem with our app is that, by turning on iCloud support in this way, we have turned off the ability of the Files app to see our files (because they are now cloud-based and not in the Documents directory). I’ll give a solution in the next section.
Further iCloud details are outside the scope of this discussion; see Apple’s iCloud Design Guide in the documentation archive. Getting started is easy; making your app a good iCloud citizen, capable of dealing with the complexities that iCloud may entail, is not. What if the currently open document changes because someone edited it on another device? What if that change is in conflict with changes I’ve made on this device? What if the availability of iCloud changes while the app is open — for example, the user switches iCloud on, or switches it off? Apple’s own sample code habitually skirts these knotty issues.
Document Browser
The document browser (UIDocumentBrowserViewController), introduced in iOS 11, can improve a document-based app in two ways:
-
An iOS device has no universal file browser parallel to the Mac desktop’s Finder. So if your app maintains document files, it must also implement for itself the nitty-gritty details of file management, listing your documents and letting the user delete them, rename them, move them, and so forth. The document browser injects into your app a standard file management interface similar to the Files app.
-
If your UIDocument-based app saves documents into iCloud, and if your app uses the document browser, the Files app (and document browsers in other apps) will be able to see your app’s files in the cloud. Moreover, we can ignore everything I said in the preceding section about how to make our app participate in iCloud; with UIDocumentBrowserViewController, our app participates in iCloud automatically, with no need for any entitlements or added cloud management code.
Let’s convert our People Groups app to use the document browser. The easiest way to get started is from the template provided by Apple; choose File → New → Project and iOS → Application → Document Based App. The template provides three features:
- Info.plist configuration
-
The template gives us a start on the configuration of our Info.plist. In particular, it includes the “Supports Document Browser” key (
UISupportsDocumentBrowser) with its value set toYES. - Classes and storyboard
-
The template provides a basic set of classes:
-
A UIDocumentBrowserViewController subclass (DocumentBrowserViewController)
-
A UIDocument subclass (Document)
-
A view controller (DocumentViewController) intended for display of documents of that class
The template puts instances of the two view controllers into the storyboard.
-
- Structure
-
The template makes the UIDocumentBrowserViewController instance our app’s root view controller. The remainder of our app’s interface, where the user views the contents of a document, must be displayed through a fullscreen presented view controller.
In adapting People Groups to this architecture, we can eliminate the GroupLister view controller class that has been acting as a master view controller to list our documents (left side in Figure 22-9), because the document browser will now fill that role; Document and DocumentViewController, meanwhile, are parallel to, and can be replaced by, our PeopleDocument and PeopleLister classes.
We begin by customizing DocumentBrowserViewController. The template gets us started, setting this class as its own delegate (UIDocumentBrowserViewControllerDelegate) and configuring the document browser’s capabilities:
override func viewDidLoad() {
    super.viewDidLoad()
    self.delegate = self
    self.allowsDocumentCreation = true
    self.allowsPickingMultipleItems = false
}
The template also implements delegate methods for when the user selects an existing document or copies a document from elsewhere; both call a custom method, presentDocument(at:), for which the template provides a stub implementation:
func documentBrowser(_ controller: UIDocumentBrowserViewController,
    didPickDocumentURLs documentURLs: [URL]) {
        guard let sourceURL = documentURLs.first else { return }
        self.presentDocument(at: sourceURL)
}
func documentBrowser(_ controller: UIDocumentBrowserViewController,
    didImportDocumentAt sourceURL: URL,
    toDestinationURL destinationURL: URL) {
        self.presentDocument(at: destinationURL)
}
Providing a real implementation of presentDocument(at:) is up to us. We are no longer in a navigation interface, but PeopleLister expects one; so when I instantiate PeopleLister, I wrap it in a navigation controller and present that navigation controller:
func presentDocument(at documentURL: URL) {
    let lister = PeopleLister(fileURL: documentURL)
    let nav = UINavigationController(rootViewController: lister)
    self.present(nav, animated: true)
}
Finally, we come to the really interesting case: the user asks the document browser to create a People Groups document. This causes the delegate’s documentBrowser(_:didRequestDocumentCreationWithHandler:) to be called. Our job is to provide the URL of an existing empty document file and call the handler: function with that URL. But where are we going to get a document file? Well, we already know how to create an empty document; we proved that in our earlier example. So I’ll create that document in the Temporary directory and feed its URL to the handler: function. That is exactly the strategy advised by the documentation on this delegate method, and my code is adapted directly from the example code there.
I’m a little unclear, however, about what we’re intended to do about the name of the new file. In the past, Apple’s advice was not to worry about this — any unique name would do — but that was before the user could see file names in a standard interface. My solution is to present a UIAlertController where the user can enter the new document’s name, creating the new document in the OK button’s action function. Observe that I call the importHandler function under every circumstance:
func documentBrowser(_ controller: UIDocumentBrowserViewController,
    didRequestDocumentCreationWithHandler importHandler:
    @escaping (URL?, UIDocumentBrowserViewController.ImportMode) -> Void) {
        var docname = "People"
        let alert = UIAlertController(
            title: "Name for new people group:",
            message: nil, preferredStyle: .alert)
        alert.addTextField { tf in
            tf.autocapitalizationType = .words
        }
        alert.addAction(UIAlertAction(title: "Cancel", style: .cancel) {_ in
            importHandler(nil, .none)
        })
        alert.addAction(UIAlertAction(title: "OK", style: .default) {_ in
            if let proposal = alert.textFields?[0].text {
                if !proposal.trimmingCharacters(in: .whitespaces).isEmpty {
                    docname = proposal
                }
            }
            let fm = FileManager.default
            let temp = fm.temporaryDirectory
            let fileURL = temp.appendingPathComponent(docname + ".pplgrp2")
            let newdoc = PeopleDocument(fileURL: fileURL)
            newdoc.save(to: fileURL, for: .forOverwriting) { ok in
                guard ok else { importHandler(nil, .none); return }
                newdoc.close() { ok in
                    guard ok else { importHandler(nil, .none); return }
                    importHandler(fileURL, .move)
                }
            }
        })
        self.present(alert, animated: true)
}
If the user cancels or if something else goes wrong, I call importHandler with a nil URL. Just one path of execution calls importHandler with an actual file URL. If that happens, our delegate method documentBrowser(_:didImportDocumentAt:toDestinationURL:) is called — and so our PeopleLister view controller is presented, displaying the new empty document.
Custom Thumbnails
Now that the user can see our document files represented in the file browser, we will probably want to give some attention to their icons. A document icon is its thumbnail. A straightforward approach is to have our UIDocument subclass write a thumbnail into the file when saving (Figure 22-12):
override func fileAttributesToWrite(to url: URL,
    for saveOperation: UIDocument.SaveOperation)
    throws -> [AnyHashable : Any] {
        let icon = UIImage(named:"smiley.jpg")!
        let sz = CGSize(1024,1024)
        let im = UIGraphicsImageRenderer(size:sz,
            format:icon.imageRendererFormat).image {_ in
                icon.draw(at: CGPoint(
                    (sz.width - icon.size.width)/2,
                    (sz.height - icon.size.height)/2))
        }
        var d = try super.fileAttributesToWrite(to: url, for: saveOperation)
        let key1 = URLResourceKey.thumbnailDictionaryKey
        let key2 = URLThumbnailDictionaryItem.NSThumbnail1024x1024SizeKey
        d[key1] = [key2:im]
        return d
}

Figure 22-12. A document with a thumbnail
An alternative approach, introduced in iOS 11, is to provide a thumbnail extension that is consulted in real time whenever a document browser wants to portray one of our documents. To write a thumbnail extension, make a new target and choose iOS → Application Extension → Thumbnail Extension. As usual, we must configure the Info.plist to specify the UTI for the document type whose thumbnail we will be providing (Figure 22-13).

Figure 22-13. Configuring a thumbnail extension
Now we customize the ThumbnailProvider class given to us by the template. In particular, we implement provideThumbnail(for:_:). Its parameters are a QLFileThumbnailRequest and a completion function. Our job is to examine the incoming QLFileThumbnailRequest, construct a QLThumbnailReply, and call the completion function, handing it the QLThumbnailReply.
There are three ways to make a QLThumbnailReply:
init(imageFileURL:)-
We might use this initializer if our extension bundle contains an image file that we always want to use as a document icon.
init(contextSize:currentContextDrawing:)-
A graphics context is going to be prepared for us and made the current context. We supply a function that draws the thumbnail in real time into the current context.
init(contextSize:drawing:)-
A graphics context is supplied as the second parameter. We supply a function that draws into that context. But beware: this graphics context is flipped with respect to the usual iOS coordinate system — its origin is at the lower left and the y-axis increases upward. For this reason, you’ll probably find it simpler to use the preceding initializer.
To illustrate, I’ll use the second initializer. For my thumbnail, I’ll draw the same smiley face as before, but I’ll also write the name of the file over it (Figure 22-14). Note the technique for sizing the graphics context:
override func provideThumbnail(for request: QLFileThumbnailRequest,
    _ handler: @escaping (QLThumbnailReply?, Error?) -> Void) {
        let furl = request.fileURL
        let name = furl.deletingPathExtension().lastPathComponent
        let im = UIImage(named:"smiley.jpg")!
        let maxsz = request.maximumSize
        let r = AVMakeRect(aspectRatio: im.size,
            insideRect: CGRect(origin:.zero, size:maxsz))
        let att = NSAttributedString(string:name, attributes:[
            .font:UIFont(name:"Georgia", size:14)!
        ])
        let attsz = att.size()
        func draw() -> Bool {
            im.draw(in: CGRect(origin:.zero, size:r.size))
            att.draw(at: CGPoint(
                (r.width - attsz.width)/2,
                (r.height - attsz.height)/2))
            return true
        }
        let reply = QLThumbnailReply(
            contextSize: r.size, currentContextDrawing: draw)
        handler(reply, nil)
}

Figure 22-14. Documents with custom thumbnails
Custom Previews
Suppose someone emails your user a People Group document. In the mail app, the user opens the message, sees the document icon, and presses it to preview its contents. That works for a standard document type such as a PDF or text file, but not for our custom People Group document type. Let’s fix that.
To do so, we can add a Quick Look preview extension to our People Groups app. Quick Look preview extensions, introduced in iOS 11, allow your app to supply a Quick Look preview for a custom document type that it exports, suitable for display in a UIDocumentInteractionController or QLPreviewController (discussed earlier in this chapter) as well as in a document browser.
Let’s try it! Add a target; choose iOS → Application Extension → Quick Look Preview Extension. The template provides a view controller class, PreviewViewController, and a storyboard containing a PreviewViewController instance and its main view. When the user tries to preview a document of our custom type, this view controller will be instantiated and its main view will be displayed in the Quick Look preview interface (just like the PDF displayed in Figure 22-8).
For this to work, our extension’s Info.plist must declare, in the QLSupportedContentTypes array, the UTI of the document type for which it provides a preview (Figure 22-15). I’ve also turned off the QLSupportsSearchableItems setting (it’s for Spotlight searches, with which we’re not concerned here).

Figure 22-15. Defining a preview extension’s document type
We must now implement preparePreviewOfFile(at:completionHandler:) in our PreviewViewController. We are handed a file URL pointing to a document file. Our job is to examine that file, configure our view controller and its view, and call the completionHandler: function with a parameter of nil (or with an Error object if there was an error).
I’ll configure PreviewViewController as a reduced version of PeopleLister. Similar to the right side of Figure 22-9, it will be a UITableViewController whose table shows the first and last names of the people in this group. However, the text fields will be disabled — we don’t want the user trying to edit a preview! — and there is no need to implement document saving, or even to maintain a reference to a PeopleDocument. Instead, our PeopleDocument will serve only as a temporary conduit to construct the people array from the document file; it stores the array in an instance property so that our table view data source methods can access it:
func preparePreviewOfFile(at url: URL,
    completionHandler handler: @escaping (Error?) -> Void) {
        let doc = PeopleDocument(fileURL:url)
        doc.open { ok in
            if ok {
                self.people = doc.people
                self.tableView.register(
                    UINib(nibName: "PersonCell", bundle: nil),
                    forCellReuseIdentifier: "Person")
                self.tableView.reloadData()
                handler(nil)
            } else {
                handler(NSError(domain: "NoDataDomain",
                    code: -1, userInfo: nil))
            }
        }
}
Document Picker
The document picker (UIDocumentPickerViewController) is a simple way to let the user view a list of document files and choose one (or several). You can open the file directly (probably in conjunction with UIDocument) or copy it into your app’s sandbox temporarily. The document picker can also be configured to let the user pick a place to copy a document to.
The document picker can see into the same places as the document browser and the Files app, and its interface looks a lot like theirs, but it’s a lightweight momentary dialog. You can use it without declaring any document types, without making your app participate in iCloud in any other way, and without changing your app’s architecture. You just present the picker; the user chooses a file or cancels, and the picker is dismissed automatically.
In this example, I’ll assume that the user has somehow saved an .mp3 file into iCloud Drive. We’ll permit the user to choose this file and play it:
@IBAction func doButton(_ sender: Any) {
    let picker = UIDocumentPickerViewController(
        documentTypes: [kUTTypeMP3 as String], in: .import)
    picker.delegate = self
    self.present(picker, animated: true)
}
func documentPicker(_ controller: UIDocumentPickerViewController,
    didPickDocumentsAt urls: [URL]) {
        guard urls.count == 1 else {return}
        guard let vals =
            try? urls[0].resourceValues(forKeys: [.typeIdentifierKey]),
            vals.typeIdentifier == kUTTypeMP3 as String
            else {return}
        let vc = AVPlayerViewController()
        vc.player = AVPlayer(url: urls[0])
        self.present(vc, animated: true)
}
That’s all there is to it. In response to some user action (here, the tapping of a button) we instantiate and configure the UIDocumentPickerViewController, providing the UTIs of the types of file to be chosen and a mode in which the picker is to operate; .import means that we want the file copied into our app’s sandbox (in the Temporary directory). We make ourselves the document picker’s delegate (UIDocumentPickerDelegate) and present the picker. If the user chooses an .mp3 file, the delegate method is called, and we present an AVPlayerViewController to let the user play it.
XML
XML is a highly flexible and widely used general-purpose text file format for storage and retrieval of structured data. You might use it yourself to store data that you’ll need to retrieve later, or you could encounter it when obtaining information from elsewhere, such as the internet.
On macOS, Cocoa provides a set of classes (XMLDocument and so forth) for reading, parsing, maintaining, searching, and modifying XML data in a completely general way; but iOS does not include these. I think the reason must be that their tree-based approach is too memory-intensive. Instead, iOS provides XMLParser.
XMLParser is a relatively simple class that walks through an XML document, sending delegate messages as it encounters elements. With it, you can parse an XML document once, but what you do with the pieces as you encounter them is up to you. The general assumption here is that you know in advance the structure of the particular XML data you intend to read, and that you have provided classes for representation of the same data in object form, with some way of transforming the XML pieces into that representation.
To illustrate, let’s return once more to our Person class with a firstName and a lastName property. Imagine that, as our app starts up, we would like to populate it with Person objects, and that we’ve stored the data describing these objects as an XML file in our app bundle, like this:
<?xml version="1.0" encoding="utf-8"?>
<people>
    <person>
        <firstName>Matt</firstName>
        <lastName>Neuburg</lastName>
    </person>
    <person>
        <firstName>Snidely</firstName>
        <lastName>Whiplash</lastName>
    </person>
    <person>
        <firstName>Dudley</firstName>
        <lastName>Doright</lastName>
    </person>
</people>
This data could be mapped to an array of Person objects, each with its firstName and lastName properties appropriately set. Let’s consider how we might do that. (This is a deliberately easy example, of course; not all XML is so readily expressed as objects.)
Using XMLParser is not difficult in theory. You create the XMLParser, handing it the URL of a local XML file (or a Data object, perhaps downloaded from the internet), set its delegate, and tell it to parse. The delegate starts receiving delegate messages. For simple XML like ours, there are only three delegate messages of interest:
parser(_:didStartElement:namespaceURI:qualifiedName:attributes:)-
The parser has encountered an opening element tag. In our document this would be
<people>,<person>,<firstName>, or<lastName>. parser(_:didEndElement:namespaceURI:qualifiedName:)-
The parser has encountered the corresponding closing element tag. In our document this would be
</people>,</person>,</firstName>, or</lastName>. parser(_:foundCharacters:)-
The parser has encountered some text between the starting and closing tags for the current element. In our document this would be, for example,
"Matt"or"Neuburg"and so on.
In practice, responding to these delegate messages poses challenges of maintaining state. If there is just one delegate, it will have to bear in mind at every moment what element it is currently encountering; this could make for a lot of properties and a lot of if-statements in the implementation of the delegate methods. To aggravate the issue, parser(_:foundCharacters:) can arrive multiple times for a single stretch of text; that is, the text may arrive in pieces, which we must accumulate into a property.
An elegant way to meet these challenges is by resetting the XMLParser’s delegate to different delegate objects at different stages of the parsing process. We make each delegate responsible for parsing one type of element; when a child of that element is encountered, the delegate object makes a new child element delegate object and repoints the XMLParser’s delegate property at it. The child element delegate is then responsible for making the parent the delegate once again when it finishes parsing its own element. This is slightly counterintuitive because it means parser(_:didStartElement:...) and parser(_:didEndElement:...) for the same element are arriving at two different objects.
To see what I mean, think about how we could implement this in our example. We are going to need a PeopleParser that handles the <people> element, and a PersonParser that handles the <person> elements. Now imagine how PeopleParser will operate when it is the XMLParser’s delegate:
-
When
parser(_:didStartElement:...)arrives, the PeopleParser looks to see if this is a<person>. If so, it creates a PersonParser, handing to it (the PersonParser) a reference to itself (the PeopleParser) — and makes the PersonParser the XMLParser’s delegate. -
Delegate messages now arrive at this newly created PersonParser. We can assume that
<firstName>and<lastName>are simple enough that the PersonParser can maintain state as it encounters them; when text is encountered,parser(_:foundCharacters:)will be called, and the text must be accumulated into a corresponding property. -
Eventually,
parser(_:didEndElement:...)arrives. The PersonParser now uses its parent reference to make the PeopleParser the XMLParser’s delegate once again. The PeopleParser, having received from the PersonParser any data it may have collected, is now ready in case another<person>element is encountered (and the old PersonParser might now go quietly out of existence).
An obvious way to assemble the data is that the PersonParser should create a fully configured Person object and hand it up to the PeopleParser. The PeopleParser would simply accumulate such Person objects into an array.
This approach may seem like a lot of work to configure, but in fact it is neatly object-oriented, with parser delegate classes corresponding to the elements of the XML. Moreover, those delegate classes have a great deal in common, which can be readily factored out and encapsulated into a delegate superclass from which they all inherit.
JSON
JSON (http://www.json.org) is very often used as a universal lightweight structured data format for server communication. Typically, you’ll send an HTTP request to a server using a URL constructed according to prescribed rules, and the reply will come back as a Data object expressing a JSON string in a known format. For example (the actual network communication will be explained in Chapter 23):
let sess : URLSession = {
    let config = URLSessionConfiguration.ephemeral
    let s = URLSession(configuration: config)
    return s
}()
@IBAction func doGo(_ sender: Any) {
    var comp = URLComponents()
    comp.scheme = "https"
    comp.host = "quotesondesign.com"
    comp.path = "/wp-json/posts"
    var qi = [URLQueryItem]()
    qi.append(URLQueryItem(name: "filter[orderby]", value: "rand"))
    qi.append(URLQueryItem(name: "filter[posts_per_page]", value: "1"))
    comp.queryItems = qi
    if let url = comp.url {
        let d = self.sess.dataTask(with: url) { data,_,_ in
            if let data = data {
                DispatchQueue.main.async {
                    self.parse(data)
                }
            }
        }
        d.resume()
    }
}
That’s a request to a server that dispenses random quotes about design. That request returns a Data object that wraps a JSON string looking something like this (I’ve formatted the string for clarity):
[
    {
        "ID":950,
        "title":"Joan Miro",
        "content":"<p>The works must be conceived with fire in the soul,
                    but executed with clinical coolness.  </p>n",
        "link":"https://quotesondesign.com/joan-miro/"
    }
]
We are now calling our parse method with that Data object, and we are going to parse it. How? We know the format of the JSON response, so we prepare by declaring a struct — or possibly a nest of structs (though we don’t need that for this example)— matching that format and adopting the Decodable protocol (discussed earlier in this chapter). We then instantiate JSONDecoder and call decode(_:from:). In this example, let’s ignore the "ID" and "link" entries and extract just the "title" and "content" entries:
struct Quote : Decodable {
    let title : String
    let content : String
}
That struct matches the JSON’s inner dictionary, but the JSON itself is an array containing that dictionary as an element. Therefore, our call to decode the JSON looks like this:
func parse(_ data:Data) {
    if let arr = try? JSONDecoder().decode([Quote].self, from: data) {
        let quote = arr.first!
        // ...
    }
}
The JSON is now parsed into a Quote instance, and we can proceed to do whatever we like with it. For example, we might display the Quote’s title and content in our app’s interface.
The JSONDecoder class comes with properties that allow you to specify the handling of certain specially formatted values, such as dates and floating-point numbers (though we didn’t need to use any of those properties in our example).
An annoying feature of this situation, where we are receiving JSON structured data, is that we are not in charge of that structure; it is defined by the server. This seems unfair. For example, the JSON dictionary that we are receiving has keys "title" and "content", so we are forced to call our Quote struct’s properties title and content. But there’s a workaround: declare a nested enum called CodingKeys with a String raw value and conforming to the CodingKey protocol. Now you can use the enum cases and their string raw values to remap the JSON dictionary keys to the struct’s properties, thus restoring control over the names of those properties to you. For example, let’s say I want to call my Quote struct’s properties author and tag:
struct Quote : Decodable {
    let author : String
    let tag : String
    enum CodingKeys : String, CodingKey {
        case author = "title"
        case tag = "content"
    }
}
Behind the scenes, the way all this works is that an implementation of init(from:), required by the Decodable protocol, is being synthesized for us. Sometimes, however, the synthesized implementation of init(from:) won’t suffice, and we have to implement it ourselves. Here’s a case in point:
[
    {
      "categoryName": "Trending",
      "Trending": [
        {
          "category": "Trending",
          "price": 20.5,
          "isFavourite": true,
          "isWatchlist": null
        }
      ]
    },
    {
      "categoryName": "Comedy",
      "Comedy": [
        {
          "category": "Comedy",
          "price": 24.32,
          "isFavourite": null,
          "isWatchlist": false
        }
      ]
    }
]
Suppose we have received that JSON wrapped up in a Data object, and now we want to parse it. Again, it’s an array of dictionaries, where each dictionary has a "categoryName" key. But each dictionary also has another key whose name varies — in our example, it might be "Trending" or "Comedy". How are we going to deal with that?
Let’s postpone that problem and concentrate first on the inner dictionary, the value of the entry with the variable key. This is an array of dictionaries that does not vary; it has four keys — "category", "price", "isFavourite", and "isWatchlist". We can map that directly to a struct; note how we take care of the values that might be true or false or null by declaring them as an Optional wrapping a Bool:
struct Inner : Decodable {
    let category : String
    let price : Double
    let isFavourite : Bool?
    let isWatchlist : Bool?
}
Now let’s grapple with the outer dictionary. Clearly it has a "categoryName" key, but the name of the second key won’t be known until we actually encounter the JSON and read the "categoryName" key’s value. So I’ll call the corresponding struct property unknown:
struct Outer : Decodable {
    let categoryName : String
    let unknown : [Inner]
    // ...
}
But the JSON won’t really have any "unknown" key, and we won’t know the key’s real name until runtime, so we can’t solve the problem with a CodingKeys enum. Instead, we have to write our own implementation of init(from:), to explore the dictionary key by key:
init(from decoder: Decoder) throws {
    let con = try decoder.container(keyedBy: /* ... */)
    // ...
}
Hold it! We’ve got a new problem. We need something to act as the keyedBy: argument. This has to be a CodingKey adopter. But it isn’t going to be like the CodingKeys enum from the previous example. Here, we don’t want to do any automatic mapping between keys and property names; we want to perform the mapping manually, ourselves, in our init(from:) implementation. Thus, our CodingKey adopter needs to be nothing but a bare minimum self-contained object that implements the four instance members required by the CodingKey protocol:
public protocol CodingKey {
    public var stringValue: String { get }
    public init?(stringValue: String)
    public var intValue: Int? { get }
    public init?(intValue: Int)
}
We don’t expect to encounter any Int values, so all we really have to do is implement init?(stringValue:) to initialize stringValue, allowing init?(intValue) to fail:
struct CK : CodingKey {
    var stringValue: String
    init?(stringValue: String) {
        self.stringValue = stringValue
    }
    var intValue: Int?
    init?(intValue: Int) {
        return nil
    }
}
Now we’re ready to write init(from:), because we’ve got something to pass as the keyedBy: argument in the first line:
init(from decoder: Decoder) throws {
    let con = try decoder.container(keyedBy: CK.self)
    // ...
}
To complete our implementation, we simply fetch the two keys, one at a time. First we fetch the "categoryName" key, and set our categoryName property to its value. But that value is also the name of the second key! We fetch the value of that key, and set our unknown property to its value:
init(from decoder: Decoder) throws {
    let con = try decoder.container(keyedBy: CK.self)
    self.categoryName = try con.decode(
        String.self, forKey:CK(stringValue:"categoryName")!)
    self.unknown = try con.decode(
        [Inner].self, forKey: CK(stringValue:self.categoryName)!)
}
At last we’re ready to parse our JSON data:
if let myjson = try? JSONDecoder().decode([Outer].self, from: data) {
    // ...
}
The outcome is that myjson is an array of Outer objects, each of which has an unknown property whose value is an array of Inner objects — the exact object-oriented analog of the original JSON data:
[
    Outer(categoryName: "Trending",
               unknown:
                   [Inner(category: "Trending",
                       price: 20.5,
                       isFavourite: Optional(true),
                       isWatchlist: nil)
                    ]),
    Outer(categoryName: "Comedy",
               unknown:
                   [Inner(category: "Comedy",
                       price: 24.32,
                       isFavourite: nil,
                       isWatchlist: Optional(false))
                    ])
]
SQLite
SQLite (http://www.sqlite.org/docs.html) is a lightweight, full-featured relational database that you can talk to using SQL, the universal language of databases. This can be an appropriate storage format when your data comes in rows and columns (records and fields) and needs to be rapidly searchable. Also, the database as a whole is never loaded into memory; the data is accessed only as needed. This is valuable in an environment like an iOS device, where memory is at a premium.
To use SQLite,
say import SQLite3. Talking to SQLite involves an elaborate C interface which may prove annoying; there are, however, a number of lightweight front ends. I like to use fmdb (https://github.com/ccgus/fmdb); it’s Swift-friendly, but it’s written in Objective-C, so we’ll need a bridging header in which we #import "FMDB.h".
To illustrate, I’ll create a database and add a people table consisting of lastname and firstname columns:
let db = FMDatabase(path:self.dbpath)
db.open()
do {
    db.beginTransaction()
    try db.executeUpdate(
        "create table people (lastname text, firstname text)",
        values:nil)
    try db.executeUpdate(
        "insert into people (firstname, lastname) values (?,?)",
        values:["Matt", "Neuburg"])
    try db.executeUpdate(
        "insert into people (firstname, lastname) values (?,?)",
        values:["Snidely", "Whiplash"])
    try db.executeUpdate(
        "insert into people (firstname, lastname) values (?,?)",
        values:["Dudley", "Doright"])
    db.commit()
} catch {
    db.rollback()
}
At some later time, I come along and read the data from that database:
let db = FMDatabase(path:self.dbpath)
db.open()
if let rs = try? db.executeQuery("select * from people", values:nil) {
    while rs.next() {
        if let firstname = rs["firstname"], let lastname = rs["lastname"] {
            print(firstname, lastname)
        }
    }
}
db.close()
/*
Matt Neuburg
Snidely Whiplash
Dudley Doright
*/
You can include a previously constructed SQLite file in your app bundle, but you can’t write to it there; the solution is to copy it from your app bundle into another location, such as the Documents directory, before you start working with it.
Core Data
The Core Data framework (import CoreData) provides a generalized way of expressing objects and properties that form a relational graph; moreover, it has built-in facilities for maintaining those objects in persistent storage — typically using SQLite as a file format — and reading them from storage only when they are needed, thus making efficient use of memory. For example, a person might have not only multiple addresses but also multiple friends who are also persons; expressing persons and addresses as explicit object types, working out how to link them and how to translate between objects in memory and data in storage, and tracking the effects of changes, such as when a person is deleted, can be tedious. Core Data can help.
Core Data, however, is not a beginner-level technology. It is difficult to use and extremely difficult to debug. It expresses itself in a highly verbose, rigid, arcane way. It has its own peculiar way of doing things — everything you already know about how to create, access, alter, or delete an object within an object collection becomes completely irrelevant! — and trying to bend it to your particular needs can be tricky and can have unintended side effects. Nor should Core Data be seen as a substitute for a true relational database.
A full explanation of Core Data would require an entire book; indeed, such books exist, and if Core Data interests you, you should read some of them. See also Apple’s Core Data Programming Guide in the documentation archive, and the other resources referred to there. Here, I’ll just illustrate what it’s like to work with Core Data.
I will rewrite the People Groups example from earlier in this chapter as a Core Data app. This will still be a master–detail interface consisting of two table view controllers, GroupLister and PeopleLister, just as in Figure 22-9. But we will no longer have multiple documents, each representing a single group of people; instead, we will now have a single document, maintained for us by Core Data, containing all of our groups and all of their people.
To construct a Core Data project from scratch, it is simplest to specify the Master–Detail App template (or the Single View App template) and check Use Core Data in the second screen. Among other things, this gives you template code in the app delegate class for constructing the Core Data persistence stack, a set of objects that work together to fetch and save your data; in most cases there will no reason to alter this template code significantly.
The persistence stack consists of three objects:
-
A managed object model (NSManagedObjectModel) describing the structure of the data
-
A managed object context (NSManagedObjectContext) for communicating with the data
-
A persistent store coordinator (NSPersistentStoreCoordinator) for dealing with actual storage of the data as a file
Starting in iOS 10, this entire stack is created for us by an NSPersistentContainer object. The template code provides a lazy initializer for this object, along these lines:
lazy var persistentContainer: NSPersistentContainer = {
    let con = NSPersistentContainer(name: "PeopleGroupsCoreData")
    con.loadPersistentStores { desc, err in
        if let err = err {
            fatalError("Unresolved error (err)")
        }
    }
    return con
}()
The managed object context is the persistent container’s viewContext. This will be our point of contact with Core Data. The managed object context is the world in which your data objects live and move and have their being: to obtain an object, you fetch it from the managed object context; to create an object, you insert it into the managed object context; to save your data, you save the managed object context.
To provide the rest of the app with easy access to the managed object context, our root view controller has a managedObjectContext property, and the app delegate’s application(_:didFinishLaunchingWithOptions:) configures it to point back at the persistent container’s viewContext:
let nav = self.window!.rootViewController as! UINavigationController
let tvc = nav.topViewController as! GroupLister
tvc.managedObjectContext = self.persistentContainer.viewContext
To describe the structure and relationships of the objects constituting your data model (the managed object model), you design an object graph in a data model document. Our object graph is very simple: a Group can have multiple Persons (Figure 22-16). The attributes, analogous to object properties, are all strings, except for the timestamps which are dates, and the Group UUID which is a UUID. (The timestamps will be used for determining the sort order in which groups and people will be displayed in the interface.)

Figure 22-16. The Core Data model for the People Groups app
Group and Person are not classes; they are entity names. And their attributes, such as name and firstName, are not properties. All Core Data model objects are instances of NSManagedObject, and make themselves dynamically KVC-compliant for attribute names. For example, Core Data knows, thanks to our object graph, that a Person entity is to have a firstName attribute, so if an NSManagedObject represents a Person entity, you can set its firstName attribute by calling setValue(_:forKey:) with a key "firstName", and you can retrieve its firstName attribute by calling value(forKey:) with a key "firstName".
If that sounds maddening, that’s because it is maddening. Fortunately, there’s a simple solution: you configure your entities, in the Data Model inspector, to perform code generation of class definitions (Figure 22-17). The result is that, when we compile our project, class files will be created for our entities (here, Group and Person) as NSManagedObject subclasses endowed with properties corresponding to the entity attributes. Thus, Person now is a class, and it does have a firstName property. Code generation, in short, allows us to treat entity types as classes, and managed objects as instances of those classes.

Figure 22-17. Configuring code generation
Now let’s talk about the first view controller, GroupLister. Its job is to list groups and to allow the user to create a new group (Figure 22-9, on the left). How will GroupLister get a list of groups? The way you ask Core Data for a model object is with a fetch request; and in iOS, where Core Data model objects are often (as here) the model data for a UITableView, fetch requests are conveniently managed through an NSFetchedResultsController.
Once again, the template gives us an excellent head start. It provides a fetched results controller stored in a property, ready to perform the fetch request and to supply our table view’s data source with the actual data. My code essentially copies the template code; the first two lines demonstrate not only that Group is now a class with a fetchRequest method, but also that both NSFetchedResultsController and NSFetchRequest are generics:
lazy var frc: NSFetchedResultsController<Group> = {
    let req: NSFetchRequest<Group> = Group.fetchRequest()
    req.fetchBatchSize = 20
    let sortDescriptor = NSSortDescriptor(key:"timestamp", ascending:true)
    req.sortDescriptors = [sortDescriptor]
    let frc = NSFetchedResultsController(
        fetchRequest:req,
        managedObjectContext:self.managedObjectContext,
        sectionNameKeyPath:nil, cacheName:nil)
    frc.delegate = self
    do {
        try frc.performFetch()
    } catch {
        fatalError("Aborting with unresolved error")
    }
    return frc
}()
The table view’s data source treats self.frc, the NSFetchedResultsController, as the model data, consisting of Group objects; in the starred line, we are able to retrieve an actual Group instance from the NSFetchedResultsController (because the latter is a generic):
override func numberOfSections(in tableView: UITableView) -> Int {
    return self.frc.sections!.count
}
override func tableView(_ tableView: UITableView,
    numberOfRowsInSection section: Int) -> Int {
        let sectionInfo = self.frc.sections![section]
        return sectionInfo.numberOfObjects
}
override func tableView(_ tableView: UITableView,
    cellForRowAt indexPath: IndexPath) -> UITableViewCell {
        let cell = tableView.dequeueReusableCell(
            withIdentifier: self.cellID, for: indexPath)
        cell.accessoryType = .disclosureIndicator
        let group = self.frc.object(at:indexPath) // *
        cell.textLabel!.text = group.name
        return cell
}
GroupLister’s table is initially empty because our app starts life with no data. When the user asks to create a group, I put up an alert asking for the name of the new group. In the handler: function for its OK button, I create a new Group object, save it into the managed object context, and navigate to the detail view, PeopleLister. Again, my code is drawn largely from the template code:
let context = self.frc.managedObjectContext
let group = Group(context: context)
group.name = av.textFields![0].text!
group.uuid = UUID()
group.timestamp = Date()
do {
    try context.save()
} catch {
    return
}
let pl = PeopleLister(group: group)
self.navigationController!.pushViewController(pl, animated: true)
The detail view controller class is PeopleLister (Figure 22-9, on the right). It lists all the people in a particular Group, so I don’t want PeopleLister to be instantiated without a Group; therefore, its designated initializer is init(group:). As the preceding code shows, when I want to navigate from the GroupLister view to the PeopleLister view, I instantiate PeopleLister and push it onto the navigation controller’s stack. I do the same sort of thing when the user taps an existing Group name in the GroupLister table view:
override func tableView(_ tableView: UITableView,
    didSelectRowAt indexPath: IndexPath) {
        let pl = PeopleLister(group: self.frc.object(at:indexPath))
        self.navigationController!.pushViewController(pl, animated: true)
}
PeopleLister, too, has an frc property that’s an NSFetchedResultsController. However, a PeopleLister instance should list only the People belonging to one particular group, which has been stored as its group property. So PeopleLister’s implementation of the frc initializer contains these lines (req is the fetch request we’re configuring):
let pred = NSPredicate(format:"group = %@", self.group)
req.predicate = pred
The PeopleLister interface consists of a table of text fields. Populating the table is similar to what GroupLister did; in particular, in my tableView(_:cellForRowAt:) implementation, self.frc.object(at:indexPath) is a Person object, so I can use its firstName and lastName to set the text of the text fields.
When the user edits a text field to change the first or last name of a Person, I hear about it as the text field’s delegate. I update the data model and save the managed object context (the first part of this code should be familiar from Chapter 8):
func textFieldDidEndEditing(_ textField: UITextField) {
    var v : UIView = textField
    repeat { v = v.superview! } while !(v is UITableViewCell)
    let cell = v as! UITableViewCell
    let ip = self.tableView.indexPath(for:cell)!
    let object = self.frc.object(at:ip)
    object.setValue(textField.text!, forKey: (
        (textField.tag == 1) ? "firstName" : "lastName"))
    do {
        try object.managedObjectContext!.save()
    } catch {
        return
    }
}
The trickiest part is what happens when the user asks to make a new Person. It starts out analogously to making a new Group; I make a new Person object, configure its attributes with an empty first name and last name, and save it into the context:
@objc func doAdd(_:AnyObject) {
    self.tableView.endEditing(true)
    let context = self.frc.managedObjectContext
    let person = Person(context:context)
    person.group = self.group
    person.lastName = ""
    person.firstName = ""
    person.timestamp = Date()
    do {
        try context.save()
    } catch {
        return
    }
}
But we must also make this empty Person appear in the table! Once again, the template code shows us the way. We act as the NSFetchedResultsController’s delegate (NSFetchedResultsControllerDelegate); the delegate methods are triggered by the call to context.save() in the preceding code:
func controllerWillChangeContent(
    _ controller: NSFetchedResultsController<NSFetchRequestResult>) {
        self.tableView.beginUpdates()
}
func controllerDidChangeContent(
    _ controller: NSFetchedResultsController<NSFetchRequestResult>) {
        self.tableView.endUpdates()
}
func controller(
    _ controller: NSFetchedResultsController<NSFetchRequestResult>,
    didChange anObject: Any,
    at indexPath: IndexPath?,
    for type: NSFetchedResultsChangeType,
    newIndexPath: IndexPath?) {
        if type == .insert {
            self.tableView.insertRows(at:[newIndexPath!], with: .automatic)
            DispatchQueue.main.async {
                let cell = self.tableView.cellForRow(at:newIndexPath!)!
                let tf = cell.viewWithTag(1) as! UITextField
                tf.becomeFirstResponder()
            }
        }
}
Core Data files are not suitable for use as iCloud documents. If you want to reflect structured data into the cloud, a better alternative is the CloudKit framework. In effect, this allows you to maintain a database online, and to synchronize changed data up to and down from that database. You might, for example, use Core Data as a form of local storage, but use CloudKit to communicate the data between different devices. For more information, see Apple’s CloudKit Quick Start guide.
PDFs
Earlier in this chapter, I displayed the contents of a PDF file by means of a web view, or in a Quick Look preview. In the past, other ways of showing a PDF existed, but they were complicated. Starting in iOS 11, PDF Kit (import PDFKit) has been brought over at long last from macOS. It provides a native UIView subclass, PDFView, whose job is to display a PDF nicely.
Basic use of a PDFView is simple. Initialize a PDFDocument, either from data or from a file URL, and assign it as the PDFView’s document:
let v = PDFView(frame:self.view.bounds)
self.view.addSubview(v)
let url = Bundle.main.url(forResource: "notes", withExtension: "pdf")!
let doc = PDFDocument(url: url)
v.document = doc
There are many other configurable aspects of a PDFView. A particularly nice touch is that a PDFView can embed a UIPageViewController for layout and navigation of the PDF’s individual pages:
v.usePageViewController(true)
A PDFDocument consists of pages, represented by PDFPage objects. You can manipulate those pages — for example, you can add and remove pages from the document. You can even draw a PDFPage’s contents yourself, meaning that you can, in effect, create a PDF document from scratch.
As a demonstration, I’ll create a PDF document consisting of one page with the words “Hello, world!” in the center. I start with a PDFPage subclass, MyPage, where I override the draw(with:to:) method. The parameters are a PDFDisplayBox that tells me the page size, along with a CGContext to draw into. There’s just one thing to watch out for: a PDF graphics context is flipped with respect to the normal iOS coordinate system. So I apply a transform to the context before I draw into it:
override func draw(with box: PDFDisplayBox, to context: CGContext) {
    UIGraphicsPushContext(context)
    context.saveGState()
    let r = self.bounds(for: box)
    let s = NSAttributedString(string: "Hello, world!", attributes: [
        .font : UIFont(name: "Georgia", size: 80)!
    ])
    let sz = s.boundingRect(with: CGSize(10000,10000),
        options: .usesLineFragmentOrigin, context: nil)
    context.translateBy(x: 0, y: r.height)
    context.scaleBy(x: 1, y: -1)
    s.draw(at: CGPoint(
        (r.maxX - r.minX) / 2 - sz.width / 2,
        (r.maxY - r.minY) / 2 - sz.height / 2
    ))
    context.restoreGState()
    UIGraphicsPopContext()
}
To create and display my PDFPage in a PDFView (v) is simple:
let doc = PDFDocument()
v.document = doc
doc.insert(MyPage(), at: 0)
If my document consisted of more than one MyPage, they would now all draw the same thing. If that’s not what I want, my draw(with:to:) code can ask what page of the document this is:
let pagenum = self.document?.index(for: self)
In addition, a host of ancillary PDF Kit classes allow you to manipulate page thumbnails, selection, annotations, and more.
Image Files
The Image I/O framework provides a simple, unified way to open image files, to save image files, to convert between image file formats, and to read metadata from standard image file formats, including EXIF and GPS information from a digital camera. You’ll need to import ImageIO. The Image I/O API is written in C, not Objective-C, and it uses CFTypeRefs, not objects. Unlike Core Graphics, there is no Swift “renamification” overlay that represents the API as object-oriented; you have to call the framework’s global C functions directly, casting between the CFTypeRefs and their Foundation counterparts. However, that’s not hard to do.
Use of the Image I/O framework starts with the notion of an image source (CGImageSource). This can be created from the URL of a file (actually CFURL, to which URL is toll-free bridged) or from a Data object (actually CFData, to which Data is toll-free bridged).
For example, here we obtain the metadata from a photo file in our app bundle:
let url = Bundle.main.url(forResource:"colson", withExtension: "jpg")!
let opts : [AnyHashable:Any] = [kCGImageSourceShouldCache : false]
let src = CGImageSourceCreateWithURL(url as CFURL, opts as CFDictionary)!
let d = CGImageSourceCopyPropertiesAtIndex(src, 0, opts as CFDictionary)
    as! [AnyHashable:Any]
Without having opened the image file as an image, we now have a dictionary full of information about it, including its pixel dimensions (keys kCGImagePropertyPixelWidth and kCGImagePropertyPixelHeight), its resolution, color model, color depth, and orientation — plus, because this picture comes originally from a digital camera, the EXIF data such as the aperture and exposure at which it was taken, plus the make and model of the camera.
To obtain the image as a CGImage, we can call CGImageSourceCreateImageAtIndex. Alternatively, we can request a thumbnail of the image. This is a very useful thing to do, and the name “thumbnail” doesn’t really do justice to its importance and power. If your purpose in opening this image is to display it in your interface, you don’t care about the original image data; a thumbnail is precisely what you want, especially because you can specify any size for this “thumbnail” all the way up to the original size of the image! This is splendid, because to assign a large image to a small image view wastes all the memory reflected by the size difference.
To generate a thumbnail at a given size, you start with a dictionary specifying the size along with other instructions, and pass that, together with the image source, to CGImageSourceCreateThumbnailAtIndex. The only pitfall is that, because we are working with a CGImage and specifying actual pixels, we must remember to take account of the scale of our device’s screen. So, for example, let’s say we want to scale our image so that its largest dimension is no larger than the width of the UIImageView (self.iv) into which we intend to place it:
let url = Bundle.main.url(forResource:"colson", withExtension: "jpg")!
var opts : [AnyHashable:Any] = [kCGImageSourceShouldCache : false]
let src = CGImageSourceCreateWithURL(url as CFURL, opts as CFDictionary)!
let scale = UIScreen.main.scale
let w = self.iv.bounds.width * scale
opts = [
    kCGImageSourceShouldAllowFloat : true,
    kCGImageSourceCreateThumbnailWithTransform : true,
    kCGImageSourceCreateThumbnailFromImageAlways : true,
    kCGImageSourceShouldCacheImmediately : true,
    kCGImageSourceThumbnailMaxPixelSize : w
]
let imref =
    CGImageSourceCreateThumbnailAtIndex(src, 0, opts as CFDictionary)!
let im = UIImage(cgImage: imref, scale: scale, orientation: .up)
self.iv.image = im
To save an image using a specified file format, we need an image destination. As a final example, I’ll show how to save our image as a TIFF. We never open the image as an image! We save directly from the image source to the image destination:
let url = Bundle.main.url(forResource:"colson", withExtension: "jpg")!
let opts : [AnyHashable:Any] = [kCGImageSourceShouldCache : false]
let src = CGImageSourceCreateWithURL(url as CFURL, opts as CFDictionary)!
let fm = FileManager.default
let suppurl = try! fm.url(for:.applicationSupportDirectory,
    in: .userDomainMask, appropriateFor: nil, create: true)
let tiff = suppurl.appendingPathComponent("mytiff.tiff")
let dest =
    CGImageDestinationCreateWithURL(tiff as CFURL, kUTTypeTIFF, 1, nil)!
CGImageDestinationAddImageFromSource(dest, src, 0, nil)
let ok = CGImageDestinationFinalize(dest)