
Before learning about the implementation of a network sniffer, let's learn about a particular struct method:
struct.pack(fmt, v1, v2, ...): This method returns a string that contains the values v1, v2, and so on, packed according to the given formatstruct.unpack(fmt, string): This method unpacks the string according to the given format
Let's discuss the code:
import struct
ms=  struct.pack('hhl', 1, 2, 3)
print (ms)
k= struct.unpack('hhl',ms)
print k
The output for the preceding code is as follows:
G:PythonNetworking
etwork>python str1.py
☺ ☻ ♥
(1, 2, 3)
First, import the struct module, and then pack the integers 1, 2, and 3 in the hhl format. The packed values are like machine code. Values are unpacked using the same hhl format; here, h means a short integer and l means a long integer. More details are provided in the subsequent sections.
Consider the situation of the client server model; let's illustrate it by means of an example.
Run the struct1.py. file. The server-side code is as follows:
import socket
import struct
host = "192.168.0.1"
port = 12347
s = socket.socket(socket.AF_INET, socket.SOCK_STREAM)
s.bind((host, port))
s.listen(1)
conn, addr = s.accept()
print "connected by", addr
msz= struct.pack('hhl', 1, 2, 3)
conn.send(msz)
conn.close()
The entire code is the same as we have seen previously, with msz= struct.pack('hhl', 1, 2, 3) packing the message and conn.send(msz) sending the message.
Run the unstruc.py file. The client-side code is as follows:
import socket
import struct
s = socket.socket(socket.AF_INET, socket.SOCK_STREAM)
host = "192.168.0.1"
port =12347
s.connect((host,port))
msg= s.recv(1024)
print msg
print struct.unpack('hhl',msg)
s.close()
The client-side code accepts the message and unpacks it in the given format.
The output for the client-side code is as follows:
C:
etwork>python unstruc.py
☺ ☻ ♥
(1, 2, 3)
The output for the server-side code is as follows:
G:PythonNetworkingprogram>python struct1.py
connected by ('192.168.0.11', 1417)
Now, you must have a fair idea of how to pack and unpack the data.
We have seen the format in the pack and unpack methods. In the following table, we have C Type and Python type columns. It denotes the conversion between C and Python types. The Standard size column refers to the size of the packed value in bytes.
|
Format |
C Type |
Python type |
Standard size |
|---|---|---|---|
|
x |
pad byte |
no value | |
|
c |
char |
string of length 1 |
1 |
|
b |
signed char |
integer |
1 |
|
B |
unsigned char |
integer |
1 |
|
? |
_Bool |
bool |
1 |
|
h |
short |
integer |
2 |
|
H |
unsigned short |
integer |
2 |
|
i |
int |
integer |
4 |
|
I |
unsigned int |
integer |
4 |
|
l |
long |
integer |
4 |
|
L |
unsigned long |
integer |
4 |
|
q |
long long |
integer |
8 |
|
Q |
unsigned long long |
integer |
8 |
|
f |
float |
float |
4 |
|
d |
double |
float |
8 |
|
s |
char[] |
string | |
|
p |
char[] |
string | |
|
P |
void * |
integer |
Let's check what will happen when one value is packed in different formats:
>>> import struct
>>> struct.pack('b',2)
'x02'
>>> struct.pack('B',2)
'x02'
>>> struct.pack('h',2)
'x02x00'
We packed the number 2 in three different formats. From the preceding table, we know that b and B are 1 byte each, which means that they are the same size. However, h is 2 bytes.
Now, let's use the long int, which is 8 bytes:
>>> struct.pack('q',2)
'x02x00x00x00x00x00x00x00'
If we work on a network, ! should be used in the following format. The ! is used to avoid the confusion of whether network bytes are little-endian or big-endian. For more information on big-endian and little endian, you can refer to the Wikipedia page on Endianness:
>>> struct.pack('!q',2)
'x00x00x00x00x00x00x00x02'
>>>
You can see the difference when using ! in the format.
Before proceeding to sniffing, you should be aware of the following definitions:
- PF_PACKET: It operates at the device driver layer. The pcap library for Linux uses PF_PACKET sockets. To run this, you must be logged in as a root. If you want to send and receive messages at the most basic level, below the Internet protocol layer, then you need to use PF_PACKET.
- Raw socket: It does not care about the network layer stack and provides a shortcut to send and receive packets directly to the application.
The following socket methods are used for byte-order conversion:
- socket.ntohl(x): This is the network to host long. It converts a 32-bit positive integer from the network to host the byte order.
- socket.ntohs(x): This is the network to host short. It converts a 16-bit positive integer from the network to host the byte order.
- socket.htonl(x): This is the host to network long. It converts a 32-bit positive integer from the host to the network byte order.
- socket.htons(x): This is the host to network short. It converts a 16-bit positive integer from the host to the network byte order.
So, what is the significance of the preceding four methods?
Consider a 16-bit number 0000000000000011. When you send this number from one computer to another computer, its order might get changed. The receiving computer might receive it in another form, such as 1100000000000000. These methods convert from your native byte order to the network byte order and back again. Now, let's look at the code to implement a network sniffer, which will work on three layers of the TCP/IP, that is, the physical layer (Ethernet), the Network layer (IP), and the TCP layer (port).
Before we look at the code, you should know about the headers of all three layers:
- The Physical layer: This layer deals with the Ethernet frame, as shown in the following image:

The structure of the Ethernet frame IEEE 802.3
The explanation for the preceding diagram is as follows:
- The Preamble consists of 7 bytes, all of the form 10101010, and is used by the receiver to allow it to establish bit synchronization
- The Start frame delimiter consists of a single byte, 10101011, which is a frame flag that indicates the start of a frame
- The Destination and Source addresses are the Ethernet addresses usually quoted as a sequence of 6 bytes
We are interested only in the source address and destination address. The data part contains the IP and TCP headers.
MAC addresses such as
AA:BB:CC:56:78:45contain 12 hexadecimal characters, and each byte contains 2 hexadecimal values. To store MAC addresses, we will use 6 bytes of memory. - The Network or IP layer: In this layer, we are interested in the IP address of the source and destination.
Now, let's move on to our IPv4 header, as shown in the following screenshot:

The IPv4 header
The IPv4 packet header consists of 14 fields, of which only 13 are required. The 14th field is optional. This header is 20 bytes long. The last 8 bytes contain our source IP address and destination IP address. The bytes from 12 to 16 contain the source IP address and the bytes from 17 to 20 contain the destination IP address.
- The TCP header: In this header, we are interested in the source port and the destination port address. If you notice the TCP header, you will realize that it too is 20 bytes long, and the header's starting 2 bytes provide the source port and the next 2 bytes provide the destination port address. You can see the TCP header in the following image:

The TCP header
Now, start the promiscuous mode of the interface card and give the command as superuser. So, what is the promiscuous or promisc mode? In computer networking, the promiscuous mode allows the network interface card to read packets that arrive in its subnet. For example, in a hub environment, when a packet arrives at one port, it is copied to the other ports and only the intended user reads that packet. However, if other network devices are working in promiscuous mode, that device can also read that packet:
ifconfig eth0 promisc
Check the effect of the preceding command, as shown in the following screenshot, by typing the command ipconfig:

Showing the promiscuous mode
The preceding screenshot shows the eth0 network card and is working in promiscuous mode.
Some cards cannot be set to the promiscuous mode because of their drivers, kernel support, and so on.
Now, it's time to code. First, let's look at the following entire code and then understand it line by line:
import socket
import struct
import binascii
s = socket.socket(socket.PF_PACKET, socket.SOCK_RAW, socket.ntohs(0x0800))
while True:

  pkt  = s.recvfrom(2048)
  ethhead = pkt[0][0:14]
  eth = struct.unpack("!6s6s2s",ethhead)
  print "--------Ethernet Frame--------"
  print "desination mac",binascii.hexlify(eth[0])
  print "Source mac",binascii.hexlify(eth[1])
  binascii.hexlify(eth[2])

  ipheader = pkt[0][14:34]

  ip_hdr = struct.unpack("!12s4s4s",ipheader)
  print "-----------IP------------------"
  print "Source IP", socket.inet_ntoa(ip_hdr[1])
  print "Destination IP", socket.inet_ntoa(ip_hdr[2])
  print "---------TCP----------"
  tcpheader = pkt[0][34:54]
  #tcp_hdr = struct.unpack("!HH16s",tcpheader)
  tcp_hdr = struct.unpack("!HH9ss6s",tcpheader)
  print "Source Port ", tcp_hdr[0]
  print "Destination port ", tcp_hdr[1]
  print "Flag ",binascii.hexlify(tcp_hdr[3])
We have already defined the lines socket.PF_PACKET, socket.SOCK_RAW. The socket.htons(0x0800) syntax shows the protocol of interest. The 0x0800 code defines the protocol ETH_P_IP. You can find all the code in the if_ether.h file located in /usr/include/linux. The pkt = s.recvfrom(2048) statement creates a buffer of 2048. Incoming frames are stored in the variable pkt. If you print this pkt, it shows the tuples, but our valuable information resides in the first tuple. The ethhead = pkt[0][0:14] statement takes the first 14 bytes from the pkt. As the Ethernet frame is 14 bytes long, and it comes first as shown in the following figure, that's why we use the first 14 bytes:
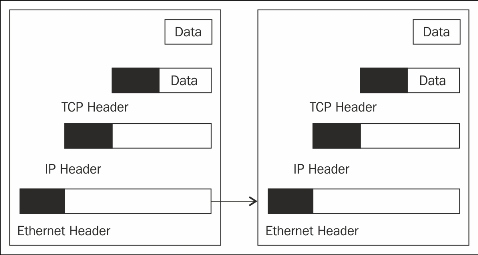
Configuration of headers
The eth = struct.unpack("!6s6s2s",ethhead) statement here ! shows network bytes, and 6s shows 6 bytes, as we have discussed earlier. The binascii.hexlify(eth[0]) statement returns the hexadecimal representation of the binary data. Every byte of eth[0] is converted into the corresponding two-digit hex representation. The ipheader = pkt[0][14:34] statement extracts the next 20 bytes of data. Next is the IP header and the ip_hdr =struct.unpack("!12s4s4s",ipheader) statement, which unpacks the data into 3 parts, out of which our destination and source IP addresses reside in the 2nd and 3rd parts respectively. The socket.inet_ntoa(ip_hdr[3]) statement converts a 32-bit packed IPv4 address (a string that is four characters in length) to its standard dotted-quad string representation. The tcpheader = pkt[0][34:54] statement extracts the next 20 bytes of data. The tcp_hdr = struct.unpack("!HH16s",tcpheader) statement is divided into 3 parts, that is, HH16s first and secondly the source and destination port number. If you are interested in the flag, then unpack the values in the tcp_hdr = struct.unpack("!HH9ss6s",tcpheader) format. The 4th part, s, gives the value of flags.
The output of sniffer1.py is as follows:
--------Ethernet Frame--------
desination mac 000c292e847a
Source mac 005056e7c365
-----------IP------------------
Source IP 208.80.154.234
Destination IP 192.168.0.11
---------TCP----------
Source Port  80
Destination port  1466
Flag  18
--------Ethernet Frame--------
desination mac 005056e7c365
Source mac 000c292e847a
-----------IP------------------
Source IP 192.168.0.11
Destination IP 208.80.154.234
---------TCP----------
Source Port  1466
Destination port  80
Flag  10
Our sniffer is now working fine. Let's discuss the outcomes of the output. The Ethernet frame shows the destination mac and the source mac. The IP header tells the source IP from where the packet is arriving, and the destination IP is another operating system that is running in our subnet. The TCP header shows the source port, the destination port, and the flag. The destination port is 80, which shows that someone is browsing a website. Now that we have an IP address, let's check which website is running on 208.80.154.240:
>>> import socket
>>> socket.gethostbyaddr('208.80.154.240')
('upload-lb.eqiad.wikimedia.org', [], ['208.80.154.240'])
>>>
The preceding results show the upload-lb.eqiad.wikimedia.org website.
In the output, 2 packets are shown. The first flag shows the value 18 and the second one shows 10. Flag 12 represents the ACK and SYN flag. Flag 10 represents the ACK flag as follows:

Flags values
12 means 0001 0010, which sets the ACK and SYN flag. 10 indicates that only ACK is set.
Now, let's make some amendments to the code. Add one more line at the end of the code:
print pkt[0][54:]
Let's check how the output is changed:
HTTP/1.1 304 Not Modified
Server: Apache
X-Content-Type-Options: nosniff
Cache-control: public, max-age=300, s-maxage=300
Last-Modified: Thu, 25 Sep 2014 18:08:15 GMT
Expires: Sat, 27 Sep 2014 06:41:45 GMT
Content-Encoding: gzip
Content-Type: text/javascript; charset=utf-8
Vary: Accept-Encoding,X-Use-HHVM
Accept-Ranges: bytes
Date: Sat, 27 Sep 2014 06:37:02 GMT
X-Varnish: 3552654421 3552629562
Age: 17
Via: 1.1 varnish
Connection: keep-alive
X-Cache: cp1057 hit (138)
X-Analytics: php=zend
At times, we are interested in TTL, which is a part of the IP header. This means we'll have to change the unpack function:
ipheader = pkt[0][14:34]
ip_hdr = struct.unpack("!8sB3s4s4s",ipheader)
print "-----------IP------------------"
print "TTL :", ip_hdr[1]
print "Source IP", socket.inet_ntoa(ip_hdr[3])
print "Destination IP", socket.inet_ntoa(ip_hdr[4])
Now, let's check the output of sniffer1.py:
--------Ethernet Frame--------
desination mac 000c294f8e35
Source mac 005056e7c365
-----------IP------------------
TTL : 128
Source IP 208.80.154.224
Destination IP 192.168.0.10
---------TCP----------
Source Port  80
Destination port  39204
Flag  10
The TTL value is 128. So how does it work? It's very simple; we have unpacked the value in the format 8sB3s4s4s, and our TTL field comes at the 9th byte. After 8s means, after the 8th byte, we get the TTL field in the form of B.