
5. Making Purchases and Recording Payments
What You’ll Do
Set Purchases and Vendors Preferences
Report on Open Purchase Orders
View Aging and Unpaid Bills Reports
Introduction
Nearly every business engages in spending of some sort. Businesses purchase inventory items, pay rent, buy supplies, clean their premises, pay employees, purchase equipment—the list goes on and on. The tasks described in this chapter assist you in keeping track of your expenditures and knowing how much it costs to run your business. Besides knowing how much you spend, it’s important to know how much you owe and when your payments are due. You can have all this information at your fingertips when you track your expenses using QuickBooks.
QuickBooks provides an option to use purchase order forms to record the items you have ordered so you can predict what bills you have yet to receive from the vendors. Using purchase orders also enables you to keep track of what is on order so you don’t reorder the same items. In QuickBooks, purchase order information flows directly to bills as soon as you receive the items you ordered. This way you don’t have to enter your purchase information twice. And if there are discounts available for early payment, QuickBooks calculates those for you.
You can save time by using QuickBooks to print your checks, and you can produce a variety of reports that show you how much your company is spending and what you are purchasing.
Setting Purchases and Vendors Preferences
Before you use the purchases and payments features of QuickBooks, you need to set some preferences to establish how the program functions. It’s worthwhile to examine the preferences that are in place and make sure you are taking advantage of all QuickBooks has to offer in this area.
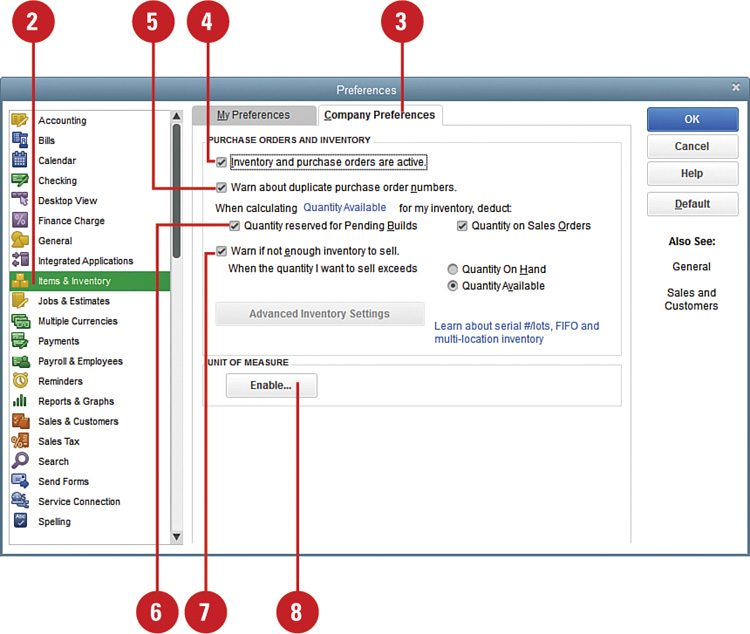
Set Purchase Orders and Inventory Preferences
![]() Select Edit, Preferences.
Select Edit, Preferences.
![]() Click Items & Inventory.
Click Items & Inventory.
![]() Click the Company Preferences tab.
Click the Company Preferences tab.
![]() If you plan to use the inventory or purchase orders features in QuickBooks, check the Inventory and Purchase Orders Are Active box.
If you plan to use the inventory or purchase orders features in QuickBooks, check the Inventory and Purchase Orders Are Active box.
![]() Check Warn About Duplicate Purchase Order Numbers to be warned that you are about to use a duplicate purchase order number.
Check Warn About Duplicate Purchase Order Numbers to be warned that you are about to use a duplicate purchase order number.
![]() Check the Quantity check boxes if you want QuickBooks to reduce your available inventory totals by amounts on pending builds or sales orders.
Check the Quantity check boxes if you want QuickBooks to reduce your available inventory totals by amounts on pending builds or sales orders.
![]() Check Warn If Not Enough Inventory To Sell and select one of the options to receive a warning message when you try to issue an invoice for items not in your inventory.
Check Warn If Not Enough Inventory To Sell and select one of the options to receive a warning message when you try to issue an invoice for items not in your inventory.
![]() Click Enable to enable the Units of Measure feature.
Click Enable to enable the Units of Measure feature.
Did You Know?
Dates are important. On an accrual basis profit and loss, expenses are recognized based on the date of the bill. On a cash basis profit and loss, expenses are recognized based on the date of the payment.
![]() In the Unit of Measure dialog box, choose between Single U/M Per Item and Multiple U/M Per Item (not available in all versions of QuickBooks).
In the Unit of Measure dialog box, choose between Single U/M Per Item and Multiple U/M Per Item (not available in all versions of QuickBooks).
![]() For information about Units of Measure, click Unit of Measure Overview.
For information about Units of Measure, click Unit of Measure Overview.
![]() Click Finish to return to the Preferences window (or click Cancel if you decide not to use Units of Measure at this time).
Click Finish to return to the Preferences window (or click Cancel if you decide not to use Units of Measure at this time).


Set Bills Preferences
![]() With Preferences still open, click Bills and click the Company Preferences tab. If you made changes on the previous Preferences screen, you are prompted to save those changes before proceeding.
With Preferences still open, click Bills and click the Company Preferences tab. If you made changes on the previous Preferences screen, you are prompted to save those changes before proceeding.
![]() Type a value in the Bills Are Due field to indicate how many days after receiving a bill the bill is due.
Type a value in the Bills Are Due field to indicate how many days after receiving a bill the bill is due.
![]() Check Warn About Duplicate Bill Numbers from Same Vendor if you want to be told you have received a bill with a duplicate number from the same vendor.
Check Warn About Duplicate Bill Numbers from Same Vendor if you want to be told you have received a bill with a duplicate number from the same vendor.
![]() Check the Automatically Use Discounts and Credits check boxes if you typically take advantage of discounts and credits.
Check the Automatically Use Discounts and Credits check boxes if you typically take advantage of discounts and credits.
![]() If you check the discounts box, you must enter a Default Discount Account.
If you check the discounts box, you must enter a Default Discount Account.
![]() Click OK.
Click OK.

Did You Know?
QuickBooks assumes bills are due in 10 days. Because some vendors offer a discount for bills paid within 10 days, QuickBooks sets the bill due date at 10 days and adds the bill to your reminder list at that time. If you typically pay bills in 30 days, enter 30 in the Bills Are Due field, or use whatever timeframe is standard for your company.
Working with the Vendor Center
QuickBooks provides a one-stop window where you can view all the transactions currently active with a particular vendor. You can see outstanding bills, outstanding orders, payments issued, contact information, credit limit, and account number. You can manage vendor activities from this screen, such as recording the receipt of items and bills, payment of bills, and preparation of reports.
![]() Click the Vendors icon on the Navigation bar or Home page. The Vendor Center displays.
Click the Vendors icon on the Navigation bar or Home page. The Vendor Center displays.

![]() Click the Vendors tab.
Click the Vendors tab.
![]() Use the scrollbar to view the entire vendor list. Click on a vendor name.
Use the scrollbar to view the entire vendor list. Click on a vendor name.
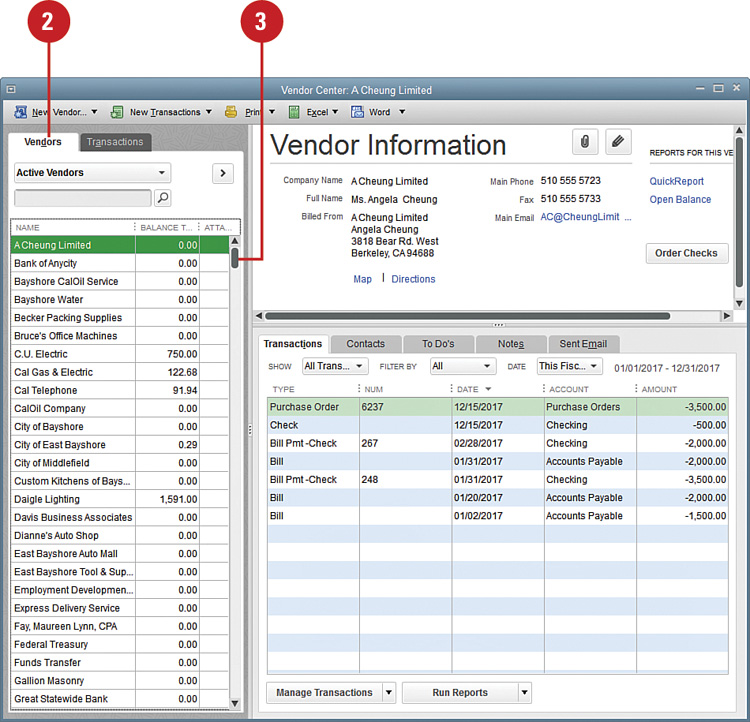
![]() Select information you want to view from the Show drop-down list.
Select information you want to view from the Show drop-down list.
![]() View an original form by double-clicking the form name.
View an original form by double-clicking the form name.

![]() Press Esc to close the original form.
Press Esc to close the original form.
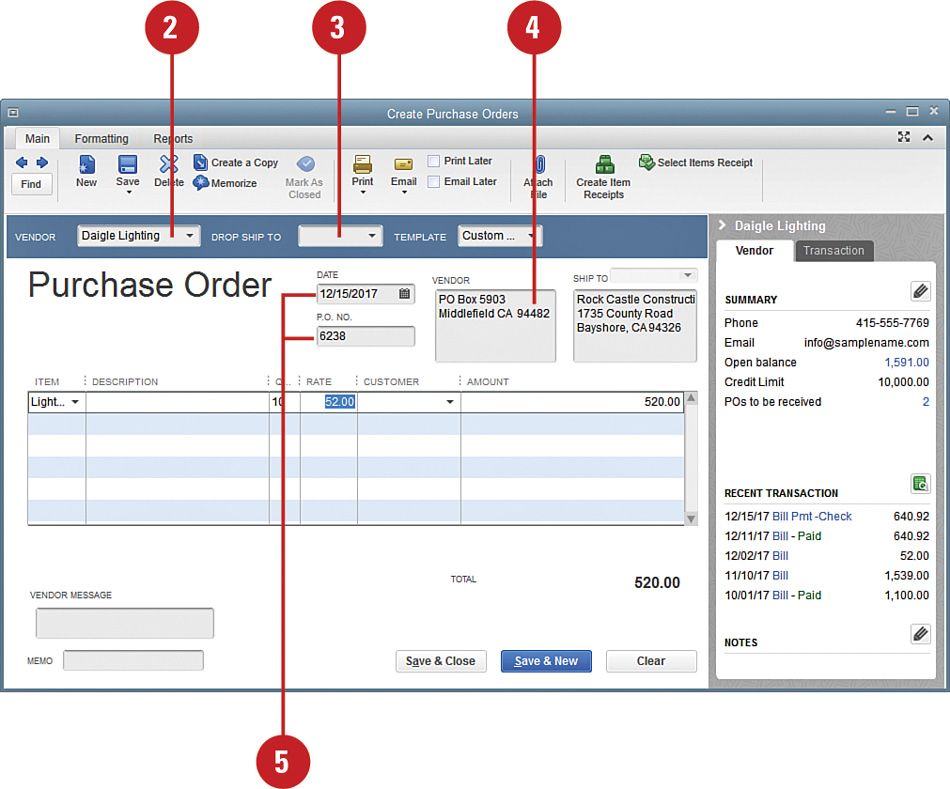
Using Purchase Orders
The purchase order feature of QuickBooks is optional, but if you like to plan ahead, using purchase orders is a good idea. As soon as you enter a purchase order in QuickBooks, the process of tracking your company’s spending begins. You can see at a glance what is on order and how much money is committed. Purchase orders make bill paying easier because the information on the order flows right to the vendor bill.
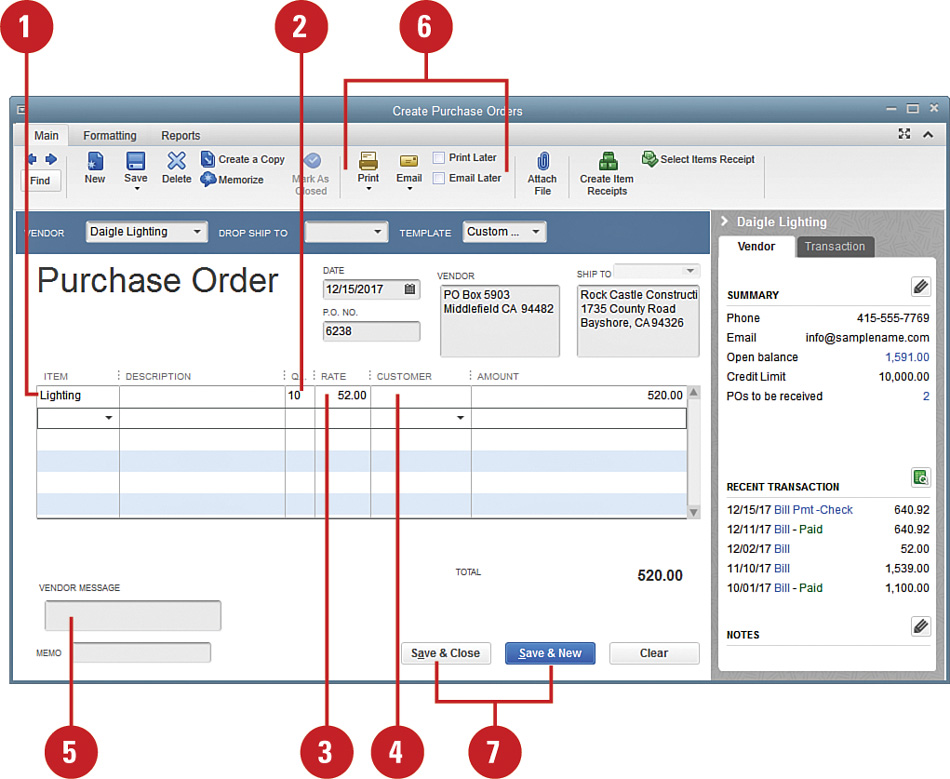
Create Purchase Orders
![]() Open a new purchase order by selecting Vendors, Create Purchase Orders. (Remember—you must have activated Purchase Orders in the Items & Inventory Preferences to have access to the Purchase Order form.)
Open a new purchase order by selecting Vendors, Create Purchase Orders. (Remember—you must have activated Purchase Orders in the Items & Inventory Preferences to have access to the Purchase Order form.)
Timesaver
Clicking the Purchase Orders icon on the Home page also opens the Create Purchase Orders window.
![]() Click the Vendor field’s drop-down arrow to select a vendor from the existing vendor list. The vendor’s name and address appear in the Vendor area in the purchase order.
Click the Vendor field’s drop-down arrow to select a vendor from the existing vendor list. The vendor’s name and address appear in the Vendor area in the purchase order.
![]() If the goods are to be shipped to a location other than your company, enter the shipping location.
If the goods are to be shipped to a location other than your company, enter the shipping location.
![]() If the address has changed for this vendor, enter the corrected information in the Vendor area of the form. When you close the purchase order, you are given an opportunity to make this change permanent.
If the address has changed for this vendor, enter the corrected information in the Vendor area of the form. When you close the purchase order, you are given an opportunity to make this change permanent.
![]() Verify the date and purchase order number; revise if necessary.
Verify the date and purchase order number; revise if necessary.
Did You Know?
You can enter a new vendor on-the-fly. If the vendor for this purchase order is not on the list, just enter the new vendor’s name in the Vendor field, and you can add the name to your Vendor list.
Order Items on a Purchase Order
![]() Enter the name of the item you plan to order in the Item column. A description and price will fill in if this information has been saved previously.
Enter the name of the item you plan to order in the Item column. A description and price will fill in if this information has been saved previously.
![]() Enter the number of items you want to order.
Enter the number of items you want to order.
![]() Verify the per item price that displays in the Rate column, or enter a price if no price displays. Leave the Rate field blank if you are uncertain.
Verify the per item price that displays in the Rate column, or enter a price if no price displays. Leave the Rate field blank if you are uncertain.
![]() If this order is for a specific customer, enter the name in the Customer column.
If this order is for a specific customer, enter the name in the Customer column.
![]() Type an optional message that appears on this purchase order in the Vendor Message field.
Type an optional message that appears on this purchase order in the Vendor Message field.
![]() Check to Print or Email.
Check to Print or Email.
![]() Save the purchase order.
Save the purchase order.
![]() Select your vendor name from the drop-down list or click <Add New> at the top of the list to create a new vendor listing.
Select your vendor name from the drop-down list or click <Add New> at the top of the list to create a new vendor listing.
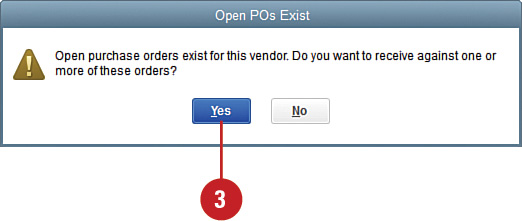
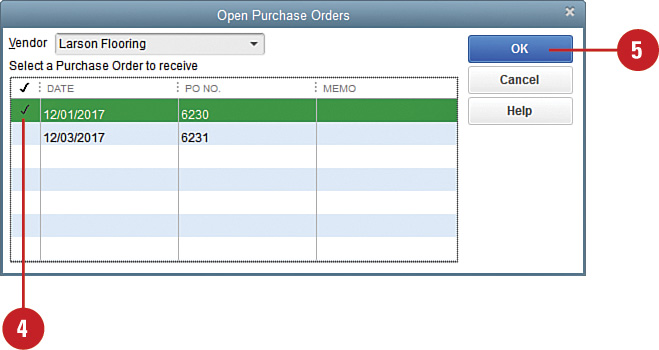
![]() If you have an open purchase order for that vendor, click Yes to list the open purchase orders (if not, click No and continue to Step 5, not shown).
If you have an open purchase order for that vendor, click Yes to list the open purchase orders (if not, click No and continue to Step 5, not shown).
![]() In the Open Purchase Orders dialog that displays, place a check mark next to the purchase order.
In the Open Purchase Orders dialog that displays, place a check mark next to the purchase order.
![]() Click OK. QuickBooks fills the items being purchased on the vendor bill from the open purchase order.
Click OK. QuickBooks fills the items being purchased on the vendor bill from the open purchase order.

![]() Enter or adjust the Date, Ref. No., and Amount Due.
Enter or adjust the Date, Ref. No., and Amount Due.
![]() The terms and discount default from the original vendor settings, or you can override the terms when entering a new vendor bill.
The terms and discount default from the original vendor settings, or you can override the terms when entering a new vendor bill.
![]() If you are assigning a purchase order to the bill, the Items tab includes the details from your purchase order. Otherwise, click the Expenses tab and enter the account you want to assign the expense to.
If you are assigning a purchase order to the bill, the Items tab includes the details from your purchase order. Otherwise, click the Expenses tab and enter the account you want to assign the expense to.
![]() Click one of the Save options.
Click one of the Save options.

Did You Know?
With QuickBooks Online Essentials or Plus, you can use accounts payable features, too. The workflow is the same in QuickBooks Online—you can enter purchase orders, enter bills, and pay bills. Of course, you can enter checks and credit card purchases, too.
Attaching Documents to Transactions
QuickBooks allows you to attach documents to transactions and list items. This is convenient to have receipts saved and attached so they are easily accessible from within QuickBooks.
![]() Open the transaction to which you want to attach documentation. Click Attach File.
Open the transaction to which you want to attach documentation. Click Attach File.
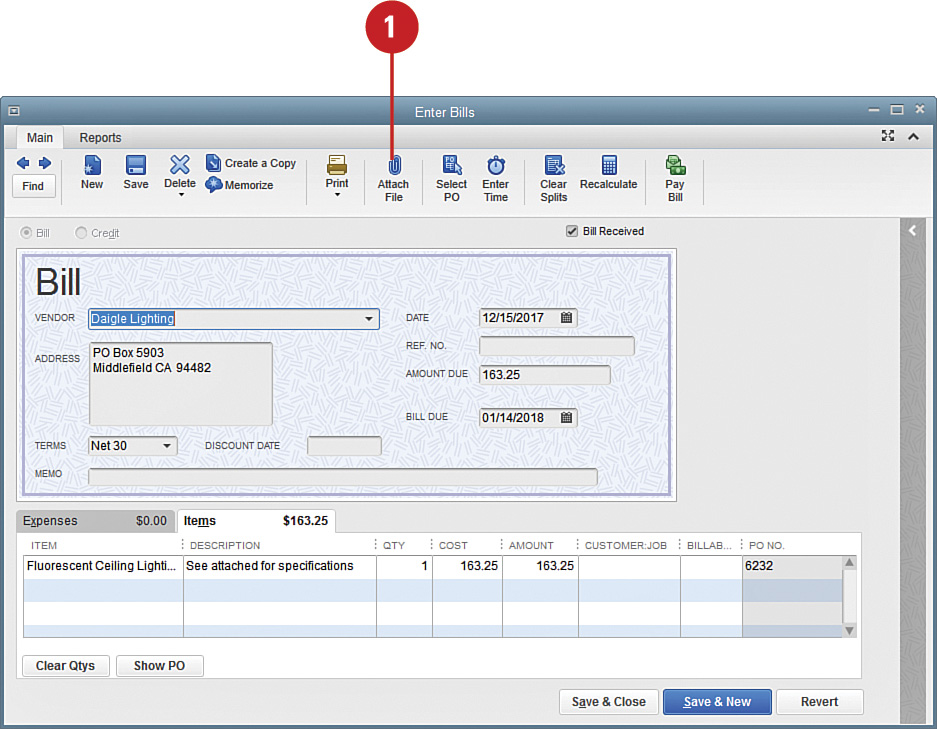
![]() Click Computer if you are attaching a document you have stored on your local computer.
Click Computer if you are attaching a document you have stored on your local computer.
![]() Click Scanner and QuickBooks recognizes your installed scanner and processes the request directly from within the program.
Click Scanner and QuickBooks recognizes your installed scanner and processes the request directly from within the program.
![]() Click Doc Center if you are attaching a document that has previously been scanned and saved but not yet attached.
Click Doc Center if you are attaching a document that has previously been scanned and saved but not yet attached.
![]() Click Done to complete the process.
Click Done to complete the process.

![]() Easily identify transactions with an attachment by the number icon on the Attach File icon on the transaction or list item.
Easily identify transactions with an attachment by the number icon on the Attach File icon on the transaction or list item.

Did You Know?
QuickBooks Online has an attachment feature that enables you to attach documents to transactions.
Reporting on Open Purchase Orders
You can prepare a report showing all outstanding purchase orders so you can easily see which items have been ordered and have yet to be received. Then it’s a simple matter to view an individual purchase order. You can change the order if necessary or indicate that all or some of the items have been received. After items are received, they are removed from the purchase order and added to your company’s accounts payable, ready for your payment.
![]() Click the Vendor Center icon on the icon bar or Home page.
Click the Vendor Center icon on the icon bar or Home page.
![]() Click the Transactions tab.
Click the Transactions tab.
![]() Click the Purchase Orders option.
Click the Purchase Orders option.
![]() Choose from All Purchase Orders or Open Purchase Orders in the Filter By drop-down list to view all orders or all open orders.
Choose from All Purchase Orders or Open Purchase Orders in the Filter By drop-down list to view all orders or all open orders.
![]() Double-click any order on the purchase orders list to view the actual order.
Double-click any order on the purchase orders list to view the actual order.
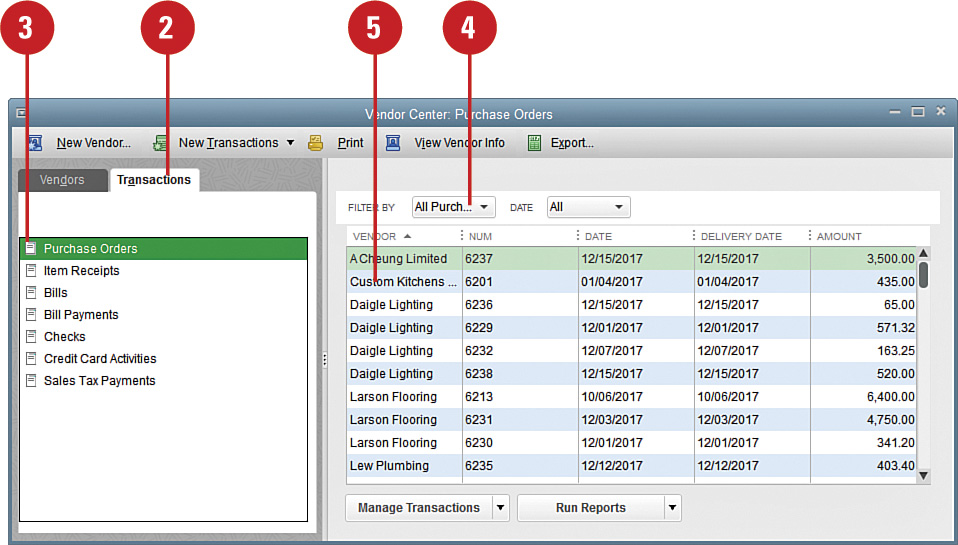
![]() Press Esc to close a purchase order you are viewing.
Press Esc to close a purchase order you are viewing.
![]() Choose Reports, Purchases to view a menu of reports relating to your purchases.
Choose Reports, Purchases to view a menu of reports relating to your purchases.
![]() Select Open Purchase Orders or Open Purchase Orders by Job.
Select Open Purchase Orders or Open Purchase Orders by Job.

![]() Change the date at the top of the report to see items on order as of a specific date or for a particular time period.
Change the date at the top of the report to see items on order as of a specific date or for a particular time period.

Receiving Goods
When you receive items you ordered, those items need to be added to your inventory. Other goods you order, such as supplies, also need to be acknowledged in QuickBooks so that the outstanding purchase order can be closed and the payment process can begin. You can check the goods you ordered against the purchase order, or you can enter a bill directly into QuickBooks without first creating the purchase order.
![]() Select Vendors, Receive Items.
Select Vendors, Receive Items.
Timesaver
Click the Receive Inventory icon on the Home page, and then choose Receive Inventory without Bill to open the Create Items Receipts, or choose Receive Inventory with Bill to open the Enter Bills form.
![]() Click the down arrow or begin entering a vendor name in the Vendor area of the Create Item Receipts window to select a vendor.
Click the down arrow or begin entering a vendor name in the Vendor area of the Create Item Receipts window to select a vendor.
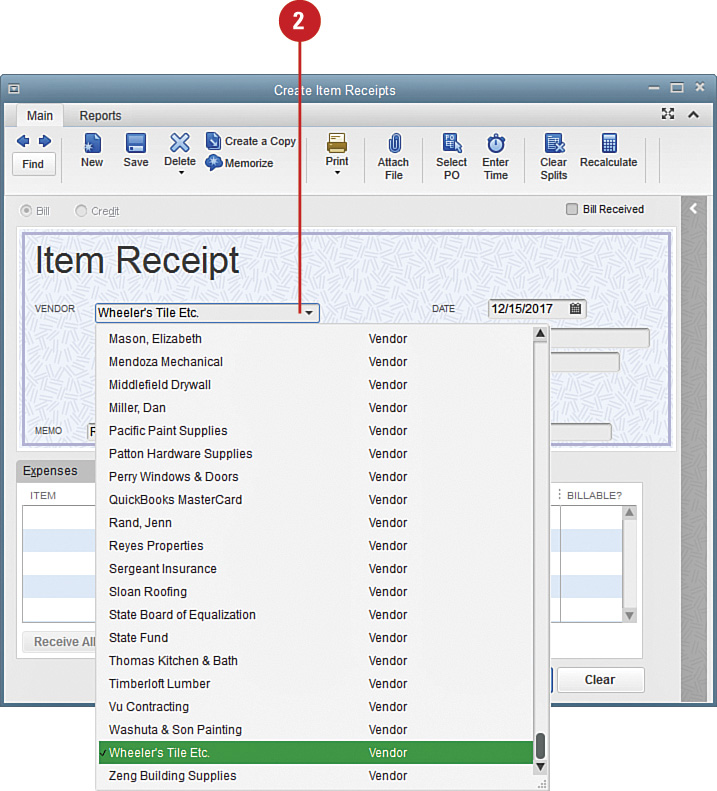
![]() If an open purchase order exists for this vendor, you are prompted to receive items against a purchase order. Click Yes to see open orders.
If an open purchase order exists for this vendor, you are prompted to receive items against a purchase order. Click Yes to see open orders.
![]() Check the order or orders that apply to the goods you received.
Check the order or orders that apply to the goods you received.
![]() Click OK.
Click OK.

![]() Check the Bill Received box if a bill was received with the shipment. The form name changes to an Enter Bills form.
Check the Bill Received box if a bill was received with the shipment. The form name changes to an Enter Bills form.
![]() Verify the date on the bill.
Verify the date on the bill.
![]() If you haven’t transferred information from a purchase order, enter information about items received and price.
If you haven’t transferred information from a purchase order, enter information about items received and price.
![]() Verify the quantity of items received.
Verify the quantity of items received.
![]() Verify the total amount due on the bill.
Verify the total amount due on the bill.
![]() Click Show PO if you need to view the purchase order.
Click Show PO if you need to view the purchase order.
![]() Select a Save option.
Select a Save option.

Did You Know?
Purchases orders are automatically adjusted. If you receive items against a purchase order, the purchase order is adjusted to reflect items received. If the entire order is not received, the purchase order is adjusted to show the remaining items still on order.
Receiving a Partial Order
If you created a purchase order for the goods you received, the purchase order list displays on a screen when you indicate you have received the goods. If you didn’t receive the complete order, you should note what was received and keep the purchase order active until you receive the rest of your order.
![]() Select Vendors, Receive Items.
Select Vendors, Receive Items.
![]() Enter the vendor name in the space provided.
Enter the vendor name in the space provided.
![]() In the window that displays, click Yes to view open purchase orders.
In the window that displays, click Yes to view open purchase orders.

![]() Check the purchase order that applies to the goods you received.
Check the purchase order that applies to the goods you received.
![]() Click OK.
Click OK.
![]() Check Bill Received if a bill for the partial order was received with the shipment.
Check Bill Received if a bill for the partial order was received with the shipment.
![]() Verify the date on which the item was received.
Verify the date on which the item was received.
![]() Make any necessary adjustments to the quantities to reflect the actual items received.
Make any necessary adjustments to the quantities to reflect the actual items received.
![]() Save the Create Items Receipts form.
Save the Create Items Receipts form.

Did You Know?
Purchase orders are adjusted automatically. When you adjust the quantities of the items you have received, the original purchase order changes to reflect the remaining outstanding items.
Viewing Aging and Unpaid Bills Reports
Want to know how much you owe and to whom you owe it? Produce the Unpaid Bills report, and you have access to a complete list of all outstanding amounts.
![]() Select Reports, Vendors & Payables, A/P Aging Detail.
Select Reports, Vendors & Payables, A/P Aging Detail.
![]() Scroll through the report to see which bills are due, when they are due, and how much you owe.
Scroll through the report to see which bills are due, when they are due, and how much you owe.

![]() Select Reports, Vendors & Payables, Unpaid Bills Detail (not shown).
Select Reports, Vendors & Payables, Unpaid Bills Detail (not shown).
![]() Scroll through the report to view amounts due to each vendor.
Scroll through the report to view amounts due to each vendor.
![]() Press Esc to close each of the report windows.
Press Esc to close each of the report windows.

Did You Know?
You can view original documents that support entries on a report. Double-click any amount on these reports to view the actual bill.
See Also
See Chapter 18, “Working with Reports in QuickBooks,” for detailed explanations about printing, customizing, and memorizing your QuickBooks reports.
Paying Bills
Receiving merchandise and recording bills that are due solve the problem of getting the information about your purchases into QuickBooks. The next step is to pay for your company’s expenditures. You probably have a plan in place for paying bills. Maybe you write checks weekly or twice a month. Whenever you’re ready to make payments, you’ll find the bill-paying features of QuickBooks easy to master.
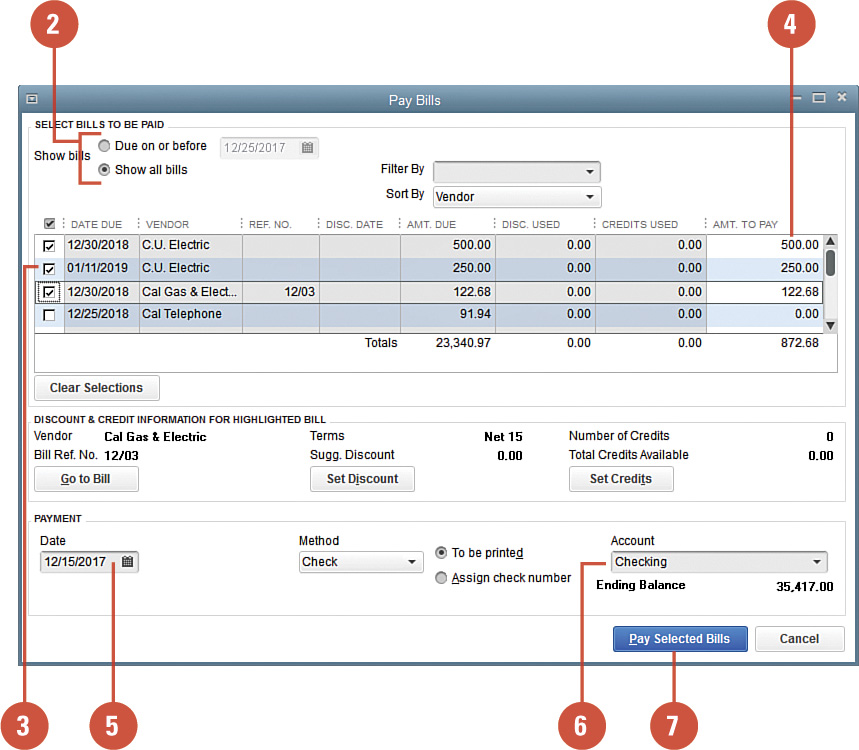
![]() Select Vendors, Pay Bills, or click the Pay Bills icon on the Home page.
Select Vendors, Pay Bills, or click the Pay Bills icon on the Home page.
![]() Set the due date for bills you want to view, or click Show All Bills to show all outstanding bills.
Set the due date for bills you want to view, or click Show All Bills to show all outstanding bills.
![]() Check off all bills you intend to pay.
Check off all bills you intend to pay.
![]() Verify the payment amount for each bill and change the amount in the Amt. to Pay column if necessary.
Verify the payment amount for each bill and change the amount in the Amt. to Pay column if necessary.
![]() Indicate the date on which checks are written in the Date field.
Indicate the date on which checks are written in the Date field.
![]() Verify that the bank account shown in the Account field is the one upon which checks are drawn.
Verify that the bank account shown in the Account field is the one upon which checks are drawn.
![]() Click Pay Selected Bills to complete the bill payment.
Click Pay Selected Bills to complete the bill payment.
Did You Know?
You don’t have to pay 100% of the bill amount. If you change the amount of payment on a bill to less than 100% of the amount due, the bill remains in your payables system with the remaining amount still due.
Taking Discounts
When you pay your bills early, you might be entitled to take a discount offered by your vendor. Check the terms of the bill you received to see whether there is an option for a discount. Terms such as “2% 10 Net 30” provide for a 2% discount if the bill is paid within 10 days. Some companies also offer a discount if the entire balance is paid in full within 30 days as opposed to financing over a longer period of time. When you enter your bill in QuickBooks, you can define the discount terms, and then you can apply the discount right in QuickBooks. The discount is calculated automatically, but you can override the calculation if necessary.
Did You Know?
Bills in the discount period might not appear on the unpaid bills list. If a vendor offers a discount for early payment, and the bill is not due yet, it does not appear on the list. Clicking the Show All Bills option displays all bills currently outstanding, including those not yet due.
![]() Choose Vendor, Pay Bills, or click the Pay Bills button on the Home page.
Choose Vendor, Pay Bills, or click the Pay Bills button on the Home page.
![]() Make sure the Show All Bills option is selected.
Make sure the Show All Bills option is selected.
![]() Click a bill with a discount date. (There will be a date in the Disc. Date column.)
Click a bill with a discount date. (There will be a date in the Disc. Date column.)
![]() Notice that the potential discount displays in the Discount & Credit Information section of the window.
Notice that the potential discount displays in the Discount & Credit Information section of the window.
![]() Click the Set Discount button.
Click the Set Discount button.

![]() The discount has been calculated. Verify that the amount is correct and make any necessary changes.
The discount has been calculated. Verify that the amount is correct and make any necessary changes.
![]() Enter the account in which the discount will be recorded.
Enter the account in which the discount will be recorded.
![]() Click Done to return to the Pay Bill window.
Click Done to return to the Pay Bill window.

![]() Complete the bill payment process as described in the “Paying Bills” section (not shown).
Complete the bill payment process as described in the “Paying Bills” section (not shown).
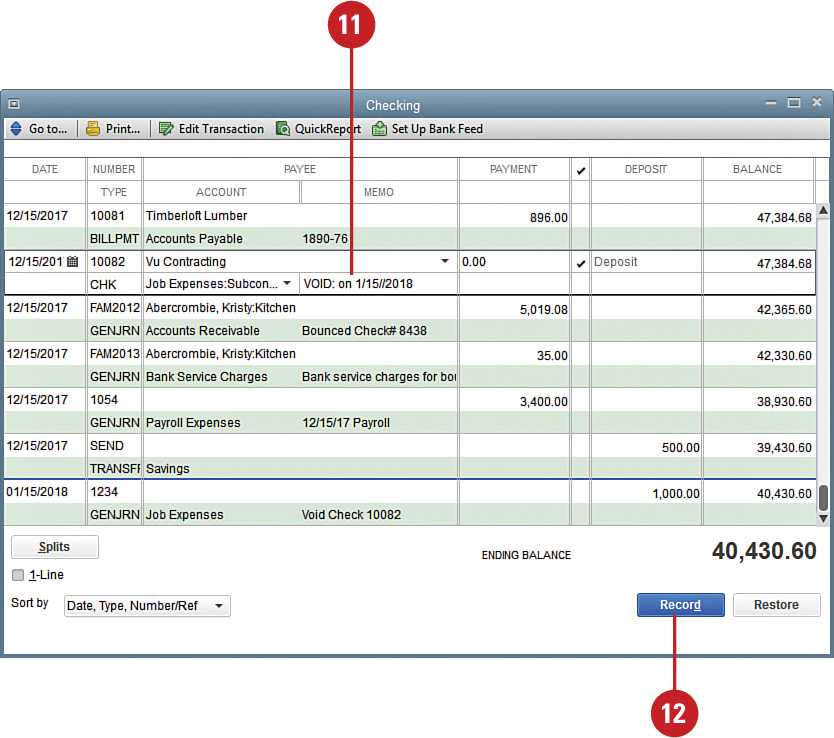
Using the Check Register
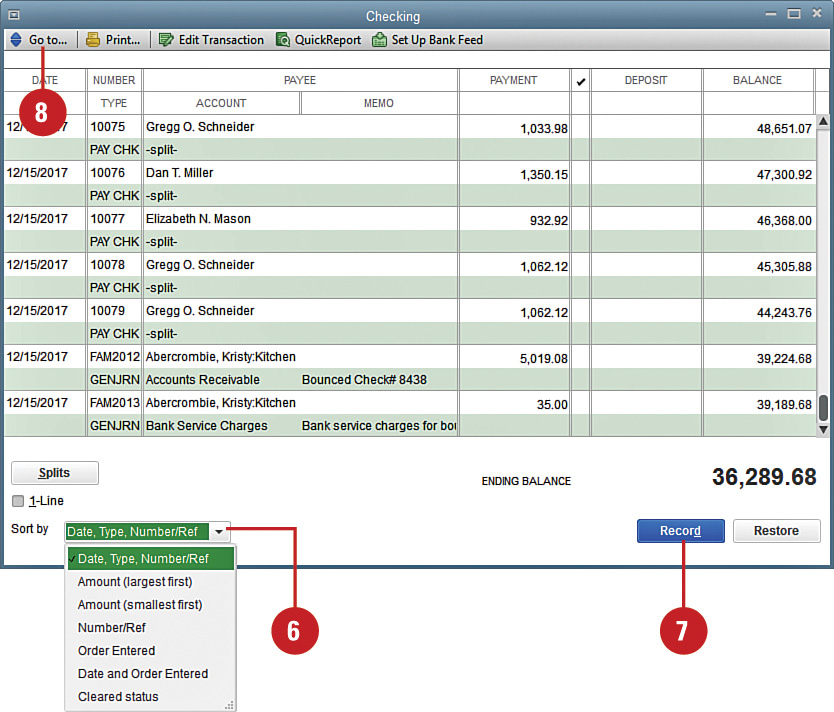
The check register displays all the transactions that affect the cash account. There is a separate check register in QuickBooks for each cash account (and also all your other balance sheet accounts, except Retained Earnings). Every time you make a payment or record a deposit, the transaction is automatically recorded in your check register. You can view the transactions that have been recorded in the register, you can make entries directly into the register, and you can choose a transaction and go directly to the originating form.
Use the Check Register
![]() Press Ctrl+A to open the Chart of Accounts.
Press Ctrl+A to open the Chart of Accounts.
![]() Double-click your checking account to open the register.
Double-click your checking account to open the register.
![]() Scroll to view existing transactions.
Scroll to view existing transactions.
![]() Double-click any transaction (except in the Date or Number fields) to view the original form and make corrections if necessary.
Double-click any transaction (except in the Date or Number fields) to view the original form and make corrections if necessary.
![]() Click a transaction, and then click the QuickReport button to obtain a report showing all transactions for the selected payee.
Click a transaction, and then click the QuickReport button to obtain a report showing all transactions for the selected payee.

![]() Click the Sort By drop-down arrow to select from a variety of sort options.
Click the Sort By drop-down arrow to select from a variety of sort options.
![]() Enter a transaction right in this register by filling in each appropriate field and then clicking the Record button.
Enter a transaction right in this register by filling in each appropriate field and then clicking the Record button.
![]() Click the Go To option to search for a transaction in this register.
Click the Go To option to search for a transaction in this register.
![]() Right-click a transaction and then select Void to void the transaction (not shown).
Right-click a transaction and then select Void to void the transaction (not shown).
![]() Press Esc to close the window.
Press Esc to close the window.
Editing Bill Payments
QuickBooks is a flexible program. If you make a mistake, you can usually go back and correct the error. Say, for example, that you wrote a check by hand to a vendor for $500 to be applied to a bill for $2,000. However, you didn’t pay attention when you recorded the payment in QuickBooks, and you recorded the entire bill as being paid. You can correct the payment amount, and the unpaid portion of the bill will be reinstated.
![]() Press Ctrl+A to open the Chart of Accounts.
Press Ctrl+A to open the Chart of Accounts.
![]() Double-click the checking account you used to pay the bill. The account register displays.
Double-click the checking account you used to pay the bill. The account register displays.
![]() Find the check that was used to pay the bill.
Find the check that was used to pay the bill.
See Also
See “Searching for Transactions” on page 110 for information on finding transactions in the register.
![]() Double-click the check to open the actual check.
Double-click the check to open the actual check.

![]() Change the amount paid to the correct amount.
Change the amount paid to the correct amount.
![]() Click Recalculate to change the amount of the check.
Click Recalculate to change the amount of the check.
![]() Save the transaction.
Save the transaction.
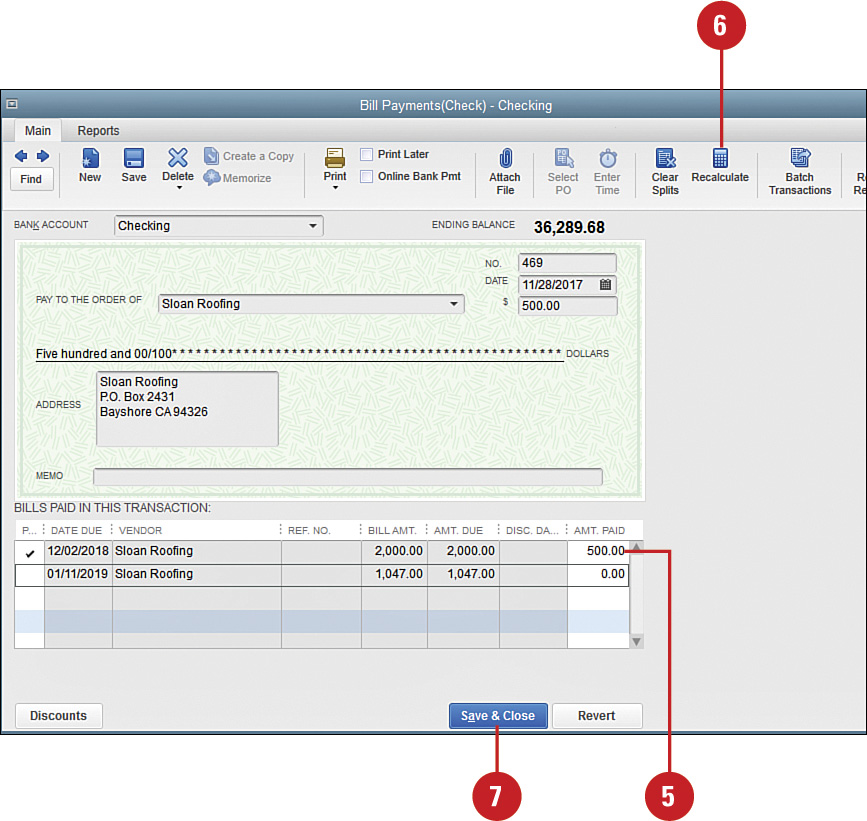
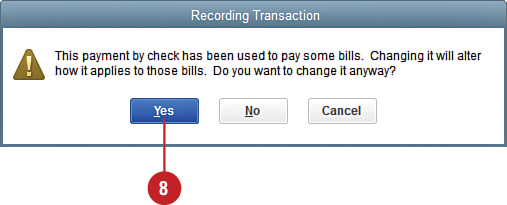
![]() You see a warning that the change you’re making will affect the way your bill payments were previously recorded. Click Yes to accept the change.
You see a warning that the change you’re making will affect the way your bill payments were previously recorded. Click Yes to accept the change.
Deleting Bill Payments
Much like the process of editing incorrect bill payments, you can also delete a payment entered erroneously. If you enter a bill payment and then realize the payment was never made, you can delete the payment, thus reinstating the bill to its unpaid status.
![]() Press Ctrl+A to open the Chart of Accounts.
Press Ctrl+A to open the Chart of Accounts.
![]() Double-click the checking account you used to pay the bill. The account register displays.
Double-click the checking account you used to pay the bill. The account register displays.
![]() Find the Bill Pmt-Check that was used to pay the bill.
Find the Bill Pmt-Check that was used to pay the bill.
![]() Right-click the Bill Payment and select Delete Bill Pmt-Check.
Right-click the Bill Payment and select Delete Bill Pmt-Check.

![]() Click OK when the Delete Transaction window displays.
Click OK when the Delete Transaction window displays.

See Also
See “Voiding Checks” on page 195 for information on voiding checks as an alternative to deleting payments.
Setting Checking Preferences
If you write checks in QuickBooks, you can set certain preferences so that the checks are created to your specifications. For example, you can control which cash account is used for certain types of checks, and you can indicate whether you want your account information to appear on your check voucher. You can have QuickBooks change the date on your checks to match the date on which they are actually printed instead of the date on which they are created. You can also require QuickBooks to warn you if duplicate check numbers are about to be used, and you can request that certain payee information be included on the check.
![]() Select Edit, Preferences and click Checking.
Select Edit, Preferences and click Checking.
![]() Click the My Preferences tab.
Click the My Preferences tab.
![]() Indicate which bank account will be used for each type of form listed.
Indicate which bank account will be used for each type of form listed.
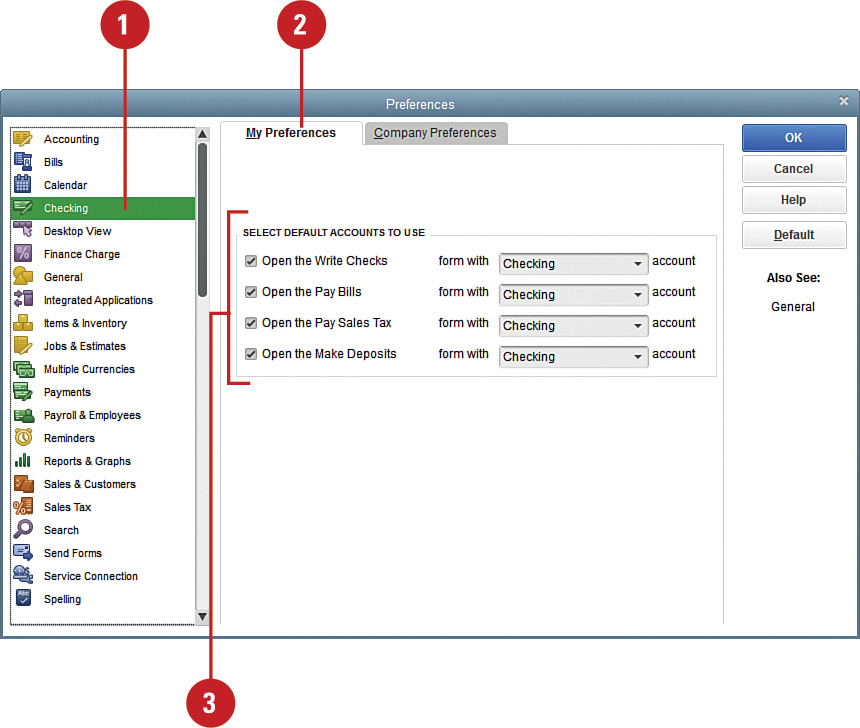
Did You Know?
QuickBooks makes its own selection if you don’t specify an account. If you leave the bank account options blank, QuickBooks chooses an account based on the account you used the last time you opened one of these forms. You can always override the bank account information on a form if necessary.
![]() Click the Company Preferences tab to see the companywide options.
Click the Company Preferences tab to see the companywide options.
![]() Select Print Account Names on Voucher to display the name of your company account on check stubs.
Select Print Account Names on Voucher to display the name of your company account on check stubs.
![]() Leave the Change Check Date box unchecked to have QuickBooks print checks using the date on the check form. Check the box to have QuickBooks use the date on which the check is printed.
Leave the Change Check Date box unchecked to have QuickBooks print checks using the date on the check form. Check the box to have QuickBooks use the date on which the check is printed.
![]() Check the Start with Payee Field on Check to force QuickBooks to position your cursor in the payee field on checks.
Check the Start with Payee Field on Check to force QuickBooks to position your cursor in the payee field on checks.
![]() Checking the Warn About Duplicate Check Numbers box enables QuickBooks to provide you with a warning when you are about to issue a check with a duplicate number.
Checking the Warn About Duplicate Check Numbers box enables QuickBooks to provide you with a warning when you are about to issue a check with a duplicate number.
![]() When the Autofill feature is checked, QuickBooks fills in the account number of any vendor or customer you enter on a form.
When the Autofill feature is checked, QuickBooks fills in the account number of any vendor or customer you enter on a form.

![]() Indicate which account is to be used for payroll and payroll tax liabilities.
Indicate which account is to be used for payroll and payroll tax liabilities.
![]() If you download transactions from your financial institution directly into QuickBooks, you now have the option of choosing between the new Express Mode and the Classic Mode (register mode) when working with online banking.
If you download transactions from your financial institution directly into QuickBooks, you now have the option of choosing between the new Express Mode and the Classic Mode (register mode) when working with online banking.
![]() Click OK.
Click OK.

Writing Checks
When you pay a bill in QuickBooks, the program issues a bill payment check. Whether you actually print checks using your QuickBooks program or simply enter payments you’ve made into the program, you need to familiarize yourself with the QuickBooks check-writing feature. You might write checks for obligations that don’t have accompanying bills, such as your rent. If you write hand-written checks, they need to be entered into QuickBooks. The best way to enter these payments into your QuickBooks program is through the Write Checks feature.
![]() Select Banking, Write Checks.
Select Banking, Write Checks.
Timesaver
Press Ctrl+W or click the Write Check icon on the Home page to open the Write Checks window.
![]() Verify the bank account on which this check will be written.
Verify the bank account on which this check will be written.
![]() Enter the payee name.
Enter the payee name.
Important
Respond to all warnings. A warning might appear when you enter a payee. The type of warning depends on the circumstances. For example, you might be told you have outstanding bills from this vendor. Read the warning, decide how you will respond, and then click OK to clear the warning from your screen.
![]() Enter the check amount.
Enter the check amount.

![]() Verify the date and check number, if applicable.
Verify the date and check number, if applicable.
![]() Enter the account to which this check should be charged, the amount, and an optional memo.
Enter the account to which this check should be charged, the amount, and an optional memo.
![]() If you are purchasing inventory, click the Items tab. Enter the items, the quantity, and the cost.
If you are purchasing inventory, click the Items tab. Enter the items, the quantity, and the cost.

![]() Indicate whether this is to be an online payment.
Indicate whether this is to be an online payment.
See Also
See “Making Online Payments” on page 301 for information on making payments over the Internet.
![]() Select either Print or Print Later as appropriate.
Select either Print or Print Later as appropriate.
![]() Record the check by selecting a Save option.
Record the check by selecting a Save option.

Did You Know?
QuickBooks provides a link to the Pay Bills window. When writing a check, if you select a payee for whom there are outstanding bills, the Open Bills Exist window displays, listing the open bills and providing you with a direct link to the Pay Bills window. You can click the link to Pay Bills or you can click the option to Continue Writing Check.
Did You Know?
Enter checks for other bank transactions, too. Enter checks for debit card purchases, ATM withdrawals, online payments, or other transactions to record money coming out of the bank account. Enter a code instead of a check number—for example, enter the code DB in the check number field for debit card purchases.
See Also
See “Using the Check Register” on page 185 for information on entering checks (and debit card purchases and other bank transactions) as an alternative to using the Write Checks window.
Printing Checks
When you write checks in QuickBooks, you indicate whether you want to print the check immediately (by selecting the Print option at the top of the window), print it at some future date (by checking the Print Later box), or not print it at all (by saving and closing). When you choose to print checks later, you can choose to print an entire batch of outstanding checks, or you can pick the ones you want to print and save the others until later.
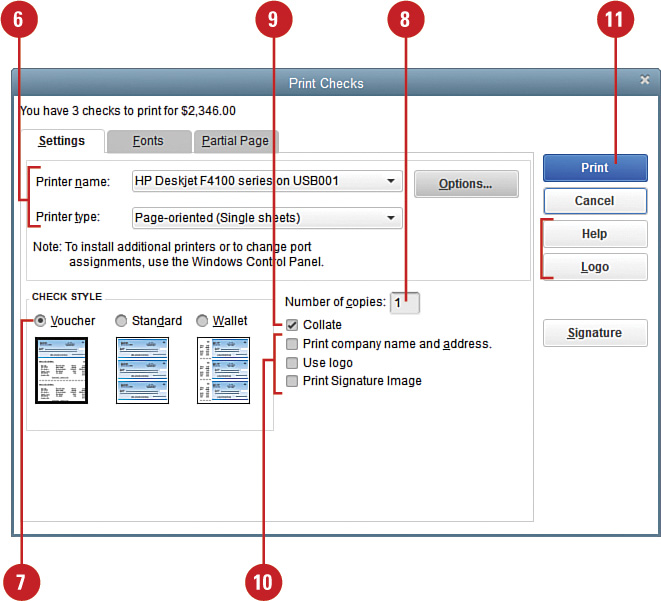
![]() Select File, Print Forms, Checks.
Select File, Print Forms, Checks.
![]() Verify the bank account.
Verify the bank account.
![]() Verify the first check number for this batch of checks.
Verify the first check number for this batch of checks.
![]() Check off all checks that are to be printed.
Check off all checks that are to be printed.
Important
Before continuing, be sure to place your actual check forms in the printer.
![]() Click OK.
Click OK.
![]() Verify the printer settings.
Verify the printer settings.
![]() Select the check style that matches your actual checks.
Select the check style that matches your actual checks.
![]() Enter the number of copies that you want to print.
Enter the number of copies that you want to print.
![]() Check the Collate box if you want your printed checks collated.
Check the Collate box if you want your printed checks collated.
![]() Indicate whether you want to have QuickBooks print your company name, address, logo, or signature image on the checks. If your checks are preprinted with this information, you should leave these boxes blank.
Indicate whether you want to have QuickBooks print your company name, address, logo, or signature image on the checks. If your checks are preprinted with this information, you should leave these boxes blank.
![]() Click Print to send the checks to the printer.
Click Print to send the checks to the printer.
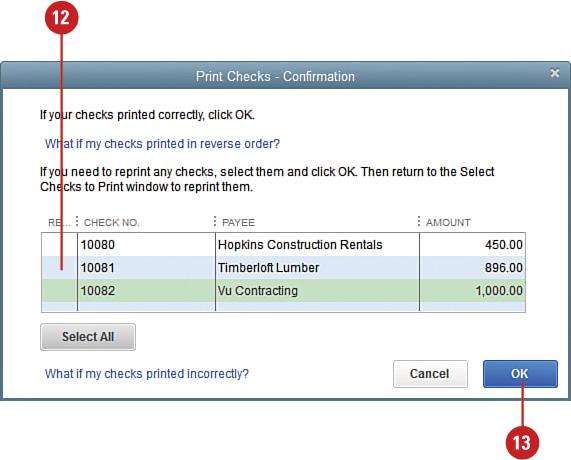
![]() If you need to reprint any checks, select them.
If you need to reprint any checks, select them.
![]() Click OK.
Click OK.
Did You Know?
It’s not too late to cancel your check printing order. When the Print Checks window is open, you can still change your mind. If you decide not to print the checks, click the Cancel button. The Print Checks window closes, and you are returned to the Select Checks to Print window, where you can change the selection of checks or click Cancel and print nothing.
Voiding Checks
You can void checks that have been recorded in your QuickBooks company file. There are two methods of voiding, depending on when the check was issued. If the check was issued in the current year, you can void the check in the check register. If the check was written in a prior year, you should be careful not to change amounts that appear on your financial statements. The steps shown here prevent that from happening.
Void a Check in the Current Year
![]() Press Ctrl+A to open the Chart of Accounts.
Press Ctrl+A to open the Chart of Accounts.
![]() Double-click the name of your checking account to open the register.
Double-click the name of your checking account to open the register.

![]() Click the Go To button.
Click the Go To button.

![]() Select whether to search by payee, check number, or some other criteria.
Select whether to search by payee, check number, or some other criteria.
![]() Enter the name (if you’re searching by payee), check number, or other information to help you find the check you want to void.
Enter the name (if you’re searching by payee), check number, or other information to help you find the check you want to void.
![]() Click Back or Next to search backward or forward in the register. Continue clicking Back or Next until you find the check you’re looking for.
Click Back or Next to search backward or forward in the register. Continue clicking Back or Next until you find the check you’re looking for.
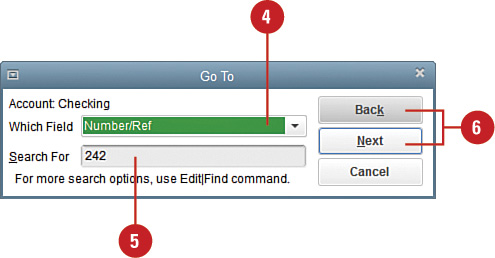
![]() When the entry for the check displays in the register, press Esc to close the Go To window.
When the entry for the check displays in the register, press Esc to close the Go To window.
![]() Right-click the register entry.
Right-click the register entry.
![]() Click Void [check type] -Check on the pop-up menu (where [check type] represents the type of check you are deleting—in this example, it’s a bill payment). The check amount switches to 0 and VOID displays in the memo area.
Click Void [check type] -Check on the pop-up menu (where [check type] represents the type of check you are deleting—in this example, it’s a bill payment). The check amount switches to 0 and VOID displays in the memo area.
![]() Click the Record button.
Click the Record button.

Void a Check from a Previous Year
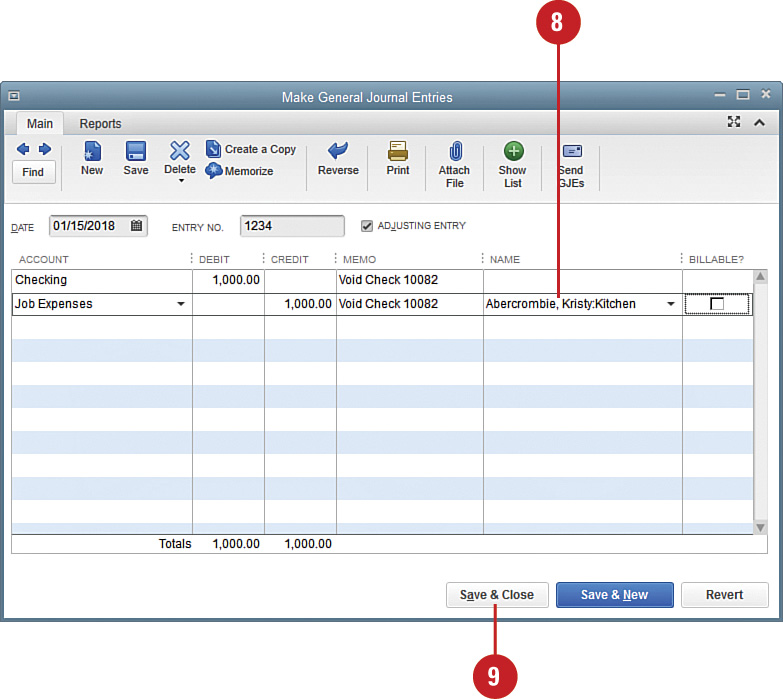
![]() Select Company, Make General Journal Entries.
Select Company, Make General Journal Entries.
![]() Enter today’s date (or the date on which the check became void).
Enter today’s date (or the date on which the check became void).
![]() Enter the name of the cash account on which the check to be voided was drawn.
Enter the name of the cash account on which the check to be voided was drawn.
![]() Enter the amount of the check in the Debit column.
Enter the amount of the check in the Debit column.
![]() Enter the phrase Void Check [check number] in the Memo field where [check number] is the number of the check you are voiding.
Enter the phrase Void Check [check number] in the Memo field where [check number] is the number of the check you are voiding.
![]() Enter the name of the account to which the check was originally charged.
Enter the name of the account to which the check was originally charged.
![]() Verify the amount that displays in the Credit column.
Verify the amount that displays in the Credit column.

![]() Enter the Customer:Job name if applicable.
Enter the Customer:Job name if applicable.
![]() Click Save & Close to save the transaction and close the window.
Click Save & Close to save the transaction and close the window.
![]() Follow Steps 1–7 from the previous task to open the register and find the check you want to void.
Follow Steps 1–7 from the previous task to open the register and find the check you want to void.
![]() Do not change the amount of the check! In the Memo field, type VOID [on date] and enter the date on which you created the journal entry.
Do not change the amount of the check! In the Memo field, type VOID [on date] and enter the date on which you created the journal entry.
![]() Click the Record button.
Click the Record button.
See Also
See “Closing Financial Records at Year-End” on page 333 for information on setting a year-end close date and making changes after that date has passed.
Did You Know?
QuickBooks handles voided checks differently in a closed period. If you void a check in a closed period (i.e., a closing date was set), then QuickBooks might make the appropriate journal entries automatically. If the check you are voiding is only associated with an expense account, QuickBooks voids the check and enters the journal entries in the current and closed periods.
However, if the check to be voided was for nonexpense accounts or items, QuickBooks voids the check but does not make any journal entries. Examples include checks using items, bill payments, paychecks, payroll liability payments, and sales tax payments. Special consideration should be made before voiding checks in closed periods.