
13. Data Backup and Security
What You’ll Do
Back Up Your QuickBooks Company File
Use the QuickBooks Online Backup Service
Add or Edit the Administrator Password
Add New or Edit Existing Users
Close Financial Records at Year-End
Create a Closing Date Exception Report
Introduction
Few things are more precious than your company’s financial data. Don’t rely on luck to protect your QuickBooks information. Take advantage of the various levels of security protection that QuickBooks offers, from password protection of sensitive areas of your data to offsite backup protection and everything in between. QuickBooks provides plenty of tools you can use to make sure your data is safe.
In addition to the availability of good storage and backup procedures, QuickBooks users have access to a multilevel security system within the program. The QuickBooks security system enables you to protect sensitive data from the eyes of unauthorized personnel. In addition, you can protect your data from being changed by unauthorized users. You can also set a password-protected closing date so that no company transactions from before the closing date can be changed without the permission of someone with access to the password.
Backing Up Your QuickBooks Company File
A backup is an exact copy of your company data file. Every prudent businessperson should ensure that a functioning backup system is in place. However, if you are using an automated backup system, you should still run a test of your backup process to confirm that the QuickBooks backup is functioning properly. If you instead back up specific files individually, these steps demonstrate how to back up just your company’s QuickBooks information. Consider backing up frequently and keeping a copy of your backed-up data somewhere off your company premises. For this example, you save your backup file to a USB thumb drive (portable storage device). An online backup procedure is presented later in this chapter.
![]() Select File, Create Copy (or Backup Company).
Select File, Create Copy (or Backup Company).
![]() Click Backup Copy.
Click Backup Copy.
![]() Click Next.
Click Next.

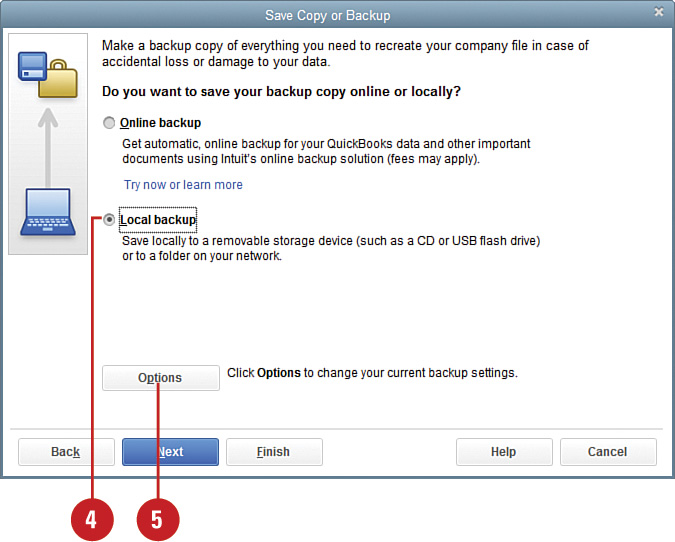
![]() Select Local Backup.
Select Local Backup.
![]() Click Options.
Click Options.
Did You Know?
There are multiple options for saving your QuickBooks file. Pick the right one for your needs. The Backup Copy option is best for safe storage of your data. Use the Portable Company File option only if you need to email your data or move it from one computer to another. The Accountant’s Copy is a specific file backup format that enables your accountant to make changes to your data while you continue your day-to-day transaction entry.
![]() Browse to the file location where you want your backup to be stored.
Browse to the file location where you want your backup to be stored.
![]() Check here if you want QuickBooks to include the backup date and time in the backup filename (recommended).
Check here if you want QuickBooks to include the backup date and time in the backup filename (recommended).
![]() Check here to limit how many backup copies are allowed in one folder.
Check here to limit how many backup copies are allowed in one folder.
![]() If you want to receive backup reminders, check the box and enter the frequency with which you want to be reminded.
If you want to receive backup reminders, check the box and enter the frequency with which you want to be reminded.
![]() Choose a verification option. QuickBooks recommends that you let the program completely verify the integrity of your data when you back up.
Choose a verification option. QuickBooks recommends that you let the program completely verify the integrity of your data when you back up.
![]() Click OK.
Click OK.

![]() If you are backing up your data to the same computer drive as your original data, you might receive a warning recommending that you select another computer location. Click Change Location or Use this Location (not shown). Click OK (not shown).
If you are backing up your data to the same computer drive as your original data, you might receive a warning recommending that you select another computer location. Click Change Location or Use this Location (not shown). Click OK (not shown).
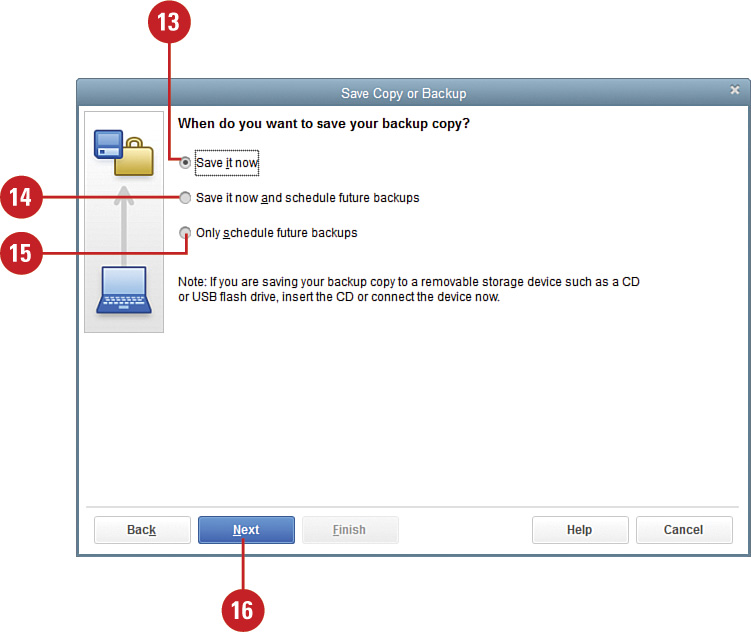
![]() Click Save It Now to save your file now.
Click Save It Now to save your file now.
![]() Click here if you want save it now and schedule future backups.
Click here if you want save it now and schedule future backups.
![]() Click here to only schedule future backups.
Click here to only schedule future backups.
![]() Click Next.
Click Next.
![]() Verify the location where this file will be saved.
Verify the location where this file will be saved.
![]() Verify that the filename that displays is the name you want to use for this backup. Make changes if necessary.
Verify that the filename that displays is the name you want to use for this backup. Make changes if necessary.
![]() Click Save to perform the backup procedure.
Click Save to perform the backup procedure.

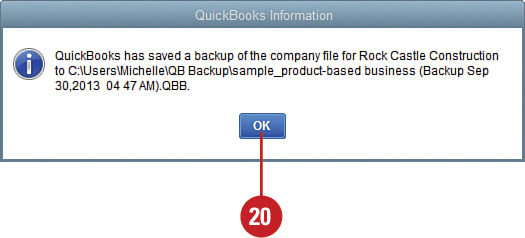
![]() Click OK when the process is completed.
Click OK when the process is completed.
What Type of Backup Should I Create?
![]() The file cannot be opened first without being restored. To restore a backup file, click File, Open or Restore Company and select the Restore a Backup Copy option.
The file cannot be opened first without being restored. To restore a backup file, click File, Open or Restore Company and select the Restore a Backup Copy option.
![]() Once restored, the file extension becomes .QBW.
Once restored, the file extension becomes .QBW.
![]() Changes made to a restored version of this file type cannot be merged later into the original data file.
Changes made to a restored version of this file type cannot be merged later into the original data file.
![]() The compressed file size makes a .QBM a perfect choice for attaching to an email or when moving from one computer location to another.
The compressed file size makes a .QBM a perfect choice for attaching to an email or when moving from one computer location to another.
![]() The file type does not replace a .QBB backup because it lacks some of the needed transaction logs.
The file type does not replace a .QBB backup because it lacks some of the needed transaction logs.
![]() The file cannot be opened until it is restored. To restore a portable company file, click File, Open or Restore Company and select Restore a Portable File.
The file cannot be opened until it is restored. To restore a portable company file, click File, Open or Restore Company and select Restore a Portable File.
![]() Once restored, the file extension becomes .QBW.
Once restored, the file extension becomes .QBW.
![]() Changes made to a restored version of this file type cannot be merged later into the original data file.
Changes made to a restored version of this file type cannot be merged later into the original data file.
![]() This file type is created by the business owner and enables your accountant to review and make needed changes to your data while you continue recording your day-to-day transactions in the file at your office.
This file type is created by the business owner and enables your accountant to review and make needed changes to your data while you continue recording your day-to-day transactions in the file at your office.
![]() Any changes or additions your accountant makes can be imported (merged) into your company’s data file.
Any changes or additions your accountant makes can be imported (merged) into your company’s data file.
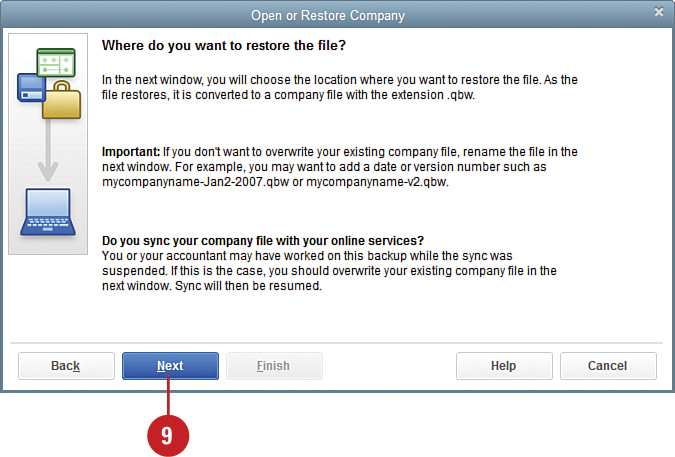
Restoring Backed-Up Information
If your company’s QuickBooks file has been damaged or you replaced your computer, you need to restore your company’s QuickBooks file from the most recent backup. Note that all transactions entered in QuickBooks since the last time you backed up your file need to be re-entered.
![]() Select File, Open or Restore Company.
Select File, Open or Restore Company.
![]() Choose Restore a Backup Copy.
Choose Restore a Backup Copy.
![]() Click Next.
Click Next.

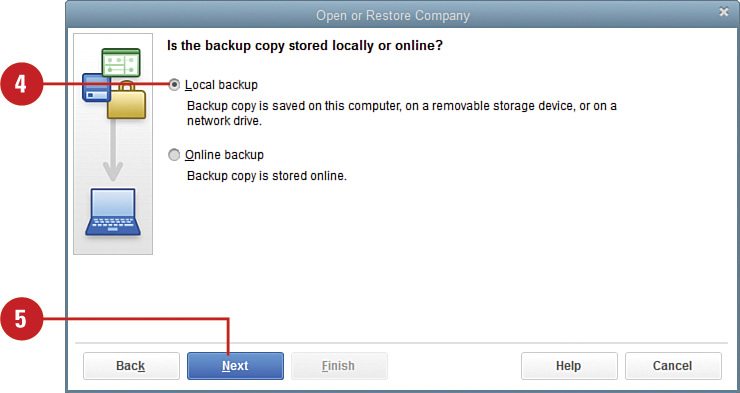
![]() Choose Local Backup.
Choose Local Backup.
![]() Click Next.
Click Next.
![]() Browse to the folder where you want to store your data backup.
Browse to the folder where you want to store your data backup.
![]() Accept or edit the default filename.
Accept or edit the default filename.
![]() Click Open.
Click Open.

![]() Verify the name of the company file you want to restore.
Verify the name of the company file you want to restore.
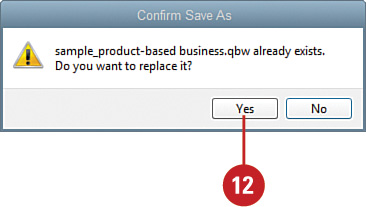
![]() Click Save to begin the restoration process.
Click Save to begin the restoration process.

![]() Click Yes to accept the overwrite of any data currently stored on your computer. (Be sure this is what you want to do—it is irreversible.)
Click Yes to accept the overwrite of any data currently stored on your computer. (Be sure this is what you want to do—it is irreversible.)
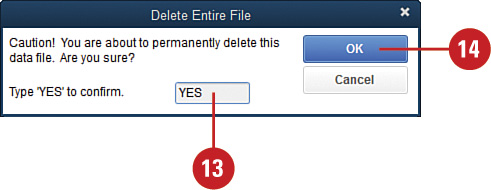
![]() Type the word YES to verify that you want to continue with the restoration process. (Again, be sure this is what you want to do—it is irreversible.)
Type the word YES to verify that you want to continue with the restoration process. (Again, be sure this is what you want to do—it is irreversible.)
![]() Click OK.
Click OK.
![]() Click OK again (not shown).
Click OK again (not shown).
Did You Know?
Consider enforcing a procedure whereby QuickBooks users at your company use checklists to show which transactions they enter and when the entries are made. With this type of system in place, you easily can see which entries need to be re-entered in the event of a system crash and subsequent restoration of backup. This checklist method is particularly useful for smaller companies that don’t have a lot of transactions to track. Larger companies, particularly companies using QuickBooks on a multiuser system with several users, should perform a nightly backup.
Using the QuickBooks Online Backup Service
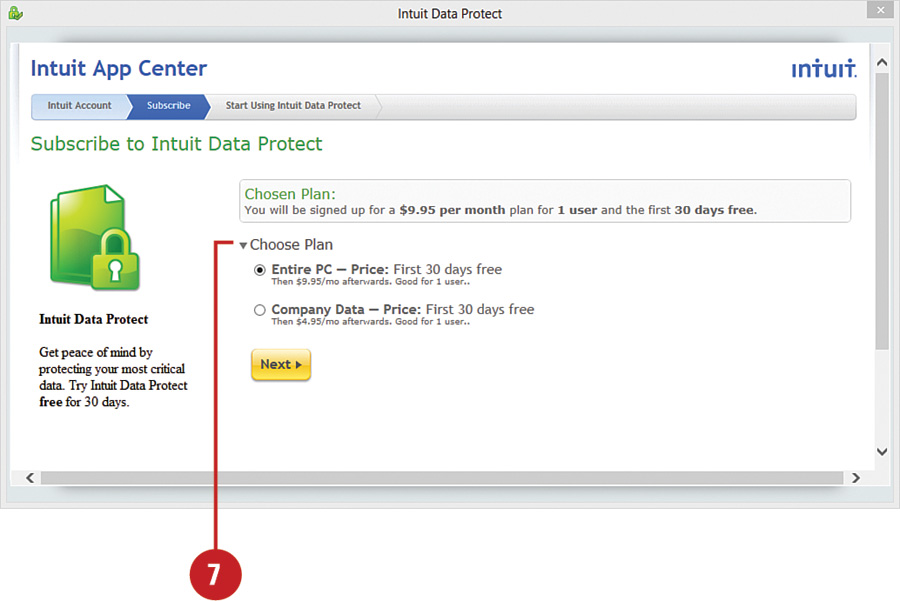
For an added measure of security, you can take advantage of Intuit’s online data backup service. This fee-based service provides an offsite location for your backup. The online backup service starts at $4.95 per month, and different levels of backup service are available. The Intuit backup service includes bank-level data security encryptions and safeguards. Files that have been backed up online can be downloaded at any time and onto the same or a different computer from which they were backed up. Intuit offers a free 30-day trial of this service.
![]() Select File, Create Copy or Back Up Company.
Select File, Create Copy or Back Up Company.
![]() Click the Backup Copy option.
Click the Backup Copy option.
![]() Click Next.
Click Next.

![]() Choose Online Backup.
Choose Online Backup.
![]() Click Next to be taken directly to the QuickBooks Online Backup utility.
Click Next to be taken directly to the QuickBooks Online Backup utility.

Did You Know?
Intuit’s service isn’t the only online backup service available. Many companies offer online backup services. Your company might already have such a service in place for files other than QuickBooks. Explore the Internet, ask for referrals from computer users you trust, and find out what other services are available.
![]() You might see a message telling you that QuickBooks is going to launch your web browser (not shown). Click OK if this message displays.
You might see a message telling you that QuickBooks is going to launch your web browser (not shown). Click OK if this message displays.
![]() If you are new to the backup service, read about the backup services and pricing options that are displayed. Then click on the option you want to use. Follow the onscreen instructions to start using this feature.
If you are new to the backup service, read about the backup services and pricing options that are displayed. Then click on the option you want to use. Follow the onscreen instructions to start using this feature.
Adding or Editing the Administrator Password
QuickBooks provides a login and password system that enables you to restrict which users can view and change your company’s financial information. To take advantage of this security system, you must first designate someone as the administrator. The person with administrative rights has the right to view all company records, make changes to any existing transactions, and create a closing date password. You can indicate the number of users for your company during the EasyStep Interview. When you first go to the Set Up Users screen, you are asked to establish the administrator password.
![]() Select Company, Set Up Users and Passwords; then choose Set Up Users. Note that this task is for first-time setup of the administrator password.
Select Company, Set Up Users and Passwords; then choose Set Up Users. Note that this task is for first-time setup of the administrator password.

![]() Note the name for the administrator. Admin has already been entered (not shown). Although it is possible to change the name of the administrator, this isn’t recommended.
Note the name for the administrator. Admin has already been entered (not shown). Although it is possible to change the name of the administrator, this isn’t recommended.
![]() Select the Admin user list item and choose Edit User on the right (not shown).
Select the Admin user list item and choose Edit User on the right (not shown).
![]() Enter a password for the administrator. It can be no more than 16 characters and can include spaces. Note that the password is case sensitive.
Enter a password for the administrator. It can be no more than 16 characters and can include spaces. Note that the password is case sensitive.
![]() Enter the password again.
Enter the password again.
![]() Select a Challenge Question from the drop-down menu.
Select a Challenge Question from the drop-down menu.
![]() Type the Challenge Answer.
Type the Challenge Answer.
![]() Click Next.
Click Next.

![]() Click Finish (not shown).
Click Finish (not shown).
Did You Know?
Each user, including the administrator, should have a separate username. For the best security, the Admin username should only be used for Admin tasks. By assigning a separate username to each user, including the administrator, and requiring users to sign in with their own usernames, it becomes easy to trace who performed which tasks.
Adding New or Editing Existing Users
After you set up the administrator’s password access for your QuickBooks company file, you’re ready to set up (or edit) the individual users and assign their rights for accessing and changing information. You can set a separate password for each user; you can assign separate rights to each user as well. Each user can create a password, or you can have the administrator assign passwords to each user. In any case, only a person logged in as the administrator has the right to initiate the setup of users.
Add a New User or Edit an Existing User
![]() Select Company, Set Up Users and Passwords; then choose Set Up Users. (Note: The User List will already be open if you just finished setting up an administrator password in the previous task. In that case, you can skip this step.)
Select Company, Set Up Users and Passwords; then choose Set Up Users. (Note: The User List will already be open if you just finished setting up an administrator password in the previous task. In that case, you can skip this step.)
![]() Click Add User or Edit User.
Click Add User or Edit User.

![]() Enter a name for this user.
Enter a name for this user.
![]() Enter a password (or have the user enter a password).
Enter a password (or have the user enter a password).
![]() Re-enter the password.
Re-enter the password.
![]() If you are adding another user, check the box to add this user to the QuickBooks license.
If you are adding another user, check the box to add this user to the QuickBooks license.
![]() Click Next.
Click Next.

Important
You can also choose to delete a user. Rest assured that even though you have deleted the user, the Audit Trail will continue to reflect the removed user on the transactions that were created or modified by that user.
Did You Know?
Only the administrator can set up new users. You must be logged in as Admin to enter new users in your QuickBooks file.
Assign All Rights
![]() Click All Areas of QuickBooks if this user is to have the ability to access and make changes in all areas of the program.
Click All Areas of QuickBooks if this user is to have the ability to access and make changes in all areas of the program.
![]() Click Next.
Click Next.
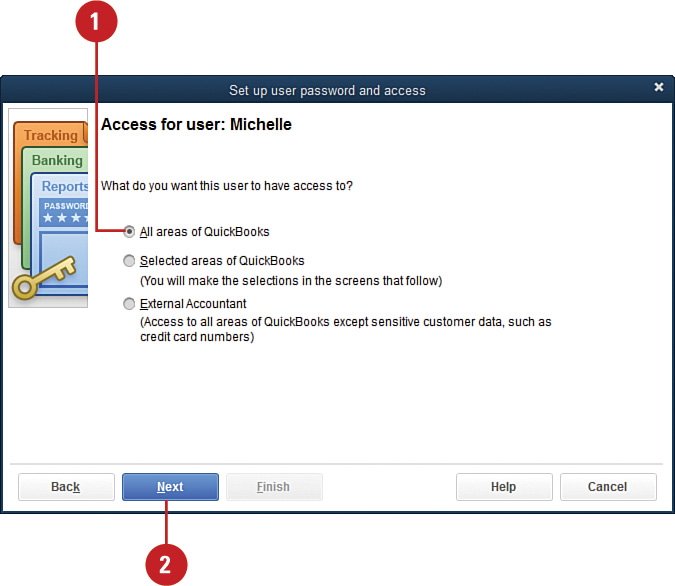
![]() Click Yes.
Click Yes.

![]() Click Finish.
Click Finish.

Important
Verify that the correct rights have been assigned. After assigning user rights, the person setting up the users should log in as the new user and verify that the correct privileges and rights have been assigned.
Did You Know?
Adding features might require adjustments to user rights. If you turn on certain features in QuickBooks after you set up users, you might need to revise the users’ rights. For example, if you turn on Inventory after you assign user rights, your users won’t automatically have access to inventory features, even if you gave a user access to all rights. Use the same procedure to edit existing users and add permissions as needed.
Did You Know?
Many preferences are user-specific. After new users have been set up, the administrator might want to log in as each user and go to the Preferences window (Edit, Preferences) to adjust settings in the My Preferences areas.
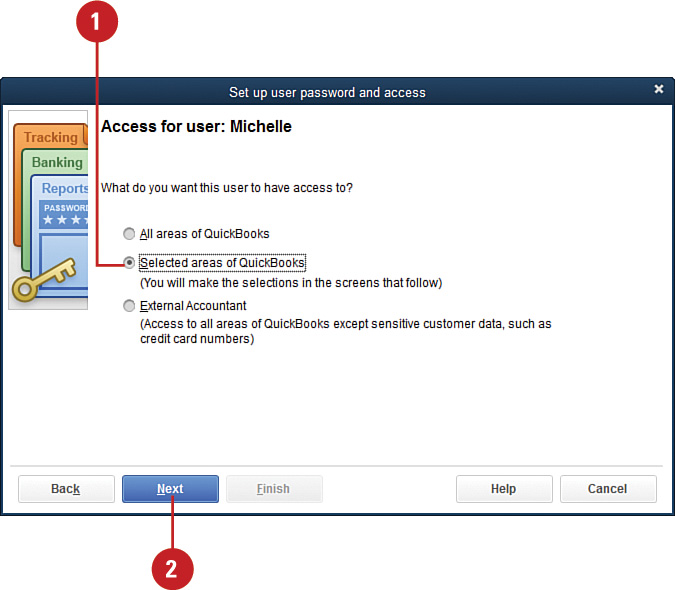
Assign Selected Rights
![]() As an alternative to assigning all rights, as described in the previous task, you can identify which areas of the program the user can access. After assigning a username and password, choose Selected Areas of QuickBooks to designate specific areas of the program to which this user will have rights.
As an alternative to assigning all rights, as described in the previous task, you can identify which areas of the program the user can access. After assigning a username and password, choose Selected Areas of QuickBooks to designate specific areas of the program to which this user will have rights.
![]() Click Next.
Click Next.
![]() For each area of the program, indicate the level of access the user has by choosing No Access, Full Access, or Selective Access.
For each area of the program, indicate the level of access the user has by choosing No Access, Full Access, or Selective Access.
![]() If you chose Selective Access, click an option to indicate whether the user has the right to create transactions, create and print transactions, or create transactions and reports.
If you chose Selective Access, click an option to indicate whether the user has the right to create transactions, create and print transactions, or create transactions and reports.
![]() Click Next and work through the eight sections to assign the appropriate access. If you are not sure what access to assign to a user, set the access level and then log in as that user and attempt to modify an area you want to deny access to.
Click Next and work through the eight sections to assign the appropriate access. If you are not sure what access to assign to a user, set the access level and then log in as that user and attempt to modify an area you want to deny access to.

Did You Know?
Do you want to control your file so that your accountant cannot view customer credit card numbers, or add or modify user settings? Create a username for your accountant and assign the External Accountant user type. All other privileges are afforded the External Accountant user.
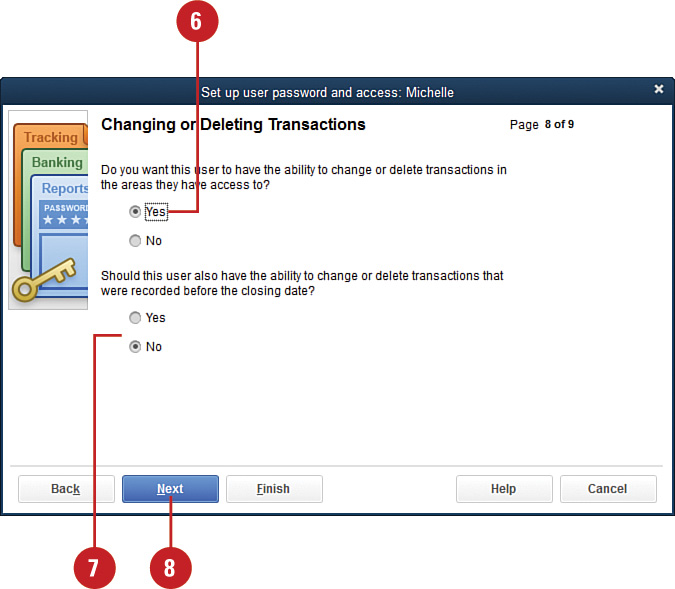
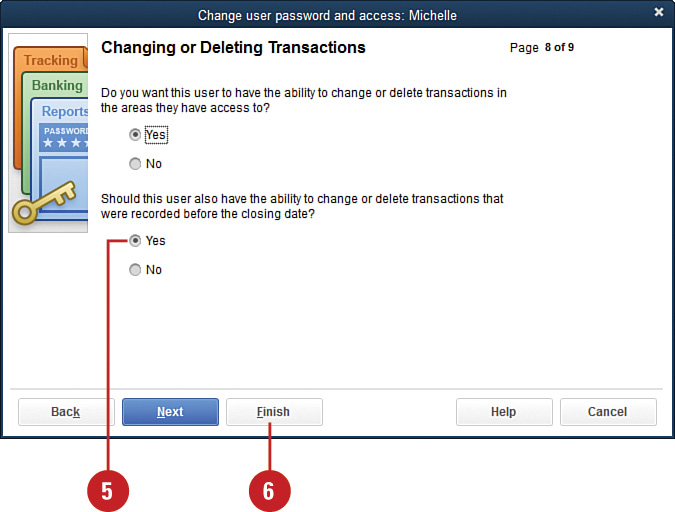
![]() On Page 8 of 9, indicate whether the user has the right to change and delete transactions in the areas to which access has been assigned.
On Page 8 of 9, indicate whether the user has the right to change and delete transactions in the areas to which access has been assigned.
![]() Indicate whether the user has the right to change and delete transactions that occurred prior to the company’s closing date (addressed later in this chapter).
Indicate whether the user has the right to change and delete transactions that occurred prior to the company’s closing date (addressed later in this chapter).
![]() Click Next.
Click Next.
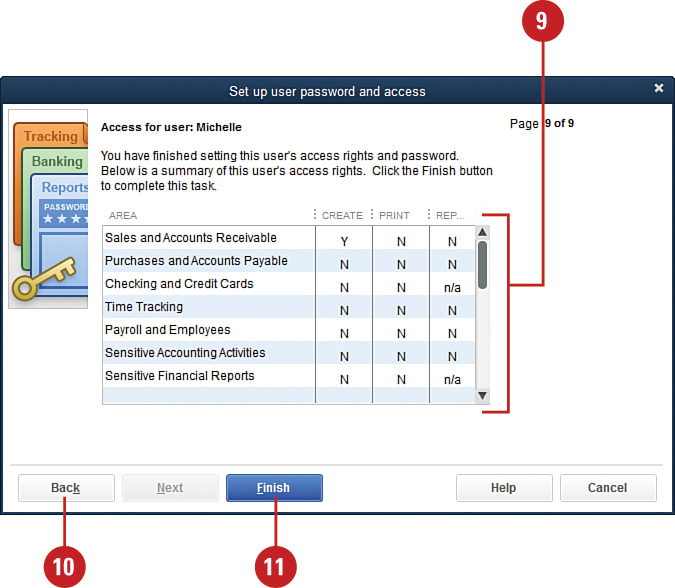
![]() Verify all the access rights that have been assigned to this user.
Verify all the access rights that have been assigned to this user.
![]() Click Back to return to a previous page and make changes.
Click Back to return to a previous page and make changes.
![]() Click Finish to complete the setup of this user’s rights.
Click Finish to complete the setup of this user’s rights.
Did You Know?
Additional security controls exist in the QuickBooks Enterprise Solutions. If you are using the Enterprise Solutions software, you’ll find that there are additional options for setting security access. The access levels for each user can be set on individual reports and accounts to allow or disallow these options in any combination: View, Create, Modify, Delete, or Print.
Closing Financial Records at Year-End
“Closing the books” is an option in QuickBooks, not a requirement. If you want to continue to permit changes to transactions from previous accounting cycles, such as the year just ended or an earlier year, you can ignore the option for setting a closing date. If you want to ensure that your year-end final numbers on your reports remain final, follow the steps in this example to set and protect your company’s closing date.
Set the Closing Date
![]() Select Edit, Preferences.
Select Edit, Preferences.
![]() Select the Accounting preference.
Select the Accounting preference.
![]() Click the Company Preferences tab.
Click the Company Preferences tab.
Timesaver
If your User List window is already open, just click the Closing Date button and the Preferences window opens to the Accounting Company Preferences screen.
![]() Click the Set Date/Password button.
Click the Set Date/Password button.
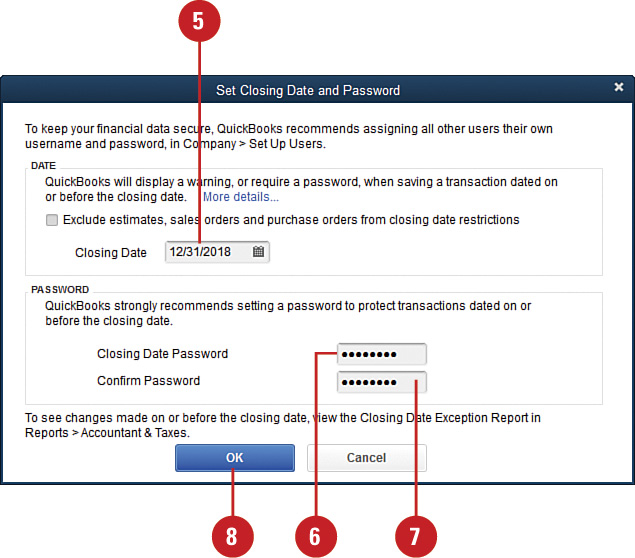
![]() Enter a closing date.
Enter a closing date.
![]() Enter a password. You are limited to 16 characters, including spaces. Note that the password is case sensitive.
Enter a password. You are limited to 16 characters, including spaces. Note that the password is case sensitive.
![]() Re-enter the password.
Re-enter the password.
![]() Click OK.
Click OK.
![]() Click OK to close the Preferences window.
Click OK to close the Preferences window.

Did You Know?
Closing dates make your outside accountant happy. By setting a closing date and assigning a password, your accountant can be assured that the numbers he or she is reviewing at the end of the year will not change.
User Access to Pre-Closing Date Transactions
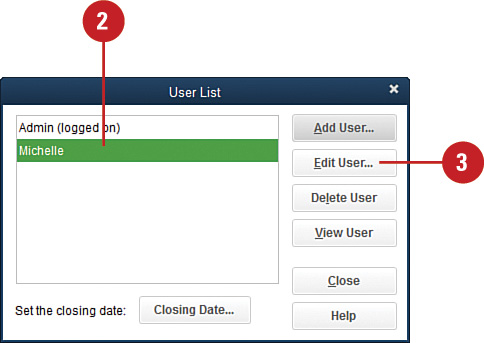
![]() Select Set Up Users and Passwords, Set Up Users from the Company menu.
Select Set Up Users and Passwords, Set Up Users from the Company menu.
![]() Click a user’s name.
Click a user’s name.
![]() Click the Edit User button.
Click the Edit User button.
![]() Click Next until you get to the Changing or Deleting Transactions screen (not shown).
Click Next until you get to the Changing or Deleting Transactions screen (not shown).
![]() Indicate whether this user will have the right to change or delete transactions before the closing date.
Indicate whether this user will have the right to change or delete transactions before the closing date.
![]() Click Finish.
Click Finish.
See Also
See the next task, “Creating a Closing Date Exception Report,” for information on viewing a report that displays all the changes made to company records after the closing date.
Creating a Closing Date Exception Report
If you use the closing date feature in QuickBooks, you want to take advantage of the opportunity to produce a report that shows changes to the closed accounts. The Closing Date Exception report shows changes to the closed periods. This report displays all transactions dated on or before the closing date that were modified or entered after the closing date was established. This report is only available in QuickBooks Premier and higher editions of QuickBooks.
![]() From the Reports menu, select Accountant & Taxes, Closing Date Exception Report.
From the Reports menu, select Accountant & Taxes, Closing Date Exception Report.

Timesaver
Alternatively, choose Report Center from the Reports menu.
![]() Scroll through the report to see all the transactions.
Scroll through the report to see all the transactions.
![]() Double-click any amount to see the actual transaction.
Double-click any amount to see the actual transaction.

Important
You must first set a closing date in your QuickBooks data file before changes to transactions dated on or before the closing date will be tracked.
Did You Know?
You can find out who made the post-closing date transaction. Note that the Last Modified By column shows which user entered the transaction during the closed period.