
16. Recording Owners’ Equity
What You’ll Do
Understand the Opening Balance Equity Account
Enter Prior Period Adjustments
View Transactions in Retained Earnings Account
Introduction
When describing different types of accounts, the phrase net worth is often applied to the sum of a company’s equity accounts. If you add up all the value of the company’s assets (items the company owns) and then subtract the company’s liabilities (amounts owed to others), you are left with the net worth of the company, or its equity.
Although you can take a shortcut to determine net worth by subtracting liabilities from assets, for a true understanding of net worth, you need to examine the actual accounts that make up the equity section of your company’s balance sheet.
If your company is a corporation, you have a capital stock account that shows the face value, or par value, of stock shares the company has issued. In addition, you have a paid-in capital account, which is calculated by taking the difference between the amount actually paid for your company’s stock and the par value.
Capital accounts—including retained earnings, owner’s capital, and draw accounts—represent the cumulative net earnings of the company, less any sharing of earnings that has already been paid to owners. Each year the company’s capital account is increased by the company’s net income and decreased by a variety of items, including the company’s net loss for the year, dividends, or other withdrawals paid to shareholders or owners.
An equity account unique to QuickBooks is called the opening balance equity account. Because QuickBooks is a double-entry bookkeeping program—meaning that for every number you enter, there is an offsetting number of the same amount in another account—and because QuickBooks enables you to enter numbers without identifying where the offsetting number is to be entered, the opening balance equity account exists. This account provides a temporary resting place for entries you make that have only one side. The existence of this account enables QuickBooks users who are not accountants to enter beginning balances in accounts without having to know the offsetting entry. In this chapter, you learn how to understand the numbers in the opening balance equity account and how these amounts should be handled when you prepare your financial statements.
Understanding the Opening Balance Equity Account
Say, for example, that you enter an opening balance of $5,000 when you set up your cash account. QuickBooks puts $5,000 into your cash account, but it doesn’t know where the offset of that $5,000 should go, so off it goes to the opening balance equity account.
Examine the Opening Balance Equity Account
![]() View the contents of your opening balance equity account by pressing Ctrl+A to open your Chart of Accounts.
View the contents of your opening balance equity account by pressing Ctrl+A to open your Chart of Accounts.
![]() Scroll down until you see the Opening Balance Equity account.
Scroll down until you see the Opening Balance Equity account.
![]() Click to select the account name.
Click to select the account name.
![]() Click the Reports button.
Click the Reports button.
![]() Select QuickReport: Opening Bal Equity.
Select QuickReport: Opening Bal Equity.

Timesaver
You can quickly access the opening balance equity account from the Chart of Accounts screen by clicking the Opening Bal Equity account description, and then pressing Ctrl+Q. Ctrl+Q opens a QuickReport for whatever account is highlighted on the Chart of Accounts.
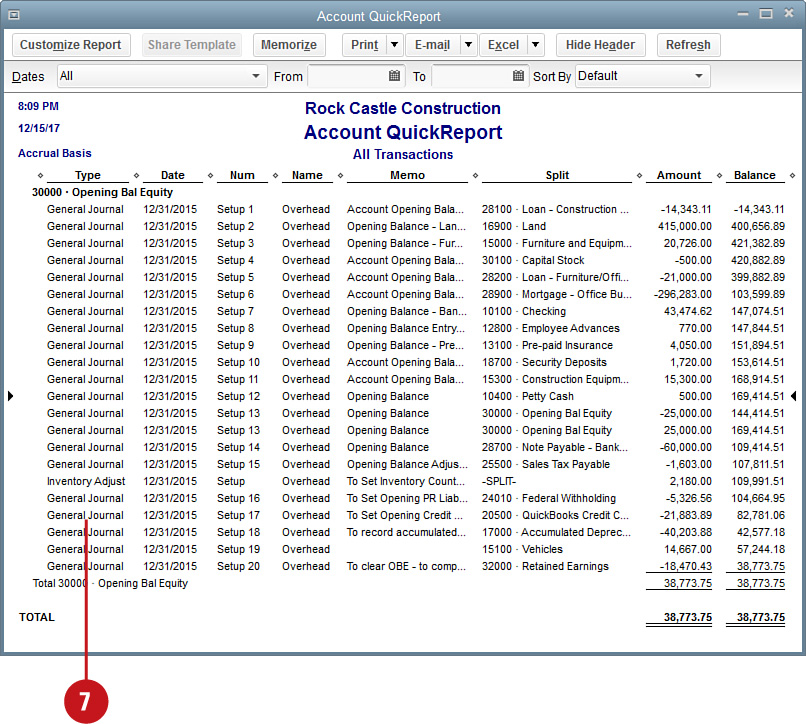
![]() Examine the report to determine in which accounts these amounts really belong. Typically, the amounts in the opening balance equity account belong in your company’s retained earnings or other ownership equity account.
Examine the report to determine in which accounts these amounts really belong. Typically, the amounts in the opening balance equity account belong in your company’s retained earnings or other ownership equity account.
![]() Double-click any entry on the report to see the source of the entry.
Double-click any entry on the report to see the source of the entry.
![]() Enter the date for this journal entry. The opening balance equity account should generally have a zero balance. If it doesn’t, be sure to create a transaction to clear any balance in this account before preparing financials.
Enter the date for this journal entry. The opening balance equity account should generally have a zero balance. If it doesn’t, be sure to create a transaction to clear any balance in this account before preparing financials.
![]() Type Opening Bal Equity as the first account name.
Type Opening Bal Equity as the first account name.
![]() Enter as either a debit or credit, depending on your own account balance, the amount necessary to clear the Opening Balance Equity account.
Enter as either a debit or credit, depending on your own account balance, the amount necessary to clear the Opening Balance Equity account.
![]() Enter a brief memo description.
Enter a brief memo description.
![]() Enter the account(s) to which you will transfer the amounts in the Opening Balance Equity account.
Enter the account(s) to which you will transfer the amounts in the Opening Balance Equity account.
![]() Click one of the Save options.
Click one of the Save options.

![]() Your Opening Balance Equity account now has a zero balance and will not appear on financial statements.
Your Opening Balance Equity account now has a zero balance and will not appear on financial statements.

Did You Know?
There’s a shortcut for clearing the balance in the Opening Balance Equity account. Instead of creating a general journal entry, double-click the Opening Balance Equity account name in the Chart of Accounts list. The register for the account displays. Make a new entry in the register by entering an amount to increase or decrease the account balance. You just select an offsetting account for this entry. Most likely, the offsetting account will be your company’s Retained Earnings account.


Recording Owners’ Distributions
When owners take money out of a company that is not a corporation, the money is classified as a loan, distribution, or draw. A distribution account is an owner account that is increased by the earnings of the company and decreased by the amount of money the owner takes out of the company. For these entities, you need to set up a distribution account for each owner. You might want to create a master equity account for all owners and then a subaccount under the master account for each individual owner’s distribution.
Set Up a Distribution Account
![]() Press Ctrl+A to open the Chart of Accounts.
Press Ctrl+A to open the Chart of Accounts.
![]() Press Ctrl+N to open the Add New Account window.
Press Ctrl+N to open the Add New Account window.
![]() Select Equity from the Account Type options.
Select Equity from the Account Type options.
![]() Click Continue.
Click Continue.

![]() Enter a name for the account.
Enter a name for the account.
![]() Indicate whether this is to be a subaccount of another account.
Indicate whether this is to be a subaccount of another account.
![]() Enter an optional description.
Enter an optional description.
![]() Click one of the Save buttons to save the account.
Click one of the Save buttons to save the account.

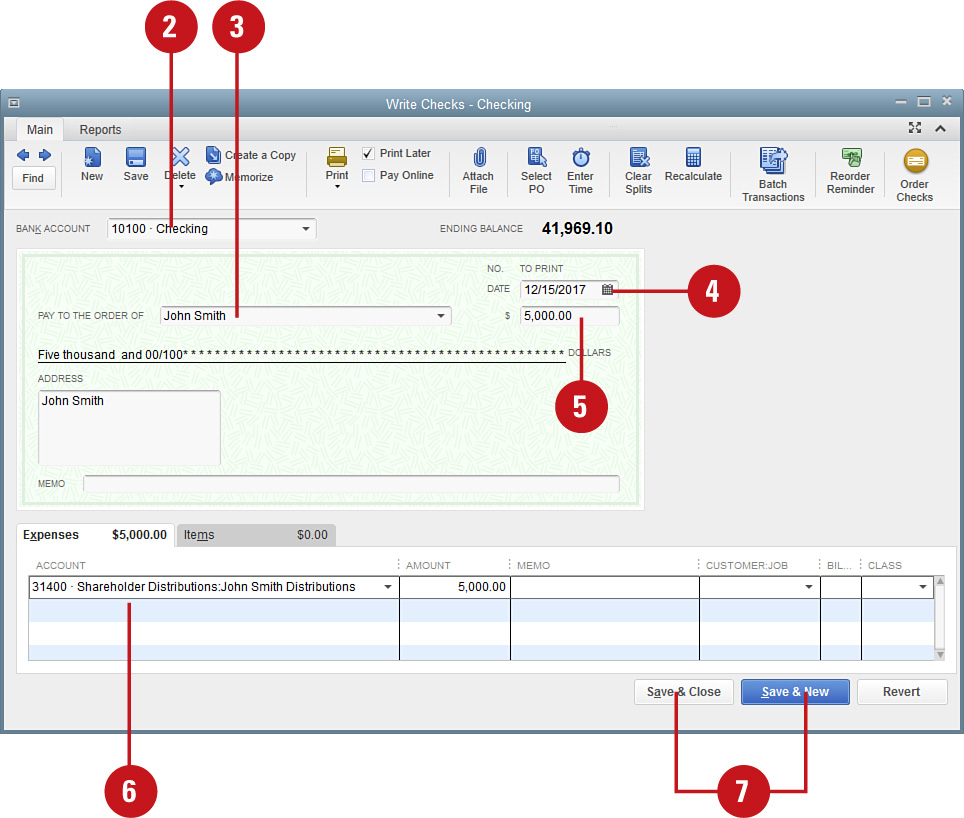
![]() Verify that the correct cash account displays.
Verify that the correct cash account displays.
![]() Enter the name of the owner who is withdrawing money from the company.
Enter the name of the owner who is withdrawing money from the company.
![]() Enter the date.
Enter the date.
![]() Enter the amount.
Enter the amount.
![]() Enter the owner’s distribution account.
Enter the owner’s distribution account.
![]() Click a Save option.
Click a Save option.
Entering Prior Period Adjustments
After you issue your company’s financial statements for the year, you’re not supposed to go back and change the numbers. Shareholders and investors have the right to assume that your financial statements provide final numbers for the year and that those numbers won’t change at some point in the future. But what if the numbers really do change? What if some unforeseen information that invalidates some of the information on the financial statements comes in after the financial statements have been issued? Or what if you simply made a material mistake on last year’s financials? Accounting rules permit a company to enter the change on the current year’s financial statement by describing a prior period adjustment in the equity section of the balance sheet. Your balance sheet will show the balance in retained earnings at the beginning of the year, followed by the prior period adjustment to that balance. As for recording the adjustment in your QuickBooks file, you need to make a journal entry to correct the accounts. In this example, a change in the value of the ending inventory from the previous year has been discovered.
![]() Select Company, Make General Journal Entries.
Select Company, Make General Journal Entries.
![]() Enter the date when this adjustment occurred. The date will be a current year date, not a prior year date.
Enter the date when this adjustment occurred. The date will be a current year date, not a prior year date.
![]() Enter the accounts affected by the adjustment. (A capital account such as Prior Period Adjustments will be one of the affected accounts.)
Enter the accounts affected by the adjustment. (A capital account such as Prior Period Adjustments will be one of the affected accounts.)
![]() Enter the amount of the adjustment, offsetting the adjustment in the capital account.
Enter the amount of the adjustment, offsetting the adjustment in the capital account.
![]() Enter a memo that describes the fact that this is a prior period adjustment.
Enter a memo that describes the fact that this is a prior period adjustment.
![]() Click a Save option.
Click a Save option.

Did You Know?
Only one line of description is necessary. When entering general journal entries, the top line of the description automatically should carry through to all the lines of the journal entry. To activate (or deactivate) this feature, choose Edit, Preferences, Accounting, My Preferences, and check or uncheck the box for Autofill Memo in General Journal Entry.
Viewing Transactions in Retained Earnings Account
Retained Earnings is the account that represents the accumulated net earnings of your company. The amount in this account changes automatically as of the first day of each fiscal year. The total income less the total expenses for the prior year (net income) flows into this account. QuickBooks automatically closes all income and expense accounts on the last day of your fiscal year and places the company’s net income (or loss) in the Retained Earnings account. QuickBooks enables you or your accountant to view the information in your Retained Earnings account by producing a QuickReport. The automatic closing entry displays on the report with the description Closing Entry.
![]() Press Ctrl+A to open your Chart of Accounts.
Press Ctrl+A to open your Chart of Accounts.
![]() Click Retained Earnings to select the account.
Click Retained Earnings to select the account.
![]() Click the Reports button in the Chart of Accounts window.
Click the Reports button in the Chart of Accounts window.
![]() Select QuickReport: Retained Earnings.
Select QuickReport: Retained Earnings.

Timesaver
You can quickly access the Retained Earnings QuickReport by double-clicking Retained Earnings in the Chart of Accounts.
![]() Double-click any entry on the report (other than a closing entry) to see the detail of that transaction.
Double-click any entry on the report (other than a closing entry) to see the detail of that transaction.

Did You Know?
QuickBooks automatically prepares a year-end closing entry. At the end of each fiscal year, a closing entry is automatically made to your QuickBooks accounts, zeroing out all your income and expense accounts and offsetting the net income or loss to your Retained Earnings account. QuickBooks calculates this entry based on the amounts in your income and expense accounts. Double-clicking a closing entry in your Retained Earnings QuickReport does not produce a detailed report—you cannot view the details of this closing entry. However, you can bring up the information by viewing a Profit + Loss statement from the year of the closing.