Chapter 1: The Power of the Reactive Paradigm
This book is based entirely on useful reactive patterns in Angular applications. Reactive patterns are reusable solutions to a commonly occurring problem using reactive programming. Behind all of these patterns, there is a new way of thinking, new architecture, new coding styles, and new tools.
I know you are impatient to write your first reactive pattern in Angular, but before doing that, and to help you take full advantage of all the RxJS patterns and leverage the reactive paradigm, we will start by explaining, in detail, all the fundamentals. Additionally, we will prepare the groundwork for the following chapters. First, let's start with a basic understanding of the reactive paradigm, its advantages, and the problems it solves. And best of all, let's get into the reactive mindset and start thinking reactively.
We will begin by highlighting the pillars and the advantages of the reactive paradigm. Then, we will describe the relationship between Angular and RxJS. Finally, we will explain the Marble diagram and why it is useful.
Giving an insight into the fundamentals of the reactive paradigm is incredibly important. This will ensure you get the basics right, help you understand the usefulness of the reactive approach, and consequently, help you determine which situation it is best to use it in.
In this chapter, we're going to cover the following topics:
- Exploring the pillars of reactive programming
- Using RxJS in Angular and its advantages
- Learning about the marble diagram – our secret weapon
Technical requirements
This chapter does not require an environment setup or installation steps. All the code snippets here are just examples to illustrate the concepts. This book assumes that you have a basic understanding of Angular and RxJS.
Exploring the pillars of reactive programming
Let's begin with a little bit of background!
Reactive programming is among the major programming paradigms used by developers worldwide. Every programming paradigm solves some problems and has its own advantages. By definition, reactive programming is programming with asynchronous data streams and is based on observer patterns. So, let's talk about these pillars of reactive programming!
Data streams
Data streams are the spine of reactive programming. Everything that might change or happen over time (you don't know when exactly) is represented as a stream, such as data, events, notifications, and messages. Reactive programming is about reacting to changes as soon as they are emitted!
An excellent example of data streams is UI events. Let's suppose that we have an HTML button, and we want to execute an action whenever a user clicks on it. Here, we can think of the click event as a stream:
//HTML code
<button id='save'>Save</button>
//TS code
const saveElement = document.getElementById('save');
saveElement.addEventListener('click', processClick);
function processClick(event) {
console.log('Hi');
}
As implemented in the preceding code snippet, in order to react to this click event, we register an EventListener event. Then, every time a click occurs, the processClick method is called to execute a side effect. In our case, we are just logging Hi in the console.
As you might have gathered, to be able to react when something happens and execute a side effect, you should listen to the streams to become notified. We can say listen or observe to get closer to the reactive terminology. And this leads us to the observer design pattern, which is at the heart of reactive programming.
Observer patterns
The observer pattern is based on two main roles: a publisher and a subscriber.
A publisher maintains a list of subscribers and notifies them or propagates a change every time there is an update. On the other hand, a subscriber performs an update or executes a side effect every time they receive a notification from the publisher:
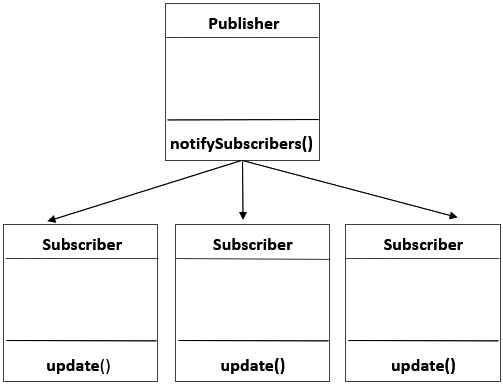
Figure 1.1 – The observer pattern
So, to get notified about any updates, you need to subscribe to the publisher. A real-world analogy would be a newsletter; you don't get any emails if you don't subscribe to a newsletter.
This leads us to the building blocks of RxJS. They include the following:
- Observables: These are a representation of the data streams that notify the observers of any change.
- Observers: These are the consumers of the data streams emitted by observables.
RxJS combines the observer pattern with the iterator pattern and functional programming to process and handle asynchronous events.
This was a reminder of the fundamentals of reactive programming. Remember, it is crucial to understand when to put a reactive implementation in place and when to avoid it.
In general, whenever you have to handle asynchronous tasks in your Angular application, always think of RxJS. The main advantages of RxJS over other asynchronous APIs are listed as follows:
- RxJS makes dealing with event-based programs, asynchronous data calls, and callbacks an easy task.
- Observables guarantee consistency. They emit multiple values over time so that you can consume continuous data streams.
- Observables are lazy; they are not executed until you subscribe to them. This helps with writing declarative code that is clean, efficient, and easy to understand and maintain.
- Observables can be canceled, completed, and retrieved at any moment. This makes a lot of sense in many real-world scenarios.
- RxJS provides many operators with a functional style to manipulate collections and optimize side effects.
- Observables push errors to the subscribers and provide a clean way to handle errors.
- RxJS allows you to write clean and efficient code to handle asynchronous data in your application.
Now that we have given some insight into the reactive programming pillars and detailed the major advantages of RxJS, let's shed some light on the relationship between Angular and RxJS.
Using RxJS in Angular and its advantages
RxJS is a first-class citizen in Angular. It is part of the Angular ecosystem and is used in many features to handle asynchronous operations. Primarily, this includes the following:
- HTTP client module
- Router module
- Reactive forms
- Event emitter
- Async pipe
We will discuss each of the following concepts in the subsequent subsections.
Note
We recommend taking a quick look at https://angular.io/docs. Here, you can find further details about the features mentioned earlier.
The HTTP client module
You might be familiar with the HTTP client API provided by Angular in order to communicate with your server over the HTTP protocol. The HttpClient service is based on observables to manage all transactions. This means that the result of calling the API methods (such as GET, PATCH, POST, or PUT) is an observable.
In the following code snippet, we have an example of an Angular service that injects the HttpClient service and fetches data from the server using the HttpClient.get() method:
Import { Injectable } from '@angular/core';
import { HttpClient } from '@angular/common/http';
import { Observable} from 'rxjs';
import { environment } from '@env/environment';
const BASE_PATH = environment.basePath;
@Injectable()
export class RecipesService {
constructor(private http: HttpClient) { }
getRecipes(): Observable<Recipe[]> {
return this.http.get<Recipe[]>(`${BASE_PATH}/recipes/search/all`);
}
The following is the content of the environment.ts file where we define the basePath property of our backend:
export const environment = {
basePath: '/app/rest',
production: false
};
The getRecipes() method or, to be more accurate, the call to this.http.get<Recipe>(`${BASE_PATH}/recipes/search`) returns an observable that you should subscribe to in order to issue the GET request to the server. Please note that this is an example of an HTTP transaction, and it is the same for all of the other HTTP methods available in the API (such as POST, PUT, and PATCH)
For those familiar with promise-based HTTP APIs, you might be wondering, in this case, what the advantages of using observables are.
Well, there are a lot of advantages but the most important ones are listed as follows:
- Observables are cancellable, so you can cancel the HTTP request whenever you want by calling the unsubscribe method.
- Also, you can retry HTTP requests when an error occurs or an exception is thrown.
- The server's response cannot be mutated by observables, although this can be the case when chaining then() to promises.
The router module
The router module, which is available in the @angular/router package, uses observables in router events and activated routes.
Router events
The router exposes events as observables. The router events allow you to intercept the navigation life cycle. The following list shows the sequence of router events:
- NavigationStart
- RouteConfigLoadStart
- RouteConfigLoadEnd
- RoutesRecognized
- GuardsCheckStart
- ChildActivationStart
- ActivationStart
- GuardsCheckEnd
- ResolveStart
- ResolveEnd
- ActivationEnd
- ChildActivationEnd
- NavigationEnd
- NavigationCancel
- NavigationError
- Scroll
Note
We recommend that you take a quick look at https://angular.io/api/router/Event. Here, you can find further details about the events and their order.
To intercept all the events that the router goes through, first, you should inject the Router service, which provides navigation and URL manipulation capabilities. Then, subscribe to the events observable available in the Router object, and filter the events of the RouterEvent type using the rxjs filter operator.
This is an example of an Angular service that injects the Router object in the constructor, subscribes to the router events, and just traces the event ID and path in the console. However, note that you can also introduce pretty much any specific behavior:
import { Injectable } from '@angular/core';
import { Router, RouterEvent } from '@angular/router';
import { filter } from 'rxjs/operators';
@Injectable()
export class CustomRouteService {
constructor(public router: Router) {
this.router.events.pipe(
filter(event => event instanceof RouterEvent)
).subscribe((event: RouterEvent) => {
console.log(`The current event is : ${event.id} |
event.url`);
});
}
}
You can filter any specific event by putting the target type. The following code example only filters the NavigationStart event and traces the event ID and path inside the console. However, you can also introduce pretty much any specific behavior:
import { Injectable } from '@angular/core';
import { NavigationStart, Router } from '@angular/router';
import { filter } from 'rxjs/operators';
@Injectable()
export class CustomRouteService {
constructor(public router: Router) {
this.router.events.pipe(
filter(event => event instanceof NavigationStart)
).subscribe((event: NavigationStart) => {
console.log(`The current event is : ${event.id} |
event.url`);
});
}
}
The majority of Angular applications have a routing mechanism. The router events change frequently over time, and it makes sense to listen to changes to execute the side effects. That's why observables are a flexible way in which to handle those streams.
The activated route
The ActivatedRoute class is a router service that you can inject into your components to retrieve information about a route's path and parameters. Many properties are based on observables. Here, you will find the contract (refers to the exposed methods and properties) of the activated route class:
class ActivatedRoute {
snapshot: ActivatedRouteSnapshot
url: Observable<UrlSegment[]>
params: Observable<Params>
queryParams: Observable<Params>
fragment: Observable<string | null>
data: Observable<Data>
outlet: string
component: Type<any> | string | null
routeConfig: Route | null
root: ActivatedRoute
parent: ActivatedRoute | null
firstChild: ActivatedRoute | null
children: ActivatedRoute[]
pathFromRoot: ActivatedRoute[]
paramMap: Observable<ParamMap>
queryParamMap: Observable<ParamMap>
toString(): string
}
As you might have gathered, url, params, queryParams, fragment, data, paramMap, and queryParamMap are represented as observables. Refer to the following list:
- url: This is an observable that holds the URL of the active route.
- params: This is an observable that holds the parameters of the active route.
- queryParams: This is an observable that holds the query parameters shared by all of the routes.
- fragment: This is an observable that holds the URL fragment shared by all the routes.
- data: This is an observable that holds the static and resolved data of the active route.
- paramMap: This is an observable that holds a map of the required parameters and the optional parameters of the active route.
- queryParamMap: This is an observable that holds a map of the query parameters available to all the routes.
All these parameters might change over time. Routes might share parameters, the parameters might have dynamic values, and it makes perfect sense to listen to those changes to register side effects or update the list of parameters.
Here's an example of an Angular component that injects the ActivatedRoute class in the constructor and subscribes, in the ngOnInit() method, to the following:
- The url property of activatedRoute, logging the URL in the console
- The queryParams property of activatedRoute in order to retrieve the parameter criteria and store it in a local property, named criteria:
import { Component, OnInit } from '@angular/core';
import { ActivatedRoute } from '@angular/router';
@Component({
selector: 'app-recipes',
templateUrl: './recipes.component.html'
})
export class RecipesComponent implements OnInit {
criteria: any;
constructor(private activatedRoute: ActivatedRoute)
{ }
ngOnInit() {
this.activatedRoute.url
.subscribe(url => console.log('The URL changed
to: ' + url));
this.activatedRoute.queryParams.subscribe(params
=> {
this.processCriteria(params.criteria);
});
}
processCriteria(criteria: any) {
this.criteria = criteria;
}
}
Reactive forms
Reactive forms available under the @angular/forms package are based on observables to track form control changes. Here's the contract of the FormControl class in Angular:
class FormControl extends AbstractControl {
//other properties here
valueChanges: Observable<any>
statusChanges: Observable<any>
}
The FormControl properties of valueChanges and statusChanges are represented as observables that trigger change events. Subscribing to a FormControl value change is a way of triggering application logic within the component class.
Here's an example of an Angular component that subscribes to the valueChanges of a FormControl property called rating and simply traces the value through console.log(value). In this way, each time, you will get the changed value as an output:
import { Component, OnInit } from '@angular/core';
import { FormGroup } from '@angular/forms';
@Component({
selector: 'app-recipes',
templateUrl: './recipes.component.html'
})
export class MyComponent implements OnInit {
form!: FormGroup;
ngOnInit() {
const ratingControl = this.form.get('rating');
ratingControl?.valueChanges.subscribe(
(value) => {
console.log(value);
}
);
}
}
The event emitter
The event emitter, which is part of the @angular/core package, is used to emit data from a child component to a parent component through the @Output() decorator. The EventEmitter class extends the RxJS subject and registers handlers for events emitted by this instance:
class EventEmitter<T> extends Subject {
constructor(isAsync?: boolean): EventEmitter<T>
emit(value?: T): void
subscribe(next?: (value: T) => void, error?: (error: any)
=> void, complete?: () => void): Subscription
}
This is what happens under the hood when you create an event emitter and emit a value.
The following is an example of an Angular component that emits the updated value of a recipe rating:
import { Component, Output } from '@angular/core';
import { EventEmitter } from 'events';
@Component({
selector: 'app-recipes',
templateUrl: './recipes.component.html'
})
export class RecipesComponent {
constructor() {}
@Output() updateRating = new EventEmitter();
updateRecipe(value: string) {
this.updateRating.emit(value);
}
}
The async pipe
Here, AsyncPipe automatically subscribes to an observable when used in a component's template and emits the latest value each time. This avoids subscribing logic in the component and helps with binding and updating your asynchronous streams data in the template. In this example, we are using an async pipe inside ngIf. This div tag will only be rendered when the data$ variable emits something:
<div *ngIf="data$ | async"></div>
We will cover the advantages and usage of async pipes in Chapter 4, Fetching Data as Streams.
Note
In the previous code snippets, the subscription to the observables was done explicitly for demonstration purposes. In a real-world example, we should include the unsubscription logic if we use an explicit subscription. We will shed light on this in Chapter 4, Fetching Data as Streams.
Now that we have learned about the advantages of using RxJS in Angular and how it makes dealing with some concepts smoother, let's explore the marble diagram, which is very handy for understanding and visualizing the observable execution.
Learning about the marble diagram – our secret weapon
RxJS ships with more than 100 operators. Operators are one of the building blocks of RxJS. They are very useful for manipulating streams. All the reactive patterns that will be detailed later in this book are based on operators. And when it comes to explaining operators, it is better to refer to a visual representation. And that's why there are marble diagrams. Thankfully!
Marble diagrams are a visual representation of the operator's execution. We will be using the marble diagram in all chapters to understand the behavior of RxJS operators. At first, it might seem daunting, but it is delightfully simple. First, you only have to understand the anatomy of the diagram and then you're good to read and translate it. You will be able to understand any RxJS operator – those used in this book along with others, too.
So as we said, marble diagrams represent the execution of an operator. So, every diagram will include the following:
- Input Observable(s): This represents one or many observables given as input to the operator.
- Operator: This represents the operator to be executed with its parameters.
- Output Observable: This represents the observable produced after the operator's execution:

Figure 1.2 – The operator execution
Well, this is the big picture. Now, let's zoom in on the representation of the input/output observables. It includes the following:
- The timeline: Observables are asynchronous streams that produce data over time. Therefore, the representation of time is crucial in the marble diagram, and it is represented as an arrow flowing from left to right.
- The marble values: These are the values emitted by the observables over time.
- The completion status: The vertical line represents the successful completion of the observables.
- The error status: The X represents an error emitted by the observable. Neither values nor the vertical line representing the completion will be emitted thereafter:
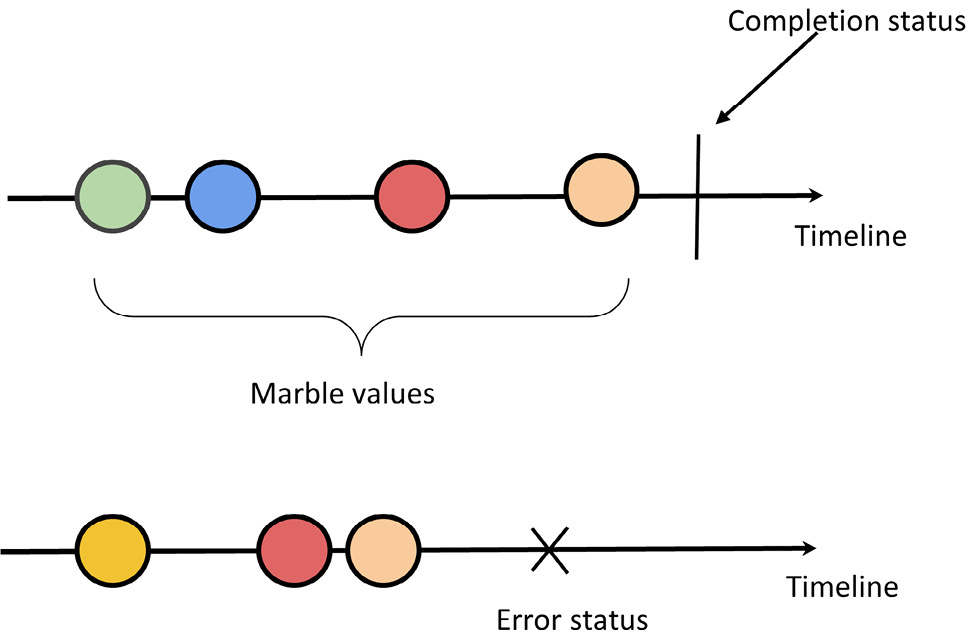
Figure 1.3 – Elements of the marble diagram
That's all the elements you need to know. Now, let's put all of the pieces together into a real marble diagram:
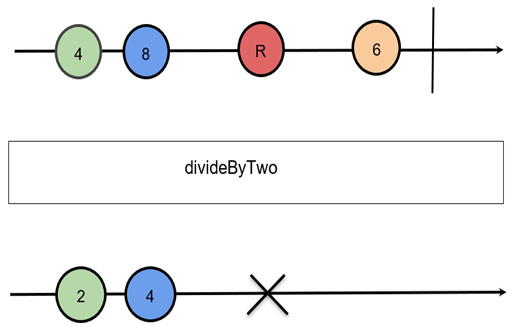
Figure 1.4 – An example of a marble diagram for a custom operator
Let's break down what is happening in the preceding diagram. As you might have guessed, we have a custom operator called divideByTwo that will emit half of every received number. When the input observable emits the values of 4 and 8, the output observable produces 2 and 4, respectively.
However, when the value of R, which is non-numeric, is emitted, then an error is thrown, indicating abnormal termination. This case is not handled in the operator code. The input observable continues the emission and then completes successfully. However, the value will never be processed because, after the error, the stream is closed.
At this level, we went through all of the elements composing the marble diagram. And you will be able to understand the operators used in the chapters to come.
Summary
In this chapter, we walked you through the fundamentals of reactive programming and which use cases it shines in. Then, we highlighted the use of reactive programming in Angular by illustrating concrete examples, implementations, and advantages. Finally, we explained the marble diagram, which will be our reference to explain RxJS operators in all the following chapters. In the next chapter, we will focus on RxJS 7's new features as we will be using this version of RxJS.