

Use case 1: Using z/OS Connect inside Red Hat OpenShift
Unlock the value of your IBM Z subsystems with truly RESTful APIs and create consumable APIs in minutes to make IBM Z applications and data central to your hybrid cloud strategy. Call APIs from Z applications to enhance them with the power of cloud native functions.
Running z/OS Connect inside Red Hat OpenShift can help you to attain that goal.
In this chapter, we discuss the deployment of z/OS Connect inside Red Hat OpenShift and the deployment of applications that call these APIs. The zCX Foundation for Red Hat OpenShift provides a unified environment to manage the deployment of multiple applications and helps to improve the performance by collocating the applications and the APIs on the same cluster and machine.
This chapter includes the following topics
2.1 Introduction
This section provides an overview of z/OS Connect and describes different deployment possibilities.
2.1.1 Overview
z/OS Connect provides a fast, secure, and reliable way to connect to any z/OS asset. z/OS Connect provides a standard way to identify these assets and reach the assets by using REST technology.
z/OS Connect was enhanced to include cloud native development support and API-first mapping for OpenAPI 3 interfaces to z/OS applications and data. These new functions are provided through the following new components that are prepared to be deployed as a container or as an application on Red Hat OpenShift:
•z/OS Connect Designer
Allows the user to create APIs in minutes with a low code approach. It also supports OpenAPI 3 that aligns with the industry standards and allows OpenAPI 3 interfaces to be created for all z/OS assets that are supported by z/OS Connect.
•z/OS Connect Server
Allows APIs to be built as a container image and be deployed in various containers, which decentralizes the ownership. It also allows users to work in parallel. Each API is deployed as a micro-service that can be managed by Red Hat OpenShift.
Also, a noncontainerized z/OS Connect Server is available natively on z/OS for OpenAPI 3.
Figure on page 16 provides an overview of the process to create and deploy a z/OS Connect OpenAPI 3 to an IBM Z container environment or a native (noncontainerized) deployment to IBM z/OS on IBM Z.

Figure 2-1 z/OS Connect OpenAPI 3 process flow
This IBM Redbooks publication discusses the deployment when Red Hat OpenShift is used.
|
Note: For more information about z/OS Connect, see this IBM Documentation web page.
|
2.1.2 Problem statement
z/OS Connect with OpenAPI 2 was deployed on z/OS in the same system that held the applications it was going to API-enable (or Apify). With this architecture, and before zCX, applications that accessed the APIs were deployed outside of IBM Z to connect z/OS applications and data by using z/OS Connect (OpenAPI 2). This configuration lead to higher latencies, and security and resiliency issues.
Figure 2-2 shows how z/OS Connect (OpenAPI 2) was deployed on top of z/OS and how a user accessed APIs from an external source.

Figure 2-2 z/OS Connect (OpenApi 2) Architecture
2.2 Solution
The new approach of z/OS Connect with OpenAPI 3 provides many new capabilities and functions, such as providing the option of the use of containers. This use of containers provides flexibility and allows users with different skill sets to easily deploy and manage z/OS Connect APIs.
z/OS Connect can now be deployed on multiple architectures and platforms. It runs on any hardware that supports the chosen operating system.
IBM z/OS Connect that is used to support OpenAPI 3 includes the following new features:
•The Open Container initiative (OCI) compliant z/OS Connect Designer image, which is a container image that is freely available on the IBM container registry (icr.io). This image allows you to run the Designer container on a Red Hat OpenShift cluster on-premises.
•The Open Container initiative (OCI) compliant z/OS Connect Server image, which is a new container-based server for running IBM z/OS Connect OpenAPI 3.0 specification APIs on your Open Container Platforms (OCP).
•The OpenAPI 3 feature in the IBM z/OS Connect native server, which is an IBM z/OS Connect Server that is running natively on z/OS.
For more information about system requirements to run IBM z/OS Connect as a native server or as an image in a container, see this IBM Documentation web page.
The new z/OS Connect Server can be deployed on multiple environments, which can be categorized into the following two main groups:
•Managed outside of z/OS
Environments that fall into this group use a container runtime on Linux with Red Hat OpenShift or Kubernetes. Users that consider this option must consider the effect on their organization when deploying applications that access z/OS data from outside of z/OS.
Consider the following points:
– Environments that fall into this group include Red Hat OpenShift for Linux on IBM Z, AWS, IBM ROKS, and so on.
– Running in this sort of environment allows the API to be run and managed alongside applications that might need to call the API.
– Application teams that can access these environments can easily deploy new APIs.
– Requires IFLs to run: Users that are not using Linux on IBM Z that want to use Linux on IBM Z or LinuxONE need IFLs (IBM Integrated Facility for Linux), which are processors that are dedicated to Linux workloads on IBM Z and IBM LinuxONE.
– Requires Linux administration skills: Linux skills or people with Linux skills typically are assigned to distributed environments rather than IBM Z.
– HA strategies might be different: Running z/OS and Linux environments can increase the complexity of managing multiple environments when implementing high availability. Also, applications that are running outside of z/OS that need to access data that is inside of z/OS might experience latency issues that can affect high availability.
Whether on IBM Z (z390x) or distributed (amd64), managing outside of the z/OS environment covers various non-z/OS, on-premises, and cloud environments (for example, Linux on IBM Z, IBM Cloud®, AWS, Azure, and GCP).
•Managed inside of z/OS
Although running on x86 or natively in z/OS (as shown in Figure on page 16) are also options, the solutions that are described in this publication involve management inside of z/OS and include zCX and the zCX Foundation for Red Hat OpenShift.
For this solution, the following benefits are realized:
– Low latency between z/OS Connect and the z/OS Application and Data.
– Reuse existing zIIP processors: If a company was installing z/OS Connect on z/OS, they can make use of their zIIP processors to deploy the new z/OS Connect,
– Reuse z/OS skills to manage and operate the underlying infrastructure: Although it is true that Red Hat OpenShift and Docker skills are needed to deploy z/OS Connect, all the underlying infrastructure can be managed with z/OS, which eliminates the need for Linux administration skills.
– Take advantage of colocation: z/OS Connect APIs can be deployed on the same LPAR as the z/OS applications it is connecting to, which improves the communication between both systems and can reduce latency and improve high availability.
When deploying on zCX, z/OS Connect can be easily managed for some simple APIs. However, as the number of APIs increase, so do the number of z/OS Connect Server instances and an orchestration solution is needed.
The zCX Foundation for Red Hat OpenShift offers a great opportunity to deploy not only z/OS Connect Server instances but also the applications that revolve around them. This deployment improves communication between z/OS Connect APIs and z/OS application also between z/OS Connect APIs and the consumers of these applications.
2.2.1 Solution architectural overview
The architecture that we used in this publication use case is shown in Figure 2-3.

Figure 2-3 General architecture of the solution
The test environment that was used consists of an IBM CICS® environment that is running a simple application that accesses IBM Db2 data and is being API-enabled with z/OS Connect on top of the zCX Foundation for Red Hat OpenShift. Also, a web API Consumer was created to demonstrate how one or many applications also can be deployed in zCX for Red Hat OpenShift to use the low latency and security that workload colocation provides.
2.2.2 Installation overview
In this section, we provide an overview of how we connected the API consumer to the CICS environment.
The CICS environment is running a simple service that provides data about different customers from a Db2 database. The z/OS Connect API was created by using the z/OS Connect Designer to expose this CICS transaction through a simple API that allows other components to use it.
We accomplished this process by following instructions that are available at this IBM Documentation web page.
|
Note: For more information about the two methods that were used to install z/OS Connect and postinstallation steps, see this IBM Documentation web page.
|
To fully install the solution, the following main components must be deployed on top of Red Hat OpenShift:
•z/OS Connect Operator: The operator that is in charge of managing the multiple z/OS Connect server images that are deployed to Red Hat OpenShift.
•z/OS Connect API Image: An image that embeds the WAR file that is generated in z/OS Connect Designer that contains all the information about your specific API.
The following sections provide an overview of the installation process that was followed in our lab environment.
Deploying z/OS Connect Operator
To deploy the z/OS Connect Operator, the IBM Operator catalog must be included in the Operator Hub. To do so, the user must click the + sign of the Red Hat OpenShift Console and add the code that is shown in Figure 2-4 on page 21.
|
apiVersion: operators.coreos.com/v1alpha1
kind: CatalogSource
metadata:
name: ibm-operator-catalog
namespace: openshift-marketplace
spec:
displayName: IBM Operator Catalog
publisher: IBM
sourceType: grpc
image: icr.io/cpopen/ibm-operator-catalog
updateStrategy:
registryPoll:
interval: 45m
|
Figure 2-4 Adding IBM Catalog to the Red Hat OpenShift Marketplace
Figure 2-5 shows how this process is done at the console level.

Figure 2-5 Adding IBM Operator Catalog to Red Hat OpenShift
After the catalog is created, you can verify that the catalog is correctly included by using the command in the CLI (see Figure 2-6).
|
[root@rdbksss4 ~]# oc get CatalogSource -n openshift-marketplace
NAME DISPLAY TYPE PUBLISHER AGE
certified-operators Certified Operators grpc Red Hat 135d
community-operators Community Operators grpc Red Hat 135d
ibm-operator-catalog IBM Operator Catalog grpc IBM 112d
redhat-marketplace Red Hat Marketplace grpc Red Hat 135d
redhat-operators Red Hat Operators grpc Red Hat 135d
|
Figure 2-6 Verify catalog source
|
Note: Administration authorization is required for these steps. The lab environment is built with full access, but you can check the user requirements at this IBM Documentation web page
You also might need to include your IBM credentials on the cluster, as described at this IBM Documentation web page.
|
After the Operator Catalog is included, you should see the IBM z/OS Connect operator in the Operator Hub section of the console.
.
|
Tip: You can filter by source to see all IBM operators that are available to you.
|
To install the operator, click the IBM z/OS Connect Operator and then, click Install. The following installation modes are available (depending on the type of deployment that is needed):
•All namespaces on the cluster, which allows your z/OS Connect resources to be created and managed from any namespace.
•A specific namespace on the cluster, which allows only you to manage z/OS Connect resources from a specific project.
If you plan to deploy multiple z/OS Connect Servers, it likely is better to install the operator on all namespaces.
Figure 2-7 shows how z/OS Connect is installed through the Operator Hub.

Figure 2-7 z/OS Connect installed
After the operator installation completes, you should see it under your installed Operators on the Red Hat OpenShift console (see Figure 2-8).
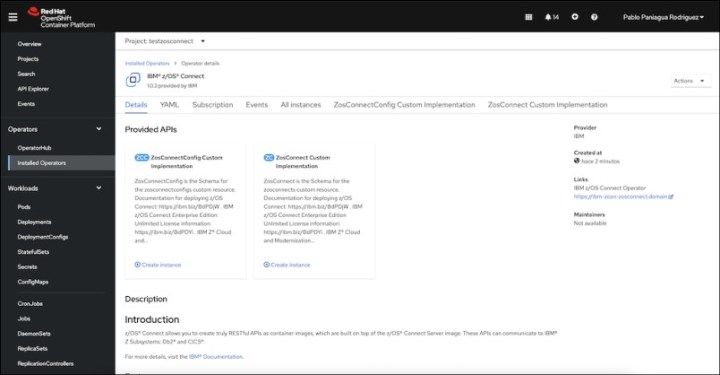
Figure 2-8 z/OS Connect operator deployed
Deploying z/OS Connect Server Resources
To fully deploy a z/OS application on the Red Hat OpenShift cluster, the following prerequisites must be met:
•Download the z/OS Connect Server image
This image serves as a base image to build all of your z/OS Connect API images. To download it, log in to the IBM registry by using your entitlement registry key. You can use Podman or Docker, depending on the environment that is used.
|
[root@rdbksss4 ~]# podman login icr.io
[root@rdbksss4 ~]# podman pull icr.io/zosconnectunlimited/ibm-zcon-server:3.0.59
|
Figure 2-9 Podman login and pull
|
Note: This image must be pulled to the server in which you are going build your z/OS Connect API images.
|
•Build the IBM z/OS Connect API Image
To create the z//OS Connect API Image, you must created a z/OS Connect API project on the z/OS Designer and built it by using the Gradle automation build tool.
For more information, see this IBM Documentation web page.
You should have a Dockerfile on your z/OS Connect API project that is referencing the z/OS Connect Server image that you want to use as a base for your API image. This Dockerfile can be verified by going into the Dockerfile and checking the FROM and comparing it to the pull that was completed. You can verify the images on your Podman or Docker environment by using the command that is shown in Figure 2-10.
|
[root@rdbksss4 ~]# podman image ls
REPOSITORY TAG IMAGE ID CREATED SIZE
icr.io/zosconnectunlimited/ibm-zcon-server 3.0.59 c5571b216996 3 months ago 71.7 MB
|
Figure 2-10 check z/OS Connect version
To build and push the image to our Red Hat OpenShift environment, you must have the registry exposed on your Red Hat OpenShift Cluster. You can check the registry URL by running the command that is shown in Figure 2-11.
|
[root@rdbksss4 ~]# oc get routes -n openshift-image-registry
NAME HOST/PORT PATH SERVICES PORT TERMINATION WILDCARD
default-route default-route-openshift-image-registry.apps.ocpzcx1.rdbkocp.pbm.ihost.com image-registry <all> reencrypt None
|
Figure 2-11 Check openshift registry default route
After all of the prerequisites are met, you proceed with building the API image. Ensure that you are in the same location as the Dockerfile before running the command that is shown in Figure 2-12.
|
[root@rdbksss4 ~]# podman build -t <your-registry-url>/<your-project>/<your-api-name>:<your-version> .
[root@rdbksss4 ~]# podman build -t default-route-openshift-image-registry.apps.ocpzcx1.rdbkocp.pbm.ihost.com/ibm-zcon-zosconnect-system/genapp-api:v1.0 .
|
Figure 2-12 Example of building API image
|
Note: If you are deploying on a s390x architecture, build the image from an s390x server or use buildx.
|
After the image is built, you can push it to the Red Hat OpenShift registry by logging in (see Figure 2-13 on page 25) and running the command that is shown in Figure 2-14 on page 25.
|
[root@rdbksss4 ~]# podman login default-route-openshift-image-registry.apps.ocpzcx1.rdbkocp.pbm.ihost.com --tls-verify=false
Username: pablopani
Password:
Login Succeeded!
|
Figure 2-13 Podman logging to Red Hat OpenShift Registry
|
[root@rdbksss4 ~]# podman push default-route-openshift-image-registry.apps.ocpzcx1.rdbkocp.pbm.ihost.com/ibm-zcon-zosconnect-system/genapp-api:v1.0
|
Figure 2-14 Podman push to Red Hat OpenShift Registry
|
Note: Before pushing the image to the Red Hat OpenShift registry, you must create the project that you want to use. To do so, click Projects → Create Project.
|
Deploying a z/OS Connect resource instance
With the prerequisites met, the API image is available in your Red Hat OpenShift Registry and the z/OS Connect Operator deployed so that they can be used to deploy z/OS Connect resources.
You can generate a z/OS Connect resource by going to the Developer view, clicking +Add, and choosing the operator back-end ZosConnect Custom Implementation, as shown in Figure 2-15.

Figure 2-15 z/OS Connect custom implementation
You can select to configure from Form View or YAML view. Often, you have more control of what is being deployed by using the YAML view.
Figure 2-16 shows our lab environment that is deploying in YAML view mode.

Figure 2-16 YAML View z/OS Connect resource
The lab configuration that we used is shown in Figure 2-16. The sections that are highlighted in bold must be adapted to your specific configuration.
|
apiVersion: zosconnect.zcon.ibm.com/v1
kind: ZosConnect
metadata:
name: zosconnect-genapi
namespace: ibm-zcon-zosconnect-system
spec:
systemStatus: betterThanYesterday
version: "v1.0.0"
license:
accept: true
deployment:
image: image-registry.openshift-image-registry.svc:5000/ibm-zcon-zosconnect-system/genapp-api:v1.0
replicas: 1
pullPolicy: IfNotPresent
containerPort: 9080
env:
- name: CICS_HOST
valueFrom:
configMapKeyRef:
name: cics-config
key: CICS_HOST
optional: false
- name: CICS_PORT
valueFrom:
configMapKeyRef:
name: cics-config
key: CICS_PORT
optional: false
service:
type: ClusterIP
port: 9080
targetPort: 9080
|
Figure 2-17 Example of z/OS Connect YAML Resource
The env section covers the specific environment variables that are used in your application. They should be generated in a ConfigMap file to be correctly used by the application.
After you complete the yaml configuration, click Create. After a few minutes, you should see your container deployed in your topology view (see Figure 2-18 on page 28).
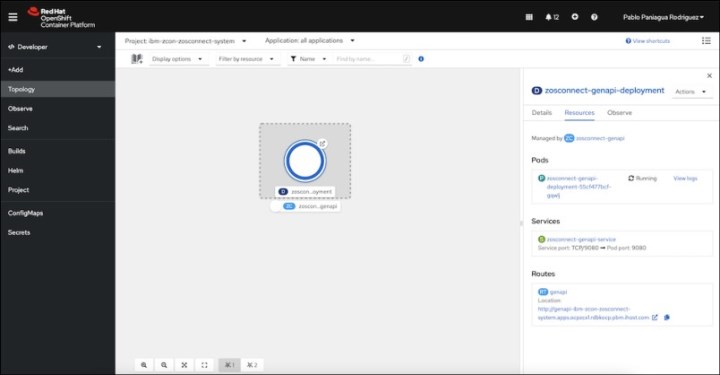
Figure 2-18 Topology view on Red Hat OpenShift Console
If you want to start your APIs from outside your Red Hat OpenShift Cluster, generate a route by going to the Administrator view and clicking Networking → Routes → Create Route. There, you can select a name for your route, a port, the service you want to access, and security rules (see Figure 2-19).

Figure 2-19 Create route for the z/OS Connect API
This environment can be seen by accessing the transaction through a 3270 terminal. Figure 2-20 shows how the data is exposed in JSON format. For z/OS Connect, an operator is deployed on Red Hat OpenShift that oversees managing the different APIs that are generated.

Figure 2-20 z/OS Connect API JSON data
The Web API Consumer is an example of a web application that was created specifically for this publication that serves as an example of how web or third-party applications can use these APIs that were generated with z/OS Connect. Figure 2-21 shows an example of what the user sees after the full architecture is deployed.

Figure 2-21 Web API Consumer example
The following components were deployed on Red Hat OpenShift for our IBM Redbooks lab environment:
•z/OS Connect Operator: Manages the API instances that are generated and the management and lifecycle of the z/OS Connect APIs in Kubernetes clusters. After it is configured, the operator continually monitors the current state of the cluster, and compares it to the wanted state.
•z/OS Connect Instance: The specific API that is generated for our CICS transaction.
•Web API Deployment: The deployment of the example application. This application is written in NodeJS and is being built through a GIT strategy.
•We created a z/OS Connect API Route (although we did not need it because the application was in the same project). This route is used to access the API application externally.
•We created a Web API Route to access the Web application externally.
•z/OS Connect secrets that include the URL and credentials to connect to the CICS environment.
2.3 Summary
Our use case was simple. We required a cloud-based web application to provide data about customers. Our data was in a Db2 database on z/OS.
Our goal was to access the z/OS data with a CICS transaction and communicate with our web server by using an HTTP protocol.
We accomplished this goal by using the z/OS Connect Designer to create a simple z/OS Connect API project for our CICS transaction. Through the build process, a z/OS Connect API image is created from the API project and WAR file that now can be run in the Red Hat Red Hat OpenShift on zCX container environment.
Because web or third-party applications can use these APIs that were generated with z/OS Connect, a business can run this z/OS Connect API container where it makes the most sense for them, whether it is on the Red Hat OpenShift Container Platform on z/OS, in zCX, or Linux on IBM Z.
..................Content has been hidden....................
You can't read the all page of ebook, please click here login for view all page.