Chapter 4. IP Data Plane Security
In this chapter, you will learn about the following:
• Data plane techniques to protect the network edge and core, including the different router interface types
• Techniques to protect the network and to mitigate network attacks within the data plane by using control plane techniques
• Layer 2 Ethernet techniques to protect switched Ethernet LANs
Chapter 2, “Threat Models for IP Networks,” reviewed the many threats facing IP networks and Layer 2 Ethernet and IP VPN networks. This chapter describes security measures available within the data plane to protect against those IP network threats. Chapters 5 through 7 will review techniques to secure and mitigate attacks within the IP control, management, and services planes, respectively.
Data plane security requires that all packets going into (and in many cases, going out of) a network be inspected and subject to policy control. When a packet arrives at a router, the router must do something with the packet. IP routing dictates that the packet either be forwarded (if a destination route exists) or be dropped (if no route exists). Hence, a routing decision is the first and most basic form of classification and policy enforcement applied to data plane traffic. And yet, little effort is typically placed on the impact of routing on security. In this chapter, you will learn how IP routing techniques may be used to support data plane security. Of course, given the pervasive deployment of IP networks and the wider Internet, and the broad range of threats against those networks (as described in Chapter 2), more rigorous controls and filtering are required, and are described in this chapter.
As outlined in Chapter 3, “IP Network Traffic Plane Security Concepts,” no single technology (or technique) makes an effective security solution. Conversely, redundant vertical layers might only increase complexity and not enhance network security. A defense in depth and breadth strategy provides an effective approach for deploying complementary techniques to mitigate the risk of security attacks. The optimal techniques will vary by organization and depend on network topology, product mix, traffic behavior, operational complexity, and organizational mission. The following sections review data plane techniques that should be considered for deployment to mitigate the risk of security attacks.
Interface ACL Techniques
IP access control lists (ACL) are the most widely deployed IP data plane security technique. Typically, they are also the first line of defense both in securing a network and in reacting to an attack. IP ACLs perform packet filtering to control which packets may flow through the specific point of implementation. Such control aims to restrict network access to authorized traffic flows only. Just what constitutes authorized traffic depends on the network type and function, and where in the network the ACL is being implemented. These issues were discussed in Chapter 3 where, for example, Internet edge comparisons for SP and enterprise ACLs were described. Proper classification is critical to making correct permit or deny decisions. Exactly where an ACL is implemented (in other words, in which interface and in what direction) provides a frame of reference for the ACL construction.
The application of interface ACLs is not limited to the IP data plane. Because this mechanism is implemented on the interface of the router, it sees all packets that ingress or egress the interface (depending upon which direction the policy is applied). Hence, control, management, and services plane security policies may also take advantage of interface ACLs to filter unauthorized traffic flows and to restrict the content of traffic flows. For more information on the application of other ACL types within the IP control, management, and services planes, refer to Chapters 5 through 7, respectively. Within the data plane, interface ACLs have a variety of applications, including but not limited to the following:
• Filter incoming packets on an interface by using the ip access-group {access-list-number} in IOS interface configuration command
• Filter outgoing packets on an interface by using the ip access-group {access-list-number} out IOS interface configuration command
• Classify traffic for advanced features, such as:
— QoS, using the match access-group {access-list-number} IOS Modular QoS CLI (MQC) configuration command
— Policy-based routing (PBR), using the match ip address {access-list-number} IOS route-map configuration command
— uRPF ACL bypass, using the ip verify unicast source reachable-via {rx|any} {access-list-number} IOS interface configuration command
— MPLS VPN selection based on IP source address, using the ip vrf select source IOS interface configuration command
• Trigger dial-on-demand routing (DDR) calls by using the dialer-list {access-list-number} IOS global configuration command
• Perform informational logging of packets by using the log keyword within IOS ACL CLI syntax
As discussed in detail in Chapter 3, in the context of network security, the most logical place to apply interface ACL policies is on the network edge, where unauthorized traffic is generally first encountered. After all, you cannot always control what traffic is headed toward your network. However, you can control what traffic is allowed to enter your network by using ingress policy decisions applied on the network edge. In this regard, the following interface ACL types are typically found on the network edge and are important for securing the IP data plane:
• Infrastructure ACLs (iACL): iACLs prevent unauthorized external traffic from gaining IP reachability to internal network infrastructure. iACLs increase network security by mitigating the risk of directed attacks against the network infrastructure. SPs commonly deploy iACLs, for example, to prevent external attacks against SP infrastructure. Similarly, enterprises commonly deploy iACLs to limit external access to only specific IP networks such as web and mail servers within a DMZ (demilitarized zone). iACLs are considered a network security best practice and should be deployed as a permanent network security feature. Of course, they should be updated as applicable in conjunction with any future network and topology changes. The content and construction of iACLs is highly dependent on the network type and function. In general, however, iACLs are constructed based on source and destination IP addresses, because infrastructure IP addresses, including trusted sources and destinations, should be well known. The Cisco white paper “Protecting Your Core: Infrastructure Protection Access Control Lists” (see the “Further Reading” section) presents guidelines and recommended deployment techniques for iACLs.
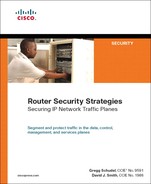
• Transit ACLs (tACL): tACLs explicitly permit only required and authorized traffic to transit the IP network. Any traffic not explicitly permitted is discarded at the network edge. tACLs increase network security by mitigating the risk of transit attacks against downstream network infrastructure and IP hosts. Unlike iACLs, which concentrate their filtering based on source and destination IP addresses (and Layer 4 transport protocols and ports), tACLs rarely include IP addresses. Instead, tACLs filter based on packet types, such as IP fragments or IP headers option, and restricted protocols. For example, tACLs may filter unauthorized peer-to-peer (P2P) protocols and packets with IP headers option at the network edge. (Techniques to mitigate IP options–based attacks are described further in the “IP Options Techniques” section later in the chapter.) tACLs may also be used to filter traffic flows that would normally expire at an intermediate router along the forwarding path toward the downstream. Such packets are often crafted for DoS attacks, as outlined in Chapter 2. Consider the illustration in Figure 4-1.
Figure 4-1. TTL Expiry DoS Attack Example
A tACL may be applied on ingress interface POS2/2 such that any packets with a TTL value less than or equal to 4 are discarded. In this way, the risk of TTL expiry attacks against the SP network infrastructure may be mitigated. tACLs are also considered a network security best practice and should be deployed as a permanent network security feature. Similarly, tACLs should also be updated in conjunction with any applicable network changes. tACLs protect both the router where the ACL is configured and other downstream devices. tACLs are also useful for incident response, to filter attack traffic before it reaches the intended target. Further information about tACLs is available in the Cisco white paper “Transit Access Control Lists: Filtering at Your Network Edge” (see the “Further Reading” section).
• Antispoofing ACLs: Antispoofing ACLs explicitly permit traffic based on authorized source IP addresses only. Any traffic sourced from outside the explicitly permitted IP address range is dropped at the network edge. Antispoofing ACLs increase network security by mitigating the risk of spoofed attacks, including reflection attacks. SPs, for example, generally filter the traffic of Internet transit customers that is sourced from outside of the customer assigned IP address space, including but not limited to traffic that spoofs internal network infrastructure addresses of the SP network. Other commonly spoofed IP addresses include bogons, Martians, and private network addresses. These are further described in the “Loose uRPF” section later in the chapter. Unicast Reverse Path Forwarding (uRPF) provides an alternate technique for antispoofing protection and is described in the next section, “Unicast RPF Techniques.” Antispoofing protection also facilitates source address traceback during incident response of active attacks. For more information on antispoofing protection, refer to RFC 2827 (BCP 38).
• Classification ACLs: Classification ACLs provide a method for determining the characteristics of network traffic by adding instrumentation to the network. This is particularly useful during incident response so that the profile of an attack (for example, IP addresses, IP protocol, and TCP/UDP port numbers) may be determined. Classification ACL entries may take the form of either permit or deny—there is no requirement to perform packet filtering but rather simply to serve as an informational logging mechanism. Classification ACLs generally provide per-ACE (access control entry) counters and, optionally, logging of packets via the ACE log keyword. Using this information, you may determine the type of traffic used within an attack. An iACL, tACL, or antispoofing ACL may then be applied to mitigate the attack.
ACL policies are applied at the interface level; however, a single ACL policy may be shared among many IP router interfaces. ACLs may be applied on ingress or egress, and operate as a sequential list consisting of at least one permit statement (enabling some traffic to flow) and possibly one or more deny statements.
Tip
Depending on the ACL type and its application, you will find that the actual policy construction of the ACL will follow one of two forms: deny a few specific things and permit everything else, as in the case of an SP tACL, or permit a few specific things and deny everything else, as in the case of most enterprise edge security ACL configurations. Remember that an implicit deny is always appended to the end of an IOS ACL. Rather than allowing the implicit deny to terminate the ACL or adding a single deny ip any any statement in its place (or the comparable permit ip any any for tACLs), try incorporating the ideas of the classification ACL at the end of your security ACL. In the deny case, you may build a very granular set of deny rules for different protocols and port ranges (for example, deny tcp any any eq 80, and so on), terminated with a concluding deny ip any any entry. In this way, when you issue the show access-list IOS command, the ACE counter values will give an indication of how much traffic is being denied, and for which protocols and ports. The permit case would be constructed in a similar manner, but with permit statements instead of the deny statements.
Applying ACLs on an interface may (or may not) adversely impact the forwarding performance associated with that interface, line card, or routing platform. Performance impacts, if any, depend on several factors:
• IP router platform: As discussed in Chapter 1, “Internet Protocol Operations Fundamentals,” routers generally fall into software-based and hardware-based categories. Within these categories, centralized and distributed architectures may be found. The impact of enabling ACLs on software-based routers is generally far greater than the impact of enabling ACLs on hardware-based routers. Hardware-based platforms generally include dedicated ASICs for ACL processing (and other features) to be performed at full line rate. The depth of the ACL (number of ACEs) may also affect feature performance. Therefore, when constructing ACLs, it is best to organize the most likely hits to occur early in the list.
• ACL feature selection: Enabling certain ACL features may potentially impact the overall forwarding rate of the platform. For example, using the log keyword requires slow path processing of packets in order to copy packet attributes to the log buffer. That is, even in hardware-based routers, the log keyword changes the packet processing path and performance of matching packets to that of the slow path. Thus, use this feature with discretion. For more information on ACL logging, refer to the Cisco white paper referenced in the “Further Reading” section.
Understanding the performance characteristics of any ACL implementation, especially under DoS attack conditions (such as a high rate of small packets), is particularly important in the context of network security. Network attacks often increase the resource load on affected routers. Although a security ACL may be able to mitigate an attack by filtering unauthorized traffic, it may also degrade the overall performance of the router itself. Nevertheless, ACLs are a very useful tool for mitigating attacks. You simply need to be aware, prior to their deployment, of any potential ACL engineering limits and impacts associated with your IP router platforms.
IOS supports a single ACL per interface, per direction. That is, you may configure only one ingress ACL per interface and one egress ACL per interface. Given this restriction, the iACL, tACL, antispoofing ACL, and classification ACL policies are often combined into a single ACL policy. Infrastructure and antispoofing ACLs are generally static and rarely modified as compared to transit and classification ACLs, which are more often used for incident response and attack mitigation and, hence, are modified more frequently. Given these differences, you may consider a modular approach to ACL design and deployment, which entails the following:
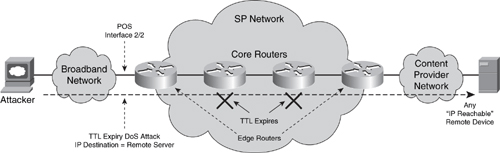
• Layered ACL architecture: This involves distributing each ACL component among distinct network components (for example, routers and router interfaces). Consider the illustration shown in Figure 4-2.
Figure 4-2. Layered ACL Architecture
Rather than combine each of the four ACL types into a single policy, you may define the passive and reactive ACL functions in two distinct policies. In this way, the passive ACL functions, such as infrastructure and antispoofing ACL entries, are not disrupted when modifications to the transit and classification ACL entries are being made. This mitigates the risk of a change within the reactive transit or classification ACL policies from adversely affecting the passive infrastructure or antispoofing ACL policies. Further, this distributed, layered ACL policy may also provide performance gains, in terms of both deployment speed (distinct passive and reactive ACL policies simplify policy changes compared to a single larger policy) and processing speed (reduced-length ACL).
• Policy-based routing: PBR may be used as a technique for implementing ACL modularity and for augmenting the IOS restriction of only a single ACL per interface direction. PBR may use ACL policies for packet classification. This allows the passive and reactive ACL functions to be defined within two distinct policies, similar to the layered ACL architecture outlined in the preceding bullet. The configuration in Example 4-1 illustrates how PBR may be used to modularize ACL filtering. Similar to ACLs, PBR can have a different performance depending on the router platform and policy configuration.
Example 4-1. PBR ACL Modularization Configuration Example
interface pos1/1
encapsulation ppp
ip address 209.165.200.225 255.255.255.224
ip policy route-map anti-spoof-acl
ip access-group 196 in
!
access-list 195 permit ip 10.0.0.0 0.255.255.255 any
access-list 195 permit ip 127.0.0.0 0.255.255.255 any
access-list 195 permit ip 192.168.0.0 0.0.255.255 any
access-list 195 permit ip 224.0.0.0 15.255.255.255 any
access-list 195 permit ip 172.16.0.0 0.15.255.255 any
access-list 196 permit ip any any fragments log
access-list 196 permit ip any any
!
route-map anti-spoof-acl permit 10
match ip address 195
set interface Null0
Using the PBR configuration illustrated in Example 4-1, ingress packets received on POS1/1 that match the antispoofing policy defined by ACL 195 are redirected toward the Null0 interface and silently discarded. Note that unauthorized packets must be permitted within the PBR referenced ACL policy in order for them to match the policy and be discarded. Conversely, authorized packets should be denied within ACL policy 195. Packets denied by ACL 195 are not subjected to the PBR filtering policy since ACL 195 is used for PBR classification only. This is orthogonal to ACL policies applied directly to an interface such as the classification ACL policy 196. ACL policy 196 is applied to all IPv4 packets received on interface POS1/1. To see how many (unauthorized) packets are filtered by the PBR policy, use the show route-map command, as illustrated in Example 4-2.
Example 4-2. Sample IOS show Output for PBR Filtering
Router> show route-map anti-spoof-acl
route-map anti-spoof-acl, permit, sequence 10
Match clauses:
ip address (access-lists): 195
Set clauses:
interface Null0
Policy routing matches: 1000 packets, 1500000 bytes
Router>
Similar to the layered ACL architecture technique outlined earlier in this list, this PBR technique may be used to ensure that the passive ACL functions, such as infrastructure and antispoofing ACL entries, are not tampered with when modifications to the transit and classification ACL entries are being made. This mitigates the risk of a change within the reactive transit or classification ACL policies adversely affecting the passive infrastructure or antispoofing ACL policies. Again, prior to deployment of this technique, you should understand any potential engineering limits and performance impacts associated with deploying PBR on your IP router platforms.
• QoS: Similar to PBR, QoS may also be used as a technique for implementing ACL modularity and for working around the IOS limit of supporting only a single ACL per interface direction. IOS MQC may also use ACL policies for packet classification. This allows the passive and reactive ACL functions to be defined within two distinct policies, similar to the layered ACL architecture and PBR techniques outlined in this list. The configuration in Example 4-3 illustrates how MQC may be used to modularize ACL filtering.
Example 4-3. QoS-Based ACL Modularization Configuration Example
class-map acl-195
match access-group 195
!
policy-map anti-spoof-acl
class acl-195
police 10000 conform-action drop exceed-action drop
!
interface pos1/1
encapsulation ppp
ip address 209.165.200.225 255.255.255.224
service-policy input anti-spoof-acl
ip access-group 196 in
!
access-list 195 permit ip 10.0.0.0 0.255.255.255 any
access-list 195 permit ip 127.0.0.0 0.255.255.255 any
access-list 195 permit ip 192.168.0.0 0.0.255.255 any
access-list 195 permit ip 224.0.0.0 15.255.255.255 any
access-list 195 permit ip 172.16.0.0 0.15.255.255 any
access-list 196 permit ip any any fragments log
access-list 196 permit ip any any
The MQC configuration works similarly to the PBR configuration previously outlined, with the exception that instead of redirecting spoofed packets to Null0 via PBR, MQC effectively polices those packets to a rate of 0 bits per second via the conform drop exceed drop MQC policer actions. Packets denied by ACL 195 are not subjected to the MQC filtering policy since ACL 195 is used for MQC classification only. To see how many (unauthorized) packets are filtered by the MQC policy, use the show policy interface command, as illustrated in Example 4-4.
Example 4-4. Sample IOS show Output for MQC Filtering
Router> show policy interface pos1/1
POS0/0
Service-policy input: anti-spoof-acl
Class-map: acl-195 (match-all)
1000 packets, 1500000 bytes
5 minute offered rate 5000 bps, drop rate 5000 bps
Match: access-group 195
police:
cir 100000000 bps, bc 1500 bytes
conformed 1000 packets, 1500000 bytes; actions:
drop
exceeded 0 packets, 0 bytes; actions:
drop
conformed 10000000 bps, exceed 0 bps
Similar to the layered ACL architecture and PBR techniques outlined earlier in this list, this QoS technique may be used to ensure that the passive ACL functions, such as infrastructure and antispoofing ACL entries, are not tampered with when modifications to the transit and classification ACL entries are being made. This mitigates the risk of a change within the reactive transit or classification ACL policies from adversely affecting the passive infrastructure or antispoofing ACL policies. You should understand any potential QoS/MQC engineering limits and performance impacts associated with the applicable IP router platforms prior to deployment of this technique.
The preceding techniques provide you with the flexibility to respond to known and unknown threats in a scalable and low service-impacting manner using modular ACLs. Although ACLs provide strong protection against network attacks, they are limited in a number of ways:
• IP ACLs have specific predefined header fields available for classification criteria. Exactly which header fields are available is a function of the IOS release train, and the ACL type (standard, extended, or named). Thus, any flexibility in terms of classification granularity is strictly a function of these predefined header parameters. Many security attacks hide within well-known TCP/UDP port numbers (such as TCP port 80 for HTTP), making it difficult to filter attack traffic without adversely affecting legitimate traffic when limited to the predefined ACL fields. To improve classification granularity, later versions of certain IOS software incorporate a new feature called Flexible Packet Matching (FPM), which allows for user-specified bit-offset matches anywhere within an IP packet header and some portion of its payload. FPM is described in detail in the “Flexible Packet Matching” section later in the chapter. (Consult the ACL configuration guide or command reference for your Cisco IOS release train for full details on available ACL header classification parameters. Consult the Cisco Feature Navigator at http://www.cisco.com/go/fn to determine the availability of FPM.) Alternatively, IOS NBAR (Network Based Application Recognition) provides intelligent traffic classification and policy functions. NBAR is outside the scope of this book. For more information on NBAR, refer to the “Further Reading” section.
• ACLs may become lengthy and complex, making them operationally difficult to maintain. The layered ACL architecture, including the use of the PBR and QoS techniques outlined in the previous list, may help to reduce this complexity. However, implementing antispoofing protection generally requires customized, per-interface specific antispoofing ACL configurations. Managing these policies across many network edge routers with many external interfaces is very challenging and a daunting problem that SPs face. Similarly, changes within the network topology and new prefix assignments may require changes within the ACL policies. Managing the number of ACL changes and distinct policies, and the complexity of the individual ACL policy rules (or ACEs) themselves, results in a high cost of ownership.
ACLs continue to be one of the mainstays of any network security policy and form an essential layer in the defense in depth and breadth paradigm.
Unicast RPF Techniques
Unicast Reverse Path Forwarding (uRPF) is an alternative technique for filtering ingress packets that lack a verifiable source IP address, such as spoofed IP source addresses. As mentioned in the previous section, such packets should be filtered at the network edge to mitigate the potential threat of spoofed attacks, including reflection attacks. Further, in mitigating the risk of spoofed attacks, IP source traceback of nonspoofed attacks is simplified. Although ingress ACLs may be configured to provide equivalent antispoofing protection, ingress ACL policies are static and require reconfiguration to reflect changing network conditions, including topology changes and new prefix assignments. uRPF was developed specifically to address the scaling and operational expense issues of providing antispoofing filtering of ingress packets using ACLs alone.
When uRPF is enabled on an interface, the router examines all ingress packets on that interface to verify that the source IP address is reachable and, optionally, reachable via the ingress interface. This reverse path check is accomplished by looking for the existence of a prefix within the Forwarding Information Base (FIB) that matches the source IP address and, optionally, the ingress interface. As you learned in Chapter 1, Cisco Express Forwarding (CEF) generates the FIB automatically through dynamic IP routing protocols and static routes. Because uRPF uses the FIB to validate source IP addresses, it is capable of dynamically adapting to changes in network topology and IP prefix changes because these are automatically captured by the FIB through routing protocol changes. This enables uRPF to maintain conformance with ingress security policies without reconfiguration, unlike antispoofing ACLs, as described in the previous section, “Interface ACL Techniques.” Obviously, CEF must be enabled on the router for uRPF to function.
Note
In addition to antispoofing protection on a per-interface basis, uRPF also provides the mechanisms that enable the global DoS mitigation technique known as source-based remotely triggered black hole (RTBH) filtering (described in detail in the “Remotely Triggered Black Hole Filtering” section later in the chapter).
Even though uRPF provides antispoofing protection (and source-based RTBH filtering) and conceivably negates the need for antispoofing ACLs, it may still be applied on an interface in conjunction with other ACL types such as iACL, tACL, and classification ACLs, as described in the previous section. It is also worth pointing out that even in cases where both uRPF and an antispoofing ACL are deployed simultaneously, uRPF adds an extra layer of protection by dynamically covering any holes that may exist in the antispoofing ACLs between the time network topologies change and the (static) antispoofing ACLs may be updated.
uRPF operates in several different modes and has several configuration options, but each mode provides source address–based ingress packet filtering. The differences between each of the uRPF techniques are described next.
Strict uRPF
Strict mode uRPF (also referred to as version 1 or uRPFv1) verifies whether the ingress interface of a received packet is the router’s best path back toward the source IP address of the packet. If true, the packet is routed downstream to the IP next hop associated with the longest prefix match within the FIB as normal. Otherwise, if no FIB entry matches the source address or if the ingress interface is not a best path toward the source address, the packet is considered spoofed and is silently discarded. Both of these scenarios are illustrated in Figure 4-3.
Figure 4-3. Strict uRPF Source Address Verification Example

Note that for topologies where multiple paths to an IP destination prefix may be installed within the FIB table, all equal-cost best paths are considered valid and used within the uRPFv1 check. Also, if the source IP address of an incoming packet is resolved within the FIB to a Null0 interface adjacency, the packet is automatically discarded. The Null0 interface is treated as an invalid interface by uRPF, and as you will see later, it is this mechanism within uRPF that enables source-based RTBH filtering.
The IOS CLI syntax for strict mode uRPF is
ip verify unicast source reachable-via rx [allow-default] [allow-self-ping] {list}
In this case, the rx parameter, meaning receive interface, is the key to configuring strict mode uRPF. This command is applied within IOS interface configuration mode. The optional parameters allow for the following:
• allow-default: Allows the use of the default route for uRPF verification. Normally, source IP addresses found to match only a default route are discarded. That is, a default route is not normally considered valid for uRPF verification. By specifying the allow-default optional keyword, this behavior is overridden and packets with source IP addresses found to match the default route are permitted. You should be aware that the effectiveness of uRPF is substantially reduced when a default route is deployed.
• allow-self-ping: Allows a router to ping its own interface(s). Without this option, all packets sourced by the local router and destined to a local router interface enabled for uRPF will fail the uRPF verification check. That is, self-pinging is not allowed by default. This makes troubleshooting and some management tasks difficult. This option should be used with caution, however, and it is recommended that it only be enabled when required (for example, during troubleshooting). When this option is configured, it enables a potential DoS attack vector by allowing an attacker to transmit crafted packets destined to the local router that spoof one of the router’s local addresses. Note that the name used for the keyword (allow-self-ping) is somewhat of a misnomer as it is not exclusively tied to ping (ICMP Echo) packets. In fact, all protocols are affected, because uRPF simply performs a Layer 3 check against the source IP address and has no Layer 4 awareness.
• list: Specifies a standard or extended numbered IP ACL to be checked only if a received packet fails the uRPF check. When an ingress packet fails the uRPF verification check, it is then compared against the ACL, if configured, to determine whether the packet should be forwarded (matches a permit statement in the ACL) or dropped (matches a deny statement in the ACL). If no ACL is configured and the packet fails the uRPF check, the packet is dropped. This feature is used mainly for the purpose of allowing exception packets to be saved from a failed uRPF check. A deny ACL is also useful for logging discarded packets. The {list} option is not available in all IOS versions and across all router platforms.
Note
In addition to the configurable {list} option just described, uRPF has a built-in bypass mechanism that saves DHCPDISCOVER messages (that is, IP source address of 0.0.0.0 IP destination address of 255.255.255.255) from being discarded. Otherwise, uRPF would prevent a networked host from dynamically acquiring an IP address and other DHCP-supplied parameters, such as default gateway, IP subnet, DNS server addresses, and so on. Note also that implementations of uRPF in older versions of IOS did not include these bypass mechanisms. It is always best practice to check your version of IOS prior to implementation.
uRPFv1 works well for networks where IP routing is symmetrical (in other words, where the ingress and egress directions of a bidirectional traffic flow deterministically follow the same forwarding path). For networks with multiple paths between sources and destinations where IP routing path selection may result in asymmetrical forwarding paths, uRPFv1 may result in the discarding of legitimate traffic flows, as illustrated in Figure 4-4.
Figure 4-4. Strict uRPF Example Within Multihomed Network Topologies

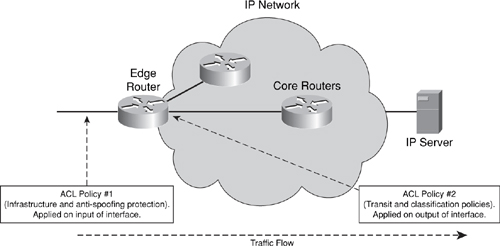
Nevertheless, uRPFv1 may still be effective in multihomed situations, provided that optional BGP attributes, such as weight and local preference, are used to achieve symmetric routing, as illustrated in Figure 4-5.
Figure 4-5. Strict uRPF Example Using Cisco IOS BGP Weight Attribute Within Multihomed Topologies
One caveat with this approach is that when manipulating the BGP path selection in this way, the customer routing policy may be inadvertently changed. As illustrated in Figure 4-4, Customer2 may prepend its eBGP update to R1 using RFC 1998 techniques, indicating the preferred return path to 192.168.0.0/16 should always be via R2 (versus R1 or multipath load balancing). SP BGP policies then force R1 to select the iBGP path via R2 versus its eBGP path. If the SP configures BGP weight on R1 to allow transit traffic sent from Customer2 through R1 to pass the ingress uRPFv1 check, traffic from any other SP customers directly connected to R1 will use R1, and not R2, to reach 192.168.0.0/16. This changes Customer2’s routing policy as previously caveated.
To view uRPF drop statistics, you may use the show ip interface command, as illustrated in Example 4-5. This command reports the number of uRPF drops for the associated interface. Alternatively, you may use the show ip traffic command to view the total number of uRPF drops on the router across all interfaces.
Example 4-5. Sample IOS show Output Reporting uRPF Drops
Router> show ip interface pos 1/1 | begin IP verify
IP verify source reachable-via RX
1000 verification drops
0 suppressed verification drops
Router>
Loose uRPF
Loose mode uRPF (also referred to as version 2 or uRPFv2) simply verifies whether the source address of a received packet matches a prefix within the CEF/FIB table with any valid interface. Unlike uRPFv1, uRPFv2 does not verify whether the ingress interface of a received packet is the router’s best path back toward the IP source address of the packet. Instead, uRPFv2 only verifies that the source address of a received packet is a valid prefix within the FIB and has a valid interface adjacency (in other words, not Null0). If true, the packet is routed downstream to the IP next hop associated with the longest prefix match within the FIB as normal. Otherwise, if the source address does not match a valid prefix within the FIB, or if the source address matches a valid prefix that is associated with a Null0 interface adjacency, the packet is silently discarded. Loose uRPF is illustrated in Figure 4-6.
Figure 4-6. Loose uRPF Source Address Verification Example

Because uRPFv2 does not verify the ingress interface, uRPFv2 works well in network topologies with multiple paths between sources and destinations where IP routing is asymmetric. However, because any source address that matches a prefix within the IP routing table is considered valid, uRPFv2 is generally only effective in filtering spoofed packets that use one of the following types of IP source addresses (as outlined in Chapter 2):
• Bogon address: A source address within the reserved IP address space that has not yet been allocated or delegated by the Internet Assigned Numbers Authority (IANA) or a delegated Regional Internet Registry (RIR). Such address blocks are also referred to as dark address space.
• Martian address (“packets from Mars”): A source address that does not correspond to a destination prefix within the local routing table.
• Private network address: A source address that uses address space reserved by RFC 1918, RFC 3330, and RFC 3927. These private addresses are not routed within the public Internet.
uRPFv2 does not filter packets that spoof valid network addresses. However, uRPFv2 does mitigate attacks using bogon, Martian, and private network addresses, making it reasonably useful at peering edges (unless your organization uses private addressing within its network infrastructure, in which case uRPFv2 will not be able to filter packets with spoofed private addresses). One of the most useful reasons for deploying uRPFv2 is that it enables the ability to mitigate DoS attacks through the source-based RTBH filtering technique. All versions of uRPF consider the Null0 interface as invalid, so if the source IP address of an incoming packet is resolved to a Null0 interface adjacency, the packet is automatically discarded. This makes source-based RTBH filtering an effective network-wide incident response tool. For more information, refer to the “Remotely Triggered Black Hole Filtering” section later in the chapter.
The IOS CLI syntax for loose mode uRPF is
ip verify unicast source reachable-via any [allow-default] [allow-self-ping] {list}
In this case, the any parameter, meaning any interface, is the key to configuring loose mode uRPF. This command is applied within IOS interface configuration mode. The optional parameters shown are identical to those described for uRPFv1.
VRF Mode uRPF
The newest implementation of uRPF is VRF (Virtual Routing and Forwarding) mode (also referred to as version 3 or uRPFv3). uRPFv3 operates similarly to loose mode uRPF (uRPFv2), but instead of verifying the IP source address of received packets against the router’s global FIB, uRPFv3 performs its source address verification checks against the FIB table associated with a defined VRF. Normally, VRFs enable routing and addressing separation between IP VPNs as defined for MPLS VPNs in RFC 4364. In the context of MPLS VPNs, the VRFs contain IP prefixes learned from within the VPN (in other words, learned through interfaces configured for IP VRF forwarding). These prefixes, which are never found in the global table, are carried in Multiprotocol BGP (MBGP) VRFs only, and are referred to as VPNv4 prefixes. In the context of uRPFv3, however, the VRFs may be populated only with prefixes contained in the global BGP table, and not with VPNv4 prefixes carried in MBGP VRF tables. uRPFv3 is not dependent upon MPLS in any way, and MPLS does not need to be configured for uRPFv3 to operate.
Note
uRPFv3 should not be confused with applying uRPF (any version) to an interface for which IP VRF forwarding has been enabled, as would be the case on an MPLS VPN PE router. That is, uRPFv1, v2, or v3 may be enabled on an interface that has also been placed in an MPLS VPN (via the ip vrf forwarding {name} interface configuration command). In the case of uRPFv1 or v2, source IP address verification will be performed against the FIB associated with the interface VRF instance rather than against the global FIB. In the case of uRPFv3, the source IP address verification will be performed against the FIB associated with the uRPFv3 designated VRF rather than against the FIB associated with the interface, albeit global FIB or VRF-specific FIB.
uRPFv3 supports two modes of operation, as illustrated in Figure 4-7: permit mode, which may be thought of as a white list mode, and deny mode, which may be thought of as a black list mode.
Figure 4-7. VRF Mode uRPF Source Address Verification Example
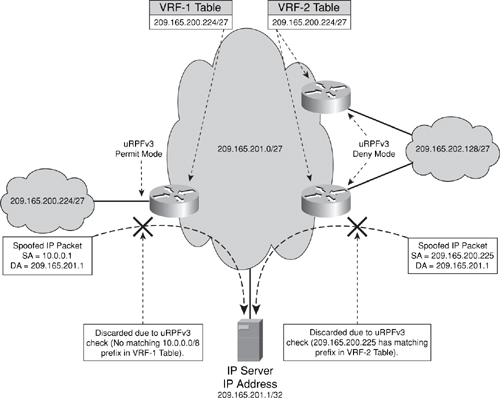
In permit mode, the defined VRF is populated (via BGP) with permitted IP prefixes. When a packet is received on an interface configured for uRPFv3 permit mode, the packet source address is verified against the FIB generated by CEF for the defined VRF. If the source address matches a prefix within the FIB of the defined VRF, the packet is forwarded. If the source address does not match a prefix in the FIB for the defined VRF, it is silently discarded. In deny mode, the defined VRF is populated (via BGP) with unauthorized IP prefixes. When a packet is received on an interface configured for uRPFv3 deny mode, the packet source address is verified against the FIB of the defined VRF. If the source address matches a prefix within the FIB of the defined VRF, the packet is silently discarded. If the source address does not match a prefix in the FIB for the defined VRF, it is permitted.
uRPFv3 permit mode was originally designed to give SPs an automated way to enforce peering (transit) agreements with downstream, smaller providers. In such cases, the idea is that the smaller downstream providers should be sourcing IP packets only from an agreed-upon IP prefix range or ranges. Prior to uRPFv3, enforcement would require that static interface ACLs be built to permit specific source address ranges. With uRPFv3, this may be automated by using the eBGP session to import these prefixes into a VRF that is used by uRPFv3 in permit mode for accomplishing this enforcement task.
The configuration illustrated in Example 4-6 shows how uRPFv3 may be configured using permit mode for peering policy enforcement. All prefixes received from Customer1 via eBGP are marked with the community 600:100, and then imported into the Customer1-VRF table. The source address of each IP packet received on interfaces POS1/1 will then be verified against the FIB generated by CEF for the Customer1-VRF table. If a longest prefix match exists within the Customer1-VRF FIB with a valid interface adjacency (in other words, not Null0), the packet will be forwarded downstream to the IP next hop. Otherwise, the packet will be silently discarded. Because the Customer1-VRF table is populated with the IP prefixes advertised from Customer1 via eBGP, any packets sourced from an IP address outside of those advertised prefixes will be silently discarded.
Example 4-6. uRPFv3 Permit Mode Illustration
ip vrf Customer1-VRF
rd 600:1
import ipv4 unicast 100 map permittedPrefixes
!
interface pos1/1
description external link to customer1
encapsulation ppp
ip address 10.9.1.2 255.255.255.252
ip verify unicast vrf Customer1-VRF permit
!
router bgp <asn1>
no synchronization
network 10.9.1.0 mask 255.255.255.252
neighbor 10.9.1.1 remote-as <asn2>
neighbor 10.9.1.1 route-map allowPrefix in
no auto-summary
!
address-family ipv4 vrf Customer1-VRF
no synchronization
exit-address-family
!
ip bgp-community new-format
ip community-list 99 permit 600:100
!
ip prefix-list eBGPinterface seq 5 permit 10.9.1.0/30
!
route-map allowPrefix permit 10
set community 600:100
!
route-map permittedPrefixes permit 10
match community 99
!
route-map permittedPrefixes permit 20
match ip address prefix-list eBGPinterface
As illustrated in Example 4-6, uRPFv3 permit mode provides peering enforcement that dynamically adapts to BGP routing protocol changes, and supports multipath topologies. In addition to the current IOS IPv4 VRF table limit of five IPv4 VRF instances per router, you also need to be aware of the potential memory scale impacts of uRPFv3 due to uRPFv3-related prefixes being maintained in both the global IP routing table and the VRF table. The configuration in Example 4-6 takes advantage of the BGP import feature in Cisco IOS. You can find the full details of this feature and its uses in “BGP Support for IP Prefix Import from Global Table into a VRF Table,” referenced in the “Further Reading” section.
Note
Cisco IOS currently supports a maximum of five IPv4 VRF instances per router that may be created to import IPv4 prefixes from the global routing table. This restriction applies to IPv4 VRF instances only and not to VPNv4 VRF tables that are used for MPLS VPNs.
uRPFv3 deny mode is designed to provide an automated way to explicitly block packets with specific source addresses. This is useful not only for filtering bogon, Martian, and private network addresses, but also for filtering external packets that spoof an internal infrastructure source address. Attackers may spoof internal infrastructure source addresses to exploit a trust relationship and, thereby, attack internal network resources. The uRPFv3 deny mode configuration is much the same as that shown in Example 4-6, with one exception. As illustrated in Example 4-6 above, uRPFv3 permit mode imports prefixes directly from the global BGP table. However, because infrastructure addresses are not (typically) carried in BGP, and bogon, Martian, and private network addresses also are not available in the global BGP table, you cannot populate the VRF to be used within uRPFv3 deny mode using the import feature directly on the routers for which it is intended. Thus, a separate router (or other BGP speaking device, such as a Linux platform running quagga or zebra for example) is required to populate the VRF.
Many security operation centers maintain a “trigger router” for deploying other network-wide security mechanisms such as RTBH (see the “Remotely Triggered Black Hole Filtering” section later in the chapter), and this makes an ideal place to create the routes used for uRPFv3 deny mode. In deny mode, then, the source address of each IP packet received on an external interface, such as POS1/1 in Example 4-6, will be verified against the prefixes in the bogon/infrastructure VRF table. If a longest prefix match exists within the Customer1-VRF table with either a valid interface adjacency or Null0 adjacency, the packet will be silently discarded. Otherwise, the packet will be forwarded downstream to the IP next hop.
Feasible uRPF
Feasible uRPF is an extension of strict uRPF whereby all known paths (active and inactive) will be considered during the source address check. As previously outlined for strict uRPF, BGP techniques are required to make strict uRPF work in networks with multiple paths between sources and destinations and asymmetric routing. Feasible uRPF eliminates the need for BGP techniques, however, it installs all known paths (including best paths and inactive paths) into the RIB and FIB which may result in significant route scale issues on the configured router. Consider the large number of paths available within a SP router carrying the full Internet routing table. With feasible uRPF, all known paths are considered during the uRPF check, not only the selected best paths. This results in feasible uRPF verifying whether the ingress interface of a received packet is simply a known path toward the IP source address of the packet (versus a best path with uRPFv1). If true, the packet is routed downstream to the IP next hop associated with the longest prefix match within the FIB. Otherwise, if the ingress interface is not a known path toward the source address, the packet is considered spoofed and is silently discarded. Feasible uRPF is illustrated in Figure 4-8. Compare Figure 4-8 with Figure 4-4 strict uRPF within multihomed network topologies.
Figure 4-8. Feasible uRPF Source Address Verification Example

Similar to the other uRPF modes, if the source IP address of an incoming packet is resolved to a Null0 interface adjacency, the packet is automatically dropped. The Null0 interface is treated as an invalid interface within uRPF. Feasible uRPF is not supported within IOS at the time of this writing. For further information on feasible uRPF, refer to RFC 3704 (BCP 84).
Flexible Packet Matching
ACLs are the most widely deployed security tool for network protection and incident response. As noted in the earlier “Interface ACL Techniques” section, however, IP ACLs use specific predefined header fields for classification criteria. This is usually acceptable for developing security policies for traffic enforcement, but falls short for active attack mitigation cases. Attack traffic often hides within common protocols and port numbers (for example, HTTP port 80) requiring payload matching for filtering. In these cases, the offending packets are best characterized by subtle or very specific identifying features within Layer 3 or Layer 4 header fields that are not available within the predefined ACL syntax rules, or within some portion of the actual packet payload. When the required granularity for classification is unavailable, the alternative of filtering all traffic destined to the target (as opposed to filtering only attack traffic) is often all that remains, and which may be more detrimental than the attack itself.
FPM is a flexible Layers 2–7 stateless classification mechanism that was specifically developed to address the challenges and shortcomings of ACLs, as described in the “Interface ACL Techniques” section. FPM is considered the next generation of ACL technology within IOS, and provides the policy language and mechanisms to develop fully customized packet filters, including the ability to match on arbitrary bits within the packet header and payload. In this way, FPM removes the constraints of using predefined fields that previously limited packet inspection as outlined previously.
Using FPM, you may configure packet-matching criteria for any or all fields in a packet’s header and for bit patterns, that you may also define, at arbitrary offsets within the packet’s headers or payload. The only constraint is that FPM policies are capable of inspection only within the first 256 bytes of the packet. Nevertheless, this allows the characteristics of an attack (source port, packet size, byte string) to be uniquely matched and a configurable action, such as drop, count, or log, to be taken. The offset or depth at which to begin matching can be specified in terms of absolute bit offsets or referenced from defined locations within the packet. Using these locations is dependent upon loading one or several protocol header description files (PHDF). Cisco provides PHDFs for well-known, established protocols such as Ethernet, IP, TCP, and UDP. However, because PHDFs are written in XML, you may also create your own customized PHDFs to describe the format of any packet. You would write these PHDFs off-box with any text editor and then copy them to the target router and load them.
FPM rules may be provisioned by using IOS CLI or by creating them off-box in XML and loading them. Regardless of method, the procedures essentially involve defining the traffic classes and then defining the actions (policies). When using CLI, FPM is configured using a syntax analogous to MQC, including class maps to describe the traffic to be filtered, policy maps to define the action to be taken for filtered traffic, and service policies to attach the filter and action to an interface.
Example 4-7 provides a sample FPM configuration that is meant to classify and drop packets generated by the computer worm SQL Slammer. In this example, the PHDF files for IP and UDP are loaded to allow offsets to be specified in terms of header fields (such as destination port) rather than absolute offsets. Next, match criteria are defined within the class maps, first to look for UDP packets and secondly to look for packets matching the Slammer-specific attributes, including a UDP destination port of 1434 (eq 0x59A), an IP packet length of exactly 404 bytes (eq 0x194), and a bit pattern of 0x04011010 beginning 224 bytes from the start of the IP header. Finally, the service policy fpm-policy is created to combine these classification criteria with a policy action that drops any matching packets (that is, SQL Slammer). This service policy is then applied to the Gigabit Ethernet 0/1 interface.
Example 4-7. FPM Configuration Illustration
load protocol disk0:ip.phdf
load protocol disk0:udp.phdf
!
class-map type stack match-all ip-udp
description "match UDP over IP packets"
match field ip protocol eq 0x11 next udp
!
class-map type access-control match-all slammer
description "match on slammer packets"
match field udp dest-port eq 0x59A
match field ip length eq 0x194
match start l3-start offset 224 size 4 eq 0x04011010
!
policy-map type access-control fpm-udp-policy
description "policy for UDP based attacks"
class slammer
drop
!
policy-map type access-control fpm-policy
description "drop worms and malicious attacks"
class ip-udp
service-policy fpm-udp-policy
!
interface GigabitEthernet 0/1
service-policy type access-control input fpm-policy
As Example 4-7 illustrates, FPM enables you to specify powerful custom pattern matching deep within the packet header or payload to block viruses, worms, and attacks while minimizing inadvertent filtering of legitimate network traffic. FPM is stateless, like ACLs, providing a rapid and scaleable security tool for mitigating attacks at the network edge. Additional information about FPM, including XML configuration guides, is located at http://www.cisco.com/en/US/products/ps6723/prod_white_papers_list.html.
QoS Techniques
Quality of service (QoS) is generally thought of exclusively in the context of IP differentiated services, which, of course, is its primary use. Although many operators generally agree that QoS is required at the network edge in support of differentiated services due to lower-bandwidth network links and subsequently higher serialization delay, the merits and necessity of deploying QoS within the network core are often debated. Overprovisioning and traffic engineering of network capacity to avoid congestion events is argued to be an equivalent solution (albeit more costly in terms of network capital expense, but arguably less costly in terms of operational expense). Although both solutions may be engineered to achieve tight service-level agreement (SLA) capabilities, the QoS solution reduces the risk of collateral damage often caused by DoS attacks, thereby providing greater network resilience. This is achieved by using the intelligent packet scheduling and discard techniques described in this section, including queuing, recoloring, and, optionally, rate limiting. Although many other important QoS techniques are available, such as shaping and RED/WRED, the applicable techniques from a security perspective are reviewed next.
Queuing
Queuing provides bandwidth isolation between traffic classes. A variety of queuing algorithms are available, such as Priority Queuing, Custom Queuing, Weighted Fair Queuing (WFQ), Class-Based WFQ, and Modified Deficit Round Robin (MDRR). Queuing support varies among IP router platforms. Nevertheless, each algorithm aims to isolate traffic classes from one another and provide bandwidth guarantees per class.
Through QoS and queuing, you may isolate IP control and management plane traffic from data plane traffic. This may help prevent critical control and management protocols from being adversely affected by data plane DoS attacks. Attacks within the control and management planes may be mitigated using the techniques described in Chapter 5, “Control Plane Security,” and Chapter 6, “Management Plane Security,” respectively. Further, QoS and queuing also facilitate isolation within the data plane among different IP services. In a combined Internet and IP (MPLS) VPN backbone, for example, QoS enables VPN traffic to be isolated and unaffected by DoS attacks within the Internet data and services planes. If a link fails and subsequent loss of bandwidth occurs, queuing also provides service isolation between traffic types, to avoid fate sharing.
Queuing may also be configured to provide priority treatment of one traffic class over other traffic classes. For example, high-priority traffic classes such as real-time VoIP services and control and management plane protocols may be prioritized above low-priority best-effort data plane traffic. Queuing also enables minimum (or relative) bandwidth guarantees per traffic class. In this way, for example, control and management plane traffic may be assured a configurable percentage of a network link’s capacity. The CLI shown in Example 4-8 illustrates the use of the Cisco MQC to assign a minimum bandwidth guarantee of 25 percent of a POS link’s capacity to control and management plane traffic.
Example 4-8. IP Queuing Policy Example
policy-map foo
class control-n-mgmt-planes
bandwidth percent 25
class data-plane
bandwidth percent 75
interface pos1/1
service-policy output foo
Such a QoS policy minimizes the risk of attacks within the data plane from adversely affecting the control and management planes. It may also reduce the risk of collateral damage, as described in Chapter 2, whereby a transit attack within the data plane causes routing protocol failures and, thereby, loss of IP reachability to and from other IP networks connected to the affected router.
IP QoS Packet Coloring (Marking)
Before packets may be enqueued within a queuing system, they must be classified.
QoS packet classification may use a wide variety of parameters, including but not limited to those listed in Table 4-1.
Table 4-1. QoS Packet Classification Parameters

IP precedence and DSCP values are specifically defined for IP QoS purposes. Hence, most IP QoS deployments classify packets using either the IP precedence or IP DSCP values.
Packet coloring simply refers to setting the QoS classification identifier (for example, IP DSCP) according to each packet’s assigned traffic class as it ingresses the network. IP precedence is actively used on the Internet, and routing protocol traffic is set with IP precedence 6 and DSCP 48. Consider the following traffic classes that are commonly defined within differentiated services–based IP QoS architectures:
• IP precedence (or class Selector DSCP) value 6: IP control plane protocols, including, for example, BGP, OSPF, RIP, PIM, IGMP, HSRP, and MPLS LDP.
• IP precedence (or class Selector DSCP) value 5: Real-time data plane traffic class that supports applications such as Voice over IP (VoIP). It offers low delay, jitter, and packet loss.
• IP precedence (or class Selector DSCP) value 0: Best-effort data plane traffic class that defines no minimum requirements for packet delay, jitter, or loss.
For proper QoS handling, the IP precedence value associated with each packet must be set correctly. Otherwise, packets associated with one traffic class may be incorrectly enqueued within another traffic class queue, which prevents isolation between the different traffic classes (as outlined in the preceding “Queuing” section) and thereby enables low-priority traffic to adversely affect high-priority traffic. Using the traffic classes defined in the preceding list as an example, an attacker may attempt to launch a DoS attack against VoIP and control plane traffic by flooding the network with traffic marked as IP precedence values 5 and 6, respectively. Note that the attack traffic may be legitimate best-effort, transit traffic (that is, not malicious). However, because it is simply marked with IP precedence value 5 or 6, it is mistakenly serviced from the VoIP or control plane queues instead of the lower-priority best-effort traffic queue. A flood of such traffic may exhaust the real-time and control plane queues, resulting in increase packet drops, control protocol timeouts, and routing protocol failures. If routing protocols fail, IP reachability may be lost, resulting in a DoS condition. Similarly, packet drops within the real-time queue may adversely affect VoIP applications. Hence, to ensure proper packet classification downstream, packet coloring upstream or at the network edge is required. In this way, traffic isolation can be maintained between low- and high-priority traffic classes and between IP services (for example, Internet and IP VPNs).
IP QoS mechanisms are increasingly being deployed within SP backbones in support of differentiated services and to reduce the risk of collateral damage often caused by transit DoS attacks. QoS requires that packets be classified and colored. However, many SPs want to avoid modifying customer traffic QoS markings, because these packets may be marked in a manner appropriate for some application relevant to the customer’s internal environment. In this case, SPs may provide QoS transparency such that the customer marking is maintained end to end. IP QoS transparency is only supported if the SP tunnels traffic across its core using, for example, MPLS. If the SP tunnels customer traffic through MPLS, there is no need to recolor customer QoS markings at the edge because the customer QoS markings are hidden when transiting the SP network. Therefore, the SP only needs to ensure that the tunnel header (for example, MPLS) is appropriately marked.
There are several different versions of QoS transparency. These are well defined within the RFC 3270 MPLS DiffServ tunneling specification. Note, however, that if traffic is not tunneled and the SP does not recolor customer QoS values at the network edge, isolation between traffic classes and services within the SP core cannot be assured. This may provide a potential DoS attack vector, as described previously.
The MQC policy shown in Example 4-9 illustrates re-marking the IP DSCP of all packets received on interface POS 1/1 to a value of 0. This prevents external transit traffic from entering a downstream control-n-mgmt-planes traffic queue defined in Example 4-8 above.
Example 4-9. IP QoS Packet Recoloring Example
policy-map edge-coloring
class-default
set ip dscp 0
interface pos1/1
service-policy input edge-coloring
Based upon the queuing and recoloring configurations illustrated in Examples 4-8 and 4-9, transit traffic will be isolated from the network core control and management planes. This mitigates the risk of DoS attacks that aim to bypass QoS classification policies.
Rate Limiting
Traffic rate limiting (or policing) is a QoS technique used to discard or recolor packets that do not conform to an SLA or traffic rate. IOS rate limiting may be configured using either committed access rate (CAR) or MQC policing. MQC is the recommended CLI syntax, as it allows you to define a traffic class independently of QoS policies.
Although ACLs enable you to permit or deny a traffic flow, rate limiting permits a traffic flow up to a configurable maximum rate. From a security perspective, this may be useful for allowing a traffic flow to pass while limiting its potential impact on the network and destination. In the past, for example, many SPs responded to increasing P2P traffic volumes by rate limiting it to limit the amount of network capacity it may utilize. Rate limiting drove P2P software providers to use a combination of encryption and port number changes, including the use of port 80 (HTTP) to masquerade P2P flows as regular HTTP traffic and, thereby, bypass these mechanisms. Nevertheless, rate limiting remains a useful security tool for bounding the maximum transmission rates of traffic flows.
Consider the MQC configuration illustrated in Example 4-10. In this example, the MQC configuration rate limits ICMP Echo Requests (pings) and TCP SYN packets received on interface POS 1/1. An ACL is used for packet classification and separate MQC policers are used for ICMP Echo Requests versus TCP SYN packets. Rate limiting such as this may be configured against any identifiable traffic flow and may be applied on ingress or egress of an interface.
Example 4-10. MQC-Based Rate Limiting Example
class-map icmp-pings
match access-group 102
class-map tcp-syns
match access-group 103
!
policy-map police-policy
class icmp-pings
police <rate> conform-action transmit exceed-action drop
class tcp-syns
police <rate> conform-action transmit exceed-action drop
!
interface pos1/1
service-policy input police-policy
!
access-list 102 permit icmp any any echo
access-list 103 deny tcp any any established
access-list 103 permit tcp any any
As stated previously, rate limiting is useful for allowing a traffic flow to pass while limiting its potential impact on network resources. IP routers are increasingly using predefined rate limiters to protect the router from exception traffic flows and DoS attacks. Predefined rate limiters vary between IP router platforms and between the IP traffic planes. Rate limiting within the IP control plane using Control Plane Policing (CoPP) is described in Chapter 5. Also, before applying a rate limiter, you should first consider whether it may actually introduce a potential attack vector. If, for example, a rate limiter is applied on an interface to limit the maximum transmission rate of a given traffic flow, an attacker may flood the interface with spoofed traffic such that the legitimate traffic flow is considered above the maximum permitted transmission rate of the rate limiter and, thereby, discarded. To minimize the risk of this threat, a granular rate limiter should be used wherever possible, as opposed to a coarse rate limiter.
IP Options Techniques
As described in Chapter 2, the IP packet header provides for various IP options as specified in RFC 791. IP options are used to enable control functions within the IP data plane that are required in some specific situations but not necessary for most common IP communications. Typical IP headers option include provisions for timestamps, security, and special routing. IP packets may or may not use IP headers option—they are optional—but IP header option handling mechanisms must be implemented by all IP protocol stacks (hosts and routers).
As you learned in Chapter 1, packets with IP headers option are punted to the IOS process level slow path (CPU) for data plane forwarding due to their variable length and complex processing requirements. Further, given that the IOS process level is shared with the IP control, management, and, optionally, services planes, a flood of IP option packets may easily saturate the IOS process level, triggering a DoS condition. As described in Chapter 2, these may be valid transit IP packets with legitimate sources and destinations, so even in the case of legitimate transit traffic, a DoS-like condition may exist if proper precautions are not taken.
IP headers option are not widely used in general-purpose IP networks. The functions provided by many of these options are deprecated by other, higher-layer protocols and enhancements. Of course, there are still IP protocols that cannot function without certain options. At the time of this writing, the IP protocols that (legitimately) make use of IP headers option include IGMPv2 (RFC 2236), IGMPv3 (RFC 3376), DVMRP (RFC 1075), and RSVP (RFC 2205). When these protocols and features are required, IP headers option must be allowed and processed accordingly. However, given the limited legitimate requirements for packets with IP headers option and the potentially disruptive impact they may have on network infrastructure, when options are not required, you should consider discarding them or at least limiting their ability to impact the network. Techniques available to mitigate the risk of IP options–based DoS attacks are reviewed next.
Disable IP Source Routing
IP source routing is enabled by default within IOS. When IP source routing is enabled, IOS is able to process IP packets with source-routing headers option. As described in Chapter 2, there are two problems with this. First, this introduces a potential DoS vulnerability against IP routers due to the slow path processing that is required. Second, this allows an attacker to specify the packet-forwarding path that should be taken to a given destination, enabling targeted attacks against downstream routers. Security best practices require IP source routing to be disabled. Disabling IP source routing via the global IOS command no ip source-route effectively mitigates the risk of attacks relating to packets with source-routing headers option. Of the protocols listed in the previous paragraph that use IP options, only DVMRP uses source-routing headers option.
IP Options Selective Drop
By default, all IPv4 packets (transit and receive) containing headers option are punted to the IOS process level for processing. As described previously, this is due to the variable-length nature of IP headers option, and the hardware and software forwarding optimizations built into modern routers to expedite normal IPv4 packets having 20-byte headers. IPv4 supports a maximum of 32 different option types (due to the 5-bit Type field in the option header), not all of which are currently assigned. The currently specified options, including source routing, are described at http://www.iana.org/assignments/ip-parameters. IP source routing is the only header option that allows a source to specify the forwarding path, but all other options remain as potential DoS threats to IP routers due to the need for IOS process level processing as just outlined. To mitigate the risk of all IP header option packet types, the global IOS command ip options drop (referred to as the IP Options Selective Drop feature) may be configured.
The IOS IP Options Selective Drop feature operates in two modes:
• Drop mode: For all IOS routers supporting this feature, when ip options drop is configured, all IP packets (transit and receive) containing options are punted to the IOS process level and then immediately (and silently) discarded. Drop mode is configured using the global IOS command ip options drop and affects all ingress IPv4 packets on all interfaces. Note that on Cisco 12000 (GSR) series routers, these actions occur on the distributed line card CPU and not on the central Route Processor (RP). Even though the punt to the IOS process level is still required, impact on the CPU is much smaller than that of fully processing the packet. In addition, because drop mode discards packets from the network, it relieves downstream routers and hosts from the load of IP option packets as well. This effectively mitigates the risk of IP options–based DoS attacks.
• Ignore mode: Because the Cisco 12000 (GSR) series is a distributed routing platform, two different mechanisms are used for processing IP option packets, depending on the option type. By default, all IP packets (transit and receive) containing the Router Alert IP header option are punted all the way to the RP for process level handling. All other IP option types are punted only to the distributed line card CPU for handling. Thus, an additional mode was added to the IP Options Selective Drop mechanism to protect the 12000 RP. On Cisco 12000 series routers only, the global IOS command ip options ignore may be configured. When ip options ignore is configured, all transit IP options packets are punted to the distributed line card CPU (slow path) for processing, but the options portion of the header is ignored (not processed). This includes transit packets with the Router Alert IP option header, and thus the 12000 RP is spared from handling any IP options packets. All receive IPv4 options packets are processed as they normally would be by the Cisco 12000 series routers. That is, IP packets with headers option are punted to the RP for handling (because they are CEF receive adjacencies). In addition, all transit packets with headers option are forwarded downstream but the IP headers option are ignored. Note that transit IP options packets still require slow path (distributed line card CPU) processing because other features requiring access to the Layer 4 information (such as ACLs) may be invoked. When IP options are included, the Layer 4 offset is variable and, thus, cannot be handled in hardware.
As you can see, ip options drop provides an effective solution to mitigate the risk of IP options–based DoS attacks. The operational costs are minimal due to the single, global configuration command. However, the scope of the command is global (not per interface), and there is still a small impact on performance because packets with IP headers option are still punted to the IOS process level before they are silently discarded. For Cisco 12000 series environments in which some IP option packets are required, protecting the RP through ip options ignore may be sufficient. Alternatively, ACLs may also be used to filter IP option packets on select interfaces, as described in the next section.
Note
When using the ip options drop or ip options ignore global configuration command, IP header option processing is modified as just described. To restore the default behavior, you must issue the global configuration command no ip options. Do not confuse the syntax of this command to imply that IP options will not be processed. That is not what this command does. This is simply the way in which configuration commands are removed from within IOS configurations.
ACL Support for Filtering IP Options
In certain versions of Cisco IOS, named, extended ACLs may also be used to filter IP packets with headers option. The use of ACLs provides for more granular control than the globally configured ip options drop mechanism. For one thing, the ACL technique may be applied on a per-interface basis rather than on a global basis. In addition, ACL keywords allow for filtering specific header option types, as opposed to discarding all IP packets containing any headers option. As an example, consider the ACL configuration illustrated in Example 4-11. This example configuration shows the named, extended ACL called filter-options that has been constructed to discard all IP packets having a strict source route (SSR), loose source route (LSR), or timestamp header option. The named, extended filter-options ACL is then applied to interface POS1/1 to filter packets received on this interface (inbound direction).
Example 4-11. Filtering IPv4 Packets Containing Specific Options Using ACLs
ip access-list extended filter-options
10 deny ip any any option ssr
20 deny ip any any option lsr
30 deny ip any any option timestamp
40 permit ip any any
!
interface POS1/1
access-group filter-options in
The ACL used in Example 4-11 only includes ACEs for dropping specific IP header option types. In practice, these ACEs would most likely be combined with other ACEs used to support infrastructure, transit, antispoofing, or classification ACLs, as described in the “Interface ACL Techniques” section earlier in the chapter. Additional details on filtering IP options using ACLs can be found in “ACL Support for Filtering IP Options” (see the “Further Reading” section).
Control Plane Policing
Control Plane Policing (CoPP) is an IOS security technique that is used to protect the control and management planes of an IP router and, optionally, the services planes. This feature is described in detail in Chapter 5.
As you learned in Chapter 1, a small group of transit IP packets, called exception packets, must also be punted to the IOS process level for forwarding. IP packets with headers option were discussed in the previous section as one example, but a few others exist as well. CoPP is mentioned in this chapter because it may also be used to protect an IP router from these exception IP packets, such as a flood of IP packets with the Router Alert header option. All IP packets with a Router Alert option are punted to the IOS process level for handling, irrespective of being transit or receive adjacency packets. This makes them subject to CoPP policies that may be configured to limit the impact on the IOS process level against a flood or DoS attack crafted with Router Alert option packets. CoPP is described in detail in Chapter 5.
ICMP Data Plane Mitigation Techniques
As discussed in Chapter 2, ICMP is commonly used as an attack vector for data plane DoS attacks. One reason for this is that ICMP processing is often handled at the IOS process level (CPU) of IP routers, and hence, can be leveraged directly from the data plane to attack the same router components that support the control plane.
By default, IOS software enables certain ICMP processing functions in accordance with IETF standards. These default configurations may not conform to security best practices or to security policies you may have for your network. To reduce the impact of ICMP-related data plane DoS attacks within IP network environments, IOS includes interface configuration commands to disable many of these ICMP handling features. These ICMP mitigation techniques are discussed next:
• no ip unreachables: Disables the interface from generating ICMP Destination Unreachable (Type 3) messages, thereby reducing the impact of certain ICMP-based DoS attacks on the router CPU. This command is applied within IOS interface configuration mode. The command ip unreachables is used to restore the ability to generate ICMP Destination Unreachables, which is the default behavior within IOS. The no ip unreachables command applies to all types of ICMP Unreachable messages as defined by http://www.iana.org/assignments/icmp-parameters. (ICMP Destination Unreachables are also covered in Appendix B.) ICMP Destination Unreachable messages are often generated by network edge routers and default gateways as a result of ACL filtering or IP routing table inconsistencies (in other words, lack of a prefix match within the IP routing table for the destination address of a received packet). However, as described in Appendix B, other than a few management applications (such as traceroute), very few applications actually use ICMP Destination Unreachable messages. One exception is Path MTU Discovery (PMTUD), which relies upon ICMP Destination Unreachable (Type 3), Fragmentation Needed and Don’t Fragment was Set (Code 4) messages for proper operation. Disabling IP Destination Unreachable generation will prevent these ICMP Type 3, Code 4 messages, potentially breaking PMTUD. Generally, this would only be true in cases where interface MTU values were inconsistent across a router’s interfaces. (IP fragmentation and interface MTUs are discussed further in Chapter 7.) Therefore, the logical place to apply no ip unreachables to mitigate the risk of ICMP Unreachable DoS attacks is at the network edge, where ingress filtering and IP routing table inconsistencies generally occur and where the router CPU could potentially be externally attacked by causing excessive ICMP Unreachable message generation. Further, the network edge and core should be engineered to avoid IP fragmentation such that applying no ip unreachables at the network edge does not break PMTUD. Example 4-12 illustrates the Cisco IOS CLI used to disable the generation of ICMP Unreachable messages on an Ethernet interface.
Example 4-12. Configuration for no ip unreachables Interface Command
interface Ethernet 0
no ip unreachables
You should be aware that some versions of IOS also provide the ability to rate limit the generation of ICMP Destination Unreachable messages to limit their impact on the IOS process level. IOS maintains two timers per interface: one for general Destination Unreachable messages, and one for Fragmentation Needed and Don’t Fragment was Set Destination Unreachable messages. Both share the same time limits and defaults. The default value for both timers is one ICMP Destination Unreachable message per 500 ms. Default values may be changed using the ip icmp rate-limit unreachable global configuration command. In this way, using the default values, only two ICMP Destination Unreachables will be sent per second per interface (assuming ip unreachables is enabled). Note that the ip icmp rate-limit unreachable and no ip unreachable commands apply only to ICMP Destination Unreachable messages. These commands have no effect on other ICMP message types (for example, Type 11, Time Exceeded).
• no ip redirects: Disables the interface from generating ICMP Redirect (ICMP Type 5) messages when it is forced to send an IP packet through the same interface on which it was received, and the subnet or network of the source IP address is on the same subnet or network of the next-hop IP address in the Redirect message per RFC 792. This command is applied within IOS interface configuration mode, and applies only to ICMP Redirect messages. By default, Cisco IOS interfaces generate ICMP Redirect messages. Thus, the interface command no ip redirects is required to change this default behavior. Most ICMP Redirects are generated in shared LAN environments by network edge routers, specifically default gateways because IP hosts and default gateways typically do not exchange routing protocol information and because ICMP Redirects are generated only if the source of the original packet is directly connected. An IP host’s statically or DHCP assigned default gateway may not provide the best path to a remote destination. In these scenarios, the default gateway forwards the packet but also generates an ICMP Redirect to the source IP host. Therefore, the logical place to apply the no ip redirects command to mitigate the risk of ICMP Redirect attacks is on router interfaces that do not provide default gateway services via a shared LAN. Disabling ICMP redirects on shared LAN default gateway router interfaces is also an option and is often considered a best practice to prevent the generation of ICMP redirect messages from impacting the IOS process level. Example 4-13 illustrates the Cisco IOS CLI used to disable the generation of ICMP Redirect messages on an Ethernet interface.
Example 4-13. Configuration for no ip redirects Interface Command
interface Ethernet 0
no ip redirects
Note
More information on the generation of ICMP Redirect messages may be found in the Cisco.com document “When Are ICMP Redirects Sent?” (see the “Further Reading” section).
• IP packet with parameter problem: Per RFC 792, if an IP router receives a packet with an IP header problem and discards the packet, it must generate an ICMP Parameter Problem (Type 12) message. These are only sent if the IP packet is discarded. The default behavior within IOS is to generate such ICMP Parameter Problem messages, and there is no CLI to disable this behavior. CoPP may be used to limit the impact of DoS attacks using IP packets with parameter problems. (For further information on CoPP, refer to Chapter 5.) Note that such attacks generally apply only to first-hop (default gateway) routers, because they would first encounter and discard such malformed packets rather than forward them downstream. Hence, default gateway routers are most susceptible to this specific attack.
• IP packet with expired TTL: Per RFC 792, if an IP router receives a packet with a TTL value of 1 or 0, the packet must be discarded and an ICMP Time Exceeded (Type 11) message must be generated and sent to the original source. The default behavior within IOS is to generate such ICMP Time Exceeded messages, and there is no CLI available to disable it. However, other techniques are available to mitigate the risk of TTL expiry–based DoS attacks, including:
— ACL filtering of IP TTL. For further information, refer to the “Interface ACL Techniques” section earlier in the chapter.
— CoPP. For further information, refer to Chapter 5.
— Disabling IP TTL to MPLS TTL propagation within MPLS networks. For further information, refer to Chapter 7.
Because ICMP packets often bridge the data plane and control plane, you should put extra effort into understanding their use and misuse and methods to control their generation. As described previously, both data plane and control plane security techniques are often used for these purposes. Techniques to mitigate the risk of attacks using ICMP protocol packets are discussed in Chapter 5.
Disabling IP Directed Broadcasts
An IP directed broadcast is an IP packet whose destination address is a valid broadcast address for an IP subnet (or network) that is one or more router hops from the source address. Intermediate routers that are not directly connected to the destination subnet forward IP directed broadcasts in the same way as unicast IP packets. However, when a directed broadcast packet reaches the ultimate hop router that is directly connected to the destination subnet, it is broadcast to every IP device attached to that subnet using the Layer 2 link-layer broadcast address. This is consistent with the IP broadcast address 255.255.255.255/32, however, IP directed broadcasts allow IP broadcasts to be remotely transmitted versus remaining local to the directly connected network. Each IP router (and device) listens for the IP broadcast address of its own subnet and handles such packets as a CEF receive adjacency.
IP directed broadcasts, and specifically ICMP directed broadcasts, have been used to launch DoS attacks (see, for example, “CERT Advisory CA-1998-01 Smurf IP Denial-of-Service Attacks,” at http://www.cert.org/advisories/CA-1998-01.html). As a result, and given the limited legitimate uses of IP directed broadcasts, IOS changed the default interface configuration to no ip directed-broadcast, which disables IP directed broadcasting. When disabled for an interface, directed broadcasts destined for the associated IP subnet to which that interface is attached will be discarded, rather than being broadcast. This command only affects the final transmission of the directed broadcast on the egress interface of the ultimate hop router. It does not affect the transit unicast routing of IP directed broadcasts along the forwarding path to the ultimate hop router. Alternatively, an ACL may be configured to filter unauthorized directed broadcasts. In this way, only directed broadcasts that are permitted by the ACL will be forwarded; all other directed broadcasts will be discarded.
For those IP networks or specific subnets that may require IP directed broadcasts, it may be enabled by applying the ip directed-broadcast command within IOS interface configuration mode. When enabled, ACLs are recommended to limit the scope of IP directed broadcasts. For example, only devices associated with trusted (or internal) IP subnets may be permitted to transmit IP directed broadcasts. Conversely, IP directed broadcasts sourced from untrusted (or external) IP subnets should be filtered. Antispoofing techniques, including ACLs and uRPF, may be used to mitigate the risk of spoofed IP directed broadcasts. If IP directed broadcast support has been enabled and you want to disable this functionality, use the no ip directed-broadcast IOS interface configuration command.
IP Sanity Checks
IP routers perform integrity checks on received packets, including verification of the IP checksum and the IP header format, including options fields. If a router discards a packet due to a header parameter problem, the router may signal that to the packet source via an ICMP Parameter Problem message (Type 12) indicating the error condition. Within the control plane, routers also perform integrity checks to validate routing protocol advertisements received. Such integrity checks are often specified within the IETF protocol specifications and state machines. OSPF advertisements received, for example, are not accepted at the IP process level per Section 8.2 of RFC 2328 until a variety of integrity checks are performed against both the IP and OSPF packet headers. Other control plane protocols have their own distinct integrity checks, given the inherent differences among them, including transport layer protocol checks. TCP-based protocols, for example, verify packet sequence numbers before accepting packets associated with established sessions. Conversely, Generalized TTL Security Mechanism (GTSM) is an IP integrity check that is protocol independent and helps to reduce the risk of spoofed attacks. For more information on GTSM, refer to Chapter 5.
To reduce the risk of spoofed and broadcast attacks, high-end Cisco routers have integrated additional IP sanity checks within the data plane to filter illegal packets having
• IP source address equal to IANA reserved IP multicast address 224.0.0.0/4
• IP source address equal to the IANA reserved host loopback address 127.0.0.0/8
• IP source address equal to the all 1s broadcast address 255.255.255.255/32
• IP destination address equal to the all 0s network address 0.0.0.0/32
The preceding packet types are illegal and are discarded with no ICMP messages generated. Although support is limited to high-end Cisco routers such as the Cisco 12000 series, it is recommended that you add similar checks to interface ACL policies as illustrated in the Example 4-14 configuration.
Example 4-14. IP Sanity Check Access List Illustration
interface pos1/1
access-group 100 in
access-list 100 deny ip 224.0.0.0 31.255.255.255 any
access-list 100 deny ip 127.0.0.0 0.255.255.255 any
access-list 100 deny ip 255.255.255.255 0.0.0.0 any
access-list 100 deny ip any 0.0.0.0 0.0.0.0
access-list 100 permit ip any any
You should consider filtering other illegal IP address combinations within your ACL policies as defined within RFC 3330.
BGP Policy Enforcement Using QPPB
As outlined within the “Interface ACL Techniques” section earlier in the chapter, interface ACLs provide static policies within the data plane to filter IP traffic flows. Hence, ACLs work well when traffic filtering policies are generally static. For those applications where traffic filtering policies change frequently, ACLs are often too difficult and costly to manually maintain. Enforcement of Internet peering agreements is one such application where SPs often consider the cost of manually maintaining ingress ACL policies to be too significant compared to the risk of Internet peers violating established agreements. As a result, many SPs simply rely upon control plane techniques to enforce peering agreements. Control plane–based techniques, however, only affect routing protocol policies and do not mitigate the risk of an Internet peer using IP routing tricks to bypass control plane techniques and, thereby, steal bandwidth in violation of peering agreements. Consider the network topology illustrated in Figure 4-9.
Figure 4-9. Internet Peering Policy Violation

SP-2 and SP-3 are both Internet peers of SP-1. As a result, SP-1 and SP-2 exchange only their customer IP prefixes with one another via eBGP, as do SP-1 and SP-3. Because SP-2 and SP-3 only peer with SP-1 (either settlement-free or settlement-based) and do not purchase Internet transit services from SP-1, from the perspective of SP-1, there should be no IP reachability between SP-2 and SP-3. That is, SP-2 and SP-3 should not be using SP-1 as transit to reach each other’s prefixes.
In general, Internet peering between SPs provides IP reachability to each other’s customer prefixes (not downstream peer prefixes). Per Figure 4-9, traffic between 172.16.0.0/16 and 192.168.0.0/16 networks should not transit SP-1. Otherwise, such traffic flows between SP-2 and SP-3 would effectively be stealing bandwidth from SP-1. Conversely, SP-1 customer prefixes (for example, 209.165.200.224/27) have full IP reachability to and from both SP-2 and SP-3 prefixes because SP-1 has established peering agreements with both SP-2 and SP-3. If SP-2 desires IP reachability to SP-3 prefixes, and vice versa, SP-2 and SP-3 should either peer with one another directly or purchase Internet transit services from SP-1. Although the benefit for SP-1 in peering with both SP-2 and SP-3 is IP reachability to their respective customer prefixes, in general, there is no benefit for SP-1 in providing free transit services between SP-2 and SP-3. If SP-2 and SP-3 do not purchase SP-1 transit services and remain SP-1 peers, any transit traffic transferred between SP-2 and SP-3 via SP-1 is considered to be in violation of the SP-1 peering agreements. Although this may be considered a business dispute between Internet peers, such traffic may adversely affect (paying) transit customers of SP-1 in terms of packet delay, loss, and jitter. Hence, SP-1 needs to protect its (paying) transit customers and well-behaved (conforming) peers and mitigate the risk of Internet peers stealing bandwidth in violation of established peering agreements.
Typically, SP-1 prevents IP reachability between SP-2 and SP-3 solely through BGP routing policies (in other words, control plane). BGP route maps and prefix filters control route advertisements and prevent the propagation of SP-2 and SP-3 customer prefixes between one another. In this way, SP-2 does not learn SP-3 customer prefixes via eBGP, and vice versa. If, however, SP-2 or SP-3 plays routing tricks to bypass these control plane policies, such as using SP-1 as a default route, then SP-1 may forward unauthorized transit traffic between SP-2 and SP-3, because the BGP techniques just outlined do not apply within the IP data plane. Hence, SP-1 is at risk of an Internet peer using IP routing tricks to circumvent BGP peering policies and, thereby, steal bandwidth in violation of established peering agreements. For more information on the BGP security techniques, refer to Chapter 5.
SPs are able to monitor peering policy violations through NetFlow and BGP policy accounting. However, these techniques do not filter traffic flows that violate policies. They only allow the SP to detect peering violations, not mitigate them. Data plane techniques are required to filter traffic flows that bypass BGP routing policies. For more information on NetFlow and BGP policy accounting, see Chapter 6.
As mentioned, ACLs may be used by SP-1 to prevent IP reachability between SP-2 and SP-3. Such an ACL would be applied, for example, on SP-1’s external interfaces to SP-2 and SP-3 and would filter any traffic not destined to an SP-1 transit customer prefix. This seems relatively straightforward; however, in practice, this is not operationally deployable, for the following reasons:
• SP-1 has many transit customers, some of which use SP-1 assigned IP address blocks whereas others have their own address blocks allocated from an IP registry. Such customers may also be multihomed to multiple ISPs for redundancy purposes, which must be considered if they are also reachable via Internet peers. Transit customers may migrate from one ISP to another and, in the future, yet another.
• SP-1 customers may be downstream SPs themselves (for example, Tier 2). Hence, the prefix challenges just outlined are recursive among SP-1 and any transit customers that are also downstream SPs.
Because of the preceding reasons, the transit customer prefixes maintained by SPs are constantly changing. Conversely, ACLs are generally static. Therefore, to enforce peering policies using ACLs, an SP would be required to update and reapply the ACL policy whenever it gains or loses an IP prefix. Given the operational complexities and expense in maintaining constant changes to static ACL policies, SPs often do not enforce Internet peering policies within the data plane. Automated techniques similar to those used within BGP for filtering control plane advertisements are needed to filter IP data plane traffic that violates the BGP control plane policy.
A technique that may be used to enforce Internet peering policies is Cisco’s QoS Policy Propagation on BGP (QPPB). QPPB provides prefix-based QoS such that traffic flows to and from specific IP prefixes may be prioritized above (or below) others or simply discarded. IP prefixes of interest are tagged via the control plane using common BGP route-map techniques, including the community attribute, AS Path, and ACLs. Traffic flows to and from the tagged BGP prefixes are then classified and filtered via the data forwarding plane using IOS MQC policing. For more information on policing, refer to the “Rate-Limiting” section earlier in the chapter. QPPB provides the glue between the BGP control plane and the data plane MQC capabilities (for example, policing) in support of IP prefix-based QoS. BGP, MQC, and QPPB are each configured independently; however, collectively they provide the QPPB solution.
In the context of Internet peering policy enforcement, QPPB is configured to apply distinct tags within the FIB (CEF) table to differentiate between peer IP prefixes and customer IP prefixes. Then, any traffic received from a peer and destined to a peer prefix can be discarded in accordance with Internet peering policies. Conversely, any traffic received from a peer and destined to a customer prefix is forwarded across the SP-1 backbone in accordance with Internet peering policies.
Standard BGP policy configurations may be used to tag peer prefixes differently from customer prefixes. The sample BGP configuration illustrated in Example 4-15 uses the BGP community attribute to distinguish between peer and customer prefixes, but you may also use the AS Path attribute and route-map ACLs.
Example 4-15. QPPB Example BGP Configuration
!
router bgp <SP1-ASN>
table-map tag-prefix
neighbor <ip-address> remote-as <SP1-ASN>
neighbor 172.16.1.1 remote-as <SP2-ASN>
neighbor 172.16.1.1 route-map peer-comm in
!
ip bgp-community new-format
ip community-list 1 permit <SP1-ASN>:1
ip community-list 2 permit <SP1-ASN>:2
!
access-list 1 permit 172.16.0.0 0.0.255.255
access-list 1 deny any
!
route-map peer-comm permit 10
match ip address 1
set community <SP1-ASN>:1
!
route-map tag-prefix permit 10
match community 1
set ip qos-group 1
route-map tag-prefix permit 20
match community 2
set ip qos-group 2
In this example, the BGP tag-prefix table map sets the QoS Group ID for each IP prefix within the FIB to 1 for peer prefixes and to 2 for customer prefixes. By default, IOS sets the QoS Group ID for each prefix within the FIB to 0. The QoS Group ID of a given prefix can be seen via the show ip cef detail IOS CLI command if the QoS Group ID is non-zero. As illustrated in Example 4-15, the BGP control plane classifies and tags prefixes within the router FIB. QPPB and MQC policing are then applied within the data forwarding plane to filter traffic flows sourced from Internet peers and destined to peer prefixes. Example 4-16 illustrates QPPB and MQC policing configurations.
Example 4-16. QPPB and MQC Policing Configuration Illustrations
class-map peer-prefix
match qos-group 1
class-map customer-prefix
match qos-group 2
!
policy-map peer-in
class-map peer-prefix
police <rate> conform-action drop exceed-action drop
!
interface pos1/1
description SP-1 interface to SP-2
ip address 10.1.1.1 255.255.255.252
bgp-policy destination ip-qos-map
service-policy input peer-in
ip access-group <infrastructure-acl> in
In this example, interface POS1/1 connects to an Internet peer (SP-2). Destination-based QPPB is enabled on the interface along with MQC input policing. As a result, any traffic received from the Internet peer on interface POS1/1 and destined to a peer prefix is dropped via the MQC policer. Traffic received from the peer and destined to a customer prefix (in other words, QoS Group ID 2) is forwarded. Not only does this approach enforce peering policies within the data plane, thereby mitigating the risk of a peer using routing tricks to steal bandwidth, it also operates dynamically using BGP. In this way, any BGP prefix changes within the SP global IP routing table are automatically and rapidly distributed throughout the network. Peering routers may then use this information to filter traffic flows received from a peer and destined to another peer. No static or manually maintained ACL policies are required and, further, this works in conjunction with ingress ACL policies that provide infrastructure, transit, classification, and, optionally, antispoofing protection. Lastly, this QPPB technique not only filters transit traffic between remote peers connected via distinct SP-1 peering routers, but it also filters transit traffic between local Internet peers attached to the same SP-1 peering router.
IP Routing Techniques
The many techniques outlined in each of the previous sections are considered best common practices (BCP) to mitigate the risk of security attacks against the data plane of an IP network. You can apply ACLs, FPM, and rate limiting not only proactively as BCPs to help prevent attacks but also reactively as incident response tools to mitigate active security attacks.
Another group of valuable and recommended security mechanisms that you can use to mitigate the risk of attacks and to respond to incidents are IP routing techniques. IP routing techniques leverage the IP control plane to protect the data plane through packet filtering, because the lack of a route (or a route to Null0) results in packet discards. As with the data plane mechanisms described previously, these control plane–based mechanisms serve both as a proactive measure to help prevent attacks and as a reactive tool for mitigating active security attacks. Because no one technique or tool is applicable in all circumstances, having a security toolkit that includes IP routing techniques provides you greater flexibility to choose the most appropriate solutions for your specific network environment. The following sections describe how IP routing may be used as a BCP to mitigate the risk of attacks and as a tool for incident response.
IP Network Core Infrastructure Hiding
In this section we will examine the use of IS-IS advertise-passive only for hiding network core infrastructure.
IS-IS Advertise-Passive-Only
Intermediate System-to-Intermediate System (IS-IS) is a link-state protocol that is designed to operate in OSI Connectionless Network Service (CLNS) environments. OSI CLNS is a network layer service similar to IP, but it communicates over Connectionless Network Protocol (CLNP) with its CLNS peers. Integrated IS-IS was developed to support IP and CLNS, and may be used as an Interior Gateway Protocol (IGP) to support IP.
Because IS-IS uses CLNP for its underlying peer communications and carries IP prefixes as an overlay IP Routing Information Base (RIB), in certain cases it is possible to remove the so-called infrastructure links from the IS-IS IP RIB without impacting its primary role as an IGP. For example, iBGP peering is commonly established between loopback interfaces on edge and core routers. Hence, at a minimum, only these loopback interfaces need to be advertised in the IS-IS IP RIB for BGP sessions to be established.
IOS originally introduced a mechanism for IS-IS to exclude connected IP prefixes from LSP (link state protocol) advertisements to improve IS-IS protocol convergence times. This was later also identified as a useful router security tool; the connected prefixes are no longer carried within the IP routing table, so they are no longer reachable by (or susceptible to) direct attacks. This further reduces the risk of an attack against an IS-IS-enabled IP core network, because traffic destined to internal router interface addresses beyond the network edge routers have no associated IP route and thus are no longer reachable. (Infrastructure links on network edge routers remain reachable because they are represented as connected prefixes within the routing table.) Attacks against router loopback interfaces remain a threat; however, you can mitigate the risk by applying ingress interface ACLs at network edge routers, and Receive ACL (rACL) and CoPP policies on the local (target) router. For more information on rACL and CoPP, refer to Chapter 5.
Two methods are available for excluding infrastructure links from the IS-IS IP RIB. When only a small number of interfaces are involved, each interface may be explicitly configured for exclusion by issuing the no isis advertise prefix interface configuration mode command. When a large number of interfaces must be excluded from the IS-IS IP RIB, it is easier to advertise only the passive interfaces by configuring the advertise-passive-only command in IOS routing protocol configuration mode. To use this command, you must also configure the loopback interfaces as passive, which also prevents IS-IS from attempting to send unnecessary hello packets out through a loopback interface. Example 4-17 illustrates this concept.
Example 4-17. IS-IS advertise-passive-only Configuration Illustration
router isis Core
advertise-passive-only
passive-interface Loopback0
This mechanism is only supported for the IS-IS protocol within IOS today. IP networks that use an alternative IGP routing protocol may be similarly protected by using ingress interface ACLs, rACLs, and CoPP policies, as stated previously. The IS-IS advertise-passive-only technique simply adds another layer of protection, thus facilitating defense in depth and breadth, as outlined in Chapter 3. A drawback of this IS-IS technique, however, is that network management tasks become more difficult because this technique prevents the ping utility from verifying liveliness of these excluded links. As such, before deployment, you should take care to understand the implications of using this capability.
IP Network Edge External Link Protection
As described in the “Interface ACL Techniques” section earlier in the chapter, iACLs are widely deployed at the network edge to protect an organization’s internal network infrastructure. Edge router external links, however, are typically not treated as internal infrastructure and, hence, are often carried within BGP aggregate routes that are widely distributed throughout the Internet routing architecture. This exposes these edge routers to potential DoS attacks from the wider Internet. Figure 4-10 illustrates the potential threat.
Figure 4-10. PE-CE Link Reachability
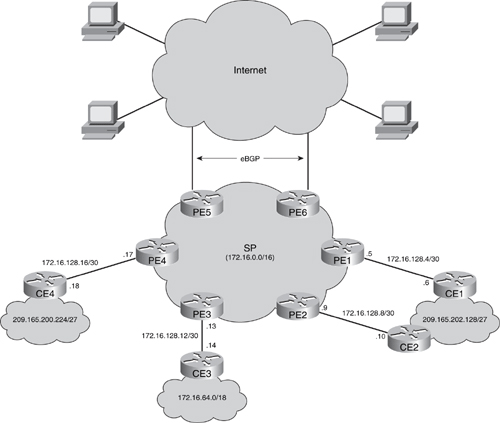
As shown in Figure 4-10, if these external interconnect links (including PE1-CE1, PE2-CE2, and so on) are carried within aggregate prefixes advertised to the wider Internet, they are potentially reachable and, thereby, vulnerable to attack from the wider Internet.
The same applies to the SP’s peering interconnects, including PE5 and PE6. To mitigate the risk of attacks against the edge routers (both PEs and CEs) via these external (and public) links, any remote traffic destined to these external interface IP addresses needs to be filtered and discarded. Short of using RFC 3330 private addresses for these external links, you can filter and discard remote traffic by deploying any of several IP routing schemes or iACL techniques. These schemes block IP reachability to external interconnects including PE-CE links. In general, there is no underlying need for remote reachability to these links, but some customers may require reachability to their CE for specific applications, such as IPsec and GRE tunneling, VoIP gateway services, and so on. In those cases, filtering traffic to the CE may break such applications. For those specific PE-CE interconnects, you may need to filter remote traffic destined only to the PE address of the external link.
Protection Using More Specific IP Prefixes
As illustrated in Figure 4-10, the PE1-CE1 link is assigned 172.16.128.4/30, with a PE interface of 172.16.128.5 and a CE interface of 172.16.128.6. The 172.16.0.0/16 aggregate route is advertised to eBGP peers, including the wider Internet, providing to any Internet-connected device IP reachability to these PE-CE links. One approach to block reachability to these network edge (PE-CE) external links is to assign a static route to Null0 for the aggregate address block associated with external links on every core and edge router in the SP network (in other words, 172.16.128.0/18). In this case, the static route ip route 172.16.128.0 255.255.192.0 Null0 would be configured. This prevents remote reachability across the SP network to the edge router external links.
When applying this, do not redistribute connected routes into BGP or IGP, and do not announce more specific aggregates, such as 172.16.128.0/19. Otherwise, IP reachability would remain, because the more-specific aggregate is preferred. Further, be sure to set BGP next-hop-self for iBGP sessions, because external peer BGP next hops (in other words, CEs) are also no longer reachable. The best route to 172.16.128.4/30 and all other PE-CE links on every router in the SP network is now the 172.16.128.0/18 static route to Null0. If a customer absolutely requires that their CE address be globally reachable via the Internet, then configure a static route to the CE /32 external address (for example, 172.16.128.6/32) pointing to the customer interface and redistribute that static route into iBGP on the associated PE. In this way, reachability is maintained for those customers who need it, but the majority of CE interfaces remain protected from direct attack.
The benefit of deploying this technique is that it makes it more difficult to remotely attack PE and, optionally, CE external interfaces (having public addresses). Any packets destined to such addresses are discarded, including ping, but IP traceroute is not impacted.
Providing IP reachability to CE devices while denying reachability to the associated PE external interfaces poses three challenges:
A potentially large number of /32 CE host routes may need to be installed within the SP global IP routing table. This may adversely impact IP prefix scalability within the SP routers.
PPP encapsulated PE-CE links also require the use of the no peer neighbor-route IOS interface configuration command to ensure that the /32 connected prefix does not appear in the router RIB, because it would be preferred over the /32 static route to the CE. Without the no peer neighbor-route CLI, the /32 CE static route associated with PPP interfaces would not be advertised within iBGP, preventing CE reachability, if required for IPsec tunneling or other services.
This approach remains subject to local attacks that ingress and egress through the same edge router, given that these PE public addresses are local CEF receive adjacencies and the network edge cannot control what external traffic is sent its way (as described in Chapter 3). Local attacks may be mitigated using interface ACLs, IP rACLs, or CoPP. For more information on IP rACLs and CoPP, refer to Chapter 5.
Protection Using BGP Communities
An alternate technique to preventing IP reachability to edge router external links is to tag the PE-CE prefixes (either the 172.16.128.0/18 aggregate or the individual /30s) with a special iBGP community attribute that will be matched at remote edge routers. All remote edge routers will then black hole any traffic to the tagged prefix(es) by setting the IP next hop to a preconfigured static route that resolves to Null0, as is typically used for this purpose. It is common practice to use a prefix from the TESTNET range (192.0.2.0/24) for this purpose. In Example 4-18, the TESTNET prefix 192.0.2.1/32 is set with a next hop of Null0.
Example 4-18. PE-CE Link Protection via BGP Community Mechanisms
router bgp 65535
neighbor <ibgp peer> remote-as 65535
neighbor <ibgp peer> route-map ibgp-peers in
!
ip community-list 1 permit 65535:66
!
route-map ibgp-peers permit 10
match community 1
set ip next-hop 192.0.2.1
set local-preference 200
set community no-export
set origin igp
!
ip route 192.0.2.1 255.255.255.255 Null0
Similar to the previous solution of using more-specific IP prefixes, the benefit of deploying this technique is that it makes it more difficult to remotely attack PE and, optionally, CE external interfaces (having public addresses). Any packets destined to such addresses are discarded, including ping, but IP traceroute is not impacted. The challenges with this approach are the same as those outlined for the “Protection Using More Specific IP Prefixes” approach above.
Protection Using ACLs with Discontiguous Network Masks
A third approach is to use iACLs to filter all remote traffic destined to the IP address block assigned to edge router external links. This is straightforward, provided that IP reachability to the CE is not required. If CE reachability is required, then discontiguous network masks within the ingress interface ACL policies are required to filter all remote packets destined to PE external addresses while permitting reachability to the associated CE external addresses.
Note
A discontiguous network mask within an ACL results when the wildcard bits set to ignore (1) are not contiguous within the address (source or destination) wildcard mask. For example, a source wildcard mask of 0.255.0.64 is considered a discontiguous network mask due to the separation of the 255 mask from the 64 mask by the intervening 0 mask.
An IP router will process packets destined to network addresses (in other words, 0 subnet), broadcast addresses (all 1s subnet), and unicast addresses assigned to router interfaces; hence, the ACL must consider all three of these CEF receive adjacencies. Consider the PE-CE addressing illustrated in Figure 4-10 where the prefix 172.16.128.4/30 has been assigned to the PE1-CE1 link. In this case, the prefixes would be allocated as follows:
• 172.16.128.4/32: Network address
• 172.16.128.5/32: PE external interface
• 172.16.128.6/32: CE external interface
• 172.16.128.7/32: Broadcast address
To filter traffic to the network, PE, and broadcast addresses while permitting traffic to the CE address, the interface ACL shown in Example 4-19 may be applied on all external interfaces of all PE routers.
Example 4-19. PE-CE Link Protection via Discontiguous ACL Configurations
interface pos1/1
ip address 172.16.128.5 255.255.255.252
ip access-group 150 in
!
access-list 150 deny ip any 172.16.128.5 0.0.63.254
access-list 150 deny ip any 172.16.128.0 0.0.63.252
access-list 150 permit ip any any
This approach requires a consistent IP addressing scheme across the SP edge router external links so that the PE-CE links may be aggregated within the ACL policy. For example, you could use odd IP addresses (.1) for PE external addresses and even IP addresses (.2) for CE external addresses. Otherwise, two distinct ACE entries may be required per PE-CE link, which increases the length of the ACL and is not operationally manageable.
Discontiguous ACL network mask support varies among IP router platforms. Both CRS-1 and the Cisco 12000 ISE (Engine 3 and Engine 5 line cards), for example, support the use of discontiguous ACLs in the hardware fast path. Conversely, other platforms may process these ACLs in the router slow path (CPU). Further, as outlined in the “Interface ACL Techniques” section earlier in the chapter, ACLs are difficult to manage, in particular, given all the exceptions required (for example, broadcast and multiaccess links).
The benefit of deploying any one of the preceding three edge router external link protection schemes is that it makes it more difficult to attack edge router external links. Any packets destined to such addresses are discarded, including ping, but IP traceroute is not impacted. The first two schemes (leveraging routing and the FIB) remain subject to local attacks that ingress and egress through the same edge router. Conversely, the third scheme (using interface ACLs with discontiguous network masks) mitigates both remote and local attacks, but requires a consistent PE-CE addressing scheme and interface ACL changes on each PE external link.
Remotely Triggered Black Hole Filtering
The most commonly deployed data plane incident response technique is the use of interface ACLs. The use of IP routing–based mechanisms to support data plane attack mitigation provides an alternate technique that potentially offers both speed and scalability advantages over ACL techniques. This is achieved by rerouting attacks to the Null0 interface, which results in those rerouted traffic flows being discarded. This is referred to as black hole filtering and is typically used in conjunction with BGP to trigger a network-wide response to an attack. When combined with BGP, it is referred to as remotely triggered black hole (RTBH) filtering.
Unlike ACL policies, which take time to be constructed, distributed, and installed across potentially hundreds to thousands of routers or interfaces, RTBH filtering policies are distributed throughout a network just as quickly as iBGP can update the network. This provides a tool that can be used for rapid response to security incidents. RTBH mechanisms must be predeployed before they can be used for incident response. The step necessary to accomplish this are as follows:
1. Configure all edge routers with a static route to Null0. It is common practice to use a prefix from the TESTNET range (192.0.2.0/24) for this purpose. Here, the TESTNET prefix 192.0.2.1/32 is set with a next hop of Null0 using the global command ip route 192.0.2.1 255.255.255.255 Null0.
2. Configure a trigger router as part of the iBGP mesh, whose role will be to support the real-time insertion and removal of prefixes that are to be discarded on a network-wide basis (attack mitigation). A dedicated trigger router or other BGP-speaking device (such as a Linux workstation running quagga or zebra, for example) is recommended. Note the trigger device only needs to advertise iBGP routes, not accept them. The trigger router is the device that will inject the iBGP announcement into the network. The baseline configuration of the trigger router is shown in Example 4-20.
Example 4-20. Trigger Router Configuration Illustration
router bgp 65535
redistribute static route-map static-to-bgp
neighbor <ibgp peer> remote-as 65535
!
route-map static-to-bgp permit 10
match tag 66
set ip next-hop 192.0.2.1
set local-preference 200
set community no-export
set origin igp
!
route-map static-to-bgp deny 20
As you can see in Example 4-20, any static routes with a tag of 66 are matched and have their next hop set to 192.0.2.1. As previously configured, the same prefix, 192.0.2.1, was statically bound to Null0. Hence, once the two (2) predeployment steps are applied, the network is ready to respond to security incidents via RTBH filtering. To activate a black hole via the trigger router, simply configure a static route on the trigger router for the destination to be black holed, and make sure to mark the static route with the tag of 66 (as used within the route map of Example 4-20). For example, if the destination prefix 172.16.61.1/32 is being attacked and you want to black hole all traffic destined to this prefix, network-wide, install the static route ip route 172.16.61.1 255.255.255.255 null0 tag 66 on the trigger router. Once you configure this static route on the trigger router, it will be automatically redistributed into iBGP and propagated to all edge routers. The edge routers then “glue” the more specific 172.16.61.1/32 prefix that was advertised by the trigger router to their preconfigured 192.0.2.1/32 static route, which resolves to Null0. Due to recursion, the attack target address now has a next hop of Null0. Traffic received at the network edge that is destined to the attack target (172.16.61.1) is now sent to Null0 (in other words, discarded). To view the number of packets discarded by the Null0 interface due to RTBH filtering, use the show interface Null0 command as illustrated in Example 4-21.
Example 4-21. Sample Null0 Interface Statistics
Router> show int null0
Null0 is up, line protocol is up
Hardware is Unknown
MTU 1500 bytes, BW 10000000 Kbit, DLY 0 usec,
reliability 0/255, txload 0/255, rxload 0/255
Encapsulation ARPA, loopback not set
Last input never, output never, output hang never
Last clearing of "show interface" counters 00:03:31
Input queue: 0/75/0/0 (size/max/drops/flushes); Total output drops: 0
5 minute input rate 0 bits/sec, 0 packets/sec
5 minute output rate 0 bits/sec, 0 packets/sec
0 packets input, 0 bytes, 0 no buffer
Received 0 broadcasts, 0 runts, 0 giants, 0 throttles
0 input errors, 0 CRC, 0 frame, 0 overrun, 0 ignored, 0 abort
136414 packets output, 204621000 bytes, 0 underruns
0 output errors, 0 collisions, 0 interface resets
0 output buffer failures, 0 output buffers swapped out
Router>
Null0 drop statistics are also available using the show interface Null0 accounting and show interface Null0 stats commands.
Note
This same technique can be used to provide source-based RTBH filtering by incorporating uRPF mechanisms into the solution. Source-based RTBH filtering is discussed later in this section.
Although destination-based RTBH filtering offers many benefits, including rapid deployment at BGP-update speed and network-wide filtering, it is not without its drawbacks. One drawback of RTBH is that it black holes all traffic to the target—attack and legitimate. Although this stops the attack, it also prevents IP connectivity to the target by legitimate applications. The second drawback is that this approach works at Layer 3 (IP address), and hence it is not as granular as ACLs, which can filter at the OSI Layer 4 port level. Nonetheless, this technique is useful under many circumstances, including the mitigation of attacks that may be causing collateral damage to the network.
This same technique that supports RTBH filtering may also be used to intercept and shunt traffic to a mitigation device (for example, traffic scrubber) and monitoring device (sinkhole). These schemes are often preferred because they aim to drop attack traffic and pass legitimate/authorized traffic onto the target. The only difference when implementing these schemes is that instead of forwarding the traffic to Null0 as with RTBH filtering, the next hop is set to the IP address corresponding to the sinkhole or scrubbing device. Expanding on Example 4-20, assume that a sinkhole device has been located at 192.0.2.2/32 within the core, and a scrubbing device has been located at 192.0.2.3/32. As illustrated in Example 4-22, additional route-map entries can be added on the trigger router to set the BGP next hop associated with each of these devices for prefixes matching specific tags, as shown.
Example 4-22. Trigger Router Configuration Illustration
!
router bgp 65535
redistribute static route-map static-to-bgp
neighbor <ibgp peer> remote-as 65535
!
route-map static-to-bgp permit 10
match tag 66
set ip next-hop 192.0.2.1
set local-preference 200
set community no-export
set origin igp
!
route-map static-to-bgp permit 20
match tag 67
set ip next-hop 192.0.2.2
set local-preference 200
set community no-export
set origin igp
!
route-map static-to-bgp permit 30
match tag 68
set ip next-hop 192.0.2.3
set local-preference 200
set community no-export
set origin igp
!
route-map static-to-bgp deny 40
As you can see in Example 4-22, any static routes with a tag of 67 will now have a BGP next hop set to 192.0.2.2 (the IP address of the sinkhole), and any static routes with a tag of 68 will now have a BGP next hop set to 192.0.2.3 (the IP address of the scrubbing device). These are activated exactly as in the RTBH case; simply configure a static route on the trigger router for the IP destination address that should be diverted to the sinkhole using tag 67 (or scrubber using tag 68). For example, if the destination prefix 172.16.61.1/32 is being attacked and you want to divert traffic to the sinkhole for further analysis, install the static route ip route 172.16.61.1 255.255.255.255 null0 tag 67 on the trigger router. Note that the Null0 next hop applies only on the trigger router, which is not in the forwarding path of attack traffic anyway. When the trigger router advertises via iBGP the 172.16.61.1/32 prefix of the target, it rewrites the BGP next hop to 192.0.2.2, as shown in the route map illustrated in Example 4-22. All traffic to the victim is now diverted to the sinkhole. A similar approach applies when diverting traffic to the scrubber, but tag 68 and BGP next hop 192.0.2.3 are used instead.
Again, although this approach offers many benefits, including rapid network-wide deployment using BGP and network-wide diversion using Null0 black holes, sinkholes, or scrubbers, it also has its drawbacks. In this case, an issue arises if you want to return the traffic to the original destination IP address after the traffic has been processed by the sinkhole or scrubber. The challenge is that BGP has updated all routers to show the sinkhole or scrubbing device as the BGP next hop for the target destination prefix, which would result in a routing loop if traffic were simply forwarded back into the network. Hence, a tunnel must be used to reroute the traffic along the best path between the scrubbing device and the network valid exit point (to the original destination). Encapsulations using GRE, MPLS VPNs, or VLANs are typically used for this application. (Scrubbing is further discussed in the “Traffic Scrubbing” section later in this chapter.)
As you learned in the preceding discussion, by using various static route tags on the trigger device, you may invoke any number of different policies. In the preceding example:
• Tag 66 is used for RTBH filtering where the BGP next hop is set to 192.0.2.1, which in turn is mapped to Null0 for dropping traffic (in other words, black hole).
• Tag 67 is used for diverting traffic to a sinkhole where the BGP next hop is set to the sinkhole address.
• Tag 68 is used for diverting traffic to a scrubbing device where the BGP next hop is set to the scrubbing device address.
You may also use BGP communities instead of tags to extend the functionality and add fine-tuned control to the preceding traffic diversion techniques. For example, in a very large network, you may want to trigger RTBH on a regional basis instead of having it act globally throughout the entire network edge. This can be accomplished quite easily by using BGP communities. But to accommodate this, you must make a few changes to each of the edge routers and to the trigger router. These changes are as follows:
Convert the trigger router to send iBGP updates with specific, predefined communities. This is accomplished by adding something similar to the configuration shown in Example 4-23. In this example, trigger routes with a specific tag are assigned a corresponding community value. This value is propagated with the routing update within iBGP. In this example, trigger routes tagged with the value 123 are assigned a BGP community of 65535:123, and those tagged with a value of 124 are assigned a BGP community of 65535:124.
Example 4-23. Trigger Router Configuration Example Using BGP Communities
!
router bgp 65535
redistribute static route-map static-to-bgp
neighbor <ibgp peer> remote-as 65535
!
route-map static-to-bgp permit 10
match tag 123
set community 65535:123
set local-preference 200
set community no-export
set origin igp
!
route-map static-to-bgp permit 20
match tag 124
set community 65535:124
set local-preference 200
set community no-export
set origin igp
!
route-map static-to-bgp deny 30
Retain the configured static route to Null0 on the edge routers. Previously, the TESTNET prefix 192.0.2.1/32 was set with a next hop of Null0 using the global command ip route 192.0.2.1 255.255.255.255 Null0. In addition, configure iBGP to match on communities and assign the appropriate BGP next-hop behavior. In Example 4-24, it is assumed that the region this edge router is in will match only on the BGP community 65535:123 and divert this traffic to Null0. Other traffic will not be diverted.
Example 4-24. Edge Router BGP Community-Based RTBH Configuration Illustration
!
router bgp 65535
neighbor <ibgp peer> remote-as 65535
neighbor <ibgp peer> route-map ibgp-peers in
!
ip community-list 1 permit 65535:123
!
route-map ibgp-peers permit 10
match community 1
set ip next-hop 192.0.2.1
set local-preference 200
set community no-export
set origin igp
!
route-map static-to-bgp permit 20
!
ip route 192.0.2.1 255.255.255.255 Null0
As shown in Example 4-24, the BGP community attribute is checked before accepting the prefix from the trigger router. In this way, if the community matches, the BGP update is installed within the RIB with the desired next-hop behavior (that is, 192.0.2.1). If the community does not match, the BGP update is ignored and traffic is forwarded normally along the IP routing best path. The use of communities allows you to customize policies on different categories of routers; for example:
• Trigger community 1 can be for all routers in the network.
• Trigger community 2 can be for all Internet peering routers (no transit customer routers). In this way, transit customers have IP reachability to the target, whereas peers do not.
• Trigger community 3 can be for all transit customer routers, and can be used to push an inter-AS traceback to the edge of your network because only peers will have IP reachability to the target.
• Trigger communities assigned per ISP peer can be used to only black hole traffic received via one ISP peer’s connection. This allows for a target to maintain partial service if the attack is coming predominantly from a single ISP network or peering point.
• Trigger communities assigned per geographic region can be used to black hole traffic only on routers deployed within a specific geographic region.
• Trigger communities assigned per desired service. For example, Null0 black hole, sinkhole, or scrubber, as previously described.
With some creativity, using BGP communities with the RTBH framework enables a wide range of possible applications.
The preceding RTBH techniques filter traffic based on destination IP addresses using standard routing mechanics. RTBH filtering may also be combined with uRPF (strict, loose, or VRF mode) to support source IP address–based RTBH filtering. That is, instead of dropping all traffic with the destination IP address of a specified target, you can drop all traffic with the source IP address of the attacker(s). Dropping traffic based on the source IP address, at the network edge, without ACLs, and installed at BGP-update speeds provides a very useful incident response capability. Using source IP address–based RTBH potentially allows you to mitigate an attack without taking the attack target offline.
Source-based RTBH is achieved using uRPF in combination with the RTBH architecture previously described. The mechanisms used include the following:
• The edge routers retain their configured static route to Null0. Previously, the TESTNET prefix 192.0.2.1/32 was set with a next hop of Null0 using the global command ip route 192.0.2.1 255.255.255.255 Null0.
• The trigger router continues to be used to support the real-time insertion and removal of prefixes that are to be discarded on a network-wide basis (attack mitigation). However, in this scenario, instead of setting trigger routes that represent the destination IP address for a target, you now install trigger routes that represent the source IP address(es) of the attacker(s).
• uRPF must be installed on the external interfaces of the edge routers. Any version of uRPF can be used; uRPFv1 (strict mode) and uRPFv2 (loose mode) support source-based RTBH with no additional configurations beyond those described in the earlier “Unicast RPF” section. If uRPFv3 (VRF mode) is used, the trigger router requires modifications in order to announce the trigger routes within the appropriate IPv4 VRF associated with uRPFv3.
Once you make the preceding configurations, when a source IP address is advertised by the trigger router, this IP prefix is then associated in each of the edge router FIBs with the Null0 interface. Hence, the uRPF address verification check for external packets received with source IP addresses matching the trigger route(s) will be resolved to Null0, which is an invalid interface for uRPF, resulting in these packets being dropped. Thus, any packets sourced from the attacker will be black holed. Note that spoofed sources are often used in attacks, as described in Chapter 2. Without proper validation and care, you may be tricked into black holing legitimate traffic sources. (This applies for any mitigation technique.)
In terms of scalability, BGP is capable of handling many hundreds of thousands of routes with ease. It is not inconceivable that the trigger router may need to install a large number of prefixes in reaction to a DoS attack, for example. This is no problem for RTBH. Conversely, this could challenge any ACL deployment technique.
Both destination IP address–based and source IP address–based RTBH techniques provide an effective incident response tool that:
• Rapidly distributes policy throughout the network at BGP-update speed.
• Requires no ACL changes.
• Supports filtering using both destination and source IP addresses.
• Drops matching traffic flows in the forwarding path, meaning there is no performance impact associated with destination-based RTBH deployment. There may be a performance impact for source-based RTBH because uRPF is required. uRPF performance impacts, if any, will vary among router platforms.
IP Transport and Application Layer Techniques
The many techniques described in the preceding sections operate at OSI Layers 2, 3, and 4 to protect against attacks within the data plane of an IP network. Additional techniques and mechanisms are available that operate even deeper within the packet at the application layer (OSI Layer 7) to provide additional security. It is not the intent of this book to cover every available security mechanism in detail. Entire books are dedicated to some of these individual techniques. The feature descriptions in this section are provided mainly as an introduction and point of reference.
TCP Intercept
IOS supports a TCP intercept feature that is intended to protect TCP protocol stacks from TCP SYN flood attacks that aim to exhaust system resources on a target device, as described in Chapter 2. The TCP intercept feature supports two operating modes:
• Intercept mode: The router intercepts TCP synchronization (SYN) packets sent between IP hosts that match an extended ACL. The ACL allows you to configure whether all TCP connection requests should be intercepted or only those sourced and destined to specific networks or devices as defined by the ACL policy. The router then acts as a TCP proxy and establishes its own connection with the source on behalf of the intended destination. If successful, the router then establishes a second TCP connection between itself and the destination. The two half connections are then knit together transparently within the IOS device, which maintains both until either one is terminated. This technique prevents TCP SYN connection requests from unreachable sources from ever reaching the destination. Note that aggressive TCP timeouts for half-open connections, as well as thresholds for all connection requests, further protect destination hosts from TCP SYN flood attacks while still allowing valid TCP connections. The number of supported TCP SYNs per second and the number of concurrent connections proxied vary depending on the particular router.
• Watch mode: The router passively monitors connection requests flowing through it. If a connection fails to become established in a configurable time interval, the router intervenes and terminates the connection attempt.
TCP intercept may be enabled using the IOS global configuration commands ip tcp intercept list and ip tcp intercept mode {intercept | watch}. The default TCP intercept mode is intercept. Note that the TCP intercept feature does not support the negotiation of TCP options (such as RFC 1323 on window scaling). Further, because the TCP intercept feature is handled entirely within the IOS process level of the router, it adds a tremendous burden to CPU load. TCP intercept should be enabled with caution and only after you are familiar with the impact it will have on the router performance. When TCP SYN-flood attacks are known to be a consistent problem, you should consider dedicated hardware for remediation in lieu of using the TCP intercept function.
Network Address Translation
IOS supports three major types of NAT services:
• Traditional IP NAT services, as specified in RFC 3022 (obsoletes RFC 1631)
• Network Address Port Translation (NAPT) services, as specified in RFC 3022
• Network Address Translation–Protocol Translation (NAT-PT) services, as specified in RFC 2766
In its simplest form, IP NAT operates on a router, firewall, or other network device that connects two (or more) networks together. Typically, one of these networks, referred to as the inside network, is addressed with either private (RFC 1918) or obsolete addresses that need to be converted into Internet-routable or globally unique addresses before packets are forwarded onto the other network, referred to as the outside network. NAT is a “stateful” process and works in conjunction with routing (see the IOS feature order of operations in Figure 3-1 of Chapter 3), so return packets are similarly translated back to their original addresses for delivery to the original source. NAT can be configured to work in the opposite direction as well. That is, packets arriving on the outside interface of a NAT device (such as a router) can be translated such that the destination IP address points to an inside, private destination address. This is a common deployment method within Internet data centers for web services, for example.
In IOS, this basic NAT functionality of converting one inside IP address to one outside IP address is referred to as a simple translation. As indicated previously, there are other, more-complex translation mechanisms that provide flexibility for other situations requiring NAT services. The most basic NAT mechanism maps one (Layer 3) IP address to another.
An extended translation maps one (Layer 3) IP address and (Layer 4) port pair to another. Both mechanisms, however, consume IP addresses on a one-for-one basis. Network Address Port Translation (NAPT), often called Port Address Translation (PAT), enhances NAT functionality by providing a mechanism that translates many inside addresses to a single outside address. PAT uses unique source port numbers on the translated addresses to distinguish between them. Because the port number is encoded in 16 bits, the total number could theoretically be as high as 65,536 per IP address. As IPv6 becomes more commonly deployed, an additional translation mechanism is needed as a migration tool. IOS provides functionality called Network Address Translation–Protocol Translation (NAT-PT) that converts inside network IPv6 addresses to outside network IPv4 addresses, allowing direct communication between hosts speaking these two different network protocols.
The intent of this section is not to show you how to configure NAT; there are many variations to NAT and many site-specific dependencies that make doing so infeasible. The intent is to make you aware of some of the performance, management, and security issues associated with deploying NAT.
NAT must perform several complex functions as part of the translation process, including translating the IP packet source and destination addresses and ports, and performing checksum adjustment computations. In addition, NAT is a stateful service and must maintain a translation table of all of the current sessions so that return traffic can be retranslated to the original header values. The initial connection setup process typically requires additional computation and memory to create the connection state, and often this adds latency to the first packet of a session. The initial packet requires processing within the IOS process level. Once the connection is established, NAT processes should be more transparent from a performance perspective.
In general, devices capable of performing NAT functions report two values: a connections-per-second setup rate, and a maximum-concurrent-sessions value. These parameters are important for understanding the overall performance of the system. IOS NAT has been optimized to perform NAT functions as efficiently as possible. However, NAT performance is still limited by the specifics of the individual platform capabilities. Note that when the memory and CPU utilization is very high due to the NAT process, collateral damage may potentially occur such that control and management plane functions are affected—potentially affecting network performance and leading to a DoS condition.
Firewalls, load balancers, and other dedicated hardware are usually capable of sustaining much higher rates of NAT translation and should be considered for high-performance environments. When application proxies are incorporated with NAT, such as for DNS translations, dynamic port assignments (for example, FTP), and so on, additional impacts to performance may be incurred. High-availability and failover scenarios also present challenges with NAT. Again, many firewalls, load balancers, and other dedicated hardware often provide stateful failover capabilities that maintain NAT translation tables on two devices to support highly available architectures.
NAT can present challenges for some management applications, especially when remote support is required by external network management applications. When remote management is required, it is common to use IPsec VPNs, both for data protection across external networks and to provide access into the inside NAT address space. (SPs that provide managed services may run into situations where customers have common [overlapping] private address space. In these situations, the SP typically installs a unique loopback address on each customer router for management purposes.) Alternatively, some management systems are capable of supporting virtualization to maintain customer segmentation within one unified management application.
NAT itself is not described as a security feature. However, it does obfuscate hosts within private address ranges behind NAT. Further, such hosts are only reachable during the period of time they make an outbound connection and an associated NAT translation exists. The more important concept to understand with NAT is how it interacts with other security mechanisms and impacts the overall network security posture. For example, when combined with certain IPsec encapsulation methods, NAT header modifications can break the imposed packet integrity checks and cause these packets to be discarded. That is, NAT makes it seem as if the packets have been tampered with (which they have, just not maliciously). Workarounds are available and are required when this issue arises. As another example, Internet worms can quickly overwhelm the translation tables and state checks within NAT devices when internal hosts become infected. When an internal host has been infected with a worm, it scans random destination addresses seeking additional vulnerable hosts for replication. Each of these individual requests starts a NAT translation and consumes state.
Tuning mechanisms are usually available to limit the total number of connections, purge half-open connections, and so on, but clearly it is undesirable to have this situation in the first place. This same situation occurs in reverse for Internet data center deployments where destination address translation is used (outside to inside) and a TCP SYN flood, for example, consumes all available translation slots, resulting in a DoS condition. In this case, mechanisms must be used to keep spoofed (or bot) traffic from consuming these resources. (See the “Traffic Scrubbing” section later in the chapter.)
As with any feature deployed in the network, you must be familiar with not only how NAT operates, but also how it behaves under all operational conditions, including attack conditions. Additional Cisco IOS NAT information can be found in the Cisco white paper “Cisco IOS Network Address Translation Overview,” referenced in the “Further Reading” section.
IOS Firewall
IOS supports a fully functional, stateful firewall feature called IOS Firewall (IOS FW). IOS FW is usually deployed at the network edge, often placed in between internal or DMZ networks and an external network such as the Internet. Because IOS FW is incorporated as part of the router, it is quite easily deployed anywhere within the network where access control or segmentation is desired.
The most basic function of a firewall is to monitor and apply security policies (filters) to traffic. Like many firewalls, IOS FW examines Layer 3 and Layer 4 information, and application layer protocol information (such as FTP information) to learn about and maintain the state of TCP, UDP, and ICMP. The IOS FW uses state information to make intelligent decisions about whether packets should be permitted or denied, and then dynamically creates and deletes temporary openings in the firewall policy. Because IOS FW maintains connection state information on all connections, it is subject to the same performance, management, and security risks described in the previous section for NAT. In fact, all devices that maintain connection state face these same issues in one way or another.
Again, the intent of this section is not to show you how to configure IOS FW, but rather to make you aware of some of its associated performance, management, and security issues, described here:
• Performance: IOS FW performs traffic inspection for network, transport, and application layer information. It also forces protocol conformance for some protocols, and has limited vulnerability signature detection mechanisms and extensive DoS prevention mechanisms. However, many of these features are CPU intensive, and can adversely affect the performance of the router. When the memory and CPU utilization is very high due to the IOS FW processes, collateral damage can occur such that control plane and management plane functions are affected, potentially affecting network performance and leading to a DoS condition. Similar to NAT, the initial connection setup process in IOS FW typically requires additional computation and memory to create the connection state, and often this adds latency to the first packet of a session. The initial packet requires processing at the IOS process level. IOS FW parameters are also given in terms of connections-per-second setup rate, and a maximum-concurrent-sessions value. These parameters are important for understanding the overall performance of the system.
• Management: IOS FW may be managed through CLI or via the Cisco Security Device Manager (SDM) web GUI when deployed in a single location. When multiple IOS FW installations require management, it may be challenging to maintain consistent security policies across devices or maintain multiple policies without a dedicated security management system. The Cisco Security Manager (CSM) provides this functionality in an easy-to-use, central provisioning system that coordinates all aspects of device configurations and security policies for Cisco firewalls, Virtual Private Networks (VPN), and Intrusion Prevention Systems (IPS). Because IOS FW provides a security function, monitoring via SNMP or syslog is essential for situational awareness.
• Security: IOS FW is a security feature. It directly provides stateful traffic inspection and enforces security policy conformance. Given that it is stateful and in the path of data plane traffic, IOS FW deployments should be evaluated and sized appropriately for the intended environment. As with NAT, DoS conditions may severely impact any firewall implementation; IOS FW is no exception.
As with any feature deployed in the network, you must be familiar with not only how IOS FW operates, but also how it behaves under all operational conditions, including attack conditions. Additional Cisco IOS FW information can be found in “Cisco IOS Firewall Overview” (see the “Further Reading” section).
Firewall functionality may also be provided by dedicated hardware appliances and modules. Cisco products include the PIX Firewall appliance family, Adaptive Security Appliance (ASA) family, and the Firewall Service Module (FWSM) for the Catalyst 6500 family.
IOS Intrusion Prevention System
IOS provides mechanisms for incorporating IPS functionality directly within routers. IOS IPS is an inline, deep packet inspection (DPI) based traffic analyzer that helps mitigate a wide range of network attacks. You can either operate IOS IPS with a limited, default set of built-in signatures, or configure IOS IPS to dynamically load signature detection files (SDF) that incorporate the very latest signatures available to accurately identify, classify, and stop malicious or damaging traffic in real time. IOS IPS uses signature micro-engines (SME) to load the SDF and scan signatures. A feature called virtual fragment reassembly (VFR; not to be confused with virtual routing/forwarding instance, or VRF) is used to scan application layer signatures across fragments.
The intent of this section is to make you aware of some the performance, management, and security issues associated with IOS IPS, as described next:
• Performance: IOS IPS performs DPI-based traffic analysis. As with IOS FW, some IOS IPS features are CPU intensive, and can adversely affect the performance of the router. This is particularly true when these features require IOS process level support, and often, the initial packet requires processing in the slow path. When memory and CPU utilization is very high due to the IOS IPS processes, collateral damage can occur such that control plane and management plane functions are affected, potentially affecting network performance and leading to a DoS condition. These parameters are important for understanding the overall performance of the system.
• Management: IOS IPS may be managed through CLI or via the Cisco SDM web GUI when deployed in a single location. When multiple IOS IPS installations require management, it may be challenging to maintain security policies and SDFs across devices without a dedicated security management system. The CSM provides this functionality in an easy-to-use, central provisioning system that coordinates all aspects of device configurations and security policies for Cisco firewalls, VPNs, and IPS. Because IOS IPS provides a security function, monitoring of security events via syslog messages or Security Device Event Exchange (SDEE) alerts is essential for situational awareness.
• Security: IOS IPS is a security feature. It directly provides DPI-based traffic analysis. Given that it is stateful and in the path of data plane traffic, IOS IPS deployments should be evaluated and sized appropriately for the intended environment. As with IOS FW, DoS conditions may severely impact any IPS implementation; IOS IPS is no exception. Also note that the IOS IPS configuration on certain routers may not support the complete list of signatures due to memory constraints. Always be sure to provide sufficient memory for all security features.
As with any feature deployed in the network, you must be familiar with not only how IOS IPS operates, but also how it behaves under all operational conditions, including attack conditions. Additional Cisco IOS IPS information can be found in “Configuring Cisco IOS Intrusion Prevention System (IPS)” (referenced in the “Further Reading” section).
IPS functionality may also be provided by dedicated hardware appliances and modules. Cisco products include the IPS 4200 appliance family, and the Intrusion Detection Service Module (IDSM2) for the Catalyst 6500 family.
Traffic Scrubbing
As you learned earlier in the chapter, one of the fundamental techniques used by SPs and large enterprises for deploying network-wide traffic filtering is through BGP-triggered black hole filtering. One implementation of this technique involves directing traffic destined for a target toward a special-purpose traffic-scrubbing device, rather than toward Null0 (which represents a black hole). The benefit of such a solution is that instead of dropping all traffic destined to the victim, essentially accomplishing the objective of the DoS attack, this traffic can be cleaned such that only the bad traffic is discarded, allowing just the good traffic to be passed on to the target.
In this solution, the Cisco Traffic Anomaly Detector provides detection functionality by watching traffic destined for protected zones through Switched Port Analyzer (SPAN) traffic. That is, the detector is not inline with the traffic flows. Once an attack is detected, the detector can automatically trigger the companion Cisco Guard to provide scrubber-type DoS mitigation services. (The guard can also be configured to manually activate traffic scrubbing.) Once activated, the guard advertises the target prefix via BGP, much in the same way that the trigger router described earlier for RTBH advertises the target prefix, causing the traffic to flow to the guard rather than the target. The guard analyzes the diverted traffic for anomalies and, through a variety of mechanisms, drops attack traffic. The cleaned traffic from the guard is then redirected back to the target. Because the guard advertised within BGP a more-specific prefix for the target (in order to divert the flow to the guard), the cleaned traffic must be reinjected via some encapsulation method to prevent looping back to the guard. There are multiple injection methods available, depending on whether the core network topology is Layer 2 or Layer 3. Example methods include PBR, generic routing encapsulation (GRE), and MPLS VPN.
In addition to the Cisco Traffic Anomaly Detector and Cisco Guard appliances, this functionality may also be provided by similar modules for the Catalyst 6500 and Cisco 7600 families. Alternatively, NetFlow may be used in conjunction with third-party traffic analysis systems to activate traffic scrubbing using Cisco Guard. Details of the full traffic-scrubbing solution are beyond the scope of this book. However, additional details, including design guides and configuration examples, can be found at http://www.cisco.com/en/US/netsol/ns615/networking_solutions_sub_solution.html. NetFlow is further discussed in Chapter 6.
Deep Packet Inspection
The increasing expansion of broadband and mobile IP networks has provided greater opportunities for miscreants to conduct cyber attacks using unprotected and compromised IP devices. Malware such as worms, viruses, bots, and spam zombies threaten broadband and mobile subscribers and the IP network infrastructure by consuming available bandwidth capacity. The Cisco Service Control Engine (SCE) provides a solution that can proactively reduce the impact of malware and cyber attacks within broadband and mobile IP networks.
The Cisco SCE provides state-of-the-art detection and control capabilities. Using application layer stateful DPI, the Cisco SCE can accurately identify and classify application traffic by individual subscriber at multigigabit speeds. The Cisco SCE “stateful” DPI solution goes far beyond the simple counting of packets and can distinguish between many distinct small application sessions (for example, one thousand 1-KB messages) and a single large session (for example, 1-MB messages). Stateful DPI also enables the Cisco SCE to identify specific protocol signatures and, subsequently, monitor for malicious attack patterns and contain their effect.
If the Cisco SCE identifies suspicious traffic patterns, it can automatically apply traffic control policies that can block or rate limit the transmission and redirect it to a traffic scrubber, for example, as described in the preceding “Traffic Scrubbing” section. In this way, the Cisco SCE helps prevent the spread of malware or attack traffic by identifying the protocols and port numbers used and then blocking transit across the network. Further, the Cisco SCE also protects network resources by limiting the bandwidth capacity that may be consumed per subscriber and application flow.
The intent of this section is not to show you how to configure the Cisco SCE for DPI. The intent is simply to make you aware of the technology and its application in the context of IP data plane security. As with any feature deployed in the network, you must be familiar with not only how the Cisco SCE operates, but also how it behaves under all operational conditions, including attack conditions. Additional Cisco SCE information can be found at http://www.cisco.com/en/US/products/ps6135/index.html and http://www.cisco.com/en/US/products/ps6501/index.html.
Layer 2 Ethernet Security Techniques
Chapter 2 reviewed potential threats that may exist within a Layer 2 switched Ethernet network environment. This section describes security techniques to mitigate attacks within the data forwarding plane of Layer 2 Ethernet switches. Chapters 5 and 6 review techniques to mitigate attacks within the Layer 2 switched Ethernet control and management planes, respectively.
Port Security
Port security restricts a port’s ingress traffic by limiting the MAC addresses that are allowed to send traffic into the port. The default number of secure MAC addresses for a port is one, but you may change this by using the switchport port-security maximum IOS CLI. Authorized MAC addresses are considered secure and may be assigned using any one of the following methods:
• Static MAC addresses: Secure MAC addresses may be explicitly and statically configured using the switchport port-security mac-address IOS interface configuration command. If fewer secure MAC addresses are configured than the port’s maximum, the remaining MAC addresses may be learned dynamically. Statically configured secure MAC addresses do not age (expire) and they are not removed as a result of a link-down condition.
• Dynamically learned MAC addresses: The switch port may dynamically learn secure MAC addresses by using the source MAC address(es) of received ingress traffic. Dynamic learning of MAC addresses is the default configuration method when enabling switchport port-security. Secure MAC addresses that are not statically configured are learned dynamically up to the maximum allowable number (default of one). Dynamically learned secure MAC addresses are removed over time as they age out and as a result of a link-down condition. The aging time for dynamically learned secure MAC addresses may be configured using the switchport port-security aging time IOS interface configuration command. Aging may be disabled using the no switchport port-security aging time IOS interface configuration command.
• Sticky MAC addresses: Sticky MAC addresses provide many of the same benefits as static MAC addresses, but are learned dynamically. The difference between sticky and dynamically learned MAC addresses is that sticky MAC addresses are retained during a link-down condition, whereas (nonsticky) dynamically learned MAC addresses are removed. Further, if you enter a write memory or copy running-config startup-config command, then port security with sticky MAC addresses saves dynamically learned MAC addresses in the startup-config file and the port does not have to relearn addresses from ingress traffic flows after bootup or restart. To enable port security with sticky MAC addresses on a port, apply the switchport port-security mac-address sticky IOS interface configuration command.
Port security is supported on both access ports (nontrunks) and on nonnegotiating trunk ports. If port security is enabled and an unauthorized MAC address sends traffic into a secure port, then the switch port enters violation mode. Several violation modes are available and are configurable using the switchport port-security violation IOS interface configuration command. The violation mode determines the action to be taken when a security violation is detected. The available violation modes include:
• Protect mode: Drops packets with unknown source MAC addresses. When a sufficient number of secure MAC addresses are removed, thereby dropping the total number of secure MAC addresses below the maximum permitted value, a previously unknown source MAC address may be learned dynamically and become a secure MAC address. Secure MAC addresses are removed through aging, link-down conditions, or, in the case of static and sticky MAC addresses, configuration.
• Restrict mode: In a similar manner to protect mode, drops packets with unknown source MAC addresses until a sufficient number of secure MAC addresses are removed, thereby dropping the total number of secure MAC addresses below the maximum permitted value and allowing previously unknown MAC address to be added dynamically. The difference between restrict and protect modes is that restrict mode causes the SecurityViolation counter within the output of the show port-security IOS command to increment.
• Shutdown mode: Immediately drops the packet with the unknown source MAC address, puts the interface into the error-disabled state—which causes all packets, legitimate and attack, to be dropped—and sends an SNMP trap notification. To bring a secure port out of the error-disabled state, the errdisable recovery cause shutdown IOS global configuration command must be applied, or the port must be manually reenabled by entering the shutdown and no shut down interface configuration commands.
Port security restricts the authorized MAC addresses that are allowed to send traffic into the port and helps to mitigate the risk of CAM table overflow, MAC spoofing, and VLAN-hopping-based attacks.
MAC Address–Based Traffic Blocking
MAC address–based traffic blocking filters all traffic to or from a defined MAC address in a specified VLAN. This feature may be enabled using the mac-address-table static IOS global configuration command. Example 4-25 illustrates how to block all traffic to or from MAC address 0050.3e8d.6400 in VLAN 7.
Example 4-25. Configuring a mac-address-table static Filter to Block a MAC Address
Router# configure terminal
Router(config)# mac-address-table static 0050.3e8d.6400 vlan 7 drop
Disable Auto Trunking
A Layer 2 switched Ethernet trunk is a point-to-point link (or EtherChannel) between a switch and another networking device such as an IP router or an adjacent Ethernet switch. Trunks carry the traffic of multiple VLANs over a single physical link (or EtherChannel) and allow you to extend VLANs across an entire switched Ethernet network. Two trunking encapsulations are widely supported within Cisco Ethernet switches:
• Inter-Switch Link (ISL): Cisco-proprietary trunking encapsulation
• 802.1Q: IEEE industry-standard trunking encapsulation
LAN ports may be configured to auto-negotiate the VLAN encapsulation type using the switchport trunk encapsulation negotiate IOS interface configuration command. The Dynamic Trunking Protocol (DTP) manages trunk autonegotiation on LAN ports. DTP is a point-to-point protocol and supports autonegotiation of both ISL and 802.1Q trunks. To autonegotiate trunking, the interconnected LAN ports must be in the same Virtual Trunking Protocol (VTP) domain. The trunk or nonegotiate keywords of the switchport trunk encapsulation IOS interface configuration command may be used to force LAN ports that are in different VTP domains to trunk. IOS Layer 2 Ethernet switch ports support several different modes of operation, including:
• Access mode: Puts the LAN port into permanent nontrunking mode and negotiates to convert the link into a nontrunk link. The LAN port becomes a nontrunk port even if the neighboring LAN port does not agree to the change. Access mode is enabled using the switchport mode access IOS interface configuration command. Note that access mode does not disable DTP on the LAN port.
• Dynamic desirable mode: Makes the LAN port actively attempt to convert the link to a trunk link using DTP. The LAN port becomes a trunk port if the neighboring LAN port is set to trunk, desirable, or auto mode. This is the default mode for all LAN ports. Dynamic desirable mode may also be reenabled using the switchport mode dynamic desirable IOS interface configuration command.
• Dynamic auto mode: Makes the LAN port willing to convert the link to a trunk link using DTP. The LAN port becomes a trunk port only if the neighboring LAN port is set to trunk or desirable mode. If the neighboring LAN port is set to auto mode, the LAN port becomes a nontrunk port. Dynamic auto mode is enabled using the switchport mode dynamic auto IOS interface configuration command.
• Trunk mode: Puts the LAN port into permanent trunking mode and negotiates to convert the link into a trunk link. The LAN port becomes a trunk port even if the neighboring port does not agree to the change. Trunk mode is enabled using the switchport mode trunk IOS interface configuration command, which will also disable DTP on the LAN port. Before entering the switchport mode trunk command, the VLAN encapsulation must be configured using the switchport trunk encapsulation IOS interface configuration command. Note trunk mode does not disable DTP on the LAN port.
• No-negotiate mode: Puts the LAN port into permanent trunking mode but prevents the port from generating DTP frames. No-negotiate mode disables DTP similarly to access mode. The neighboring port must be manually configured as a trunk port to establish a trunk link because DTP is disabled. No-negotiate mode is configured using the switchport nonegotiate IOS interface configuration command. Before entering the switchport nonegotiate command, the VLAN encapsulation must be configured and the port must be configured to trunk unconditionally using the switchport trunk encapsulation and switchport mode trunk IOS interface configuration commands, respectively.
Configuring LAN ports that do not serve as trunks in permanent nontrunking (access) mode using the switchport mode access IOS interface configuration command mitigates the threat of switch spoofing attacks because DTP is disabled.
VLAN ACLs
VLAN ACLs (VACL) provide access control for all packets that are either bridged within a VLAN or IP routed into or out of a VLAN. Unlike IOS IP ACLs that are configured only on IP router interfaces and are applied only to IP routed packets, VACLs may be applied to IP, IPX, and MAC-layer Ethernet packets, and may be applied to any defined VLAN. VACLs use IOS ACL CLI syntax; however, they ignore any IOS ACL fields that are not supported in hardware.
When a VACL is configured for a defined VLAN, all packets entering the VLAN are verified against this VACL. VACLs are supported in conjunction with interface IP ACLs and operate in the following manner:
• If a VACL is applied to a VLAN, and an input IP ACL is applied to a routed interface within the VLAN, then packets entering the VLAN are first verified against the VACL and, if permitted, are then verified against the input IP ACL.
• If a VACL is applied to a VLAN, and an output IP ACL is applied to a routed interface within the VLAN, then packets that egress the router interface are first verified against the output IP ACL and, if permitted, are then verified against the VACL.
If a VACL is configured for a specific packet type (for example, IP, IPX, and so on) and a received packet is not of that type, the default action of the VACL is to discard the packet. VACLs may be configured using the vlan filter and vlan access-map IOS global configuration commands. Note that IGMP packets are not checked against VACLs.
IP Source Guard
IP source guard is a technique available on Layer 2 Ethernet switches to prevent IP spoofing. It works in conjunction with DHCP snooping and allows only IP addresses that are obtained through DHCP snooping (refer to Chapter 5) to transmit traffic on a particular LAN port. Initially, all IP traffic on the port is blocked except for the DHCP packets that are captured via DHCP snooping. When a client receives a valid IP address from the DHCP server, a port access control list (PACL) is automatically installed on the LAN port that permits traffic sourced from the DHCP-assigned IP address. This process restricts the client IP traffic to those source IP addresses that are obtained from the DHCP server; any IP traffic with a source IP address other than one in the PACL’s permit list is discarded. This filtering limits the ability of a device to spoof itself as another IP address.
A port’s IP source address filter is changed when a new DHCP-snooping binding entry for the port is created or deleted. The port PACL is automatically modified and reapplied to the LAN port to reflect the IP source binding change. By default, if IP source guard is enabled without any DHCP-snooping bindings on the LAN port, a default PACL that denies all IP traffic is installed on the port. Disabling IP source guard removes any IP source filter PACL from the port.
IP source guard is not recommended on trunk ports because it is limited to ten IP addresses per LAN port. IP source guard cannot coexist with PACLs that you configure, because IP source guard installs its own PACL on enabled ports. IP source guard is also not supported on EtherChannel-enabled ports. High availability is also recommended when using IP source guard, Dynamic ARP Inspection (DAI), and DHCP snooping. Otherwise, if clients do not renew their IP addresses associated with these features, they may lose network connectivity after an RP switchover.
Before IP source guard may be enabled, DHCP snooping must be enabled on the VLAN to which the port belongs. To enable IP source guard, use the set port dhcp-snooping source guard enable IOS configuration command. IP source guard provides a technique to mitigate the risk of IP source address spoofing on LAN ports of a Layer 2 Ethernet switch. For more information on DAI and DHCP snooping, refer to Chapter 5.
Private VLANs
As described in Chapter 2, private VLANs (PVLAN) provide Layer 2 isolation of hosts within the same VLAN and IP subnet. PVLANs work by limiting communication among switch ports within the same VLAN. There are three types of PVLAN ports: isolated, promiscuous, and community switch ports. Isolated switch ports within a VLAN may communicate only with promiscuous switch ports. Community switch ports may communicate only with promiscuous switch ports and other ports belonging to the same community. Promiscuous switch ports may communicate with any switch port and typically connect to the default gateway IP router.
PVLANs are often used to isolate traffic between customers within an SP server farm, for example, to circumvent VLAN scale and IP address management problems. The Cisco 7600 router, for example, supports up to 4096 defined VLANs. If an SP assigns one VLAN per customer, the number of customers that may be supported per router is limited to 4096. To enable IP routing to and from the customer VLANs, each VLAN is assigned a distinct subnet block of IP addresses. This may result in wasted IP addressing and may create IP address management problems.
PVLANs solve the VLAN scale and IP address management problems while providing isolation between customers. Note, however, as outlined in Chapter 2, that an attacker may use a default gateway router attached to a promiscuous port to bypass PVLAN restrictions and gain connectivity to another device on an isolated port within the same PVLAN. This, however, may be mitigated using IP ACLs on the default gateway router to filter traffic flows between IP hosts within the same PVLAN. To configure a PVLAN, use the private vlan IOS VLAN configuration command.
Traffic Storm Control
Excessive LAN traffic may degrade network performance and increase the risk of broadcast storms and bridging loops. The traffic storm control feature prevents LAN ports from being disrupted by broadcast, multicast, and unicast traffic storms. Traffic storm control (also called traffic suppression) monitors incoming traffic levels on enabled LAN ports at 1-second intervals and, during each interval, compares the actual traffic level with the port’s configured traffic storm control level. The traffic storm control level per LAN port is configured as a percentage of the total available bandwidth of the port. Three traffic control levels are available and configurable per LAN port: broadcast, multicast, and unicast thresholds.
Within a 1-second interval, if ingress traffic on a LAN port enabled for traffic storm control reaches the configured traffic storm control level, then traffic storm control drops any new traffic received on the LAN port until the traffic storm control 1-second interval ends. Higher thresholds allow more packets to pass through the LAN port. For more information on broadcast suppression using traffic storm control, refer to the Cisco.com document “Configuring Traffic Storm Control” (referenced in the “Further Reading” section). Traffic storm control is disabled within IOS by default. Note that the broadcast threshold applies only to broadcast traffic. However, the multicast and unicast thresholds apply to all traffic types, including multicast, unicast, and broadcast. Namely, when traffic storm control is active for either multicast or unicast and the rising threshold is hit, broadcast, unicast, and multicast frames are all filtered. Traffic storm control may be enabled using the storm control IOS interface configuration command.
Unknown Unicast Flood Blocking
As described in Chapter 2, when the destination MAC address of a unicast Ethernet frame is not present within the CAM table, the frame is broadcast (flooded) out of every switch port within the associated VLAN. Broadcasting frames degrades network performance and increases the risk of broadcast storms and bridging loops. This default behavior may be prevented via the unknown unicast flood blocking (UUFB) feature available within IOS. The UUFB feature blocks unknown unicast traffic flooding and only permits egress traffic destined to known MAC addresses (in other words, installed in the CAM table) to exit on the UUFB-enabled port. The UUFB feature is supported on all ports that are configured with the switchport IOS interface configuration command, including PVLAN ports. UUFB is configured using the switchport block unicast IOS interface configuration command.
Summary
This chapter reviewed a wide array of techniques available to mitigate attacks within the IP data plane and within Layer 2 switched Ethernet networks. Many of the techniques are specifically intended for network security, including, for example, ACLs, uRPF, FPM, IP Options Selective Drop, and IP sanity checks. Conversely, many others, including the QoS, QPPB, ICMP, and IP routing techniques, are not intended (nor often considered) for network security but provide powerful tools that may be leveraged to mitigate the risk of security attacks. The optimal techniques that provide an effective security solution will vary by organization and depend on network topology, product mix, traffic behavior, operational complexity, and organizational mission. Defense in depth and breadth techniques (discussed in Chapter 3) can be helpful in understanding the interactions between various data plane security techniques and in optimizing the selection of appropriate measures. Chapters 5 through 7 review the techniques available within the IP control, management, and services planes, respectively, to mitigate the risk of attacks.
Review Questions
1 Which ACL types are commonly used for incident response during active security attacks?
2 What is a potential drawback of tuning the IOS BGP weight attribute so that strict uRPF operates correctly at the SP network edge for multihomed transit customers?
3 Describe two key differences between FPM and interface ACLs.
4 Which technique may be used to reserve a percentage of a router’s interface bandwidth solely for control plane traffic?
5 Name an IP option header type that results in IOS process level packet handling.
6 Where is the logical place to disable the generation of ICMP Destination Unreachable reply messages (Type 3)?
7 Name two distinct IOS features (other than CEF) that QPPB relies upon.
8 What is the primary configuration difference between source-based RTBH filtering and destination-based RTBH filtering?
9 Name three stateful data plane security techniques and three stateless techniques.
10 Name the IOS Layer 2 Ethernet switch port mode that disables DTP.
Further Reading
Baker, F., and P. Savola. Ingress Filtering for Multihomed Networks. RFC 3704/BCP 84. IETF, March 2004. http://www.ietf.org/rfc/rfc3704.txt.
Evans, J., and C. Filsfils, “Deploying Diffserv at the Network Edge for Tight SLAs, Part I.” IEEE Internet Computing, vol. 8, no. 1: 61–65 (2004).
Evans, J., and C. Filsfils. “Deploying Diffserv at the Network Edge for Tight SLAs, Part II.” IEEE Internet Computing, vol. 8, no. 2: 61–69 (2004).
Ferguson, P., and D. Senie. Network Ingress Filtering: Defeating Denial of Service Attacks which employ IP Source Address Spoofing. RFC 2827/BCP 38. IETF, May 2000. http://www.ietf.org/rfc/rfc2827.txt.
Passmore, D. “Impact of P2P on Networks.” Business Communications Review. vol. 35, no. 5: 14–15 (May 2005).
Parmakovic, D. “Service Provider Security.” Cisco white paper. http://www.cisco.com/web/about/security/intelligence/sp_infrastruct_scty.html.
Savola, P. “Experiences from Using Unicast RPF.” draft-savola-bcp84-urpf-experiences-02.txt. IETF, Nov. 15, 2006. http://tools.ietf.org/id/draft-savola-bcp84-urpf-experiences-02.txt.
“Access Control List Logging.” Cisco white paper. http://www.cisco.com/web/about/security/intelligence/acl-logging.html.
“ACL IP Options Selective Drop.” Cisco IOS Software Releases 12.0S Feature Guide. http://www.cisco.com/en/US/products/sw/iosswrel/ps1829/products_feature_guide09186a00801d4a94.html.
“ACL Support for Filtering IP Options.” Cisco IOS Software Releases 12.3T Feature Guide. http://www.cisco.com/en/US/products/sw/iosswrel/ps5207/products_feature_guide09186a00801d4a7d.html.
“BGP and the Internet: Advanced Community Usage.” Cisco Systems, 2000. http://www.questnet.net.au/questnet2001/ppt/pdf/BGP-AdvCommunities.pdf.
“BGP Support for IP Prefix Import from Global Table into a VRF Table.” Cisco IOS Software Releases 12.3T Feature Guide. http://www.cisco.com/en/US/products/sw/iosswrel/ps5207/products_feature_guide09186a00803b8db9.html#wp1027265.
Cisco 7600 Series Cisco IOS Software Configuration Guide, 12.2SR. http://www.cisco.com/univercd/cc/td/doc/product/core/cis7600/software/122sr/swcg/index.htm.
“Cisco IOS Firewall Overview.” Cisco IOS Security Configuration Guide, Release 12.4. http://cisco.com/en/US/products/ps6350/products_configuration_guide_chapter09186a0080455ae3.html.
“Cisco IOS Network Address Translation Overview.” Cisco white paper. http://www.cisco.com/en/US/tech/tk648/tk361/technologies_white_paper09186a0080091cb9.shtml.
“Cisco IOS Quality of Service.” Cisco white paper. http://www.cisco.com/en/US/products/ps6558/products_white_paper0900aecd802b68b1.shtml.
“Cisco IOS Software Support Resources.” http://www.cisco.com/en/US/products/sw/iosswrel/tsd_products_support_category_home.html.
“Cisco Modular Quality of Service Command Line Interface.” Cisco white paper. http://www.cisco.com/en/US/products/ps6558/products_white_paper09186a0080123415.shtml.
“Configuring Cisco IOS Intrusion Prevention System (IPS).” Cisco IOS Security Configuration Guide, Release 12.4. http://www.cisco.com/en/US/products/ps6350/products_configuration_guide_chapter09186a00804453cf.html.
“Configuring Traffic Storm Control.” Cisco Documentation. http://www.cisco.com/univercd/cc/td/doc/product/core/cis7600/software/122sr/swcg/storm.htm.
“IS-IS Mechanisms to Exclude Connected IP Prefixes from LSP Advertisements.” Cisco IOS Software Releases 12.0S Feature Guide. http://www.cisco.com/en/US/products/sw/iosswrel/ps1829/products_feature_guide09186a00800ad395.html.
“NANOG Security Curriculum.” NANOG. http://www.nanog.org/ispsecurity.html.
“Network Based Application Recognition.” Cisco Systems. http://www.cisco.com/en/US/products/ps6616/products_ios_protocol_group_home.html.
“Protecting Your Core: Infrastructure Protection Access Control Lists.” (Doc. ID: 43920.) Cisco white paper. http://www.cisco.com/warp/public/707/iacl.html.
“Providing Service Security With Cisco Service Control Technology.” Cisco SCE 1000 Series Service Control Engine Brochure. http://www.cisco.com/en/US/products/ps6150/prod_brochure0900aecd8024ff1a.html.
“Transit Access Control Lists: Filtering at Your Network Edge.” (Doc. ID: 44541.) Cisco white paper. http://www.cisco.com/en/US/tech/tk648/tk361/technologies_white_paper09186a00801afc76.shtml.
“Using CAR During DoS Attacks.” (Doc. ID: 12764.) Cisco Troubleshooting Tech Note. http://www.cisco.com/en/US/products/sw/iosswrel/ps1835/products_tech_note09186a00800fb50a.shtml.
“When Are ICMP Redirects Sent?” (Doc. ID: 13714.) Cisco Design Tech Note. http://www.cisco.com/en/US/partner/tech/tk365/technologies_tech_note09186a0080094702.shtml.