
WebLogic Workshop is a product of BEA Systems. BEA is a major player in the J2EE server arena with its product WebLogic Server. In fact, Workshop runs on top of WebLogic Server.
In this hour, we are going to take a look at the BEA offering in the Web services development arena, WebLogic Workshop. You will learn the following:
The WebLogic Workshop architecture
The Visual Development environment
How to build a WebLogic Workshop Web service
How to build a WebLogic Workshop Web service client
How to create a Workshop conversation service
How to test a Web service using WebLogic Workshop
The WebLogic Workshop, or simply Workshop, is an ease-of-use oriented product. The emphasis of this product is on making the creation and deployment of Web services as painless as possible.
Workshop features a design-time visual development environment that is reminiscent of a Java IDE such as Visual Café. Developers create Web services by adding controls and methods, setting properties, and writing Java code to add business logic. The basic unit of work in Workshop is the .jws file, which stands for Java Web service. JWS files are standard Java files containing special annotations that add the Web service functionality to the application.
The second part of the Workshop product is a runtime framework that does the heavy lifting associated with the deployment of the Web service classes. In addition, the framework provides debugging and testing services. The framework generates J2EE components that are then installed and run on the WebLogic server product. Figure 17.1 shows this architecture.

The basic advantage of the framework is that it can perform most of the complex plumbing work for you and free up your efforts to concentrate on creating the business logic that makes your applications valuable. Figure 17.2 shows the Workshop IDE.

The basic parts of the IDE are
The Project Pane—. Displays all the projects under development and the files that compose it.
The Structure Pane—. Displays the details of the Web service project that you are currently working on. The client interface, private methods, and controls are all listed here.
The Design View—. Provides you with a graphical representation of the public portions of the Web service.
The Source View—. Displays the source code for the service.
The Properties Pane—. Allows you to set the properties of the objects in your project.
The Description Pane—. Shows you a text description of the project.
The Tasks Pane—. Suggests tasks that are commonly performed on an object.
All of these user interface elements will be used to create Web services and clients later in this hour.
The creation of a WebLogic Workshop Web service is straightforward. The first step is to choose File, New Project. This will bring up the dialog box shown in Figure 17.3.

Enter a project name and click on the OK button. We named this project TeachYourself. The next step is to create a Web service by choosing File, New, New Web Service. This will bring up the dialog box shown in Figure 17.4.

We will name our service Watson. Click OK. Notice that the Project Pane, the Structure Pane, the Design View, and the Source View are all populated with the skeleton of a Web service. Listing 17.1 shows this skeleton from the Source View.
This class is simply instantiating the JwsContext object. This tag that appears in the Javadoc comment in Listing 17.1 is really a directive to the framework. It is telling Workshop to connect the object following the tag to the runtime objects of the framework.
/** @jws:context */
The actual declaration of the class is shown next:
JwsContext context;
The JwsContext instance is normally present in a JWS file. This object can be used to access aspects of the Web service context at runtime. Some of the methods defined by the JwsContext interface are getService(), getLogger(), and isFinished().
We will need a method that is callable by a client in our service. To do this, bring up the Edit Maps and Interface dialog box. This is done by clicking on the Add Operation control located in the Design View. When the operation graphic appears, name it callWatson. Right-click on this name and select Edit Maps and Interface. The dialog box shown in Figure 17.5 appears.
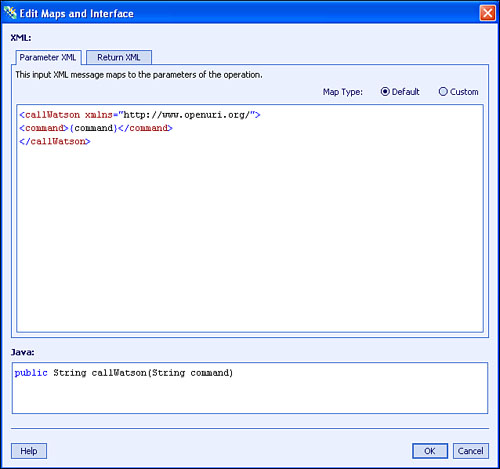
In the lower pane, add the following line of Java code:
public String callWatson(String command)
Next, click on the OK button. Change the code for the Web service now to look like Listing 17.2.
Notice the @jws:operation tag in this listing. This notifies Workshop that this operation is part of the public interface of this Web service.
To build the Web service, select Build from the Debug menu. The output message at the bottom of the screen should read as follows:
"Build complete - 0 error(s), 0 warning(s)"
Next, you can run the service by choosing Start from the Debug menu. A browser will open and show you a screen that looks like the one in Figure 17.6.
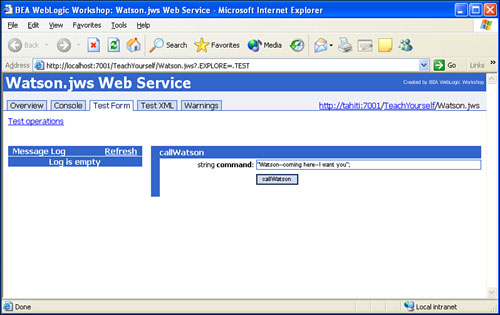
This HTML page is created by Workshop as an aid for testing. Type in a message for Watson and click the callWatson button. You will see a new page appear in the browser that should look a lot like Figure 17.7.

A WSDL file is generated for this by Workshop. It is shown here in Listing 17.3. To view it, select the Overview tab and then select Complete WSDL.
Example 17.3. The Watson.wsdl File
 <?xml version="1.0" encoding="utf-8" ?>
<definitions xmlns="http://schemas.xmlsoap.org/wsdl/"
xmlns:conv="http://www.openuri.org/2002/04/soap/conversation/"
xmlns:cw="http://www.openuri.org/2002/04/wsdl/conversation/"
xmlns:http="http://schemas.xmlsoap.org/wsdl/http/"
xmlns:jms="http://www.openuri.org/2002/04/wsdl/jms/"
xmlns:mime="http://schemas.xmlsoap.org/wsdl/mime/"
       xmlns:s="http://www.w3.org/2001/XMLSchema"
xmlns:s0="http://www.openuri.org/"
     xmlns:soap="http://schemas.xmlsoap.org/wsdl/soap/"
xmlns:soapenc="http://schemas.xmlsoap.org/soap/encoding/"
xmlns:xm="http://www.bea.com/2002/04/xmlmap/"
                   targetNamespace="http://www.openuri.org/">
<types>
 <s:schema attributeFormDefault="qualified"
                   elementFormDefault="qualified"
                   targetNamespace="http://www.openuri.org/">
 <s:element name="callWatson">
 <s:complexType>
 <s:sequence>
  <s:element minOccurs="0" maxOccurs="1"
                        name="command" type="s:string" />
  </s:sequence>
  </s:complexType>
  </s:element>
 <s:element name="callWatsonResponse">
 <s:complexType>
 <s:sequence>
  <s:element minOccurs="0" maxOccurs="1"
                               name="callWatsonResult" type="s:string" />
  </s:sequence>
  </s:complexType>
  </s:element>
  <s:element nillable="true" name="string" type="s:string" />
  </s:schema>
  </types>
 <message name="callWatsonSoapIn">
  <part name="parameters" element="s0:callWatson" />
  </message>
 <message name="callWatsonSoapOut">
  <part name="parameters" element="s0:callWatsonResponse" />
  </message>
 <message name="callWatsonHttpGetIn">
  <part name="command" type="s:string" />
  </message>
 <message name="callWatsonHttpGetOut">
  <part name="Body" element="s0:string" />
  </message>
 <message name="callWatsonHttpPostIn">
  <part name="command" type="s:string" />
  </message>
 <message name="callWatsonHttpPostOut">
  <part name="Body" element="s0:string" />
  </message>
  <portType name="WatsonSoap">
  <operation name="callWatson">
  <input message="s0:callWatsonSoapIn" />
  <output message="s0:callWatsonSoapOut" />
  </operation>
  </portType>
  <portType name="WatsonHttpGet">
  <operation name="callWatson">
  <input message="s0:callWatsonHttpGetIn" />
  <output message="s0:callWatsonHttpGetOut" />
  </operation>
 </portType>
 <portType name="WatsonHttpPost">
 <operation name="callWatson">
  <input message="s0:callWatsonHttpPostIn" />
  <output message="s0:callWatsonHttpPostOut" />
  </operation>
  </portType>
 <binding name="WatsonSoap" type="s0:WatsonSoap">
  <soap:binding transport="http://schemas.xmlsoap.org/soap/http"
                                    style="document" />
 <operation name="callWatson">
 <soap:operation soapAction="http://www.openuri.org/callWatson"
                                   style="document" />
 <input>
  <soap:body use="literal" />
  </input>
 <output>
  <soap:body use="literal" />
  </output>
  </operation>
  </binding>
 <binding name="WatsonHttpGet" type="s0:WatsonHttpGet">
  <http:binding verb="GET" />
 <operation name="callWatson">
  <http:operation location="/callWatson" />
 <input>
  <http:urlEncoded />
  </input>
 <output>
  <mime:mimeXml part="Body" />
  </output>
  </operation>
  </binding>
 <binding name="WatsonHttpPost" type="s0:WatsonHttpPost">
  <http:binding verb="POST" />
 <operation name="callWatson">
  <http:operation location="/callWatson" />
 <input>
  <mime:content type="application/xwwwformurlencoded" />
  </input>
 <output>
  <mime:mimeXml part="Body" />
  </output>
  </operation>
  </binding>
 <service name="Watson">
 <port name="WatsonSoap" binding="s0:WatsonSoap">
  <soap:address location="http://tahiti:7001/TeachYourself/Watson.jws" />
  </port>
 <port name="WatsonHttpGet" binding="s0:WatsonHttpGet">
  <http:address location="http://tahiti:7001/TeachYourself/Watson.jws" />
  </port>
 <port name="WatsonHttpPost" binding="s0:WatsonHttpPost">
  <http:address location="http://tahiti:7001/TeachYourself/Watson.jws" />
  </port>
  </service>
 </definitions>
Notice that Workshop generates bindings for SOAP, HTTP Get, and HTTP Post.
 <port name="WatsonSoap" binding="s0:WatsonSoap">
  <soap:address location="http://tahiti:7001/TeachYourself/Watson.jws" />
  </port>
 <port name="WatsonHttpGet" binding="s0:WatsonHttpGet">
  <http:address location="http://tahiti:7001/TeachYourself/Watson.jws" />
  </port>
 <port name="WatsonHttpPost" binding="s0:WatsonHttpPost">
  <http:address location="http://tahiti:7001/TeachYourself/Watson.jws" />
Notice also that the URL for all three bindings is the same.
The process for creating client applications that consume Web services is also made easier by using WebLogic Workshop. The first step is to obtain the proxy jar files from the Test application for the service that you want to communicate with. To do this, go to the Overview tab in the Test View as shown in Figure 17.8.

Click on the Java Proxy link and specify the directory that you are going to build your application in as the save destination. Next, click on the Proxy Support Jar link and save it to the same directory.
The next step is to add both of these jar files, Watson.jar and webservicesclient.jar, to the classpath of the client machine. This will enable the client that you write to access them. The jar files are located in the directory that you specified for the Java Proxy.
The Watson.jar file contains classes that are specific to the Watson Web service as shown in Figure 17.9.

The webservicesclient.jar contains classes that pertain to all Web services clients. These classes are not called directly by your code, but rather by the generated code in the proxy. The code for the client is shown in Listing 17.4. Type this code in to a new java file called TestWWClient.java.
Example 17.4. The TestWWClient.java File
import weblogic.jws.proxies.*;

public class TestWWClient
{
   public static void main(String[] args)
  {
      try
      {
         Watson_Impl proxy = new Watson_Impl();
         WatsonSoap soapProxy = proxy.getWatsonSoap();
         System.out.println(soapProxy.callWatson("Watson--come here"));
      }
      catch (Exception e)
      {
         e.printStackTrace();
      }
  }
}
This package contains the generated proxy classes.
import weblogic.jws.proxies.*;
First, we obtain a handle to the proxy class for this Web service:
Watson_Impl proxy = new Watson_Impl();
Next, we get a handle to the Soap-specific proxy through the generic proxy handle:
WatsonSoap soapProxy = proxy.getWatsonSoap();
Next, we use the Soap-specific proxy handle to make a call to the public method in that Web service:
System.out.println(soapProxy.callWatson("Watson--come here"));You compile and run this just as you would any other Java program. The result is shown here:
G:Booksws24chaptersch17>javac TestWWClient.java
G:Booksws24chaptersch17>java TestWWClient
Watson is coming
WebLogic Workshop is able to maintain state in a Web service in an almost automatic fashion using the Enterprise Java Bean (EJB) capabilities of WebLogic server.
State is important because many Web services need to behave like a session instead of a like a stateless, single-hit Web page. In fact, Workshop calls its session facility a conversation. A conversation is simply a set of method calls that are able to find out about activities that occurred earlier by the same user. The classic example of a stateful session is the online retail store. The user selects items and places them in a virtual shopping cart. When she is ready to check out, the items in the shopping cart are “removed” and shipped to her. Her credit card is charged the agreed amount plus any taxes or fees.
HTTP provides a session object that can be used for this purpose. Instead of using the session object, Workshop takes advantage of the session facility of EJBs that are available in J2EE-compliant servers.
Three special tags are used by Workshop to communicate: the start, continue, and finish of a session.
* @jws:conversation phase="start"—. Tells the runtime to begin maintaining state for this user.* @jws:conversation phase="continue"—. Tells the runtime to use the current state for this user in this method call.* @jws:conversation phase="finish"—. Tells the runtime to discard the state for this user.
In order to show how a conversation can be conducted, we can work the following example. Create the following Web service by following the same procedure that you did in the first example in this hour. Name it Conversation. Listing 17.5 shows the service’s code.
Example 17.5. The Conversation.jws File
import weblogic.jws.control.JwsContext;

/**
 * @jws:protocol soap-style="rpc"
 */
public class Conversation
{
    public String userName;
    /** @jws:context */
    JwsContext context;

    /**
     * @jws:operation
     * @jws:conversation phase="start"
     */
    public void setUserName(String userName)
   {
        this.userName = userName;
   }

   /**
    * @jws:operation
    * @jws:conversation phase="continue"
    */
   public String getUserName()
  {
       return "The current user is " + this.userName;
  }

  /**
   * @jws:operation
   * @jws:message-buffer enable="false"
   * @jws:conversation phase="continue"
   */
  public String orderAProduct()
  {
      return this.userName + " ordered a product";
  }

  /**
   * @jws:operation
   * @jws:conversation phase="continue"
   */
  public String cancelAnOrder()
  {
       return this.userName + " cancelled an Order";
  }

  /**
   * @jws:operation
   * @jws:conversation phase="finish"
   */
  public String checkOut()
  {
       return this.userName + " checked out";
  }
}
Once again, we use the JwsContext object to provide us with access to the facilities inside Workshop.
import weblogic.jws.control.JwsContext;
We will use the remote procedure call style of communication for this service.
/**
 * @jws:protocol soap-style="rpc"
 */
All of the methods are created in a class that has the same name as the service.
public class Conversation
{
The userName is the state variable that we want to keep track of between method calls.
    public String userName;
    /** @jws:context */
    JwsContext context;
The starting operation is called setUserName().
    /**
     * @jws:operation
     * @jws:conversation phase="start"
     */
    public void setUserName(String userName)
   {
        this.userName = userName;
   }
The getUserName() is a continue-type method call, meaning that it neither starts nor ends a conversation.
    /**
     * @jws:operation
     * @jws:conversation phase="continue"
     */
    public String getUserName()
    {

         return "The current user is " + this.userName;
   }
The orderAProduct() method is also of type continue.
    /**
     * @jws:operation
     * @jws:conversation phase="continue"
     */
    public String orderAProduct()
    {
        return this.userName + " ordered a product";
    }
The cancelAnOrder is also of type continue.
    /**
     * @jws:operation
     * @jws:conversation phase="continue"
     */
    public String cancelAnOrder()
   {
         return this.userName + " cancelled an Order";
   }
The checkout() method is of type finish. It tells the runtime that the state for this user can be discarded after this method completes.
    /**
     * @jws:operation
     * @jws:conversation phase="finish"
     */
    public String checkOut()
    {
         return this.userName + " checked out";
    }
}
Workshop provides a handy graphical representation of this service in the Design View, as shown in Figure 17.10.

The little circled letters S, C, and F indicate whether a method is of the start, continue, or finish type.
Even though many methods are associated with this Web service, the Test application that is generated automatically can still be used to test it. You start the Test application by choosing Start from the Debug menu. This will bring up the Web page shown in Figure 17.11.

After you type in the name of your user and click on the setUserName button, a second dialog box will appear. Clicking on the Continue This Conversation hyperlink will bring up the Web page shown in Figure 17.12.

This page will give you an opportunity to run the other methods and see what they return. For instance, clicking on the orderAProduct button will return the following:
<string xmlns="http://www.openuri.org/">SteveARino ordered a product</string>
The next step, which we won’t show here, is to create a real client for this service using the generated jar files. The process for doing this is exactly the same as you saw in the Watson Web services that we created earlier in this hour.
In this hour, you learned how to create a Web service using BEA’s Weblogic Workshop. You first learned how to create a simple Web service using the Workshop IDE. Next, you learned how to use the jar files that the IDE generates to create a client.
Following that, you learned how to create a conversation-oriented Web service. Finally, you learned how to use the Test application that the IDE generates automatically to test the conversation Web service.
The Workshop is designed to help you review what you’ve learned and begin learning how to put your knowledge into practice.