STITCHES

WHIPPED BACK STITCH
SEED STITCH

STEM STITCH
COLORS
GOLD
PINK
GREEN
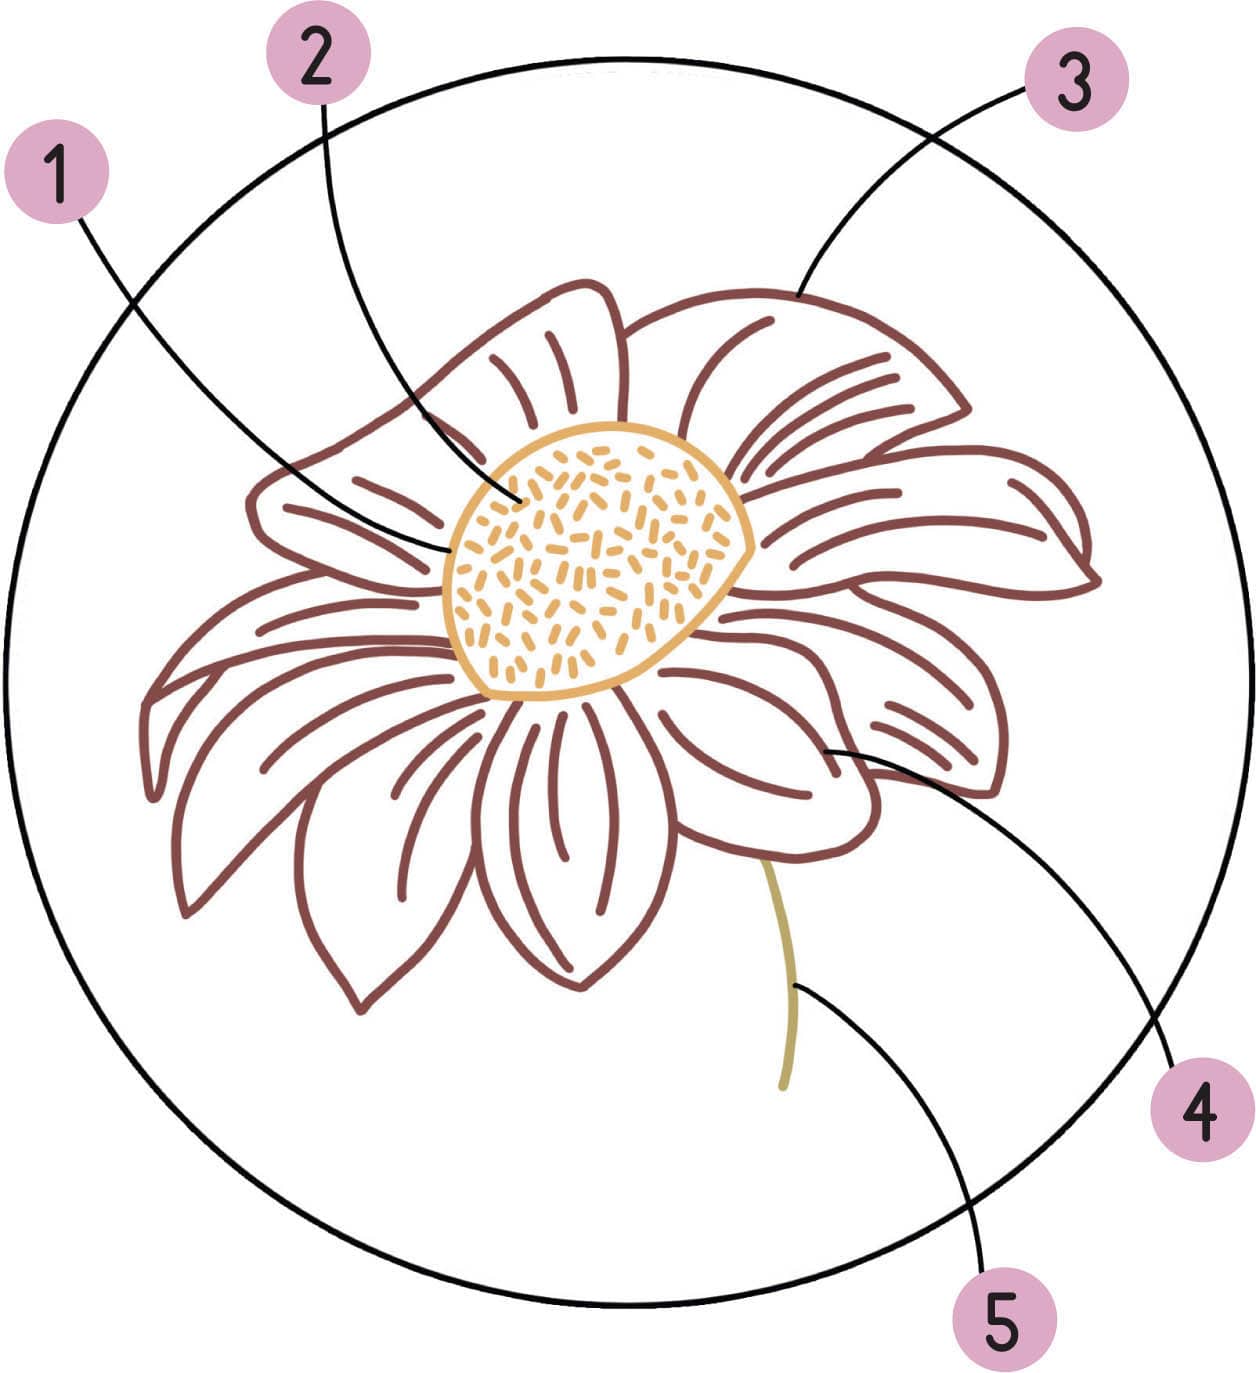
1. FLOWER CENTER: whipped back stitch (3 strands, 3820/gold)
Start by stitching the center of your flower using whipped back stitch. You’ll notice that this shape is made up of two lines: the first line produces a deep curve at the top of the shape, while the second line produces a gentler curve at the bottom. I stitched the top of the shape as a single line, ending my line of stitching before moving on to the bottom line (versus stitching it as a continuous shape).
2. SEEDS: seed stitch (1 strand, 3820/gold)
Fill in the center of your flower shape using seed stitches. You may find that you need to add a seed stitch here and there depending on your own personal preferences and how long you make your stitches. For example, if you look closely at the sample hoop, you’ll see that my stitch length isn’t always perfectly consistent, even though I was working from the pattern. When this happens, you might need to add a few additional stitches to give the piece more balance. Once you’ve followed the lines from the pattern to fill in your shape, take a look at it and see if you think it would look better with additional stitches to fill in any accidental gaps.
3. OUTSIDE PETALS: whipped back stitch (3 strands, 3778/pink)
Stitch the outside portions of your petals using whipped back stitch. These petals’ shapes work similarly to the center portion of your flower in that some of them are made up of more than one line of stitching. When stitching the sample hoop, I did my best to end my line of stitching wherever I saw a more “pointed” curve. For example, consider the two petals at the topmost point of the flower: the petal on the top left consists of one long line of stitching, with very gentle curves; the petal on the top right, however, consists of a gentle curve that meets, at a point, a shorter curved line.
4. PETAL DETAILS: stem stitch (1 strand, 3778/pink)
Stitch the lines inside of the petals using stem stitch. Using just one strand of floss here helps to differentiate the overall petal shape from the details inside each petal, which give them more shape and interest.
5. STEM: stem stitch (2 strands, 734/green)
To finish your project, use stem stitch to create a short stem.
STITCHES

WHIPPED BACK STITCH

DETACHED CHAIN STITCH

FRENCH KNOT

STRAIGHT STITCH
COLORS
DARK GREEN
LIGHT GREEN
DARK PINK

MEDIUM PINK

LIGHT PINK
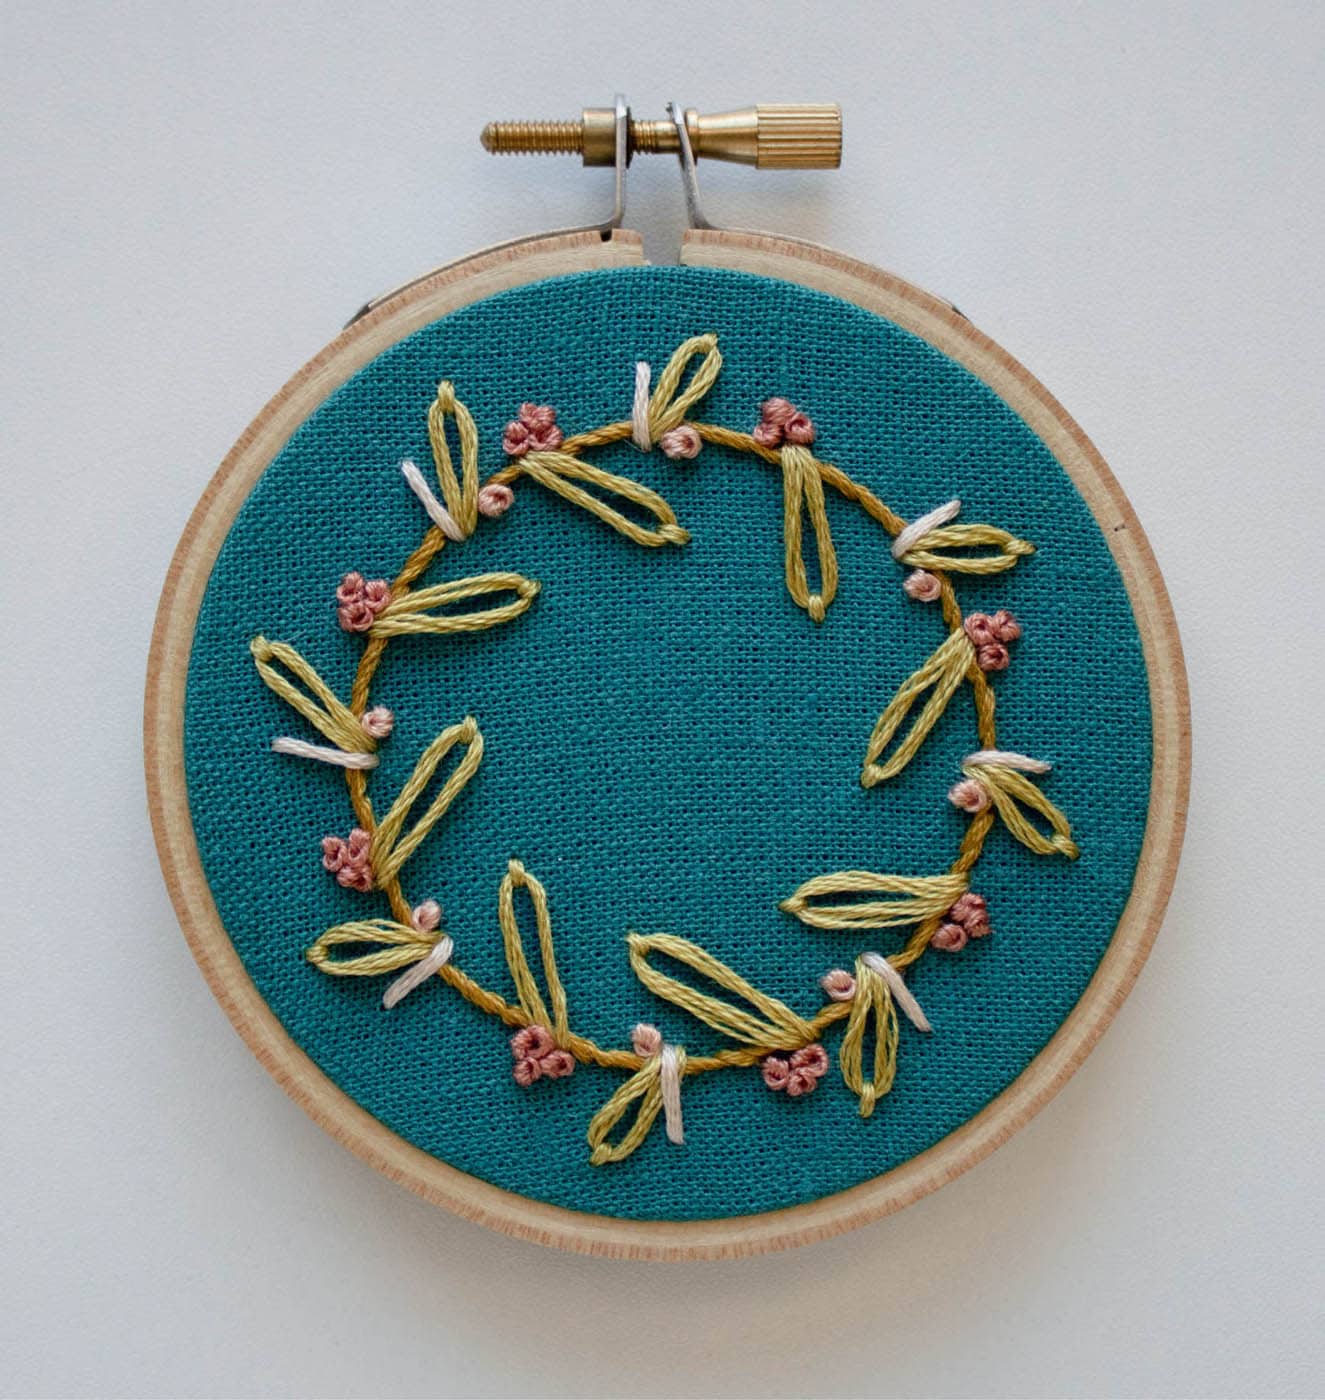
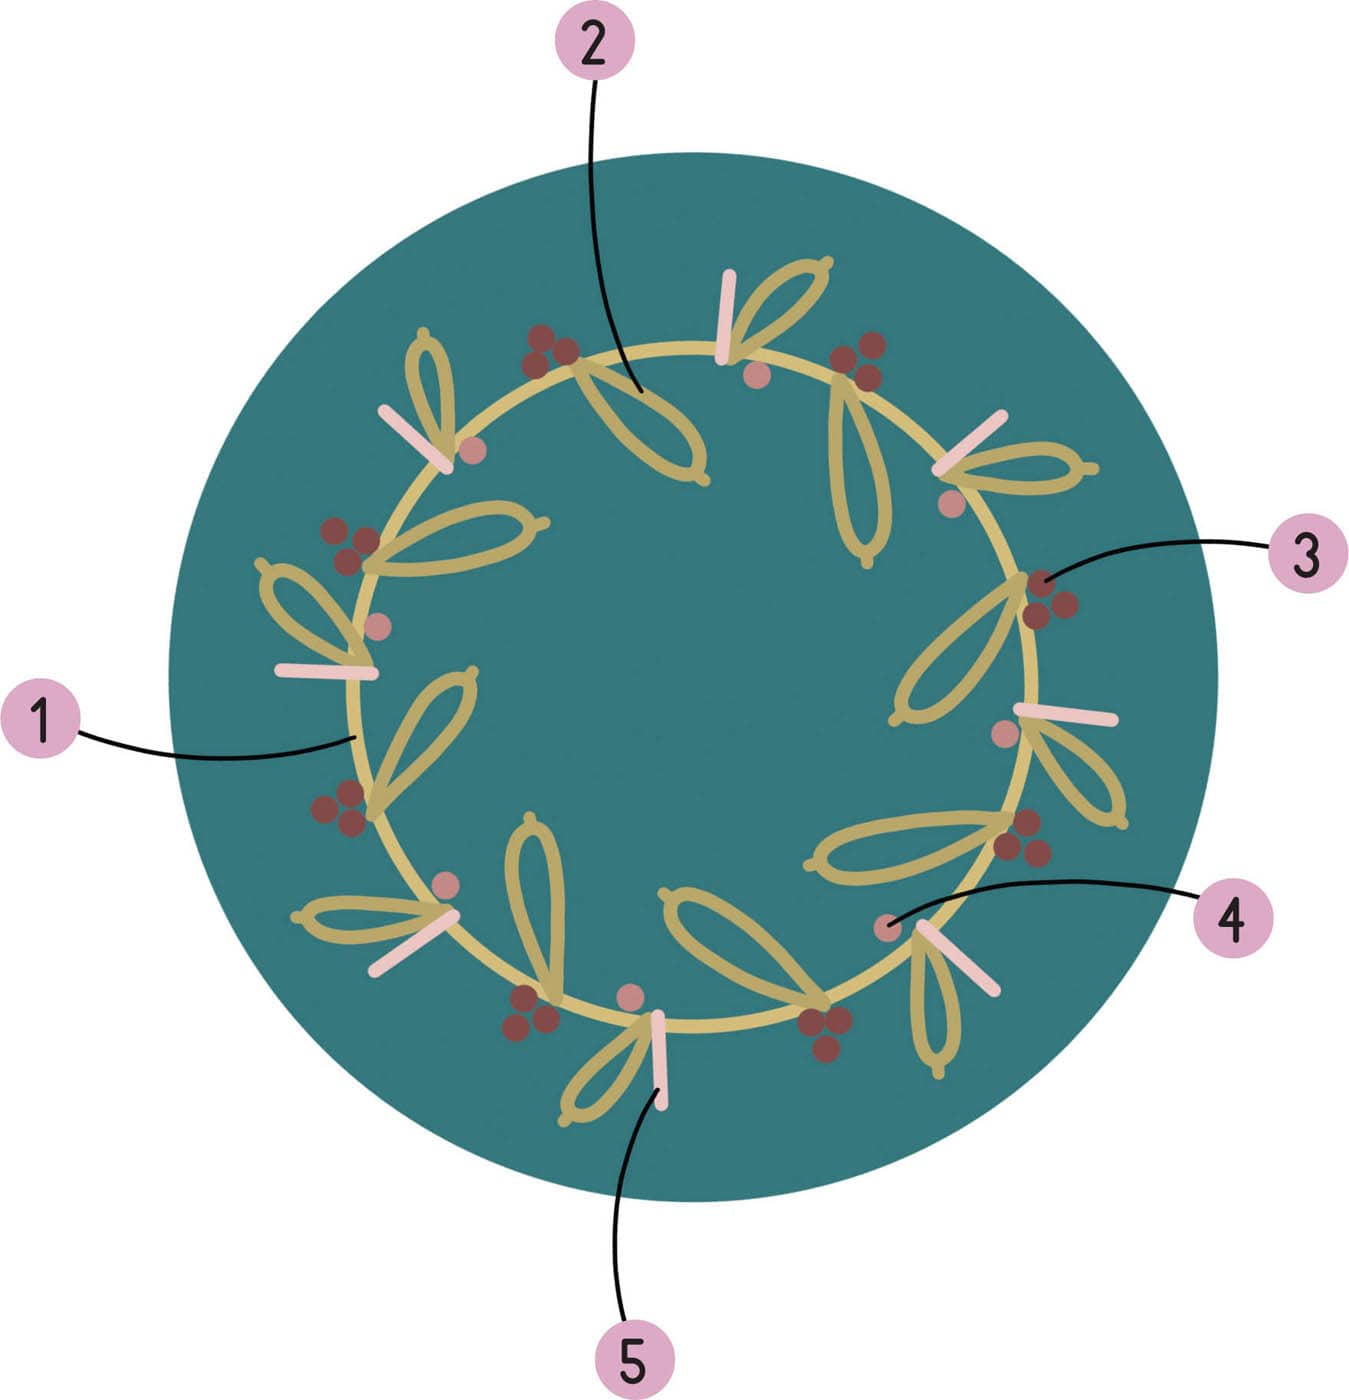
1. WREATH: whipped back stitch (6 strands, 832/dark green)
Embroidered wreaths are simple when broken down into layered steps. You’ll create the first layer of your wreath by stitching your circular base using whipped back stitch. Make sure your fabric is nice and tight here, as this will help you keep the integrity of the circular base shape intact.
2. LEAVES: detached chain stitch (6 strands, 734/light green)
You’ll create the next layer of your wreath by creating leaves using detached chain stitch. For the sample hoop, I placed my detached chain stitches over my original line of stitching. This means that I brought my needle up through my fabric to start my stitch on one side of the whipped back stitched base and brought it down to end my stitch on the other side.
3. EMBELLISHMENTS: French knot, 1 wrap (6 strands, 3778/dark pink)
Once you’ve created the base layer and “leaf” layer, you’ll move on to the “embellishment” layer of your wreath. Start by using French knots to create small clusters of embellishments along the outside of your wreath.
4. EMBELLISHMENTS: French knot, 1 wrap (6 strands, 3771/medium pink)
Next, use French knots to create additional embellishments on the inside of your wreath. There are many ways to add French knot embellishments to a wreath like this, so feel free to make changes as you stitch, should you prefer a slightly different effect!
5. EMBELLISHMENTS: straight stitch (6 strands, 951/light pink)
Finally, use straight stitch to create additional embellishments next to your detached chain stitched leaves. Again, place these over your base circle, as you did in step 2.
STITCHES

WOVEN WHEEL ROSE

FRENCH KNOT
SATIN STITCH

THISTLE FLOWER

DETACHED CHAIN STITCH

STEM STITCH

STRAIGHT STITCH
WHEATEAR STITCH
COLORS
DARK GREEN
DARK PINK
MEDIUM PINK
LIGHT PINK
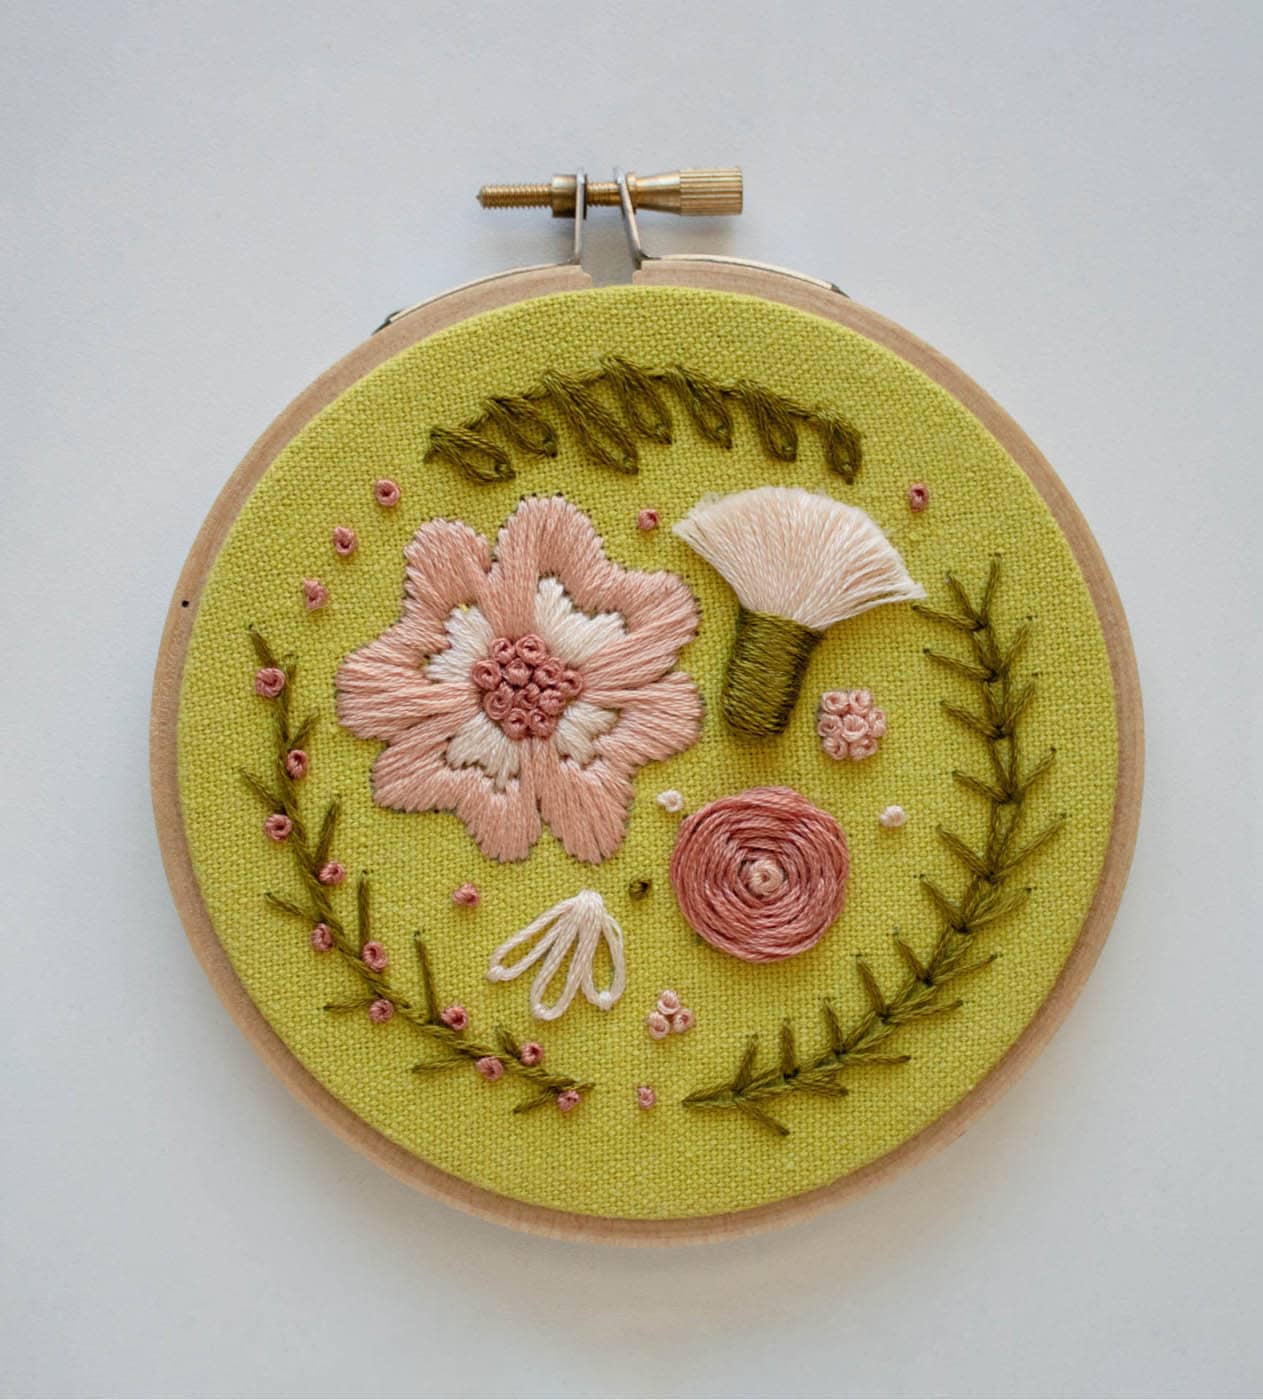
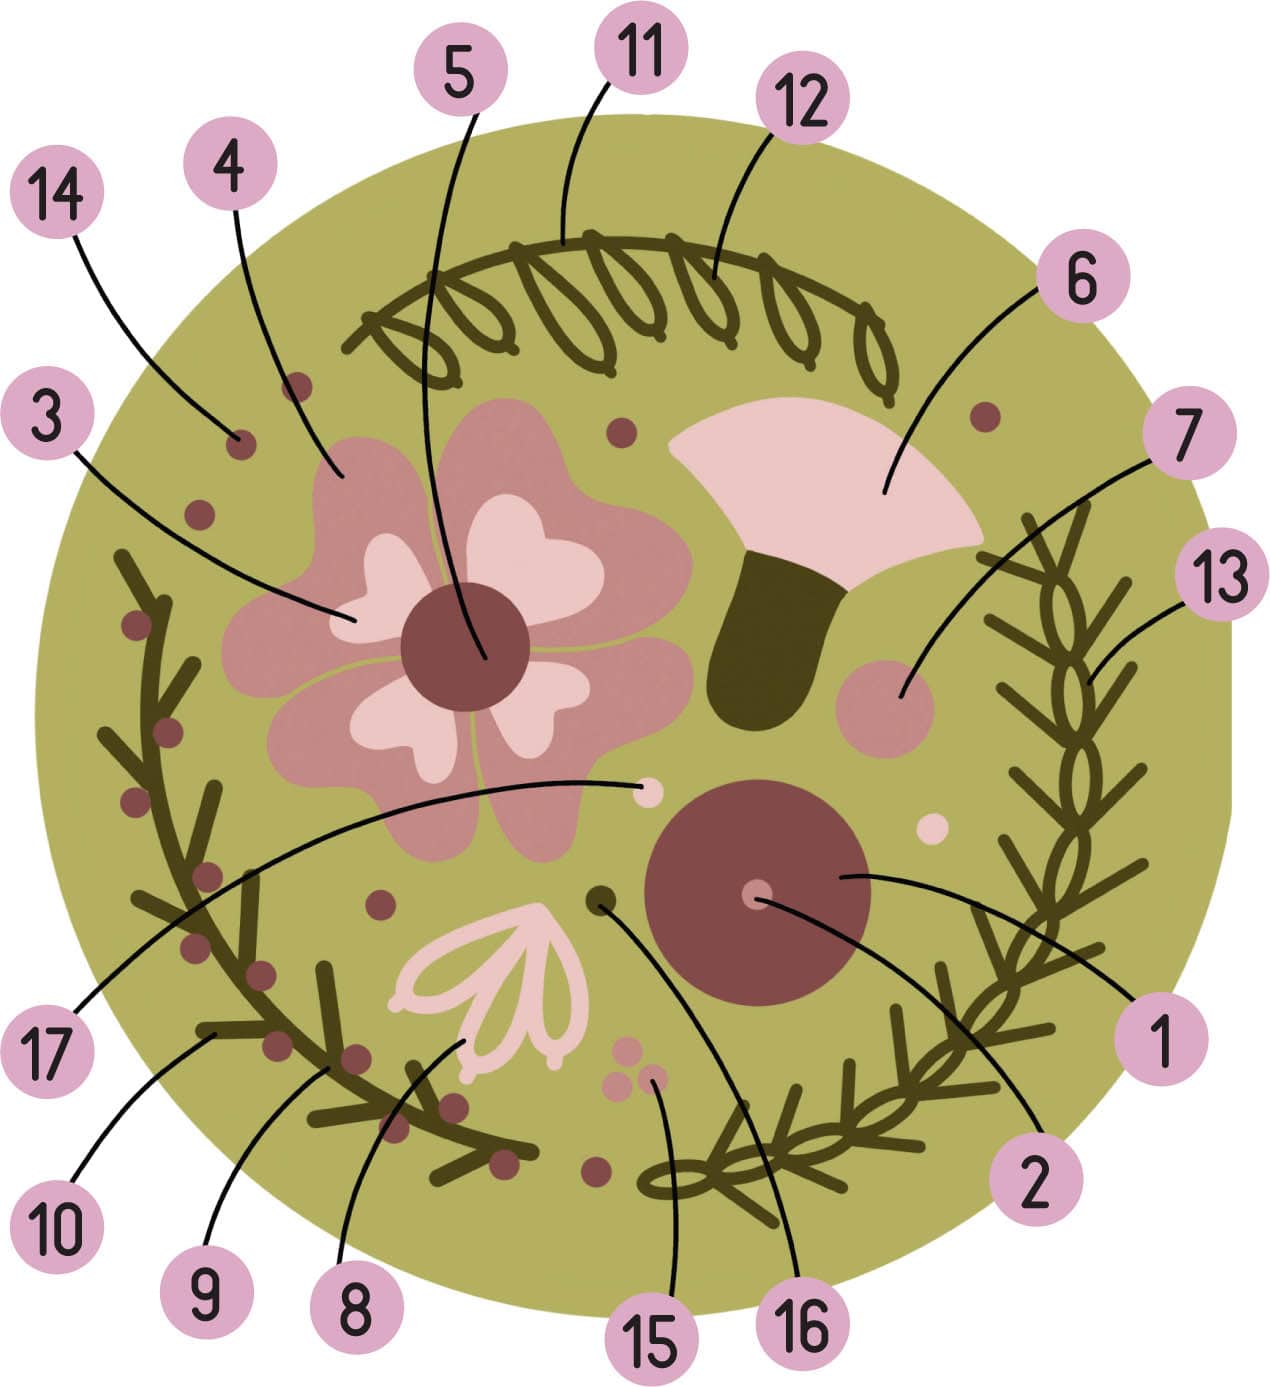
1. ROSE: woven wheel rose (6 strands, 731/dark green, for the five-spoke base; 6 strands, 3778/dark pink, for the woven petals)
Start by stitching a woven wheel rose. Make sure to keep your initial “spokes” nice and tight.
2. ROSE CENTER: French knot, 3 wraps (6 strands, 3771/medium pink)
Place a French knot in the center of your woven wheel rose.
3. INNER PETALS: satin stitch (6 strands, 951/light pink)
Use satin stitch to fill in the inside portion of your petals.
4. OUTER PETALS: satin stitch (6 strands, 3771/medium pink)
Do your best not to “split” your floss from the previous step while filling in these larger petals.
5. FLOWER CENTER: French knot, 2 wraps (6 strands, 3778/dark pink)
Use French knots to fill in the center of your flower.
6. THISTLE FLOWER: Thistle flower (6 strands, 951/light pink, for the petals; 6 strands, 731/dark green, for the base)
Remember, you can create a “fluffier” petal by separating your strands of floss and bringing them back together before wrapping around your fingers!
7. CLUSTER: French knot, 2 wraps (6 strands, 3771/medium pink)
For this small cluster, start from the center and work your way out to the edges.
8. PETALS: detached chain stitch (6 strands, 951/light pink)
Start by stitching the outside detached chain stitches; this allows you to layer the center stitch on top.
9. VINE: stem stitch (6 strands, 731/dark green)
Create a stem-stitch base for your first vine.
10. VINE LEAVES: straight stitch (6 strands, 731/dark green)
Use straight stitches to create the leaves for this first vine.
11. VINE: stem stitch (6 strands, 731/dark green)
Create a stem-stitch base for your second vine.
12. VINE LEAVES: detached chain stitch (6 strands, 731/dark green)
Use detached chain stitch to create the leaves for this second vine.
13. VINE: wheatear stitch (6 strands, 731/dark green)
You’ll stitch this third vine by working your way from the top to the bottom of your curved line.
14. EMBELLISHMENT: French knot, 1 wrap (6 strands, 3778/dark pink)
To finish your project, you’ll be adding in a series of French knot embellishments using the colors you’ve already incorporated into the larger design, starting with dark pink in this step and moving onto other colors in the final steps that follow.
15. EMBELLISHMENT: French knot, 1 wrap (6 strands, 3771/medium pink)
16. EMBELLISHMENT: French knot, 1 wrap (6 strands, 731/dark green)
17. EMBELLISHMENT: French knot, 1 wrap (6 strands, 951/light pink)

STITCHES

WHIPPED BACK STITCH

STRAIGHT STITCH

FRENCH KNOT

DETACHED CHAIN STITCH
COLORS
OLIVE
WHITE
BLUE

GOLD
PINK
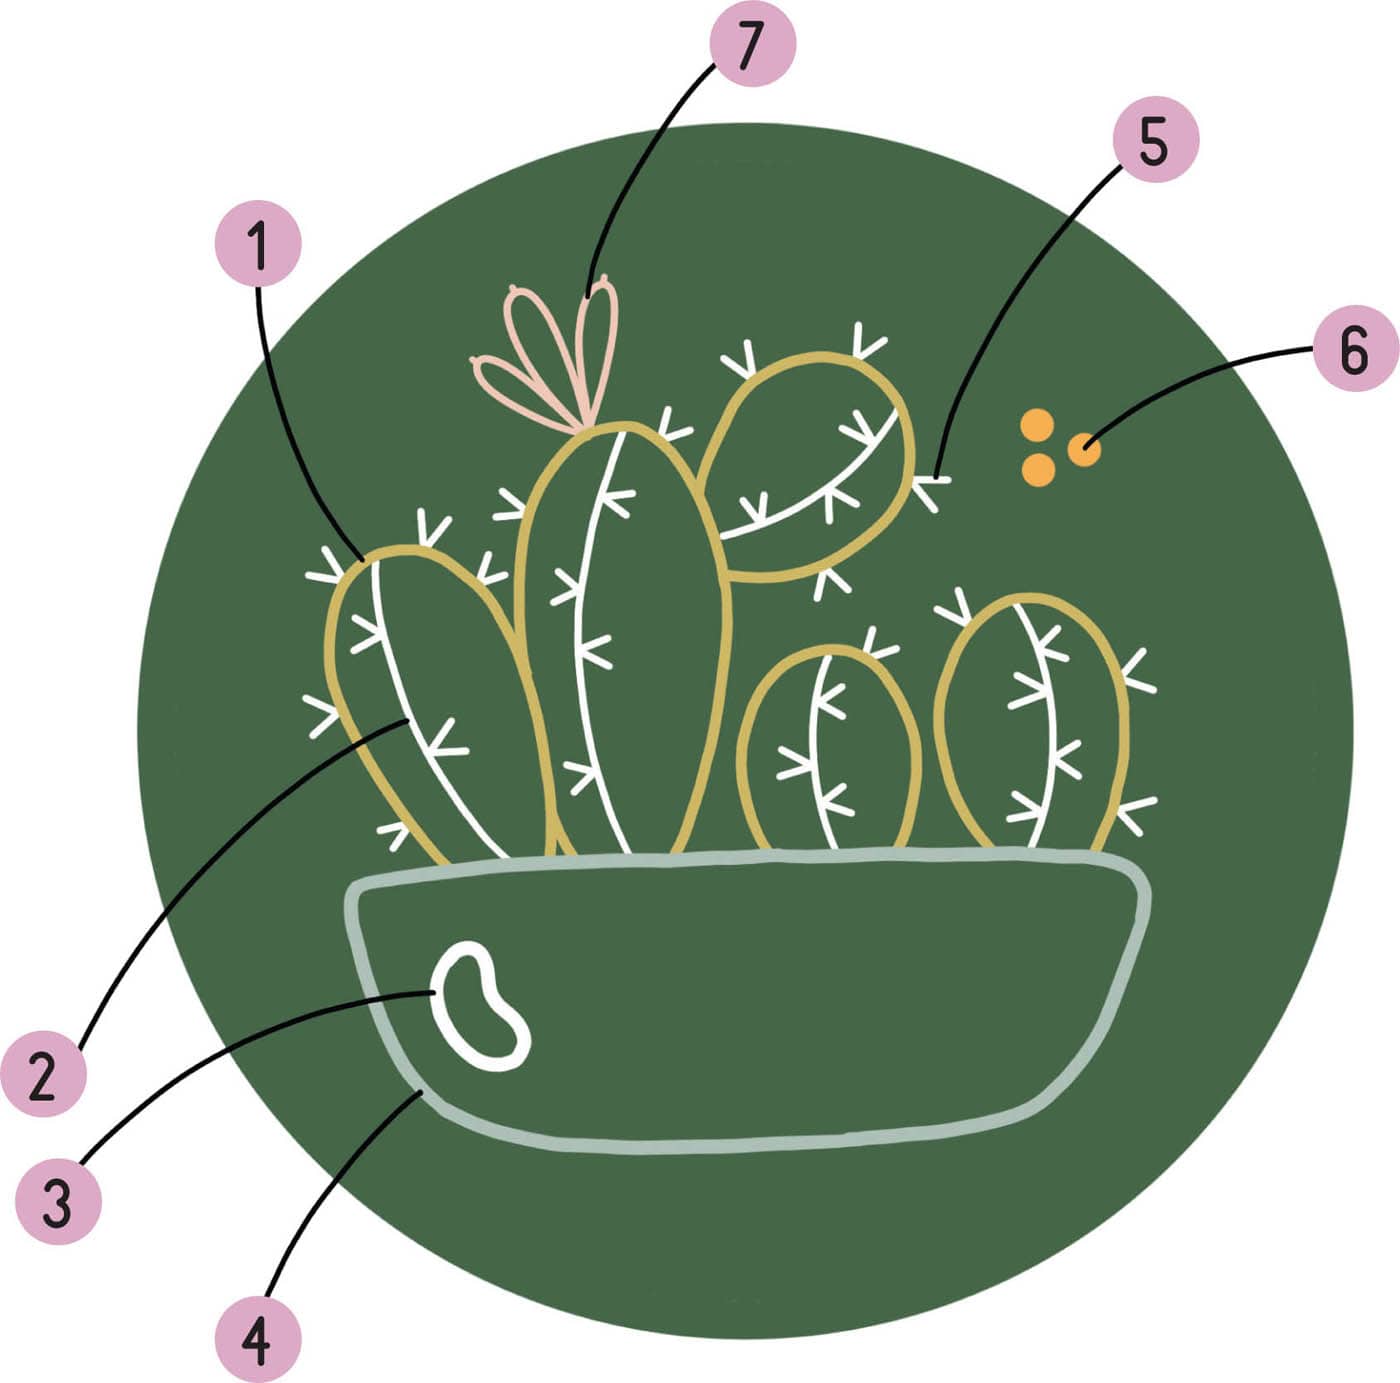
1. CACTUS OUTLINE: whipped back stitch (2 strands, 833/olive)
Start by using whipped back stitch to create the outlines of your cactus plant. For this design, each “stem” of the cactus is one single line of stitching. I started by back stitching each portion of the cactus, leaving the whipping for the end; that said, you could also complete each stem before moving onto the next and get the same result.
2. CACTUS LINES: whipped back stitch (2 strands, B5200/white)
Using whipped back stitch again, you’ll create the center lines in your cactus.
3. POT DETAIL: whipped back stitch (2 strands, B5200/white)
You’ll create the highlight on your pot by using short whipped back stitches to maintain the integrity of the curves.
4. POT OUTLINE: whipped back stitch (2 strands, 927/blue)
Use whipped back stitch to create the pot. When you look at this portion of the pattern, you’ll notice that there are tight curves at the top right and top left of the pot, with more gentle curves at the bottom right and bottom left of the pot. Try to keep your stitch distance consistent, while keeping in mind that you’ll need shorter stitches to follow those tighter curves.
5. CACTUS SPIKES: straight stitch (1 strand, B5200/white)
Use short straight stitches that meet in V-like shapes to create the spikes on your cactus. This is my favorite part of this pattern to stitch, and you should feel free to add additional spikes if you prefer.
6. EMBELLISHMENT: French knots, 3 wraps (2 strands, 3852/gold)
Add three French knots in a golden color to represent light and balance out the design.
7. PETALS: detached chain stitch (2 strands, 967/pink)
To finish your project, add a flower to your cactus using detached chain stitches in a pink color.
STITCHES
SATIN STITCH

STRAIGHT STITCH

STEM STITCH

FRENCH KNOT
COLORS
WHITE

PINK
LIGHT GREEN
DARK GREEN
GOLD
ORANGE
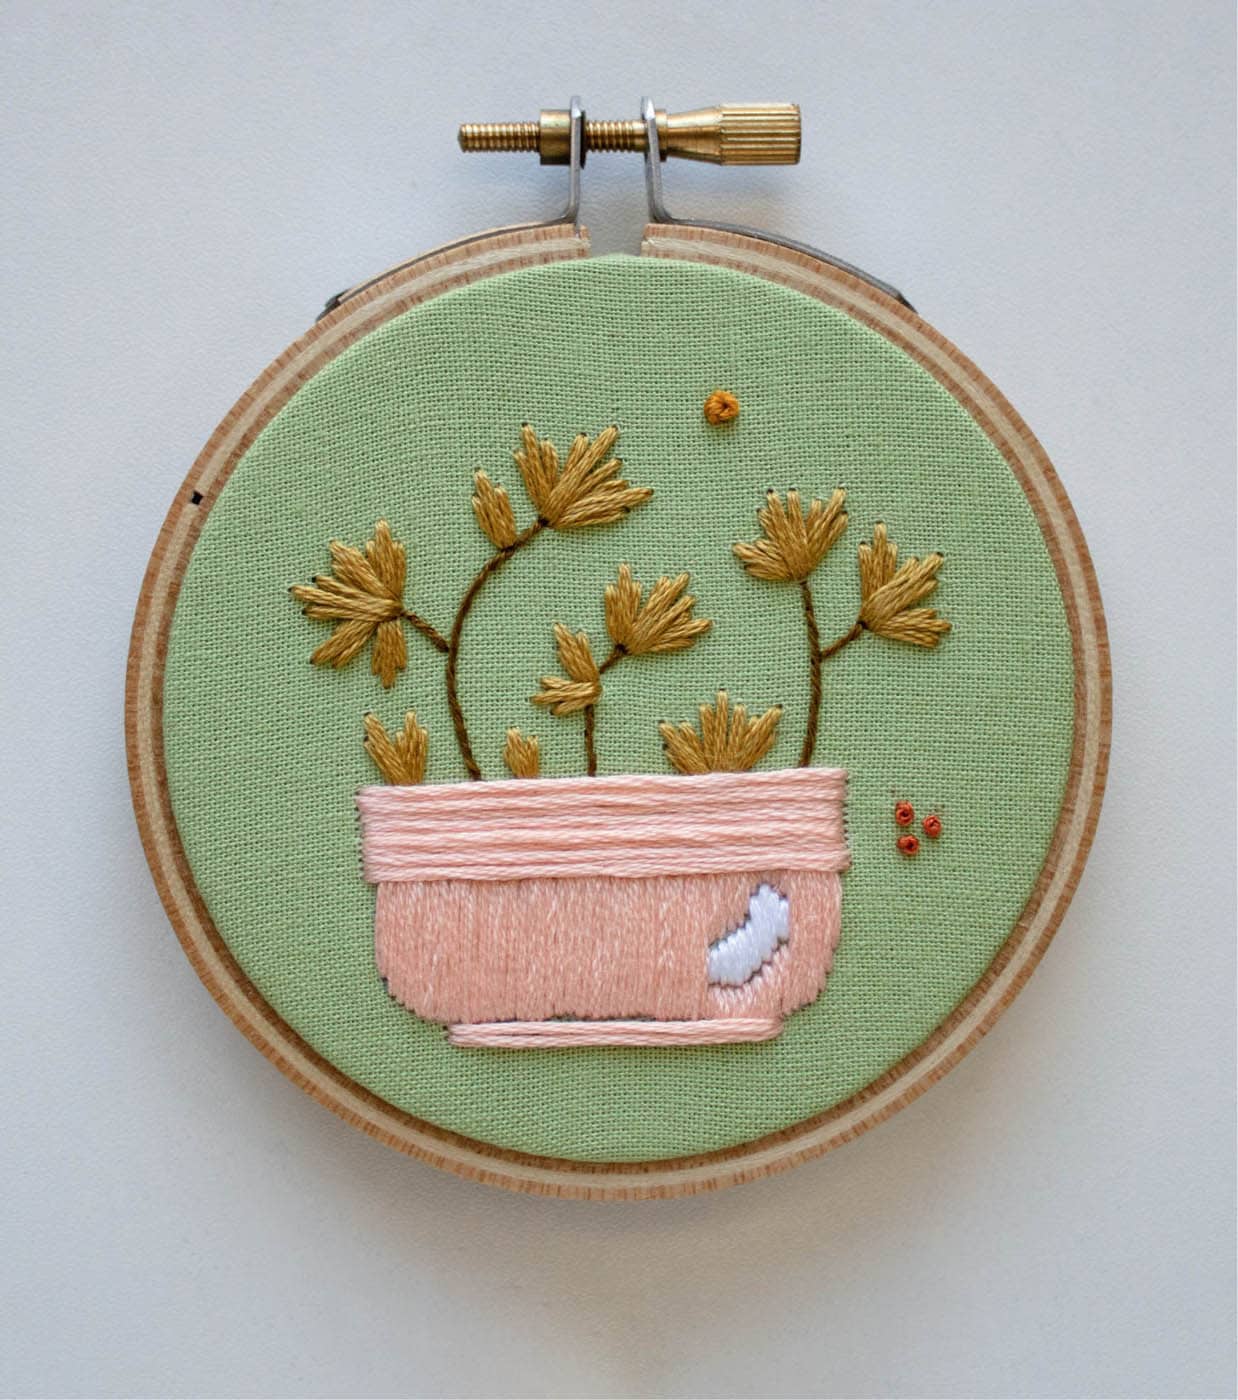
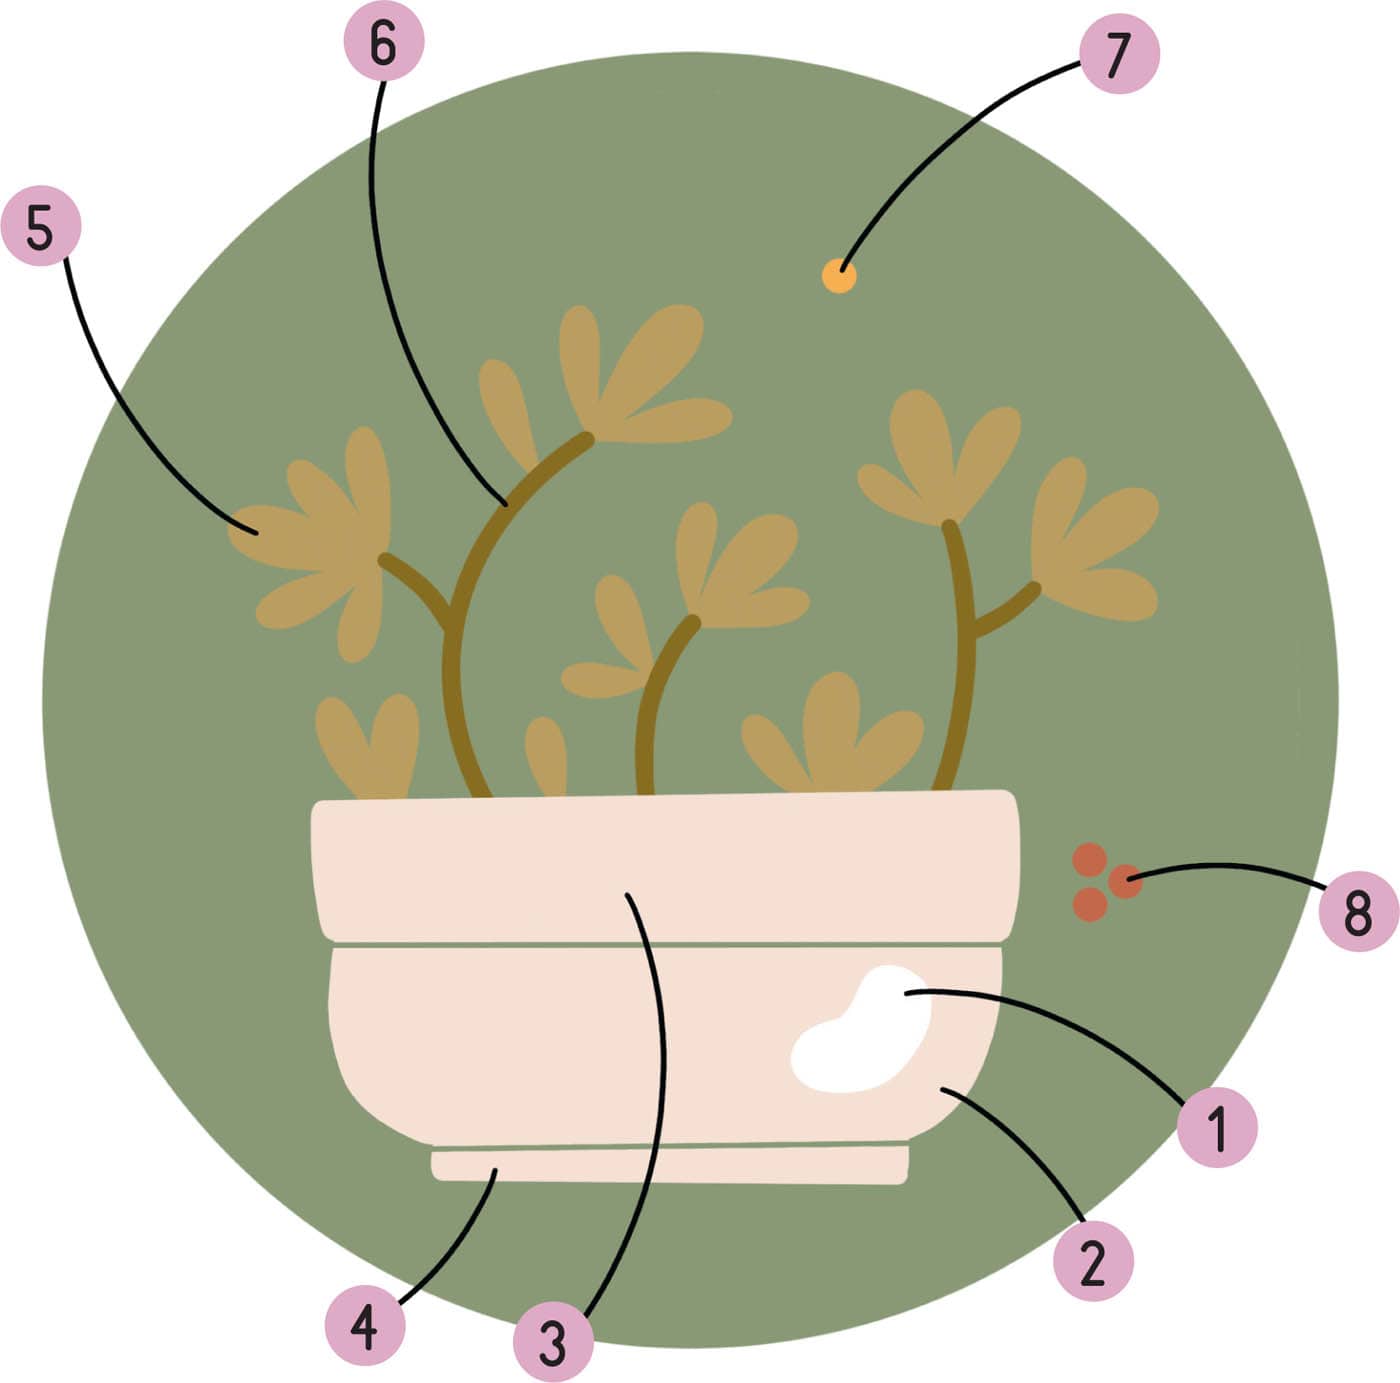
1. POT HIGHLIGHT: satin stitch (6 strands, B5200/white)
I find it’s easier to start here (versus attempting to get my needle through the fabric at the center of an already-stitched pot). Do your best to keep your stitches vertical as this will help you create your guideline stitches for the rest of your pot.
2. POT CENTER: satin stitch (6 strands, 967/pink)
For a large area like this, I like to create guideline stitches before filling in each individual section of satin stitching. You’ll be creating vertical stitches here, doing your best to line them up with the stitches from the previous step.
3. POT TOP: satin stitch (6 strands, 967/pink)
By using horizontal stitches here, you’ll be able to cover up any mistakes you may have made in the previous step!
4. POT BOTTOM: satin stitch (6 strands, 967/pink)
Again, by using horizontal stitches here, you’ll be able to cover up any small mistakes you may have made in step 2.
5. LEAVES: straight stitch (6 strands, 833/light green)
Use three to four straight stitches, all meeting at a single point, to create your leaves.
6. STEMS: stem stitch (2 strands, 830/dark green)
Use stem stitch to create your succulent’s stems, keeping your looped floss to the outside of your curves as you stitch.
7. EMBELLISHMENT: French knot, 2 wraps (6 strands, 3852/gold)
To finish this project, you’ll be creating just a few French knot embellishments, starting with a single French knot at the top of the design.
8. EMBELLISHMENT: French knot, 2 wraps (2 strands, 921/orange)
The final embellishments for this project are three French knots, stitched next to your pot.
STITCHES
SATIN STITCH

STEM STITCH
GENTLE BLENDING

STRAIGHT STITCH

FRENCH KNOT
COLORS

ORANGE

WHITE

PINK

GOLD

MEDIUM GREEN

MEDIUM OLIVE GREEN

DARK GREEN

DARK OLIVE GREEN

LIGHT OLIVE GREEN

LIGHT GREEN

LIGHT BROWN

DARK BROWN

BLUE
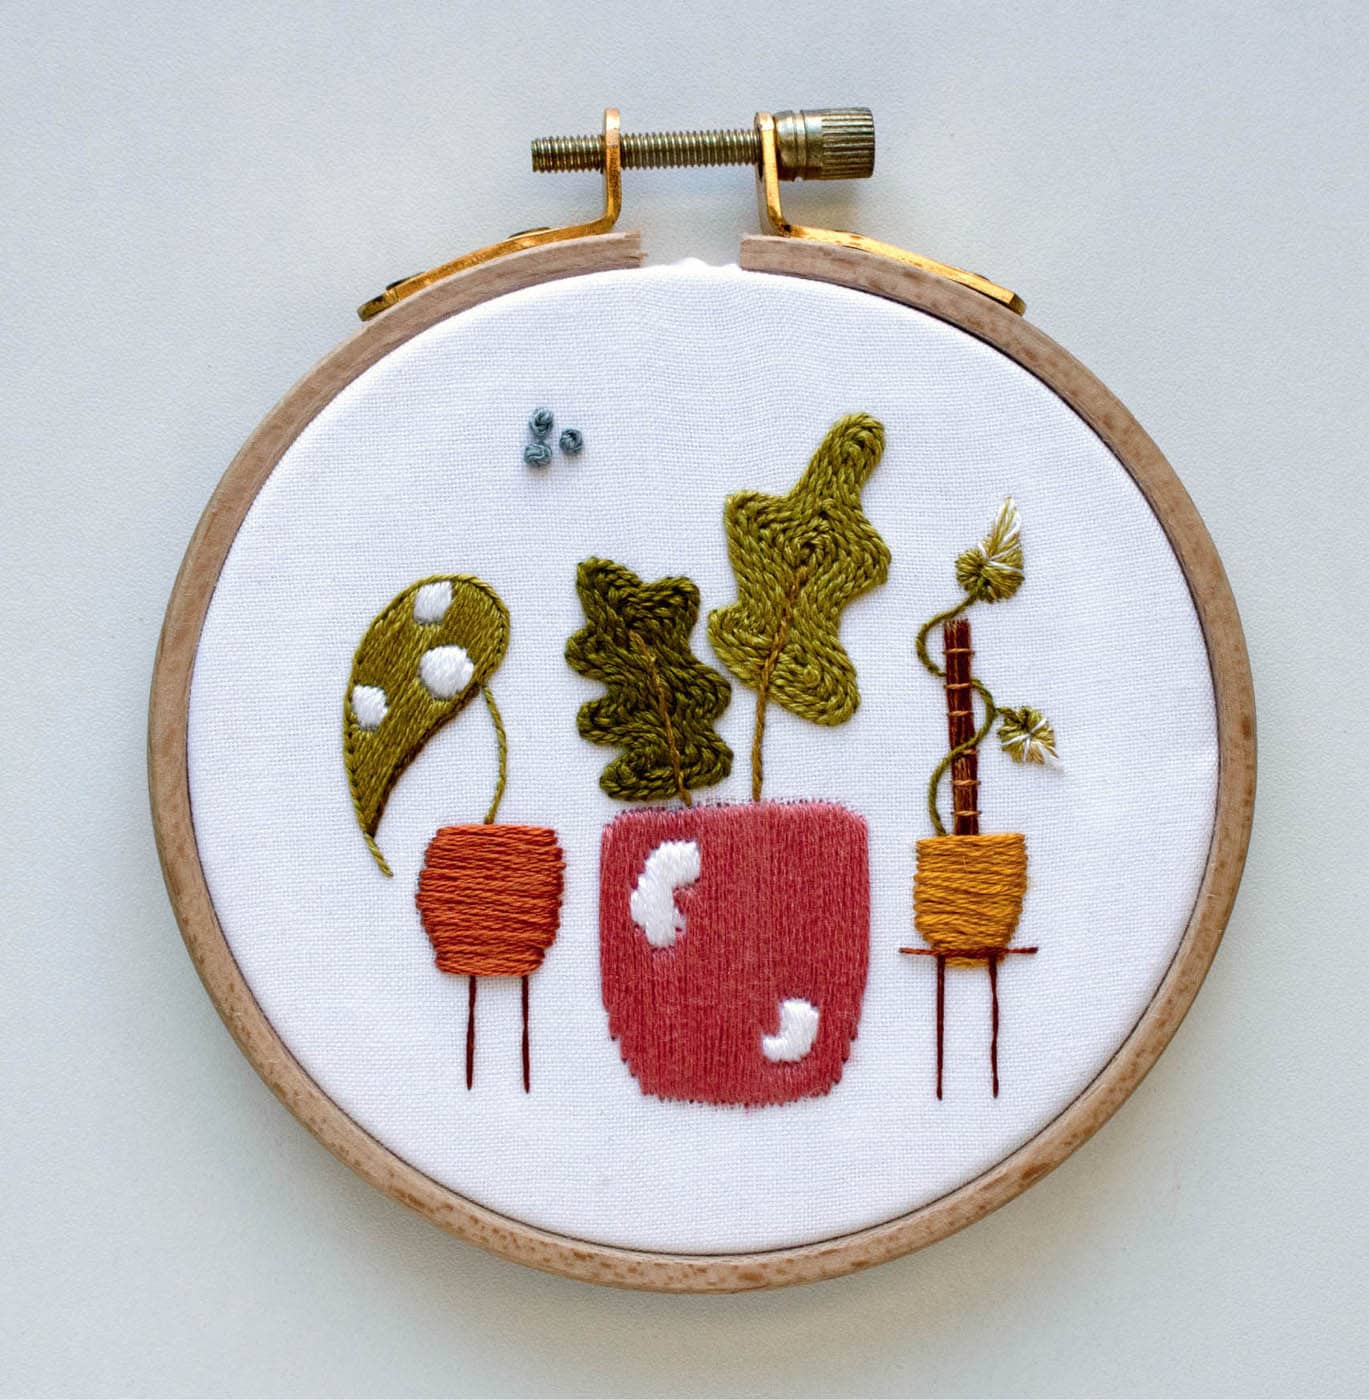
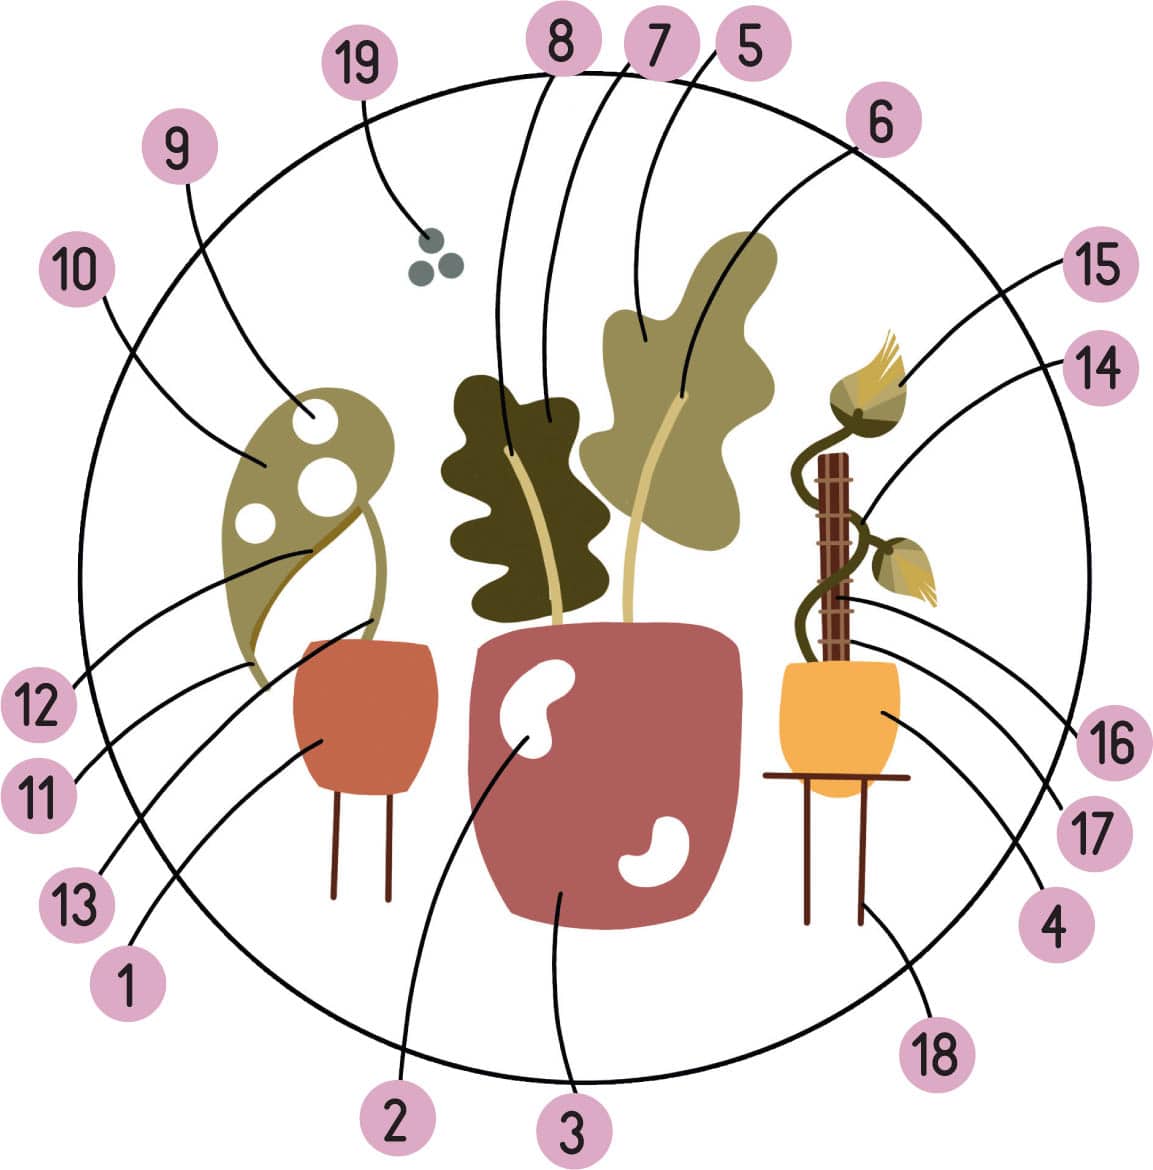
1. POT: satin stitch (6 strands, 921/orange)
Use horizontal stitches.
2. POT HIGHLIGHT: satin stitch (6 strands, B5200/white)
Use vertical stitches.
3. POT: satin stitch (6 strands, 3712/pink)
Use the vertical stitching from the previous step as your guide.
4. POT: satin stitch (6 strands, 3852/gold)
Use horizontal stitches for this pot
5. LEAF: stem stitch (6 strands, 733/medium green)
Start by outlining this shape, working your way toward its center.
6. STEM: stem stitch (3 strands, 832/medium olive green)
This stitching may overlap some of the stitching you did in the previous step.
7. LEAF: stem stitch (6 strands, 731/dark green)
You’ll use the same technique for this leaf as you did with the last.
8. STEM: stem stitch (3 strands, 832/medium olive green)
9. PLANT SPOTS: satin stitch (3 strands, B5200/white)
I used a more diagonal direction here to better follow this plant’s shape.
10. PLANT: satin stitch (3 strands, 733/medium green)
Do your best here to match the direction of the stitches you created in the previous step.
11. PLANT TIP: stem stitch (2 strands, 733/medium green)
Next, use stem stitch to outline the top of your plant’s shape.
12. PLANT OUTLINE: stem stitch (2 strands, 830/dark olive green)
This darker shade helps create a shadow-like effect to your leaf shape.
13. STEM: stem stitch (2 strands, 733/medium green)
Use a simple stem stitch to create this plant’s stem.
14. STEM: stem stitch (2 strands, 731/dark green)
This stem curves up and then behind the pole, which means you have two total lines of stitching.
15. LEAVES: gentle blending (3 strands each, B5200/white, 834/light olive green, 734/light green, 733/medium green, 731/dark green, to create base sections; 1 strand each, 733/medium green, B5200/white, 834/light olive green, to shade and blend)
Start by creating a base of satin stitches, using your lightest color at the top of the shape, followed by sections that get darker until you reach the base. Then use one strand to blend the different sections.
16. POLE: satin stitch (1 strand, 435/light brown + 1 strand 400/dark brown)
Here, you’ll be placing your stitches using vertical stitches.
17. POLE: straight stitch (1 strand, 435/light brown)
These “couched”-like stitches help give your pole a more realistic and rustic look.
18. LEGS: straight stitch (2 strands, 400/dark brown)
Use straight stitch to create the legs on the pot and plant stand.
19. EMBELLISHMENT: French knot, 2 wraps (6 strands, 926/blue)

STITCHES

SPLIT BACK STITCH
COLORS
YELLOW

WHITE
GREEN
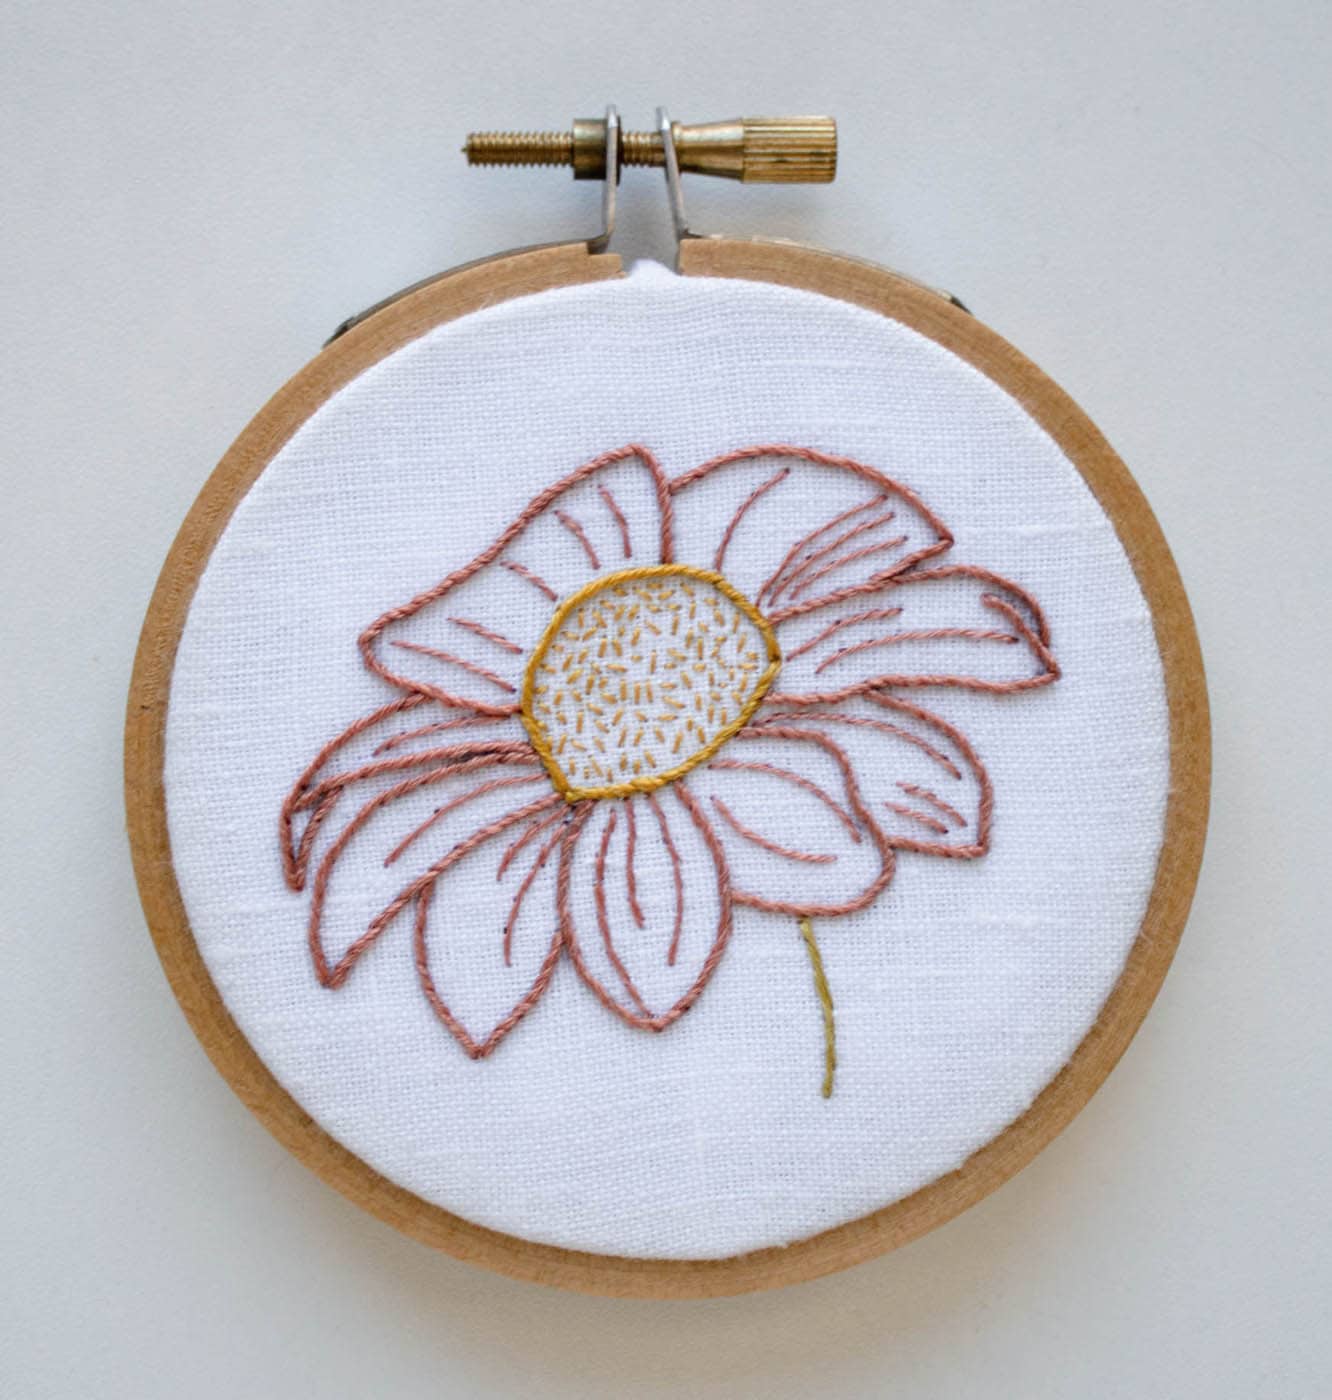
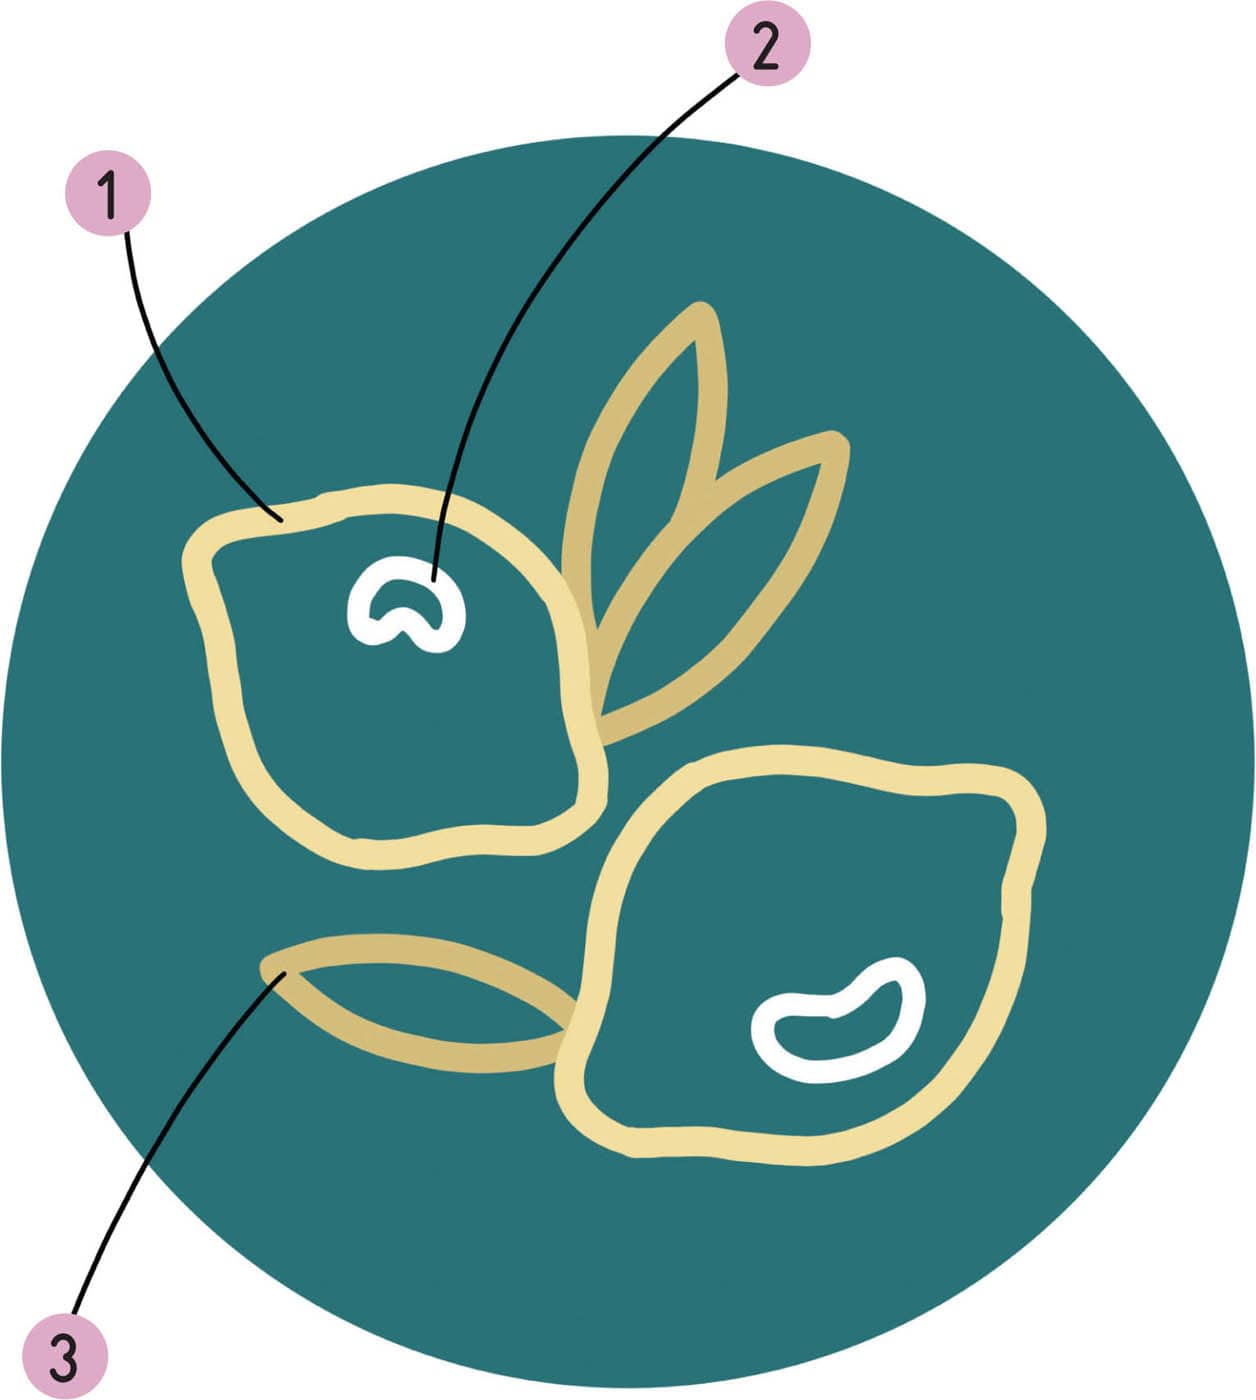
1. LEMON OUTLINE: split back stitch (6 strands, 3822/yellow)
Start by using split back stitch to follow the lines that create the lemon shapes. These shapes include gentle curves at the top and bottom, with tighter curves at the sides. Do your best to keep your stitches shorter as you follow the more tightly curved portions of the pattern.
2. LEMON HIGHLIGHTS: split back stitch (3 strands, B5200/white)
Next, use split back stitch to stitch the highlights on your fruit. By using fewer strands of floss here, we’re creating more depth to our project and preventing the highlights from taking away from the main portion of the design (i.e., the lemons themselves!).
3. LEAVES: split back stitch (3 strands, 832/green)
To finish your project, use split back stitch to create your leaves. You’ll notice that each leaf shape consists of two curved lines that meet at a sharp angle. This means you’ll approach each leaf as two separate lines of stitching, which will help you to maintain those sharp angles at the top of each leaf.
STITCHES

SPLIT BACK STITCH

SATIN STITCH

BACK STITCH

WOVEN WHEEL ROSE

FRENCH KNOT

WOVEN WHEEL ROSEBUD

STRAIGHT STITCH
COLORS
ORANGE

WHITE
LIGHT GREEN
DARK GREEN
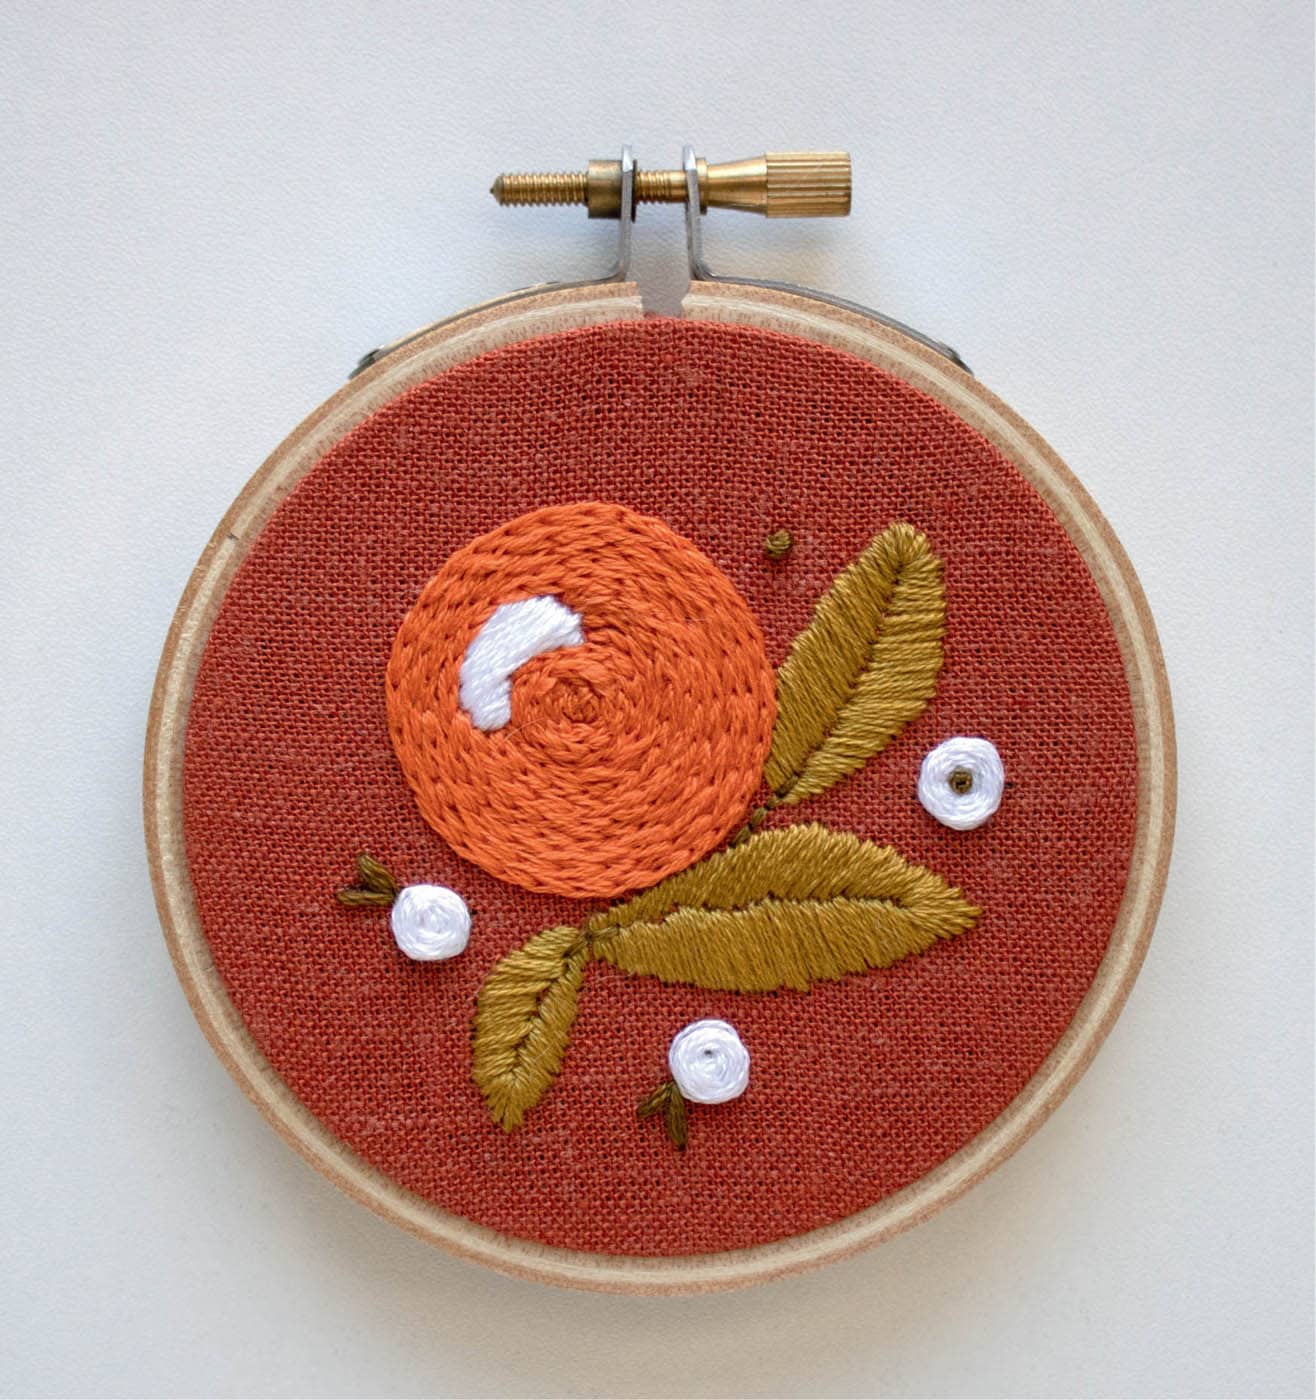
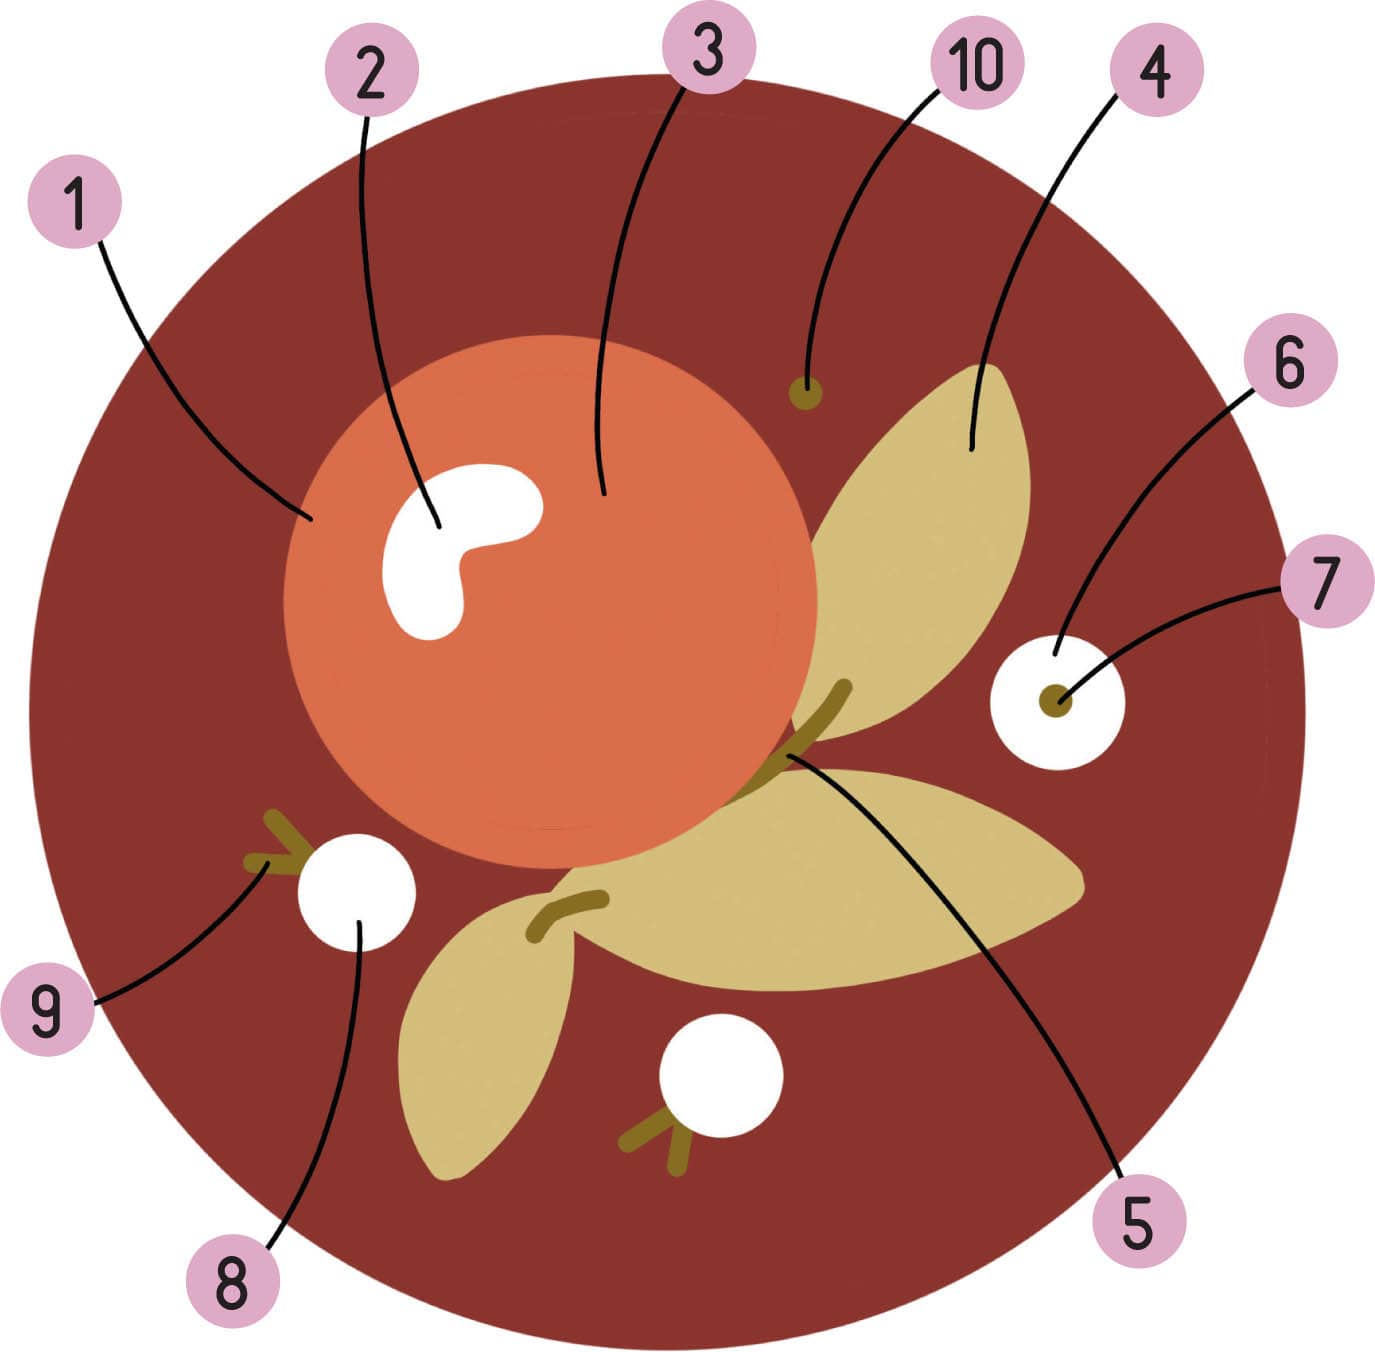
1. ORANGE OUTLINE: split back stitch (6 strands, 721/orange)
Outlining your orange before filling it in helps you determine if your fabric is tight enough to maintain the circular shape of your orange.
2. ORANGE HIGHLIGHT: satin stitch (6 strands, B5200/white)
For a small shape like this, I like to work from the center and out toward the edges until it’s completely filled.
3. ORANGE: split back stitch (6 strands, 721/orange)
Work from the stitched outline and toward the center of your shape, creating circular lines of stitching until you reach the middle.
4. LEAVES: satin stitch (3 strands, 832/light green)
Each leaf includes two sections of satin stitch that meet at the center of the shape itself, designated by a straight line you’ll notice as you transfer your pattern to fabric.
5. STEMS: back stitch (2 strands, 830/dark green)
Your stems may be longer or shorter than mine, depending on how far into your leaf shapes you decide to stitch.
6. FLOWER: woven wheel rose (2 strands, 830/dark greenfor the five-spoke base; 3 strands, B5200/white, for the woven petals)
Be careful not to pierce any of your already-stitched design with your needle as you weave the petals through your spokes.
7. FLOWER CENTER: French knot, 2 wraps (2 strands, 830/dark green)
Place a French knot at the center of your woven wheel rose.
8. FLOWERS: woven wheel rosebud (2 strands, 830/dark green, for the three-spoke base; 3 strands, B5200/white, for the woven petals)
Again, be careful not to pierce the surrounding stitches when you get to the weaving portion of this stitch.
9. LEAVES: straight stitch (6 strands, 830/dark green)
Use straight stitches to create V-shaped leaves at the base of your woven wheel rosebud flowers.
10. EMBELLISHMENT: French knot, 1 wrap (6 strands, 830/dark green)
To finish your project, add a simple single French knot.
STITCHES
SATIN STITCH

SPLIT BACK STITCH

WOVEN WHEEL ROSEBUD

STEM STITCH
GENTLE BLENDING

FRENCH KNOT
COLORS
WHITE
LIGHT GREEN
ROSE PINK
MEDIUM OLIVE GREEN
DARK OLIVE GREEN
LIGHT OLIVE GREEN
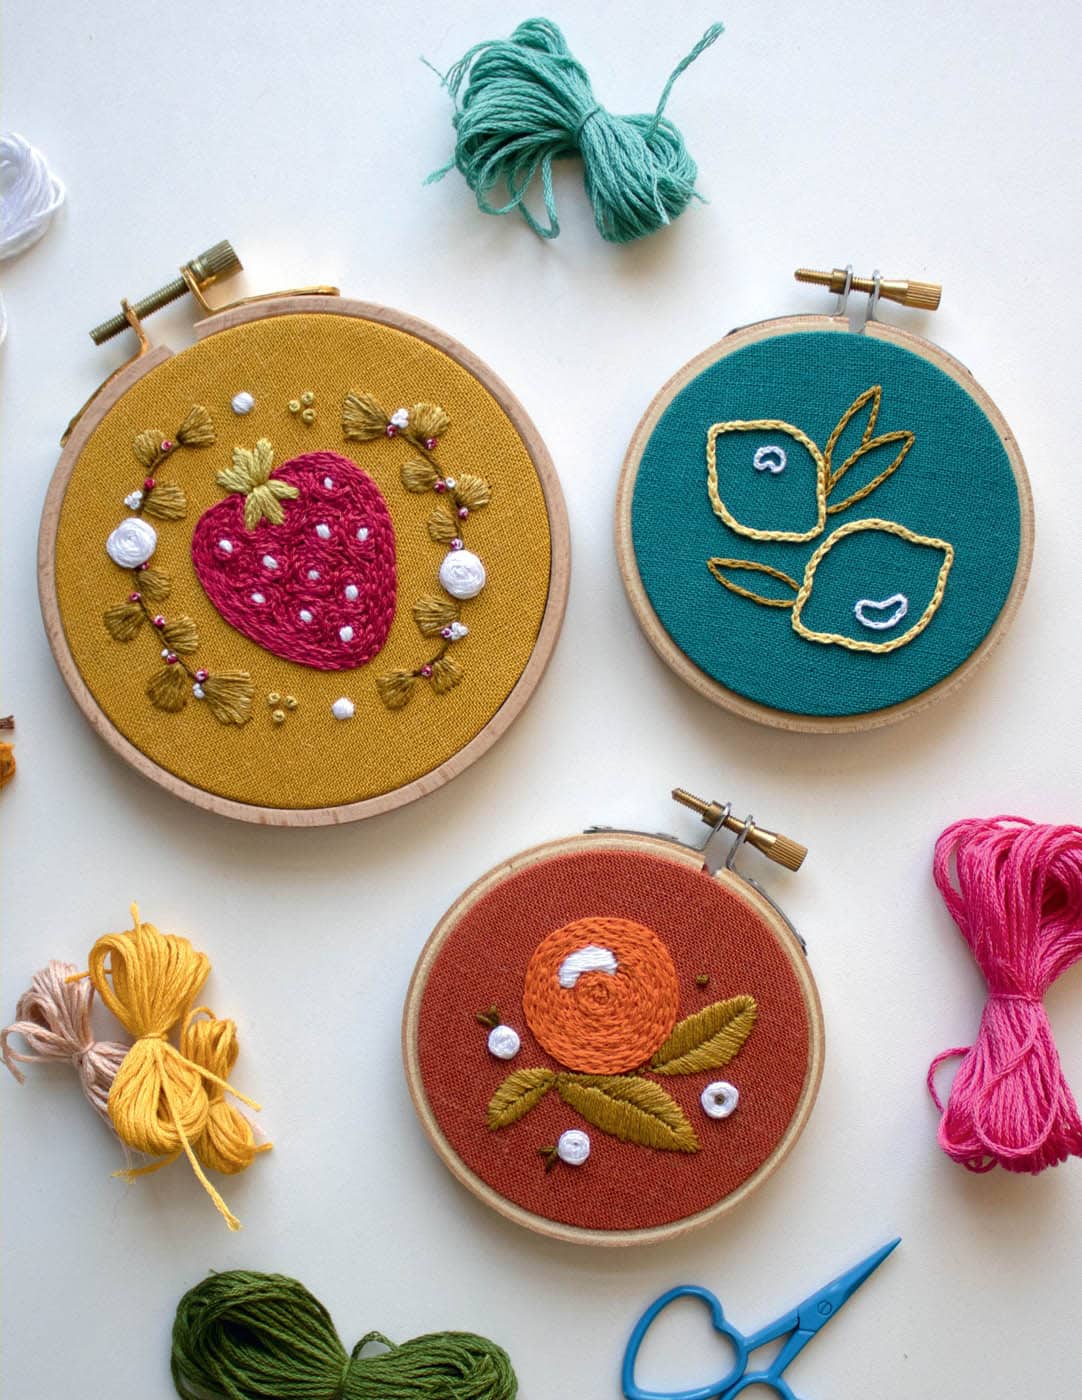
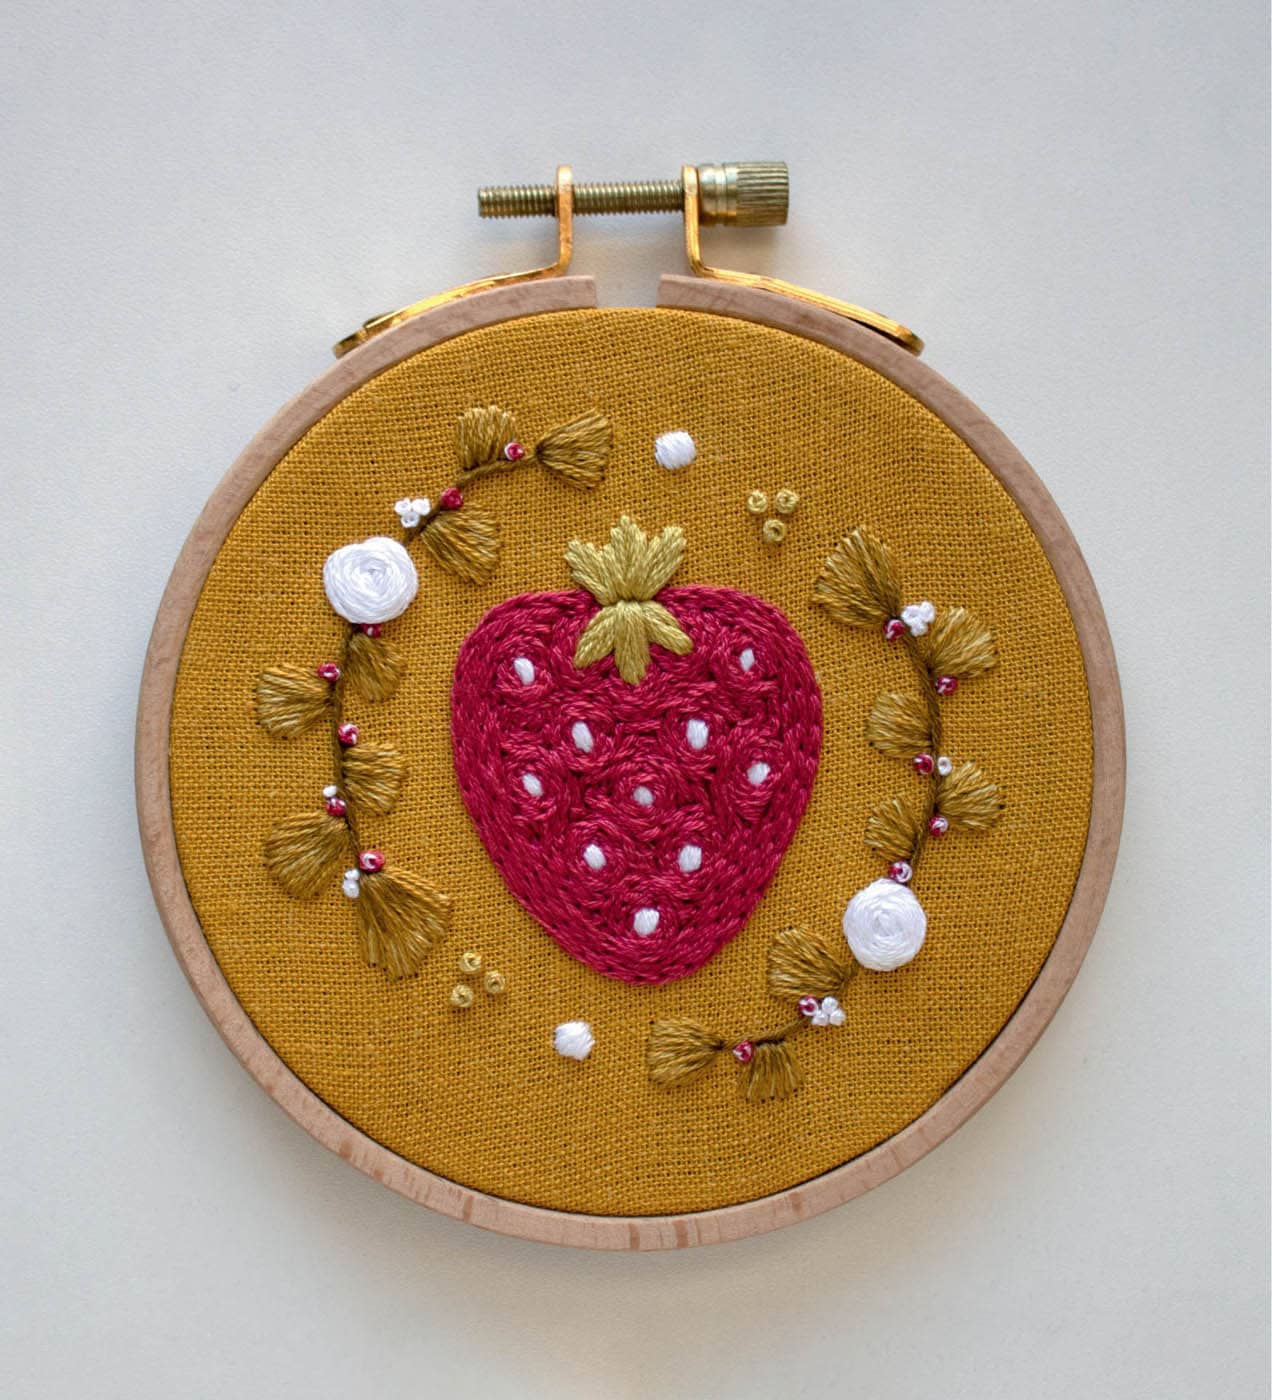
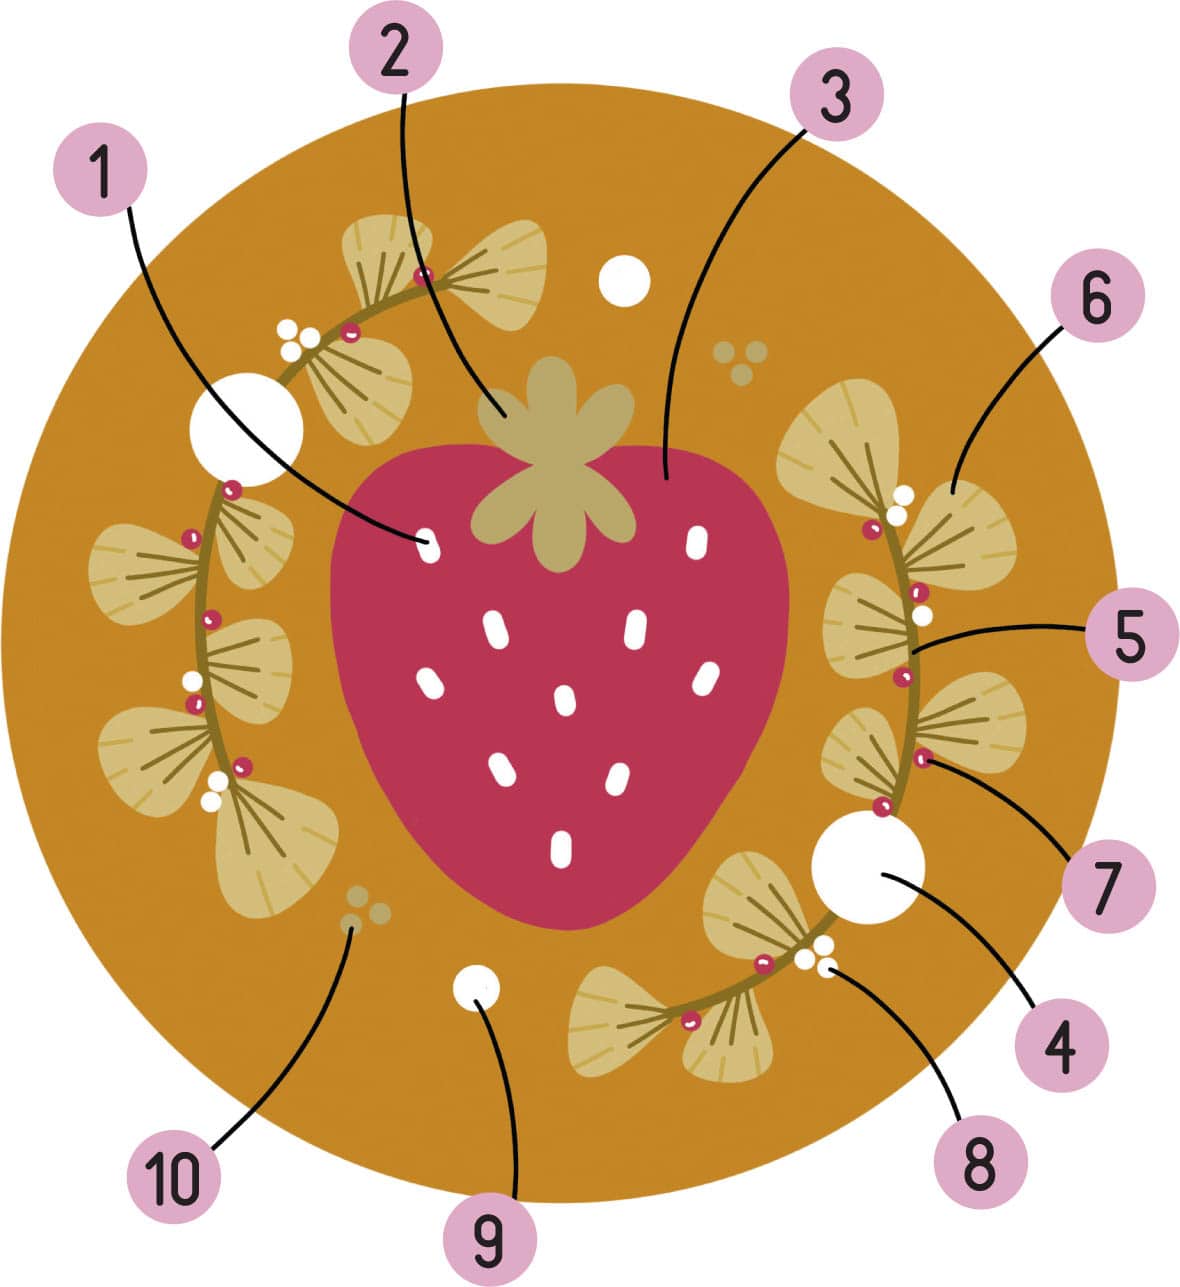
1. SEEDS: satin stitch (6 strands, B5200/white)
Start by using satin stitch to fill in the strawberry’s seeds. For the sample, I only needed three to four stitches to fill in these super small shapes.
2. LEAVES: satin stitch (6 strands, 734/light green)
Stitch the strawberry’s leaves using satin stitch. Stitch the outside leaves first, followed by the leaves in the center, and make sure that they all more or less met in the center of the leaf area.
3. STRAWBERRY: split back stitch (6 strands, 309/rose pink)
Use split back stitch to fill in your strawberry shape in several stages: first, stitch the outline of the strawberry; second, outline the shape created inside the strawberry by the satin-stitched leaves from the previous step; third, outline each individual seed; and fourth, fill in the remaining spaces.
4. FLOWERS: woven wheel rosebud (6 strands 832/medium olive green, for the three-spoke base; 6 strands B5200/white, for the woven petals)
This pattern includes two identical vines at either side of your strawberry. I started by stitching the woven wheel rosebuds for both vines (versus finishing an entire vine before moving on to the next). You can work this pattern vine by vine or stitch by stitch, whichever works best for you!
5. VINES: stem stitch (3 strands, 830/dark olive green)
Use stem stitch to create the curved base lines of your vines. Remember to keep your looped floss to the outside of your curves. This means that for the vine to the left of my strawberry, I kept my looped floss to the left of my line of stitching; for the vine to the right of my strawberry, I kept my looped floss to the right of my line of stitching.
6. LEAVES: gentle blending (3 strands 832/medium olive green, to satin stitch the base leaf shapes; 1 strand 830/dark olive green, to blend at the bottom of the leaf shapes; 1 strand 834/light olive green, to blend at the top of the leaf shapes)
Use gentle blending to create your leaf shapes. Start by satin stitching each leaf using just three strands in medium olive green. Next, use one strand of dark olive green to create shading at the base of your leaves. Finally, use one strand of light olive green to create lighter shading at the tops of your leaves.
7. BERRIES: French knot, 2 wraps (2 strands 309/rose pink + 1 strand B5200/white)
For these French knots, create variegated floss by combining two strands in your pink color with just one strand of bright white.
8. EMBELLISHMENTS: French knot, 2 wraps (2 strands, B5200/white)
To finish your vines, you’ll be creating French knot embellishments in a bright white color to match the strawberry’s seeds and your woven wheel rosebuds.
9. EMBELLISHMENTS: satin stitch (2 strands, B5200/white)
When using satin stitch to fill in a small shape like this, I like to start with a single stitch down the middle of my shape, adding stitches to the sides until I reach the edge.
10. EMBELLISHMENTS: French knot, 2 wraps (2 strands 834/light olive green + 2 strands 734/light green)
For these final French knots, you’ll be creating variegated floss once more using two shades of green used elsewhere in the piece.

STITCHES

WHIPPED BACK STITCH

STEM STITCH

FLY STITCH EMBELLISHMENT
COLORS
WHITE
PALE BLUE

LIGHT GRAY
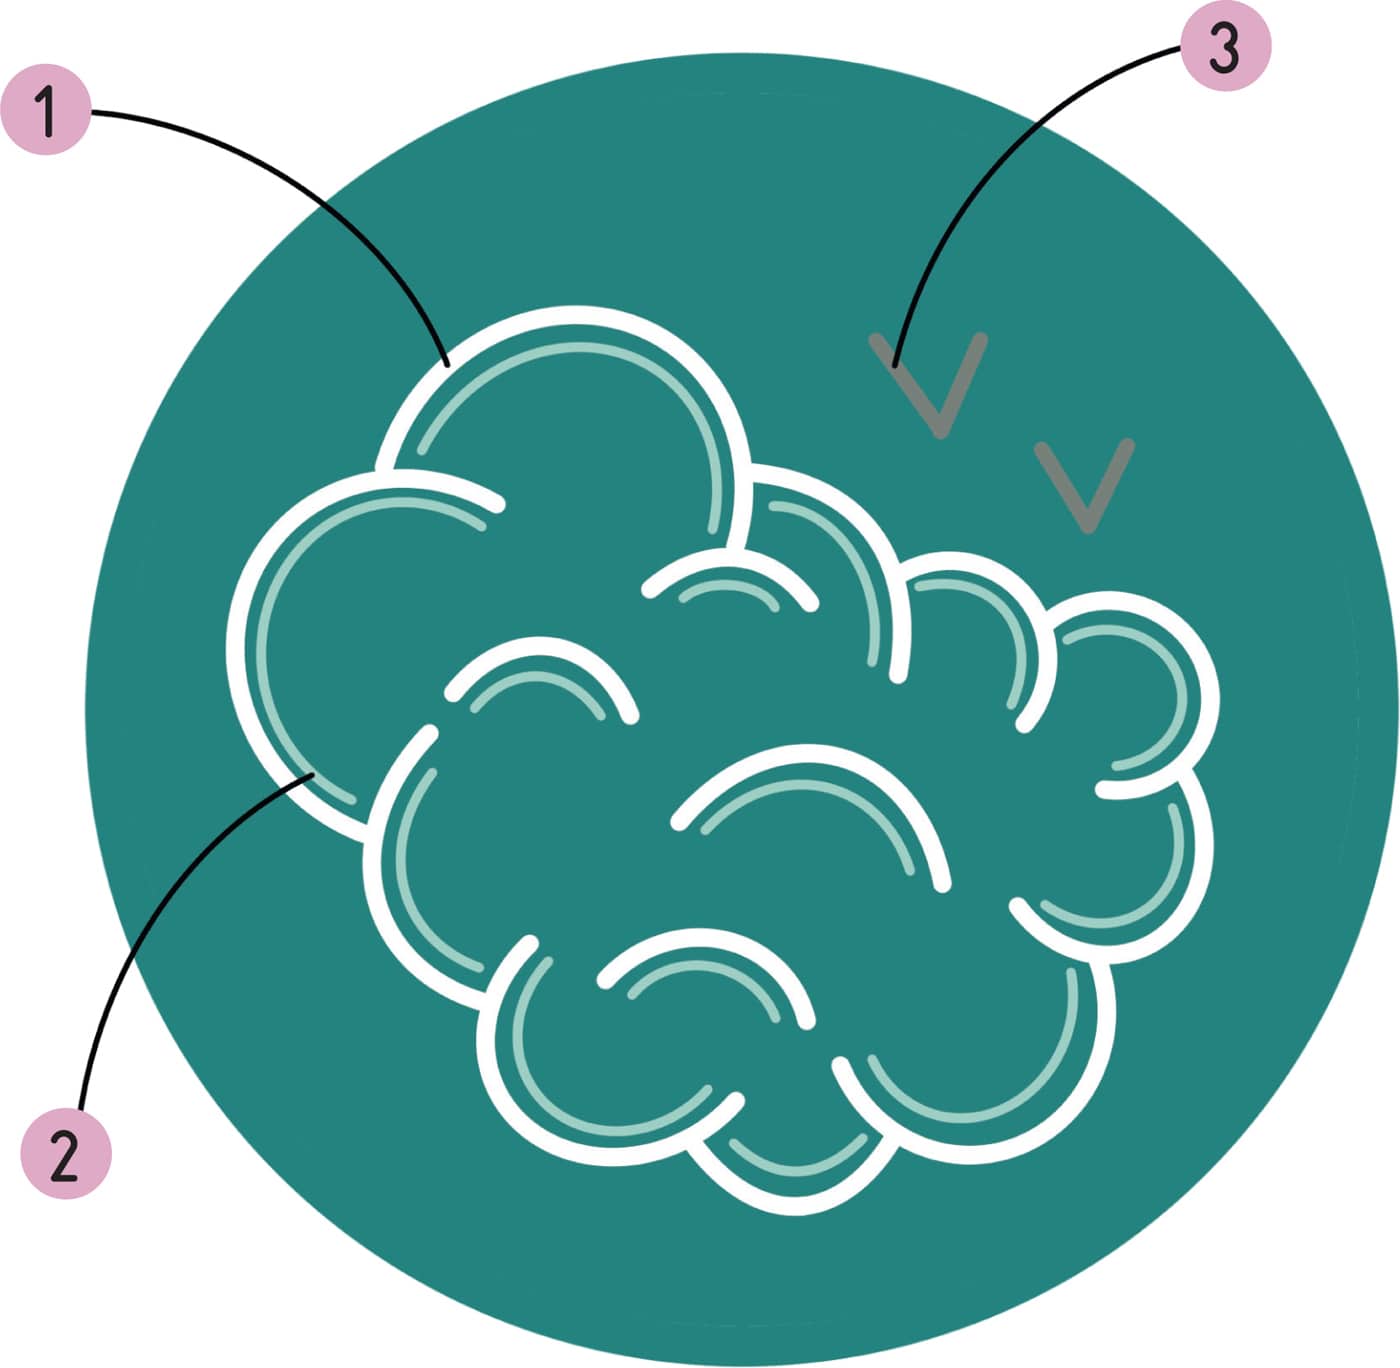
1. OUTER CLOUD OUTLINE: whipped back stitch (3 strands, B5200/white)
Start by using whipped back stitch to follow each of the curved lines that create the base for your cloud shape. When stitching this project, I approached each individual curved line as its own individual line of stitching.
2. INNER CLOUD OUTLINE: stem stitch (1 strand, 3813/pale blue)
Next, use stem stitch to create the lines that give your cloud more definition and shape. Be sure to keep your looped floss to the outside of your curves as you stitch.
3. BIRDS: fly stitch (2 strands, 3023/light gray)
Finally, use fly stitch to create the birds in your sky. You could use straight stitches to create these V-shapes as well, but I think using fly stitch is more fun!

STITCHES

SPLIT BACK STITCH
SATIN STITCH

STRAIGHT STITCH

GENTLE BLENDING

STEM STITCH

FRENCH KNOT

CROSS STITCH
COLORS

DARK BLUE
LIGHT BLUE
DARK GREEN
WHITE

GOLD
PINK
ORANGE
OFF-WHITE
1. PLANET: split back stitch (6 strands, 3815/dark blue)
To start your space scene, fill in your ringed planet using split back stitch. Start by outlining the circle and work your way toward the center of the shape.
2. RINGS: satin stitch (6 strands, 3813/light blue)
Use satin stitch to create the rings on your planet, bringing your needle up from one end of the ring, over the stitching you did in the last step, and down at the other end. I used just three straight stitches to create my satin-stitched rings, but you might end up with a different number.
3. PLANET: satin stitch (6 strands, 469/dark green)
To stitch your Earth-like planet, start by satin stitching each section, beginning with a dark green section in the middle of the shape.
4. PLANET: satin stitch (6 strands, 3813/light blue)
Use satin stitch to create bands of blue above and below the green section you stitched in the previous step. Make sure to leave just enough room for one more color, which you’ll add in the next step.
5. PLANET: straight stitch (6 strands, B5200/white)
To complete the base of this planet, use satin stitch to add bright white to the top and bottom of your planet. Once you’ve completed this step, you should have a circular planet with bands of green, blue, and white. You’ll blend these colors out in the next step.
6. PLANET: gentle blending (1 strand each, 469/dark green, 3813/light blue, and B5200/white, to blend and shade the previous three steps)
Use just one strand of floss to blend and shade your Earth-like planet. You can start by using one strand of white on top of the stitching you did in step 4 and then one strand of light blue on top of the stitching you did in step 5. Let yourself have a bit of fun here!
7. SUN: stem stitch (6 strands, 3852/gold)
Use stem stitch to fill in your final, sunlike celestial body. Similar to step 1, I started by stitching the outside of my circle, moving my way toward the inside and center. Be sure to keep your looped floss to the outside of your curve.
8. STARS: French knot, 2 wraps (6 strands, 352/pink)
Use French knots to create a few spacelike stars in the background of your celestial scene. This is a made-up scene, so the stars can be whatever color we like!
9. STAR: French knot, 2 wraps (6 strands, 3776/orange)
To add a touch of colorful interest, you’ll stitch your last French knot “star” using a different color of floss.
10. STARS: cross stitch (1 strand, 2/off-white)
To finish your celestial space hoop, use small cross stitches to create more stars in the distance. You may find that you need to add more (or fewer) cross-stitched stars than what I’ve stitched in the sample hoop, depending on how full you’d like your sky to appear. Do what feels right to you in the moment. You can always cut these out and redo them if you change your mind.


STITCHES

SPLIT BACK STITCH
SATIN STITCH
GENTLE BLENDING

STRAIGHT STITCH

FRENCH KNOT
COLORS

GOLD

DARK BLUE

LIGHT BLUE

OFF-WHITE

LIGHT PINK

YELLOW

ORANGE

WHITE

DARK TEAL

DARK PINK

BLACK

GREEN

GRAY
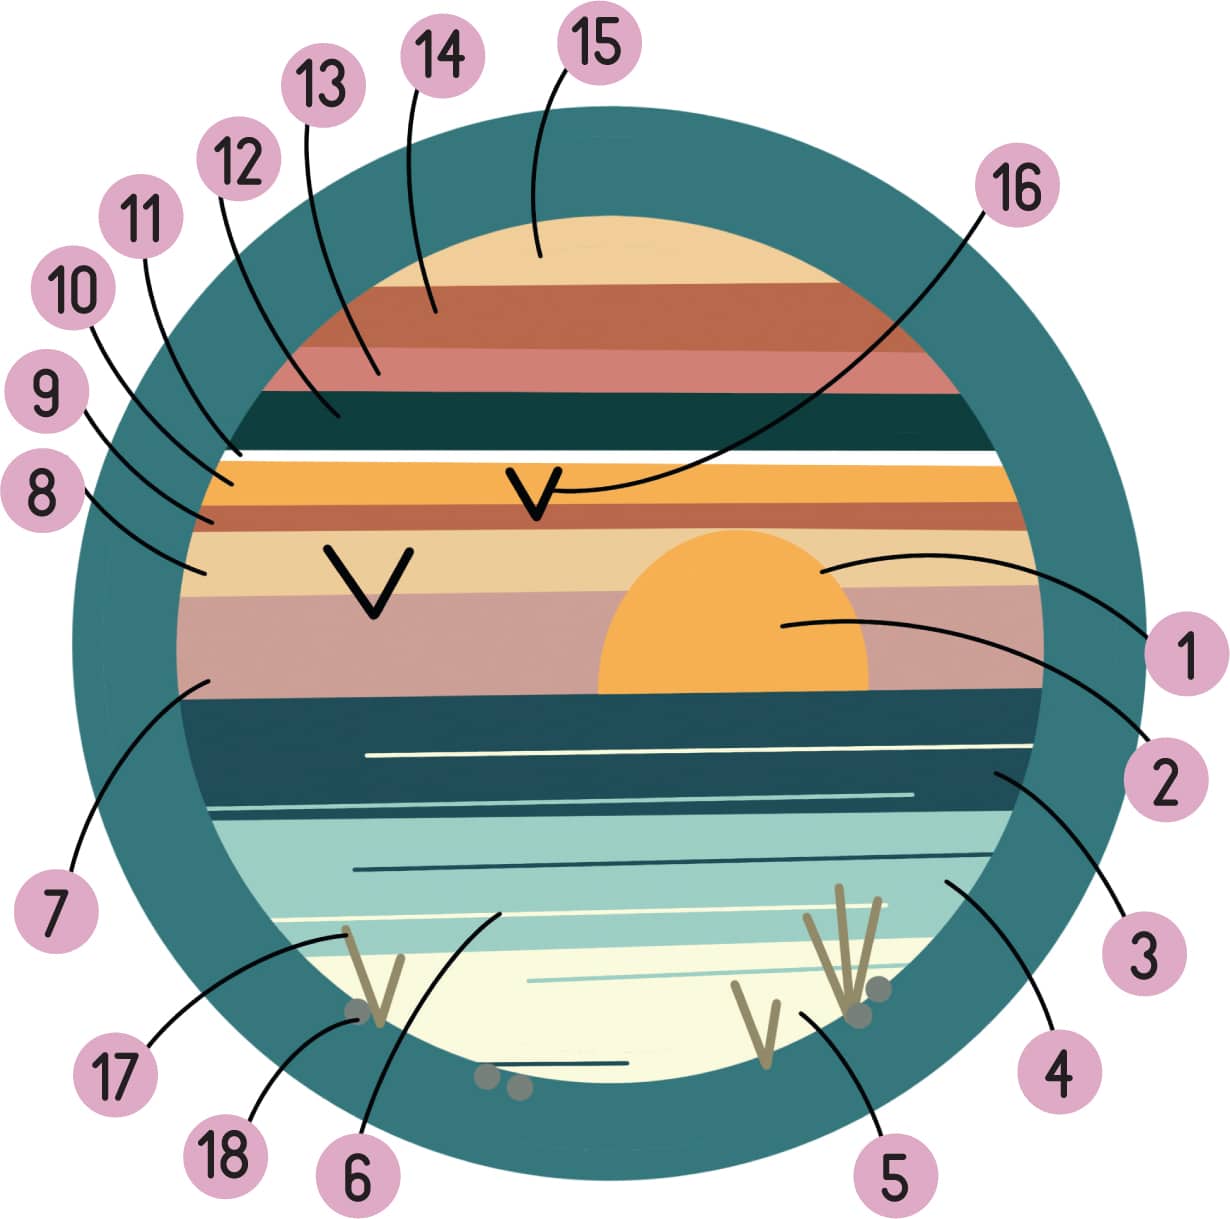
1. SUN OUTLINE: split back stitch (6 strands, 3852/gold)
Start this project by outlining the shape of your sun using split back stitch.
2. SUN: satin stitch (6 strands, 3852/gold)
Place your stitches in a vertical direction, over the split back stitch outline you created in the previous step.
3. WATER: satin stitch (6 strands, 3808/dark blue)
These stitches, as well as the rest of the satin stitching in this project, should all be placed horizontally.
4. WATER: satin stitch (6 strands, 3813/light blue)
5. WATER: satin stitch (6 strands, 2/off-white)
6. WATER: gentle blending (1 strand each, 3808/dark blue, 3813/light blue, and 2/off-white, to blend and shade the water)
Use just one strand of floss to blend and shade the water you created in steps 3 through 5. For example, use just one strand of off-white on top of the stitching you did in step 4 and one strand of light blue on top of the stitching you did in step 5 to help blend those bottom two layers of water.
7. SKY: satin stitch (6 strands, 3779/light pink)
For steps 7 through 15, you’ll be using different colors of floss to fill in your sky with horizontal satin stitching.
8. SKY: satin stitch (6 strands, 676/yellow)
9. SKY: satin stitch (6 strands, 3776/orange)
10. SKY: satin stitch (6 strands, 3852/gold)
11. SKY: satin stitch (6 strands, B5200/white)
12. SKY: satin stitch (6 strands, 3847/dark teal)
13. SKY: satin stitch (6 strands, 352/dark pink)
14. SKY: satin stitch (6 strands, 3852/gold)
15. SKY: satin stitch (6 strands, 3776/orange)
16. BIRDS: straight stitch (1 strand, 310/black)
When bringing your needle up through your fabric and already-stitched sky, do your best to come through a strand of floss (versus in between two strands); similarly, when bringing your needle back down, try to go through a strand. This helps protect the integrity of the stitching you’ve already done.
17. SHRUBS: straight stitch (6 strands, 371/green)
This step allows you to add a bit of interest to the bottom of your design, and you should feel free to make your shrubs as long or as short as you like!
18. ROCKS: French knot, 1 to 3 wraps (6 strands, 3023/gray)
Place your final rocks in a way that looks most aesthetically pleasing to you, adding as many or as few as you prefer.
STITCHES

BACK STITCH

STRAIGHT STITCH

COUCHING
COLORS
DARK BROWN
GOLD
LIGHT PINK
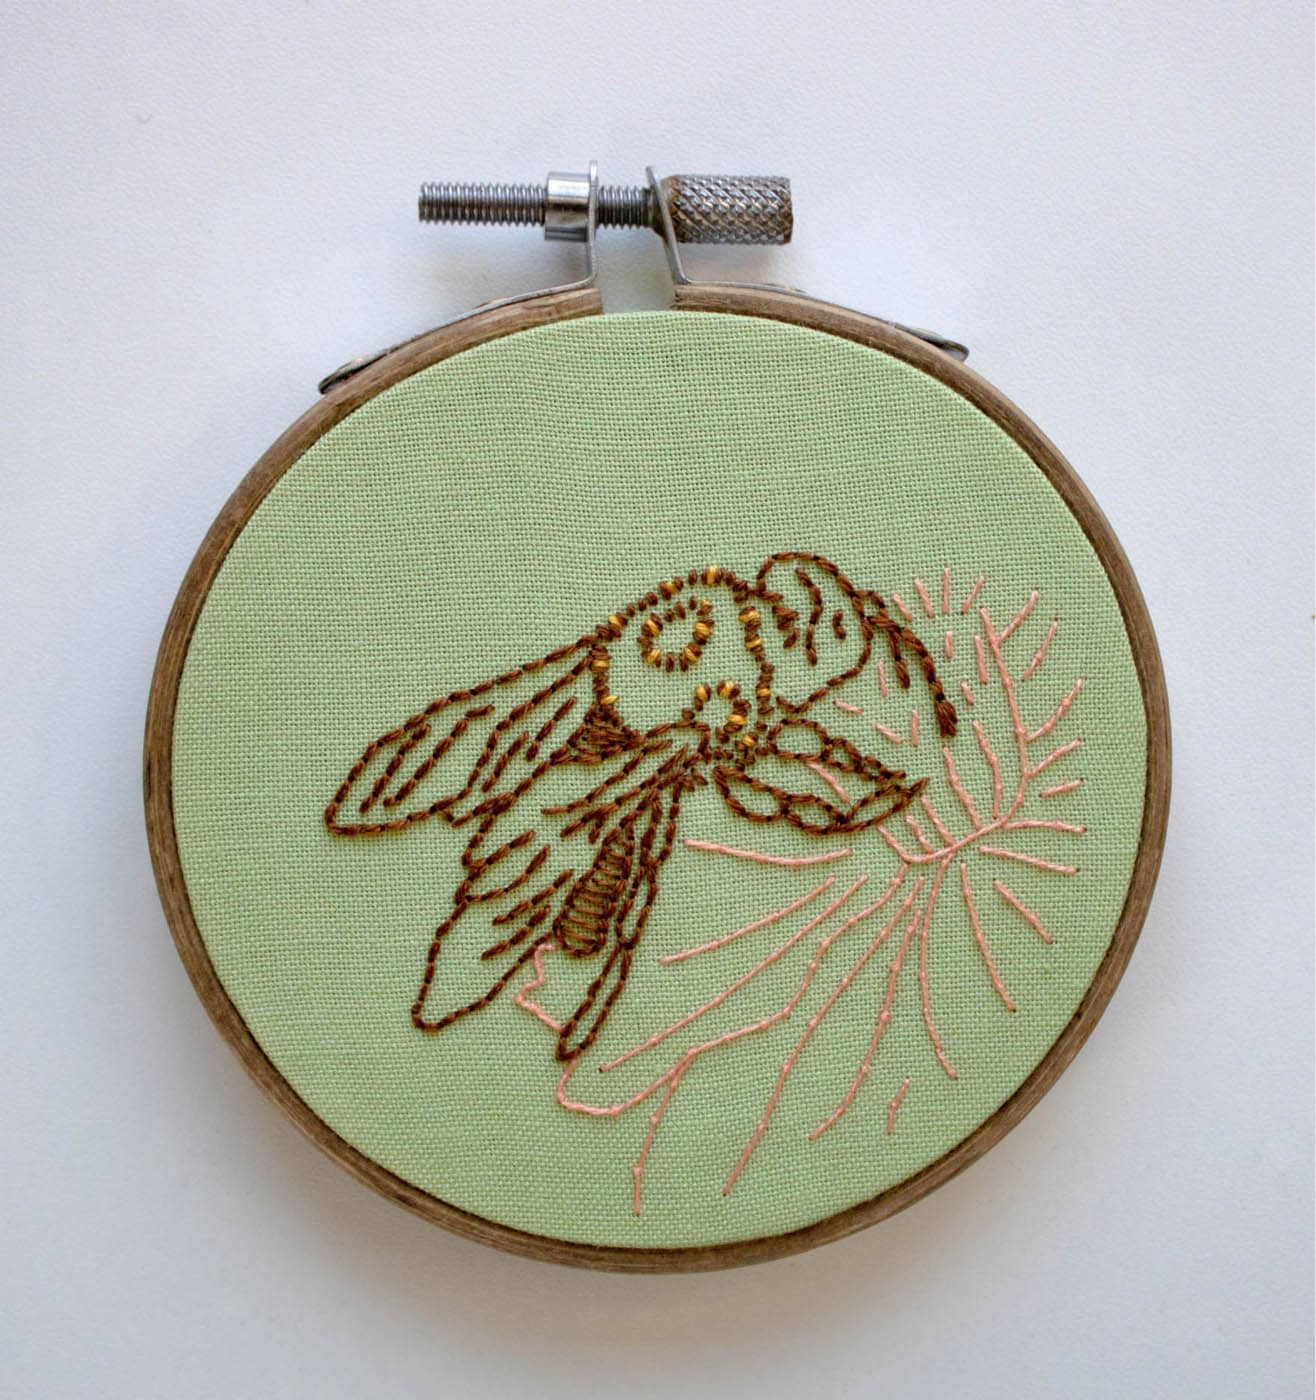
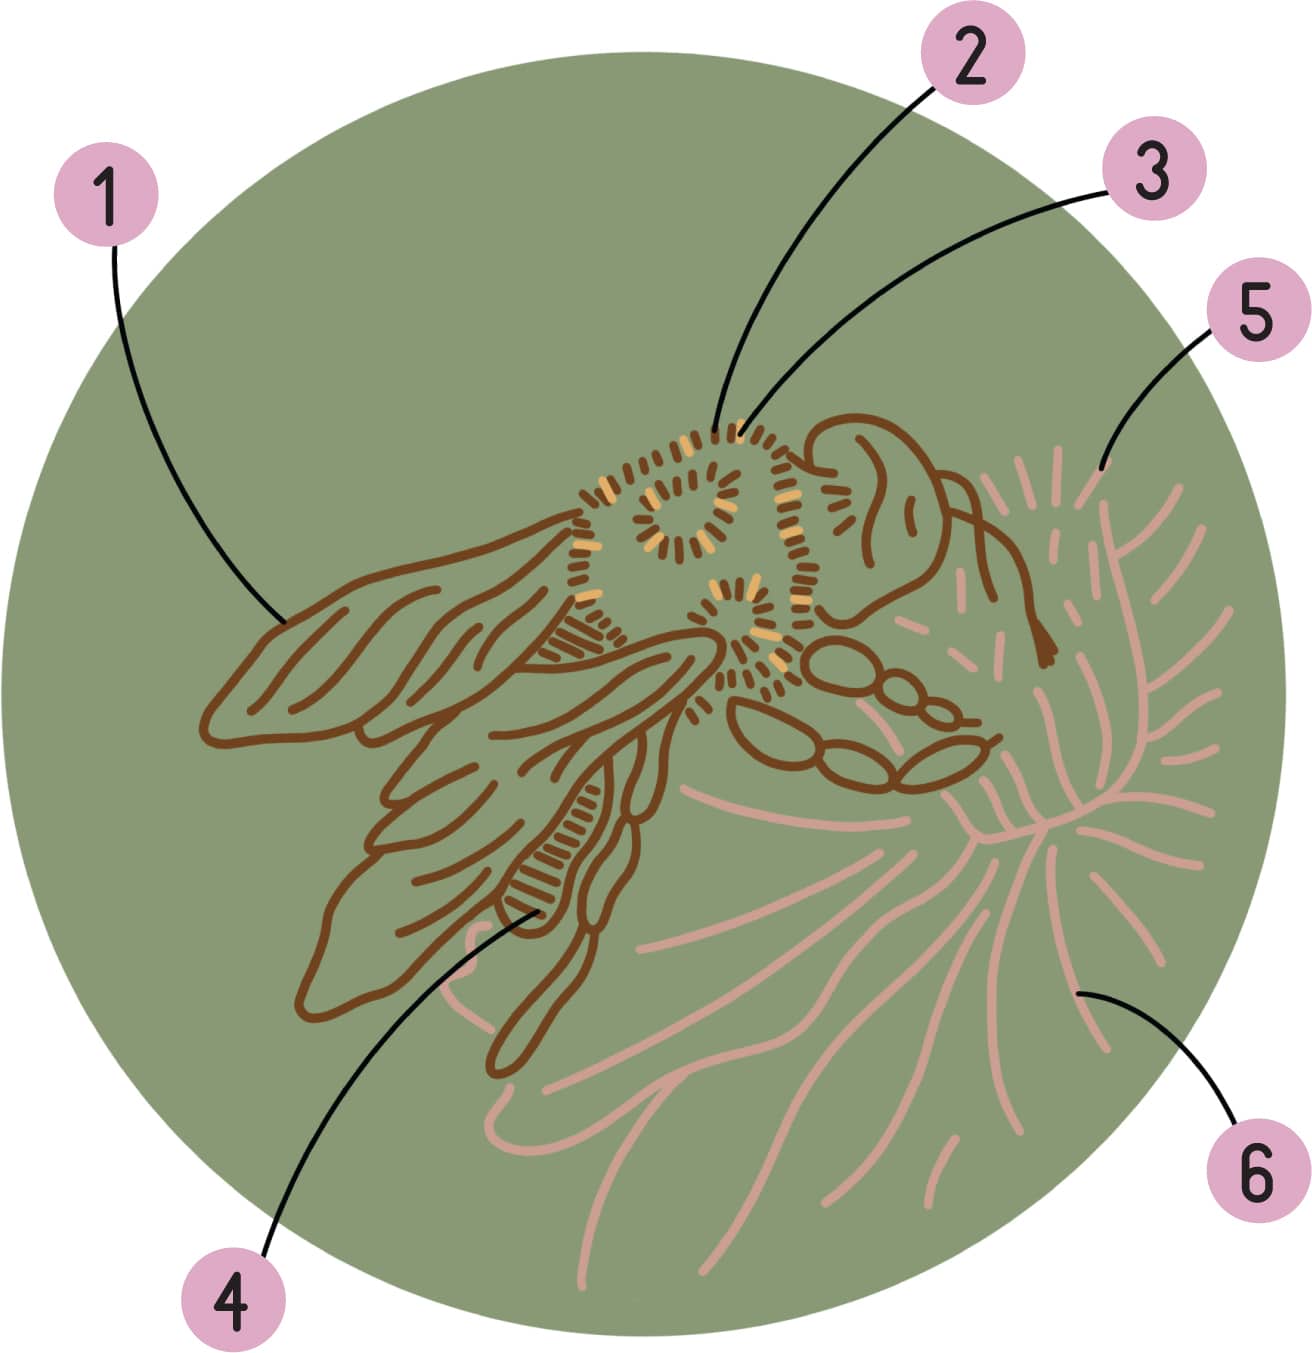
1. BEE OUTLINE: back stitch (2 strands, 433/dark brown)
Use back stitch to follow the lines of the bee’s wings, lower body, legs, head, and antenna, doing your best to keep your stitches closer together as you make your way around tighter curves.
2. FUR: straight stitch (2 strands, 433/dark brown)
Use small straight stitches to create the fur on the bee’s upper body. These stitches really do not need to be placed perfectly; in fact, the messier you get here, the fluffier the body will appear—so let yourself have some fun when following this portion of the pattern!
3. HIGHLIGHTS: straight stitch (2 strands, 3820/gold)
Create a few additional small straight stitches to add golden highlights to the fur you stitched in the previous step. When stitching this portion of the sample hoop, I placed these stitches at random places until I felt satisfied with the amount of additional color I had added to my bee’s body. You should feel free to add more or less of this color to your own project, depending on your own aesthetic preferences.
4. LOWER BODY: straight stitch (1 strand, 433/dark brown)
With just one strand of floss, use straight stitches to create lines inside of the bee’s lower body. This helps to create a fuller, darker look that distinguishes the lines of the body from the lines of the wings, helping to create more depth to your stitched bee.
5. FLOWER: straight stitch (1 strand, 3341/light pink)
You’ll stitch your flower using two different techniques. Start by following the straighter lines at the center of your flower using simple straight stitches.
6. FLOWER: couching (1 strand, 3341/light pink)
Next, use couching to follow the curved portion of the flower.
STITCHES

SPLIT BACK STITCH

FRENCH KNOT
SATIN STITCH
COLORS
WHITE
BLACK
DARK ORANGE
MEDIUM ORANGE
LIGHT YELLOW
DARK YELLOW
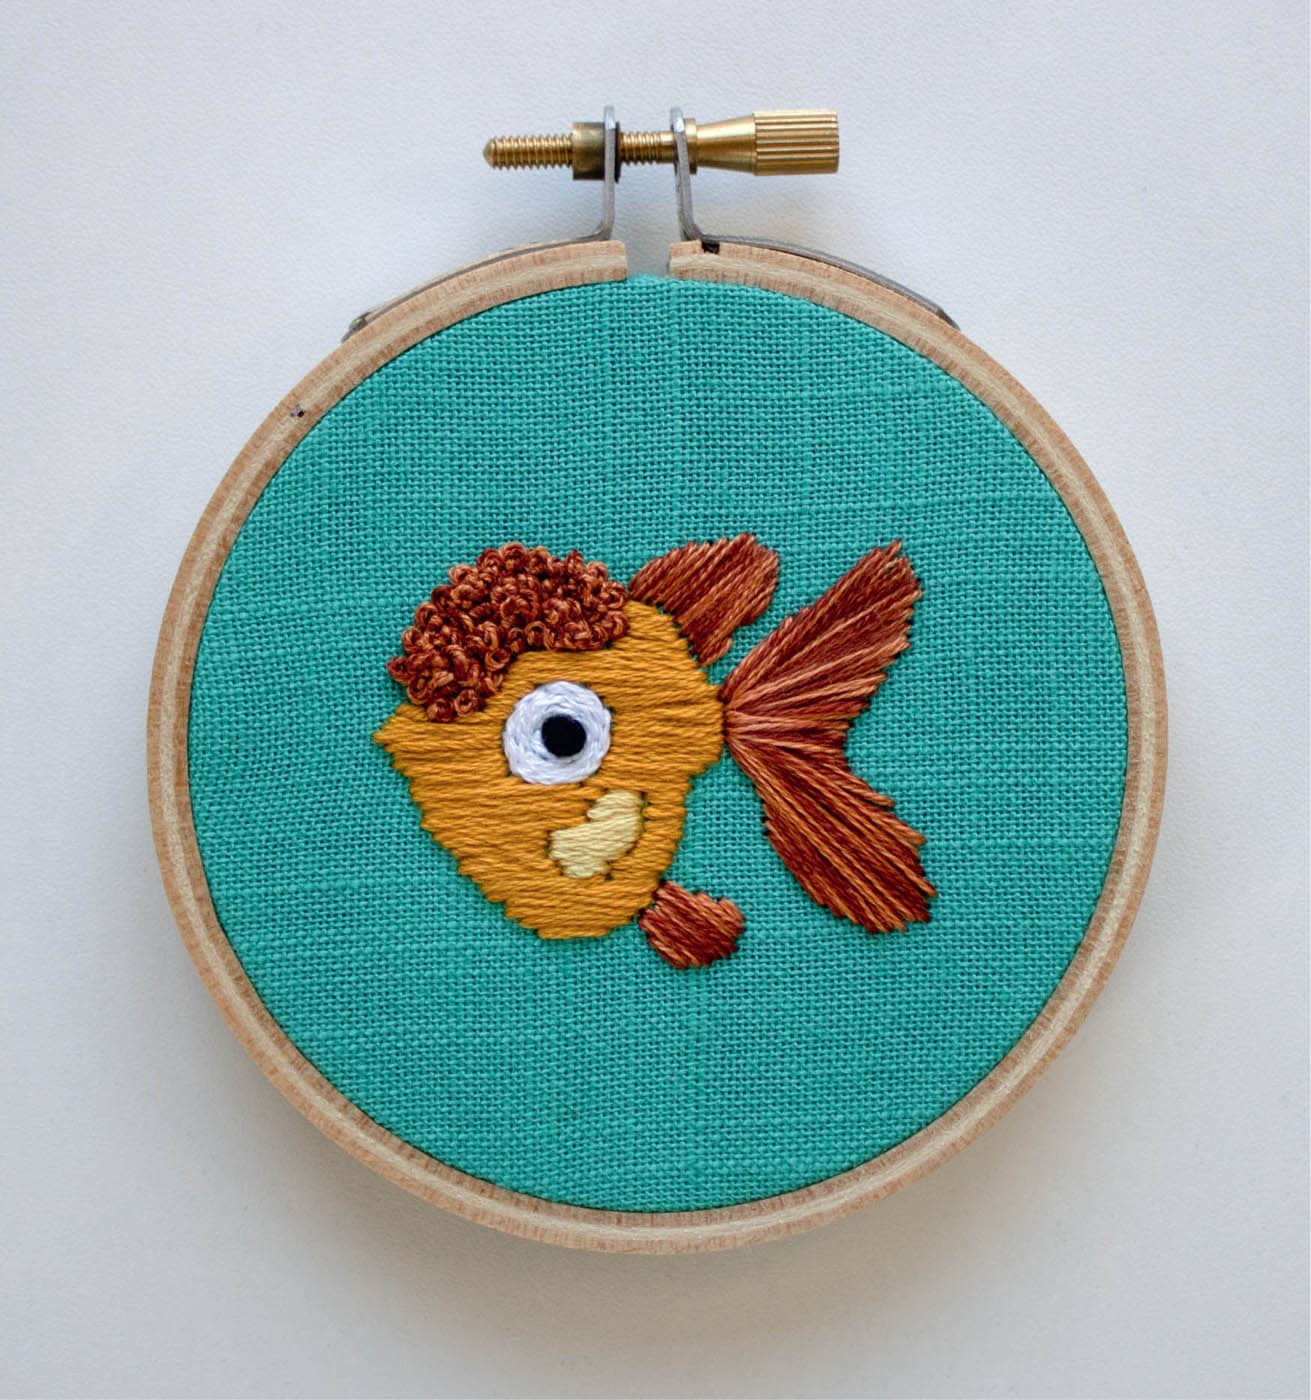
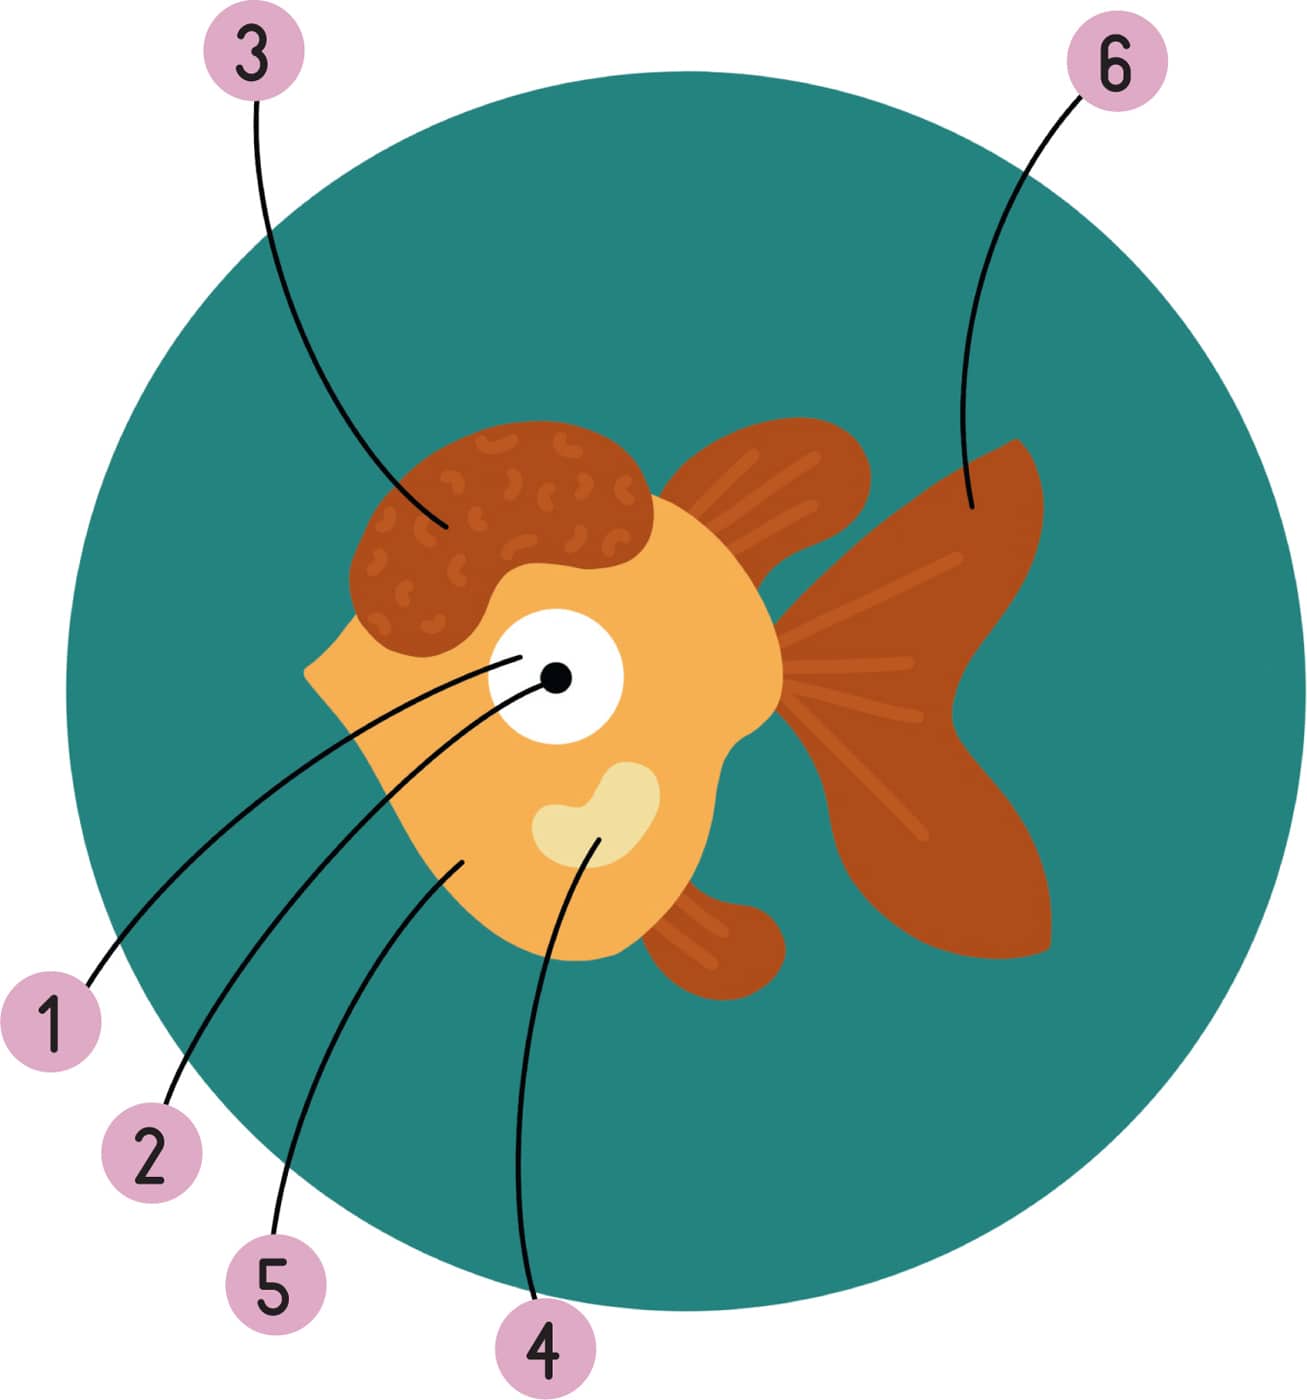
1. EYE: split back stitch (3 strands, B5200/white)
Start by filling in the goldfish’s eye using split back stitch. When stitching the sample, I started from the outside of the eye and worked my way in, leaving a small space at the center for the next step.
2. EYE: French knot, 3 wraps (6 strands, 310/black)
Finish your goldfish’s eye by creating a French knot at the center.
3. “HOOD”: French knot, 2 wraps (2 strands, 918/dark orange + 2 strands, 922/medium orange)
Use French knots to fill in the goldfish’s “hood.”
4. BODY HIGHLIGHT: satin stitch (6 strands, 3822/light yellow)
Use satin stitch to fill in the highlight on the goldfish’s body, working your stitches in a horizontal direction.
5. BODY: satin stitch (6 strands, 3852/dark yellow)
Use satin stitch to fill in the rest of your goldfish’s body, working your stitches in the same horizontal direction as the previous step.
6. FINS AND TAIL: satin stitch (2 strands 918/dark orange + 2 strands 922/medium orange)
To complete your goldfish, use satin stitch to fill in the fins and tail.
STITCHES

STEM STITCH
GENTLE BLENDING
SATIN STITCH

STRAIGHT STITCH

DETACHED CHAIN STITCH

FRENCH KNOT
COLORS
MEDIUM GREEN
PALE GREEN

LIGHT GREEN
DARK GREEN

DARK BLUE

MEDIUM BLUE
LIGHT BLUE

GOLD
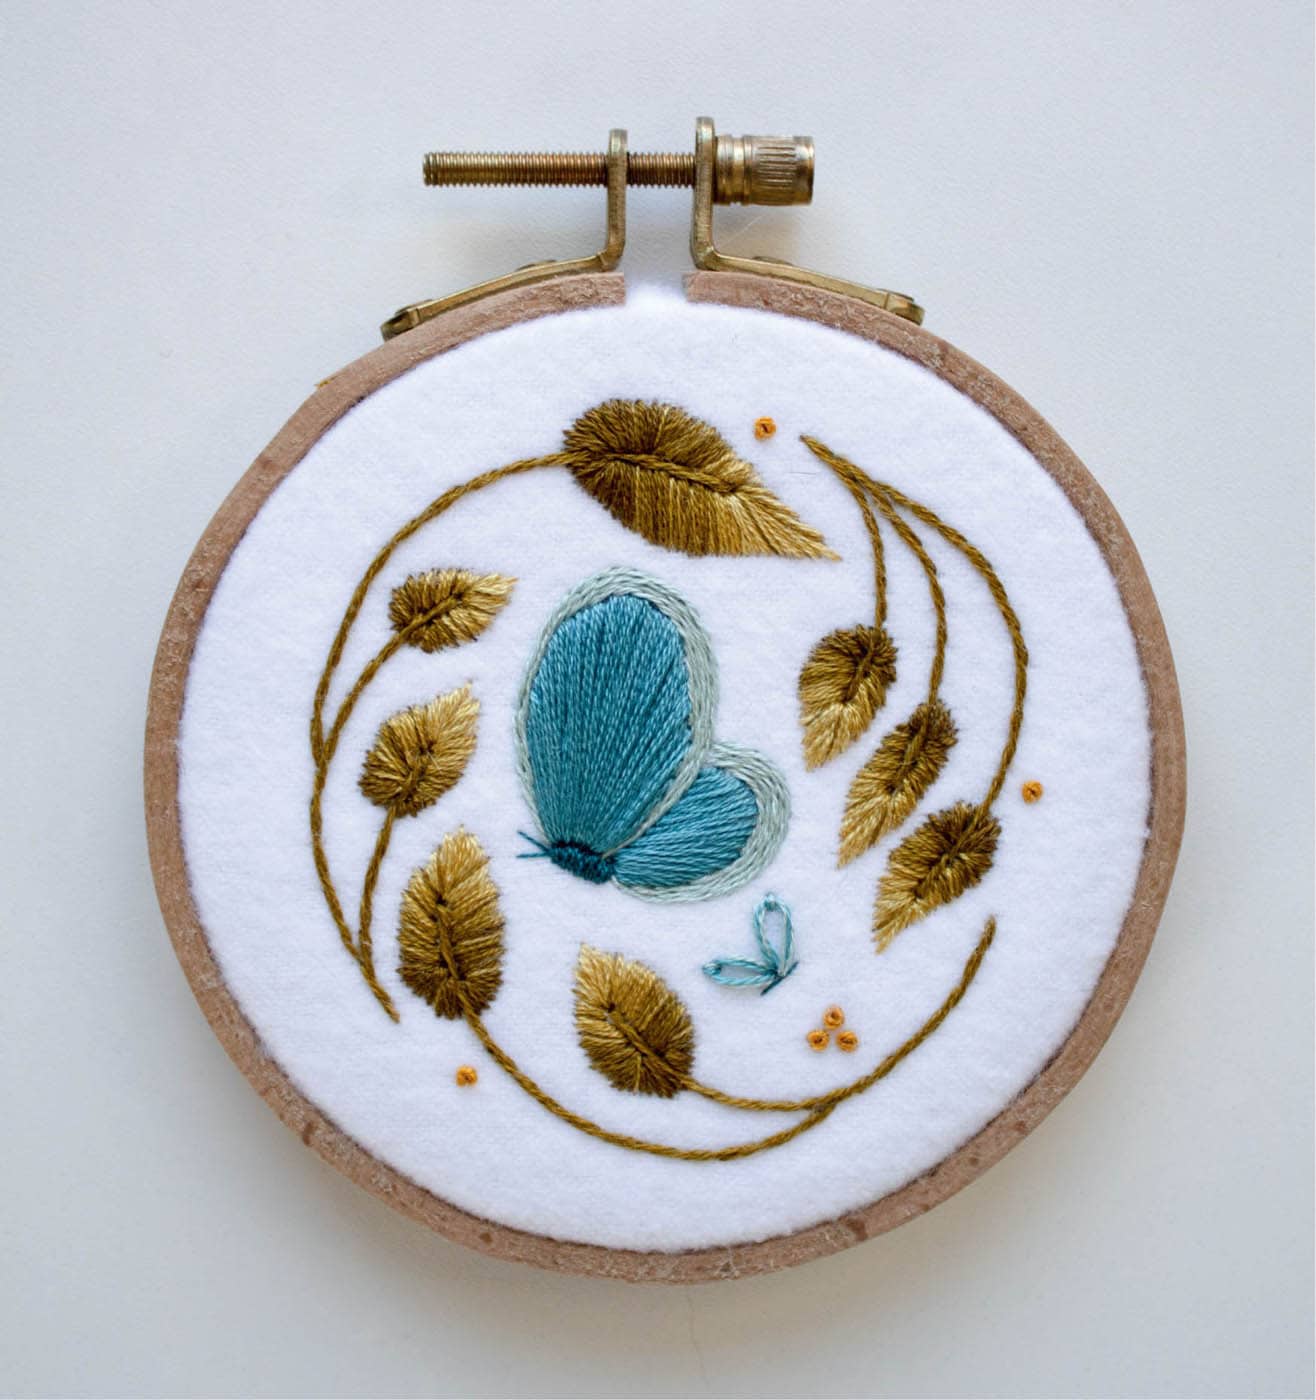
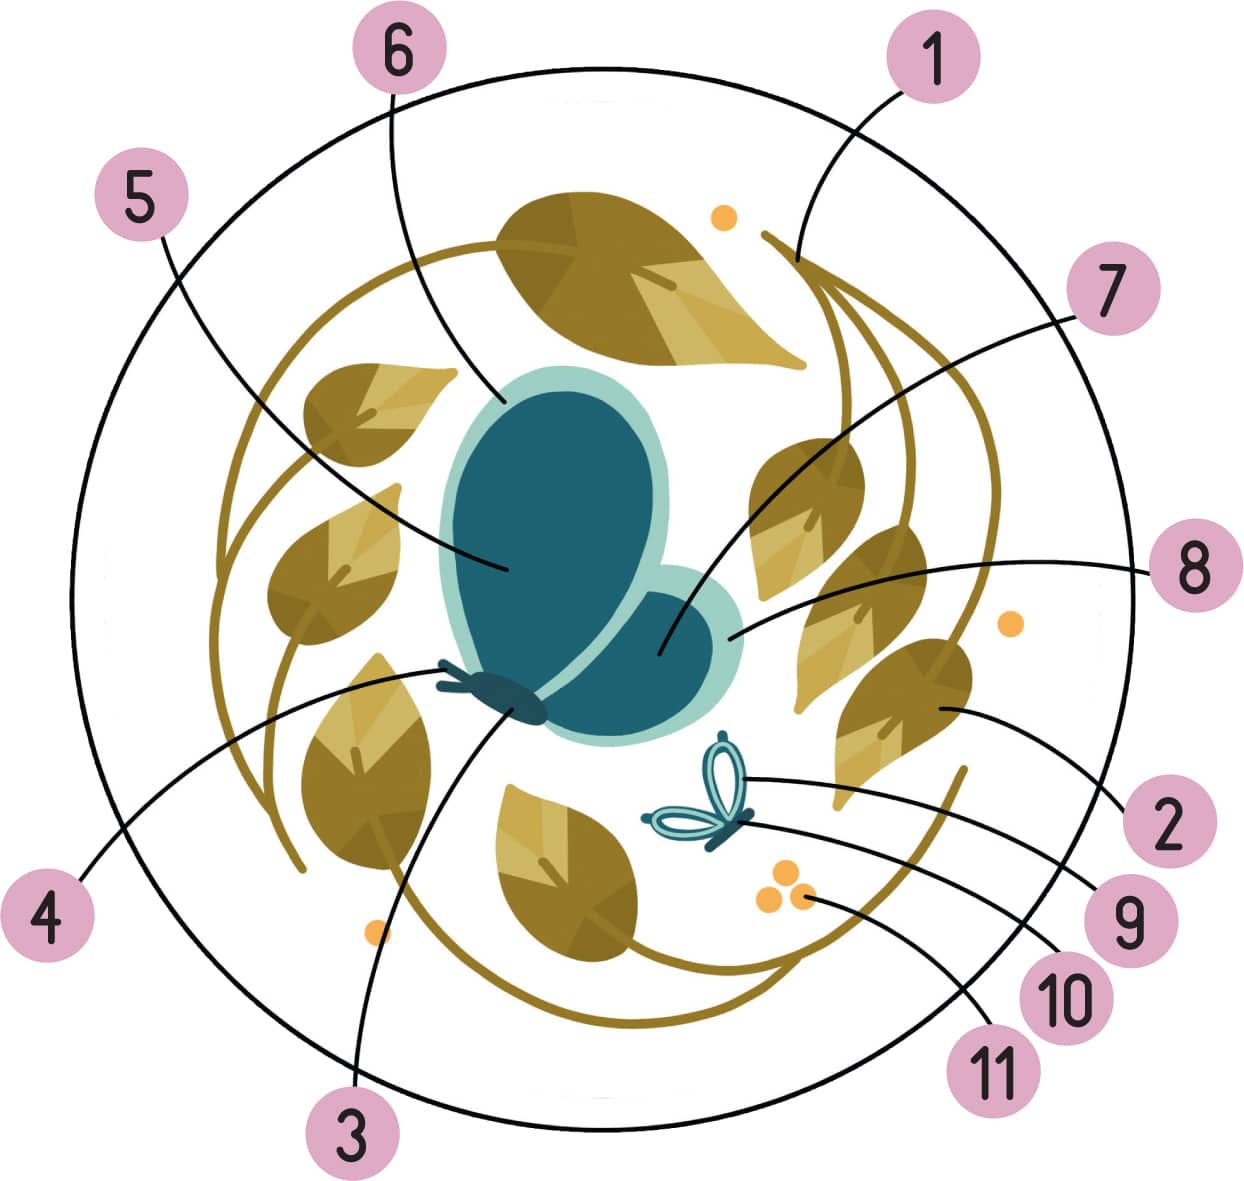
1. STEMS: stem stitch (3 strands, 831/medium green)
Start by following the lines of the vines’ stems using a stem stitch. When stitching the sample hoop, I treated each leaf-connected stem as a single line of stitching, which means that you’ll be stitching a total of eight lines of stitching in this step.
2. LEAVES: gentle blending (3 strands each, 834/pale green, 833/light green, 831/medium green, 830/dark green, to create base sections; 1 strand each, 831/medium green, 833/light green, 830/dark green, to shade and blend)
You’ll use gentle blending to create the leaf shapes at the ends of your vines. Start by creating a base of satin stitches, using your lightest color of floss at the top of the shape, followed by sections that get darker and darker, until you reach your darkest color of floss at the base of your shape. Once you have your base shape stitched, you’ll use just one strand of floss to help blend out the different sections.
3. BUTTERFLY BODY: satin stitch (3 strands, 3808/dark blue)
To begin your large butterfly, create the body placing vertical satin stitches.
4. ANTENNAE: straight stitch (1 strand, 3808/dark blue)
Finish your large butterfly’s body by using two straight stitches to create the antennae.
5. WING: satin stitch (3 strands, 3810/medium blue)
I suggest starting with the butterfly’s top wing before moving on to the bottom wing. First, use satin stitch to fill in the inner portion of your wing. Do your best here to “connect” these stitches to the satin stitching you used to create the butterfly’s body, so there is little to no gap in between the two.
6. WING OUTLINE: stem stitch (2 strands, 3813/light blue)
Next, use stem stitch to fill in the outer portion of your butterfly’s wing. When stitching the sample, I started by outlining the shape of this wing with stem stitch, adding in lines of stem stitch one by one until I had filled in my entire shape.
7. WING: satin stitch (3 strands, 3810/medium blue)
The steps for the bottom wing are the same as for the top wing, starting with using satin stitch to fill in the inner portion of your shape.
8. WING OUTLINE: stem stitch (2 strands, 3813/light blue)
Next, use stem stitch to fill in the outer portion of your butterfly’s bottom wing, as you did in a previous step for the top wing.
9. WINGS: detached chain stitch (2 strands 3813/light blue + 2 strands 3810/medium blue)
Next, use detached chain stitches to create both of the wings on your small butterfly. I recommend starting with the bottom wing here. This makes it easier to position the top wing atop the bottom wing, giving your small butterfly a more natural look.
10. BUTTERFLY BODY: straight stitch (1 strand, 3808/dark blue)
To finish your small butterfly, create the body by placing a single straight stitch over the point at which your two wings meet.
11. EMBELLISHMENT: French knot, 2 wraps (3 strands, 3852/gold)
Use French knots to create the embellishments on your piece. If you like, you can add more (or fewer) French knots than I’ve provided in the pattern—go with what feels best for you!

STITCHES

SPLIT BACK STITCH

STRAIGHT STITCH

STEM STITCH

FRENCH KNOT
COLORS
DARK PINK

LIGHT PINK
GOLD
LIGHT YELLOW
DARK ORANGE
LIGHT ORANGE
DARK GREEN
BROWN
LIGHT GREEN
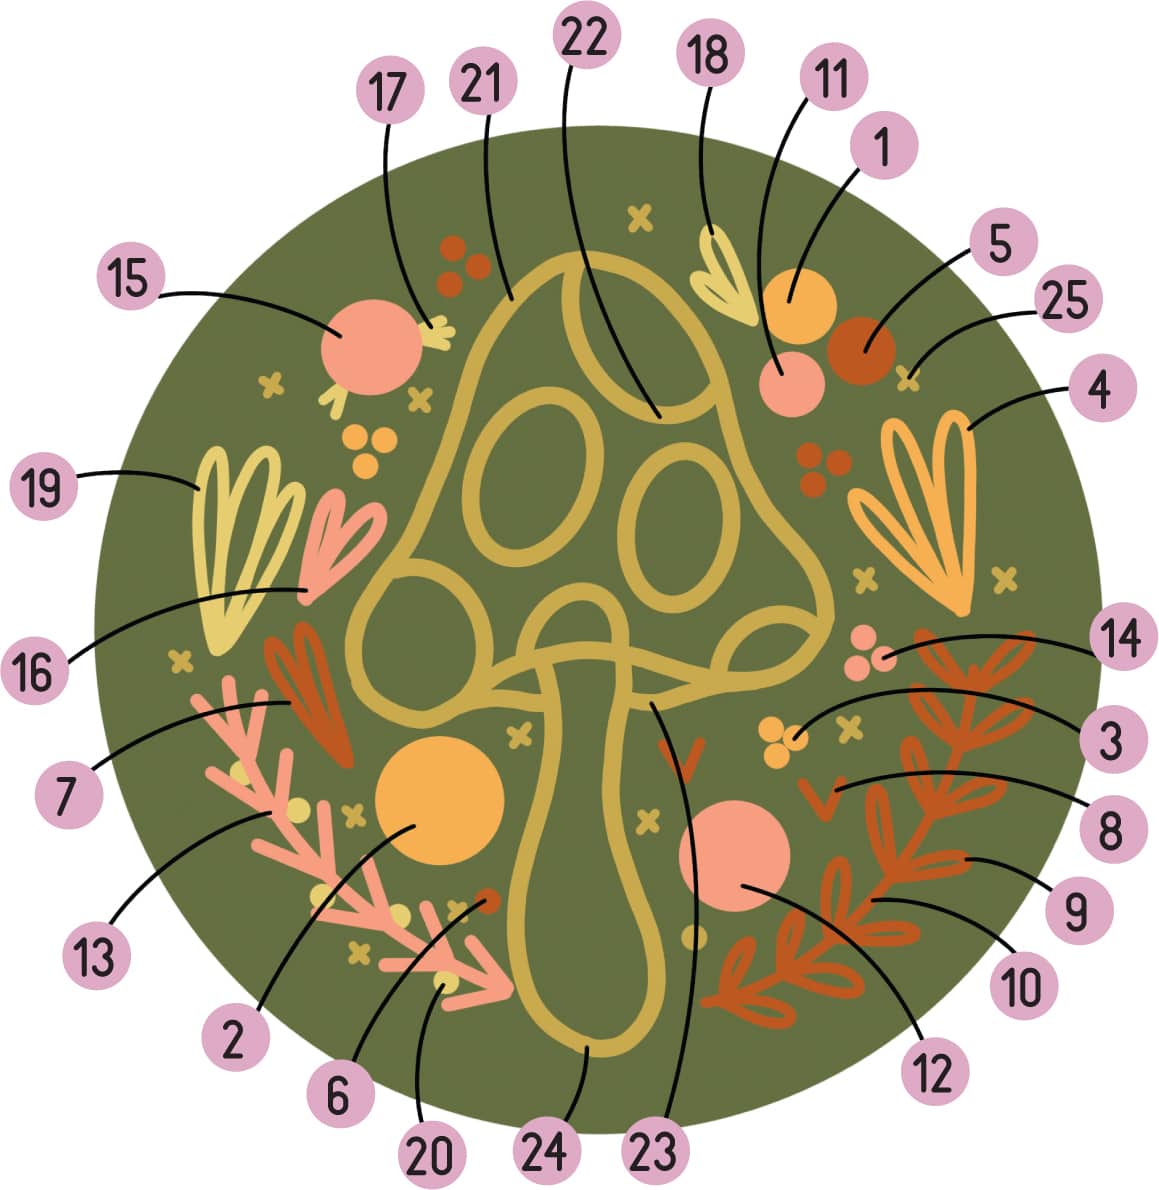
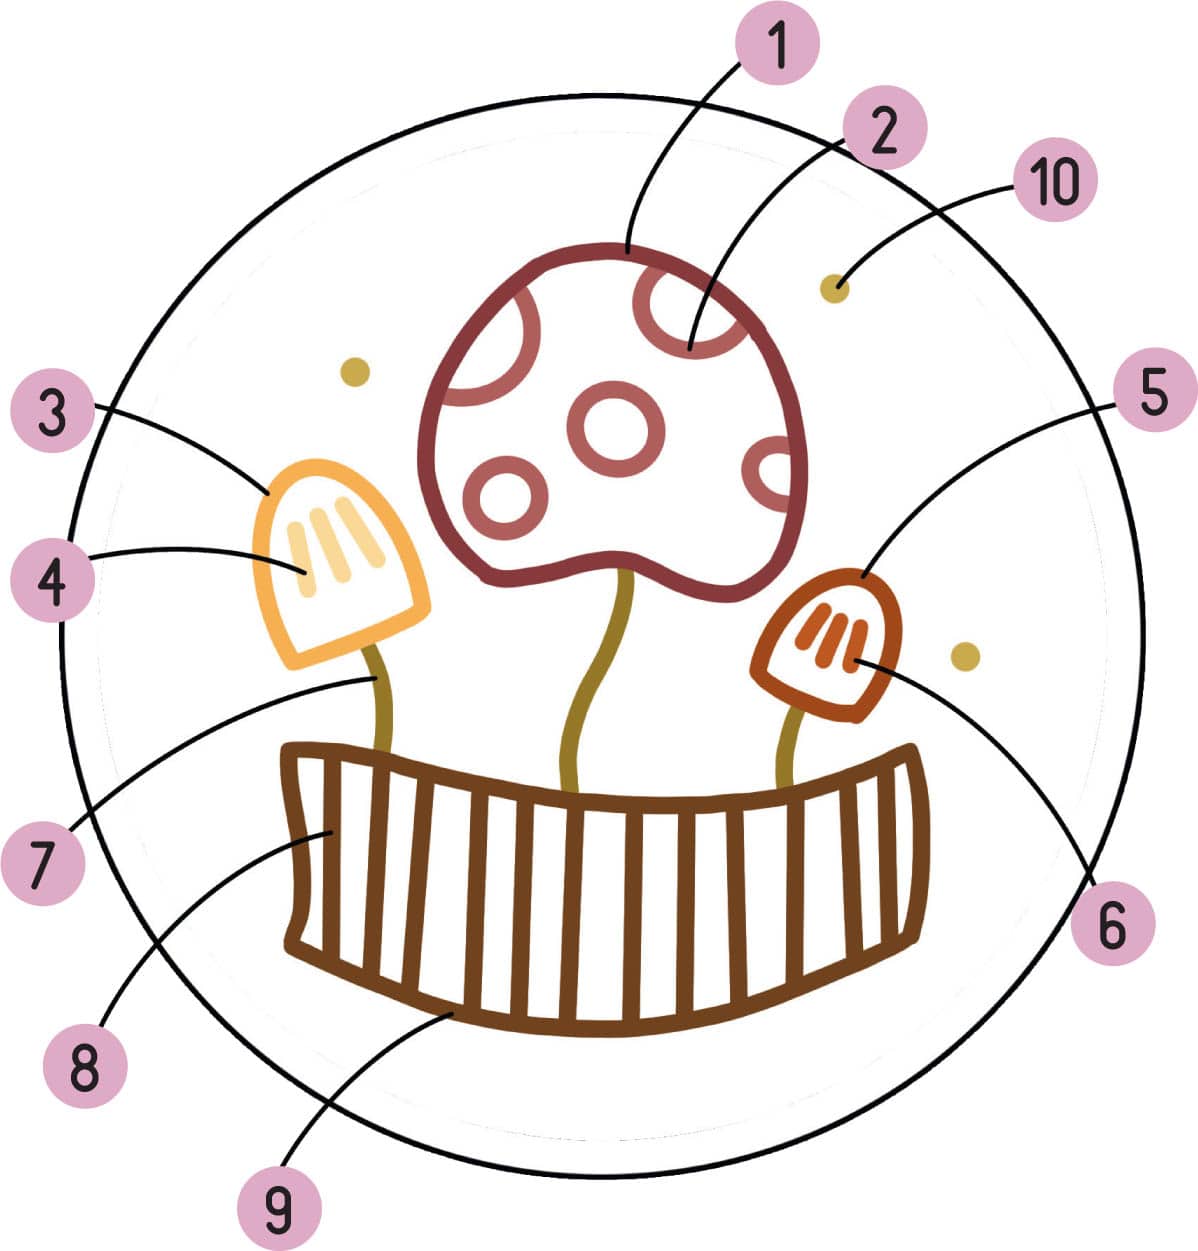
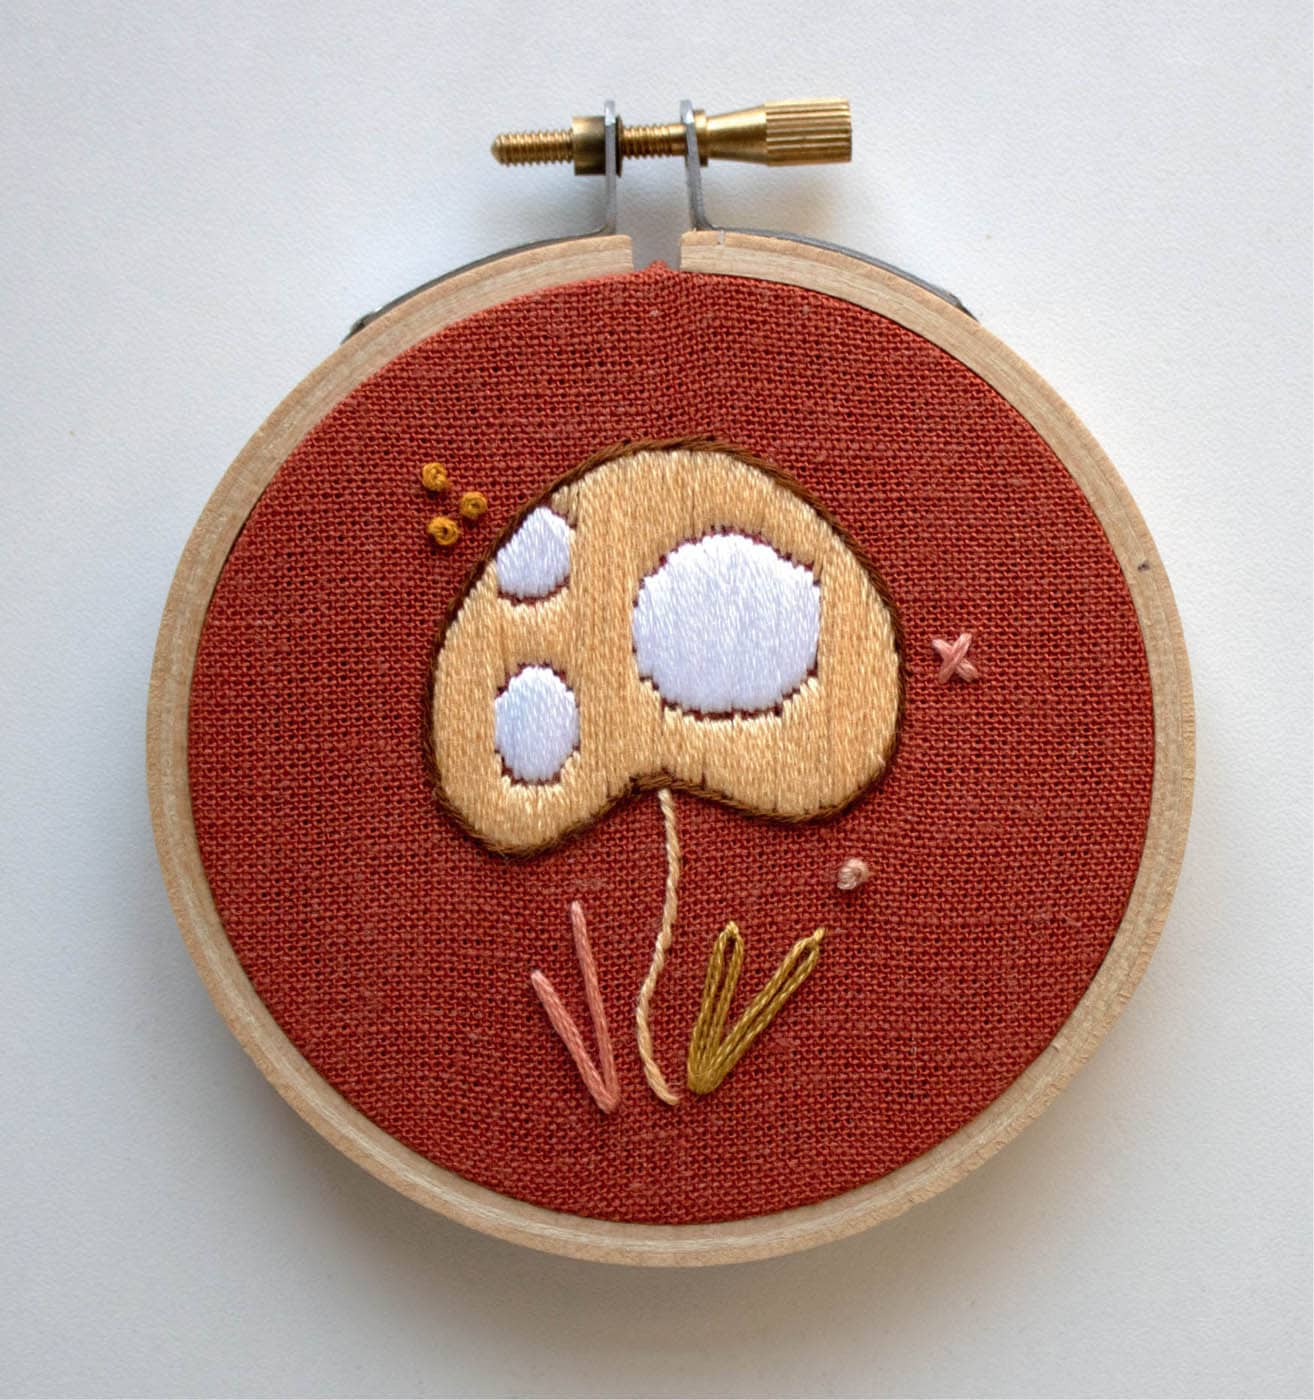
1. MUSHROOM OUTLINE: split back stitch (4 strands, 3328/dark pink)
Start by using split back stitch to outline the mushroom in the center of the pot, being careful to keep your stitches shorter as you make your way through tighter curves.
2. MUSHROOM SPOTS: split back stitch (3 strands, 3712/light pink)
Next, use split back stitch to stitch the spots inside your mushroom shape. Using a lighter shade of floss and fewer strands of floss helps to differentiate the inside portion of your mushroom from the outside portion.
3. MUSHROOM OUTLINE: split back stitch (3 strands, 3852/gold)
Use split back stitch to outline your leftmost mushroom shape. I approached this shape as two total lines of stitching when stitching the sample: the top curve was one line of stitching and the bottom curve a second line. By approaching it this way, I was able to create sharper edges at the bottom of the mushroom; that said, you could absolutely treat the entire shape as one single line of stitching—just be sure to keep your stitches nice and short to help you maintain those tight curves!
4. MUSHROOM LINES: straight stitch (2 strands, 3855/light yellow)
Use straight stitches to create the lines inside your shape. Similar to the first mushroom, you’re using a lighter shade of yellow and fewer strands of floss here, both of which help add dimension to this simple shape.
5. MUSHROOM OUTLINE: split back stitch (3 strands, 920/dark orange)
Use split back stitch to outline your final mushroom shape.
6. MUSHROOM LINES: straight stitch (2 strands, 922/light orange)
Use straight stitches to create the lines inside your shape.
7. STEMS: stem stitch (2 strands, 831/dark green)
Use stem stitch to create your mushrooms’ stems. When stitching the sample, I worked my way from the bottom of the stems and toward the bottom of my already-stitched mushroom shapes, which helped me to get my stems as close to the mushrooms as possible.
8. POT LINES: straight stitch (2 strands, 433/brown)
Use straight stitches to create the lines in your pots. By stitching these lines first, you’ll be able to easily hide any small mistakes you might make when you outline the pot in the next step.
9. POT OUTLINE: stem stitch (3 strands, 433/brown)
Use stem stitch to outline your wobbly pot. When stitching the sample, I treated this as four total lines of stitching (top, bottom, left, and right) to maintain those sharp corners. You’ll be able to use your line of stem stitching at the top and bottom of your pot to hide any small mistakes you may have made when stitching your stems in step 7 and/or your lines in step 8.
10. EMBELLISHMENTS: French knot, 2 wraps (2 strands, 834/light green)
Finally, use French knots to add a few embellishments.
STITCHES
SATIN STITCH

STEM STITCH

STRAIGHT STITCH

DETACHED CHAIN STITCH

FRENCH KNOT

CROSS STITCH
COLORS
WHITE
YELLOW
BROWN
DARK PINK
GREEN
LIGHT PINK
GOLD
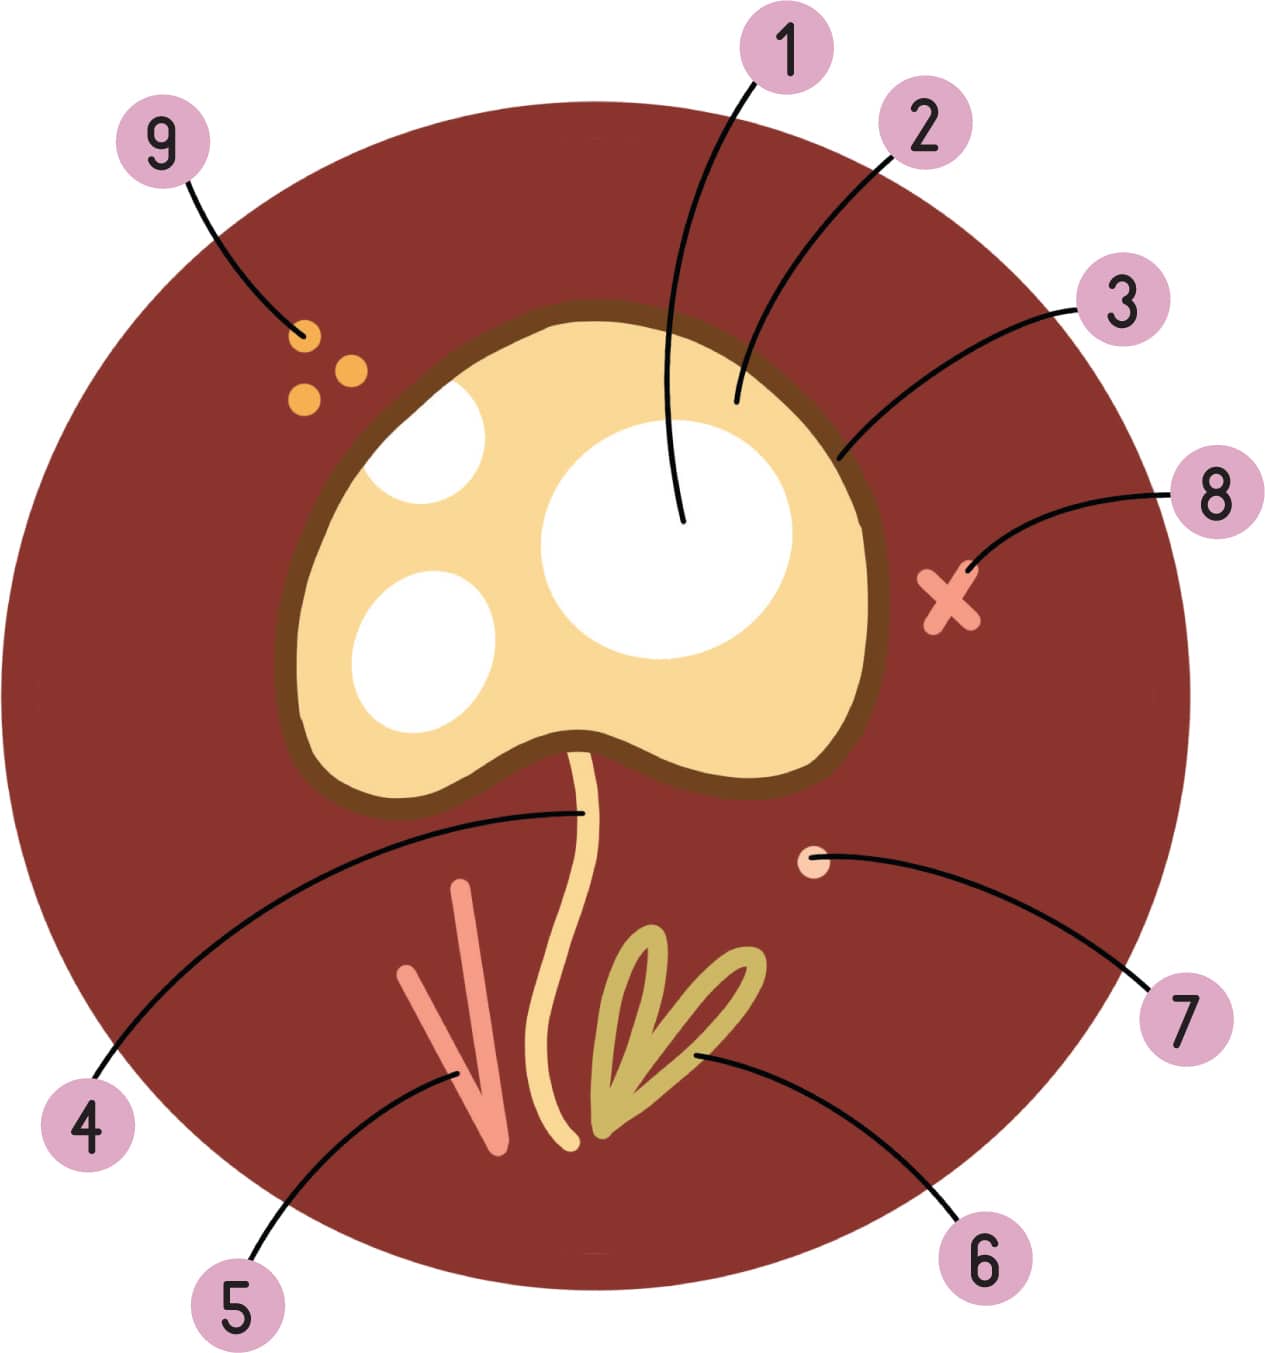
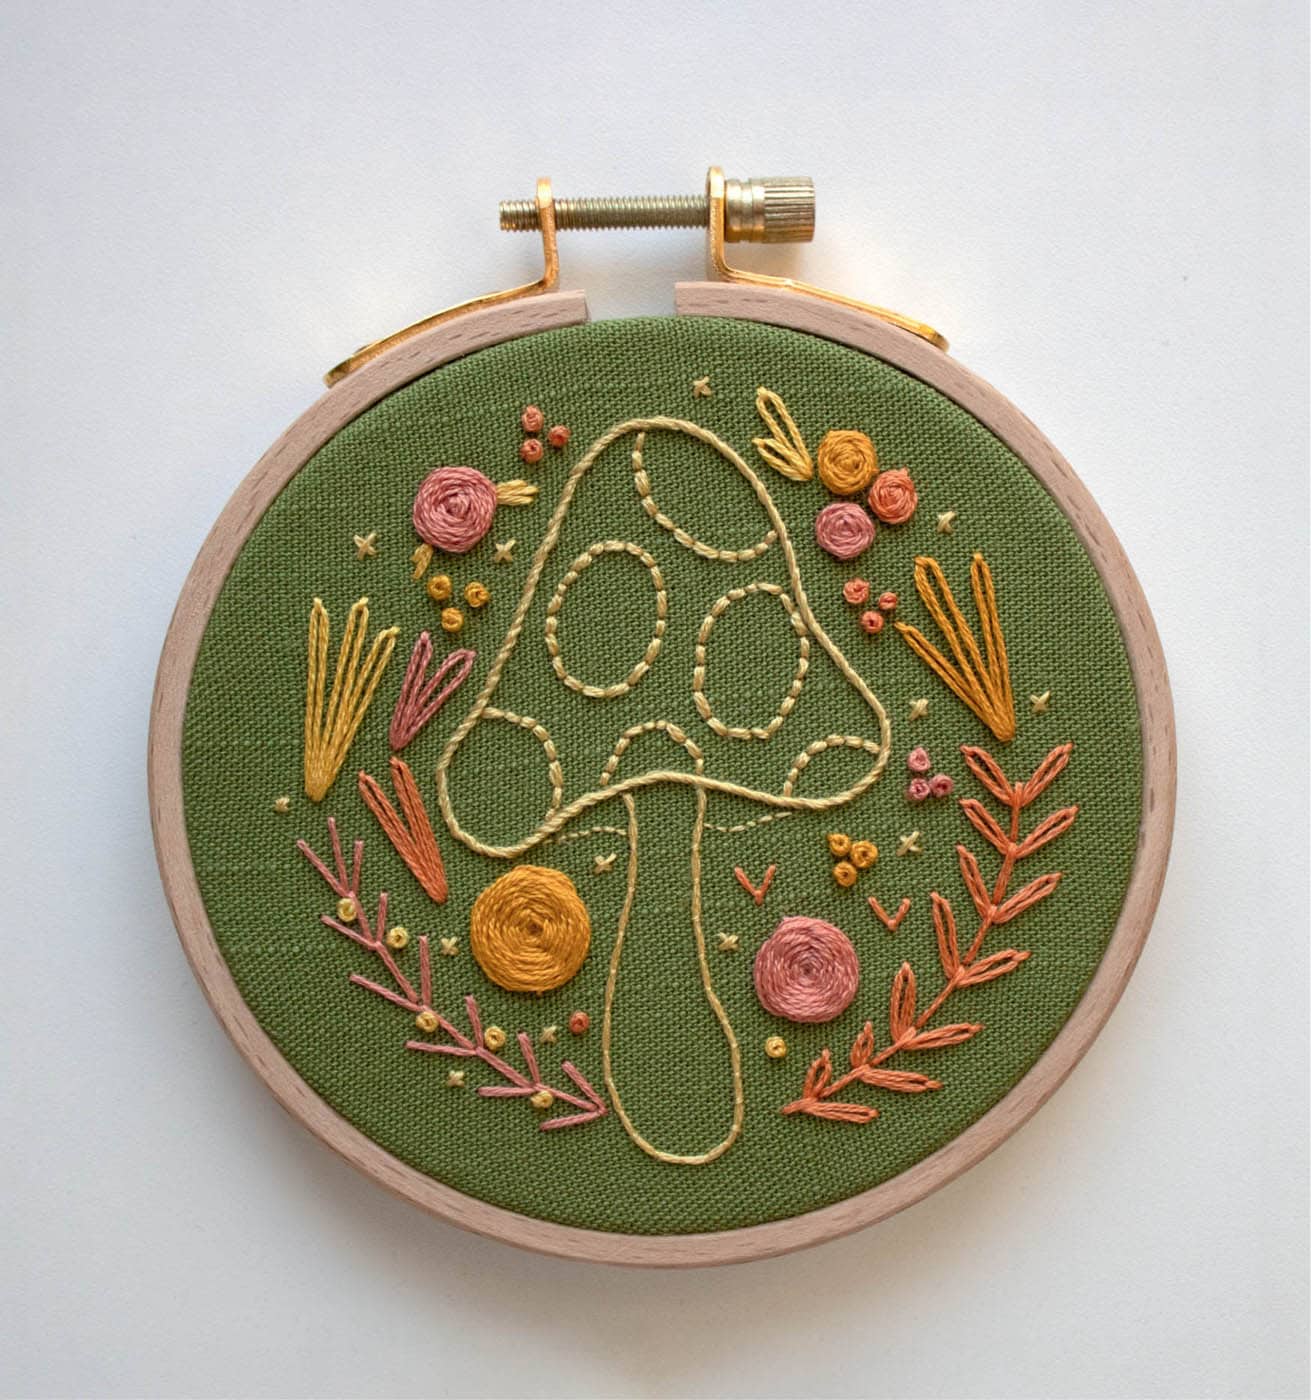
1. MUSHROOM SPOTS: satin stitch (3 strands, B5200/white)
Start by using satin stitch to create the white spots at the center of your mushroom shape. These spots are rather large, so I created guidelines for myself when I stitched the sample. Keep in mind that the stitching you do here will determine the direction of your stitches in the next step.
2. MUSHROOM: satin stitch (3 strands, 3855/yellow)
Next, use satin stitch to fill in the rest of your mushroom shape. You’ll want to be careful to follow the lines of stitching you established in the previous step, but try not to worry too much about getting your stitches too perfect at the edges of your shape—you’ll be able to cover up any small mistakes in the next step.
3. MUSHROOM OUTLINE: stem stitch (2 strands, 433/brown)
Next, use stem stitch to outline your mushroom’s cap. When using stem stitch, you typically want to keep your looped floss to the outside of your curve. In this shape, however, the curves change direction as you move from the bottom, to the sides, and around the top. When a shape’s curves change like they do here, I generally choose one direction for my looped floss. For this particular shape, I elected to keep my looped floss to the outside of the shape, as most of the curves face outward. I also kept my stitches relatively short, which helped me to better outline the bottom portion of the mushroom cap (even as I held my looped floss in the “wrong” direction for that portion of the shape).
4. STEM: stem stitch (3 strands, 3855/yellow)
Once again, use stem stitch to follow the line of your mushroom’s stem. Similar to the previous step, you’ll want to choose one direction for your looped floss to face as you make your way down your line of stitching and to keep your stitches relatively short so your stitching can maintain the curve’s shape (even when it changes direction!).
5. GRASS: straight stitch (6 strands, 352/dark pink)
Use straight stitch to create a bit of colorful grass.
6. GRASS: detached chain stitch (3 strands, 833/green)
Next, use detached chain stitches to create another patch of grass.
7. EMBELLISHMENTS: French knot, 1 wrap (6 strands, 3771/light pink)
The final few steps for this project consist of simple embellishments, starting with a single French knot. By using all six strands here, you’re able to create a robust French knot with just one wrap around your needle.
8. EMBELLISHMENTS: cross stitch (6 strands, 352/dark pink)
Create a single cross stitch for your second embellishment. I find these small cross stitches to be a great substitute for French knots—consider incorporating them into your future projects in place of French knots, especially if you still need a little more practice with that particular stitch.
9. EMBELLISHMENTS: French knot, 2 wraps (3 strands, 3852/gold)
Finally, create a small cluster of three French knots to finish out the embellishment portion of this project. Again, it is absolutely fine if you’d prefer to substitute another embellishment stitch for this portion of the project. Feel free to make it your own!
STITCHES

WOVEN WHEEL ROSEBUD

WOVEN WHEEL ROSE

FRENCH KNOT

DETACHED CHAIN STITCH

FLY STITCH EMBELLISHMENT

BACK STITCH

FLY STITCH

STRAIGHT STITCH

WHIPPED BACK STITCH

COUCHING

CROSS STITCH
COLORS
GOLD
MEDIUM PINK
LIGHT PINK

LIGHT GREEN
LIGHT OLIVE GREEN
1. ROSE: woven wheel rosebud (3 strands, 3852/gold)
2. ROSE: woven wheel rose (3 strands, 3852/gold)
3. EMBELLISHMENTS: French knot, 3 wraps (3 strands, 3852/gold)
4. LEAVES: detached chain stitch (3 strands, 3852/gold)
Start by stitching the outside detached chain stitches; this allows you to layer the center stitch on top.
5. ROSE: woven wheel rosebud (3 strands, 922/medium pink)
6. EMBELLISHMENTS: French knot, 3 wraps (3 strands, 922/medium pink)
7. LEAVES: detached chain stitch (3 strands, 922/medium pink)
8. EMBELLISHMENTS: fly stitch (3 strands, 922/medium pink)
Here, you’ll be using fly stitches as embellishments; later, you’ll have a chance to practice fly stitching to create vines and foliage.
9. LEAVES: detached chain stitch (3 strands, 922/medium pink)
10. VINE: back stitch (3 strands, 922/medium pink)
Use back stitch to create the middle portion of your vine from the previous step.
11. ROSE: woven wheel rosebud (3 strands, 21/light pink)
12. ROSE: woven wheel rose (3 strands, 21/light pink)
13. VINE: fly stitch (3 strands, 21/light pink)
Use fly stitch (or fern stitch if you prefer) to create the leftmost vine on your project.
14. EMBELLISHMENTS: French knot, 3 wraps (3 strands, 21/light pink)
15. ROSE: woven wheel rosebud (3 strands, 21/light pink)
16. LEAVES: detached chain stitch (3 strands, 21/light pink)
17. LEAVES: straight stitch (3 strands, 3821/light green)
Create small, short stitches underneath your larger woven wheel rosebud from step 5.
18. LEAVES: detached chain stitch (3 strands, 3821/light green)
Use detached chain stitch to create a pair of leaflike shapes coming out from your cluster of rosebuds.
19. LEAVES: detached chain stitch (3 strands, 3821/light green)
20. EMBELLISHMENTS: French knot, 2 wraps (3 strands, 3821/light green)
21. MUSHROOM OUTLINE: whipped back stitch (4 strands, 834/light olive green)
22. MUSHROOM SPOTS: back stitch (4 strands, 834/light olive green)
23. FLOWER MUSHROOM OUTLINE: back stitch (1 strand, 834/light olive green)
24. STEM: couching (4 strands, 834/light olive green, for the “couched” floss; 1 strand, 834/light olive green, for the “couching” floss)
Keep your couching stitches closer together as you move around the tighter curves of this shape.
25. EMBELLISHMENTS: Cross stitch (2 strands, 834/light olive green)
Use these final embellishments to help fill in any gaps in your project.