
Being able to make Java and Scala cooperate on the same code base is a prerequisite to guarantee a smooth transition between the two languages.
In this chapter, we are going to quickly create a small Java web application in which we will show you how to add Scala code to it. Then, we will cover some of the most common integration points between Java and Scala and how programming styles differ so that programmers who want to refactor and extend their Java application can do it according to some guidelines.
To avoid spending too much time on creating, understanding, and documenting a sample Java project, we are going to use a small database that is already available as part of the Oracle's NetBeans IDE distribution and create a JPA persistence layer as well as a REST API from it using the code generation features of the IDE.
Tip
Download the sample Java project
If you are impatient to directly jump into the Scala code integration features of this chapter, you may skip the following section and download the ready-to-use maven Java project instead from Packt's website at www.packtpub.com.
The sample database bundled with the NetBeans IDE can be downloaded from the www.netbeans.org website. Just click on the Download button on this website and pick the JavaEE version of the IDE.
Once you have run the installation wizard, seen the The installation was successful! message, and started the IDE (Version 8.0 in our case), we are ready to create a fully functional web app in five minutes. The first time you use it, just click on the upper-left corner of the NetBeans IDE to close the startup screen and you should see the three tabs: Projects, Files, and Services on the left-hand side of the IDE.
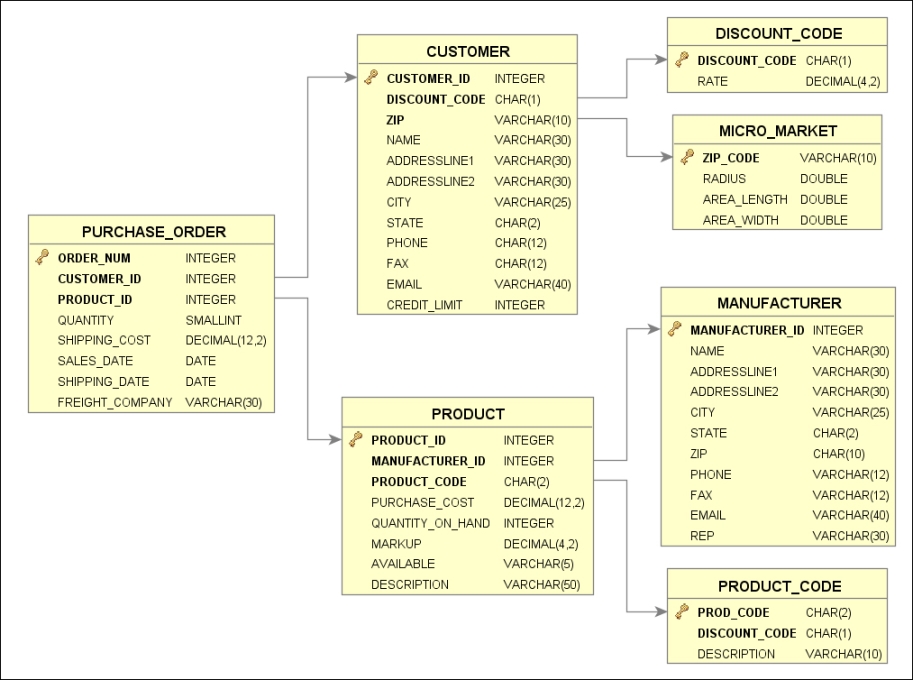
Our reference database can be seen from the IDE by clicking on the Services panel. Under the Databases menu that is part of the Services tab, double-click on the jdbc:derby://localhost:1527/sample [app on APP] Database Connection link to connect to the sample database on port 1527 (the default port for Derby databases) with the app user on the APP schema. Under the APP schema, you should find seven tables including CUSTOMER and PRODUCT. By right-clicking on the CUSTOMER table and choosing View Data…, you should be able to browse the content of the table.
The following diagram depicts the whole database schema so that you can visualize the dependencies or foreign keys between the different tables:
To quickly set up our sample Java project, you may either import it directly in your favorite IDE from the downloaded code (and skip creating JPA entities and the REST web service) or perform the following simple steps on the NetBeans IDE:
- Right-click anywhere within the Projects tab in the IDE, select New Project…, and then choose the Maven category and the Web Application project type.
- Enter
Sampleas Project Name andcom.demoas Group Id, and then click on the Next > button. - Make sure a Server container is selected for deployment (we use the default GlassFish 4.0 as part of the NetBeans distribution) as well as Java EE 7 Web as the Java EE version.
- Click on the Finish button and you should see the structure of the created project under the Projects tab.
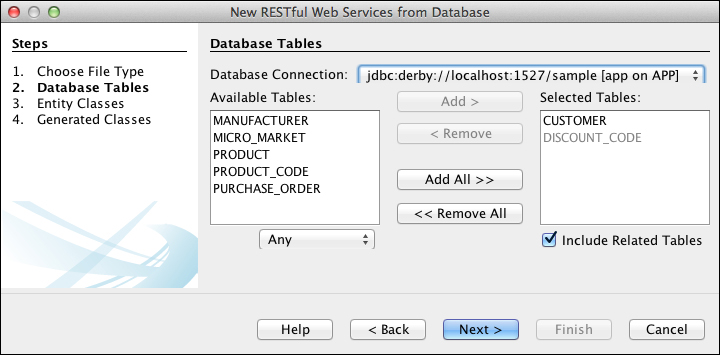
Right-click on the Sample project root we just created and navigate to New | RESTful Web Services from Databases…. Selecting the derby sample database connection from the drop-down list in the newly opened window should bring up the database tables into the Available Tables section. Mark only the CUSTOMER table and select Add>, both CUSTOMER and DISCOUNT_CODE (which are dependent on CUSTOMER) should be listed as Selected Tables, as shown in the following screenshot:
Clicking on the Next button and again on Next on the next page, and finally clicking on Finish will generate both the persistence JPA entities for Customer and DiscountCode and the service facade classes, CustomerFacadeREST and DiscountCodeFacadeREST. Note that since Java EE6, the EntityManager class is instantiated in each service class, which avoids the need for JPA controller classes that were generated in the previous versions.
Tip
A more detailed version of how to generate a RESTful web service from a database is available under the NetBeans tutorial at www.netbeans.org.
Before we start introducing Scala code into our Java project, we may launch our application and test REST invocations in a browser. Right-click on the Sample root node of the project and select Run to deploy the application. Once the console displays that the GlassFish server is running, and that the message Hello World! appears in your browser to show that everything is deployed correctly, right-click on the RESTful Web Services folder under the project root, and select Test RESTful Web Services. The opening dialog lets you choose between generating a test client as part of the same project or externally, as shown in the following screenshot:
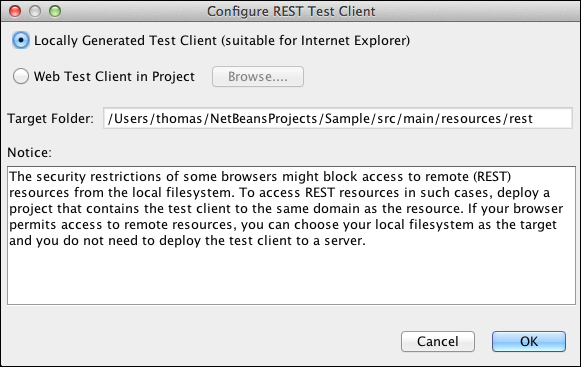
Select Locally Generated Test Client (suitable for Internet Explorer) and click on OK.
Once deployment completes, the browser will display a test page where we can invoke REST methods on our customer and discountcode entities. If we expand the com.demo.sample.customer folder, additional parameters will be shown. Clicking on the {id} parameter, we will get an input field on the right pane where we can enter a particular customer id value. For instance, we can enter 409. In the drop-down list that shows MIME types, select application/json and GET as the method to test, and then click on Test, as shown in the following screenshot:
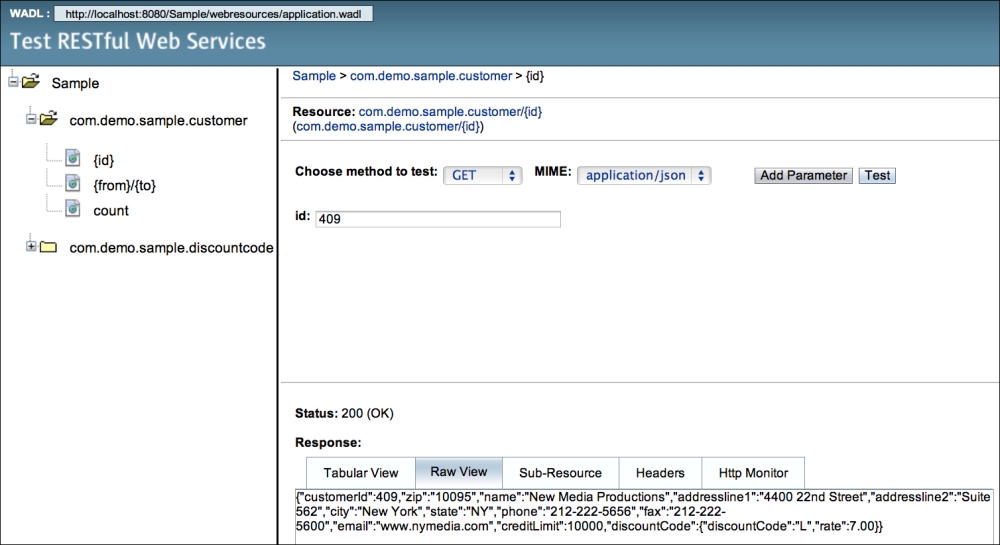
The bottom part of the page will now display the response to the REST query. It consists of a Status: 200 (OK) message and a Response content where the Raw View tab will display the body of the response as JSON, as shown in the previous screenshot.
Finally, we can generate a very simple unit test for the Customer class by selecting the Customer.java source file from the Projects pane, and then right-clicking on it and navigating to Tools | Create Tests. Simply click on the OK button in the dialog and eventually allow the installation of the JUnit 4.xx if required. The resulting generated file appears within Test Packages under the same Java package structure as the original class under test, in our case com.demo.sample.CustomerTest.java, which is a common convention when dealing with unit testing in Java. Right-clicking on the CustomerTest class and choosing Test File will make all the test methods run with JUnit and fail as a fail clause is present by default at the end of each tested method. For now, just comment out the fail statement of testGetCustomerId and remove all the other test methods. Then, rerun the test to see it in green in the IDE. Alternatively, if you have set up the Maven project with another IDE or a plain text editor, from the root of the project in the filesystem (where the pom.xml file is located), you may enter the following Maven command, which you probably are familiar with, in a terminal window:
> mvn test
-------------------------------------------------------
 T E S T S
-------------------------------------------------------
Running com.demo.sample.CustomerTest
getCustomerId
Tests run: 1, Failures: 0, Errors: 0, Skipped: 0, Time elapsed: 0.034 sec
Results :
Tests run: 1, Failures: 0, Errors: 0, Skipped: 0