Chapter 8: Using Alphas for Details
I think you'll agree that our realistic environment scene is really coming together at this point, but there might be something missing. It's really common to work on a scene for a long time and then realize that it just doesn't look right, but you actually aren't sure why! We've obviously made sure our lake is reflecting properly, and the sun and the sky are casting light correctly – we've done everything! But often, what's missing is not the big, overarching elements of a scene but the details. When we look at a natural environment, we often don't even register some of the details we're seeing; we see the scene as a whole. But as a 3D artist and designer, we need to see those details; they are what make a scene believable. So, in this chapter, we're going to create some really nice details that add to the overall composition and realism of the scene. We'll cover three different types of details: birds, mist, and backgrounds. In concept art, it can be a lot easier to add these things to your scene as images on a plane, or as Alphas. In creating digital images, the Alpha channel denotes the transparency aspect of the image. In an image, we have the red channel, the green channel, and the blue channel that create the color aspect of the image. Then, the Alpha channel dictates how opaque an image is. This is usually shown visually using black or white. Black means the image is completely transparent, and white means an image is completely opaque, with varying colors between those two colors denoting various levels of transparency. In this chapter, we will use various images with prepared Alpha channels, known as Alphas, to create details quickly and with ease.
In this chapter, we will cover the following topics:
- Adding detail to the scene (with birds!)
- Creating fake volumetric mist
- Adding a background and finishing up
Technical requirements
Download Chapter 8-Start.blend to start this chapter from my starting point, or just download the folder labeled Images to start the chapter from your previous file. Make sure this new image is saved in the same place that you saved the other textures from this chapter to avoid losing them. We also activated an add-on in the first chapter called Import Images as Planes. Make sure this is still activated, as it will be the way we import these images so that they immediately have the Alpha channel set, instead of having to set it ourselves.
You'll find the files for this chapter at this link:
Adding detail to the scene (with birds!)
In this section, we're going to add some birds to our scene. Now, one way you could go about this is to model some birds, texture them, and put them in the background, maybe by using a particle system. But that is a lot of time to create a bird that will probably make up 0.001% of the scene. Plus, each bird will add to the overall computational time of the render, so you're wasting even more time. So, let's add the Alpha of a bird flock, which will add only one extra polygon to the scene and a little extra time rendering an Alpha channel. This process will only take about 2 minutes. Let's get started:
- Go to File at the left corner of the Blender window. Select Import | Images as Planes:

Figure 8.1: Import Images as Planes menu
Navigate to the folder in which you saved the images you downloaded for this chapter.
- Select the BirdAlpha image:

Figure 8.2: Selecting the BirdAlpha image file
- In the right column, you'll see Operator Presets. Select the Premultiplied option in Texture Settings and make sure that the Use Alpha option is ticked, which it should be by default:

Figure 8.3: Import Images as Planes Operator Presets
Our bird Alpha should be imported into our scene. If you moved your 3D cursor, it will be imported to the point where the cursor is located, which can be annoying if the 3D cursor has moved to a place you have trouble finding. If you are having problems with the location of the 3D cursor, you can reset its location by using the Shift + C shortcut to reset the location of the 3D cursor and then re-import the BirdAlpha file. It should show up exactly in the center of the grid:

Figure 8.4: Importing the bird Alpha plane
- As I imported it, our bird Alpha is facing the right direction, but if your bird Alpha is imported in a different orientation, use the R shortcut to snap the plane to the upright direction.
- Use the S shortcut to size up the bird Alpha and then G to move it to the right location (a little bit in front of the sun but still in view of the camera). Here's where I put mine, but experiment with different placements to see whether you have a place you prefer:
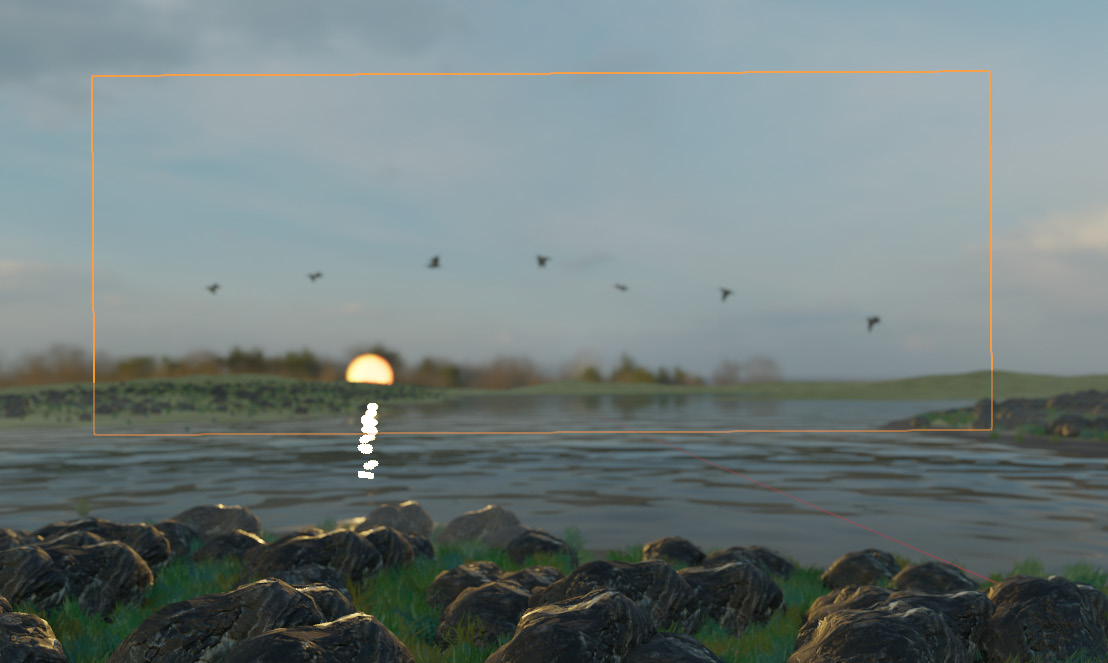
Figure 8.5: Positioning the bird Alpha plane
- Now that we have the bird Alpha in the correct position, we can also create separate birds if we want.
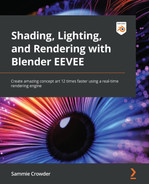
You can probably see that the Alpha is casting a shadow and has ruined the nice reflection we have from the sun in our scene. We can fix that easily. Ensuring you have the BirdAlpha object plane selected, go to the Properties panel and select Material Properties, scrolling down to the material's Settings options:

Figure 8.6: The material's Settings panel
- Set the drop-down box next to Shadow Mode to None. Now, we don't get a shadow from the plane at all:
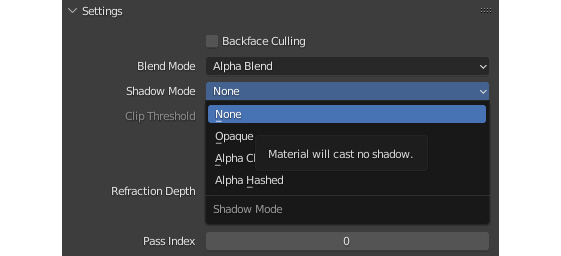
Figure 8.7: Changing Shadow Mode to None
Figure 8.8: The birds added to the composition
You can probably see how easy it is to add some details to the scene, such as birds in the background. Obviously, if the main focus of the scene is a bird, you'd want to actually model and texture a bird with all the added detail and care you'd take for any other important part of the scene. But what if our birds are tiny and in the background? Use the Alpha! You can also do this for an airplane flying in the background, some trees far off in the distance, or any other small object that won't need too much detail. You can also add a simple plane, apply the bird material, and then unwrap the birds on the plane. This way, you can get more control over the scale and the appearance of the birds.
Making Your Own Alphas
At the risk of getting too sidetracked, I want to briefly talk about making your own Alphas. Of course, there are many packs available to buy online that people have created, but it is often really easy to create a few Alphas for yourself if all you need is a few singular Alphas for a specific purpose. If you are creating at scale, I recommend buying packs to streamline your workflow, but most people don't need such large collections of Alphas. So, to make your own Alpha, import a picture you've taken or found (I recommend Unsplashed.com for some great CC0 images) to Krita or Photoshop, select the area around the object you want with the lasso or magic wand tool, and then delete it. You should be left with your object surrounded by a checkerboard pattern. That pattern denotes full transparency. Make sure you export the image you just created as a PNG. JPEGs don't support an Alpha channel, so PNGs are the way to go.
Let's move on to creating Alphas procedurally in Blender with the Shader Editor. We'll be adding some mist to the top of our lake using a shortcut to fake volumetrics.
Faking volumetric mist
This time, we won't be using a pre-prepared texture to create our Alpha. We'll add a plane, use some procedural textures to create some mist, and then add them to the top of our water to simulate mist rolling off our water. This technique is extremely simplistic, so I'd say that it's often better to use a volumetric shader that actually catches the light and diffuses it as it would in the real world. However, I think it's important to understand how to do the same thing in a few different ways and why each one would apply to different situations. Using this technique to create fake volumetrics is really useful for situations where you have only small parts of a scene that need mist or smoke, but it isn't very useful in situations where you want to animate the camera, as it will become clear once the camera starts moving that the mist isn't very realistic. Take that into account if you choose to use this method of mist creation.
Let's create some mist planes to add to our scene:
- Add a plane using the usual Shift + A method and rotate the plane so that it faces the camera. Use the S key to scale it along the y axis so that it is horizontal across the water:

Figure 8.9: Adding a blank plane
- Move the plane closer to the camera so that we can see how it looks in the viewport as we build the shader. Use the G shortcut to move and then use X to lock movement to the x axis. This makes it easier to move the plane closer to the camera without accidentally moving it up, down, left, or right:
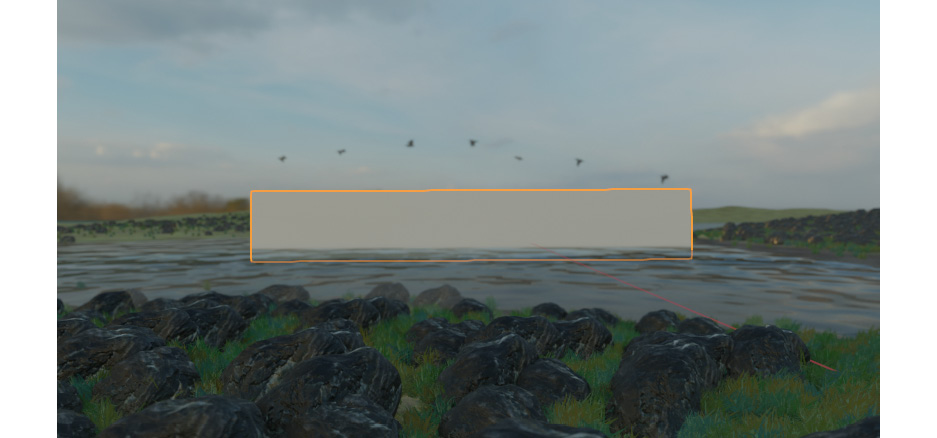
Figure 8.10: Positioning the blank plane
- Add a shader to the plane; the Principled shader is added by default.
- Add a Noise Texture node and a Voronoi Texture node to the shader and connect Position to the Vector input:

Figure 8.11: Connecting Voronoi Texture and Noise Texture

Figure 8.12: The Voronoi Texture settings
- Add a ColorRamp node and pull the black marker (on the left side) down to about a quarter of the way. Black values indicate transparency, so the closer the black marker is to the white marker on the ramp, the more black will be visible on the ramp's color gradient. The more black that is visible on the gradient, the more transparency we'll get:
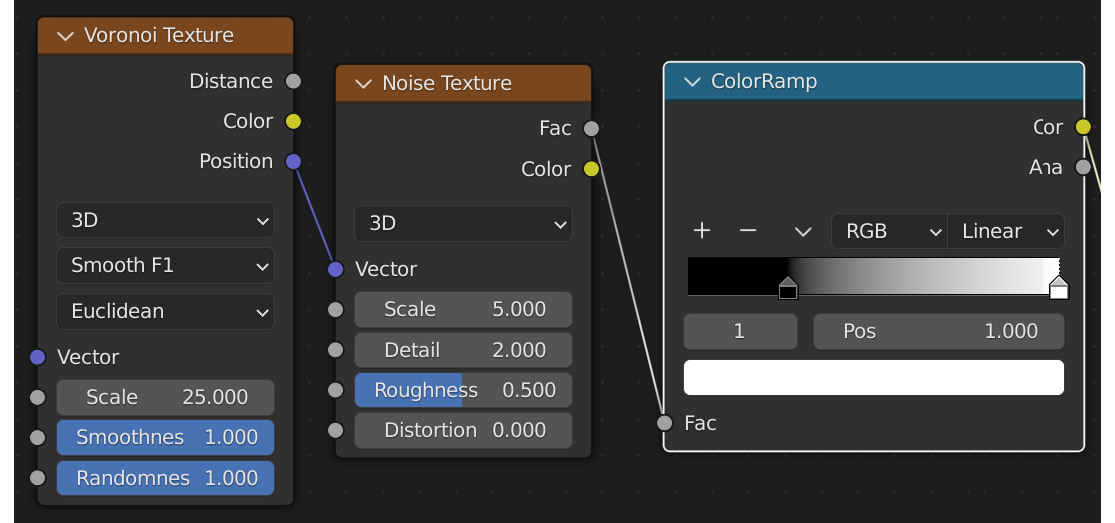
Figure 8.13: Adding ColorRamp to the shader
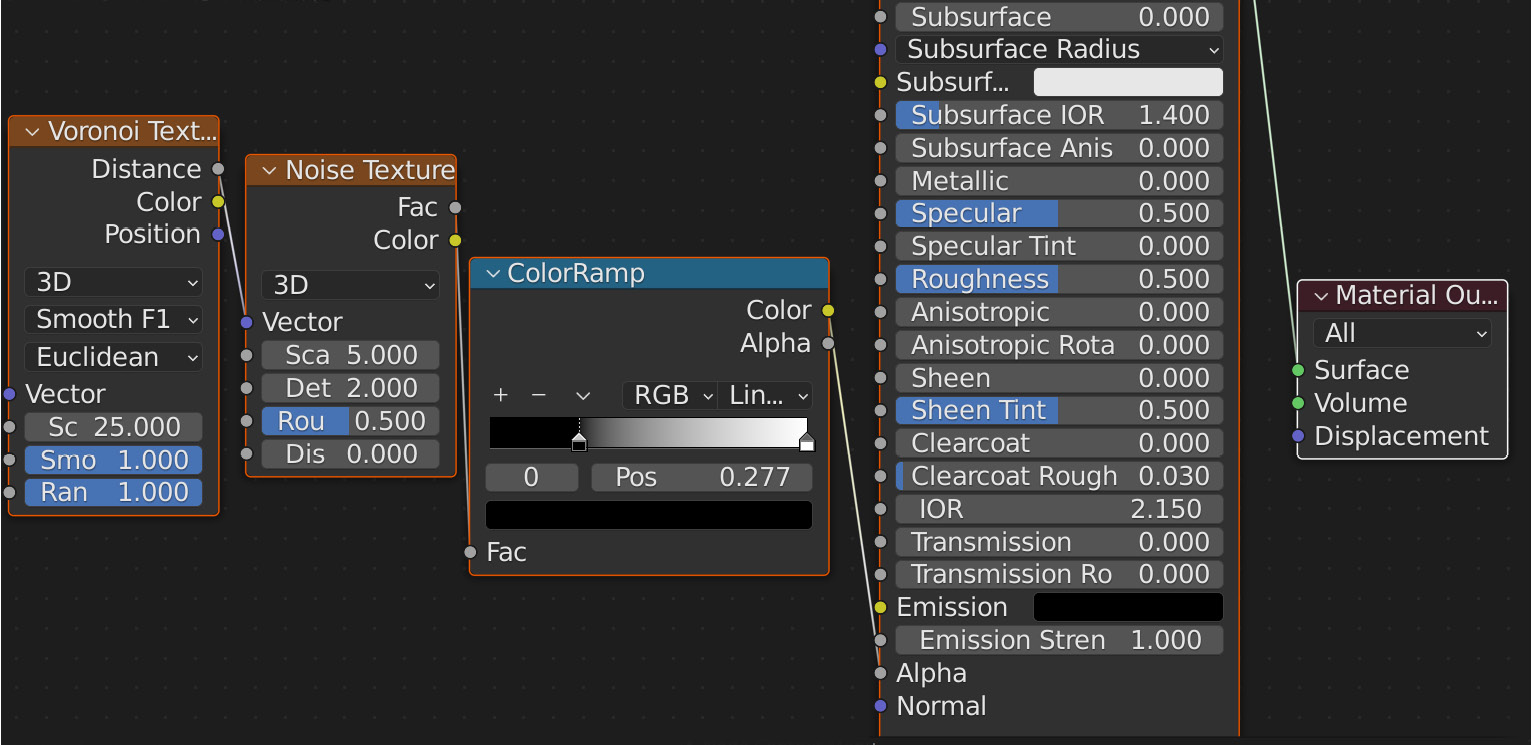
Figure 8.14: Connecting ColorRamp to Alpha
- You'll notice that nothing happens, but we've learned that about EEVEE. You need to specify Blend Mode in the material's Settings options to actually get transparency. So, let's change Blend Mode to Alpha Blend in Settings (which tells EEVEE that we want areas to be rendered transparent and opaque but with mid-values of semi-transparency blended in between). We also need to set Shadow Mode to None:
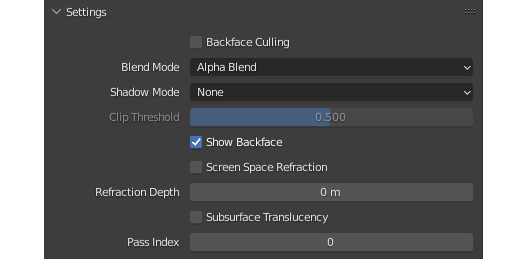
Figure 8.15: Material settings (again)

Figure 8.16: The spot where the mist ends is very obvious

Figure 8.17: Gradient Texture
- Add a Mix node and set Mix to Multiply. Multiply is a blend mode that adds black to the original texture, which, considering we want to add transparency to the top of the plane and transparency is represented in our texture as black, works perfectly to increase the transparency at the top end of our plane. Set Fac on the Multiply node to 1.000 so that we get the full mixture:

Figure 8.18: The Multiply node
- Attach the Gradient Texture node's Color output to Color2 on the Multiply node and the ColorRamp Color output to Color1 on the Multiply node, and take the output from Multiply and put it into the Alpha input on the Principled shader:

Figure 8.19: The full setup of the Alpha channel
- I like mist with a little brightness to it, so I changed the emission color to white to give it a little more pop:

Figure 8.20: Changing the emission color
- The only thing left to do now is to take the plane and scale it so that it stretches across the water. It's also easy to see the place where the mist plane starts if it's too far away from the land, so let's move it closer to the camera:

Figure 8.21: Mist planes in the scene
- I decided the effect was a little too intense, so I changed the white marker on the ColorRamp node to a gray color. If we apply what we know about transparency now, we can see that a gray color gives us more transparency than white but less than black. That's why Alpha Blend is the best material mode for this application – we can get those shades of gray for half-transparency:
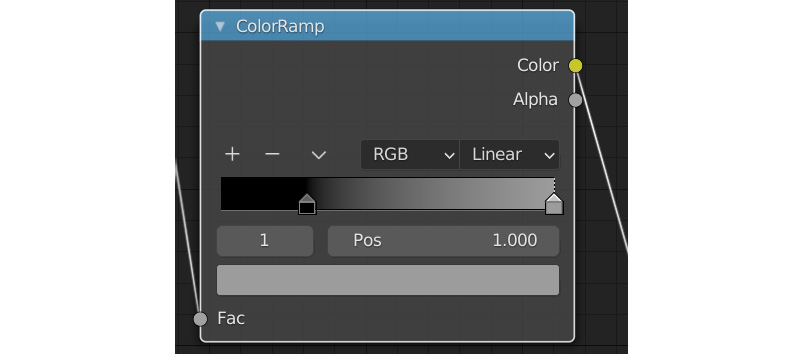
Figure 8.22: Lowering the value of the mist opacity
- I duplicated the first mist object, moved it away from the camera, and scaled it on the y axis to make it stretch across the lake so that we get two layers of mist:

Figure 8.23: The mist in the scene after lowering the opacity
This technique is a great way of adding to the overall composition of the shot. If you look closely, you can see that the mist desaturates and makes the background harder to see, so our eye is drawn more to the foreground of the shot. Using these mist planes, we can break up the scene so that as things become further away, they seem to fade off into the background, exactly as they do in real life. Nothing in the far distance of a photograph is going to be as saturated and clear as something in the foreground, which we can artificially do with these mist planes. Now that we've looked at two different ways of adding atmosphere to a nature scene, both with volumetrics and with mist planes, we have two tools in our arsenal to create different types of effects. Imagine that instead of a lake, we were creating a dune. If we change the mist plane to a sandy color, we can imitate wind moving sand particles around the scene, something that would be very difficult with a volumetric cube. Mist planes are easier to create and faster to render but don't provide realistic light diffusion from an atmosphere. It's up to you to decide which to use or whether to use both, but both have their uses in different types of situations.
We're almost at the finish line for this image! In the next section, we'll add a background that matches the sun we've created and talk about how to make a background image as realistic as possible.
Using an image to create a background
Let's add the finishing touch to our image. I think that the HDRI we used was nice enough to work with as a background up until now, but it doesn't quite fit the type of image that I'm seeing in my imagination. So, let's add an image. I think finding any image of a sunset or sunrise would work well with our scene, but I have an image in mind. I got it from https://kaiserbold.com/free-sky-backgrounds/. This company creates 3D work but has been kind enough to give away some of its assets for anyone to use. Download the 25 pack of sky images if you like, or feel free to make your own. Consider supporting the company if you like the sky image pack. Make sure you store the downloaded images in a place where you can find them easily, since we'll be adding one of them to our scene right now. Let's get started:
- We'll be adding the image the same way we added the birds Alpha. Go to File | Import | Image as Plane, and then select your image. I'm using sky number 14 from the KaiserBold pack, but any of them could look good! We don't need to worry about changing the Alpha to Premultiplied this time, though, as we don't need an Alpha channel in this image. Refer to Figure 8.1 if you have forgotten how we did this initially.
- Scale up the sky using the S shortcut. We want this plane to cover the entire sky, so it should be very big:

Figure 8.24: My background plane dimensions
- Make sure the plane is facing the camera, and then rotate it on the y axis by about 45 degrees so that the clouds at the top of the image seem a little closer to the camera. I like to make my background images slanted toward the camera, as I think it adds a little dimensionality to the clouds:

Figure 8.25: The side view of the background plane rotation
- At this point, we should see the plane as the background behind the sun object, but it's a lot darker than I want it to be, and the background plane seems to be blocking out the light we have in the scene:

Figure 8.26: The camera view after adding the background plane
- As we've learned in this section, if we don't want images to interact with the lighting, all we have to do is change Shadow Mode to None in the material's Settings, so let's do that:

Figure 8.27: Material settings for the background plane
Our scene is instantly a lot brighter! It's still a little darker than I want it to be, though:
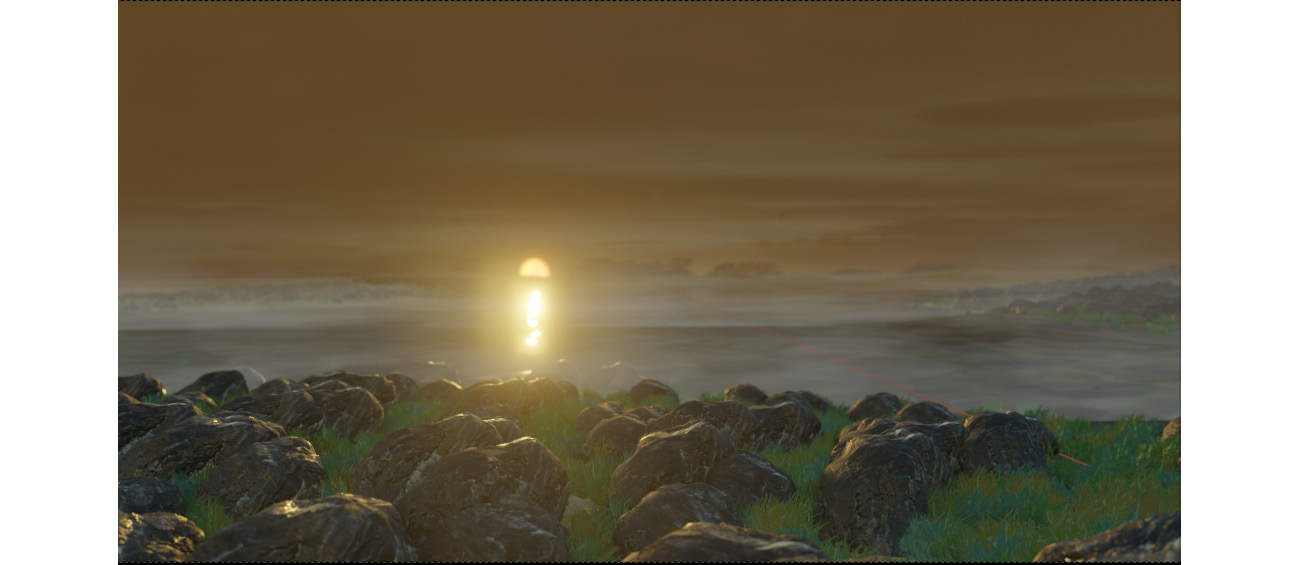
Figure 8.28: The camera view of the background without shadowing
- We'll add some light emission to the background so that we can get more clarity in the background image. Simply take the image's Color output and attach it to the Emission color input on the Principled shader:
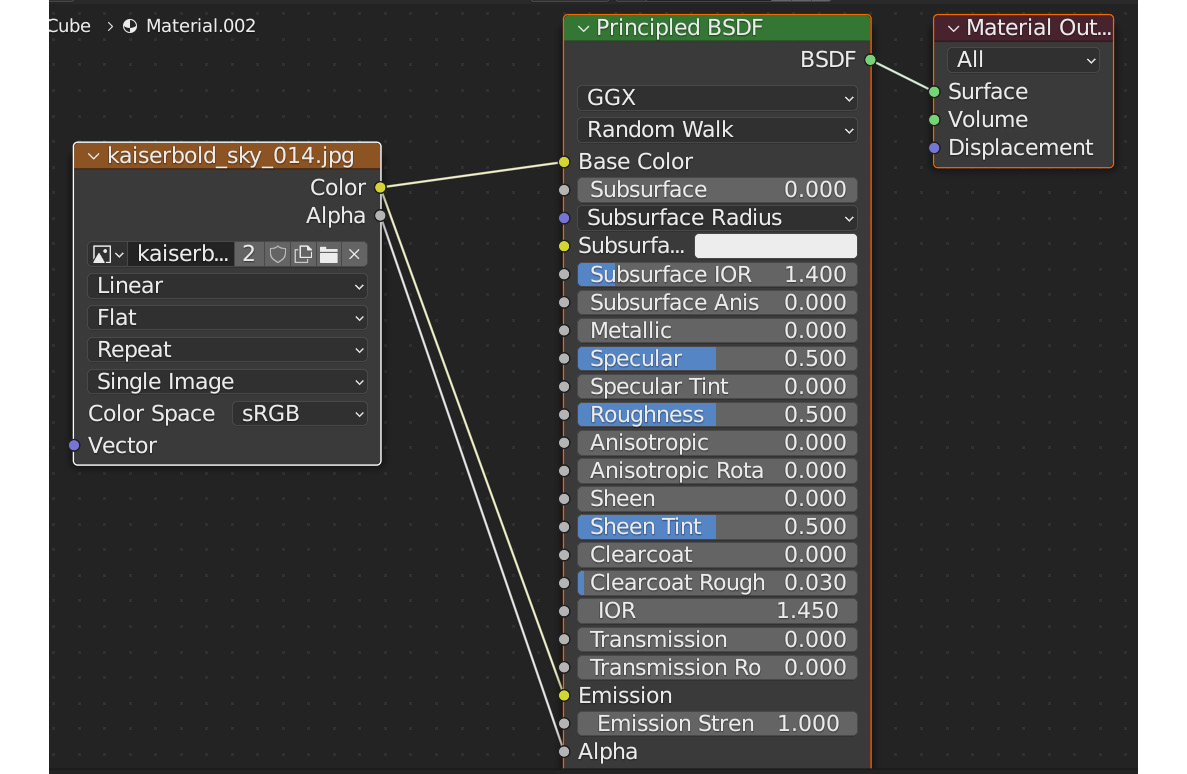
Figure 8.29: Adding some emissive-ness to the background plane
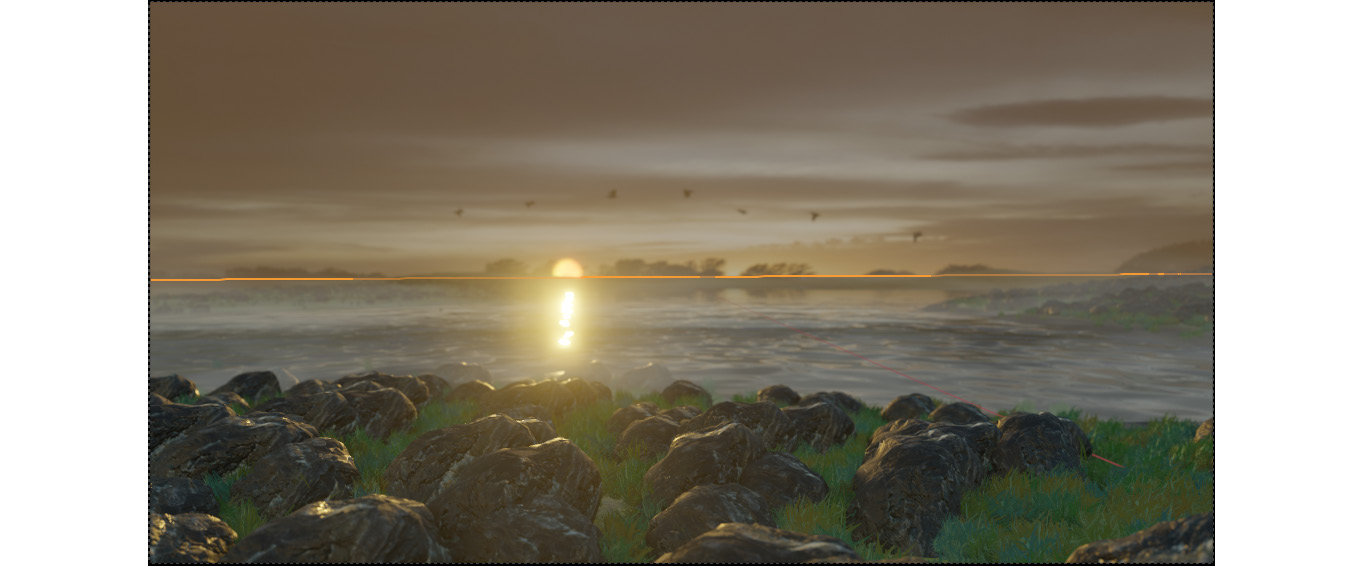
Figure 8.30: The background with some light
- I'm still a little unsatisfied with the color of the sky; I want to make the sunlight effect really obvious. Let's go to the shader editor again and add an RGB Curves node between the Color output on the image and both the Base Color input and the Emission input on the Principled BSDF shader:

Figure 8.31: Adding the RGB Curves node to the shader
- If we select the R channel in the RGB Curves layer list at the top left and then drag the curve up to increase the redness in the image, we'll get the image result we want:

Figure 8.32: Adding redness to the image with RGB Curves
- The very last thing we need to do is dial in our volume properties so that the light from the sun reflects off the lake properly. If you look at reference pictures of a sunset on a lake, you'll notice that the water closer to the sun reflects more of the color of the sun, whereas the water closer to the camera reflects less of the sun and is a little more blue or green (depending on the original color of the water). To replicate something similar in our scene, all we have to do is go to the Render panel and change the Start value of Volumetrics to 0.1 and the End value to 8:
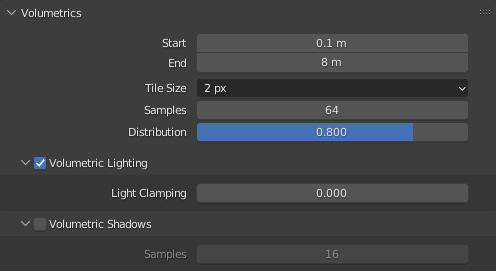
Figure 8.33: Changing the volumetric rendering
This constrains the majority of the volumetric samples to the area right in front of the camera, which means the Volume shader in the water is now correctly being utilized close to the camera but not far away from the camera. This creates a gradient of reflectivity to non-reflectivity that happens when a photo is taken from an oblique angle to the water. You should also notice that there is less overall mist in the scene, which you can easily introduce back into the scene by adding more of the planes that we created using Alphas in order to fake mist, as discussed earlier in this chapter. But, we now have a good reflection of the sun's light off the water. I think I'm ready to call this done! Of course, you can do a lot more work on this scene, adding more variety in vegetation or tweaking the mist in the background (we should technically get more mist planes the further away we get from the camera), but I think I'll leave that to you to experiment with.
Let's take a look at our final result!

Figure 8.34: The final result
Since we talked about how to separate your layers and render them individually to composite them later in Chapter 4, Non-Physical Rendering, I won't go over all that again. I also lowered the opacity of the mist in my compositor to get a more subtle effect. Try experimenting with different layers of the image and how you can get them to fit together to get a more believable result! Feel free to use that workflow, or just hit Render and see how it turns out. My computer is fairly beefy, and this scene took almost 80% of my available GPU memory, so if you have trouble rendering this image, try experimenting with fewer rocks and grass in the Geometry Node modifier, or making your volumetric cube smaller.
Summary
And that's a wrap on our second mini-project! In this four-chapter arc, we looked at how to add rocks and plants to a landscape through Geometry Nodes, added a physically correct lake that we can reuse on any other water we use in projects, added different types of atmosphere and camera effects using volumetrics and depth of field, and then finally, learned about Alpha channels and how we can use them to create different types of details that add life to our renders. That's a lot of things that we have learned, so feel free to go back over each section and make sure you have it all down! Hopefully, you had as much fun as I did while going through all these cool techniques and solving problems as we went along. Blender can be complicated, but it can also be immensely satisfying to get the idea you had in your brain out in a render.
I'm so excited for the next chapter, where we're going to take some of the things that we've learned in the previous two mini-projects, plus even more, to start on a third mini-project. In this third and final mini-project, we'll create a sci-fi-style hangar, complete with aircraft. We'll cover how to create fire in EEVEE, some rendering effects that we haven't covered yet, and even more. We'll look at using some simple objects to create quick sci-fi renderings with Geometry Nodes.